Remote Commands is a powerful feature that allows IT administrators to execute commands remotely on Windows devices within their environment. Although commands can be run via command prompt or PowerShell, however there can be chances of human error. This eliminates the need for manual intervention and reduces the risk of human error.
As a result, Remote Commands are a way to interact with the devices remotely, like configuring Windows Firewall, Fetch OS License details, Join domain, and more.
With Scalefusion MDM, admins can create remote commands via Scalefusion Dashboard, which can then be launched on managed devices to perform a set of actions remotely. This documentation will guide you through the process of creating and executing remote commands to effectively manage your Windows devices.
Pre-requisites
Scalefusion MDM Agent’s latest version (v15.4.2) should be installed on devices.
Supported OS and Device Configurations: Windows (10 or above) Pro, Enterprise, Business, Education, Home
Users should be subscribed to Scalefusion's Enterprise Plan
Creating Remote command(s) for Windows
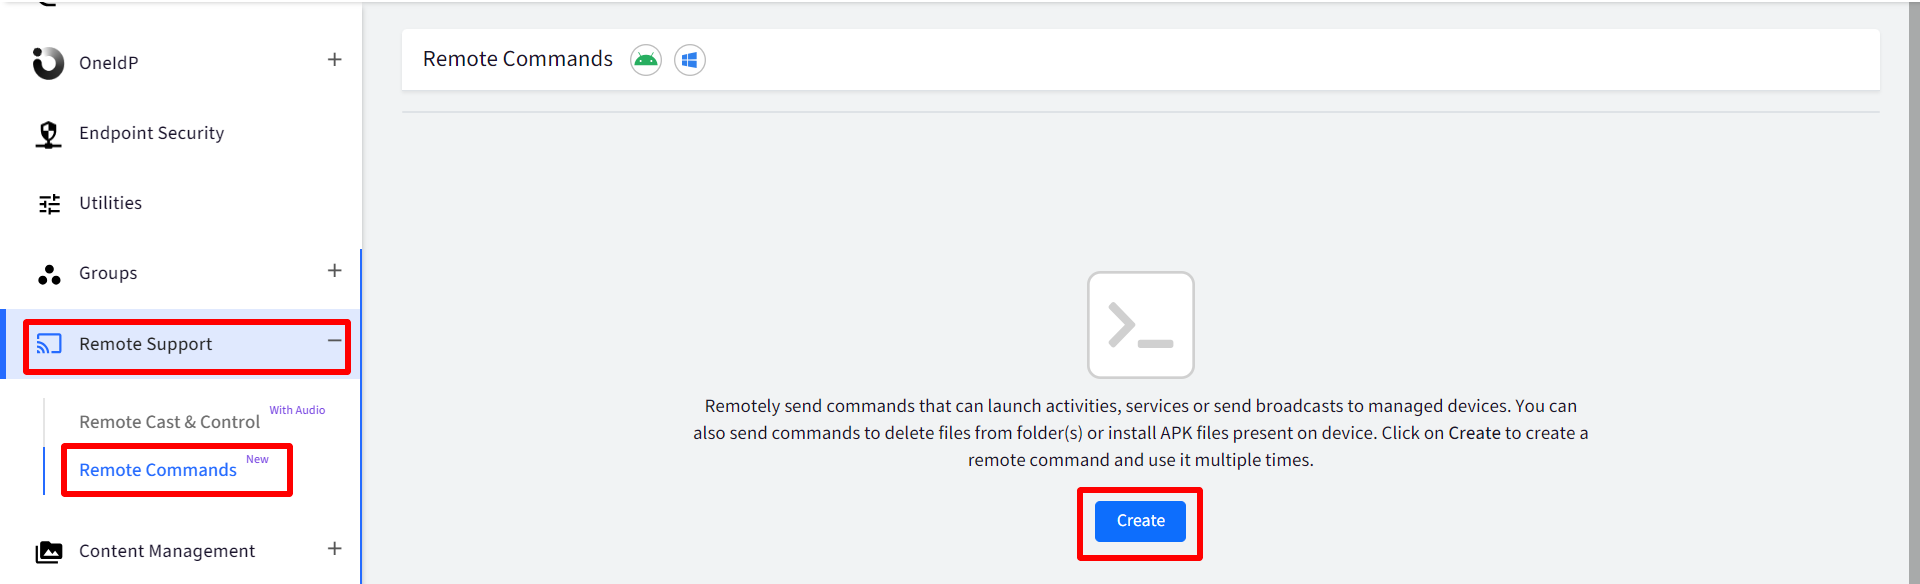
On the Scalefusion dashboard, navigate to Remote Support and click on Remote Commands.
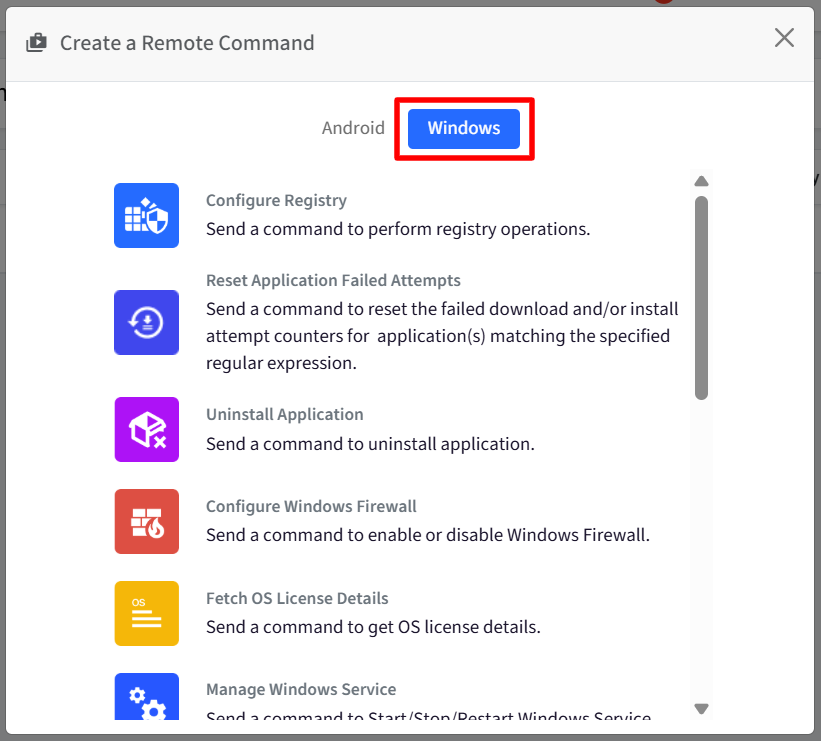
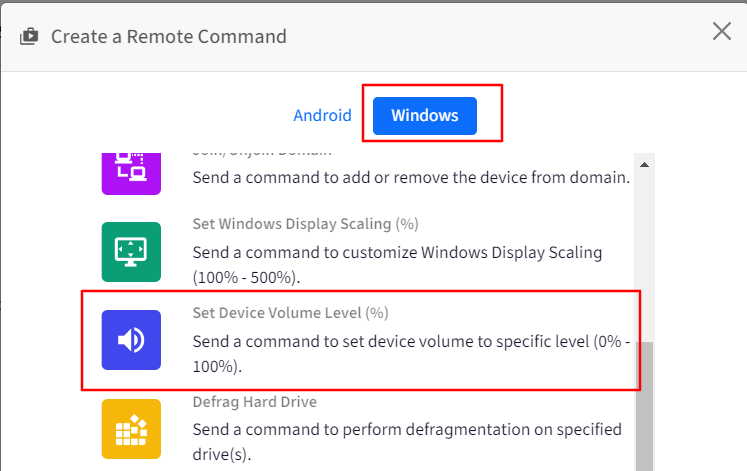
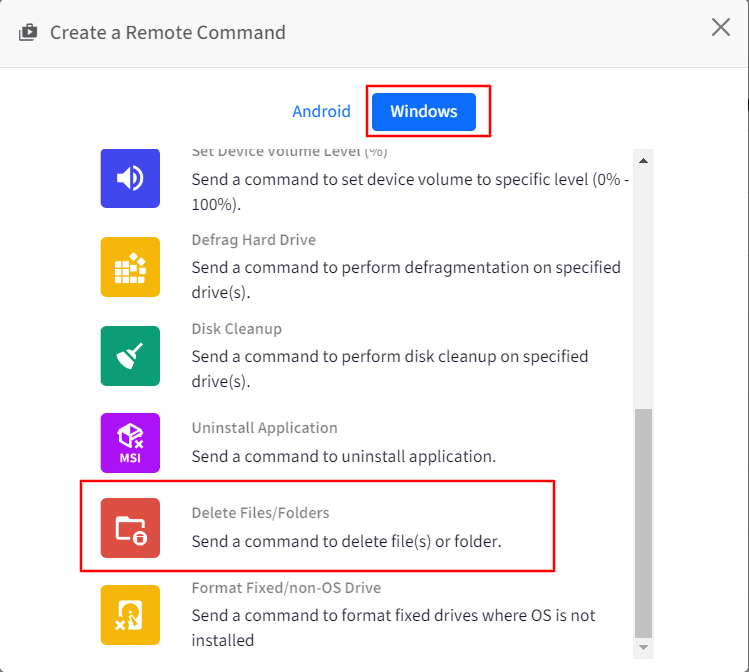
Click on Create button and in the new window that opens select Windows tab.
Here you will see a list of remote commands available for Windows.
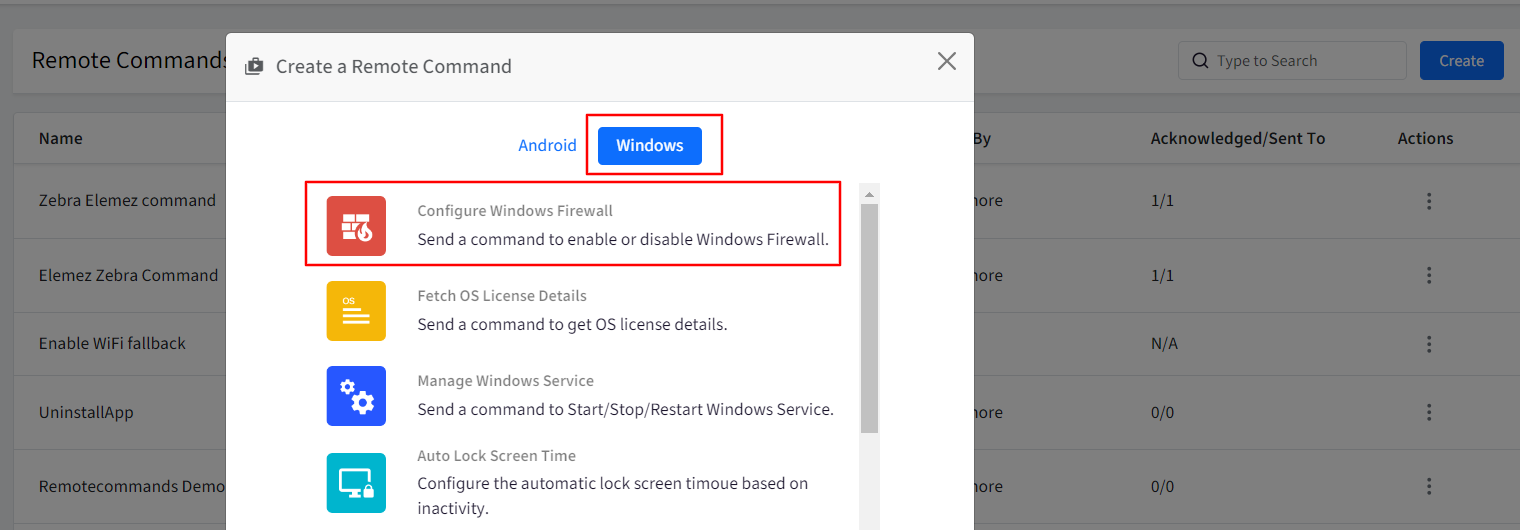
A. Configure Windows Firewall
This will help you send a command to enable or disable Windows Firewall.
Click on Configure Windows Firewall to open the command creation wizard.
Provide a Name to this command.
Domain Profile: choose to Enable or Disable it or keep it Default by clicking on the down arrow button next to the field.
Private Profile: choose to Enable or Disable it or keep it Default by clicking on the down arrow button next to the field.
Public Profile: choose to Enable or Disable it or keep it Default by clicking on the down arrow button next to the field.
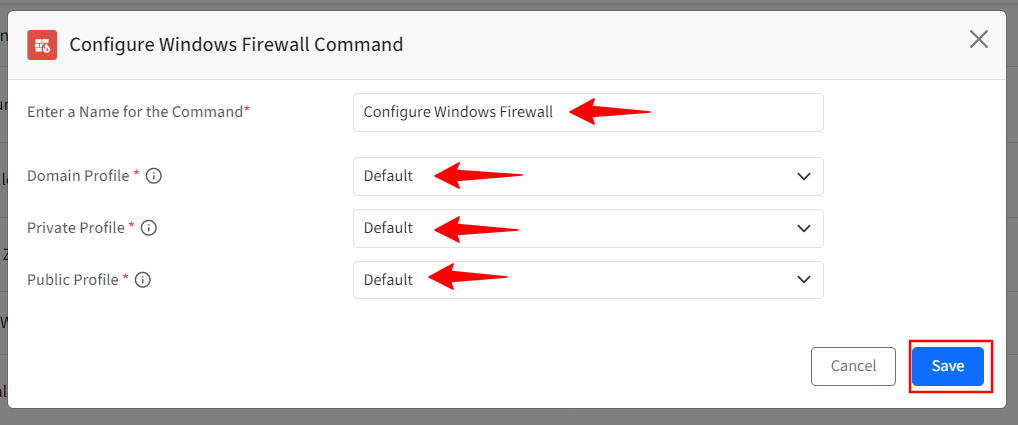
Once you have set the above fields, click on Save.
The Remote command will start showing up in the list of commands.
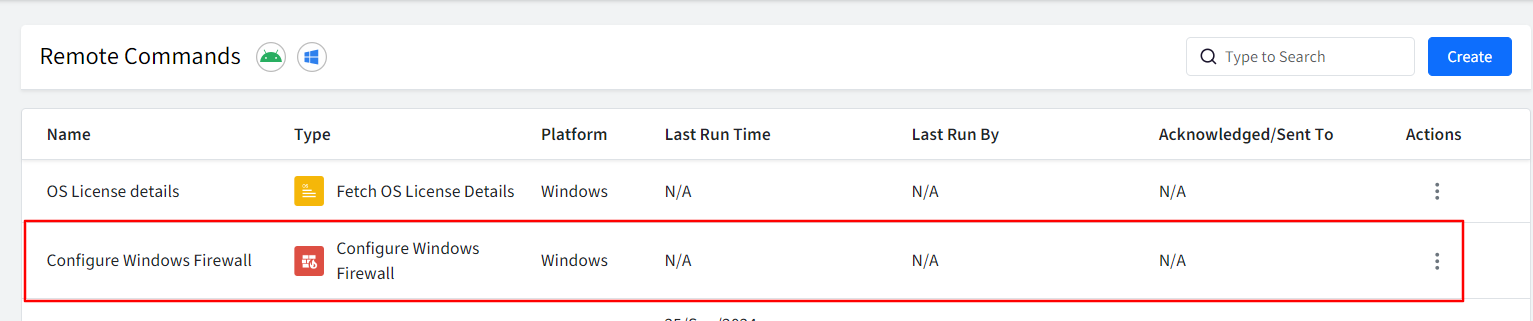
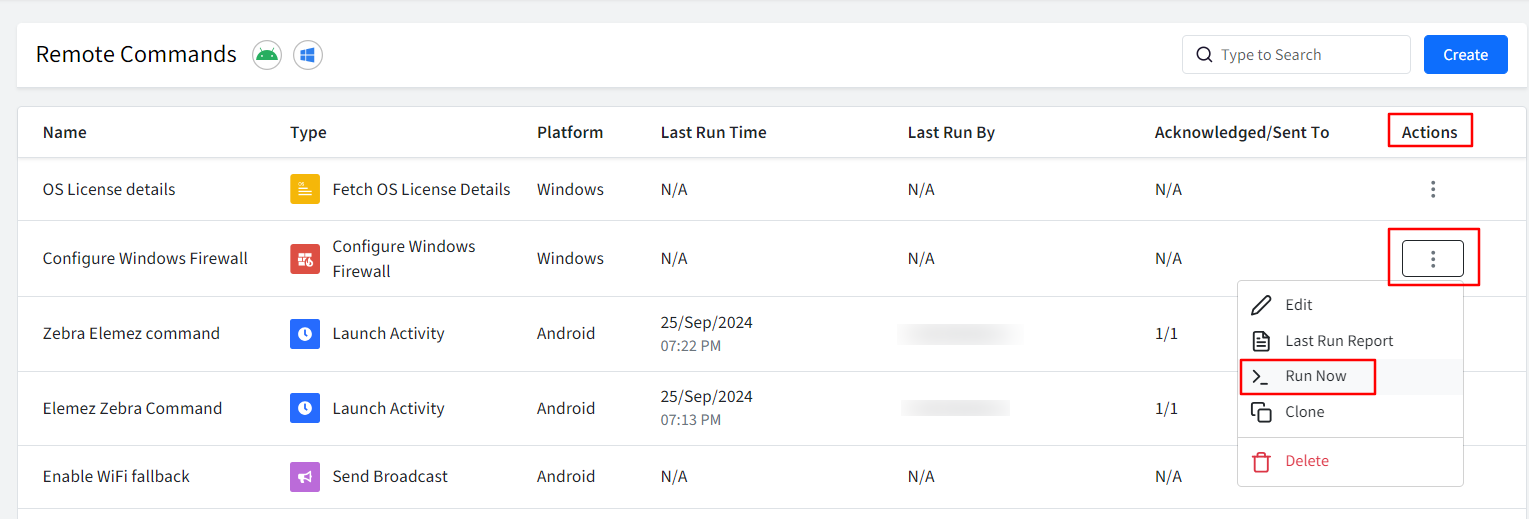
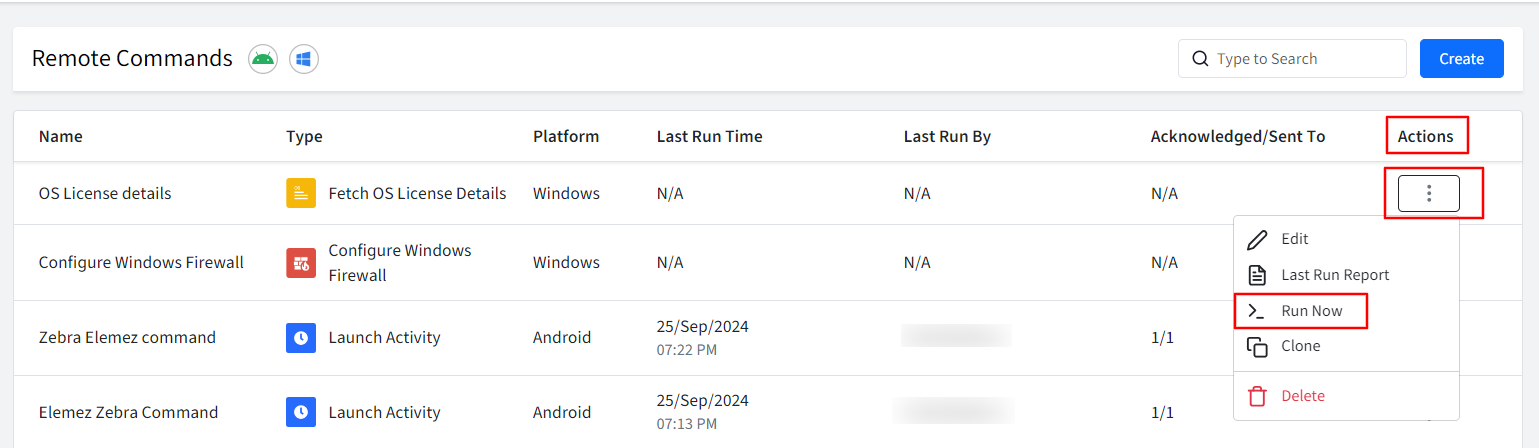
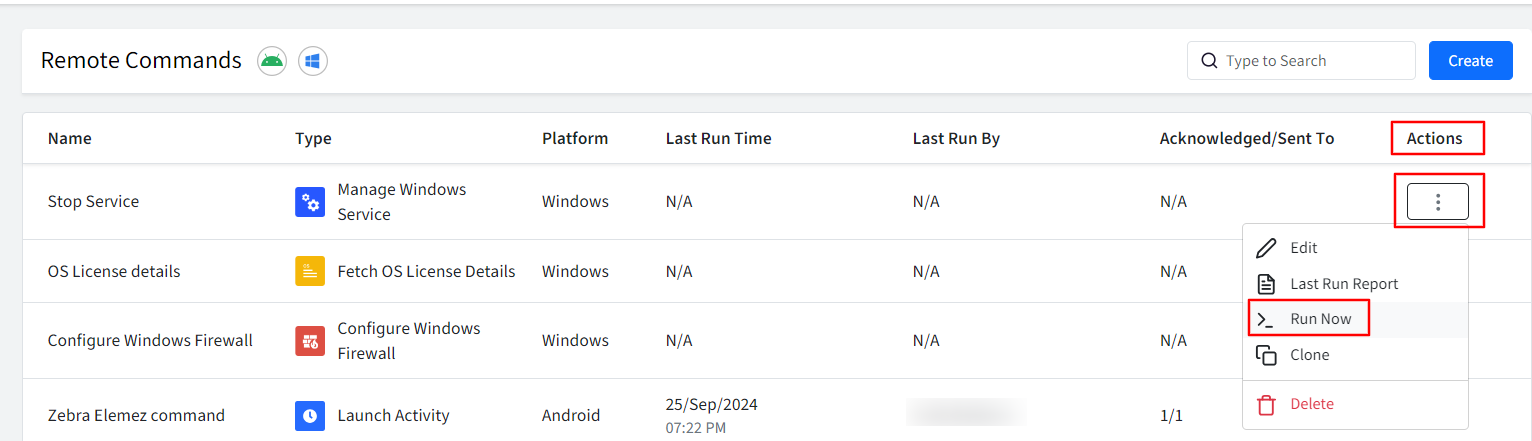
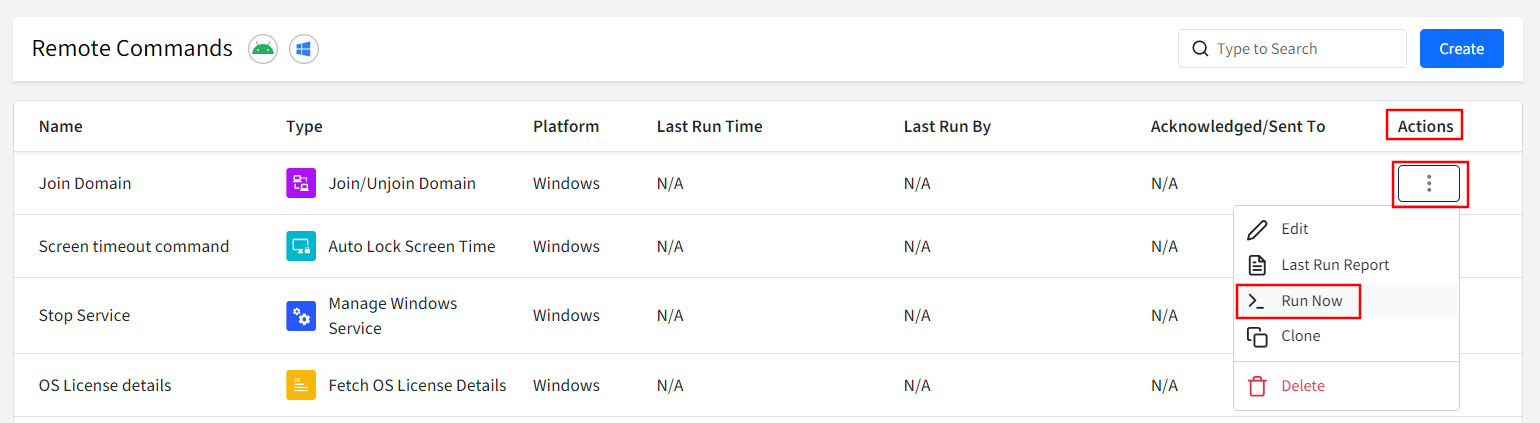
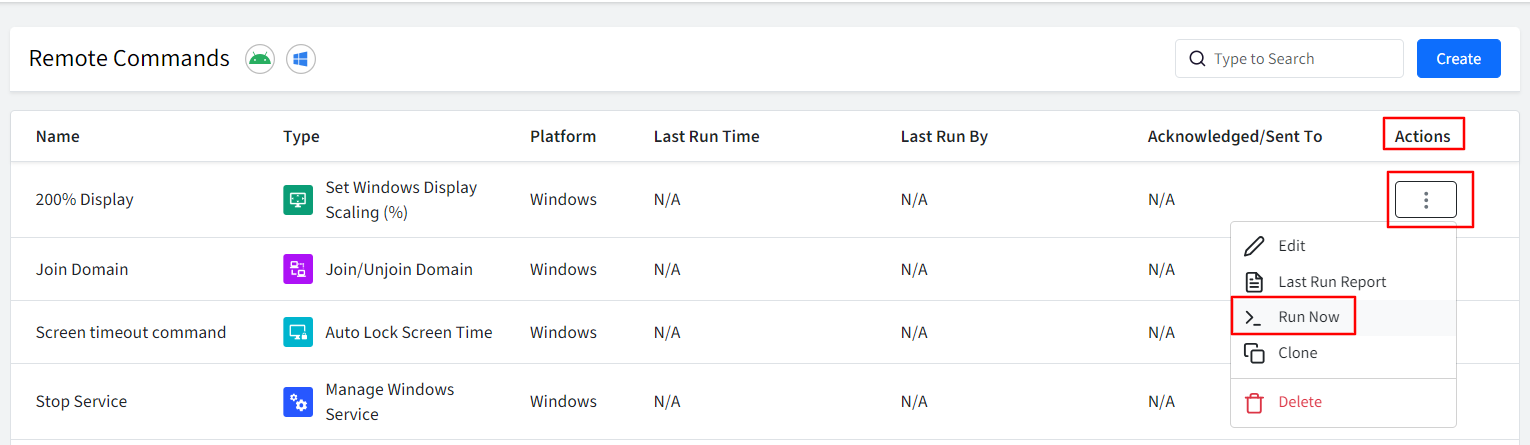
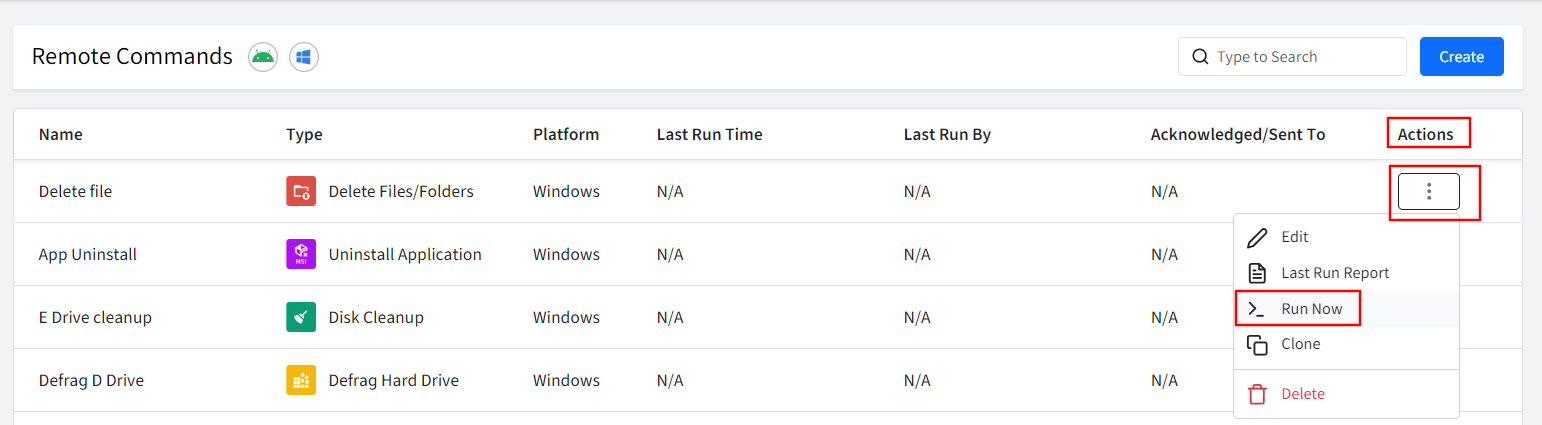
From here you can push the command to devices instantly by clicking on the 3-dots under Actions > clicking on Run Now.
B. Fetch OS License Details
This will help you send a command to get OS license details from the Windows devices.
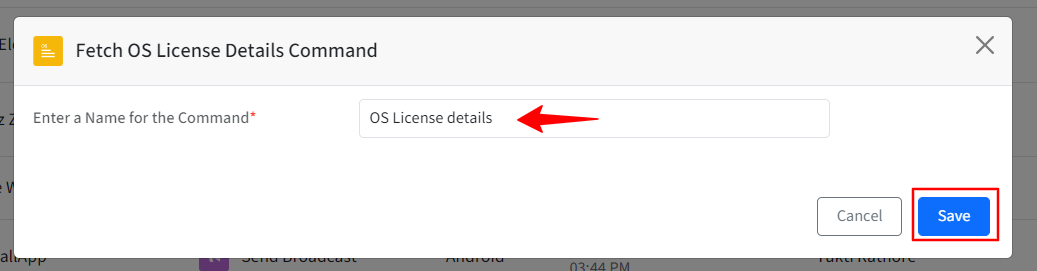
Click on Fetch OS License Details to open the command creation wizard.
Provide a Name to this command and click on Save.
The Remote command will start showing up in the list of commands.

From here you can push the command to devices instantly by clicking on the 3-dots under Actions > clicking on Run Now.
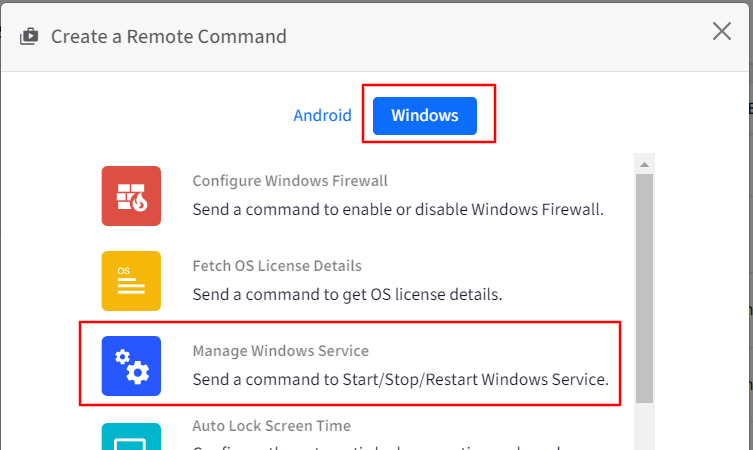
C. Manage Windows Service
This will help you send a command to Start/Stop/Restart Windows service.
Click on Manage Windows Service to open the command creation wizard.
Provide a Name to this command.
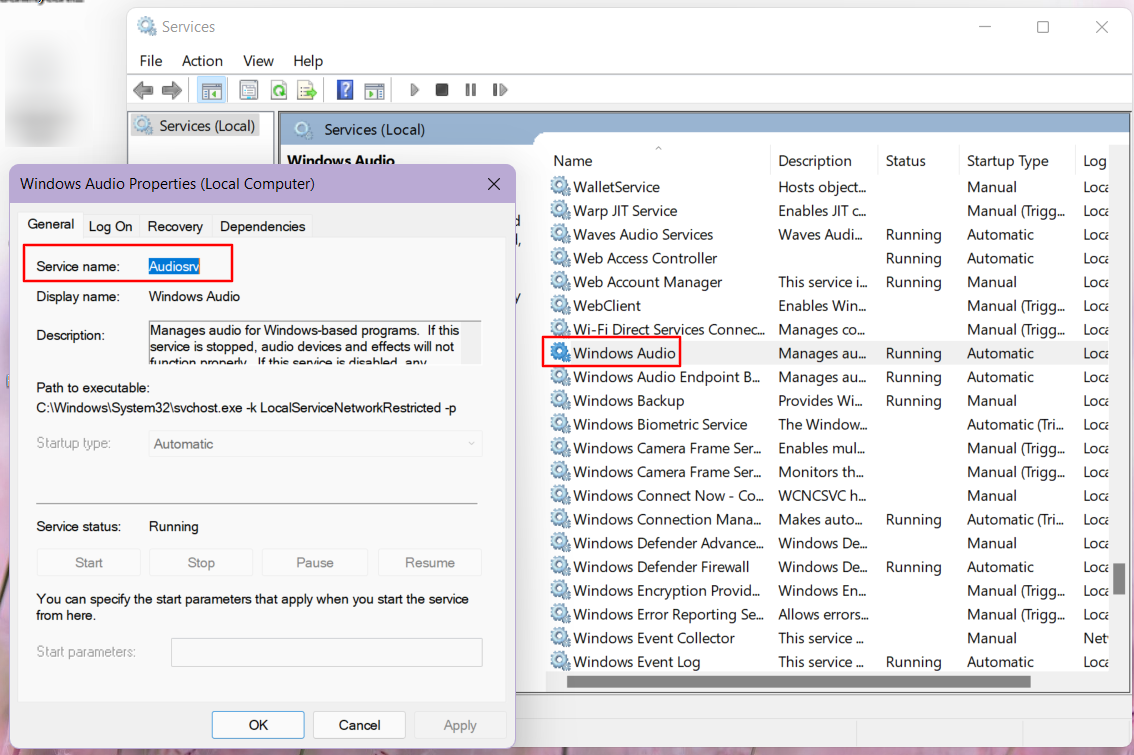
Service Name: Enter the name of the service that you want to start/stop/restart. Please make sure the name is correct or as it shows in the Services app. For example,
Select Action: choose the action that you want to perform- Start or Stop or Restart.
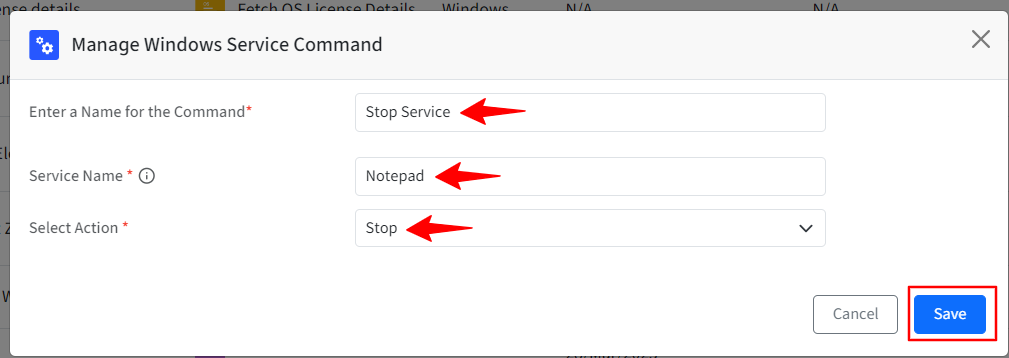
Once you have set the above fields, click on Save.
The Remote command will start showing up in the list of commands.

From here you can push the command to devices instantly by clicking on the 3-dots under Actions > clicking on Run Now.
Note
Services for which user doesn’t have access to Start or Stop or restart, for that, the remote command will not Start/Stop/restart the service - e.g. Windows defender firewall.
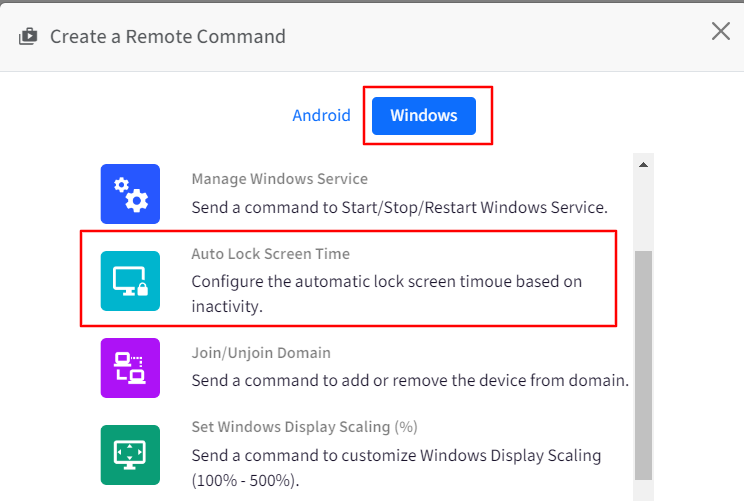
D. Auto Lock Screen Time
This will help you configure the automatic lock screen timeout based in inactivity and send it as a command to Windows devices.
Click on Auto Lock Screen Time to open the command creation wizard.
Provide a Name to this command.
Enter the timeout value in seconds. It should be between 0 to 599940 seconds.
Force Restart Device: This will force restart the device after 5 minutes to apply the settings.
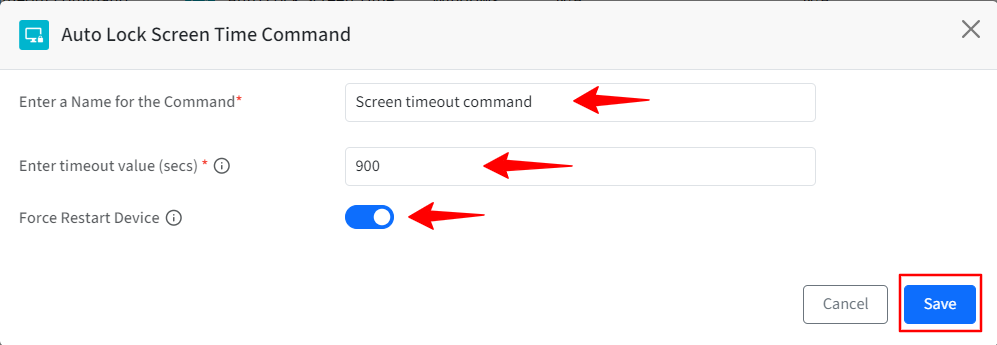
Once you have set the above fields, click on Save.
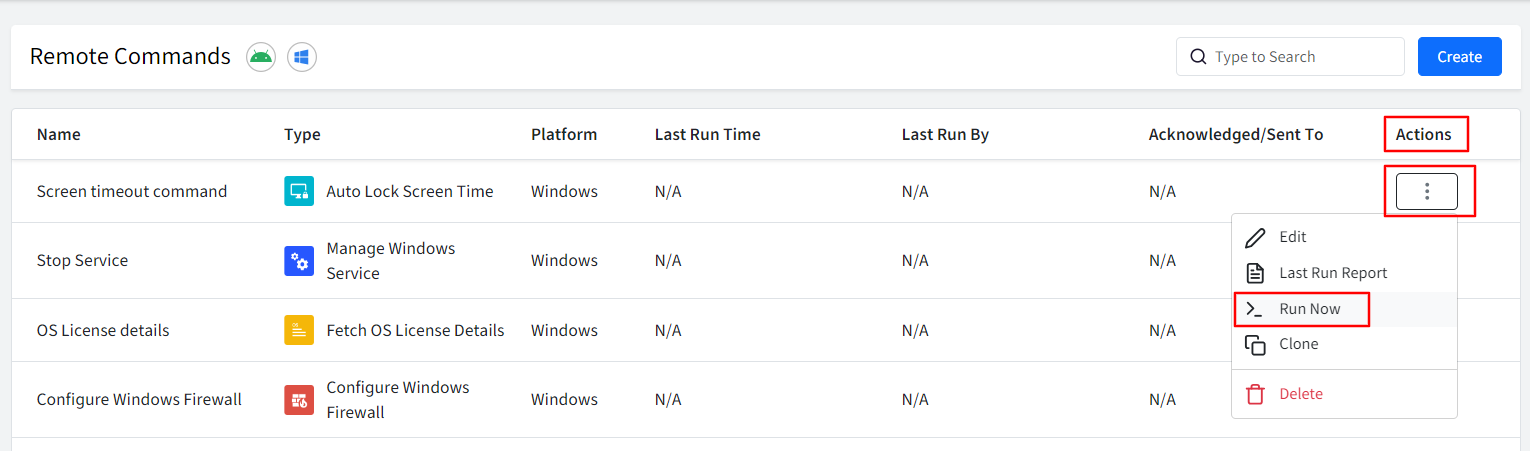
The Remote command will start showing up in the list of commands.

From here you can push the command to devices instantly by clicking on the 3-dots under Actions > clicking on Run Now.
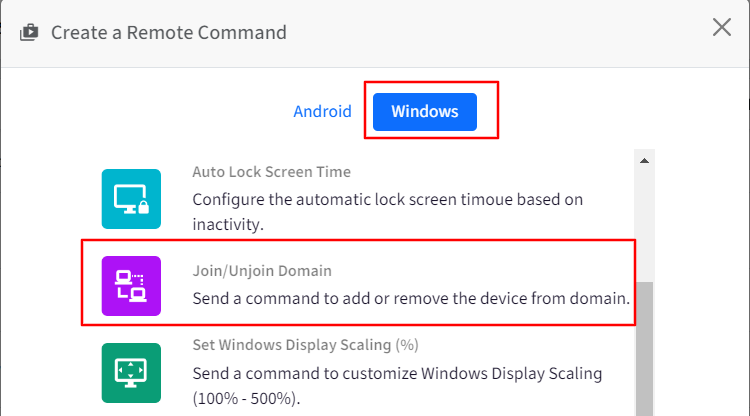
E. Join/Unjoin Domain
This will help you send a command to add or remove a device from the local Active Directory domain.
Click on Join/Unjoin Domain to open the command creation wizard.
Provide a Name to this command.
Select Action: Choose to Join or Unjoin the domain.
Domain Name: Enter the local Active Directory domain name.
AD Admin username: Enter an Admin username who is part of local Active Directory Administrator’s group.
AD Admin password: Enter the password of the admin that is added above.
Force Restart Device: This will force restart the device, after 5 minutes, to apply the settings.
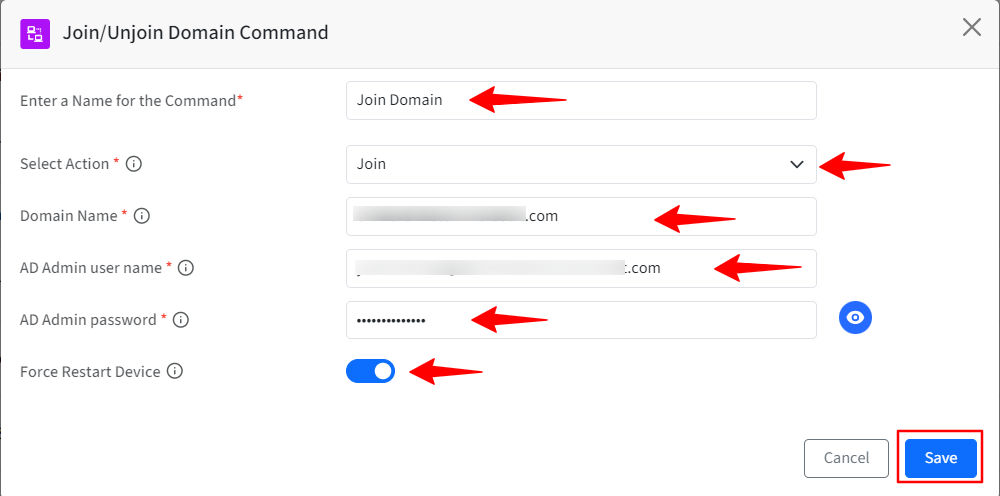
Once you have set the above fields, click on Save.
The Remote command will start showing up in the list of commands.

From here you can push the command to devices instantly by clicking on the 3-dots under Actions > clicking on Run Now.
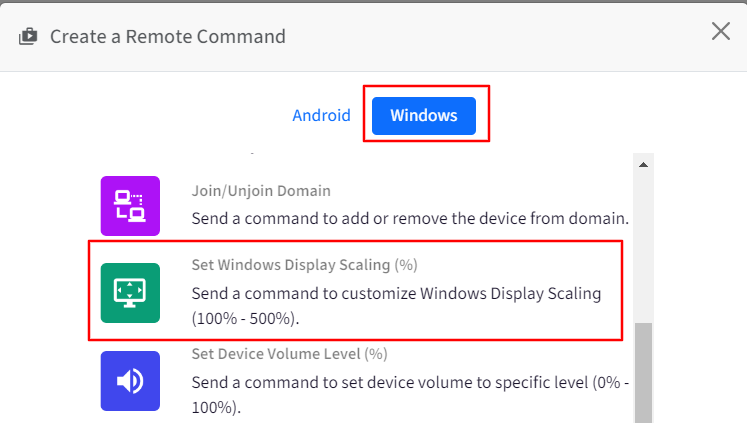
F. Set Windows Display Scaling (%)
With this command you can customize Windows display scaling. It can be set to between 100% to 500%.
Click on Set Windows Display Scaling to open the command creation wizard.
Provide a Name to this command.
Enter Scaling Percentage: Enter a custom scaling size between 100% to 500%. Higher values than this are not recommended.
Force Logoff: This will force log off the user to apply settings.
Execution Level: Choose as User.
Execution Context: Choose on to which users this command will be applied. You can choose:
All Users
Enrolled User
Administrators
Standard Users
Specific User
User name: When you select Specific User in the Execution Context then this field will become active, and you can specify the username here on which this command will be applied. Please note that you can only specify a single username here.
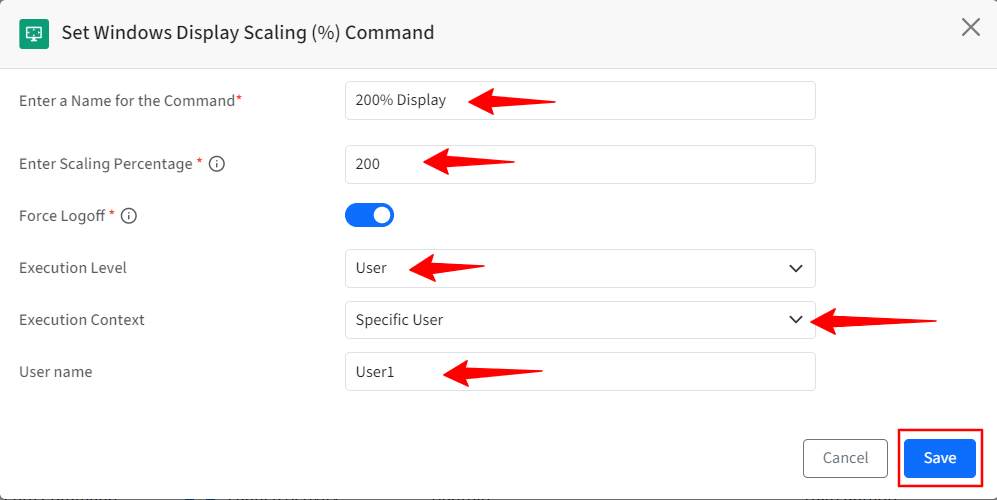
Once you have set the above fields, click on Save.
The Remote command will start showing up in the list of commands.

From here you can push the command to devices instantly by clicking on the 3-dots under Actions > clicking on Run Now.
G. Set Device Volume level (%)
This will help you send a command to device(s) and set the volume on them to a specific level. It can be set to between 0% to 100%.
Click on Set Device Volume level to open the command creation wizard.
Provide a Name to this command.
Enter Level (0-100): Enter the value here. It should be between 0-100.
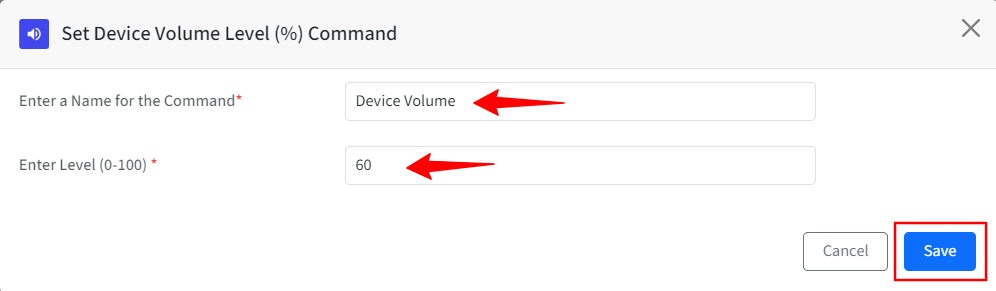
Once you have set the above fields, click on Save.
The Remote command will start showing up in the list of commands.

From here you can push the command to devices instantly by clicking on the 3-dots under Actions > clicking on Run Now.
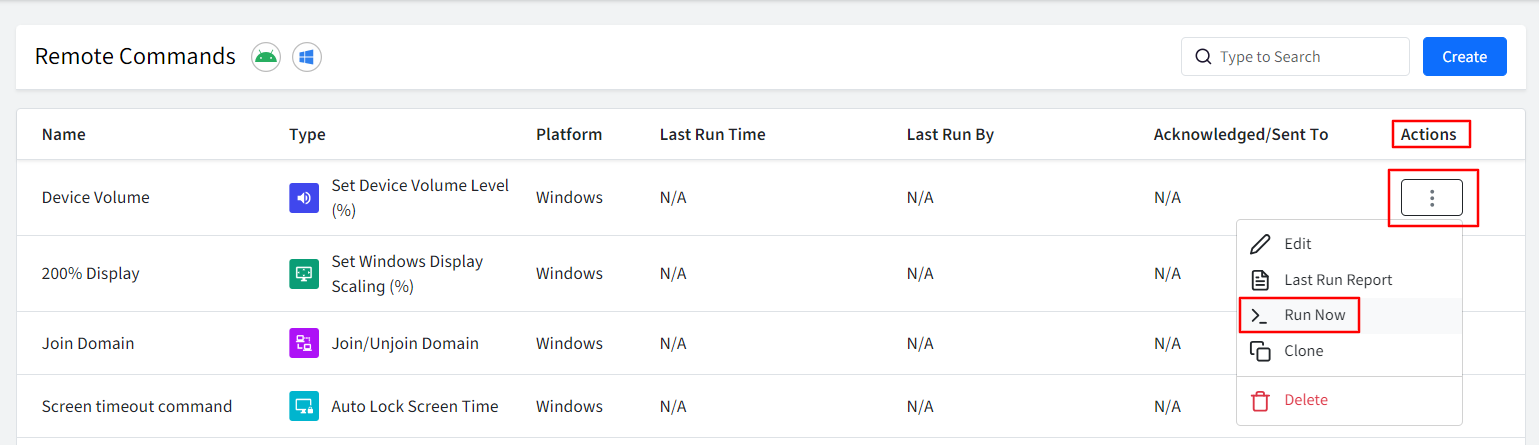
H. Defrag Hard Drive
This will help you send a command to perform defragmentation on specified drives(s).
Click on Defrag Hard Drive to open the command creation wizard.
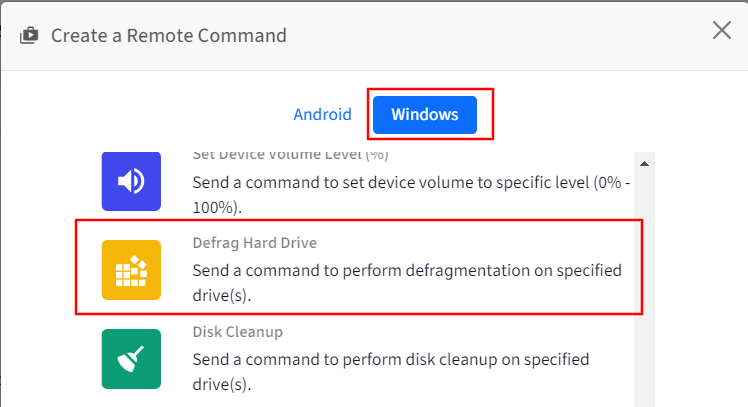
Provide a Name to this command.
Comma Separated Drive List: Enter a single drive name (D:) or comma separated drive names (eg. D:, E:).
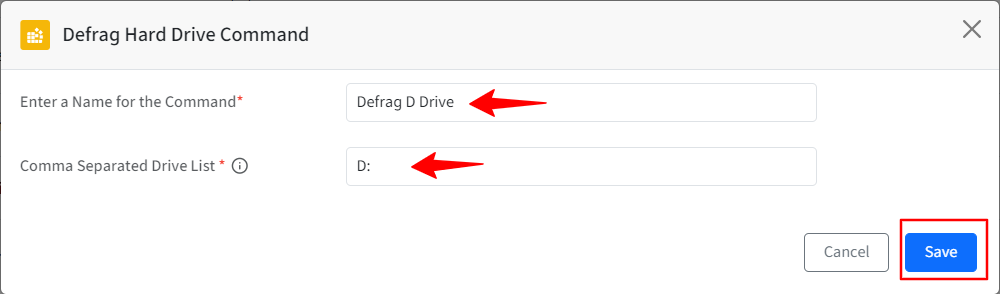
Once you have set the above fields, click on Save.
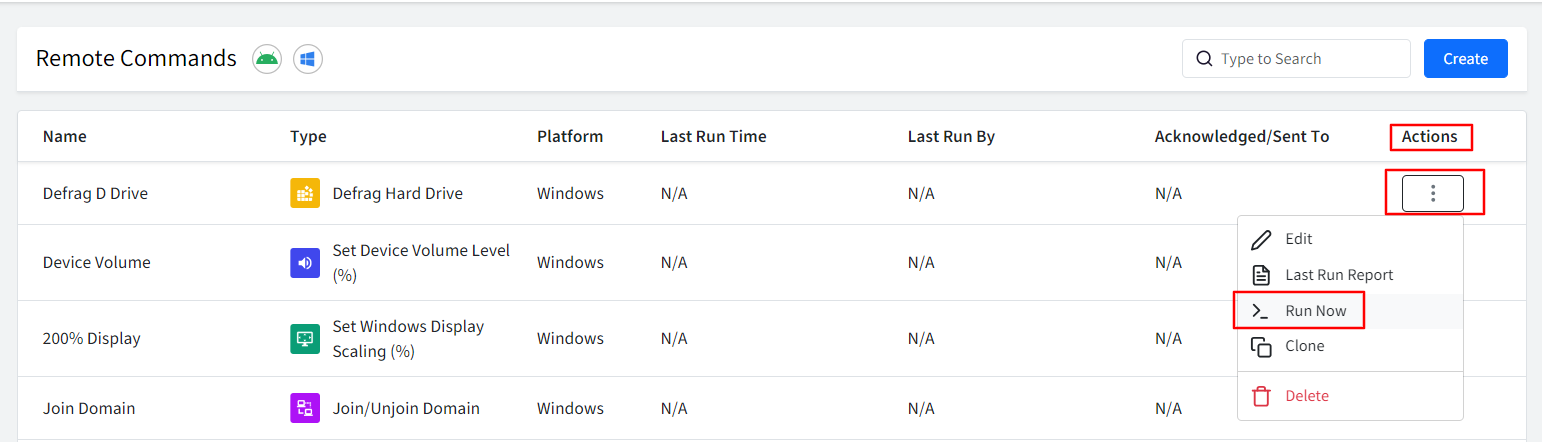
The Remote command will start showing up in the list of commands.

From here you can push the command to devices instantly by clicking on the 3-dots under Actions > clicking on Run Now.
I. Disk Cleanup
This will help you send a command to perform disk cleanup on specified drives.
Click on Disk Cleanup to open the command creation wizard.
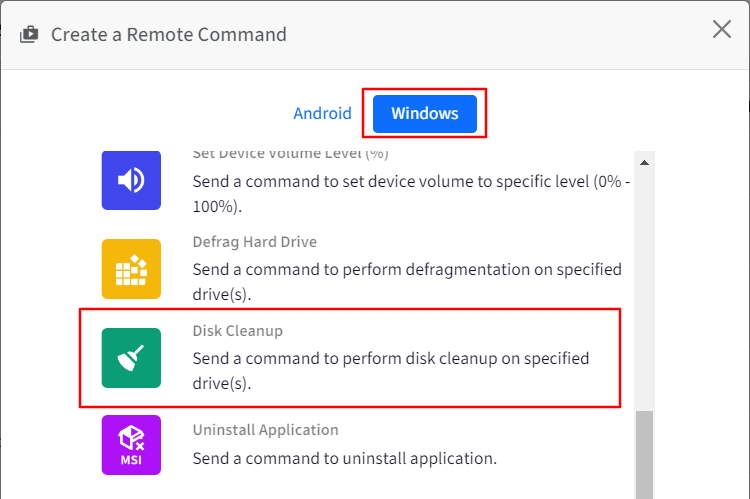
Provide a Name to this command.
Comma Separated Drive List: Enter a single drive name (D) or comma-separated drive names (eg., D, E).
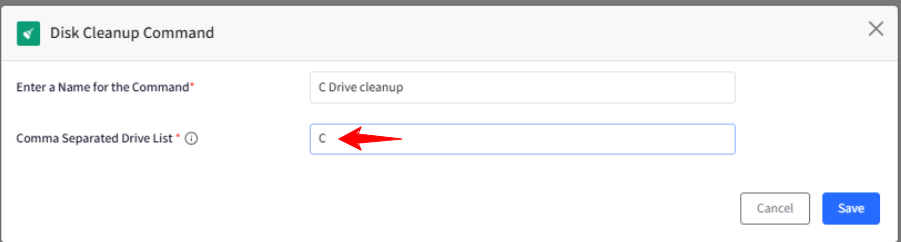
Once you have set the above fields, click on Save.
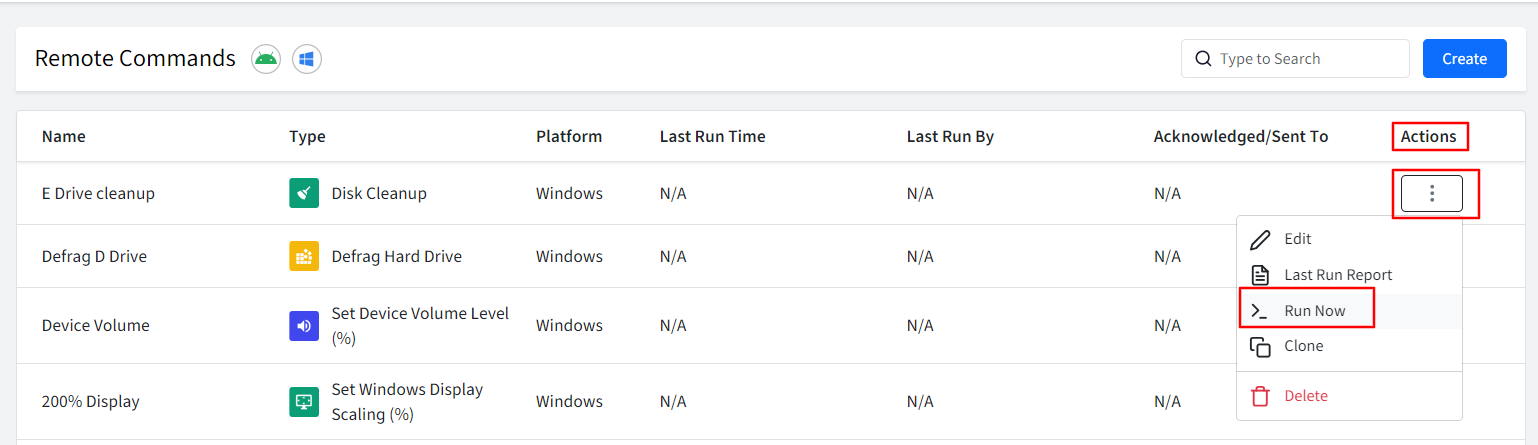
The Remote command will start showing up in the list of commands.

From here you can push the command to devices instantly by clicking on the 3-dots under Actions > clicking on Run Now.
J. Uninstall Application
This will help you send a command to uninstall application on Windows devices.
Note:
If an application requires interactive uninstallation process, in that case this command will not be able to uninstall that application.
Click on Uninstall Application to open the command creation wizard.
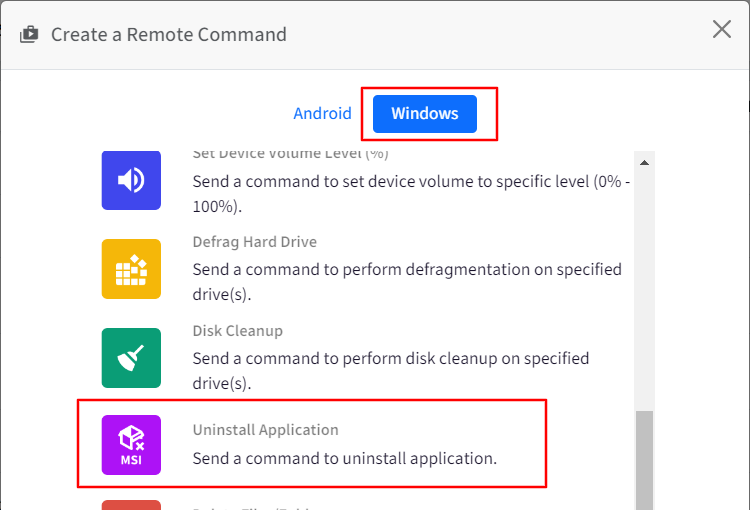
Provide a Name to this command.
Application Name: Provide package name of an application which is available in the add remove program in the device and for UWP apps through appx package.
Note:
To find out the UWP app’s appx package name, please run the below command in Window PowerShell.
get-appxpackage -name "*app-name*"
For example:
get-appxpackage -name "*Skype*"
Execution Level: You can choose Device or User level.
Execution Context: Choose on to which users this command will be applied. You can choose:
All Users
Enrolled User
Administrators
Standard Users
Specific User
User name: When you select Specific User in the Execution Context then this field will become active, and you can specify the username here on which this command will be applied. Please note that you can only specify a single username here.
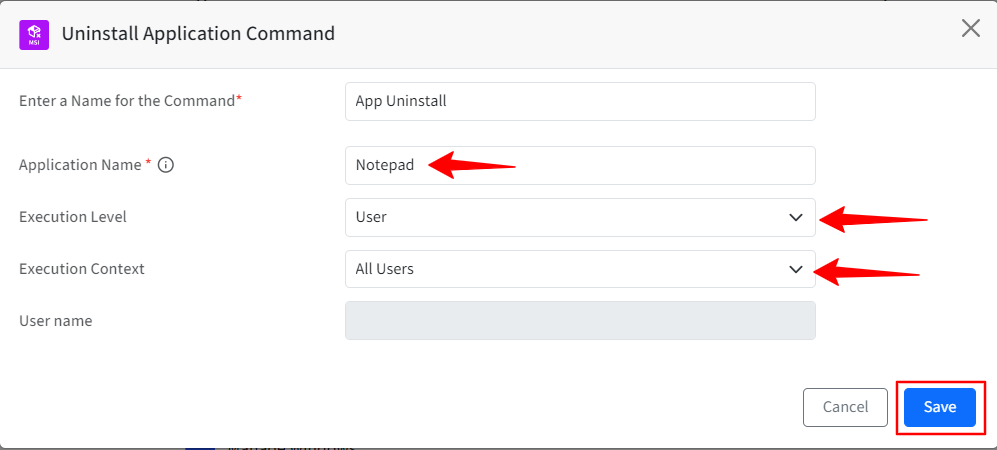
Once you have set the above fields, click on Save.
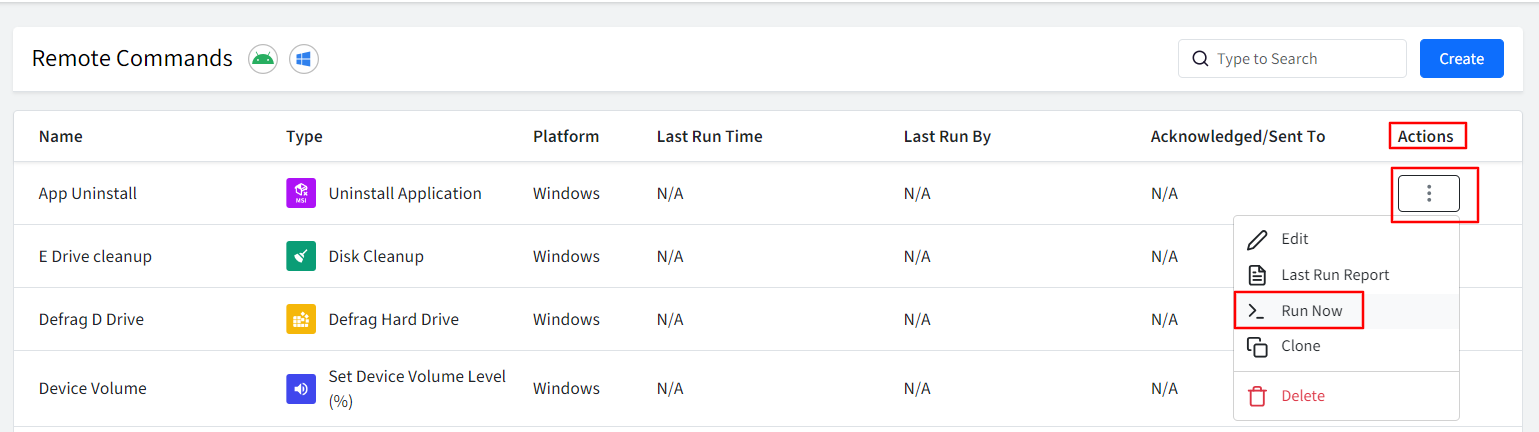
The Remote command will start showing up in the list of commands.

From here you can push the command to devices instantly by clicking on the 3-dots under Actions > clicking on Run Now.
K. Delete Files/Folders
This will help you send a command to delete File(s) or Folders on the Windows devices.
Click on Delete Files/Folders to open the command creation wizard.
Provide a Name to this command.
Folder Location: Enter the full path of the Folder.
E.g.: C:\Users\JohnDoe\Documents\ProjectsFile Name/Pattern: Enter the filename or pipe separated filenames or use pipe separated patterns like *.*.
E.g.: C:\Users\JohnDoe\Documents\Projects\Report.docxRecursive File Search: This will search through directories and their subdirectories to find files that match specific criteria, such as file names, extensions.
Delete Folders (and Subfolders): When you have specified a Folder path, and this check box is selected then this will delete all the folders and subfolders within it.
Execution Level: You can choose Device or User level.
Execution Context: Choose on to which users this command will be applied. You can choose:
All Users
Enrolled User
Administrators
Standard Users
Specific User
User Name: When you select Specific User in the Execution Context then this field will become active, and you can specify the username here on which this command will be applied. Please note that you can only specify a single username here.
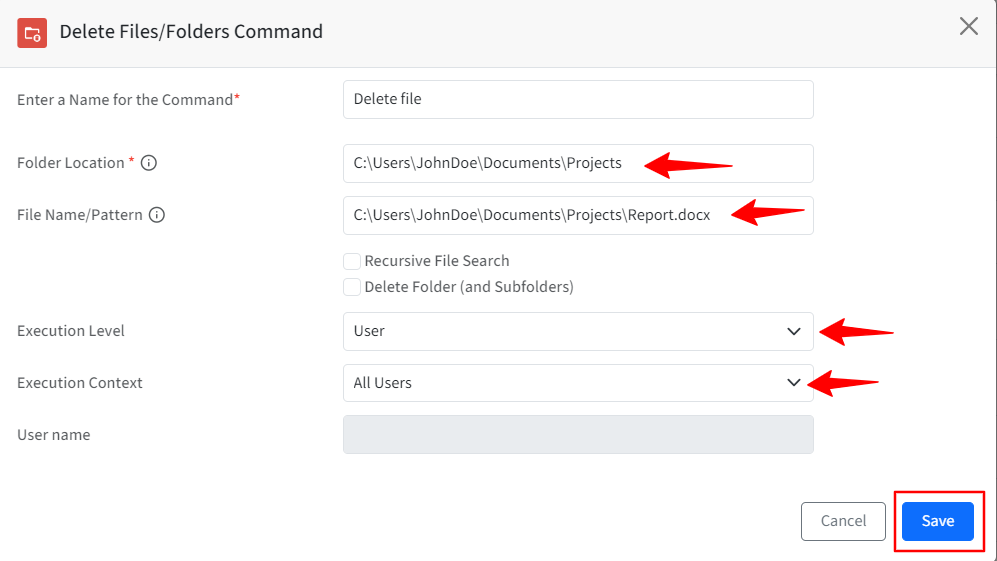
Once you have set the above fields, click on Save.
The Remote command will start showing up in the list of commands.

From here you can push the command to devices instantly by clicking on the 3-dots under Actions > clicking on Run Now.
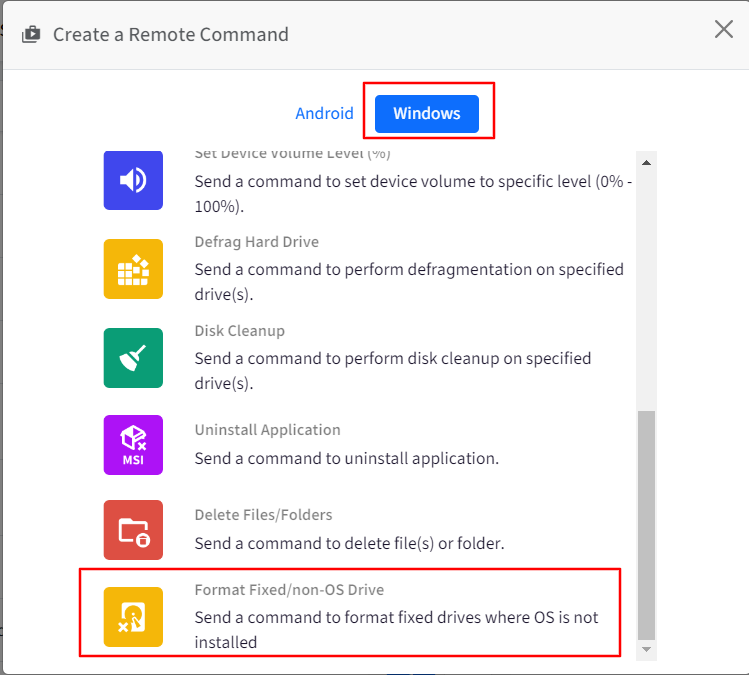
L. Format Fixed/non-OS Drive
This will help you send a command to device(s) to format fixed drives where OS is not installed.
Click on Format Fixed/non-OS Drive to open the command creation wizard.
Provide a Name to this command.
Comma Separated Drive List: Enter a single drive name (D:) or comma separated drive names (eg. D:, E:).
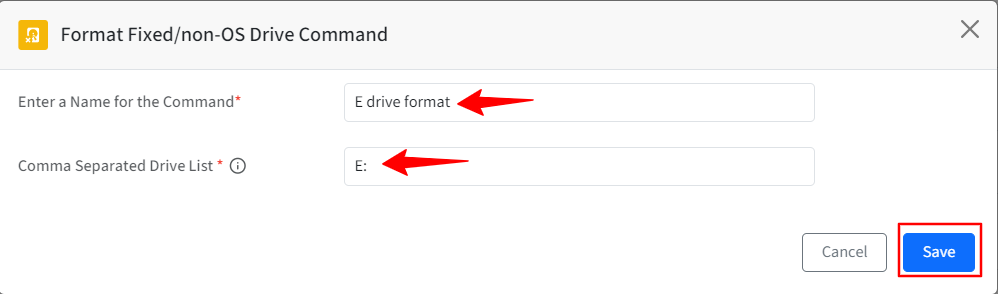
Once you have set the above fields, click on Save.
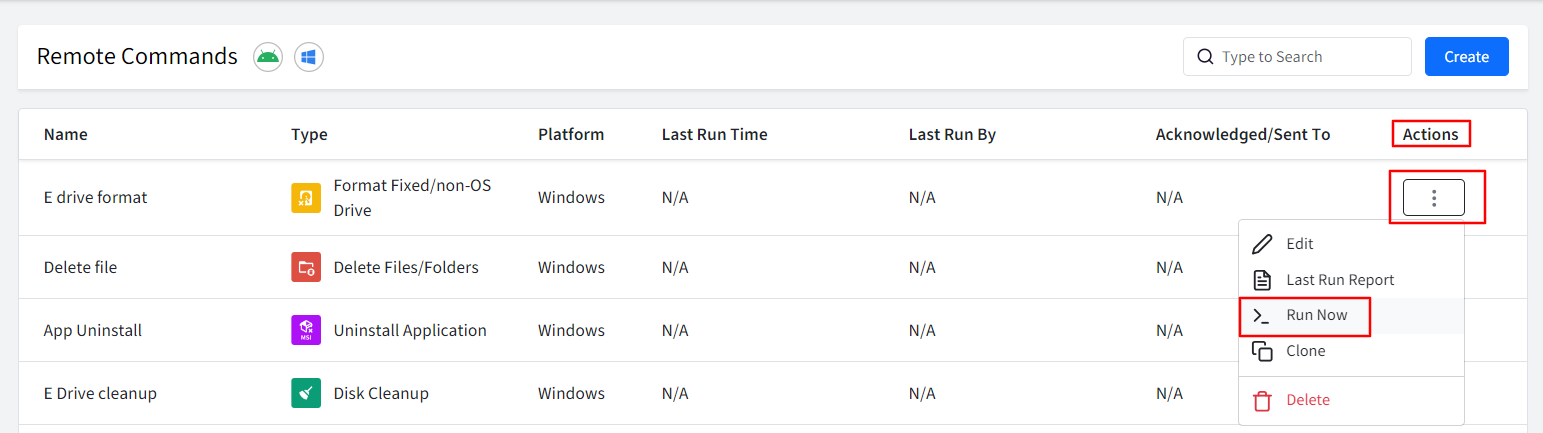
The Remote command will start showing up in the list of commands.

From here you can push the command to devices instantly by clicking on the 3-dots under Actions > clicking on Run Now.
Note:
If the drive is encrypted and it is formatted using this remote command, then the BitLocker will get removed (drive will get decrypted automatically).
M. Configure Registry
The Configure Registry remote command provides IT administrators with a centralized way to manage (create, update, or delete) Windows registry settings across remote devices. With this command, administrators can perform common registry operations directly from the Dashboard and deploy them to one or multiple devices at once.
The command supports registry operations at both the device level (HKEY_LOCAL_MACHINE/HKLM) and user level (HKEY_CURRENT_USER/HKCU). Here are the details on how to configure Registry Command.
Click on Configure Registry under Windows tab.
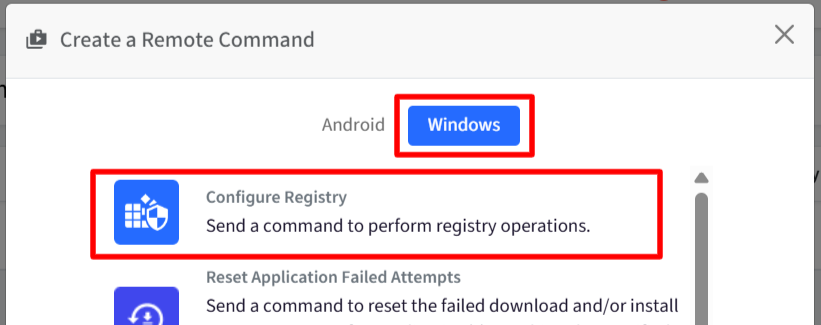
This will open the Configure Registry Command dialog. Enter the following:
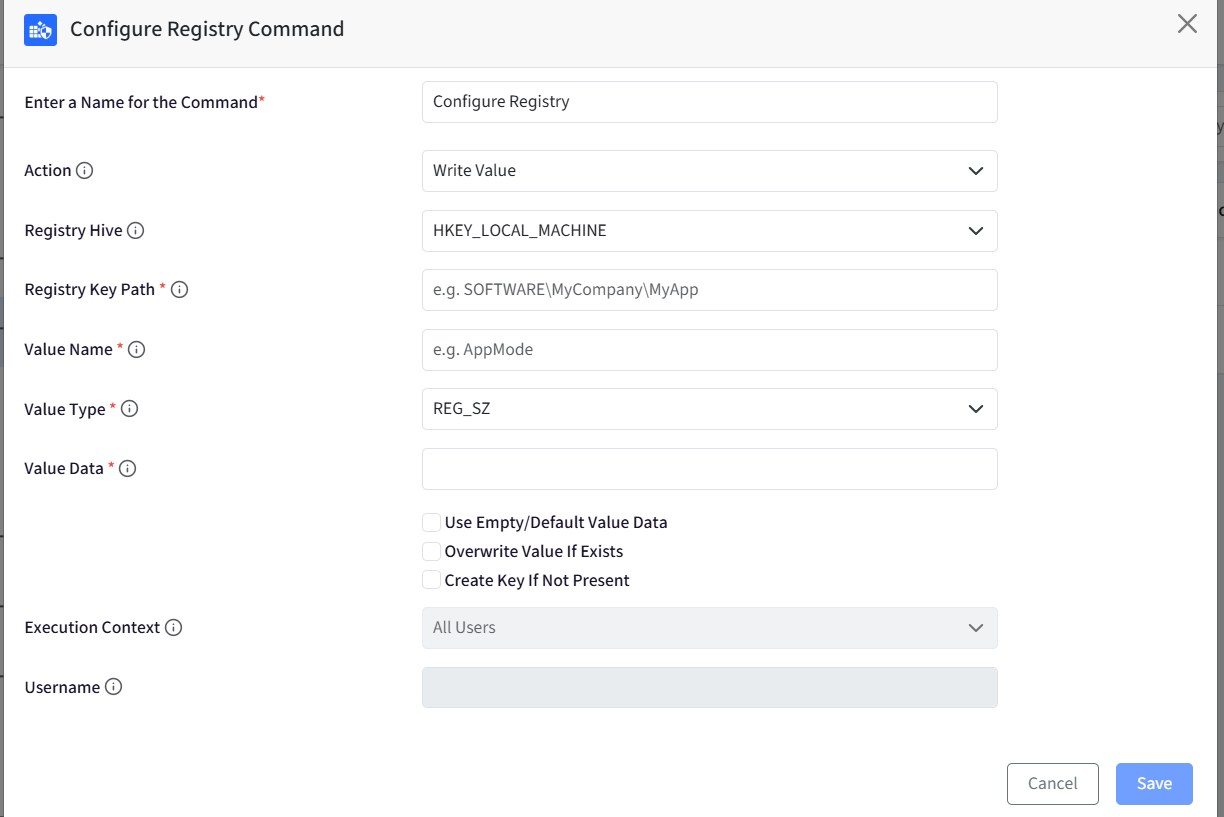
Provide a Name to this command.
Action: Select the registry operation you want to perform. You can choose:
Write Value: Creates or updates a registry value.
Delete Value: Deletes an existing registry value.
Create Key: Creates a new registry key.
Delete Key: Deletes an existing registry key.
Registry Hive: Select the root registry hive where the operation will be performed. You can choose:
HKEY_LOCAL_MACHINE: Applies the registry change at the device level.
HKEY_CURRENT_USER: Applies the registry change at the user level.
Registry Key Path: Enter the path relative to the selected registry hive. E.g.:
SOFTWARE\MyCompany\MyAppFor Write Value and Create Key operations, the complete path will be created if it does not already exist. The maximum length is 255 characters.
Value Name: For Write Value and Delete Value operations, enter the name of the registry value. E.g.:
AppMode.The maximum length is 259 characters.Value Type: For the Write Value operation, select the data type of the registry value. You can choose:
REG_SZ
REG_BINARY
REG_DWORD
REG_QWORD
REG_MULTI_SZ
REG_EXPAND_SZ
Value Data: For the Write Value operation, enter the data that you want to write to the registry value.
Use Empty/Default Value Data: When enabled, the value data can be left empty. With this you can create a registry with only the value name, without requiring any value data.
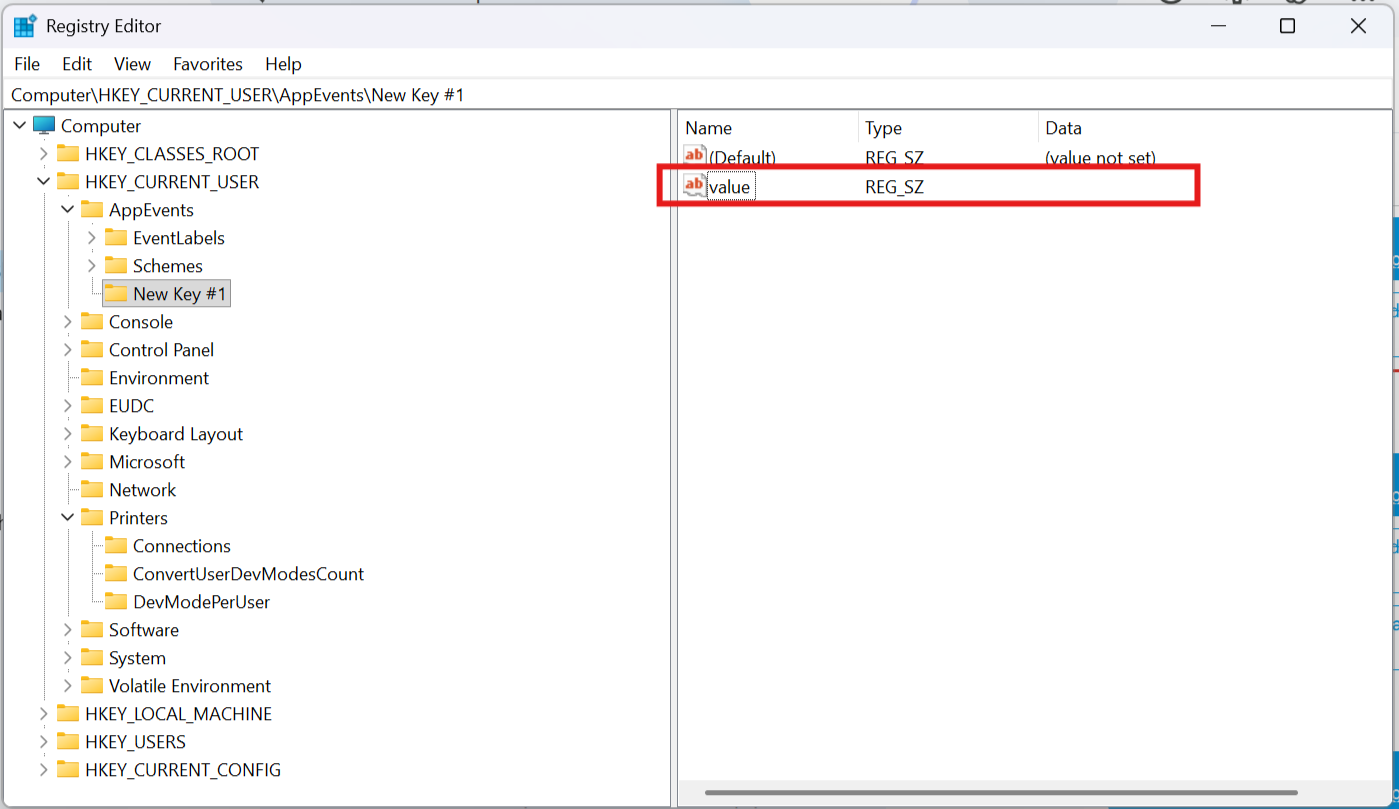
Overwrite Value, If Exists: When enabled, the existing registry value will be overwritten if it already exists.
Create Key if not present: With this enabled, if the required registry key path does not exist, the system will automatically create the missing folders/keys in that path. Any missing folder/key in the path will also be created automatically.
Execution Context: When HKEY_CURRENT_USER is selected, you can choose the users to whom the registry operation will be applied. You can choose:
All Users
Administrators
Standard Users
Specific User
For HKEY_LOCAL_MACHINE, this option remains disabled.
Username: When you select Specific User in the Execution Context, this field will become active. Enter the username for the user to whom this command will be applied.
Once you have configured the required fields, click on Save.
The Remote Command will start showing up in the list of commands.
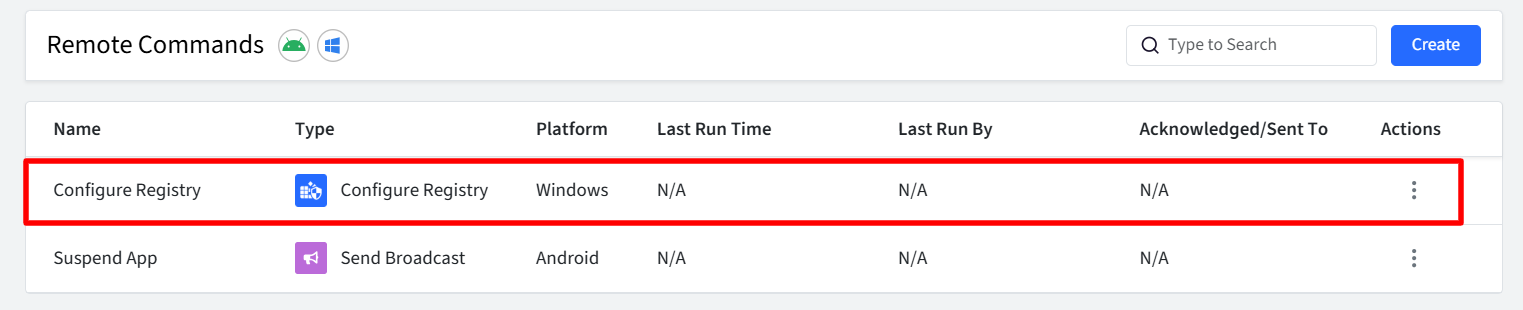
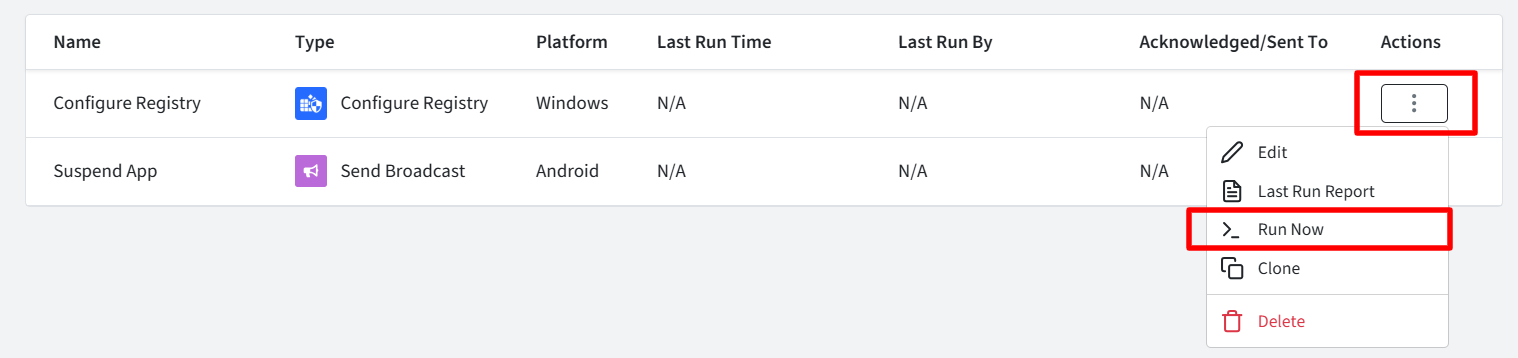
From here, you can push the command to devices by clicking on the 3-dots under Actions > Run Now.
N. Reset Application Failed Attempts
With this command you can reset the failed download and/or installation attempt counters for applications that match the specified regular expression. This can be used to clear previously recorded failures and allow the application deployment process to retry without being affected by the existing failed-attempt count.
Here, you specify the regular expression to identify the target application(s), then select whether to reset the download attempts, installation attempts, or both. To configure:
Click on Reset Application Failed Attempts in the Create Remote Command Window
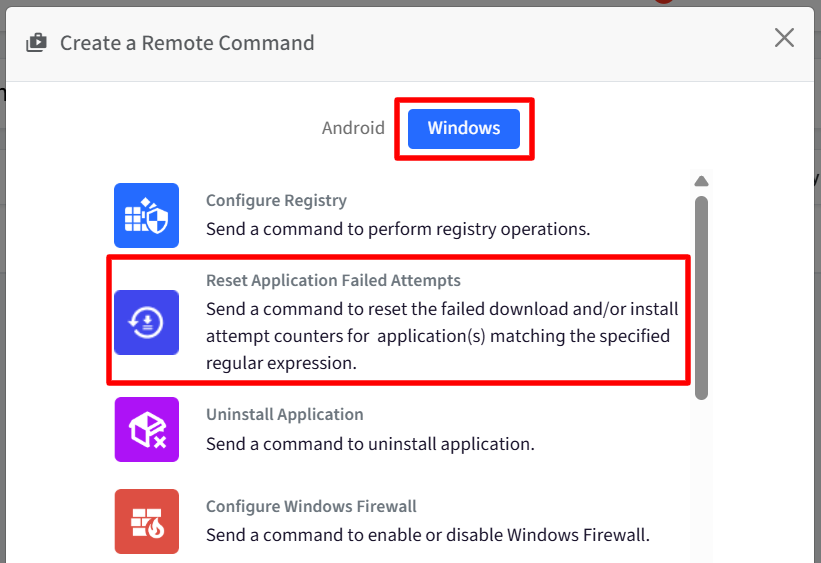
This opens a new dialog. Here, enter the following:
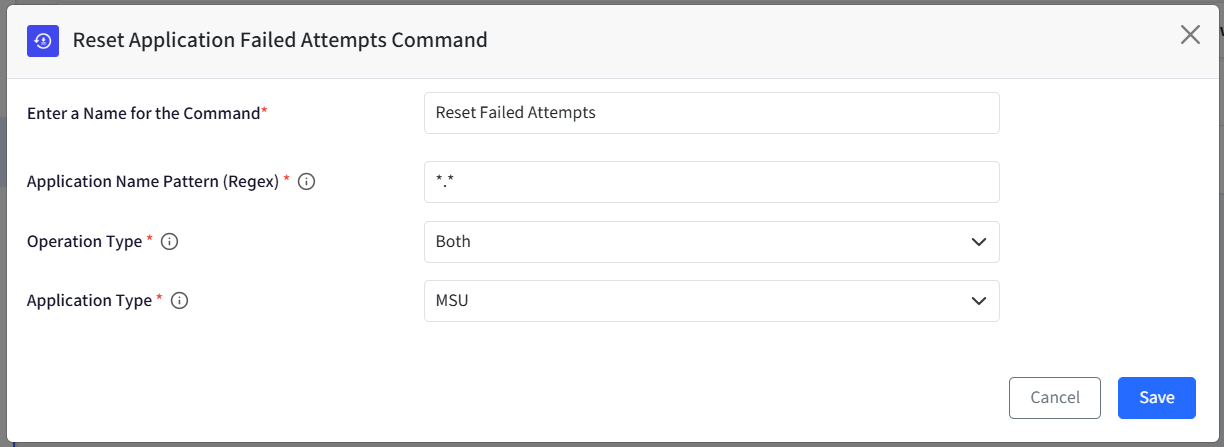
Enter a name for the command
Application Name Pattern (Regex): Enter the application name or a regular expression to identify the application(s) whose failed attempt counters you want to reset. Examples:
Google Chrome App: matches the exact application name.Google Chrome.*: matches application names beginning with Google Chrome..*: matches all applications.
The pattern is matched against the application name provided during application upload.
Operation Type: Select which failed attempt counter you want to reset. You can choose:
Download: Resets the failed download attempt counter.
Install: Resets the failed installation attempt counter.
Both: Resets both the failed download and installation attempt counters.
Application Type: Select the application package type to which the reset action should apply. You can choose:
MSU
MSI
EXE
This allows you to limit the reset operation to applications of a specific package type.
Once you have configured the required fields, click on Save.
The Remote Command will start showing up in the list of commands.
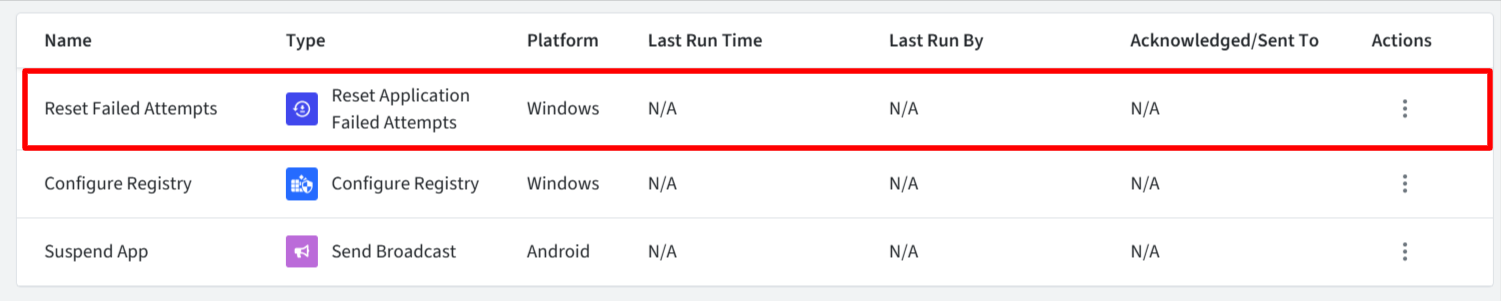
From here, you can push the command to devices by clicking on the 3-dots under Actions > Run Now.
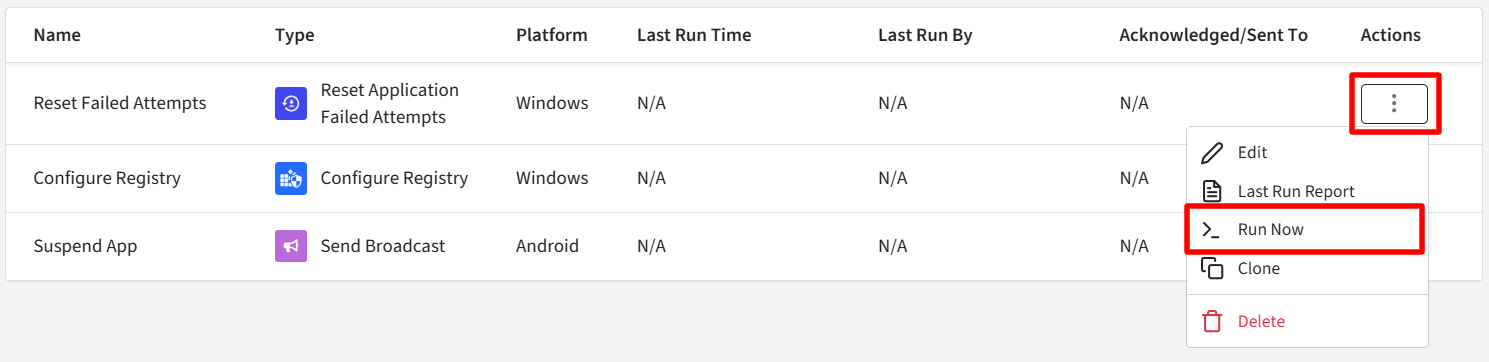
Other Actions on Remote Commands
These actions can be accessed by clicking on the three vertical dots under the Actions heading on the right.
Edit: With this, you can edit the command details.
Last Run Report: Gives a summarized report of the status of the commands installed on the device.
Run Now: Will push the commands on the device(s) instantly.
Clone: Creates a copy of the existing command.
Delete: Deletes the Remote Command. A command, once deleted, cannot be recovered. To confirm the deletion of the command, you need to enter your Scalefusion Dashboard login password.
Profile based Settings for Remote Commands
In addition to executing the Remote Commands manually, IT admins can configure additional triggers to execute them whenever that event occurs (run at every login, schedule at a specific time etc.).
On Scalefusion Dashboard, navigate to Device Profiles & Policies > Device Profiles.
Edit an existing Windows Device Profile.
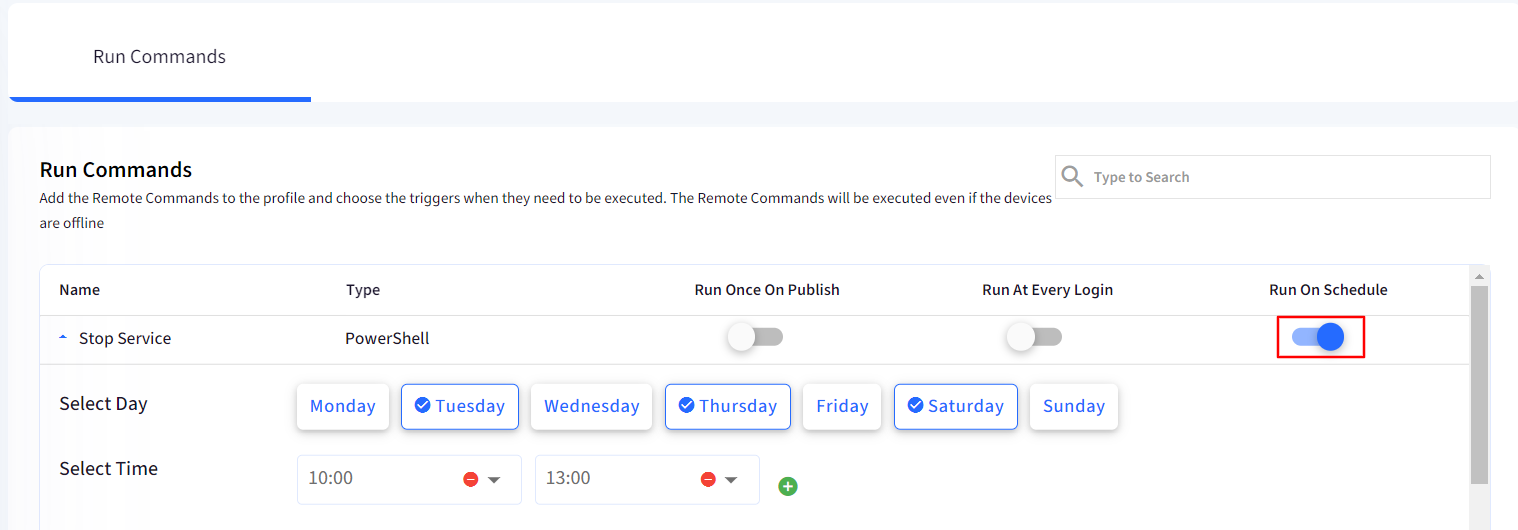
Click on Run Commands on the left panel. The Remote commands that you have created from the Remote Commands section will be displayed here with the following information:
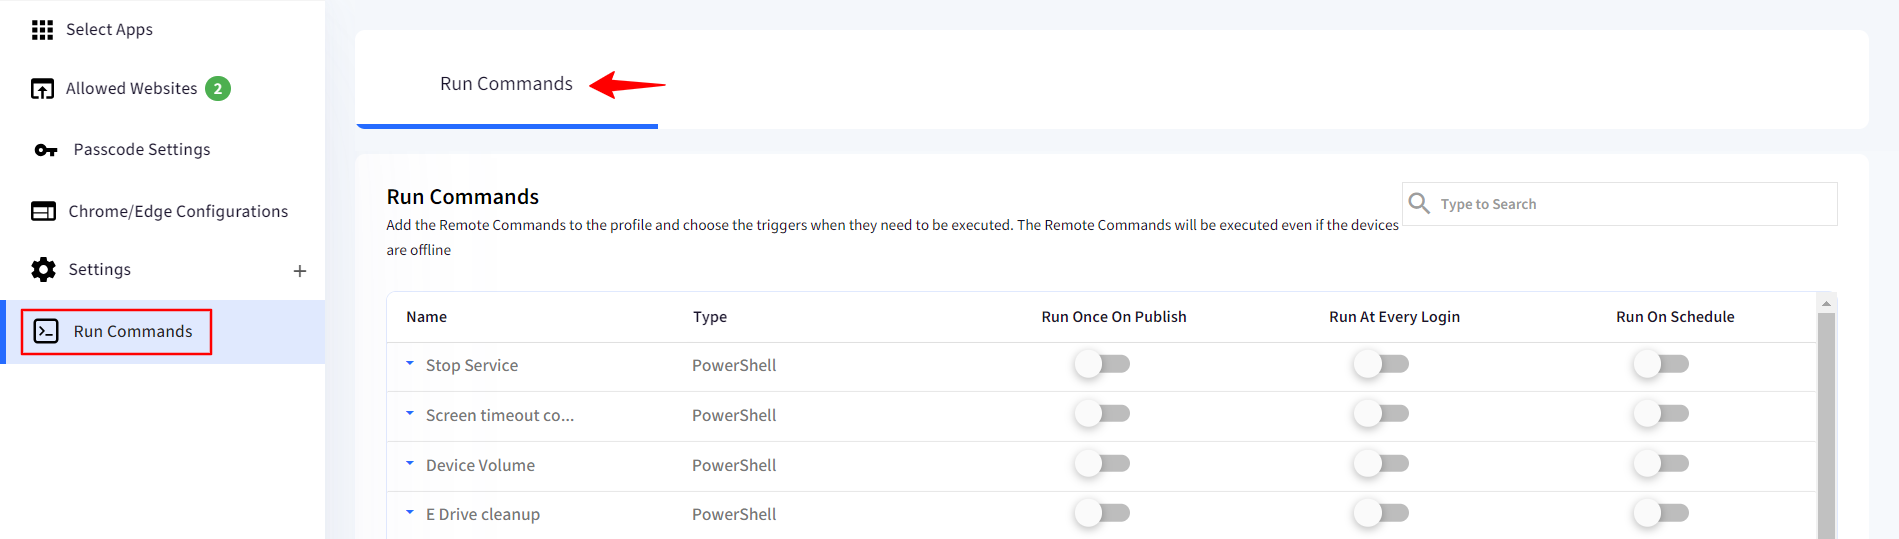
Name: Name of Remote Command which you entered at the time of creating it.
Type: This will be PowerShell.
Following are the triggers you can configure:
Run once on Publish: The command will get executed once as soon as the Profile is updated.
Run at every login: The command will run every time the user logs in on the device.
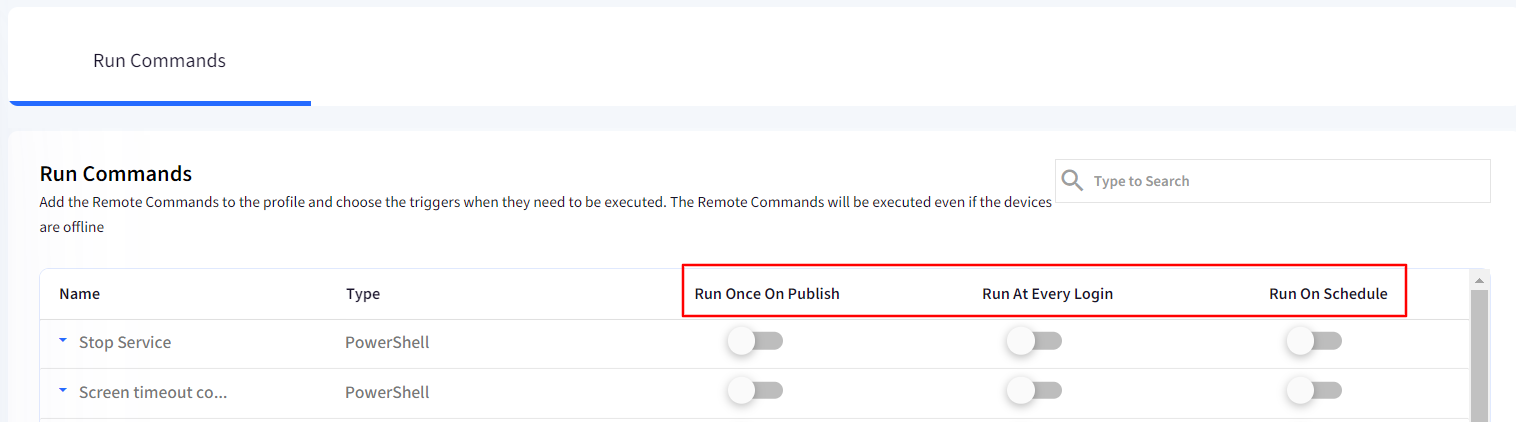
Run on Schedule: The command is executed on the given days and given time if the device is powered on. For scheduling, you can choose the following:
Select Day: Displays the days of the week. You can select one or more days.
Select Time: Select the time at which the command should be executed. You can set one time or more than one by clicking on the plus sign next to the time drop-down.