Scalefusion supports remote device troubleshooting on its managed Windows devices through its Remote Cast and Control feature. The feature allows an IT Admin to remotely view and control the end user's device either in an unattended mode or driven by user consent, thereby allowing to resolve the IT issues with the device in a quick and efficient manner. Furthermore, with Scalefusion's ITSM integrations, IT Admins can log a ticket for further debugging or escalation with the recorded videos and/or screenshots taken during the troubleshooting session.
As a result, the Remote Cast & Control feature offers a number of benefits. To name a few:
- Unattended Remote Access: IT Admins can quickly and instantly set up a remote access session with devices located anywhere in the world without an end user present with the host device.
- Control Login Screen: Take remote control directly from Windows logon screen without any end user assistance.
- Switch Users: Admins can switch user accounts without having to disconnect from the session.
- Respond to UAC Prompts: View and respond to UAC prompts which appear on Secure Desktop.
- User Consent: With this setting enabled, get user's consent before starting a remote cast session, else the session starts directly.
- Remote Keyboard and Mouse Control: Take control of end user's keyboard and mouse, remotely.
Prerequisites
- Windows OS: Windows 10 and above with minimum version 1809 or above, or Windows 11 should be installed on User’s Device.
- Supported Architectures: 32-bit, 64-bit.
- The device should be enrolled with Scalefusion.
- The latest version of Remote Support app for Windows should be installed on devices.
- On Windows Home (10 & 11) Remote Support app version 4.0.10.0 (or above) should be installed.
How does it work
- Install Remote Support app available on Scalefusion Dashboard on the device.
- Initiate Remote Session from Dashboard.
- Once started, Admins can take the control of user's device.
- View the current status of Remote session, logs, sync settings, and more.
Let us learn the detailed steps below.
Step 1: Install & Setup Remote Support app
The first step to using Remote Cast & Control on Windows devices is to install & setup the Remote Support app. The app acts as a primary entity that authenticates user’s device and Remote Cast and control Session. Please follow the steps below to install:
- Navigate to Application Management > Scalefusion Apps. Click on Scalefusion Remote Support App for Windows and select PUBLISH
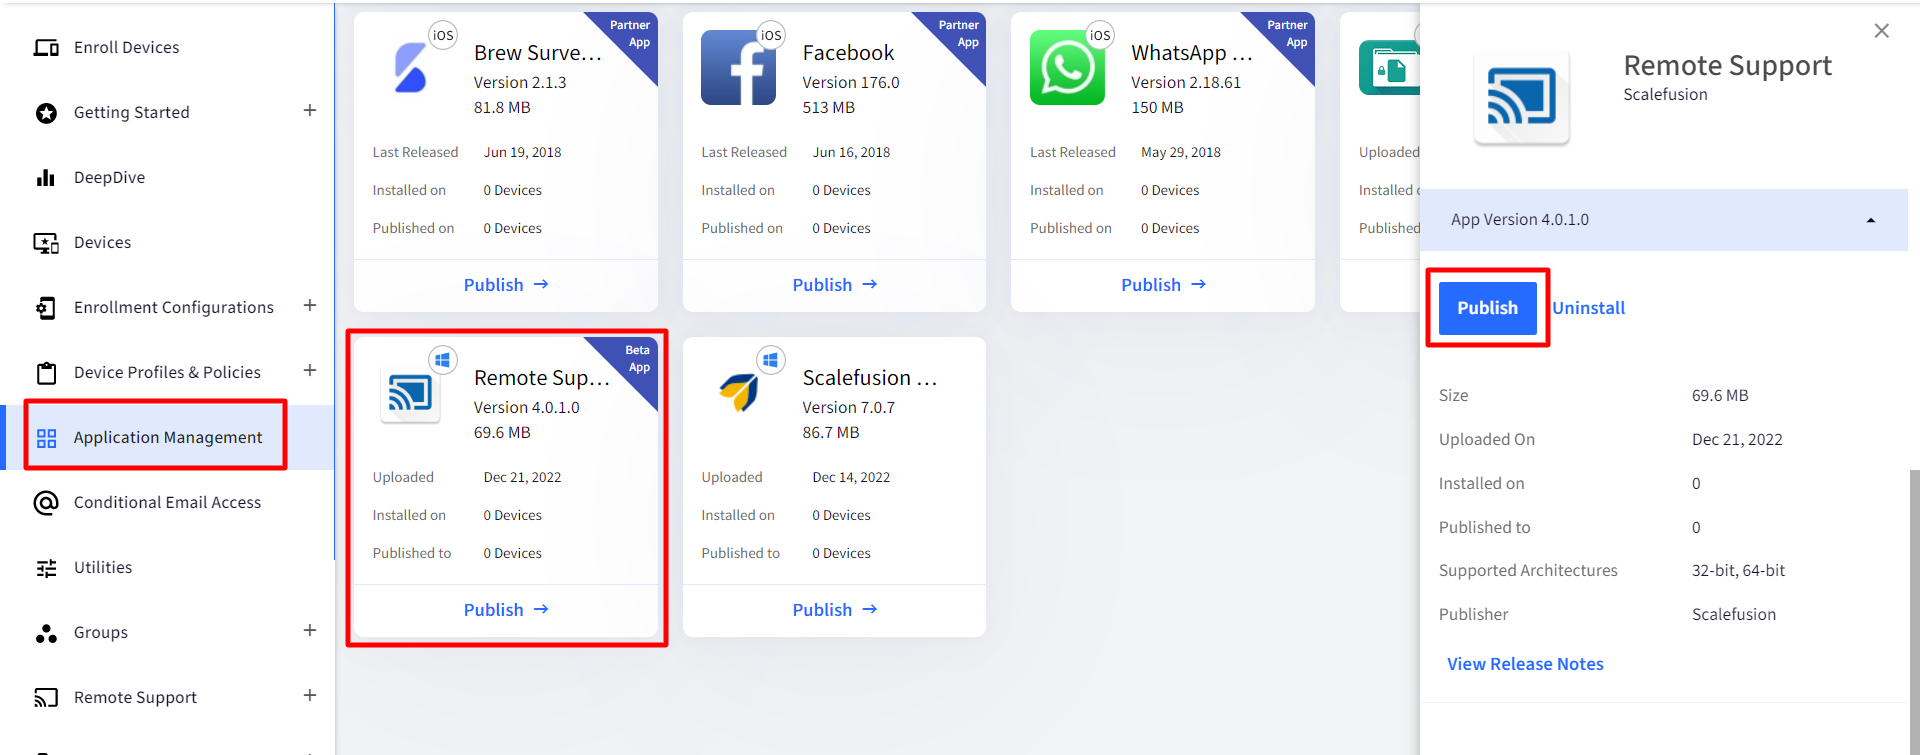
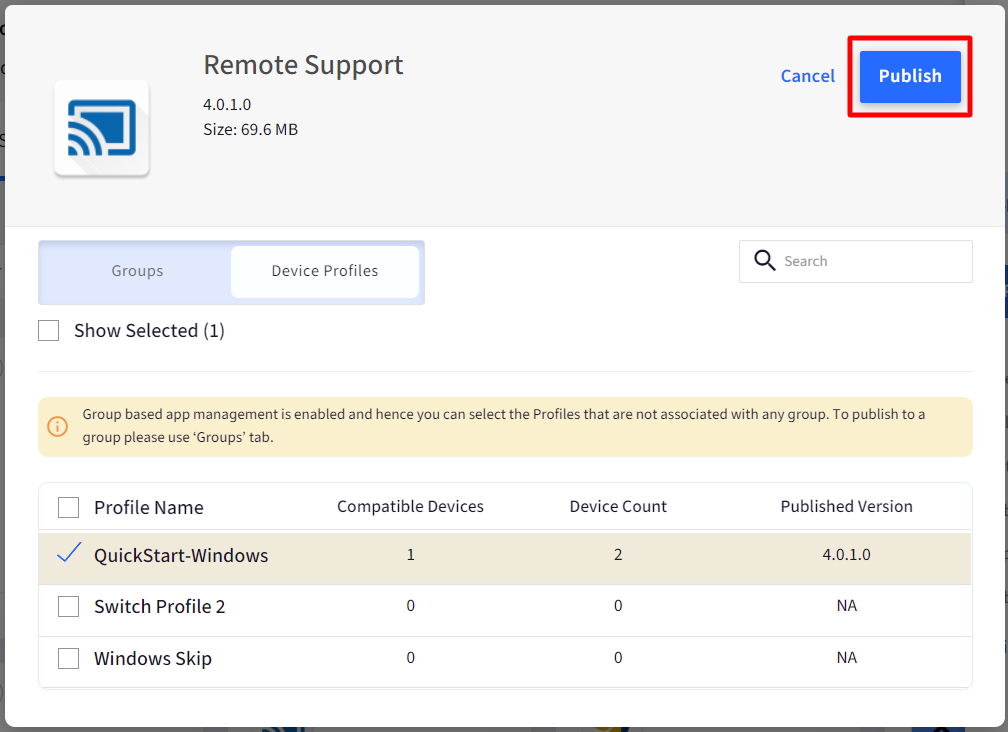
- Select the Windows Device profiles/Groups on which you want to install the application. Click on PUBLISH to confirm the installation.
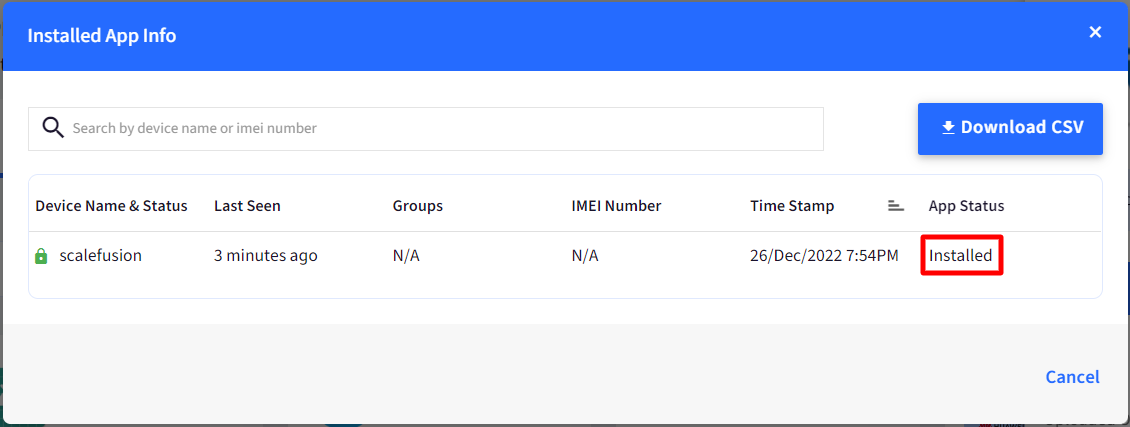
- It will take few minutes for the app to get downloaded. You can check the status on dashboard from My Apps. If installed, it will show the status as 'Installed'
 Those who are upgrading from older version of Remote Support app, if you still see an older version of RC application on the device after upgrading to 4.0.1.0, please ignore the earlier one.Once Remote Support is successfully installed, a shortcut gets created on the device's desktop. From there you can check the current status of Remote session and also perform other actions. The details are explained in a later section below.
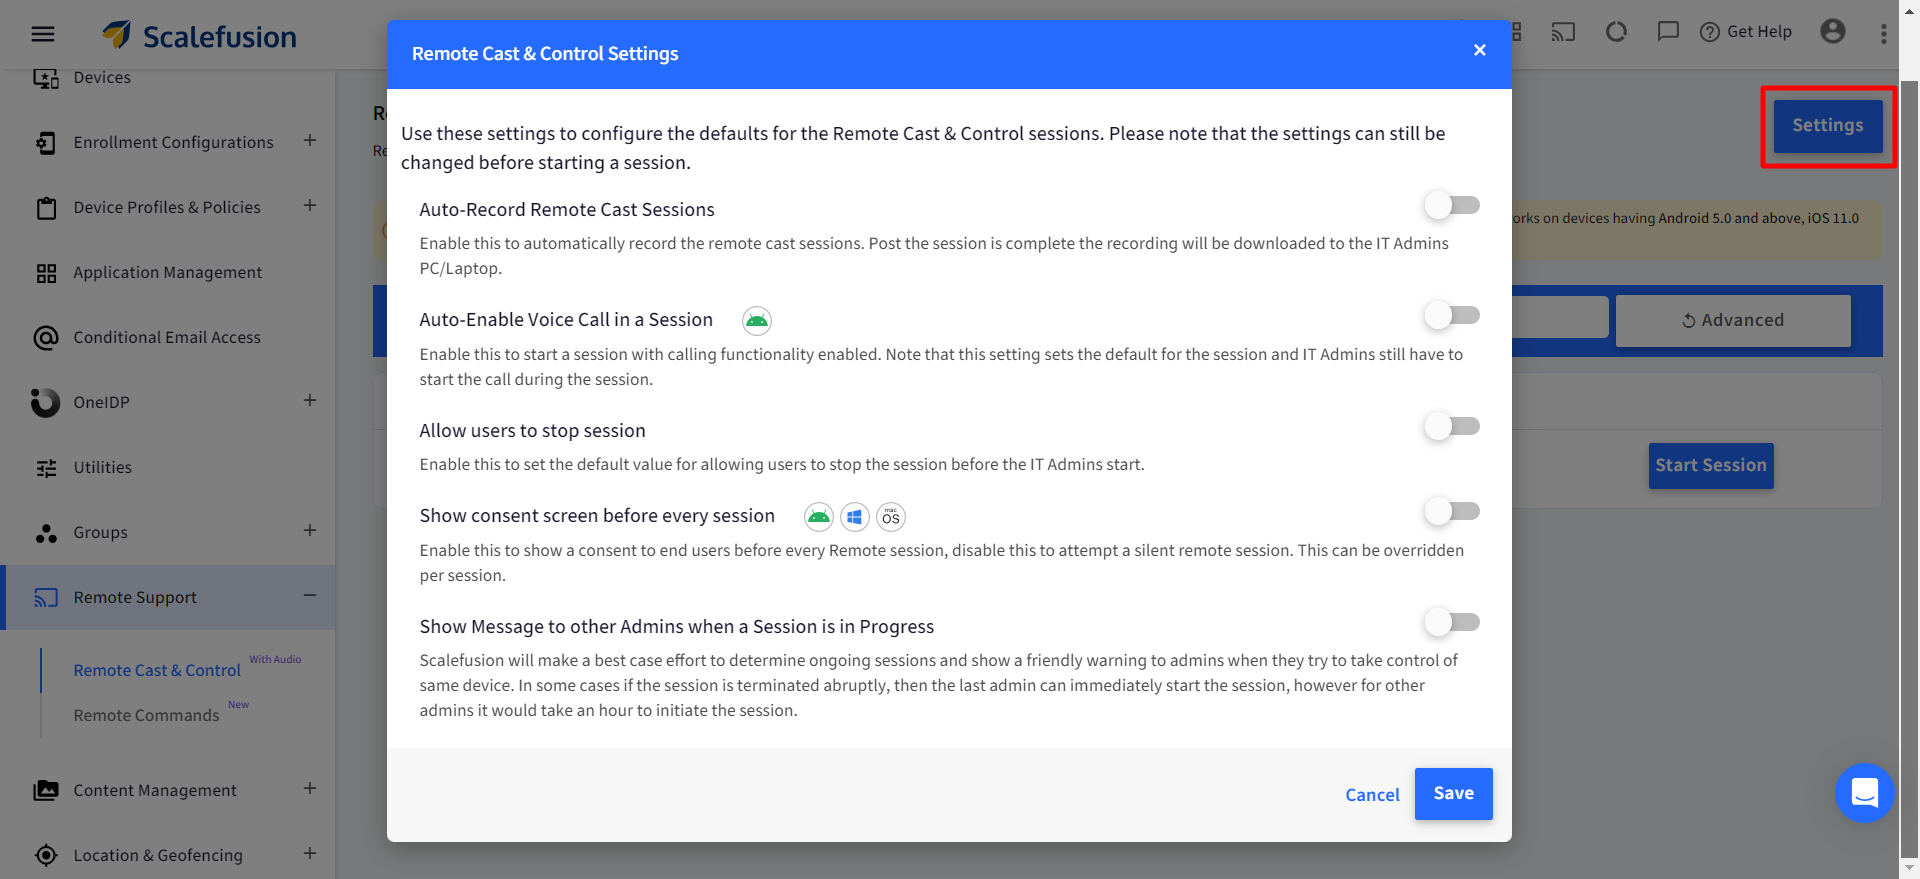
Remote Cast & Control Settings
When Remote Cast is used in security and privacy concerned domains like tablets with kids or with people in hospital care, if somebody takes a remote cast session, companies normally want to enforce recording of that session as a checkpoint for the agent taking the RCC session to make sure that everything is recorded.
To enable this, the following settings have been provided that can be configured from the Dashboard before starting a session and can be used as global settings for all admins.
The settings can be accessed from the Settings button available in Remote Cast & Control on the Scalefusion Dashboard. Clicking on Settings opens a dialog box where admins can configure them.
| Setting | Description |
| Auto-Record Remote Cast sessions | Enabling this automatically records the remote cast sessions. After the session is completed, the recording gets downloaded to the IT Admins PC/Laptop. If this setting is ON, session recording cannot be stopped. |
| Show consent screen before every session | If this flag is enabled, a dialog to take User Consent will come up and on user acceptance only, it will start screen sharing.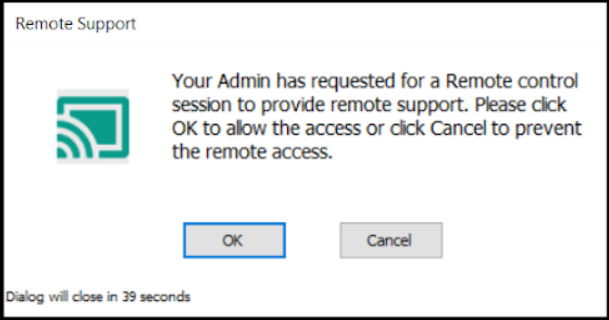 |
| Show Message to other Admins when a Session is in Progress | If this setting is enabled, IT admins get an alert when another admin tries to take access of a device that already has an ongoing session. In some cases if the session is terminated abruptly, then the last admin can immediately start the session, however for other admins it would take an hour to initiate the session. |
Step 2: Initiating a Remote Session
Once you have setup the Remote Cast application as described in Step 1, follow the steps below to initiate a casting session.
- Clicking on Remote Cast & Control on the Dashboard will show you the list of devices that support casting and control. Click on Start Session option next to the device you want to start a screen sharing session with.
- The Remote Control column indicates if the device supports control feature or not. A cross (X) indicates that the device does not support and a tick (V) mark indicates that the device supports control.
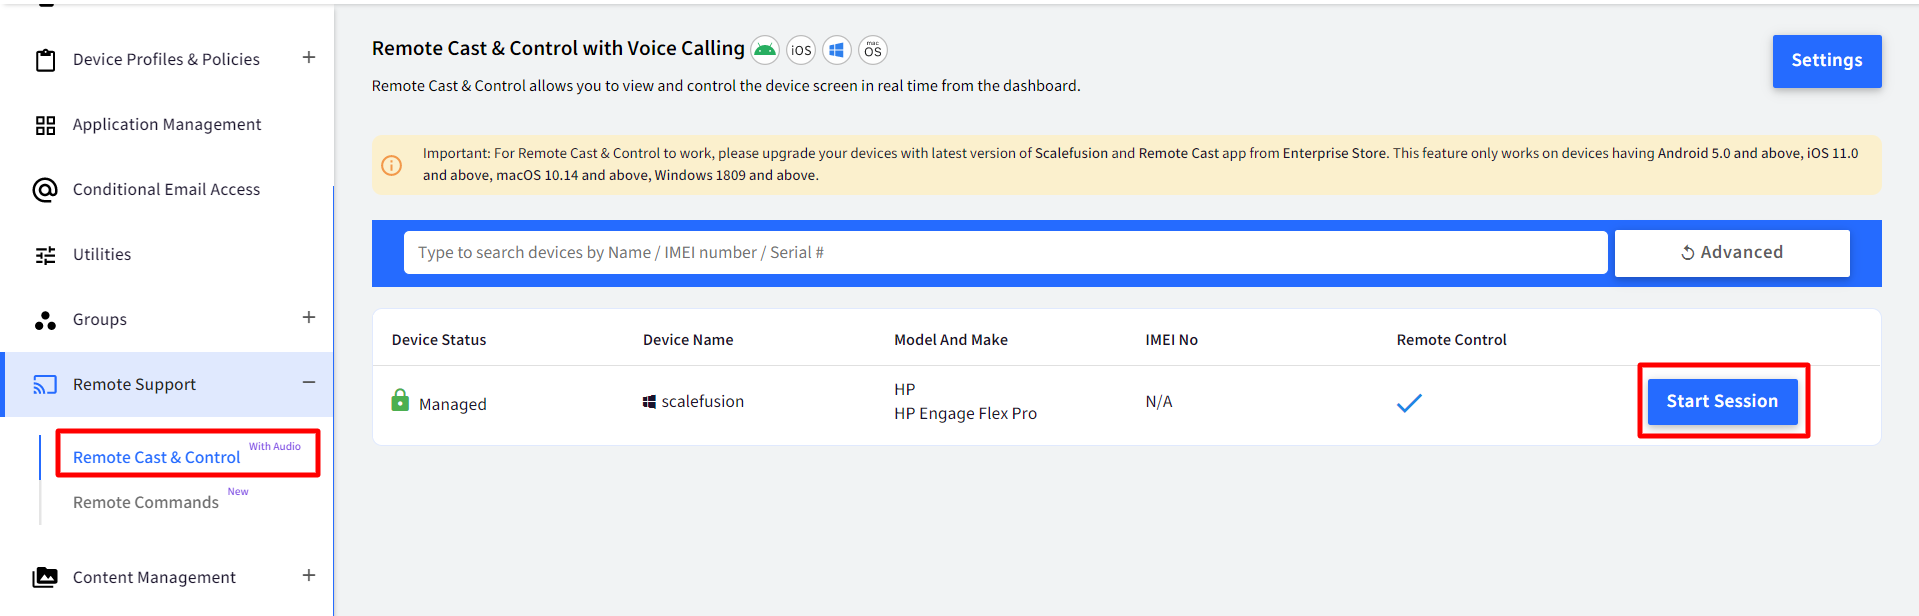 A Remote Cast session can also be initiated from Device Details page. On Device Information card there is a shortcut icon for Remote Cast before the Gear icon, clicking on which directly takes you to the Start session screen.
- The Remote Control column indicates if the device supports control feature or not. A cross (X) indicates that the device does not support and a tick (V) mark indicates that the device supports control.
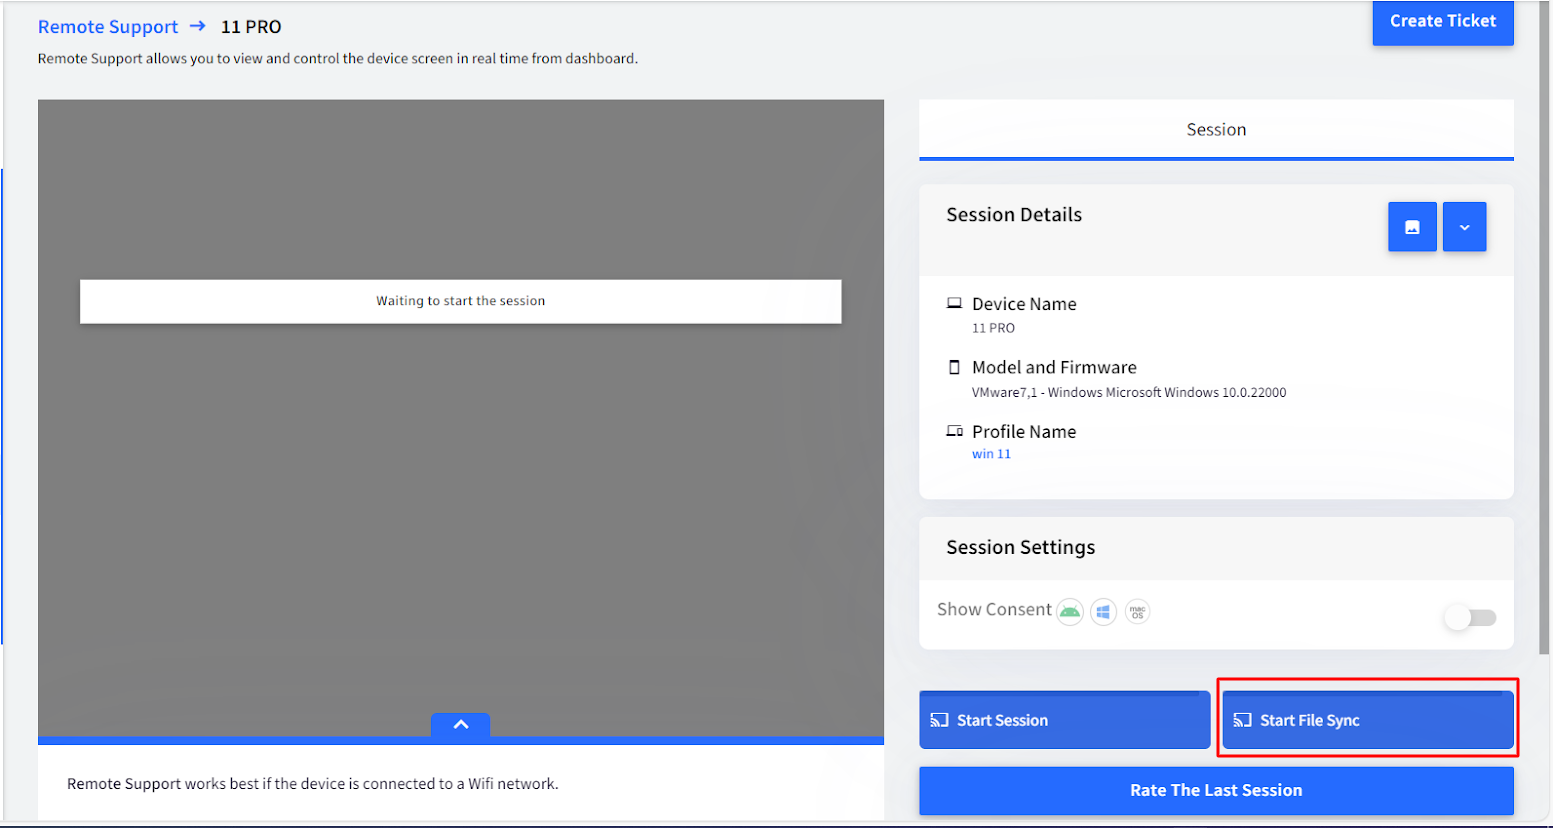
- You will be navigated to the screen casting page with the following components,

- Cast Console: The area where the mirrored screen appears.
- Session Details: Displays the windows device name and model with which the session will happen
- CREATE TICKET: Create a Service Desk ticket - Supported only if you have integrated your ITSM tool.
- Start Session: Click on this button to start the session.
- Start File Sync: Use this for file management with the remote machine by downloading, uploading, deleting files from the machine.
- Session Settings: If you want the user to give consent for starting the session, enable this toggle.
- Click on START SESSION to start the session.
- If the steps above are executed properly, then the screen that is currently running on the end user's device will be shown on the Scalefusion dashboard. The options while in an ongoing session are,
- Remote Control: The admin gets complete control of user's device, click anywhere on the screen, access apps etc. and perform required checks on user's device, all remotely.
- Full Screen: Use this option to go full screen.
- Take Screenshot: Use this option to take a screenshot of the shared screen.
- Stop Session: Use this option to stop the session.
- Start Recording: Use this option to start recording the session once it is started. After the session stops, the recording gets downloaded and can be accessed later.
- Device Level Actions: During remote session if admin wants to perform certain actions on the end user's device, they can do it from the same screen. Clicking on Settings button (next to full screen) pulls a menu with following actions to choose from:
- Refresh device
- Reboot Device
- Full Device Info
- Shortcut keys: Scalefusion supports few Windows shortcut Keys which can be used during remote sessions for troubleshooting. This also eases Admin's job. To use windows keys, click on the keyboard icon. This pulls up a menu with following key combinations:
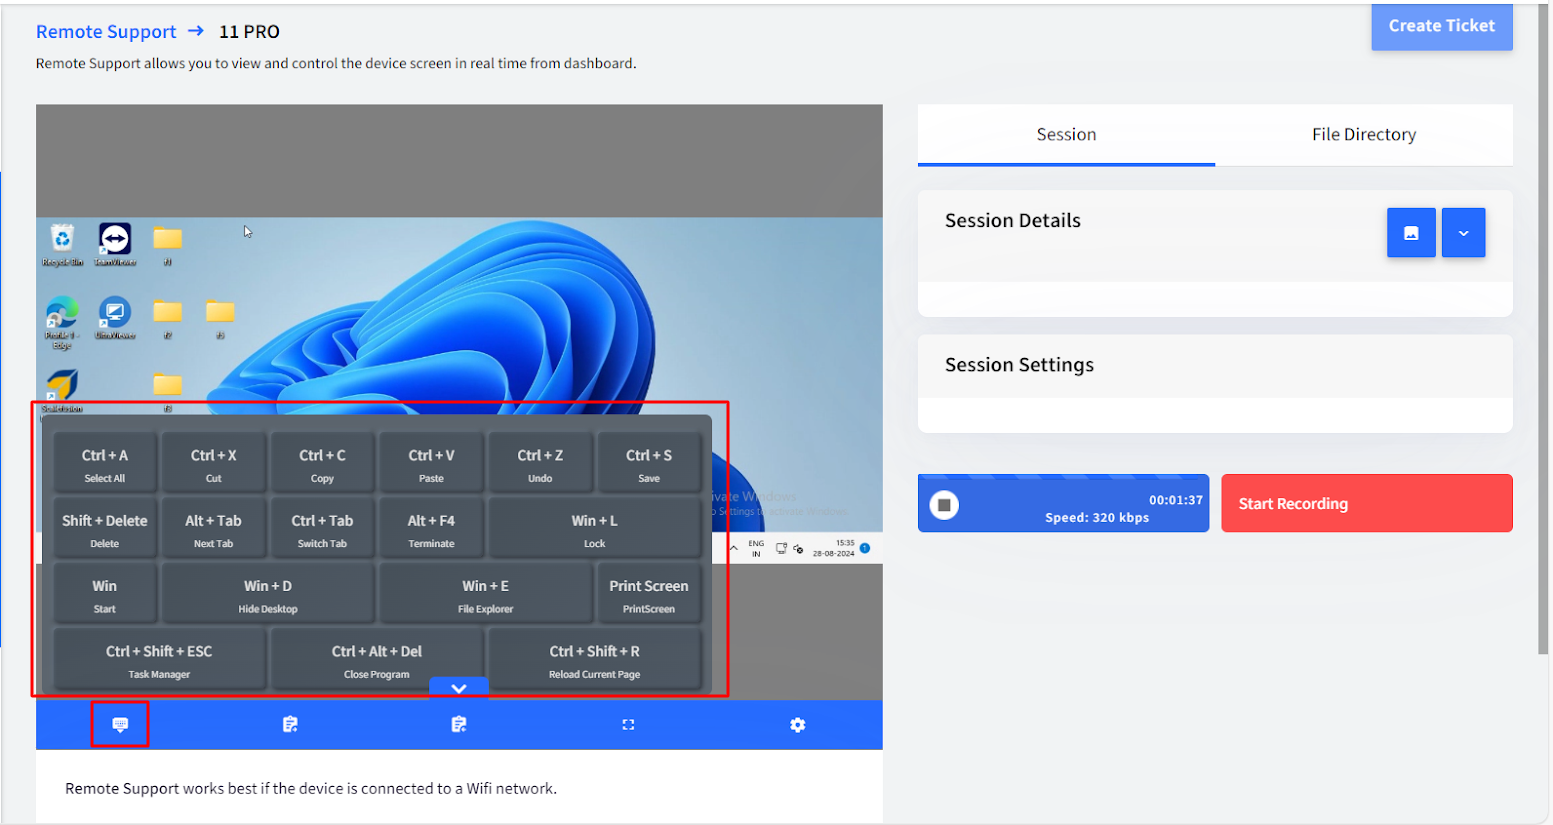
- Ctrl+A
- Ctrl+X
- Ctrl+C
- Ctrl+V
- Ctrl+Z
- Ctrl+S
- Shift+Delete
- Alt+Tab
- Ctrl+Tab
- Alt+F4
- Ctrl+Alt+Del
- Ctrl+Shift+R
- Ctrl+Shift+Esc
- WindowsKey+L
- WindowsKey+D
- WindowsKey+E
- WindowsKey
- PrintScreen
- Ctrl +
- Ctrl -
- Ctrl + Shift + i
- Other than Ctrl+C and Ctrl+V, Admins can use the key combinations only to perform operations on the end user's machine during a remote session.
- For performing operations (copy and paste) from your machine over end user's machine or vice-versa, you can use Clipboard feature.
- Mouse Scrolling (when in full screen) and dragging can also be done on the target machine during a remote session.
- Other than Ctrl+C and Ctrl+V, Admins can use the key combinations only to perform operations on the end user's machine during a remote session.
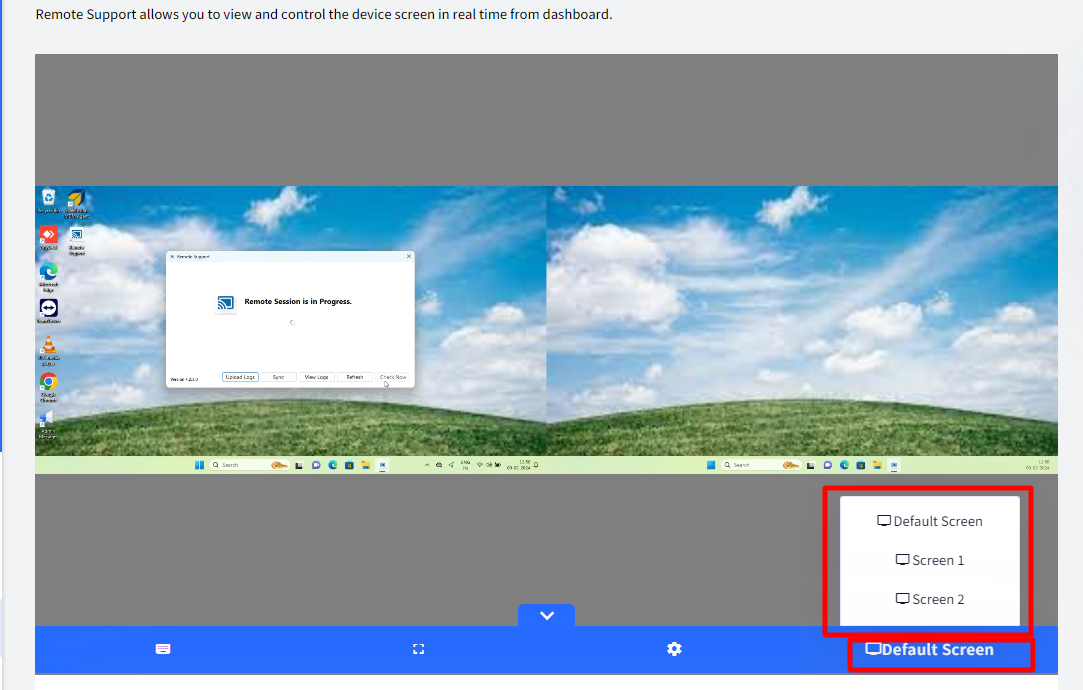
- Switch between multiple Monitors: IT Admins can switch between multiple monitors during a remote support session. If there are multiple monitors connected, then there will be an additional option on the action/blue bar at the bottom which would allow you to switch between Default and the other monitors.
- Clipboard: With this you can copy and paste text from your device to remote device and vice-versa, during a remote session. There are two buttons provided to use Clipboard:
- Send to Device Clipboard: Used to copy and paste text from your device to remote device
- Receive from device Clipboard:Used to copy and paste text from remote device onto your deviceBoth mouse (right click to copy or paste) and keyboard shortcuts (ctrl+c and ctrl+v) can be used for using clipboard actions
Remote File Management
Remote Support feature allows you to download and/or upload files from your managed Windows devices. The File Sync feature allows the admin/group admin to push a file from their system to a connected device and/or pull a file from a connected device to their system even when a remote cast session is not initiated.
- File Sync can be performed in two ways:
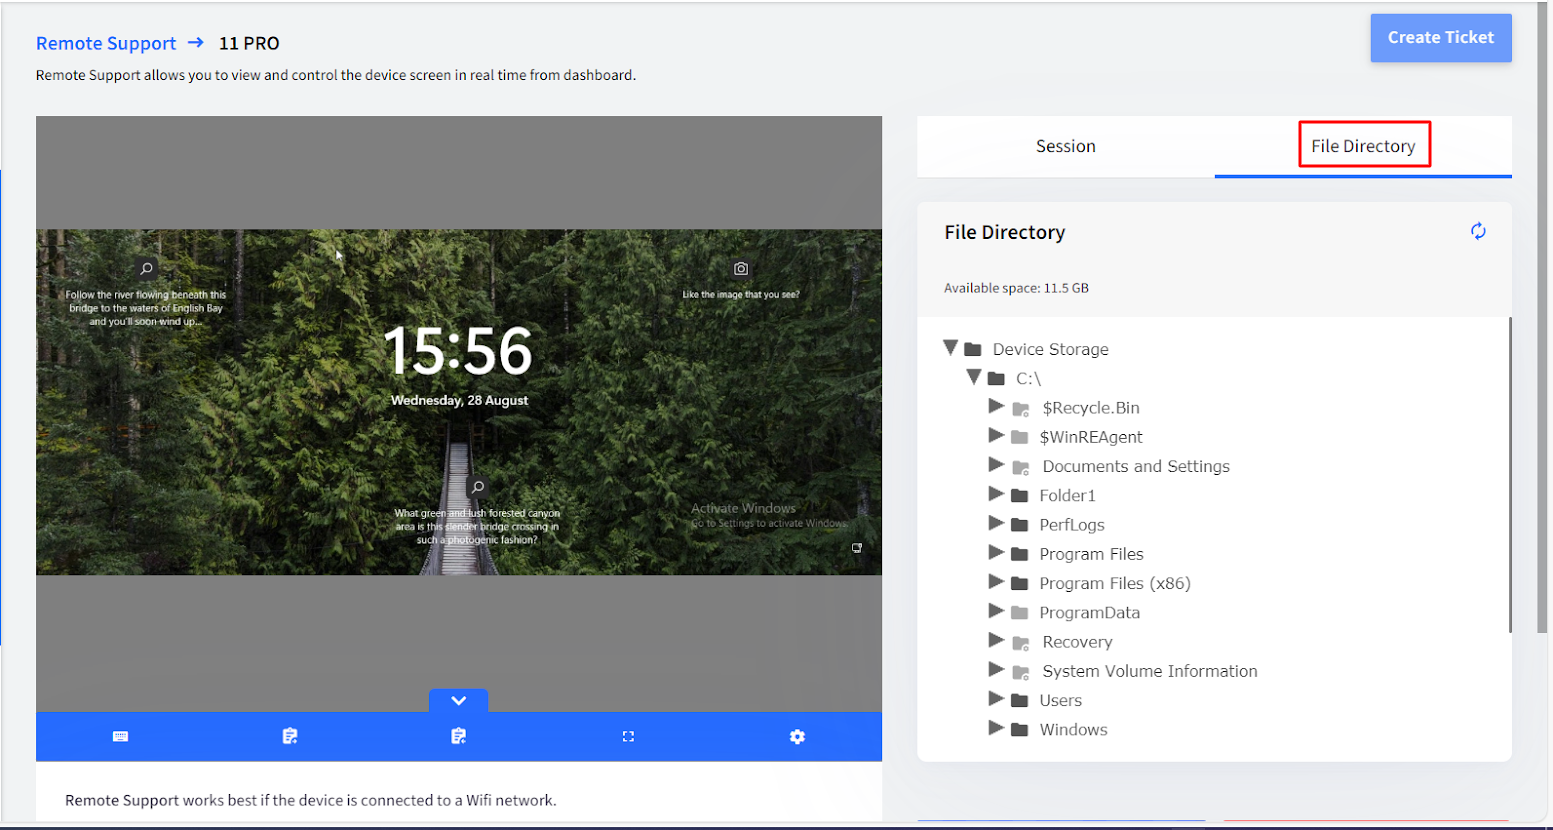
- When remote session is initiated: In this case, you need to go to File Directory tab to access the remote machine's file directory.
- When remote session is not initiated: In this case, click on the Start File Sync button which is next to the Start Session button.
- When remote session is initiated: In this case, you need to go to File Directory tab to access the remote machine's file directory.
- This will establish a connection with the device and show its File tree structure on the dashboard. Now you can transfer files to and from the device.
Note: System/Hidden folders are also visible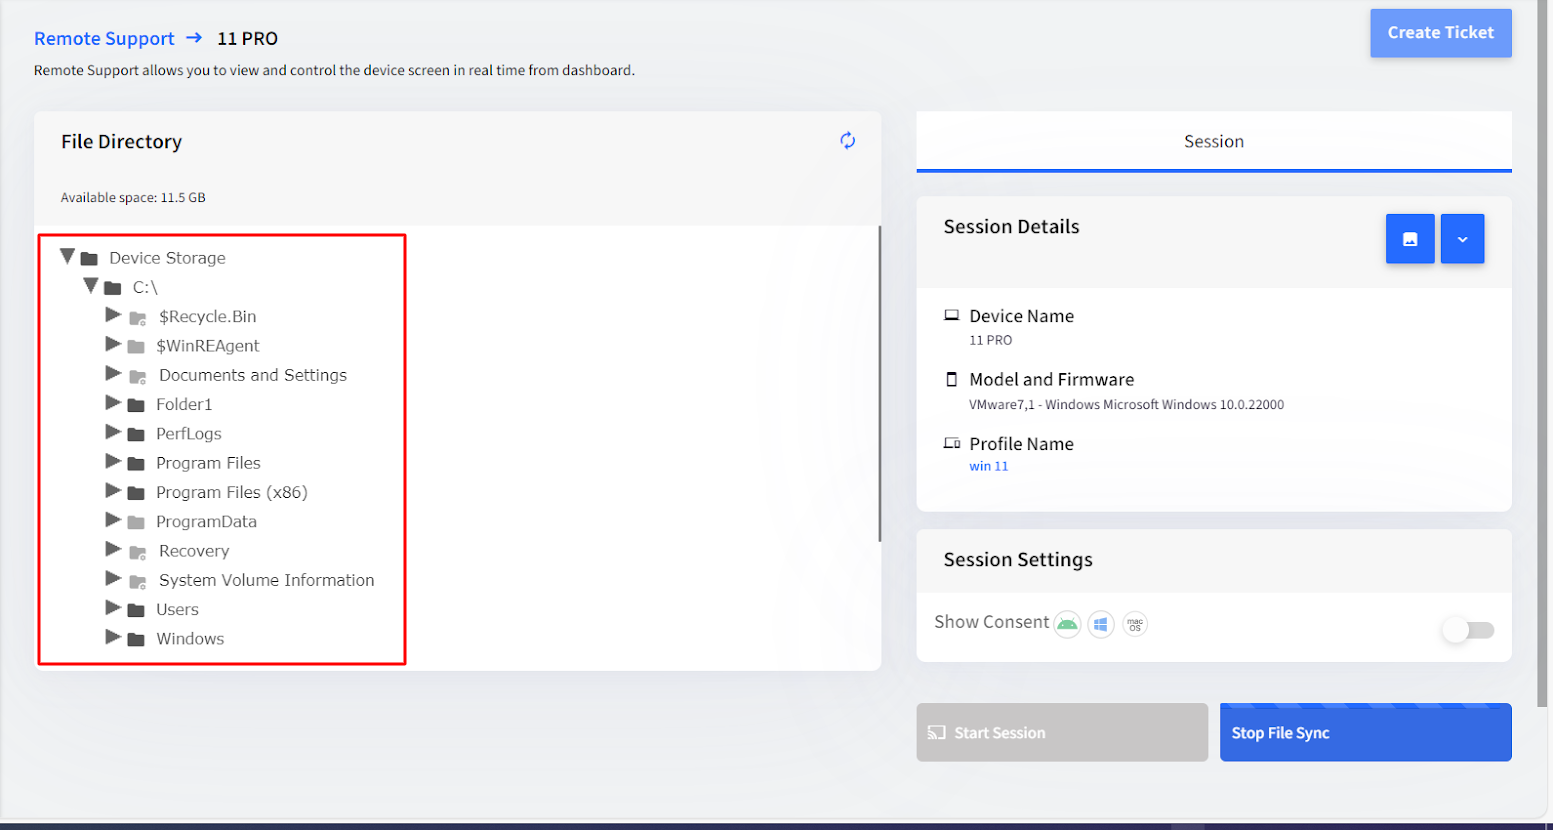
The files and folders present on the remote device will be visible when you expand the Device Storage folder on the top
Upload a File
File(s) can be uploaded from your system onto the remote device using Upload. Please follow these steps to do so:
- Click on the folder in which you want to transfer the file and then click Upload
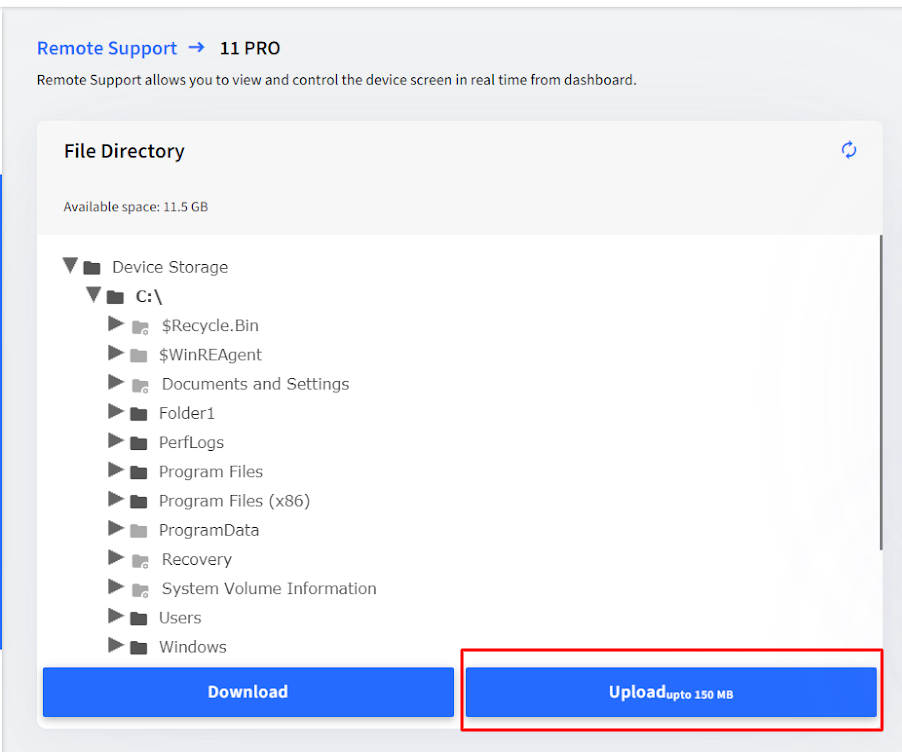
- Browse and select the file you want to transfer on the device.
- The file will start reflecting on the remote device.
Download a File or Folder
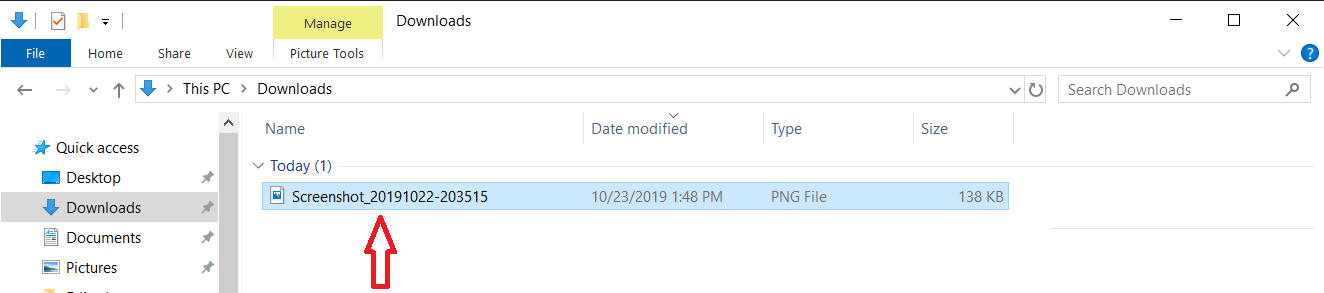
With the File Sync feature, the admins can also download file(s) or folder(s) from the remote device to your system. Please follow these steps to do so:
- Click on a file/folder name that has to be downloaded from the remote device to your system. For eg. You want to download an image from your device's Screenshots folder. For this, click on the Screenshots folder in the tree structure and then select the image to download. Then click Download.

- The file/folder will start downloading on your system and will be placed inside the Downloads folder.
Deleting a File
- To remove any file from your device, simply select the file and click the Delete button
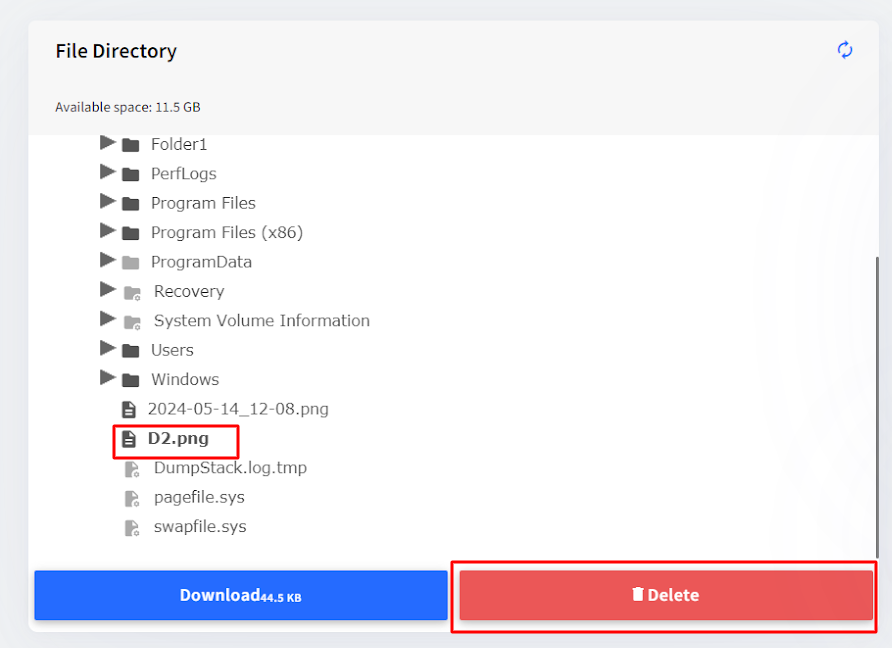
- You will get a confirmation box. Click Delete on it.
- The file will be removed from your device.
Points to Note on File Sync
- Upload: You can only upload files and not folders. Also multiple files cannot be uploaded at the same time.
- Download: You cannot download the folders that have files which are opened or in use.
- Delete: You can only delete files and not folders. Also multiple files cannot be deleted at the same time.
- You can neither delete nor download entire Drive (like C:, D: etc.)
Viewing status of Remote Session
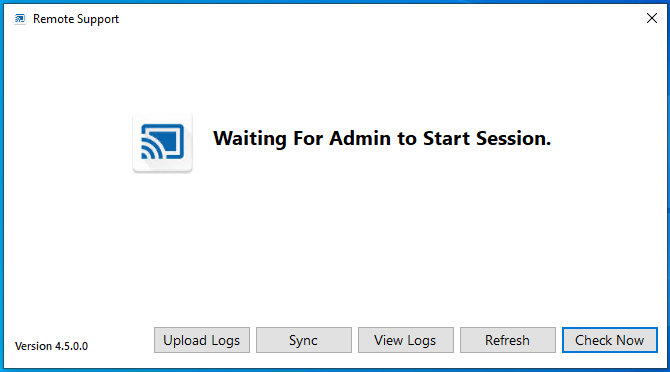
Once Remote Support app is setup and installed, you can verify if it is successfully installed and also check the current status whether remote session is waiting to be initiated or already in progress. To verify,
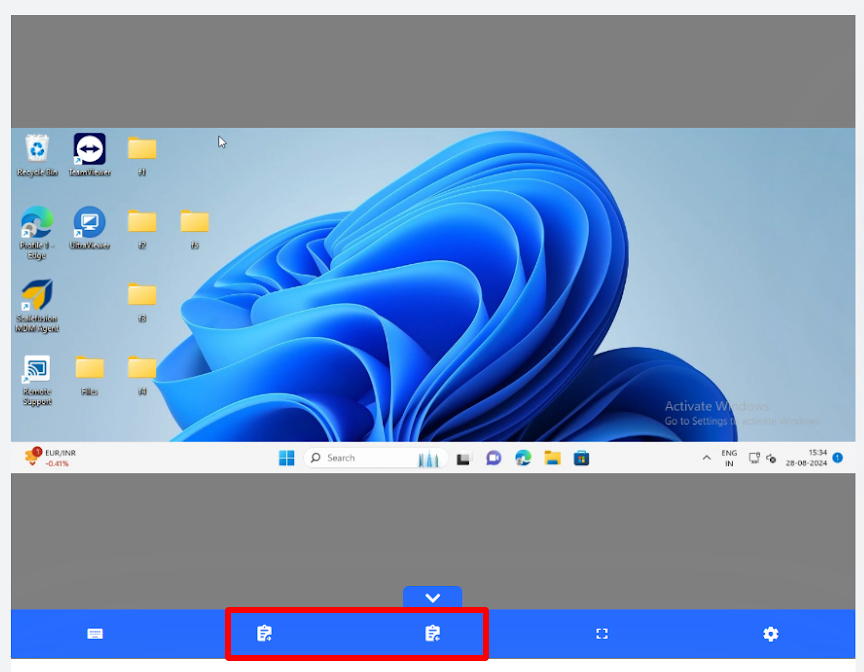
- After successful installation of Remote Support app from dashboard, a shortcut for Remote Support app will get created on the Windows device.
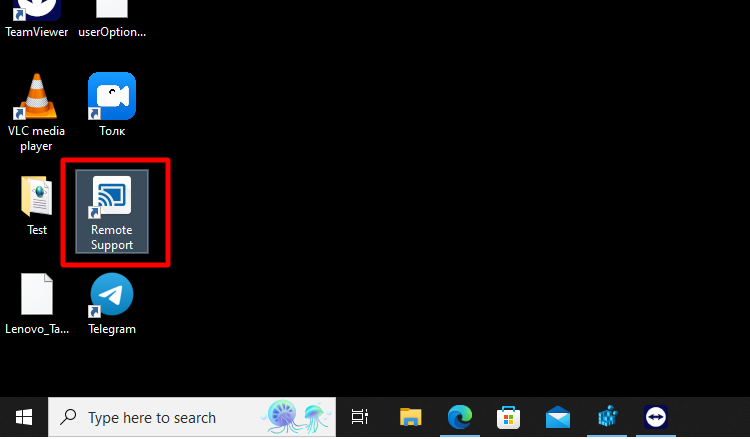
- Double-clicking on it will launch a small window displaying the current status of Remote Cast session.
- If the session is not initiated, a message will be displayed Waiting for Admin to start the session.
- If the session is initiated and going on, message will be displayed as Remote Session is in progress.

- If the session is not initiated, a message will be displayed Waiting for Admin to start the session.
- Following additional actions can be performed from this window:
- Check Now: There can be instances where a push message may not automatically start a session. In such scenarios you can click Check now which allows you to verify and kickstart a session manually. This sends push messages directly to Windows client ensuring seamless connectivity and control even in scenarios where automatic initiation may not occur.
- Refresh: Clicking on Refresh Button will update and display the current status of remote session, for example, if the session is going on then it will show as Remote Session is in Progress.
- View Logs: Clicking on this will display live logs of the remote support session. These logs can be used mainly for troubleshooting in case Remote Cast doesn't work. The logs will open in a new window and are displayed under three heads, viz. Service Log, Push Notification Log and User Agent Log.
- Refresh: Clicking on Refresh button manually refreshes the logs.
- Auto-refresh: Checking this box will automatically refresh the logs and take you to the last line as and when new logs are added. By default, auto-refresh is unchecked.

- Sync: This will sync the Remote Support settings with the server.
- Upload Logs: Uploads Remote Support application logs to backend. The logs help developers in detecting the issue if any problem occurs during Remote Cast session. After uploading the logs once, you can upload them again only after 30 minutes.
- Check Now: There can be instances where a push message may not automatically start a session. In such scenarios you can click Check now which allows you to verify and kickstart a session manually. This sends push messages directly to Windows client ensuring seamless connectivity and control even in scenarios where automatic initiation may not occur.
Frequently Asked Questions
Question: I am getting the following error on launching Remote Support from the shortcut on device.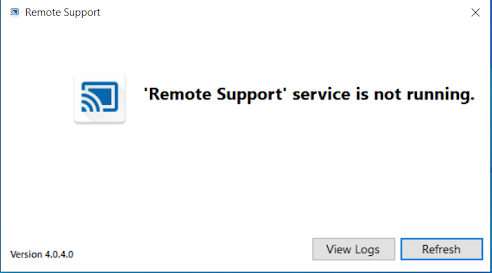
Answer: This usually happens when the Remote Support service has stopped running in the background. To make it work again, you need to restart the Remote Support service from the Services app on the device.