The Bulk Factory Reset Devices feature allows administrators to factory reset multiple devices simultaneously by uploading a CSV file through the Dashboard. Instead of initiating a factory reset individually for each device, administrators can upload a CSV containing device identifiers, review the devices identified by the system, configure platform-specific factory reset options, and submit the request.
This feature supports multiple device platforms, including Android, Apple devices, Windows, Linux, printers, and ChromeOS.
A factory reset permanently removes data from the affected devices based on the selected reset options. This action may not be reversible. Ensure that all required data is backed up before proceeding.
Supported Platforms and Devices
Bulk Factory Reset supports the following platforms and device types:
Platform | Supported devices |
|---|---|
Android | Corporate-Owned (CO), Corporate-Owned Personally Enabled (COPE) |
Apple | iOS, macOS, tvOS |
Windows | Windows devices |
Linux | Linux devices |
Printers | Zebra and Brother printers |
ChromeOS | ChromeOS devices |
The factory reset options available during configuration depend on the platforms detected in the uploaded CSV file.
Pre-requisites
Before initiating a bulk factory reset, ensure that the following requirements are met:
Bulk Factory Reset Settings must be enabled: The setting must be enabled under Dashboard → Utilities → Global Settings → General Settings.
The administrator must have the required Bulk Factory Reset permissions assigned to their role.
A CSV file containing the device identifiers of the devices to be factory reset.
The administrator must have permission to perform factory reset operations on the devices included in the CSV.
Ensure that important device data has been backed up before initiating the reset.
CSV upload limitation: A maximum of 2,000 devices can be included in a single CSV upload.
Enabling Bulk Factory Reset Settings
Log in to the Dashboard.
Navigate to Utilities → Global Settings → General Settings.
Locate Bulk Factory Reset Settings.
Enable the toggle labelled Allow Admins to Perform Bulk Factory Reset.
Save the configuration.
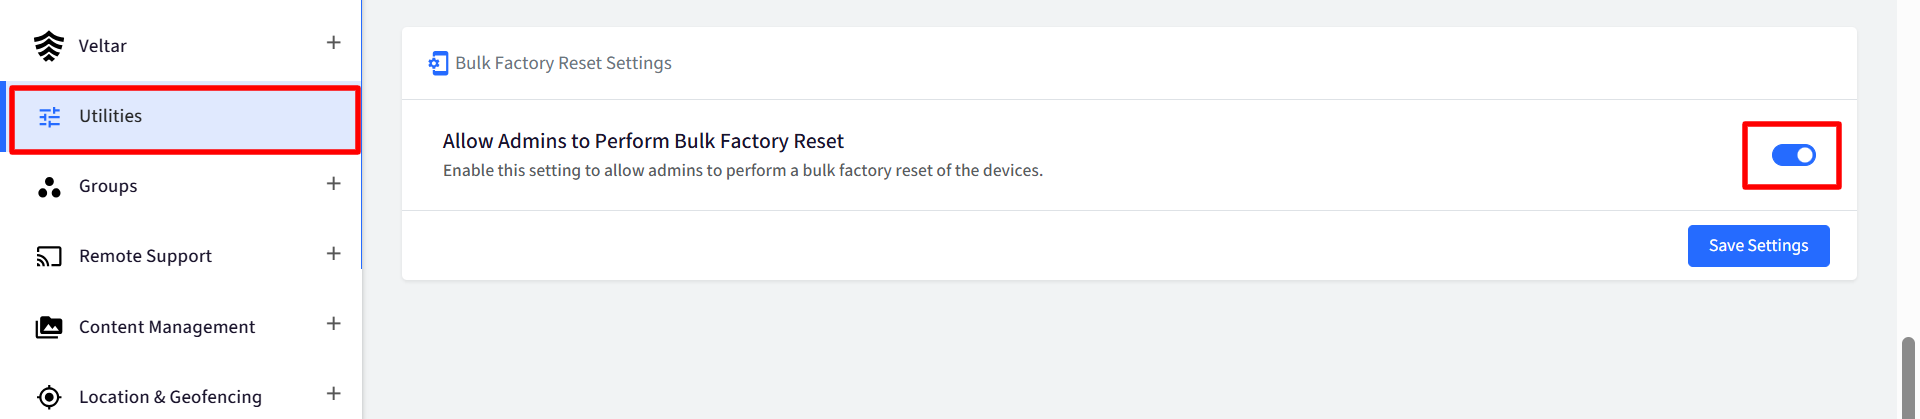
Whenever this setting is enabled or disabled, an Account Activity entry named Bulk Factory Reset Settings Updated is generated, in the Account Activity Report
Who can configure this setting?
The following roles can manage this setting:
Account Owner
Co-Account Manager
Custom Role administrators with the Bulk Factory Reset Settings permission enabled
Initiating a Bulk Factory Reset
Once Bulk Factory Reset Settings is enabled and the administrator has the required permissions, the option becomes available in the Devices section.
Step 1: Open the Bulk Factory Reset option
Log in to the Dashboard.
Navigate to Devices.
Click the three-dot menu.
Select Bulk Factory Reset Devices.
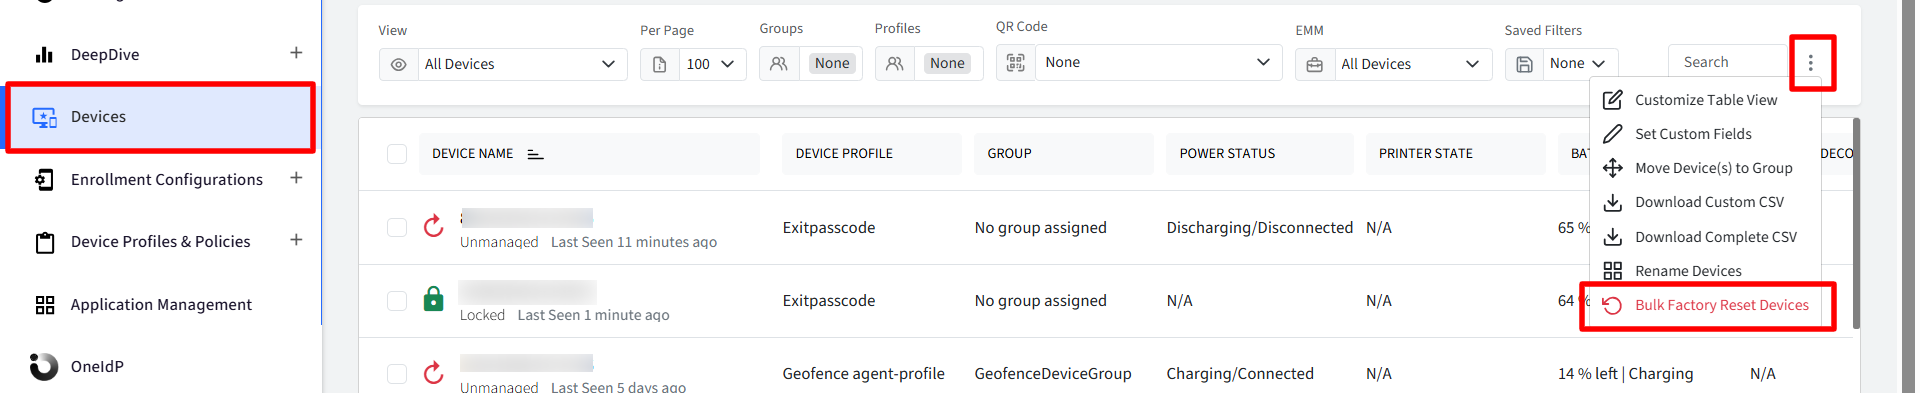
The Bulk Factory Reset Devices wizard opens.
Step 2: Download the sample CSV file
The wizard provides an option to download a sample CSV file from the top-right corner.
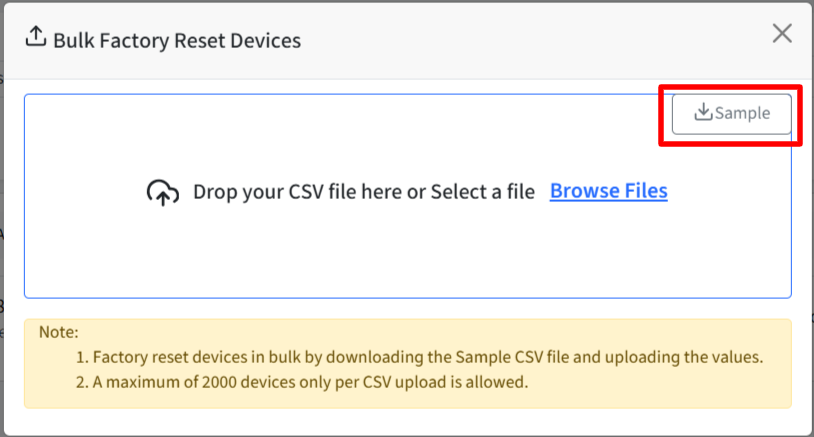
Download the sample file and use it as a reference when preparing the device list.
The CSV file supports the following device identifiers:
device_identifier (device name)
imei
serial_number
Use the downloaded sample CSV to ensure that the file follows the expected structure.
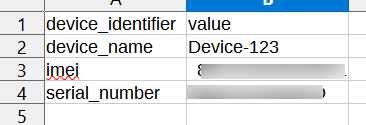
The CSV file must contain not more than 2,000 devices per upload.
Step 3: Upload the CSV file
Open the Bulk Factory Reset Devices wizard.
Drag and drop the prepared CSV file into the upload area, or click Browse Files.
Select the CSV file.
Wait for the system to validate the uploaded device information.
The system checks whether the specified devices exist in the account and whether the administrator is authorized to factory reset them.
Reviewing Upload Results
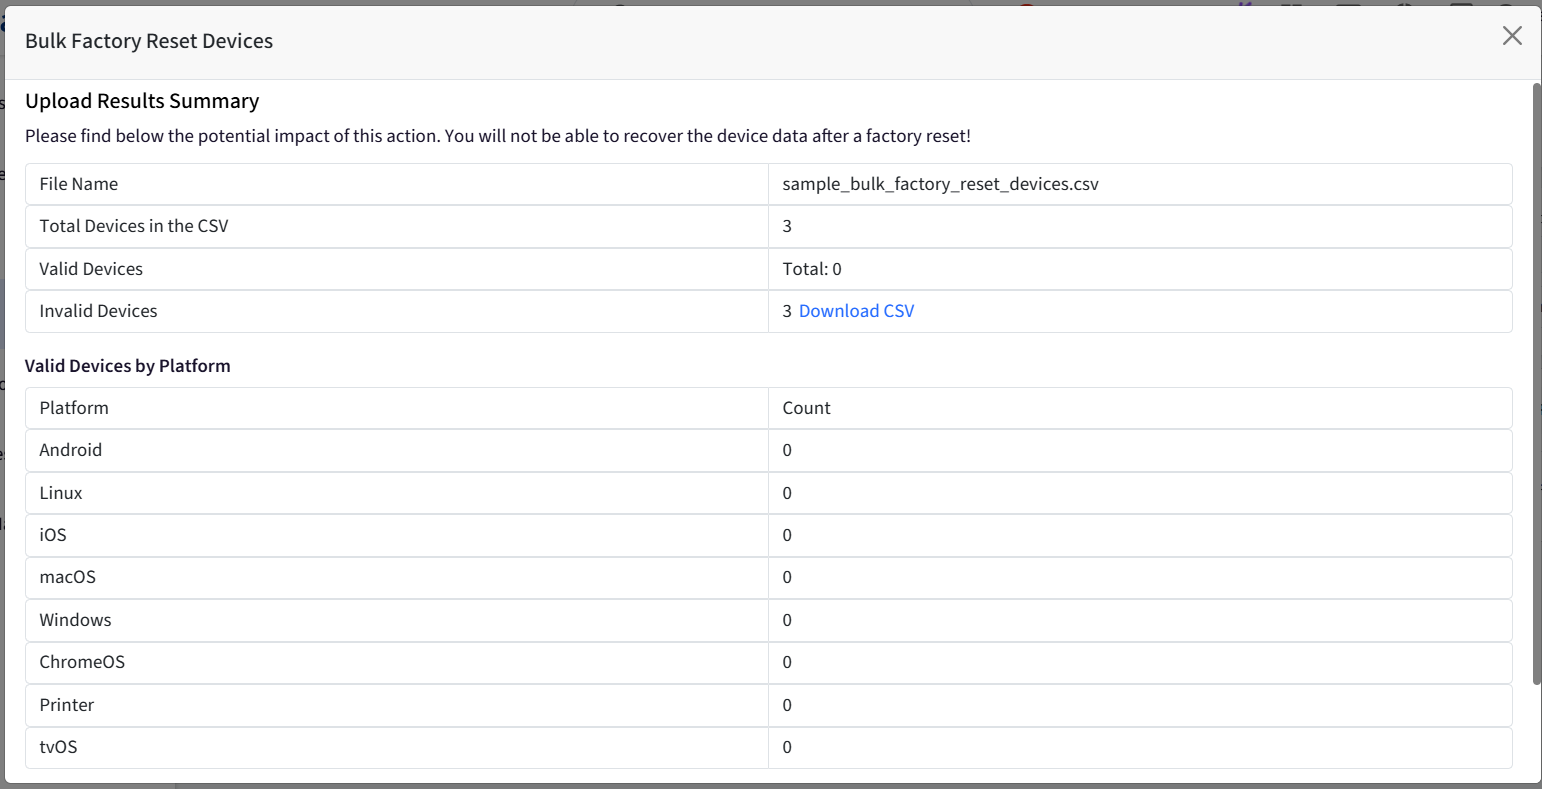
After the CSV file is uploaded and processed, the system displays the Upload Results Summary. This summary helps administrators review the devices identified in the uploaded file before proceeding. The summary contains the following information:
Field | Description |
|---|---|
File Name | Name of the uploaded CSV file. |
Total Devices in the CSV | Total number of device entries in the uploaded file. |
Valid Devices | Total number of devices eligible for the bulk factory reset operation. |
Invalid Devices | Total number of devices that failed validation. |
For invalid devices, the Dashboard provides an option to download a CSV containing the device details and the corresponding validation errors.
Understanding validation errors
The following validation errors may be displayed:
Error | Description |
|---|---|
More than 1 device has the same name | Multiple devices in the account have the same device name, making the identifier ambiguous. |
Not Found | A device with the specified identifier could not be found in the account. |
Not Authorized | The administrator does not have permission to factory reset the specified device. |
Important validation notes:
Devices that do not exist in the account are marked as invalid.
Devices with duplicate names are marked as invalid when the device name is used as the identifier.
Duplicate checks are not performed for IMEI and serial number identifiers.
Group Admins with read/write permissions can only process devices belonging to their assigned groups. Devices belonging to other groups are marked as invalid.
iOS devices configured under Utilities > Apple Settings > Configure Entitlements (for BYO, User-Based, or Account-Driven User Enrollment) will be marked as invalid if the Allow erase setting is disabled.
Android devices that do not support factory reset (such as BYOD and non-EMM enrolled devices) will be marked as invalid
Valid Devices by Platform
The Upload Results Summary also displays a platform-wise breakdown of valid devices.
The following platform categories may be displayed:
Android
iOS
macOS
tvOS
Windows
Linux
Printer
ChromeOS
Each platform displays the number of valid devices identified for that category.
Click Next to proceed to the factory reset configuration screen.
If no valid devices are identified, the Next button remains disabled, and an error notification is displayed.
Configuring Factory Reset Settings
After reviewing the upload summary, click Next to configure the factory reset options.
The Configure Factory Reset Settings screen displays tabs for the platforms identified in the uploaded CSV.
Only platforms containing at least one valid device are displayed.
You can configure the applicable factory reset options for each platform.
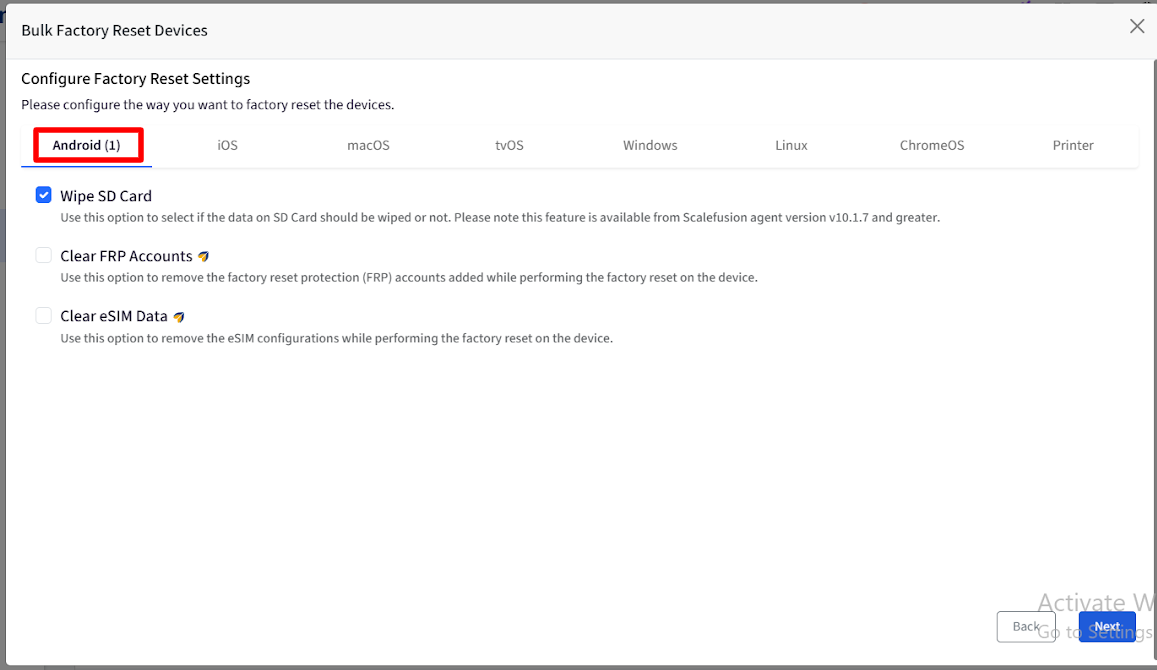
Android
For Android devices, the following options are available:
Option | Description |
|---|---|
Wipe SD Card | Removes data stored on the device's SD card. |
Clear FRP | Clears Factory Reset Protection, subject to device and platform support. |
Clear eSim Data | Removes eSIM configurations |
Click Next to proceed after configuring the required options.
iOS
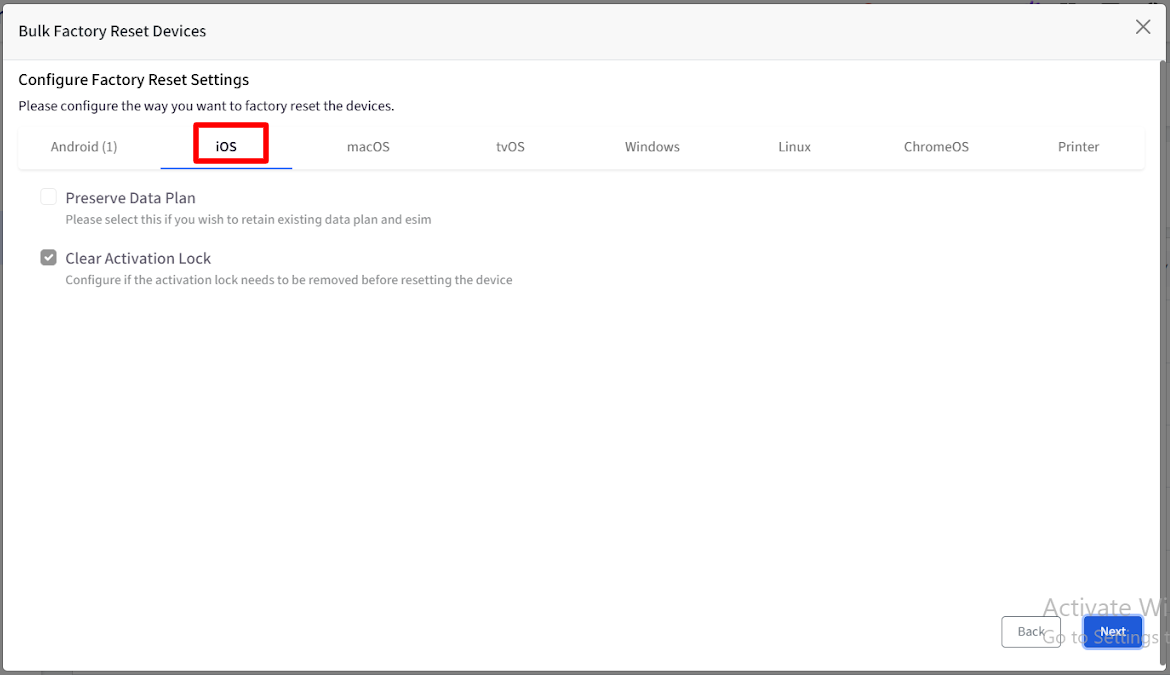
For iOS devices, the following options are available. Configure the required options and click Next.:
Option | Description |
|---|---|
Preserve Data Plan | Preserves the supported cellular data plan during the reset. |
Clear Activation Lock | Clears Activation Lock where supported and authorized. |
macOS
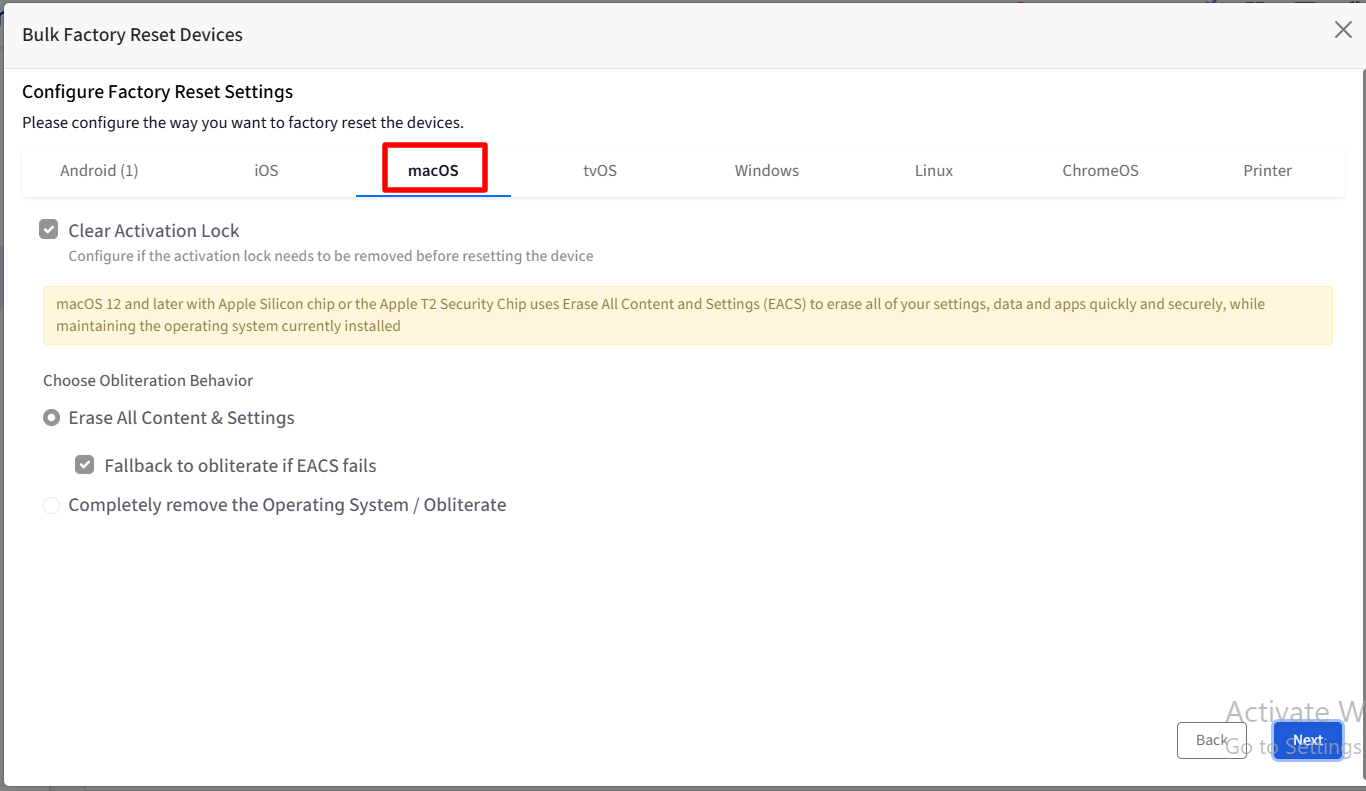
For macOS devices, the following options are available. Review the available options carefully before proceeding:
Option | Description |
|---|---|
Clear Activation Lock | Clears Activation Lock where supported and authorized. |
Erase All Content & Settings | Erases the device's content and settings. |
Fallback to obliterate if EACS fails | Attempts obliteration if Erase All Content & Settings fails. |
Completely remove the Operating System / Obliterate | Performs an obliteration operation to completely remove the operating system. |
Click Next to continue.
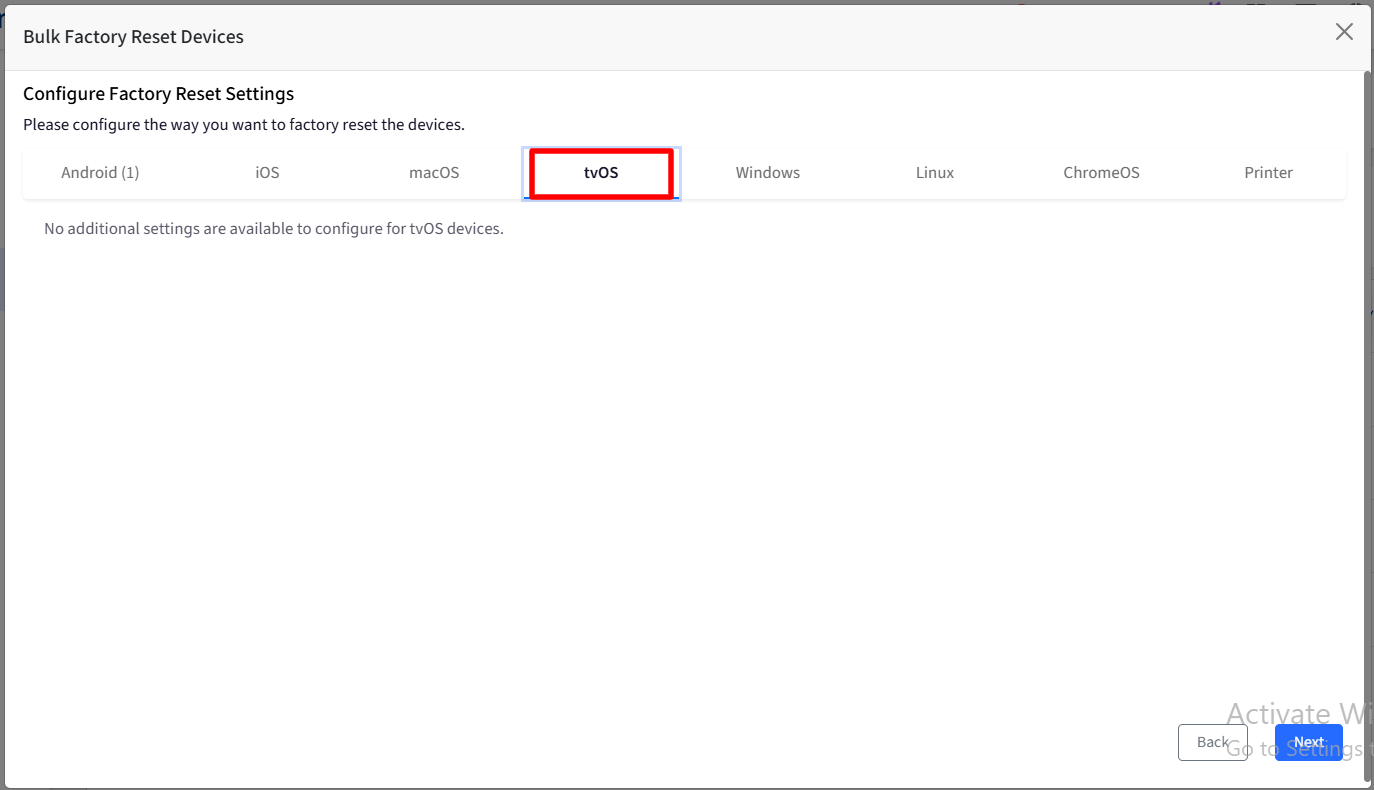
tvOS
For tvOS devices, no additional settings are required to be configured
Click Next.
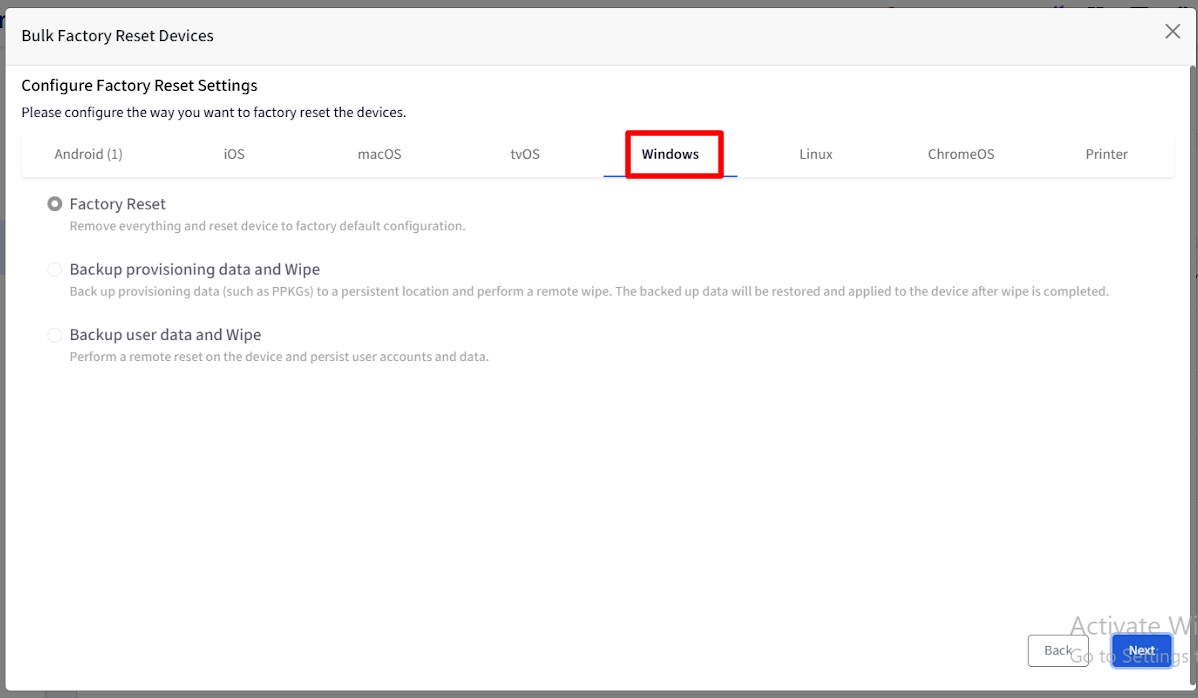
Windows
For Windows devices, the following options are available:
Option | Description |
|---|---|
Performs a factory reset of the device. | |
Back up provisioning data (such as PPKGs) to a persistent location, perform a remote wipe, and then restore and apply the data to the device once the wipe is complete. | |
Resets the device while retaining user accounts and data. |
Select the required factory reset option and click Next.
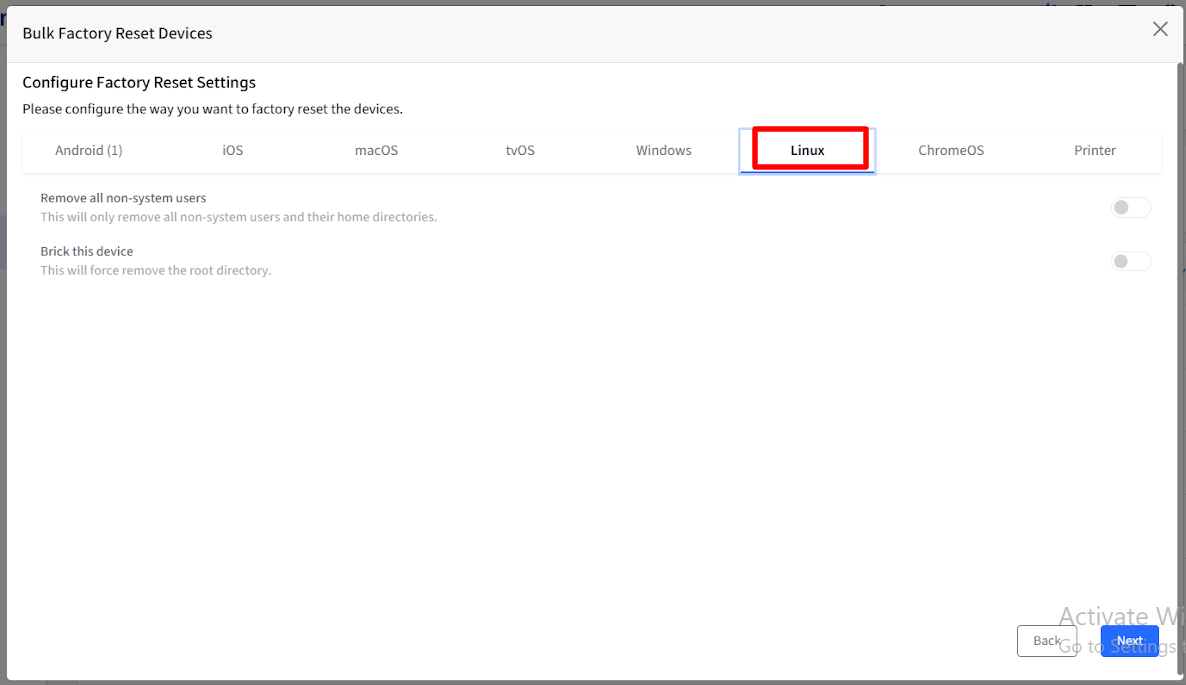
Linux
For Linux devices, the following options are available:
Option | Description |
|---|---|
Remove all non-system users | Removes all non-system user accounts. |
Brick this device | Initiates the device-bricking operation. |
Warning: The Brick this device option is destructive and may render the device unusable. Select it only when explicitly required and authorized.
Click Next to continue.
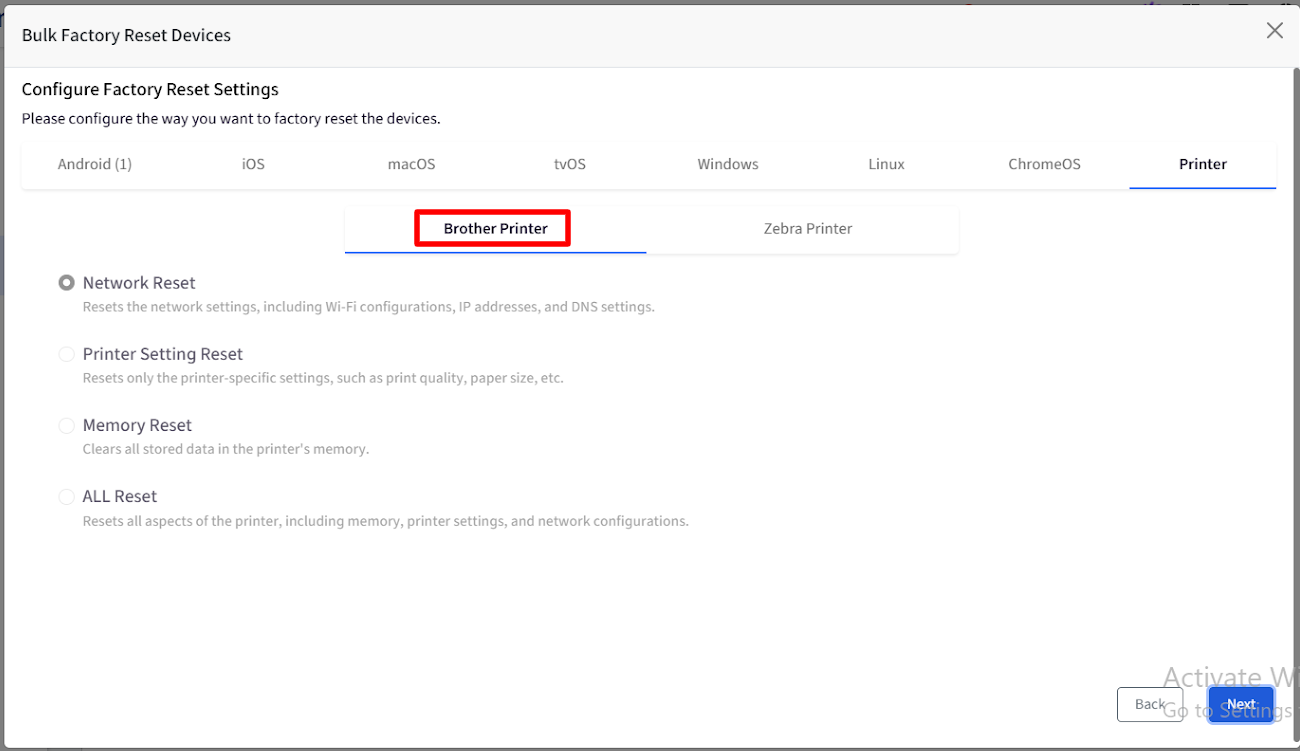
Printers
Bulk Factory Reset supports Brother and Zebra printers.
Brother Printers
The following options are available:
Option | Description |
|---|---|
Network Reset | Resets the printer's network configuration. |
Printer Setting Reset | Resets the printer settings. |
Memory Reset | Resets the printer memory. |
All Reset | Performs a complete reset of the printer. |
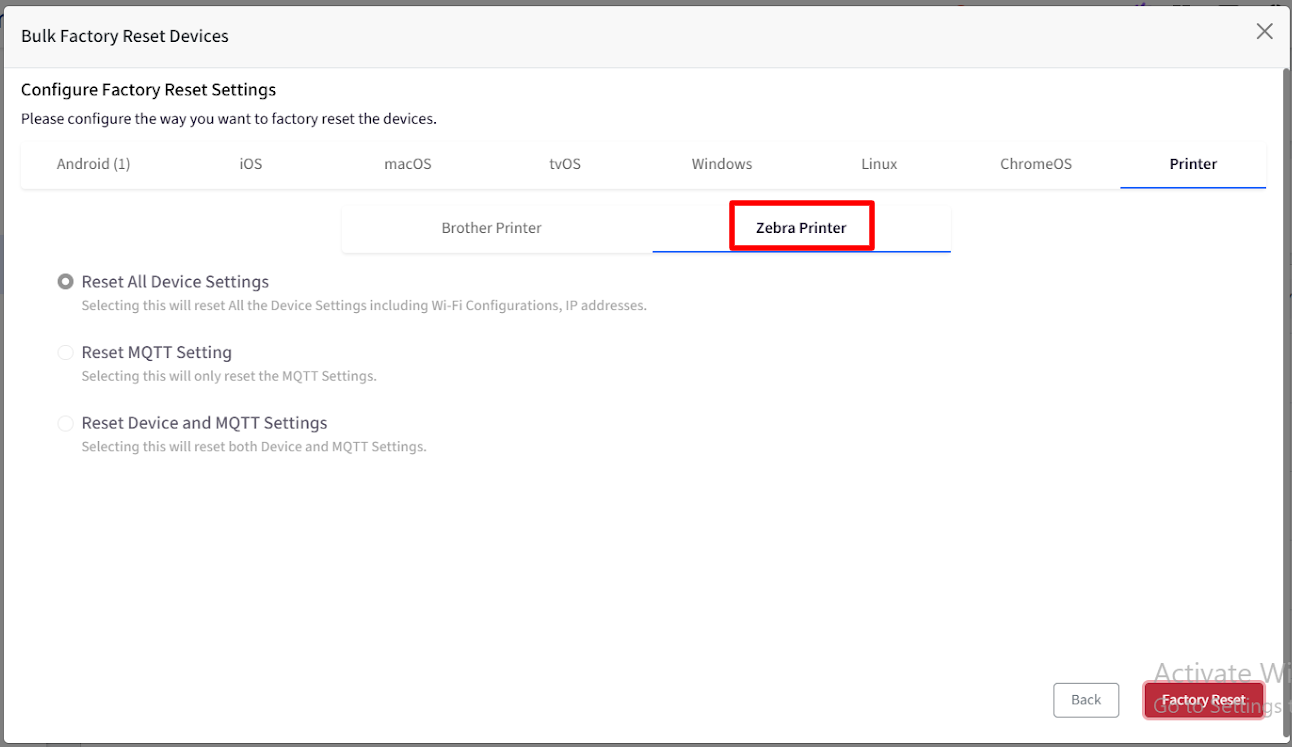
Zebra Printers
The following options are available:
Option | Description |
|---|---|
Reset All Device Settings | Resets all device settings. |
Reset MQTT Setting | Resets the MQTT configuration. |
Reset Device and MQTT Settings | Resets both device and MQTT settings. |
Configure the required options for each printer type and proceed.
ChromeOS
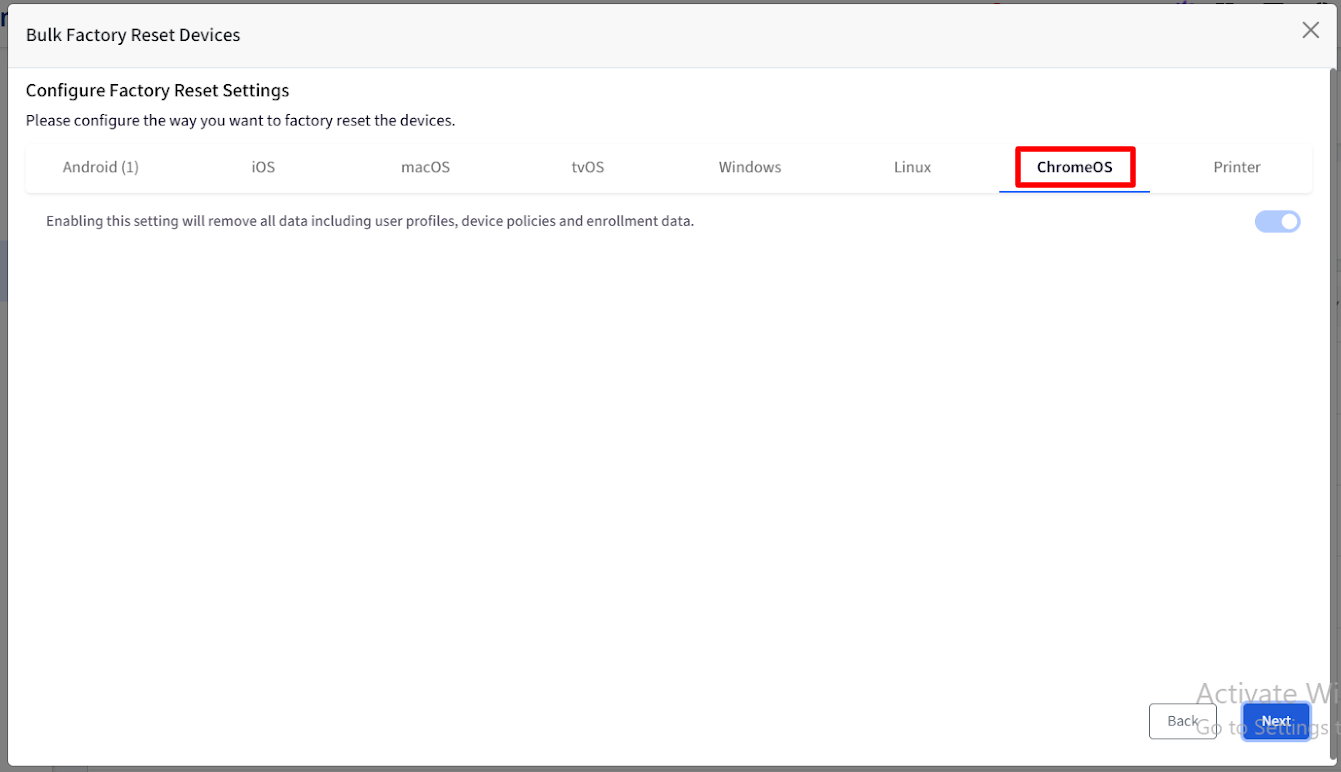
ChromeOS devices follow a predefined factory reset configuration. The setting is enabled by default and cannot be disabled or modified by administrators. When a valid ChromeOS device is included in the uploaded CSV file, the system performs a factory reset that removes:
Device data
User profiles
Device policies
Enrollment data
Important: ChromeOS factory reset is mandatory for valid ChromeOS devices included in the bulk operation. You cannot disable this behavior.
Confirming the Factory Reset Action
After configuring the factory reset settings for all applicable platforms, confirm the operation.
Review the selected factory reset options.
Click the factory reset action to initiate the confirmation process.
The Confirm Action window appears.
Enter your Dashboard login password.
Click Submit to confirm the action.
Once submitted, the devices are queued for processing according to the configured workflow.
Important: Submitting the request does not mean that every device has already completed its factory reset. Devices are processed through the applicable factory reset workflow.
Maker-Checker Approval
If Maker Checker is enabled for the Factory Reset Device action, bulk factory reset requests also follow the Maker Checker approval workflow. In this:
The administrator initiating the bulk factory reset acts as the Maker.
The designated Approver Admin reviews the request.
The Approver Admin can approve or reject the affected devices.
Tracking Bulk Factory Reset Activities
Administrators can track bulk factory reset operations through the Dashboard's Account Activity section.
Frequently Asked Questions
Q1. Can I factory reset more than one device at a time?
Yes. You can factory reset multiple devices by uploading a CSV file containing their identifiers. A maximum of 2,000 devices is allowed per upload.
Q2. What happens if my CSV contains invalid devices?
The system identifies invalid devices and provides a downloadable CSV containing the affected device identifiers and their corresponding error messages. You can correct the errors and upload the file again.
Q3. Can I proceed if some devices are invalid?
Yes. You can proceed with the valid devices as long as at least one valid device is identified.
Q4. Does the success message mean all devices have been factory reset?
No. The success message confirms that the devices have been queued for processing. Actual factory reset completion depends on the applicable device and processing workflow.