SCIM Outbound Connectors in Scalefusion OneIdP provide a seamless way to automatically provision, update, and de-provision users and groups across your external applications. By acting as the source of identity, OneIdP securely pushes user and group information such as new account creation, attribute updates as well as access removal to any application that supports the SCIM (System for Cross-domain Identity Management) standard.
This ensures consistent, real-time synchronization of identity data, simplifies onboarding and offboarding, and helps IT and HR administrators centrally manage the complete user lifecycle from the OneIdP console.
This article provides a comprehensive overview of how to set up and manage SCIM Outbound Connectors in Scalefusion OneIdP.
SCIM Providers/applications we support
Amazon Web Services
Apple Business Manager
Apple School Manager
Atlassian
Auth0
Any SCIM2.0
Pre-requisites
Users should be migrated to OneIdP
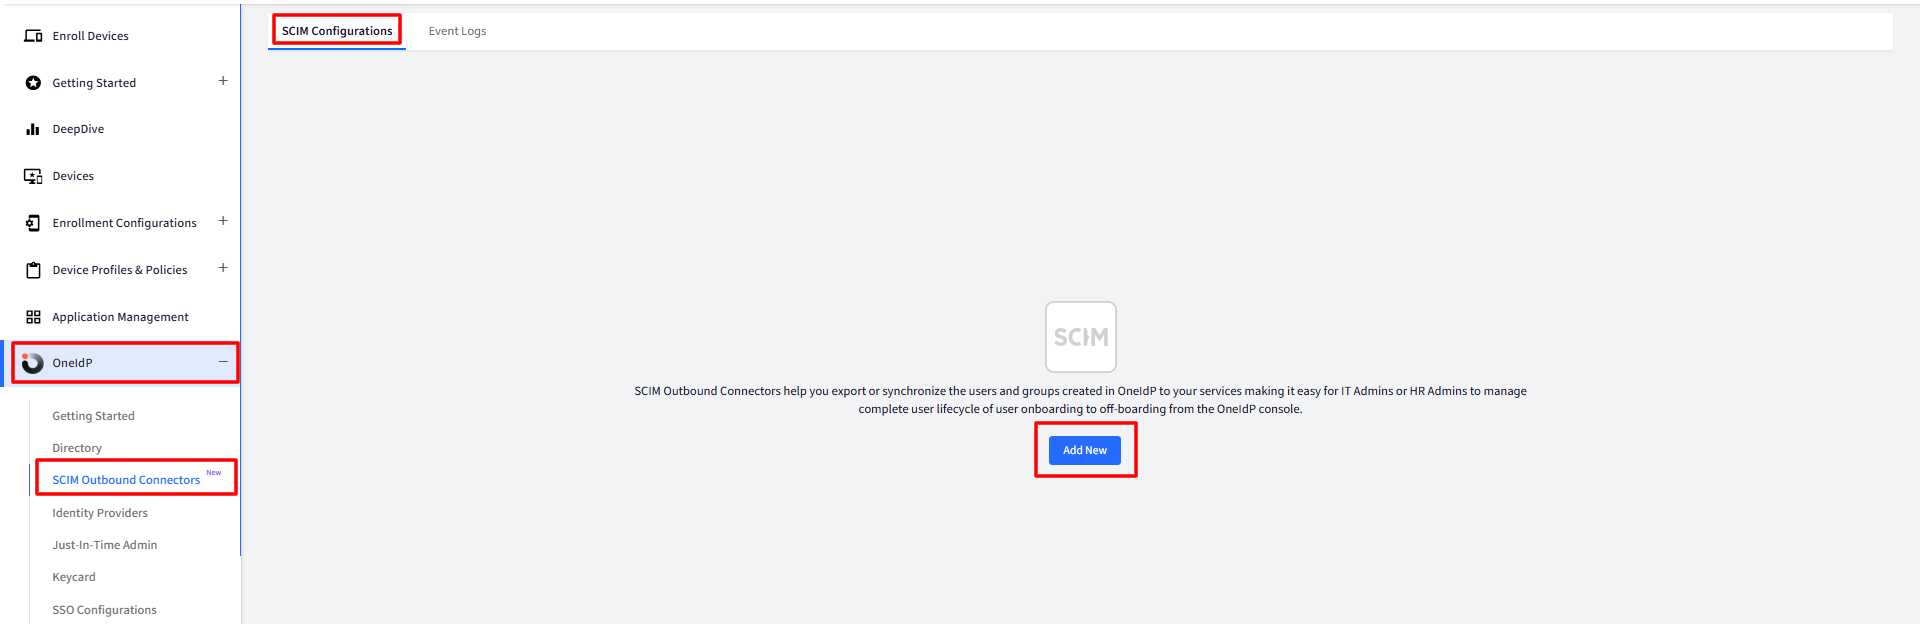
Step 1: Configure SCIM outbound connectors on Scalefusion Dashboard
Navigate to OneIdP > SCIM Outbound Connectors and click on Add New
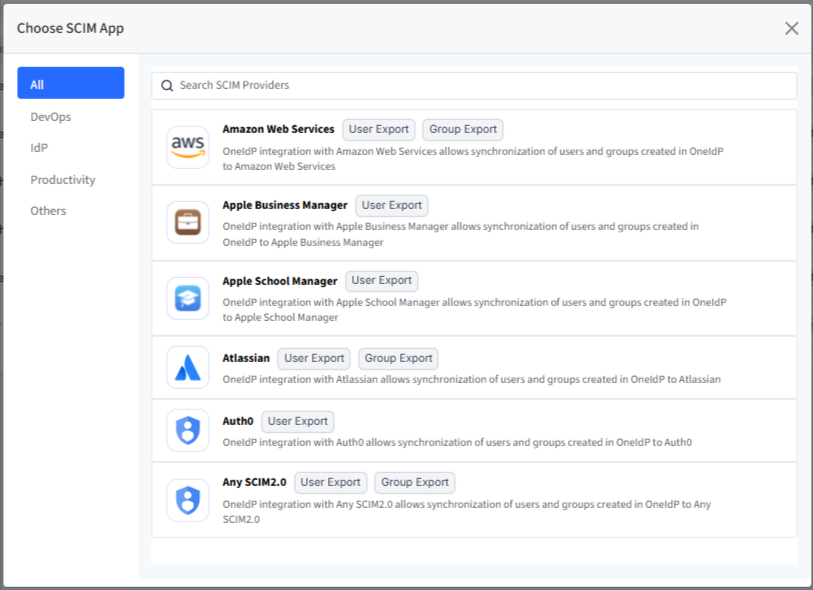
In the Choose SCIM App window, select the app for which you want to configure SCIM outbound connector
This brings up the dialog for configuring SCIM for the selected application. Enter the following details:
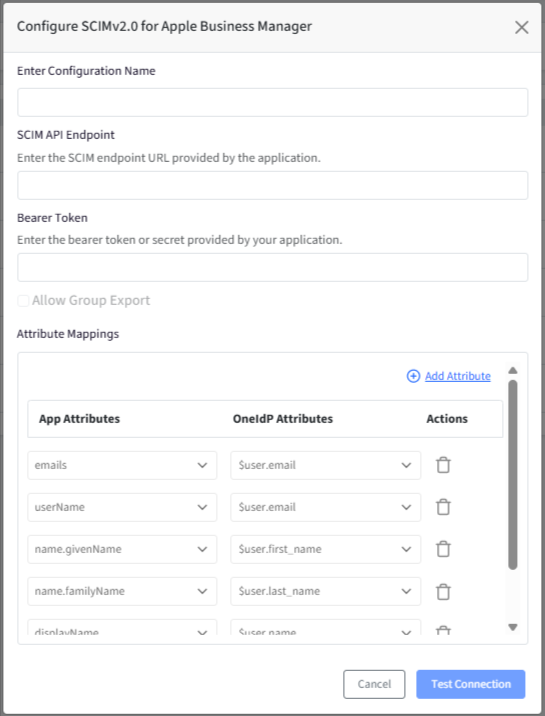
Enter Configuration Name
SCIM API Endpoint: Enter the SCIM endpoint URL provided by the application.
Bearer Token: Enter the bearer token as provided by the application.
Note: The SCIM API Endpoint and Bearer Token must be obtained from the application’s console. Refer to the respective application documentation for detailed steps.Allow Group Export: Enable this option if you want OneIdP to export user group assignments to the connected SCIM application. Allow Group Export will be enabled only if the SCIM application supports Group Export. This is indicated when you choose the SCIM application for configuring SCIM connector.
Attribute Mapping: Allows you to map OneIdP user attributes to the corresponding attributes expected by the SCIM application.
OneIdP Attributes: Attributes available in OneIdP.
App Attributes: Attributes required by the SCIM application.
Default Mappings
These are generated automatically. By default, OneIdP uses the user’s email for both the username and email fields.
OneIdP Attribute
App Attribute
user.email
username
user.email
email
user.firstName
firstName
user.lastName
lastName
user.phoneNumber
phoneNumber
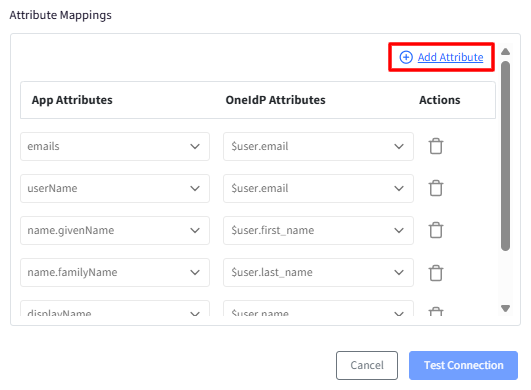
Adding Custom Mappings
Click Add Attribute to create additional mappings. This will add an additional row where you can select any custom OneIdP user attribute and map it to the corresponding attribute key expected by the SCIM application.
After entering all details, click on Test Connection. Test Connection will be enabled only after entering the details.
Next, click on Save
The newly created configuration will appear in the list of configurations with details under different heads. These are explained in detail below under Managing Configurations section.

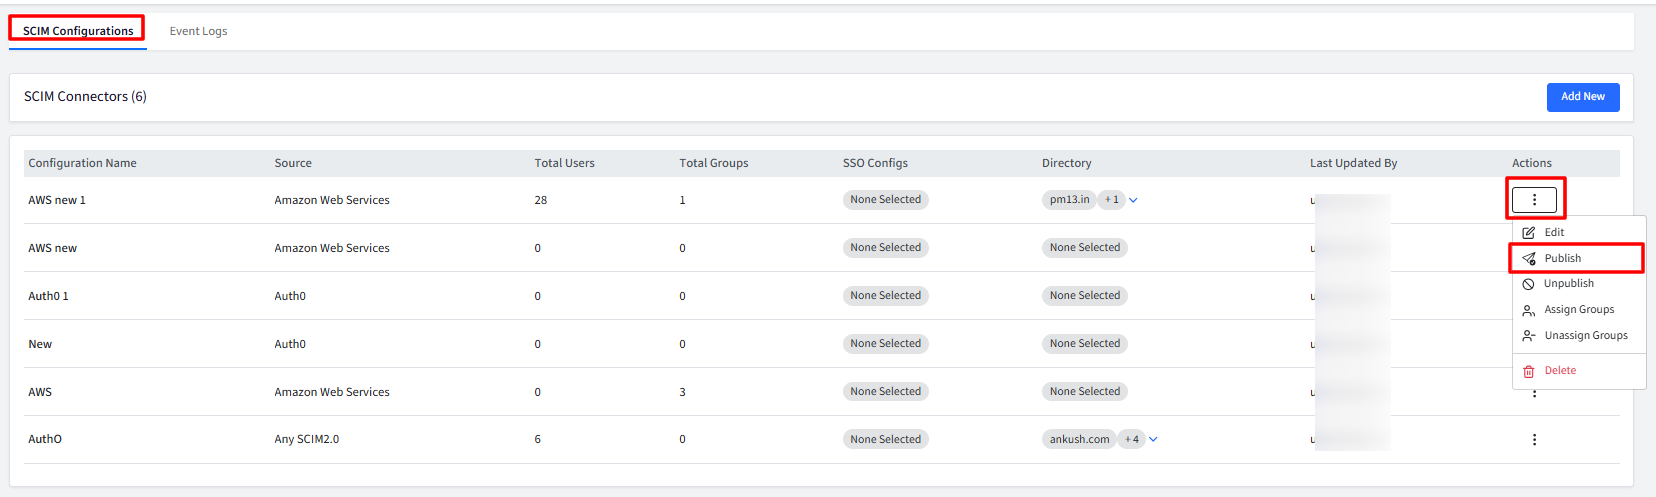
Step 2: Publish Configuration
The next step is to publish the configuration to sync users/groups onto the SCIM app.
Click on Publish under Actions, corresponding to the SCIM configuration you have created.
This will open publish dialog. Select the Directory and/or SSO Configurations you want to associate with this SCIM configuration.
Important Points to Note for publishing:
A Directory can be linked to multiple SCIM configurations.
An SSO configuration can be linked to only one SCIM configuration at a time.
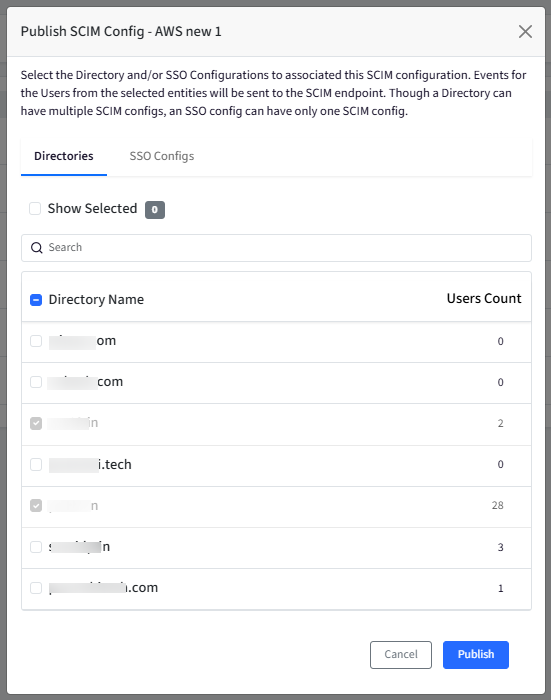
When the SCIM configuration is saved and published to the selected Directory or SSO configuration, OneIDP automatically syncs the users, and they will be listed in the user section of the connected SCIM application.
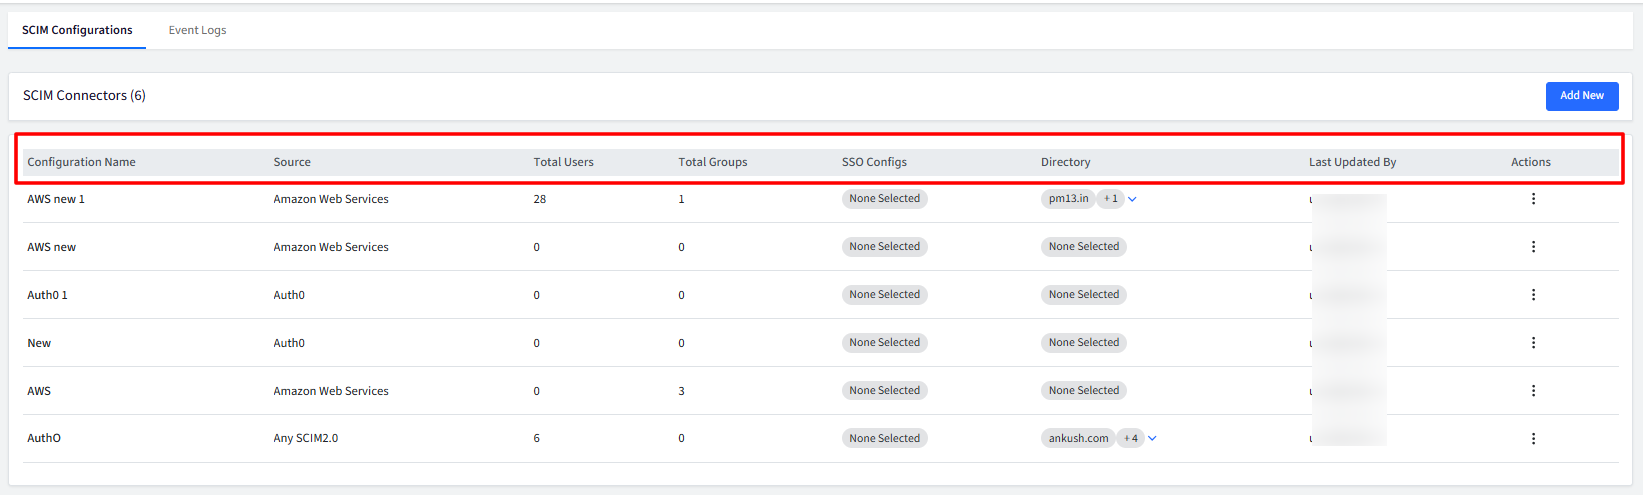
Managing Configurations
Configuration Name: The name of the SCIM connector.
Source: The SCIM application for which you have configured SCIM connector.
Total Users: The total number of users linked to the directory or SSO configuration where SCIM is enabled, representing all users successfully synchronized to the SCIM application.
Total Groups: The total number of groups successfully synchronized to the SCIM application.
SSO Configs: Displays the name(s) of linked SSO Configurations. Clicking the hyperlink opens a pop-up showing the full list of SSO configurations where the connector is published.
Directory: Displays the name(s) of linked directories. Clicking the hyperlink opens a pop-up showing all directories where the connector is published.
Last Updated By: Username of the user who last updated the configuration
Actions: Available actions include:
Edit
Publish
Unpublish: Unpublishes the SCIM config. The users already existing on SCIM app will remain there unless you check the flag Delete users from the target SCIM app
Assign Groups: With this you can assign the SCIM configuration to user groups. Select the Groups which you want to be synchronized to the SCIM app. Please note that the SCIM app should support handling of groups. You can assign Group only if Allow Group Export is enabled for the config.
Unassign Groups: Allows the Admins to un-assign the groups.
Delete: Deleting the configuration will stop syncing users and groups to the target SCIM application.
Please note that users and groups already synchronized will not be removed. If you want them deleted as well, unpublish the configuration first, then delete it again.
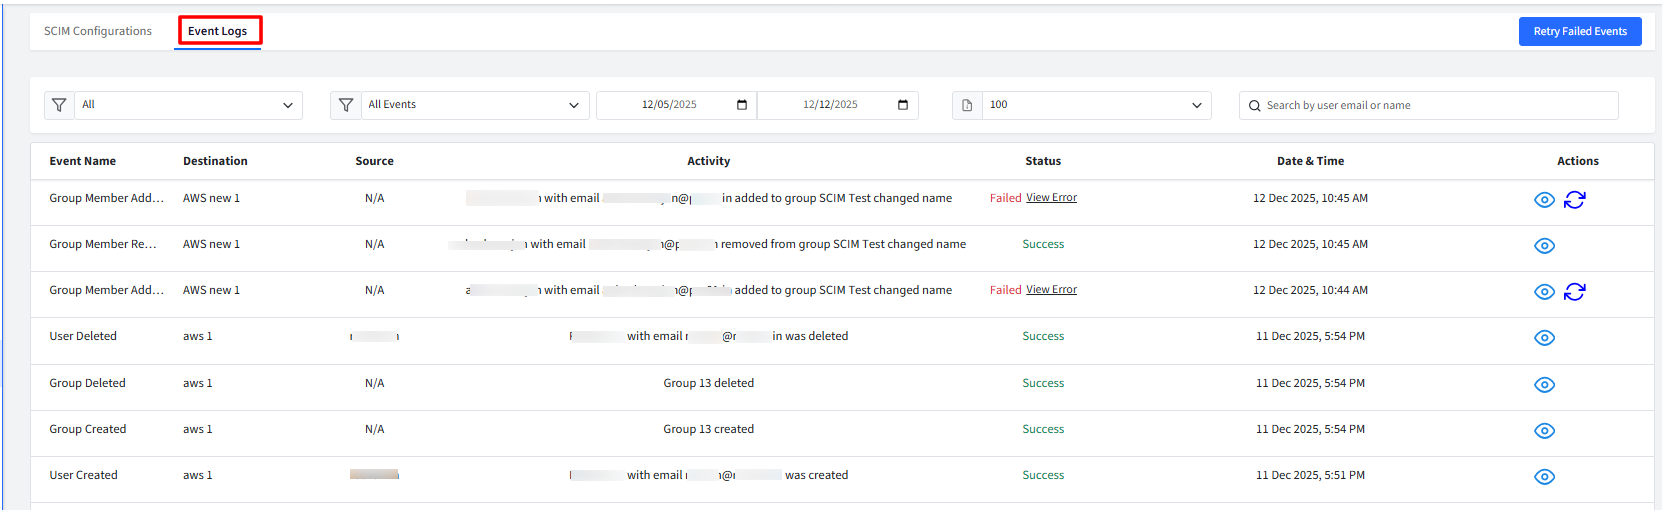
Event Logs
For every action performed by a SCIM outbound connector, system automatically creates event logs. These logs help you understand what activities have taken place, and which SCIM configuration was involved.
How Event Logging Works
Permanent Logs: Event logs remain in the system even if the associated SCIM configuration is deleted. To ensure this, each log stores a full copy of the relevant event details rather than a reference to the original configuration.
Log Retention & Rotation: Logs are kept for 30 days. After that, they are automatically rotated and removed to keep storage manageable.
What Each Event Log Contains
Every log entry includes the following details:
Event Name: The type of action that occurred. This can be any of the following:
User Created
User Updated
User Deleted
Group Created
Group Updated
Group Deleted
Group Member Added
Group Member Removed
Destination: The specific SCIM configuration that triggered the event.
Source: The directory or SSO configuration involved in the event.
Activity: Description summarizing the event.
Status: Displays status of the event as Success or Failed. If Failed, click on View Error to view the error logs.
Timestamp: The exact date and time when the event occurred. The time is based on the dashboard’s configured timezone.
Actions: Clicking the eye icon displays details of the event
Multiple Logs for a Single Event
If one event triggers synchronization to multiple SCIM configurations, the system creates separate log entries for each one to ensure accurate tracking.
FAQs
Does the SCIM outbound connector create user passwords in the SCIM provider’s console?
No. The SCIM outbound connector does not create or manage user passwords in the SCIM provider’s console. Password creation and management is being handled directly within the Identity provider’s (Scalefusion) system or through its supported authentication methods.
If an admin updates a user’s details in the Scalefusion Dashboard, how long will it take for those changes to reflect in the SCIM application?
When an admin makes changes to a user’s details in the Scalefusion Dashboard, it typically takes up to 1 minute for the updated user details to sync and appear in the SCIM application. This applies only to changes initiated by an admin.