Honeywell EZConfig allows administrators to configure Honeywell Android devices by importing XML-based configuration files. These configurations can include device settings, Wi-Fi configurations, scanner settings, and data collection parameters.
XML configurations generated using Honeywell EZConfig Editor or Enterprise Provisioner can be remotely deployed to Scalefusion-managed Honeywell devices using the Send Broadcast Remote Command.
This can be achieved using the existing Send Broadcast command available in the Scalefusion Dashboard. The XML file is first published to the device using Content Management (FileDock), after which a broadcast is sent to trigger the Honeywell EZConfig XML import process.
Let's learn how to deploy Honeywell EZConfig XML configurations on Scalefusion-managed devices.
Pre-requisites
The Honeywell Android device should be enrolled with Scalefusion in Kiosk or Agent mode.
Honeywell EZConfig / Power Tools should be available on the device.
An XML configuration file should be generated using Honeywell EZConfig Editor or Enterprise Provisioner.
The administrator should have access to Content Management and Remote Commands on the Scalefusion Dashboard.
Steps to deploy Honeywell EZConfig XML configurations on devices
Step 1: Publish the XML configuration using Content Management
The recommended way to deploy Honeywell XML configuration files is through Scalefusion Content Management (FileDock).
Before publishing the XML file, ensure that it is uploaded to the correct folder location. Honeywell devices running Android 7 and later, with the default restricted mode configuration, process EZConfig files only when they are stored under the following directory:
/sdcard/honeywell/
Files can also be stored in subfolders such as:
/sdcard/honeywell/persist/
Important: FileDock uses the Mobilock folder as its default Android storage location. Honeywell EZConfig will not import configuration files stored in this default folder. Therefore, the XML files must be published to a custom or additional location under /honeywell.
1.1 XML filename and folder requirements
Depending on the type of configuration being deployed, the XML file must follow the corresponding naming convention.
Configuration type | Publish to folder | Required filename |
|---|---|---|
Device / Wi-Fi / System settings |
|
|
Scanner / Data Collection |
|
|
Provisioner tasks |
|
|
The corresponding file paths on the device will be:
Device configuration:
/sdcard/honeywell/DeviceConfig.xmlData Collection configuration:
/sdcard/honeywell/persist/DataCollectionService.xmlProvisioner configuration:
/sdcard/honeywell/persist/Provisioner.xml
Filename requirements:
Honeywell EZConfig uses case-sensitive filename matching. The required configuration filename must remain intact.
Valid filename | Invalid filename |
|---|---|
|
|
|
|
|
|
A prefix before the required configuration filename is allowed. However, additional characters after the required configuration name are not allowed.
The folder name must always be honeywell (all lowercase).
1.2 Upload the XML file to the Scalefusion Dashboard
Navigate to Content Management > Content on the Scalefusion Dashboard.
Click Upload File.
Select Upload from Computer and choose the XML configuration file (for example,
SF_DeviceConfig.xml).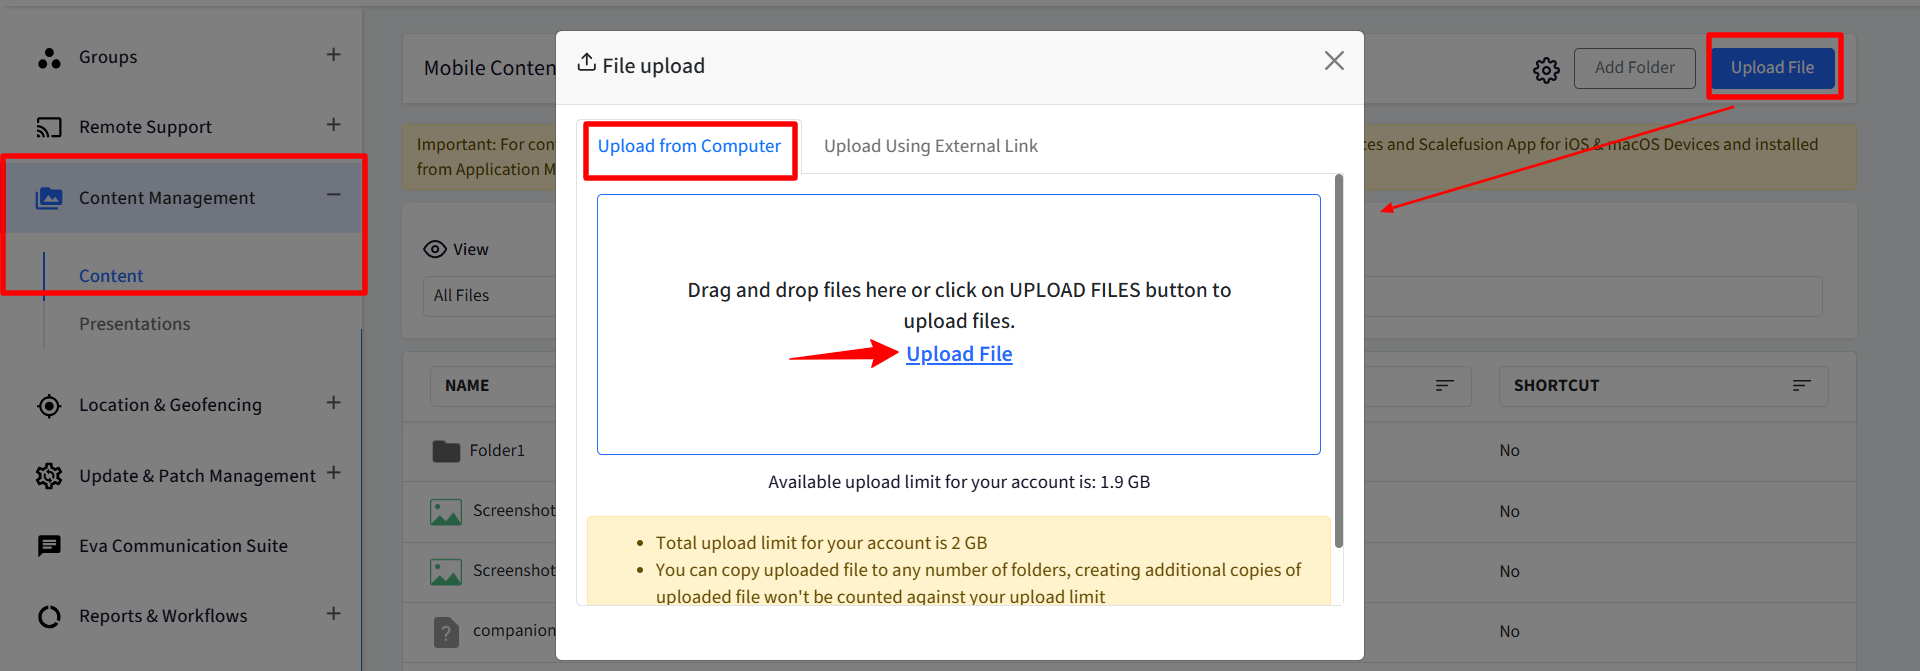
Once uploaded, select the file on the dashboard and verify that its filename ends with the required configuration name:
DeviceConfig.xmlDataCollectionService.xmlProvisioner.xml
If required, rename the file on the dashboard to follow the naming convention.
Alternatively, you can create folders using Add Folder (for example, honeywell or honeywell/persist), upload the XML file into the appropriate folder, and publish the folder to devices.

1.3 Configure FileDock to use the Honeywell folder
The XML configuration must be published to /honeywell instead of the default /Mobilock directory.
There are two ways to configure the storage location.
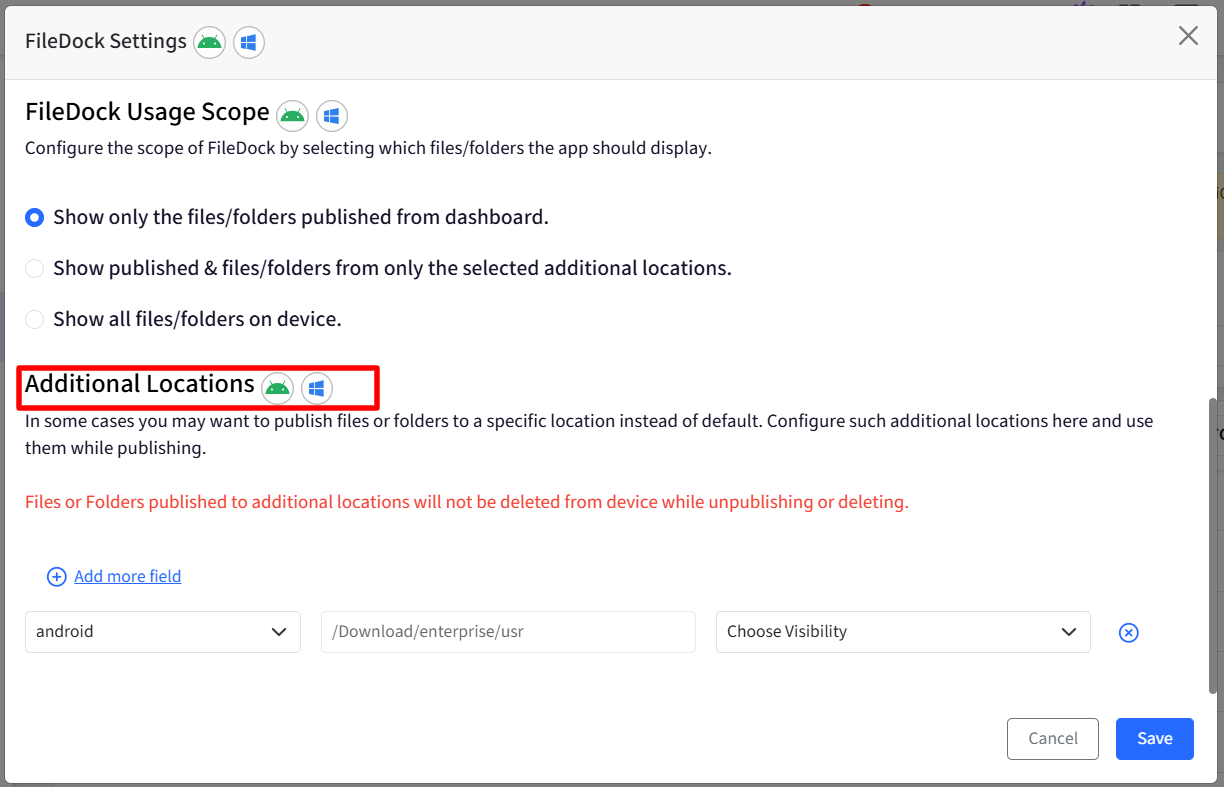
Option 1: Configure Additional Locations (Recommended)
This option allows you to retain the existing Mobilock location for other published content while storing Honeywell XML configurations separately.
Navigate to Content Management > Content > Settings (FileDock Settings).

Under Additional Locations, click Add.
Select Android as the platform.
Enter
/honeywellas the location path.If you also need to publish files under the persist directory, add another location with the path
/honeywell/persist.Click Save.
Option 2: Configure a Custom Primary Folder Location
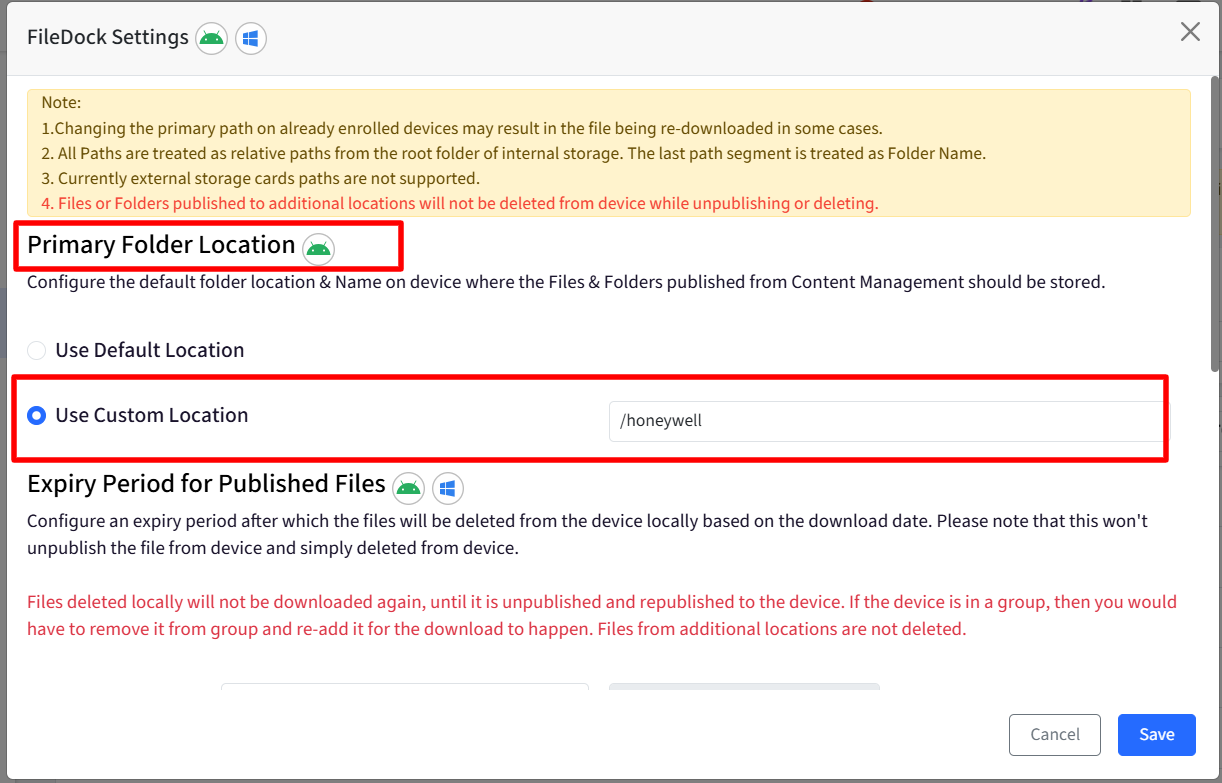
Use this option only if Honeywell XML configurations are the primary content being published to Android devices.
Note: Changing the primary folder location to /honeywell will also move the storage location of existing Mobilock content.
Navigate to FileDock Settings.
Under Primary Folder Location, select Use Custom Location.
Enter
/honeywellas the folder path.Click Save.
1.4 Publish the XML file to devices
Once the folder location is configured, publish the XML configuration file.
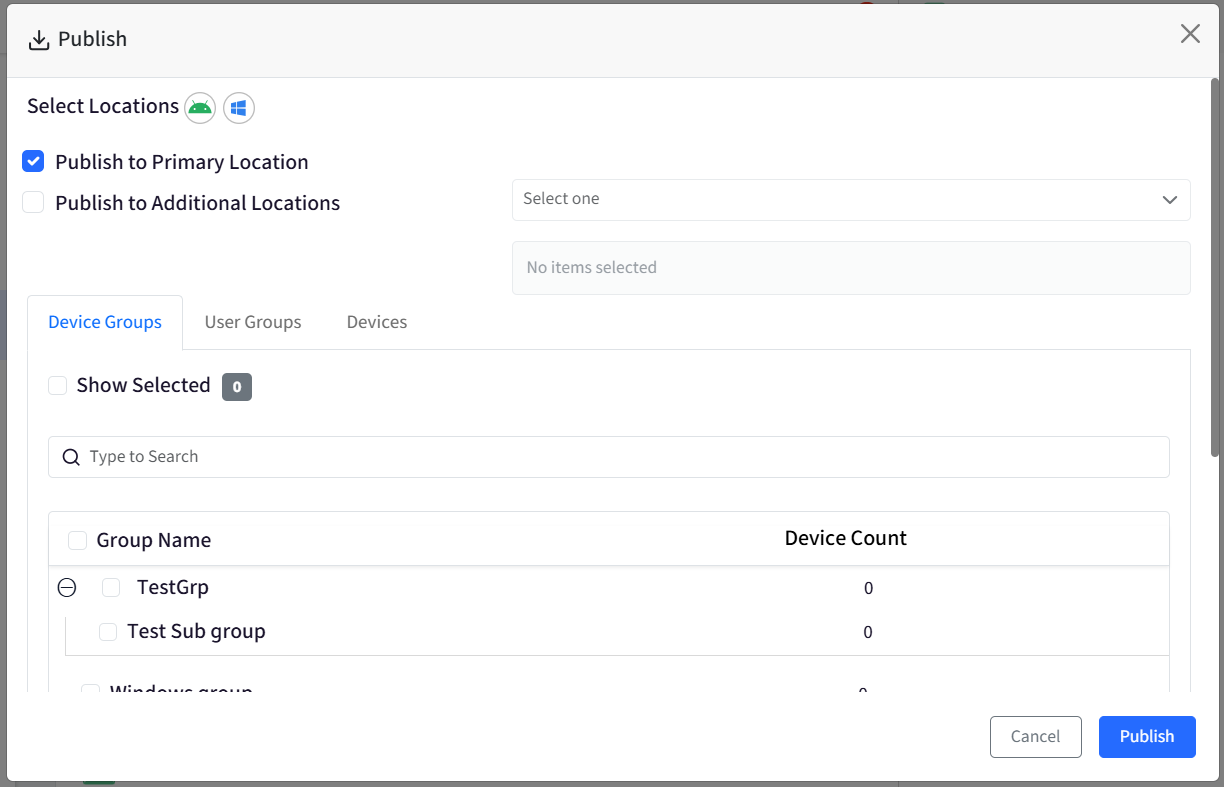
In Content Management, select the uploaded XML file and click Publish.
Choose the target Device Groups, User Groups, or individual Devices.
If Additional Locations are configured, select the appropriate location (
/honeywellor/honeywell/persist) instead of publishing only to the Primary / Mobilock location.Click Publish.
Wait for FileDock to download the file to the target devices.
You can verify the download using the Downloaded On information in the file panel. This information updates after analytics synchronization.
You can also verify the file directly on the device using File Manager by navigating to the honeywell or honeywell/persist folder.
Important: Ensure that the XML file exists at the intended device storage path before executing the Send Broadcast command.
Alternative: Using File Sync
If Content Management is unavailable, you can use Remote File Management / File Sync to upload the XML configuration file directly into the appropriate
honeywellfolder on the device.
Step 2: Create a Send Broadcast Remote Command
After the XML configuration file has been successfully downloaded to the device, create a Send Broadcast Remote Command to trigger the Honeywell EZConfig import process.
On the Scalefusion Dashboard, navigate to Remote Support > Remote Commands.
Click Create.
Select Send Broadcast from the available Remote Commands.
The Send Broadcast command uses the same configuration fields as Launch Activity / Launch Service.
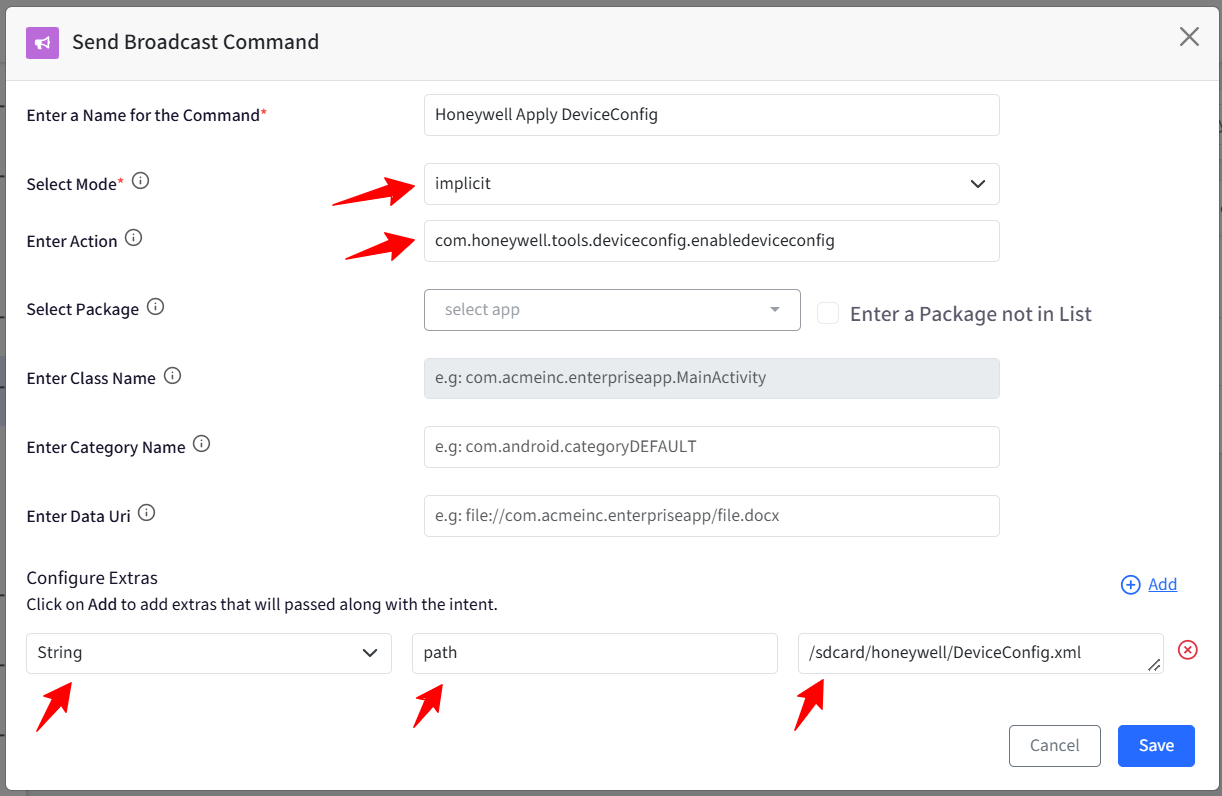
Configure the command using the following parameters.
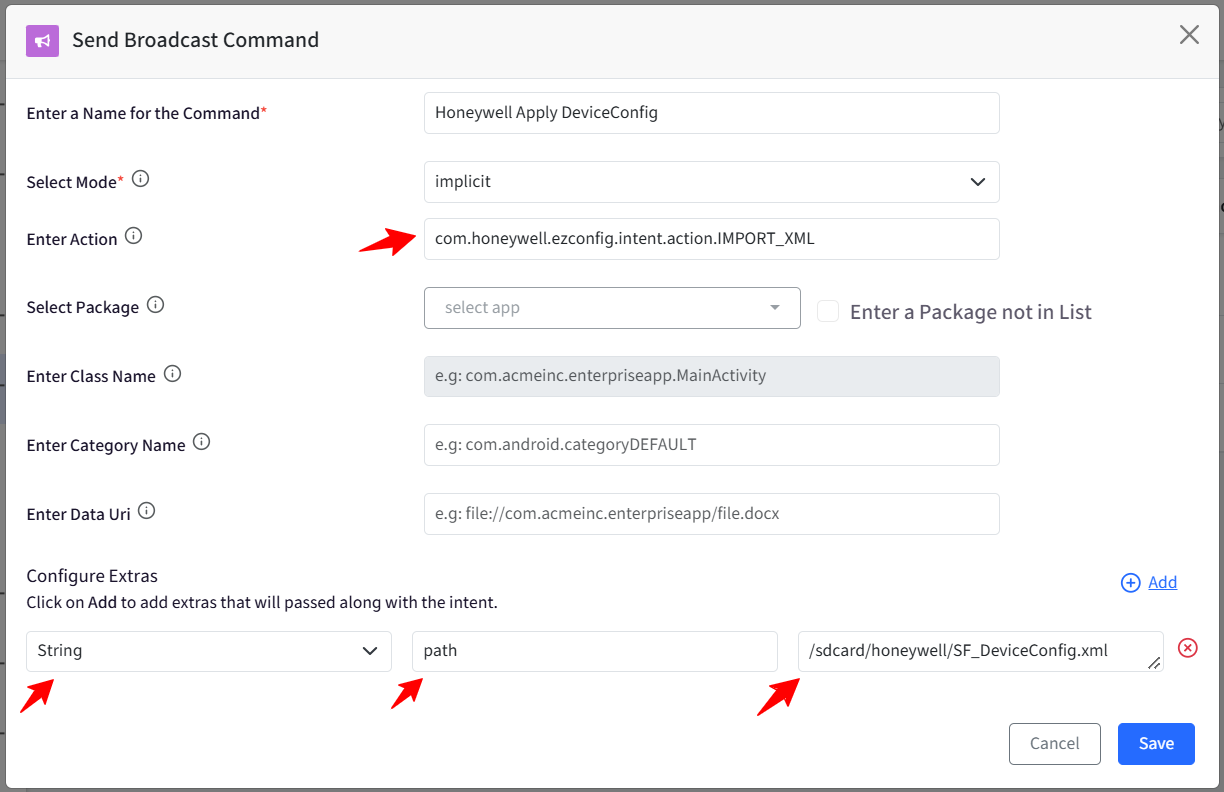
2.1 DeviceConfig.xml (Android 7 and later – Recommended)
For device-level configurations, use the following settings:
Field | Value |
|---|---|
Name | Honeywell Apply DeviceConfig |
Mode | Implicit |
Action |
|
Package | Leave empty |
Class Name | Leave empty |
Category | Leave empty |
Data URI | Leave empty |
Data Type | Leave empty |
Configure the Extra:
Extra Type | Key | Value |
|---|---|---|
String |
|
|
Note: The Extra Key must be path. The Value must contain the complete on-device file path, including the XML filename.
2.2 DataCollectionService.xml
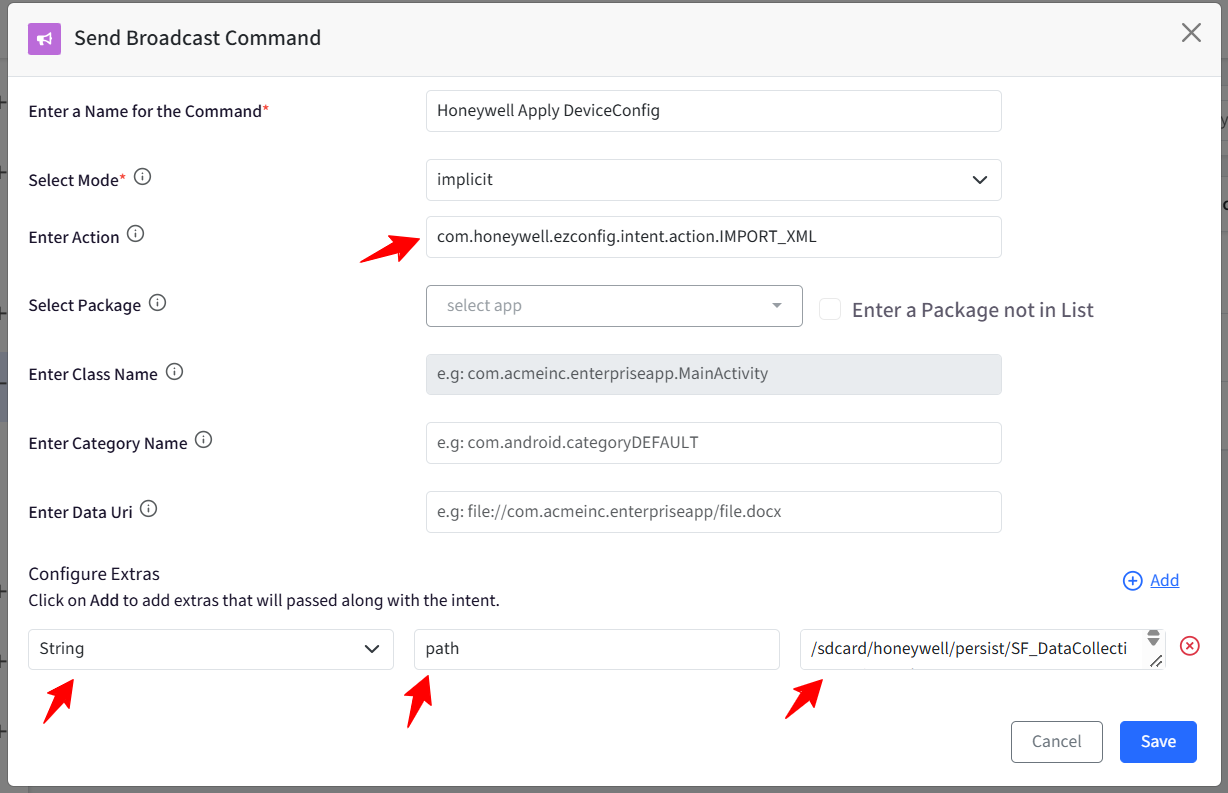
For scanner and data collection configurations, use the same broadcast action:
com.honeywell.ezconfig.intent.action.IMPORT_XML
Configure the Extra as follows:
Extra Type | Key | Value |
|---|---|---|
String |
|
|
2.3 Provisioner.xml
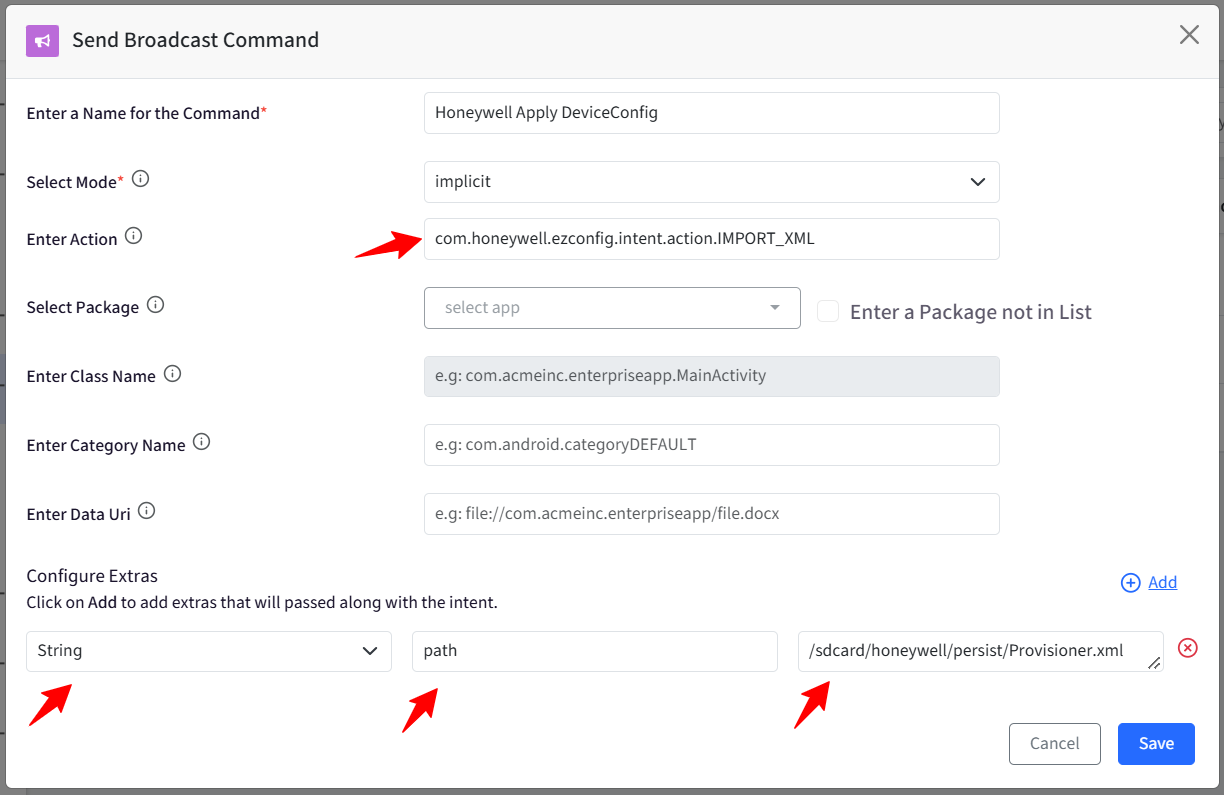
For Provisioner task configurations, use the same broadcast action:
com.honeywell.ezconfig.intent.action.IMPORT_XML
Configure the Extras as follows:
Extra Type | Key | Value |
|---|---|---|
String |
|
|
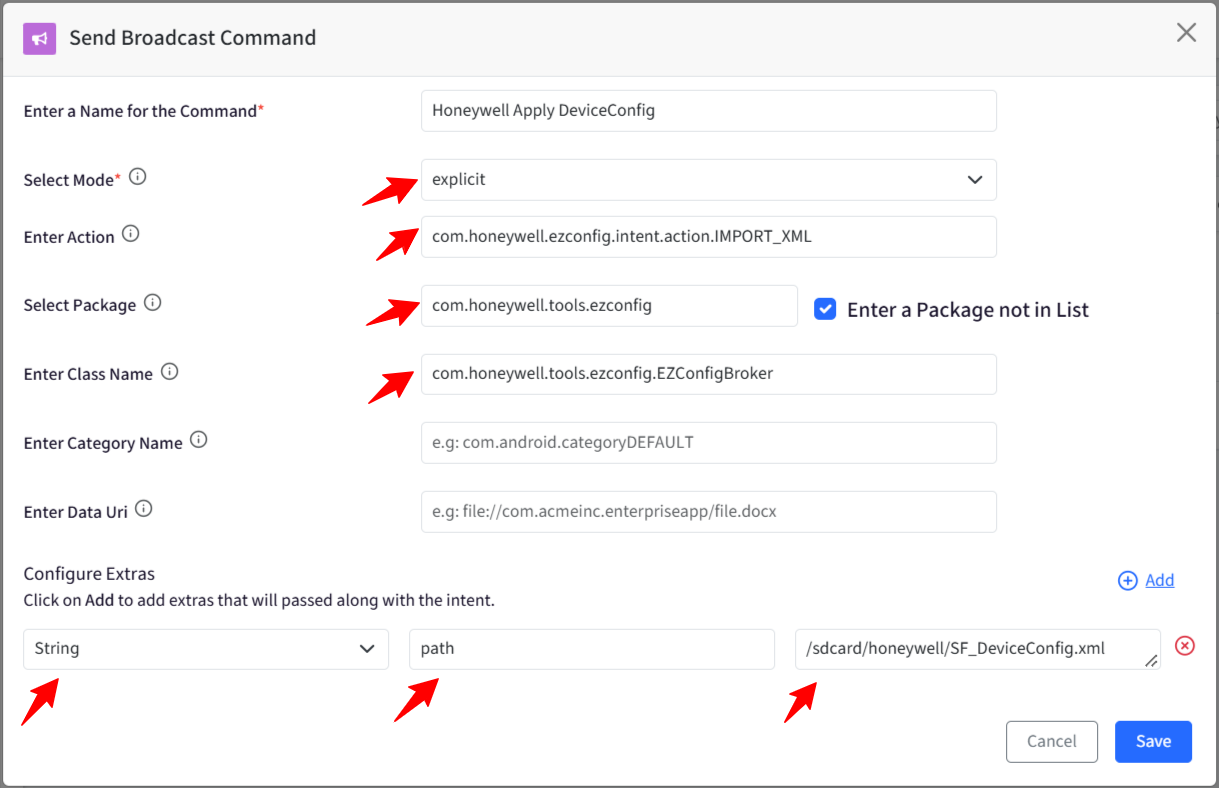
2.4 Configure Explicit Broadcast (If Required)
On Android 8 and later, Honeywell background receivers may not process implicit broadcasts in certain scenarios.
If the Last Run Report shows Success but the configuration is not applied on the device, try using Explicit mode.
Configure the Send Broadcast command as follows:
Field | Value |
|---|---|
Mode | Explicit |
Action |
|
Package |
|
Class Name |
|
Configure the Extras:
Extra Type | Key | Value |
|---|---|---|
String |
|
|
Ensure that the path matches the actual location and filename of the XML configuration file on the device.
2.5 Older DeviceConfig Intent (Pre-Android 7)
For older Honeywell firmware versions, if the IMPORT_XML broadcast is not processed, you can try the legacy DeviceConfig intent.
Configure the Send Broadcast command as follows:
Field | Value |
|---|---|
Mode | Implicit |
Action |
|
Configure the Extras:
Extra Type | Key | Value |
|---|---|---|
String |
|
|
Note: Use this legacy intent only for older firmware versions where the recommended IMPORT_XML action is not supported or processed.
Step 3: Run the Send Broadcast command
Once the Send Broadcast Remote Command has been created and saved, execute it on the same devices where the XML configuration file was published.
First, verify that FileDock has successfully downloaded the XML file to the device.
Check the Downloaded On information under Content Management.
Alternatively, verify the file using File Manager on the device.
Navigate to Remote Support > Remote Commands on the Scalefusion Dashboard.
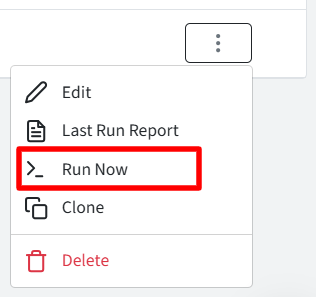
Locate the Honeywell Send Broadcast command.
Click the three dots under the Actions column and select Run Now.
Select the same Device Groups or individual Devices to which the XML file was published.
Click Execute.
Once the command has been executed, navigate to Last Run Report to review the Acknowledgment, Status, and Error details.
If the command is successfully executed, the Last Run Report will display the corresponding execution status. To learn more about executing a command, click here.
Important: A Success status in the Last Run Report confirms that Scalefusion successfully sent the broadcast. It does not necessarily confirm that Honeywell EZConfig has completed importing and applying the XML configuration.
To verify successful configuration deployment, check the relevant settings directly on the device, such as Wi-Fi configuration, scanner settings, keyboard settings, or other parameters defined in the XML file.
Important Notes
The XML configuration file must already exist on the device before the Send Broadcast command is executed.
Send Broadcast only triggers the Honeywell EZConfig import process. It does not upload or transfer the XML file to the device.
Ensure that the
pathExtra Value matches the exact on-device file location, including the filename.For Honeywell devices running Android 7 and later in restricted mode, ensure that the XML file is stored under
/sdcard/honeywell/or one of its supported subfolders.If an implicit broadcast is not processed on Android 8 and later, try configuring the command in Explicit mode.
Verify the actual configuration settings on the device after executing the command, as a successful broadcast does not guarantee successful XML import.