Once you have completed the setup of Veltar VPN server as described here, you can now proceed to create the VPN configuration on Scalefusion Dashboard and push it to the devices by performing the following steps,
Create a VPN Tunnel using the VPN server IP and Secret key
Configure the IP Range that needs to be allocated to managed devices
Configure the list of IPs that a user has access to when connected to this VPN Tunnel and optimally configure a DNS server
VPN Tunnel Configuration
When setting up VPN tunnels through the Scalefusion Dashboard, consider the following:
Listen Port for VPN Tunnels
Port Selection:
Specify a Listen Port when creating a new VPN tunnel via the Scalefusion Dashboard.
This is separate from the HTTP/HTTPS port used for the Veltar VPN API’s.
UDP Protocol:
The Listen Port for VPN tunnels uses the UDP protocol, not TCP.
Firewall Configuration:
Ensure the chosen Listen Port is open in your firewall for incoming UDP traffic.
Configure port forwarding for this UDP port if behind a NAT.
Port Range Consideration:
Consider opening a range of UDP ports (e.g., 51820-51830) for multiple VPN tunnels.
Configuring VPN on Scalefusion Dashboard
Pre-Requisites
Enrollment modes:
Android: BYOD, Shared Company Owned, COPE
iOS: BYOD, AUE, User Authenticated & DEP/ADE
macOS: BYOD, AUE, User Authenticated & DEP/ADE
Windows: Agent based enrollment, Modern Management, BYOD, User Authenticated enrollment, Serial number based enrollment
Minimum agent app versions that should be installed on devices:
Scalefusion Android Agent: v17.0.1 or above
iOS Agent: v4.1.1 or above
macOS: v4.11.8 and above
Windows MDM agent: v15.12.3 or above
Linux:
ubuntu(.deb) : tux-agent_2.0.1~20250331123358
alma(.rpm) : tux-agent-2.0.1~20250331125048
The device must be added to the User group (as the configuration can be published only to user Group).
Device Profile(s) should be created on Scalefusion Dashboard
For Linux, the logged in user should be part of User Group as well as exist in UAM section on Scalefusion Dashboard.
Step 1: Create VPN Config
On Scalefusion Dashboard, navigate to Veltar > VPN Tunnel and click on Create VPN Config.
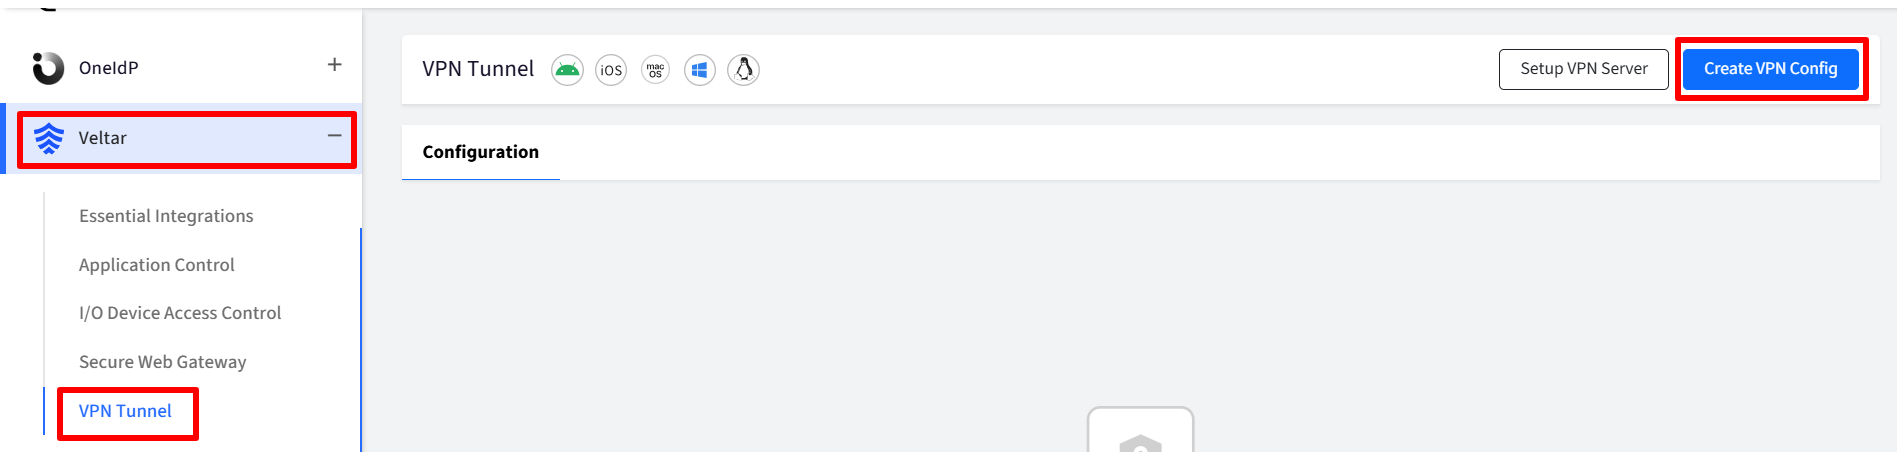
This will open the VPN config dialog/wizard.
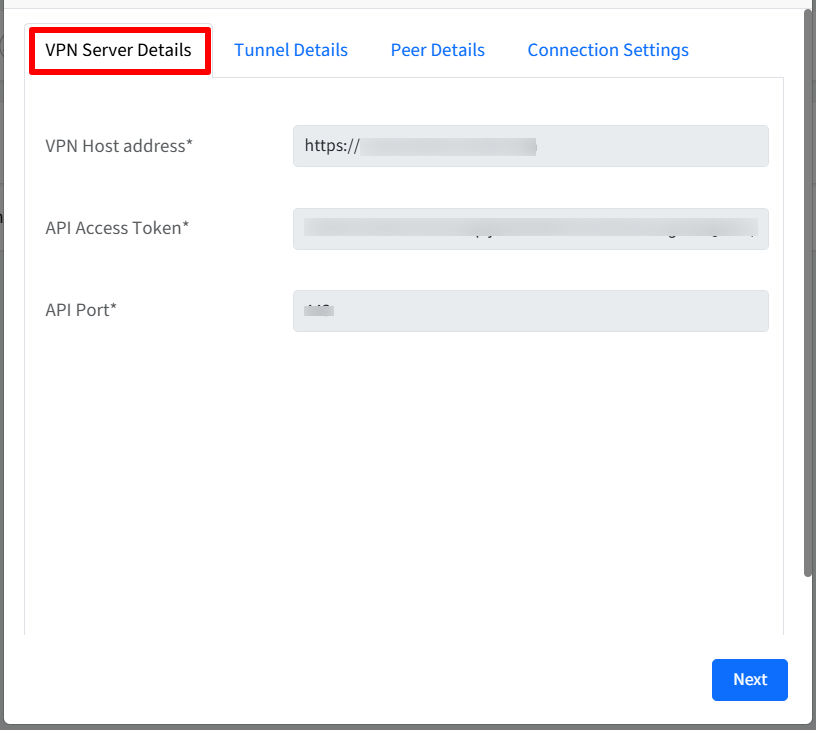
Provide the required details under following tabs:
VPN Server Details: Under this, IT Admins need to enter the basic VPN details,
VPN Host address: IP address or domain name of the VPN server that clients connect to in order to establish a secure VPN connection
API Access token: A unique identifier used to authenticate a user or application when making API calls.
API Port: The specific network port on the server that is used to handle API requests.
Click Next
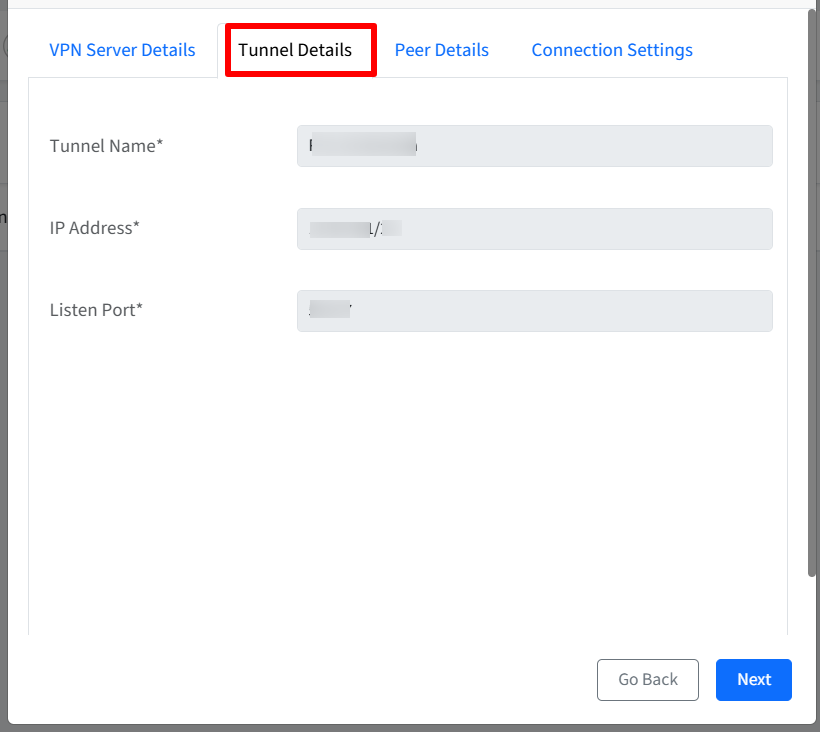
Tunnel Details
Tunnel Name: Enter a name for the tunnel
IP Address: Base IP Address for the Tunnel. It is the virtual IP address assigned to the device within the VPN tunnel. For each device it is auto generated with the help of base IP address.
Listen Port: Port on a server that accepts incoming connections
Click Next
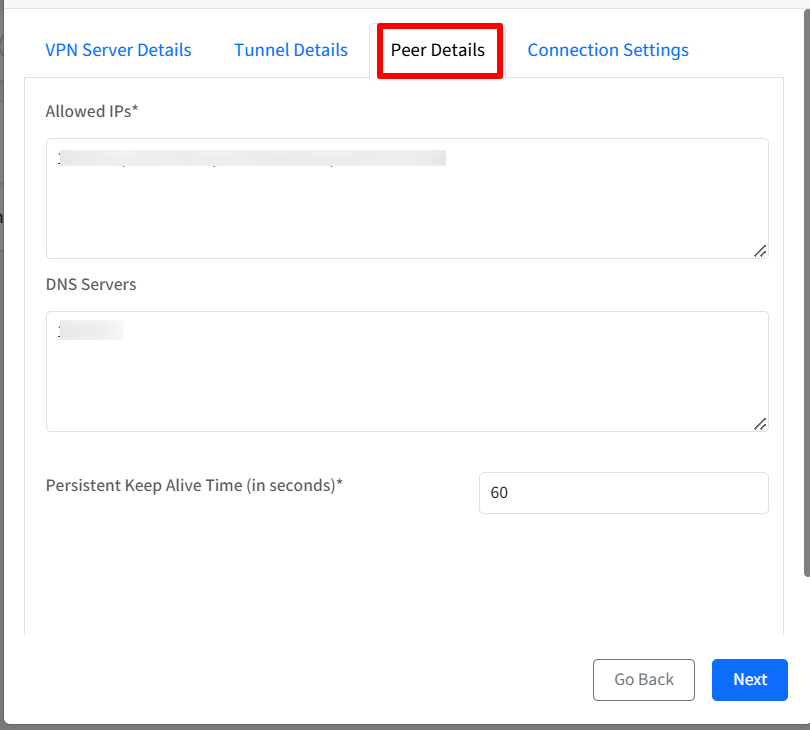
Peer Details
Allowed IPs: The IPs that we want to pass through VPN tunnel. Here, Range is supported
DNS Servers: This section is for configuring DNS servers within the customer's on-premise environment. If an on-premise DNS server exists, its details should be entered here for internal domain IP resolution. Else, this section can be left blank.
Persistent Keep Alive Time (in seconds): The idle time the connection will remain, if not actively being used. By default it is set to 60 seconds.
Connection Settings
Auto-connect to VPN on device reboot: When this setting is enabled, after the device restarts, it will automatically attempt to establish a VPN connection using the previously used VPN configuration. This means the user does not have to manually connect to the VPN each time they restart their device.
Note: This setting is applicable only on macOS, Windows and Linux devices.Allow users to disconnect from VPN: Enable this option to allow users to manually disconnect from the VPN. Disabling this option will enforce a persistent always-on VPN connection.
Note: This setting is applicable only on Android, Windows and Linux devices.
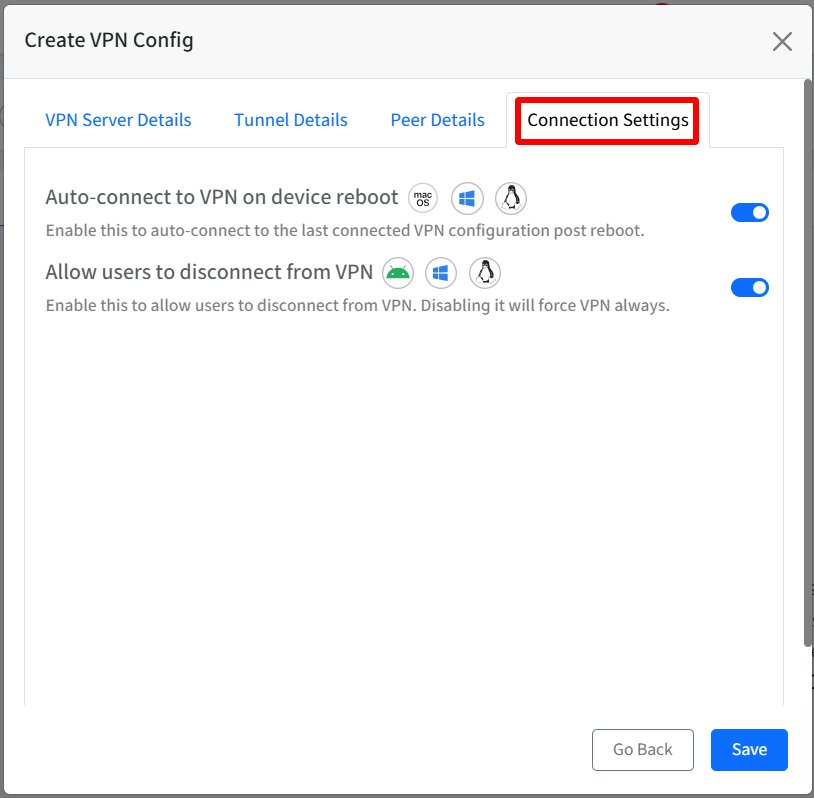
After entering all details, click on Save
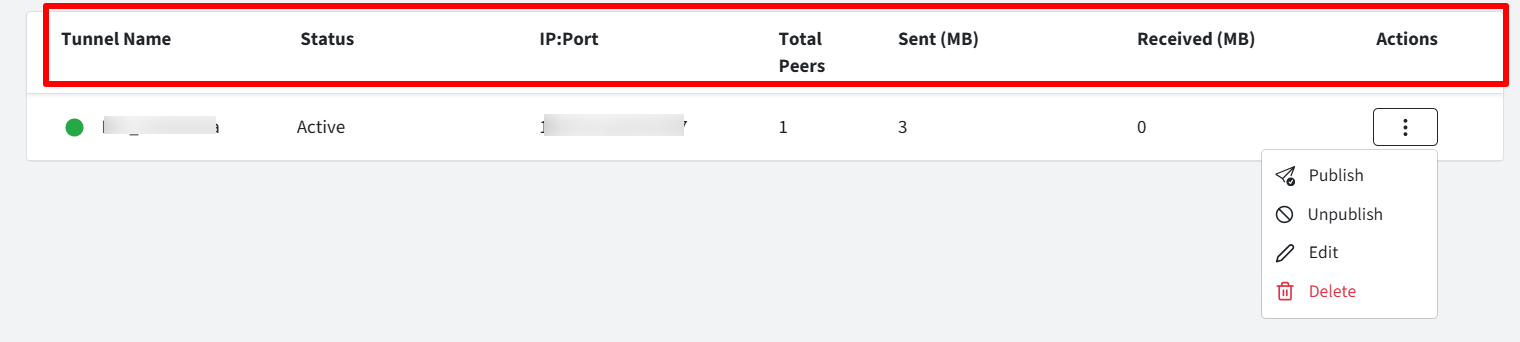
The VPN Configuration will get created and displayed on the main VPN Tunnel page with other related details. The details will be as under:
Tunnel Name
IP:Port - The IP and Port for the Tunnel
Total Peers: Number of devices on which the VPN config is published
Sent/Received (MB) : The total data (in MB) sent / received on the tunnel for all the devices.
Actions: Click on the three dots for the list of actions you can perform on VPN
Step 2: Publish VPN configuration
To apply VPN config you have created, the next step is to Publish it.
Click on publish by clicking on three dots under Actions

In the new window, select the User Group(s) on which you want to publish the configuration.
Click Publish

Additional Actions
You can perform following additional actions on a VPN Configuration (access from Actions):
Edit: Only peer details can be edited
Delete: Deleting a tunnel will unpublish/remove the VPN from the device.

User Experience on Device
On publishing the VPN config,
A new section for Veltar will be created inside Scalefusion Agent. Here, toggle on Secure VPN.

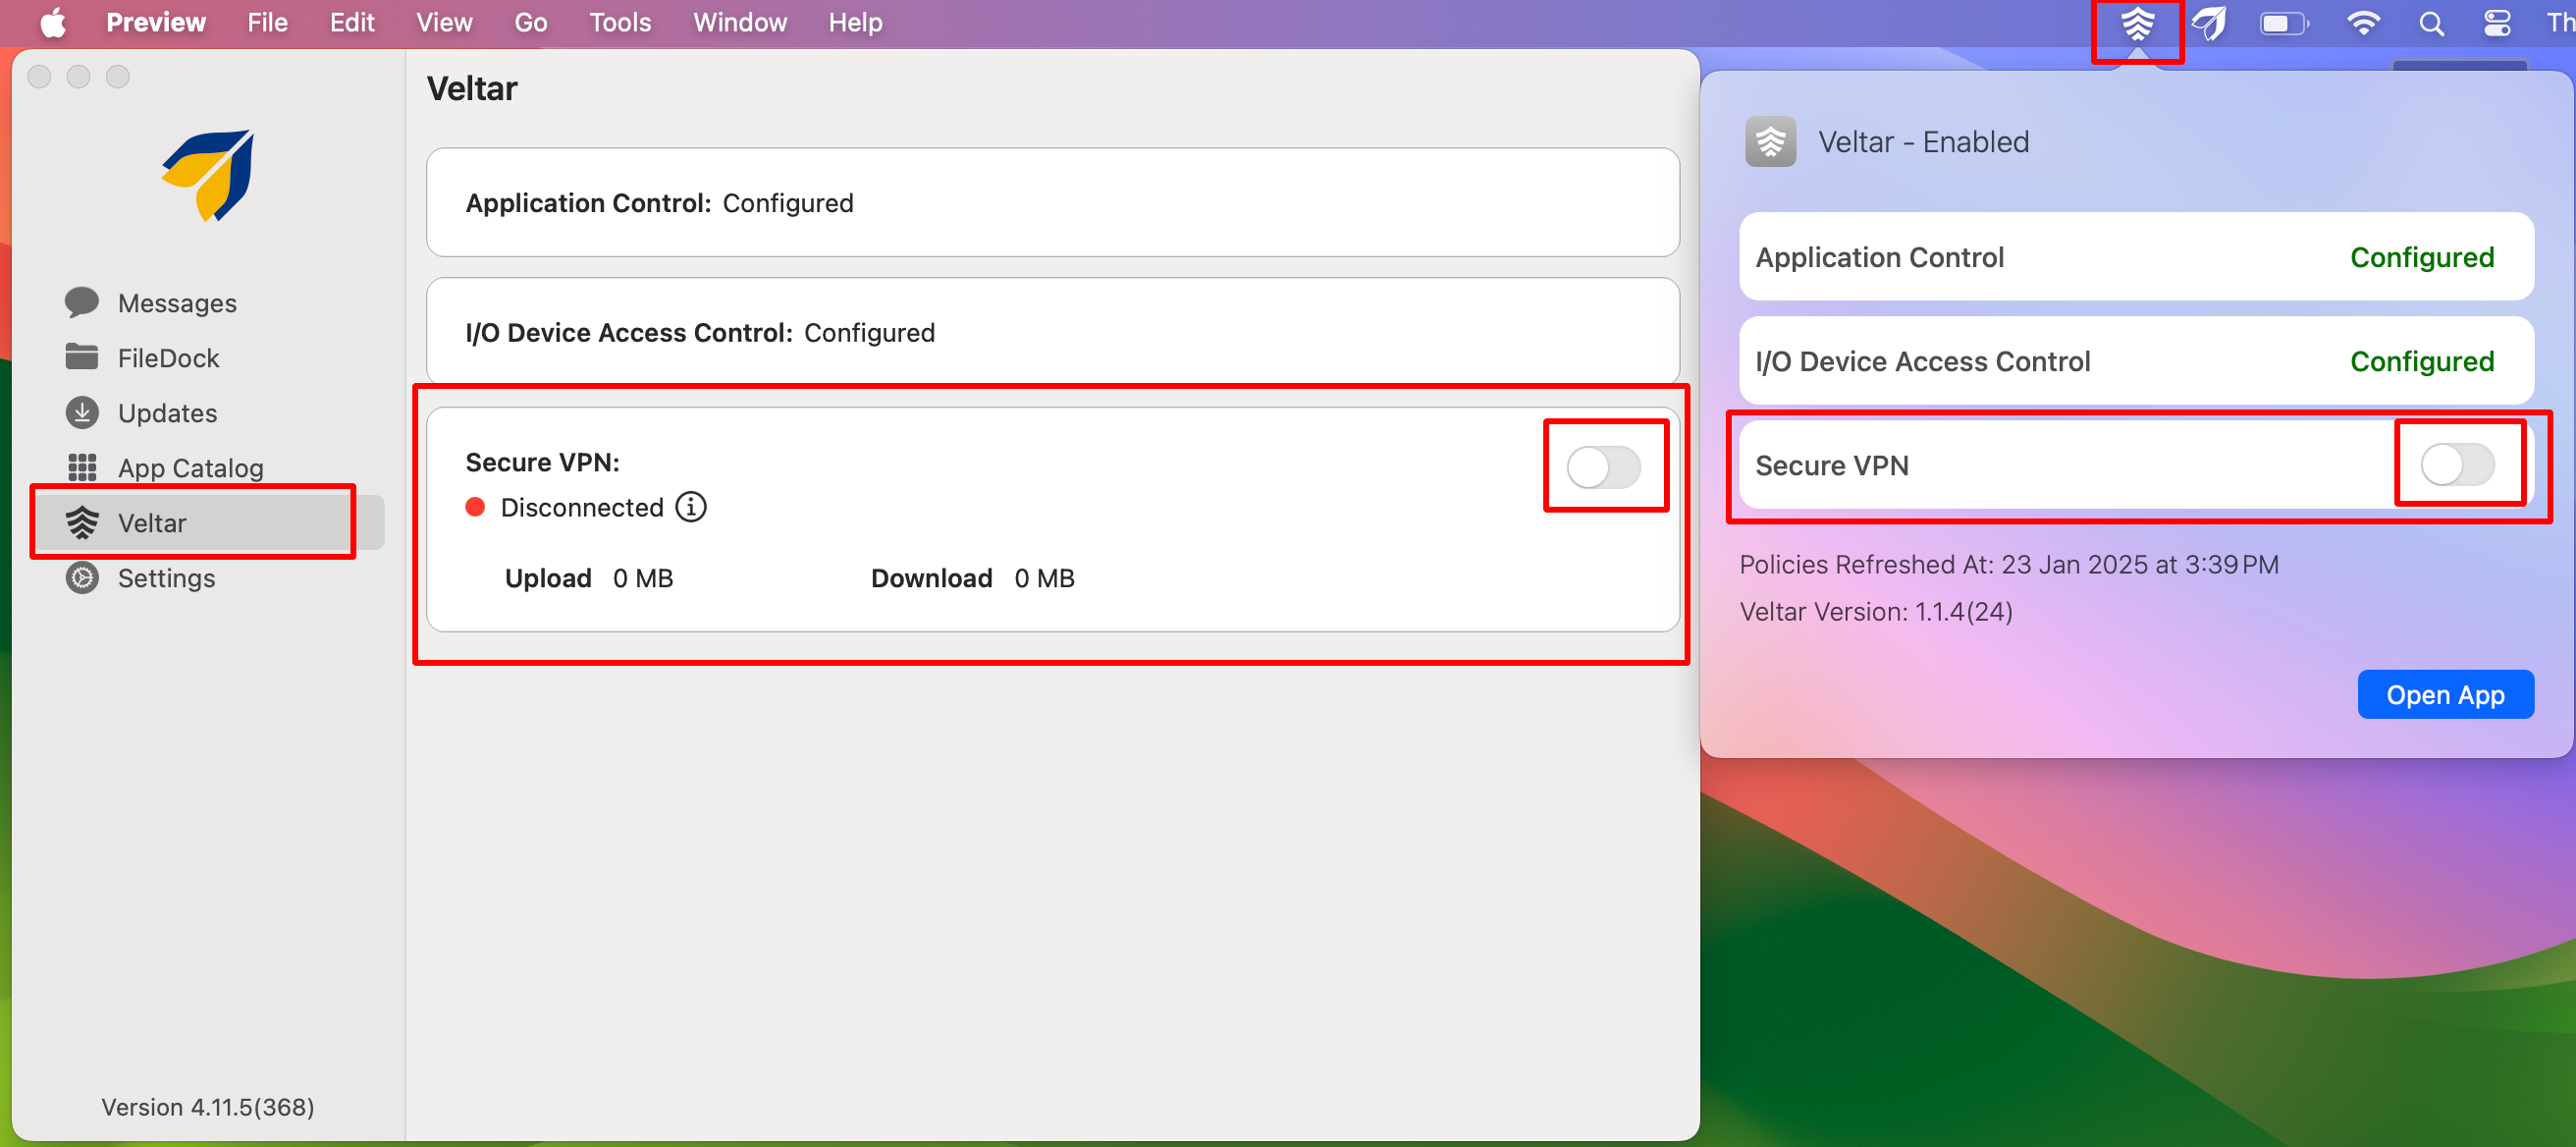
On publishing the VPN config,
Veltar will be available on the managed device at following places. Toggle on Secure VPN from anywhere:
Inside agent app for macOS
Veltar extension on top notification bar: Click on it and enable Secure VPN
On publishing the VPN config,
Veltar will be available on the managed device. When you click on it, a key icon will be visible on the top notification bar and Secure VPN shows as Enabled.

On publishing the VPN config,
Veltar icon will be available on the managed device on the top right. When you click on it, the VPN status will show as Connected.
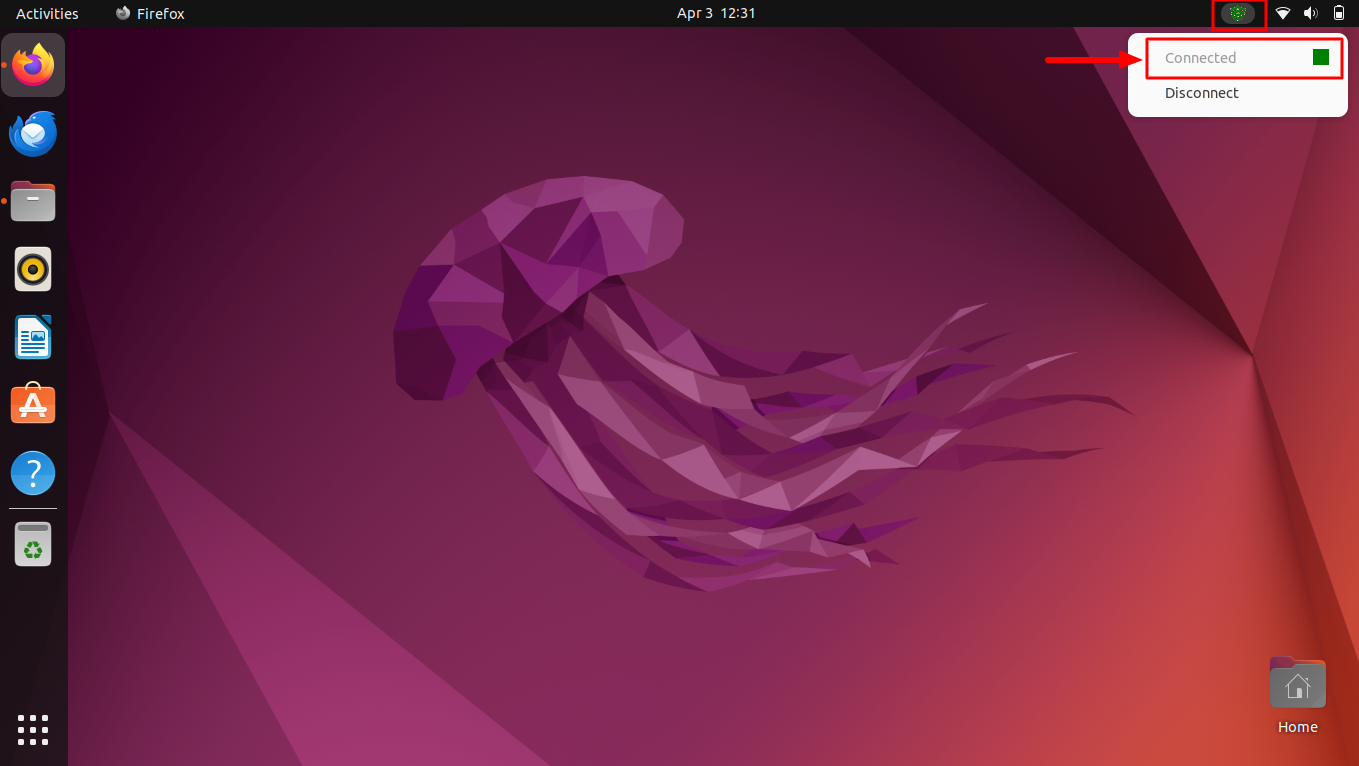
The Alma Linux environment does not provide visual indicators for VPN connection states. As a result, the VPN status will remain Connected, and disconnection functionality is unavailable on the Alma Linux side.
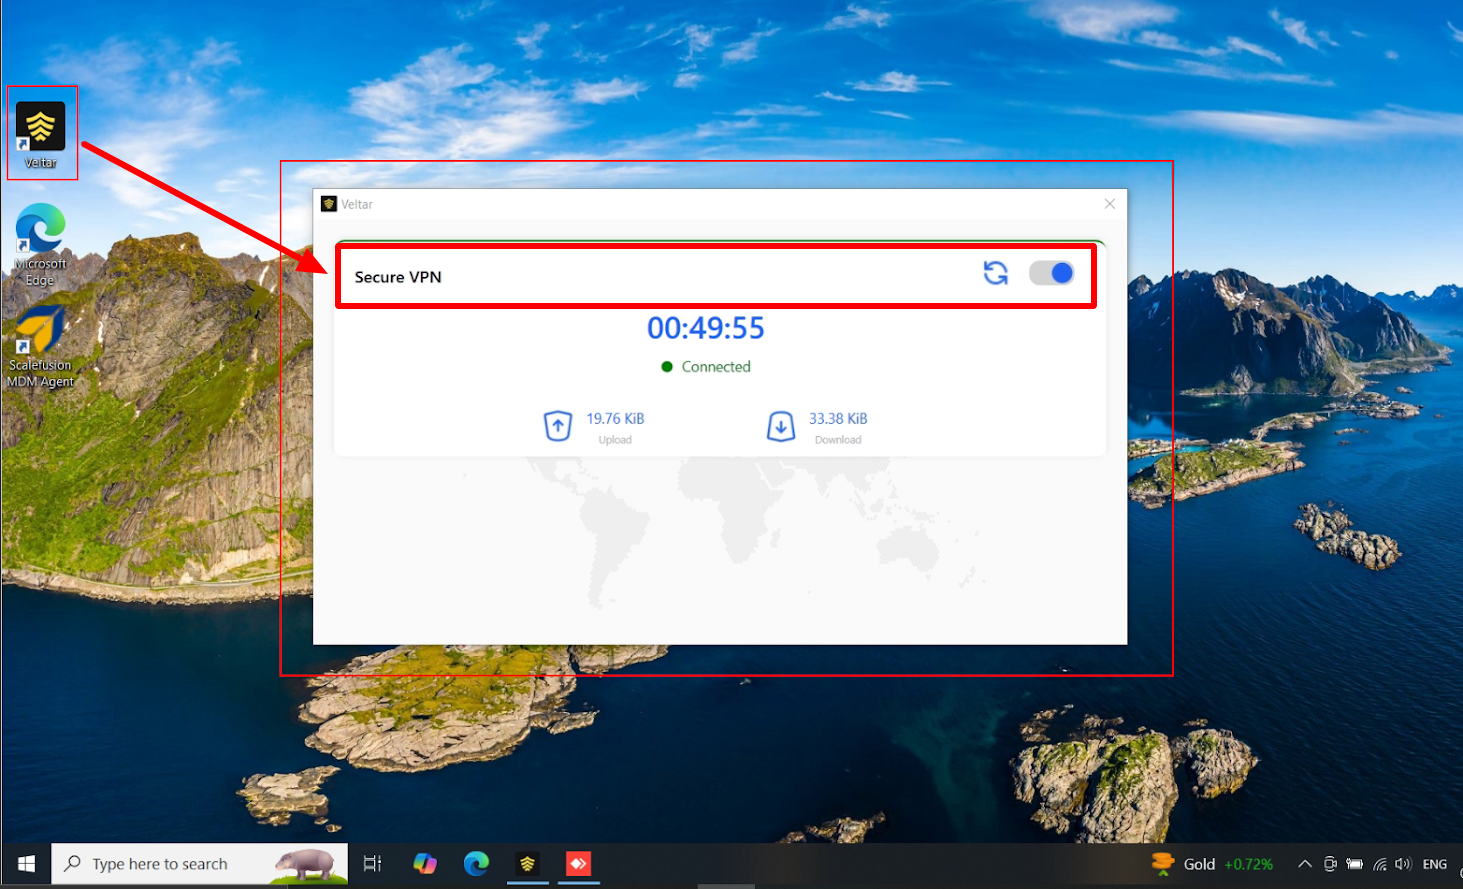
On publishing the VPN config,
Veltar icon will be available on the managed Windows device on the desktop. When you click on it, Secure VPN shows as Enabled.
Event Logs
From this section you can get detailed logs which are recorded with respect to accessing VPN. Event logs for VPN configurations are helpful for maintaining security, troubleshooting issues, ensuring compliance, and optimizing VPN performance. They offer transparency, accountability, and valuable insights into how the VPN is being used and how it can be improved. Click on Event Logs tab under VPN Tunnel.
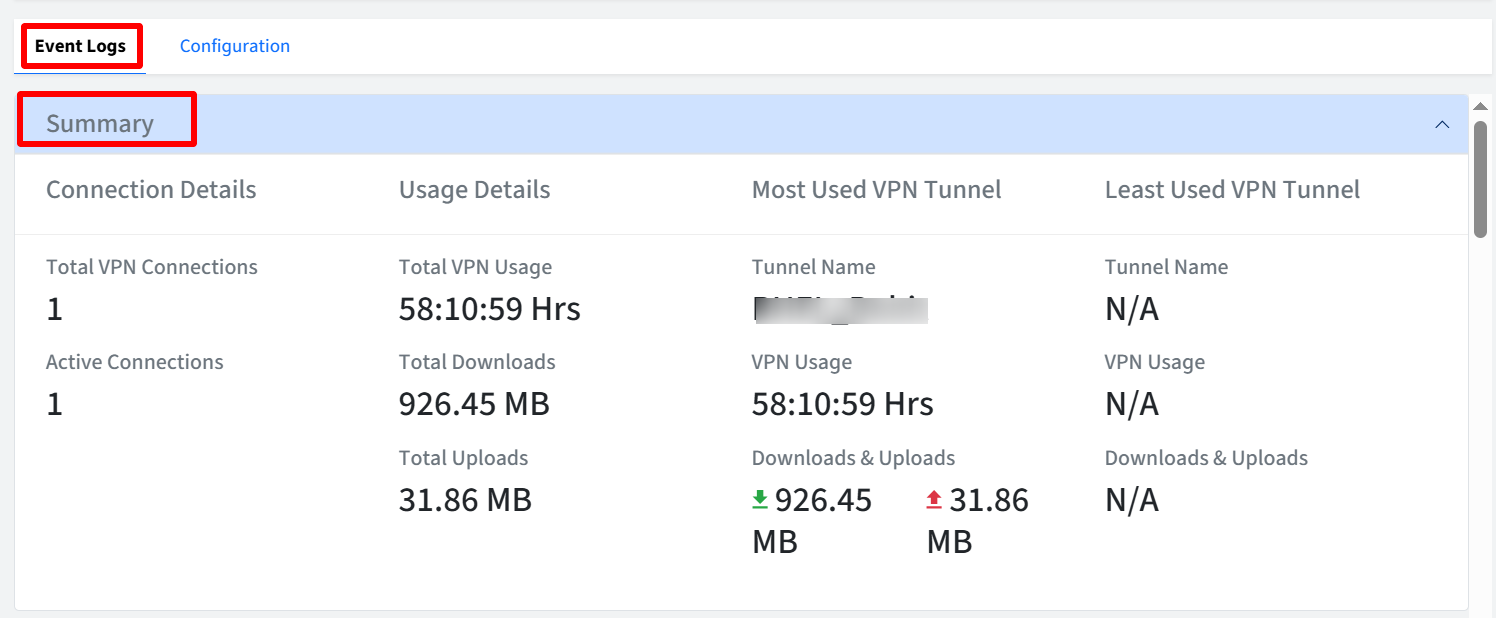
Summary View
The Summary view provides an overview of VPN tunnel usage and activity. The information can be viewed under following heads:
Connection Details
Total VPN Connections: Displays the total number of unique connections established to all VPN tunnels.
Active Connections: Displays the number of connections currently active across all VPN tunnels.
Usage Details
Total VPN Usage: Shows the cumulative duration of all VPN tunnels’ usage in HH:MM:SS format.
Total Downloads: Displays the total data (in MB, GB) downloaded through all VPN tunnels.
Total Uploads: Displays the total data uploaded (in MB, GB) through all VPN tunnels.
Most Used Tunnel:
This section provides details about the most frequently used VPN tunnel.
Tunnel Name: Displays the name of the most frequently used VPN tunnel.
VPN Usage: Shows the total duration of usage for the most used VPN tunnel in HH:MM:SS format.
Downloads and Uploads: Displays the total download and upload data usage for the most used tunnel.
Least Used Tunnel:
This section provides details about the least frequently used VPN tunnel.
Tunnel Name: Displays the name of the least frequently used VPN tunnel.
VPN Usage: Shows the total duration of usage for the least used VPN tunnel in HH:MM:SS format.
Downloads and Uploads: Displays the total download and upload data usage for the least used tunnel.
Currently, only VPN connections exceeding two consecutive hours are recorded in the event logs. Sessions shorter than two hours will not be captured.
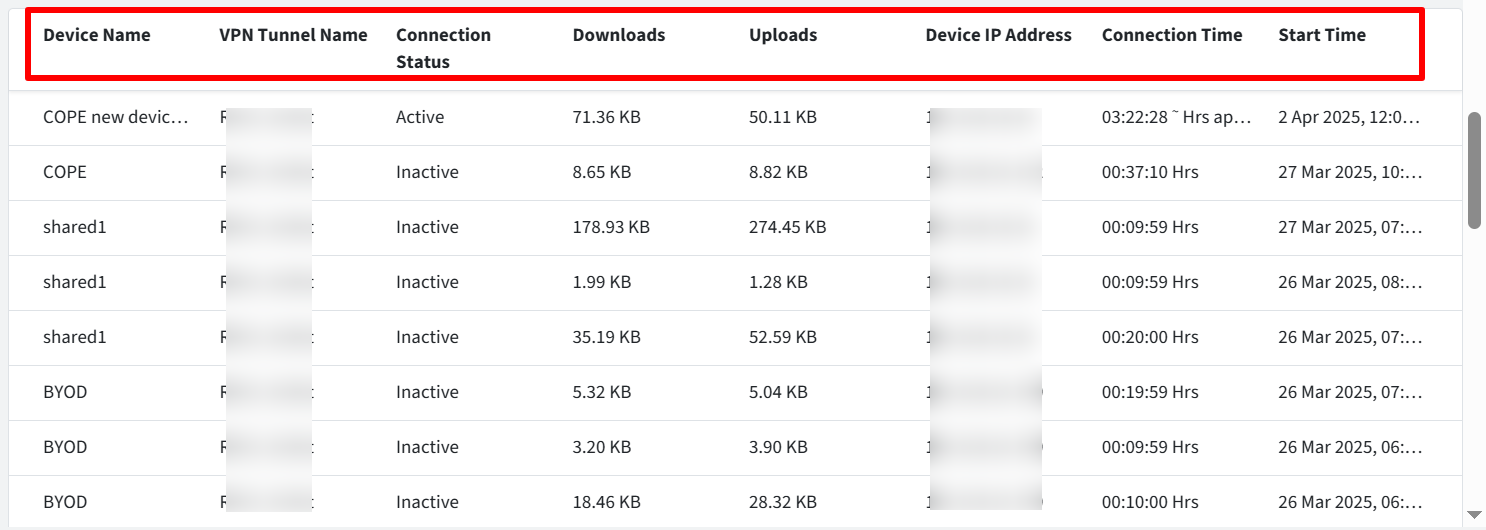
Events Info
This section shows detailed information on the events, under following heads.
Device Name: Displays the name of the device involved in the VPN tunnel connection.
VPN Tunnel Name: Displays the name of the VPN tunnel to which the device is connected.
Connection Status: Shows the current status of the VPN tunnel connection.
Active: Indicates the connection is currently established.
Inactive: Indicates the connection has been terminated.
Downloads: Displays the total download data usage (in MB, GB) for the device through the specified VPN tunnel.
Uploads: Displays the total upload data usage (in MB, GB) for the device through the specified VPN tunnel.
Device IP Address: Displays the endpoint IP address from which the device connected to the VPN tunnel.
Connection Time: Displays the total duration (in HH:MM:SS), the VPN tunnel connection was or is active.
Start Time: Displays the date and time when the VPN tunnel connection was initiated.
Additional Features
Filters
There are filtering options available for viewing activity logs. You can filter them by:
Tunnels: Allows administrators to filter event logs based on specific VPN tunnels.
Connection Status: Allows administrators to filter event logs based on connection status.
Active: Displays only active VPN tunnel connections.
Inactive: Displays only terminated VPN tunnel connections.
All: Displays all VPN tunnel connections (both active and inactive).
Date Range: Filters events based on a specific date range. Provide the start and end date. Here, start date can be from current Date to 7 days prior and you cannot select a date more than 30 days in the past.
Search: Search for specific events using Device Name, Device IP address, or VPN Tunnel name.
Page Size: Allows administrators to set the number of event log entries displayed per page.
Logs older than 30 days are automatically deleted.

Download Report
Clicking the button downloads a CSV report containing the filtered activity data. Please note the report can be downloaded for a duration of 7 days at the maximum.
Known Behaviors
Android
On certain devices, the VPN connection may be automatically disconnected due to device-specific compatibility issues. Users might encounter difficulties reconnecting to the VPN using Scalefusion in these cases.
Linux
VPN will not work if device is on IPv6.