This article explains how to configure various settings for your printers through the Scalefusion Device Profile configuration wizard. These settings allow for granular control over printer behavior, including print quality and speed, power management, Bluetooth connectivity for remote updates.
To access these settings,
On Scalefusion Dashboard, navigate to Device Profiles & Policies > Device Profiles
Either create a new Printer profile or edit an existing one.
The following sections detail the configuration options available within the profile. Click on each section to configure the policies:
Print Settings
Label Settings
Device Settings
Power Settings
Bluetooth Settings
Print Settings
The Print Settings policy allows IT administrators to remotely configure and manage key Zebra printer parameters across all enrolled devices. By centralizing printer settings such as print mode, speed, and power-up behavior, this policy helps ensure consistent performance, minimizes troubleshooting, and enhances operational efficiency.
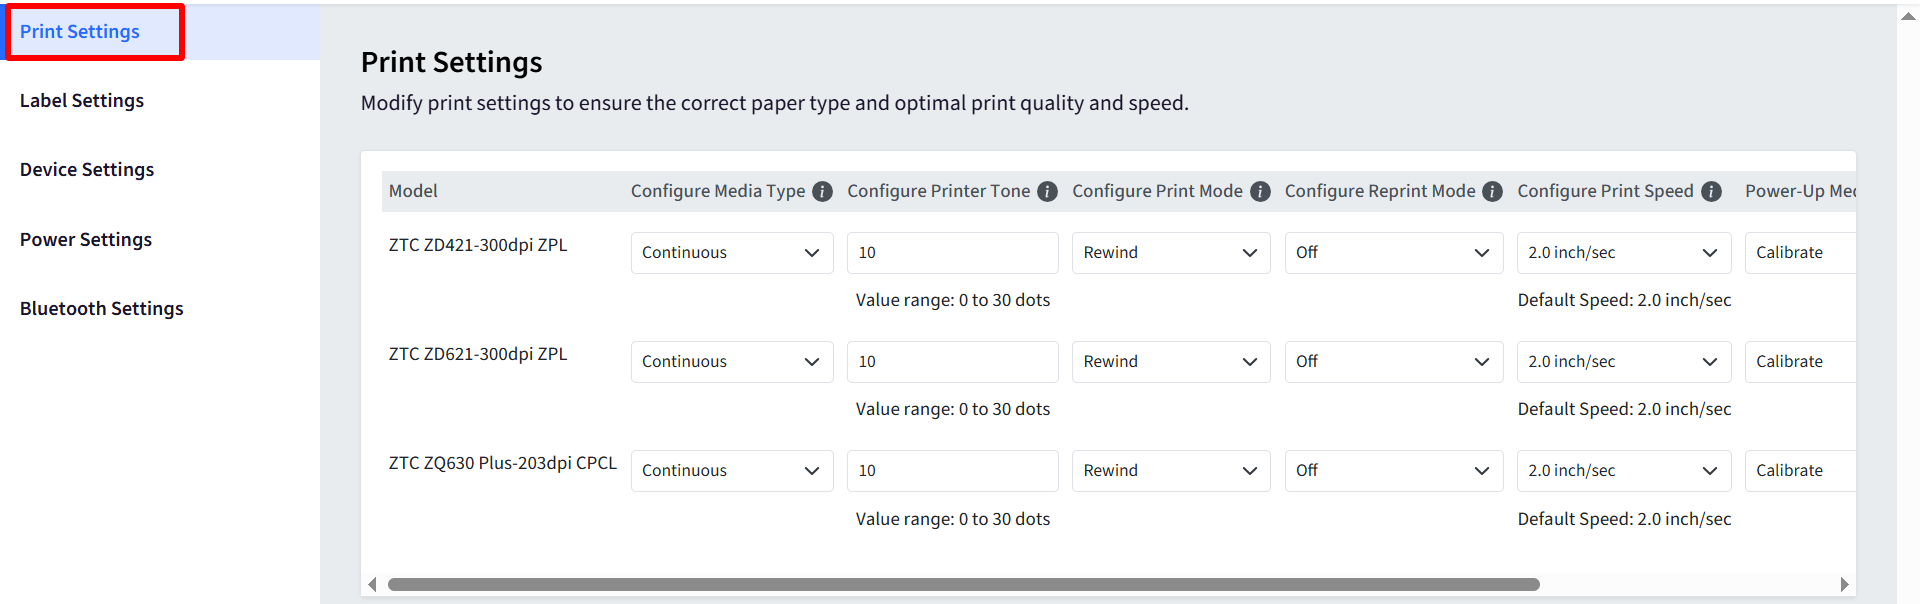
Configure Media Type: Select the media type used in the printer.
Media Type
Description
Function
Use Cases
Sensor Type
Notes
Continuous
Media is one long, unbroken length with no gaps, notches, or black marks.
Printer prints based on length settings without detecting gaps or marks.
- Receipt rolls - Full-length labels - Custom-length media
None
Label length must be defined in software or printer settings.
Gap/Notch
Labels have physical gaps or notches between them.
Printer uses a transmissive sensor to detect gaps/notches for label alignment.
- Standard label rolls - Die-cut labels with backing liners
Transmissive (detects light passing through gaps)
Most common label type.
Mark
Black marks or bars are printed on the back of the media to indicate label positions.
Printer uses a reflective sensor to detect the black marks.
- Pre-printed labels - Media where gaps are impractical
Reflective (detects light reflected off marks)
Useful for non-standard label formats.
Configure Printer Tone: Set the darkness level of printing (i.e., print density).
Allowed Range: 0 to 30
Configure Print Mode: Defines the printer’s action after printing a label or group of labels. Following are the options:
Mode
Purpose
Function
Use Case
Rewind
Used with a rewind spindle accessory
Rewinds printed labels (with or without backing liner) onto a roll inside the printer
Batch printing where labels are stored for later use
Peel Off
For peel-and-present operation
Peels label from liner and pauses until removed by user or applicator
Manual application requiring immediate label use
Tear Off
Default mode for general printing
Advances label to tear bar after printing
Manual tear-off of each label post-printing
Applicator
For automated label applicators
Signals external applicator when label is ready
High-speed environments with automated application systems
Cutter
Used with an optional cutter
Cuts label or tag after printing
Batch printing of individual tags or linerless labels
Delayed Cut
Similar to Cutter mode, but optimized for batch cutting
Waits to cut until a label batch is complete
Reduces cutter wear; groups labels for cutting
Linerless Peel
For linerless labels using a peeler
Peels and presents linerless labels similar to Peel Off mode
Eco-friendly use cases with no backing liner
Linerless Rewind
For rewinding linerless labels
Rewinds printed linerless labels onto a core
Storing or shipping linerless labels post-printing
Linerless Tear
For tearing off linerless labels
Prints and advances label to a tear-off point
Manual removal of labels without a liner
Configure Reprint Mode: Enables or disables the reprint feature after printing.
Options:
Off (Default)
On
Configure Print Speed: Allows administrators to define the speed at which a Zebra printer prints labels or documents. Print speed is measured in inches per second (ips), and adjusting it can help optimize print quality, reduce wear on printer components, and meet specific operational needs. Admins can choose from available speed options supported by the specific Zebra printer model (e.g., 2, 4, 6, 8 ips).
Power-Up Media Action: Defines the media action when the printer starts up.
Options:
Calibrate (Default)
feed
length
no motion
short cal
Media Action on Head Close: Defines the media action when the printer head is closed. Options:
Mode
Action
What It Does
Use Case
Pros
Cons
Calibrate
Performs full media calibration at startup
Feeds several labels to detect label length, gap, mark, or notch; adjusts sensors
When switching media types frequently or needing high accuracy
Most accurate
Uses more media each time printer is turned on
Feed
Feeds one label forward on startup
Advances to the next label without performing a full calibration
When media is consistent and calibration isn't necessary
Saves time and media
May cause misalignment if media type has changed
Short Cal
Performs a short calibration
Detects media gap or mark using minimal movement (usually 1–2 labels)
Balances calibration accuracy with label usage
Quicker and uses fewer labels than full calibration
Slightly less accurate than full calibrate
No Motion
Does nothing to the media on startup
Keeps current sensor settings; media doesn't move
When media hasn’t changed and fast operation is critical
Fastest; no label waste
Risk of misalignment if sensor data is outdated
Length
Detects only label length
Uses set values or minimal detection to determine label length
Continuous media or fixed-length labels with no gaps/marks
Good for consistent labels
Not suitable for variable-sized or gapped/marked labels
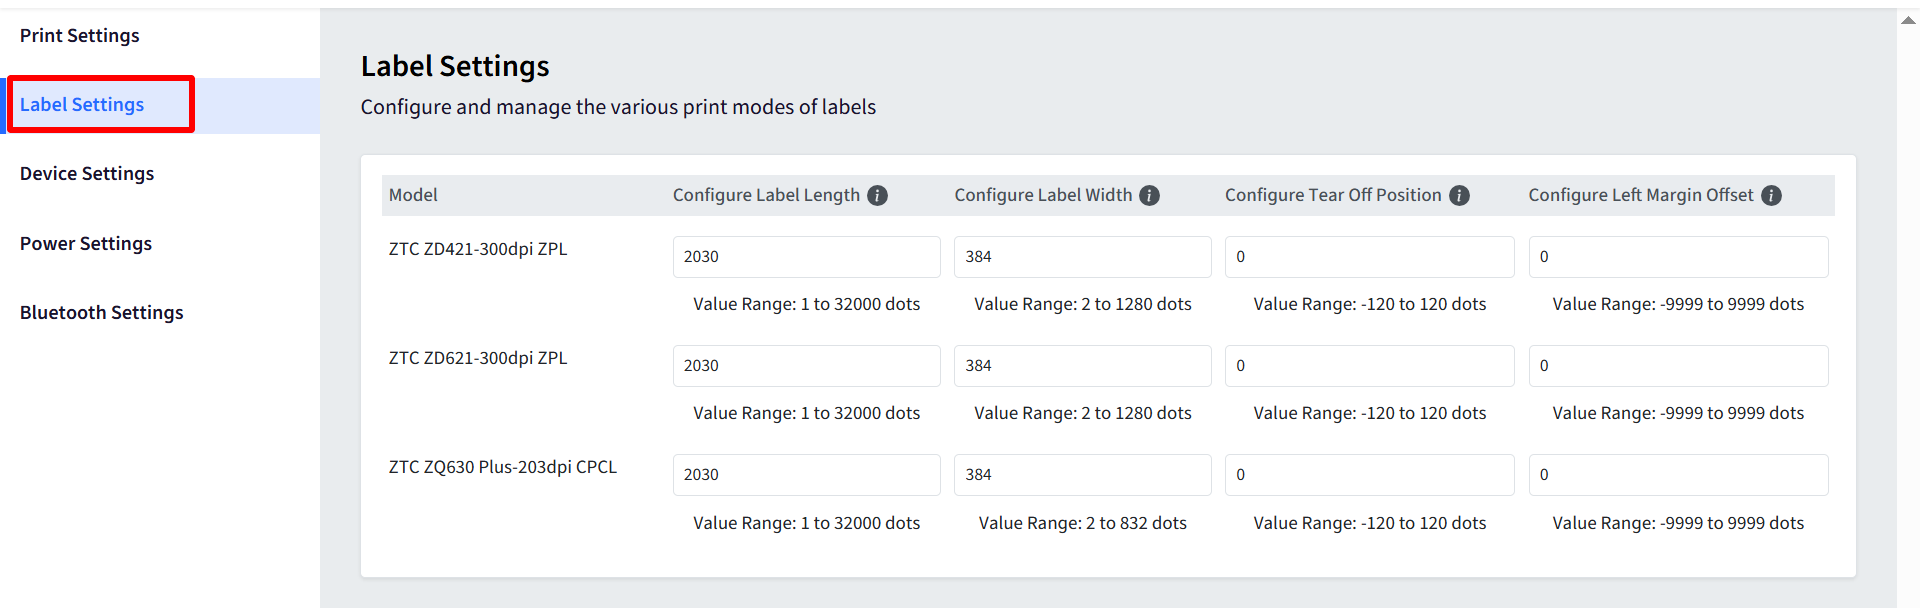
Label Settings
Configure and manage the various print modes and layout settings for supported label printers.
Hint: Ensure proper label alignment, length, and margins by adjusting the parameters below. Label Configuration Options:
Label Length: Set the label's length to ensure correct spacing and alignment during printing.
Value Range:
0to32000dotsDefault Value:
2030
Label Width: Define the width of the label based on the selected printer model.
Model-specific Value Ranges:
ZD421:
2to1000dotsZD621:
2to1280dotsZQ630:
2to832dotsDefault Value:
384
Tear-Off Position: Set the tear-off position to control where the label is detached from the backing material.
Value Range:
-120to120dots
Left Margin Offset: Adjust the left margin to fine-tune the horizontal start position of label printing.
Value Range:
-9999to9999dots
Device Settings
Adjust and manage device-specific configurations to align with operational requirements and hardware capabilities. Device Configuration Options:
Enable Feed Setting: Enables or disables the feed function via the printer's front panel.
Enable System Logs: Enables system logging for monitoring purposes. When enabled, logs are captured and sent for analysis.
Reset Button Enable: Controls whether the physical reset button on the device is active. Not Supported on ZQ630 model.
Device Language: Allows you to set the user interface language of the Zebra printer. Available Languages:
English (Default)
Spanish
French
German
Italian
Norwegian
Portuguese
Swedish
Danish
Dutch
Finnish
Japanese
Korean
Simplified Chinese
Traditional Chinese
Russian
Polish
Czech
Romanian
Note: This setting is not supported on ZD421 and ZD621 models.

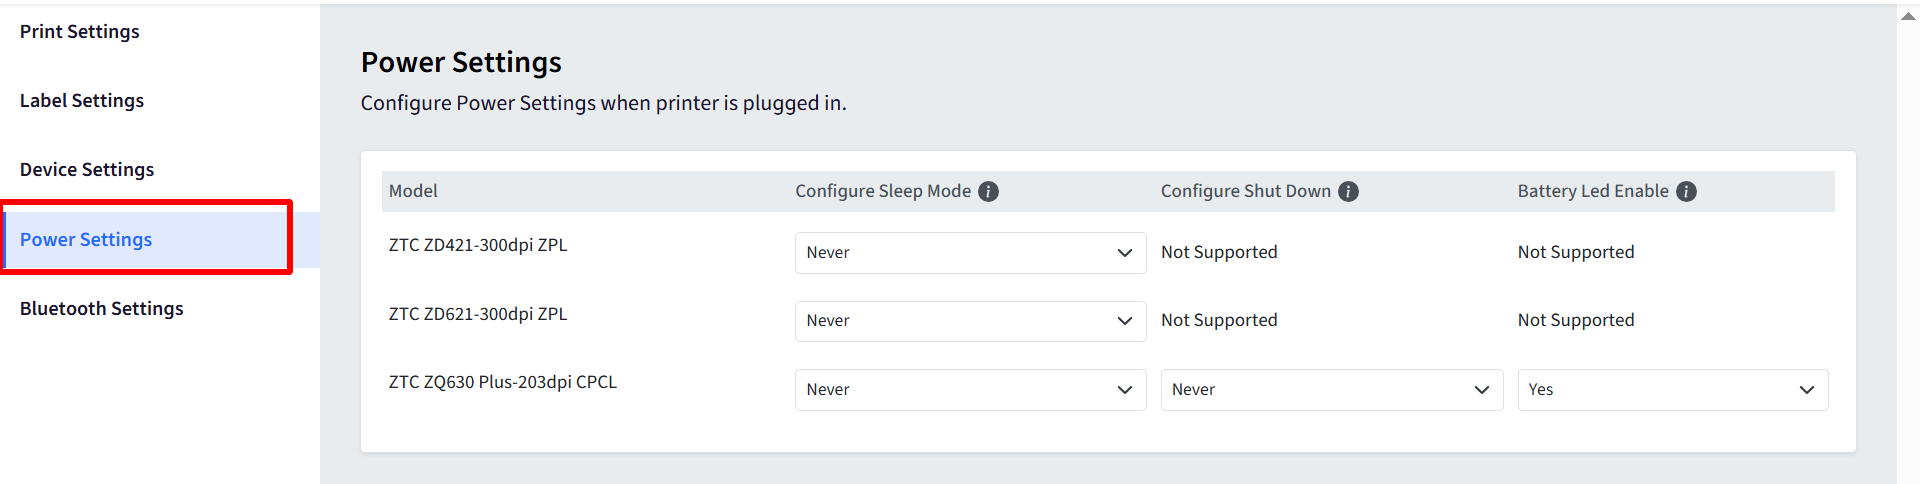
Power Settings
Configure power management settings for your printers, both when connected to a power source and when running on battery. These settings apply when the printer is connected to a power source.
Configure Sleep Mode: Click on the dropdown to set the period of inactivity after which the printer enters sleep mode to conserve energy. You can select from 0 to 9 minutes.
Configure Shutdown: Click on the dropdown to set the period of inactivity after which the printer automatically shuts down. Available options include:
Battery Led Enable: Configure battery behavior to enhance performance and extend battery life. Controls whether the battery status LED indicator is enabled on the device. This helps monitor battery status visually.
Note: This setting is not supported on ZD421 and ZD621 models.
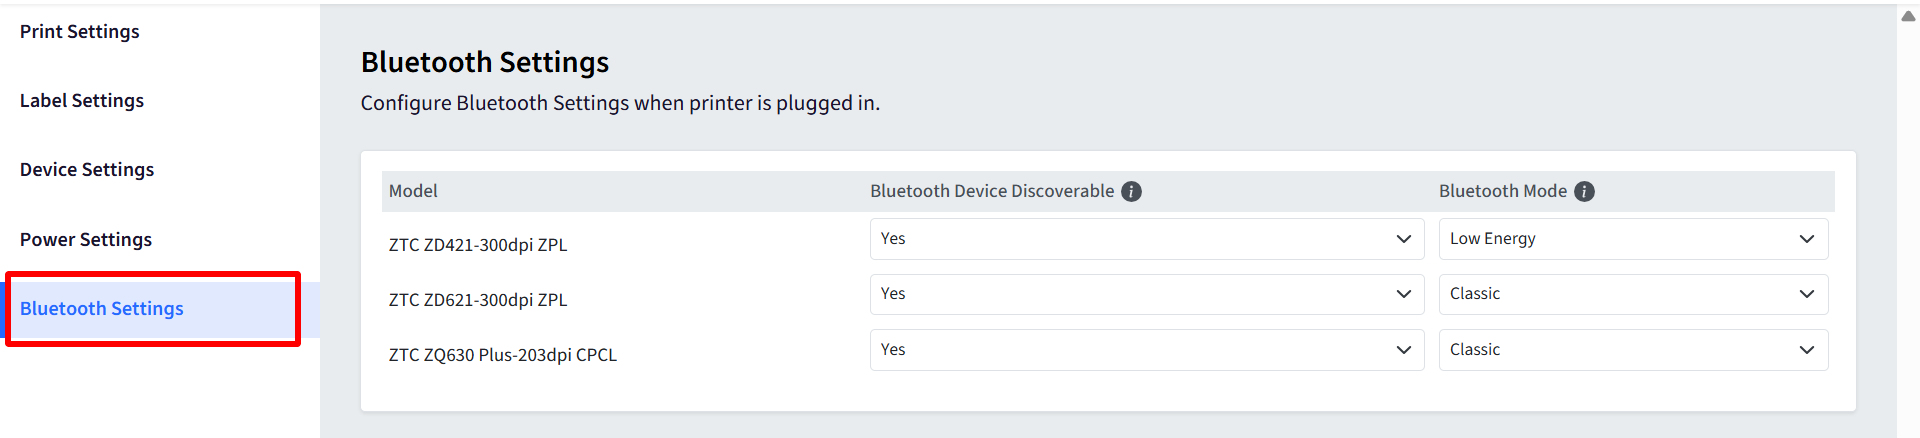
Bluetooth Settings
Configure Bluetooth settings for supported printer models.
Bluetooth Device Discoverable: Allows the printer to be visible to nearby Bluetooth devices for pairing.
Bluetooth Mode: Manages Bluetooth power usage, allowing you to choose between different energy profiles. Options:
Classic (Default)
Classic & Low Energy
Low Energy