The Compliance Management Feature provides a streamlined and customizable system to ensure devices meet regulatory and organizational standards. It automates enforcement and remediation processes, significantly reducing manual effort and complexity in managing compliance across extensive device fleets, thereby minimizing risks and securing the environment.
This article provides a comprehensive guide to leveraging Veltar's Compliance Management feature, enabling IT Admins to establish, monitor, and enforce security and regulatory standards across the Scalefusion enrolled iOS/iPadOS, macOS, Windows and Android devices. By creating and applying Policy Groups based on industry benchmarks like CIS Level 1 and CIS Level 2 (Apple), CIS Level 1 (Windows), Device Trust from Android Enterprise you can ensure your devices adhere to predefined security configurations.
This document will walk you through the essential steps of creating Policy Groups, defining and managing their rules, publishing them to your device profiles, and finally, monitoring the compliance status of your device fleet through detailed summaries and reports.
Pre-Requisites
Devices should be enrolled with Scalefusion
Supported OS versions:
iOS: OS 16 and above
macOS: Version 13 and above
Windows: Windows 11, Server 2022, Server 2025
Minimum Agent app versions:
macOS: Scalefusion MDM Client (agent app for macOS) v4.19.8 and above should be installed on device
iOS: v4.5.0 and above
Android: v18.0.0
Windows: v16.4.2 and above
Device Profiles for macOS, iOS, Android, Windows should be created on Scalefusion Dashboard
Your account should have access to Compliance feature
Overview
In general, following are the steps required to be performed for compliance management:
Step 1: Create Policy Groups,
Step 2: Define and manage rules under Policy Group,
Step 3: Publish Policy Groups
Step 4: Monitor the compliance status
Description
Step 1: Create a Policy Group
Policy Groups allow you to bundle specific compliance benchmarks and their variants for efficient monitoring and remediation across your devices. To create Policy Group, follow these steps:
On Scalefusion Dashboard navigate to Veltar > Compliance
Under Compliance Policies, click on Create Policy Group

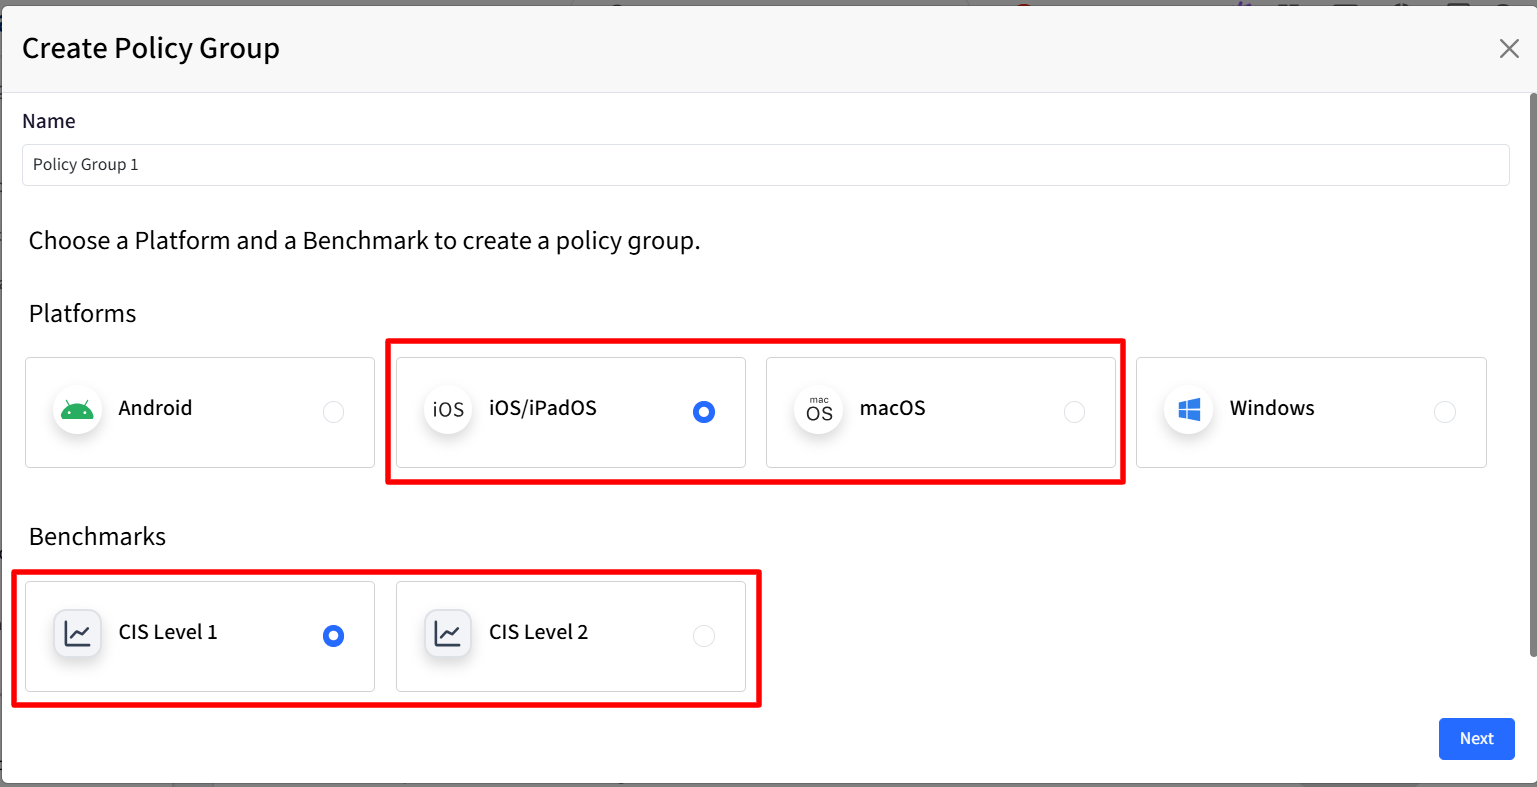
The Create Policy Group dialog will appear. Enter the following and click Next to proceed to the Select Variant screen.
Name: Please enter a name for the Policy Group.
Choose a Platform and a Benchmark to create a policy group. Choose one of the following:
iOS/iPadOS
macOS
Benchmarks: Select CIS Level 1 or CIS Level 2
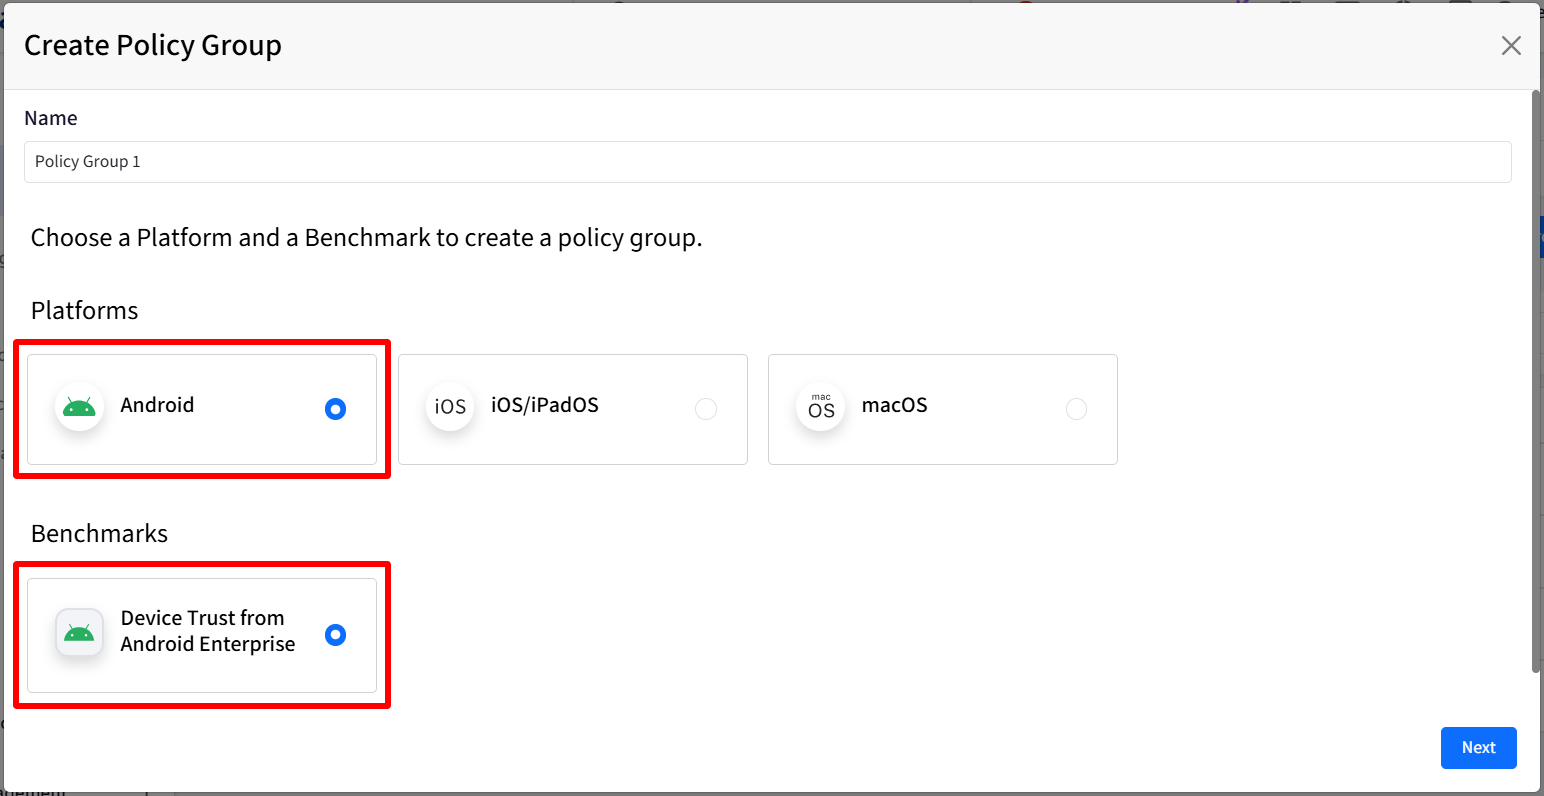
Name: Please enter a name for the Policy Group.
Choose a Platform and a Benchmark to create a policy group. Choose the following:
Android
Benchmarks: Select Device Trust from Android Enterprise
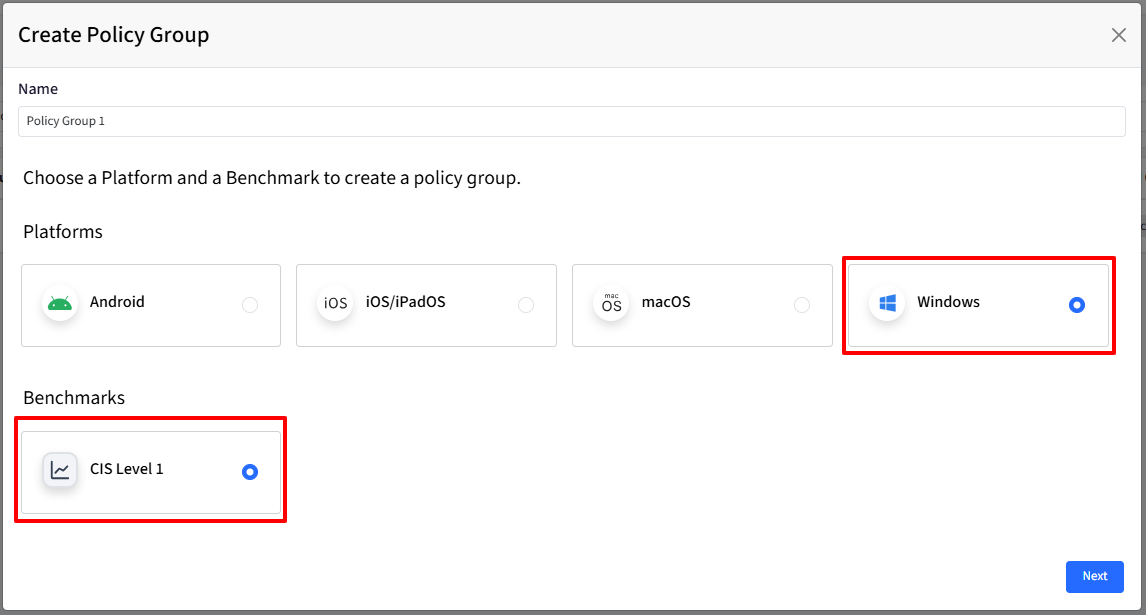
Name: Please enter a name for the Policy Group.
Choose a Platform and a Benchmark to create a policy group. Choose the following:
Windows
Benchmarks: Select CIS Level 1
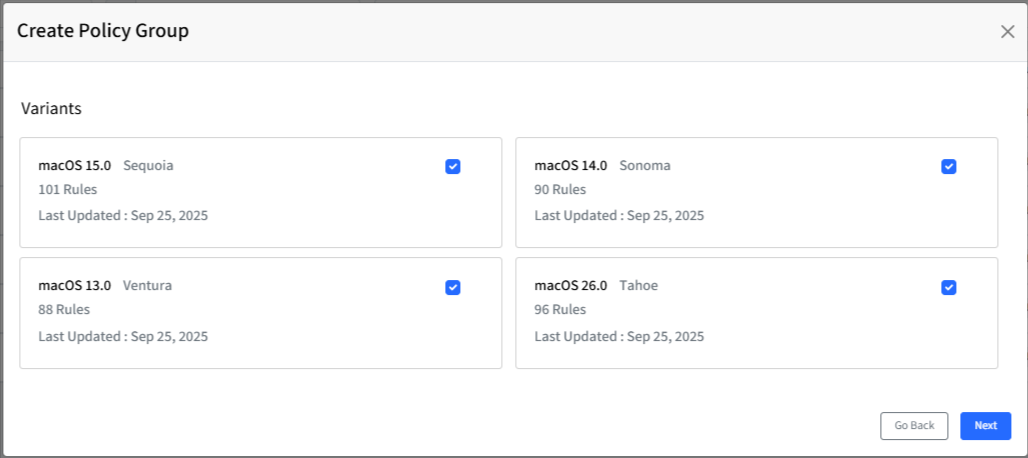
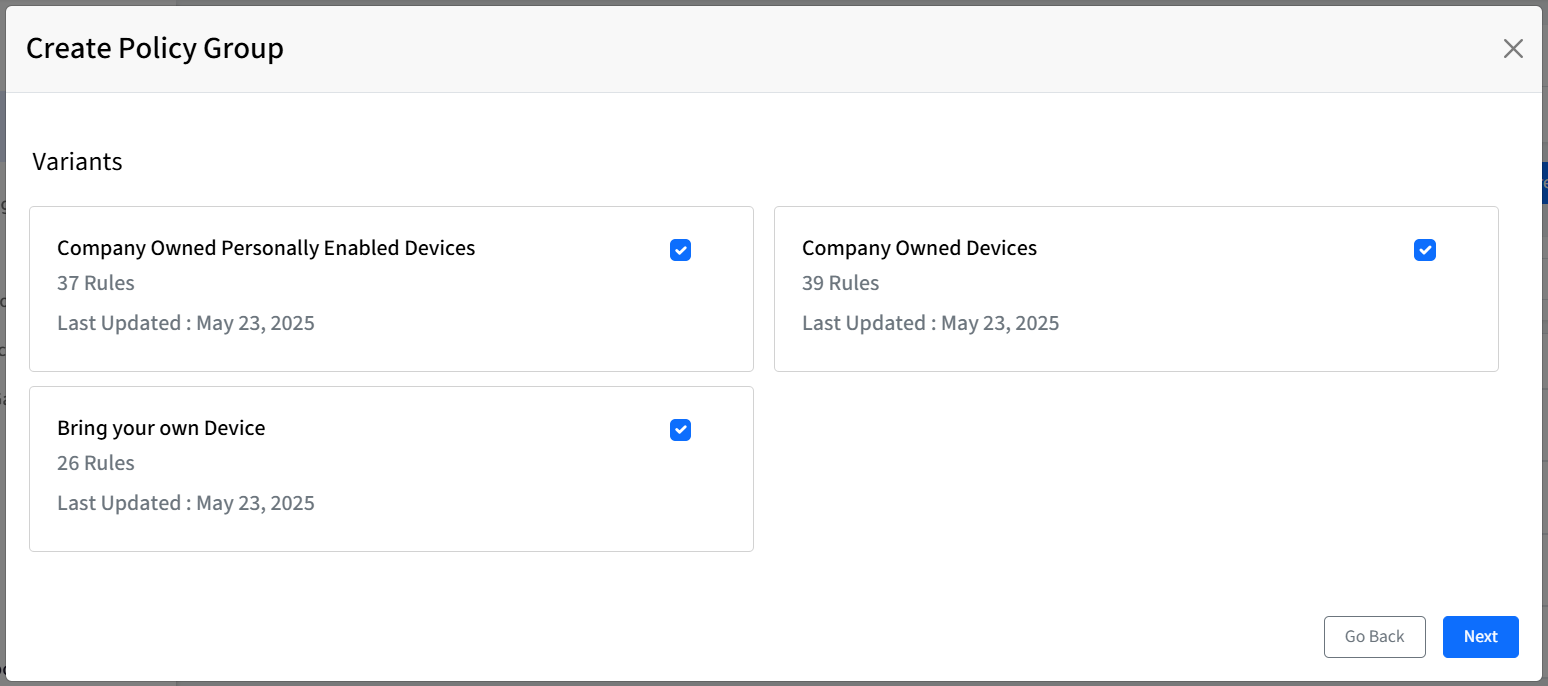
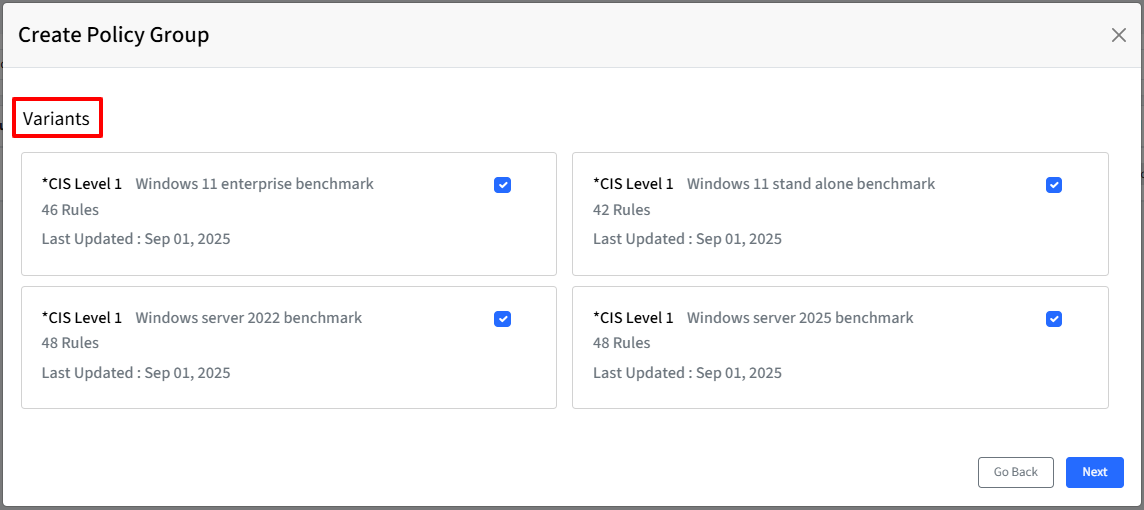
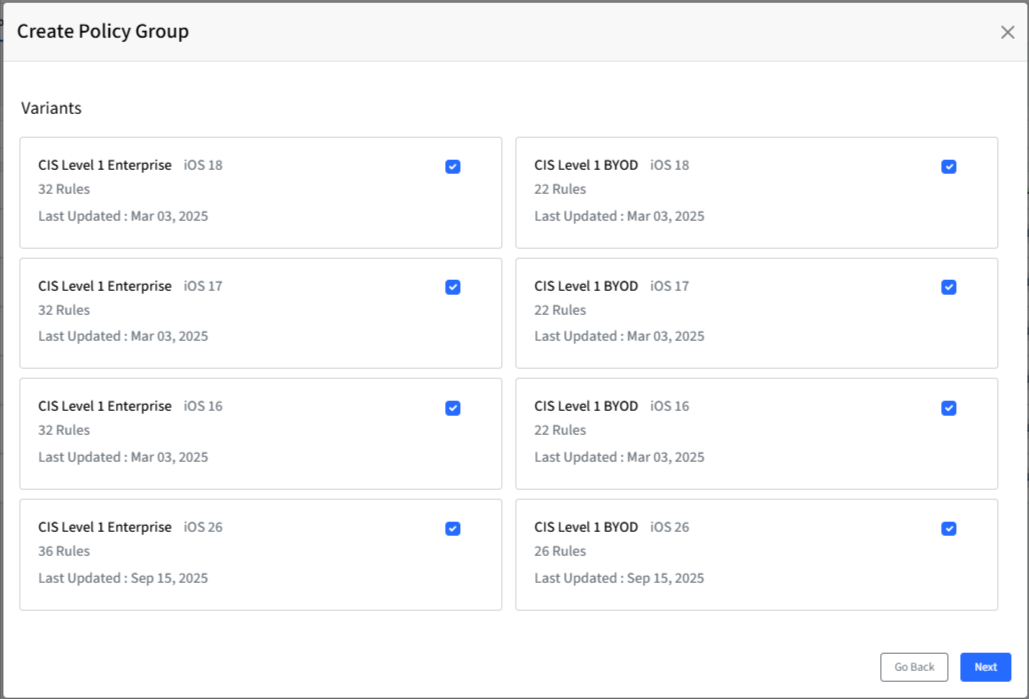
Select Variant(s): Choose the variant(s) to be a part of this policy group and click Next to proceed to the Select Mode screen. Each variant will show the following information:
Variant Name
The number of rules in that variant
Last Updated Date
For monitoring and remediation, the variant with the strictest rules will be considered where applicable.
Select Mode: Choose the Mode for the Policy Group and click on Finish
Monitoring: In this mode, Scalefusion Veltar agent will simply monitor against the compliances and provide you with a summary.
Monitor & Auto Remediation: In this mode, Scalefusion Veltar agent will continuously monitor against the compliances and attempt to automatically remediate.
There is no automatic rollback to a non-compliant state or reversal of setting once the remediation is done.

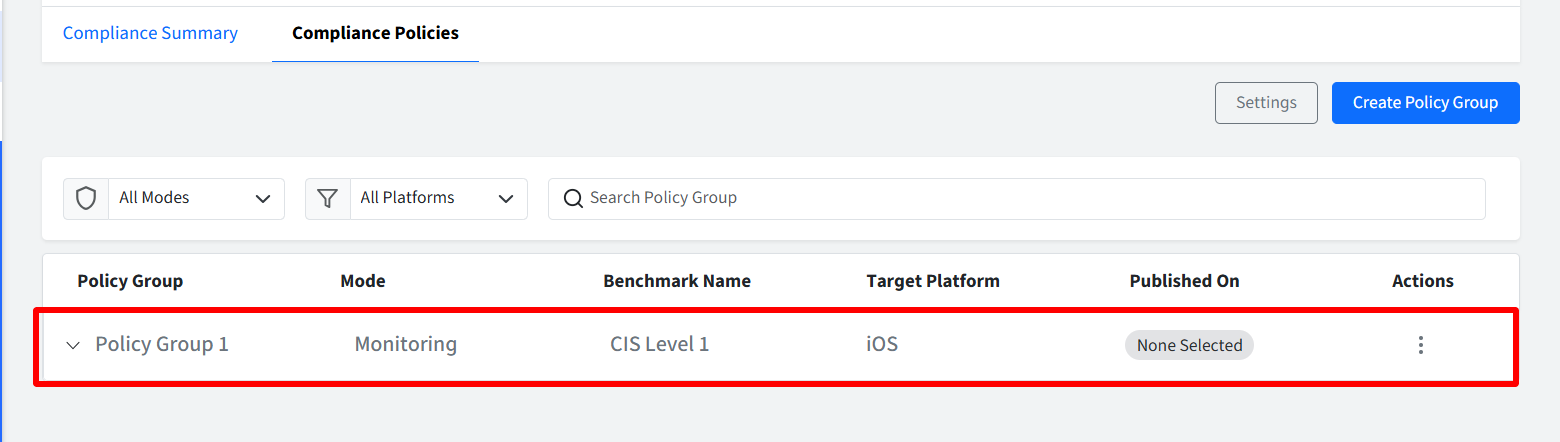
The newly created Policy Group will be displayed on the dashboard under Compliance Policies. All the variants you have selected will be displayed on clicking the downward arrow in front of policy group name.
Step 2: Define and Manage Variant Rules
Now view and edit the rules (if required) associated with a specific variant within a Policy Group in the Scalefusion Dashboard. To do so, follow these steps:
Under the Compliance Policies section, click on the Policy Group to view its details.
This provides a summary of the variants included within a specific Policy Group, offering insights into the enabled rules and their conformance with the original baseline. Following details with respect to each variant are displayed:
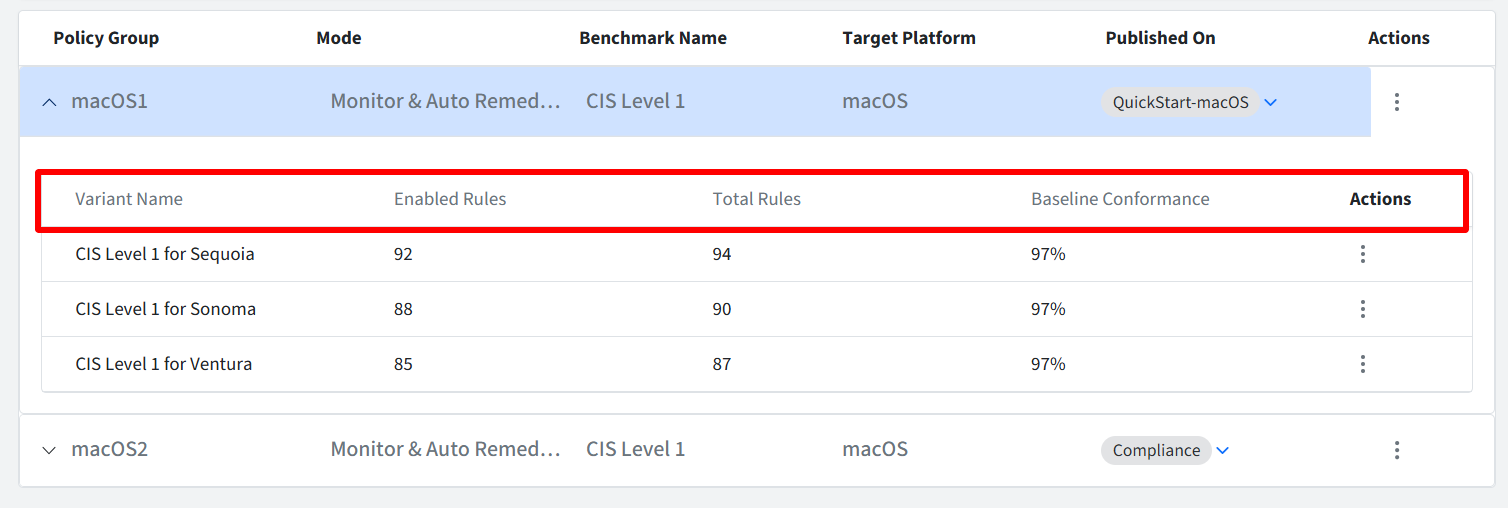
Variant Name: Displays the name of the specific variant within the Policy Group.
Enabled Rules: Shows the total number of individual rules that are currently enabled within this variant.
Total Rules: Indicates the total number of rules available in the original baseline from which this variant was created.
Baseline Conformance: Displays the percentage of rules enabled in this variant compared to the total rules in the baseline. For example, if a baseline contains 20 rules and 15 are enabled in the variant, the conformance will be 75%.
Actions: Clicking the three dots under Action will open a submenu with further options for managing this specific variant within the Policy Group.
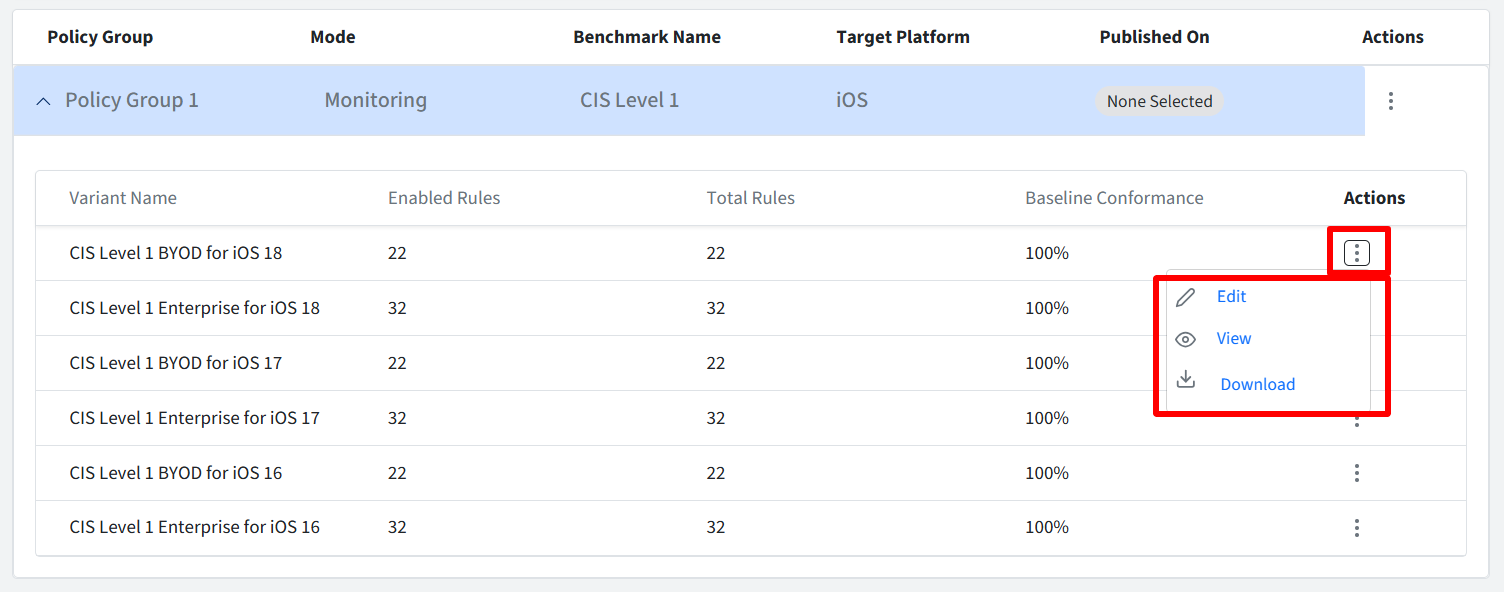
View: The View Rules page will be displayed. In View Rules mode, all rule information is read-only. You cannot make any changes to the rule configurations.
Download: Clicking here will generate and download a PDF guide that includes comprehensive information on the rules and policies. This guide is beneficial if it has to be shared with auditors.
Edit: The Edit Rules page will be displayed. You can modify the selection and configuration of individual rules within the variant. Components of Edit Rules window:
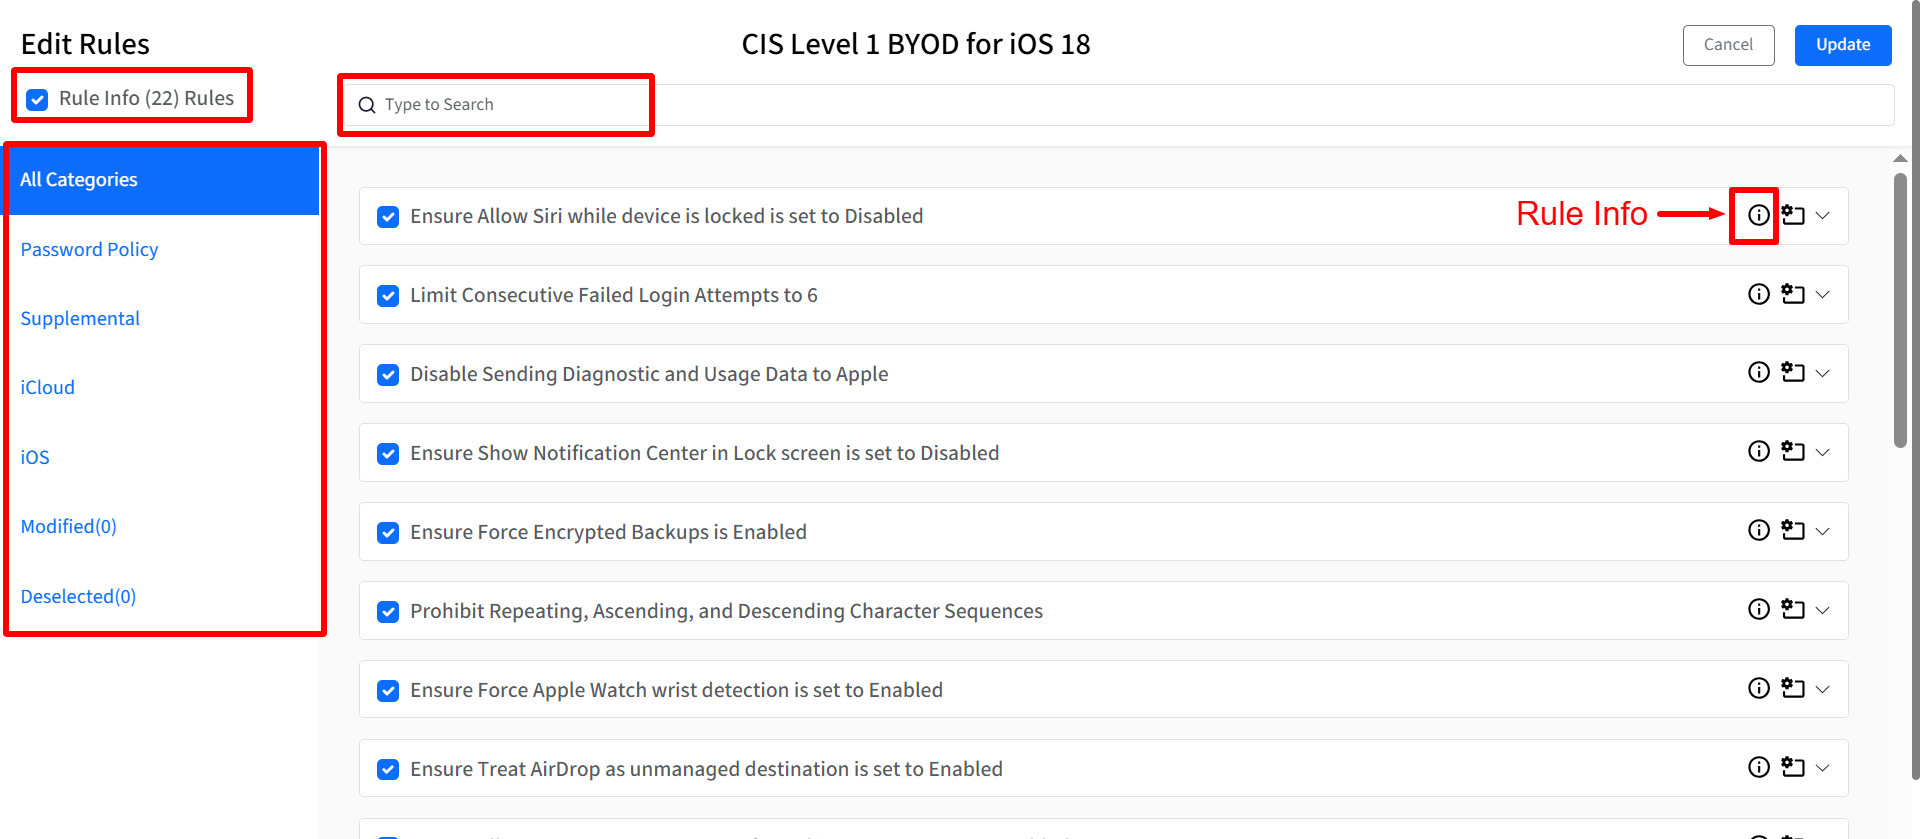
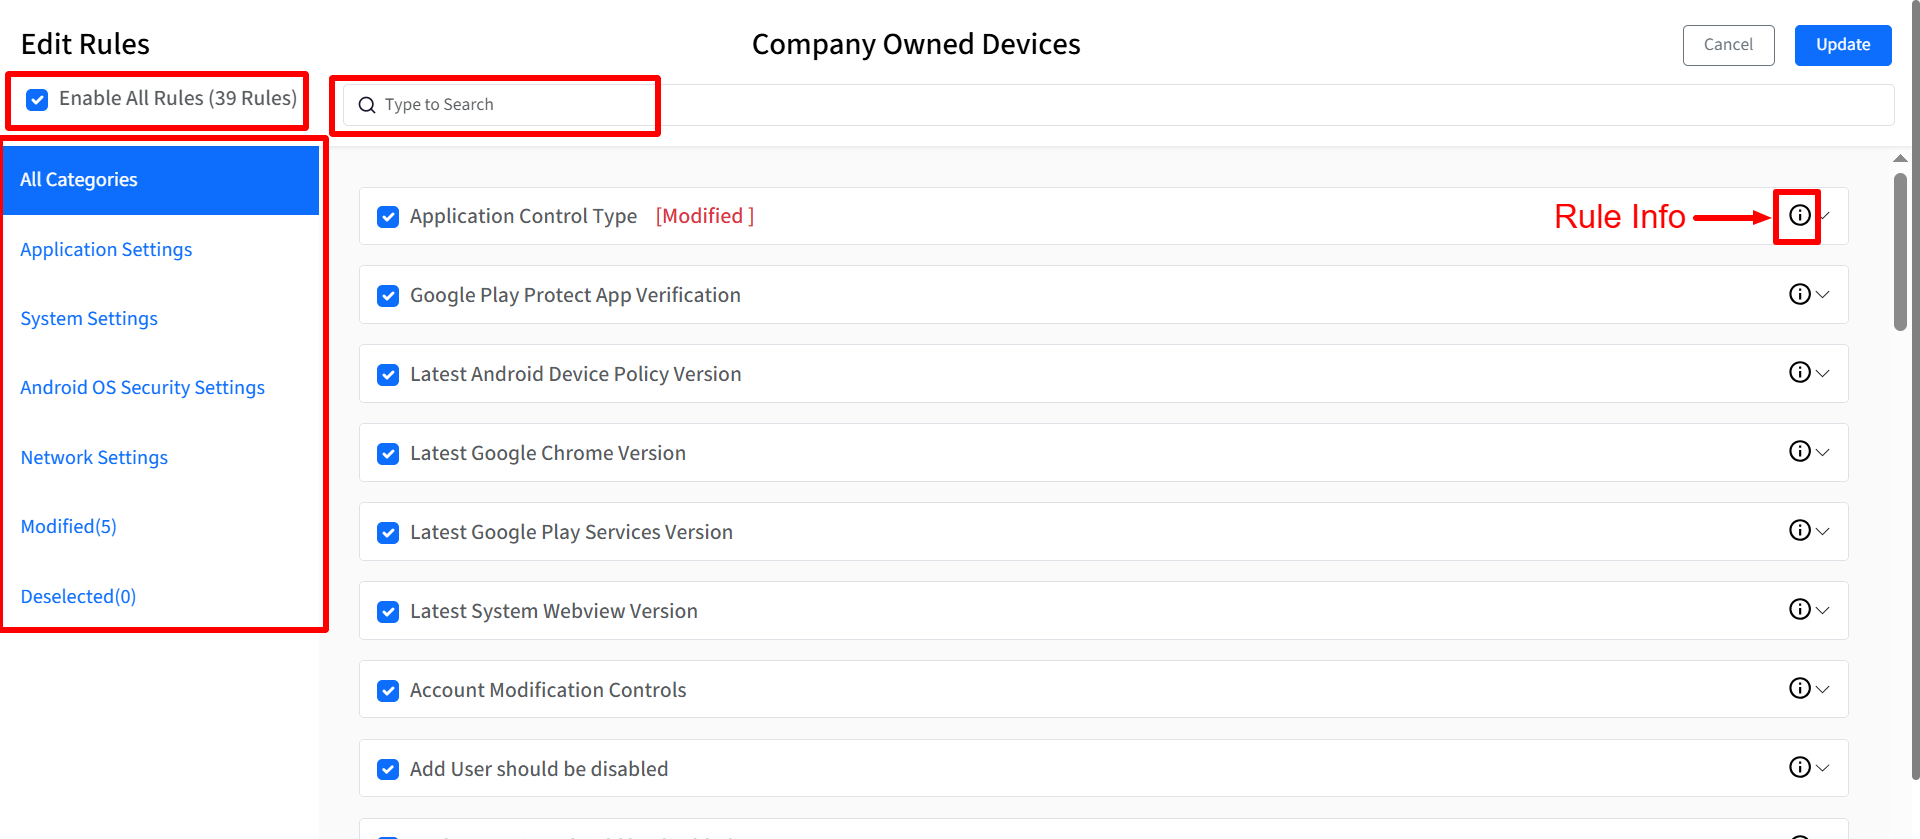
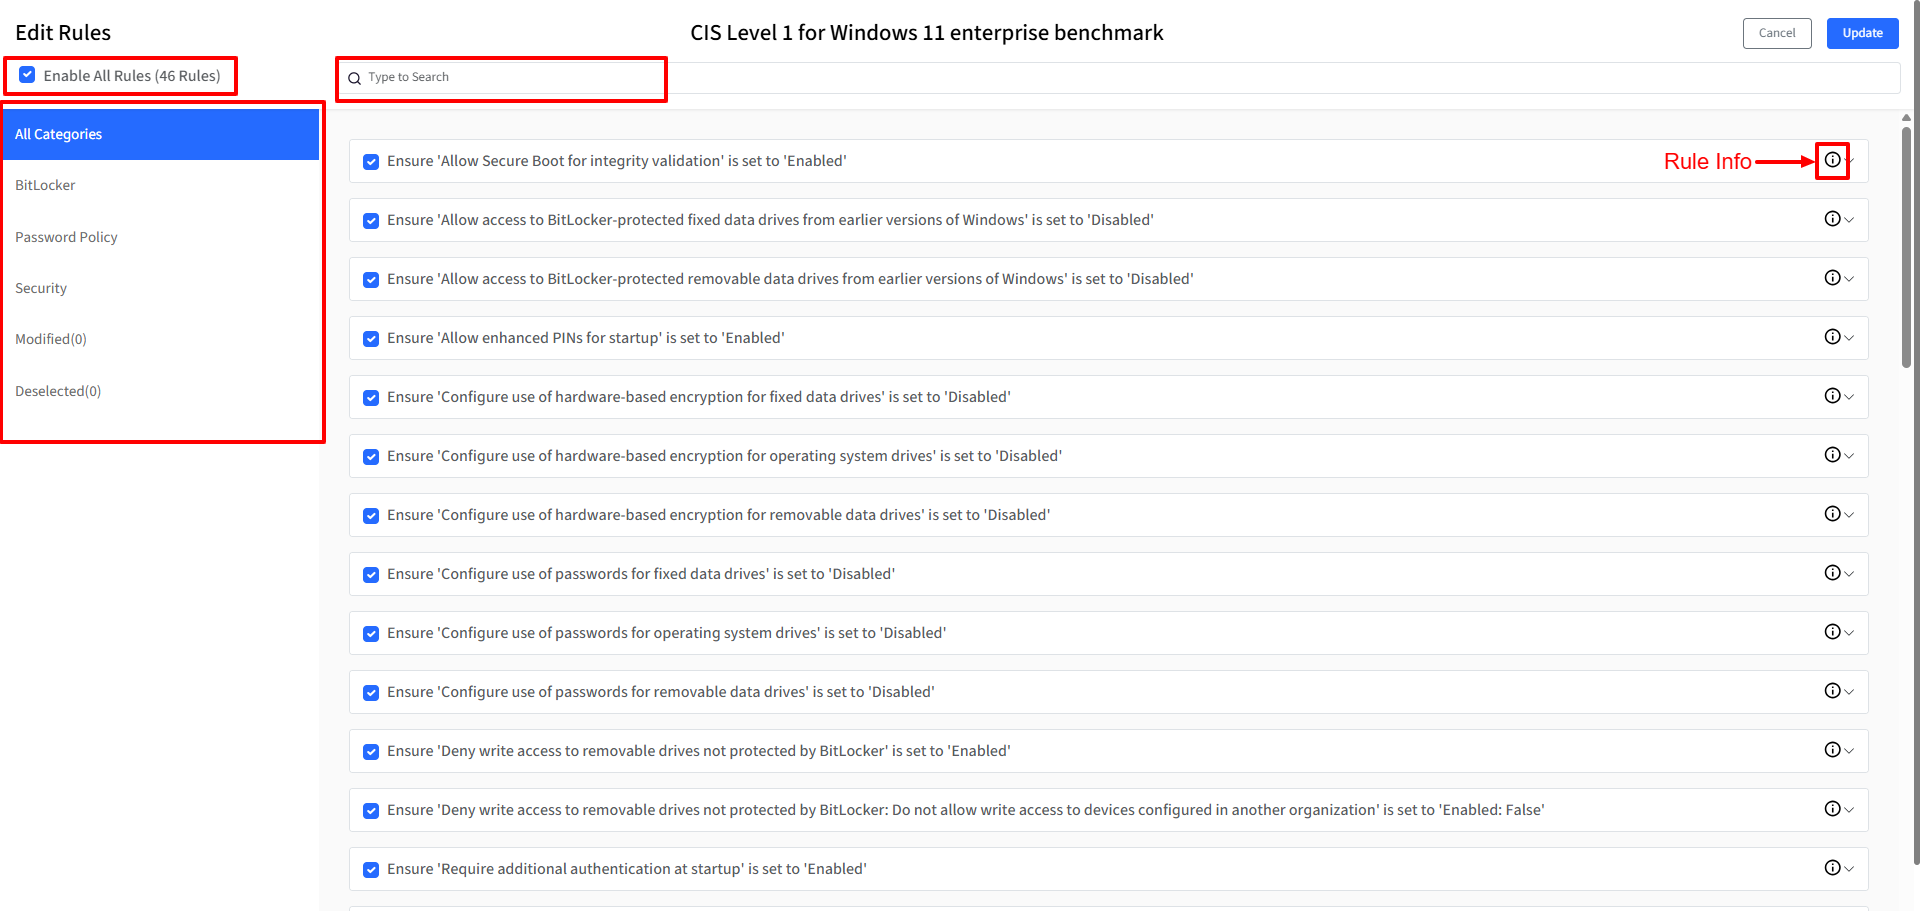
Enable All Rules: Clicking this checkbox will select or deselect all rules.
Search: Enter keywords to search for rules based on their titles within the currently selected category.
Rule Categories: These are available on the left hand menu
All Categories: Displays all rules available for the benchmark.
Other Available Categories: Lists the remaining categories of rules defined for the benchmark.
Modified: Displays rules where the Rule Value (ODV) has been changed from the recommended value.
Deselected: Displays rules that have been unchecked.
Rule Remediation Icon: Displays an icon indicating the remediation methodology (Profile or Script).
Rule Remediation is not applicable for Android
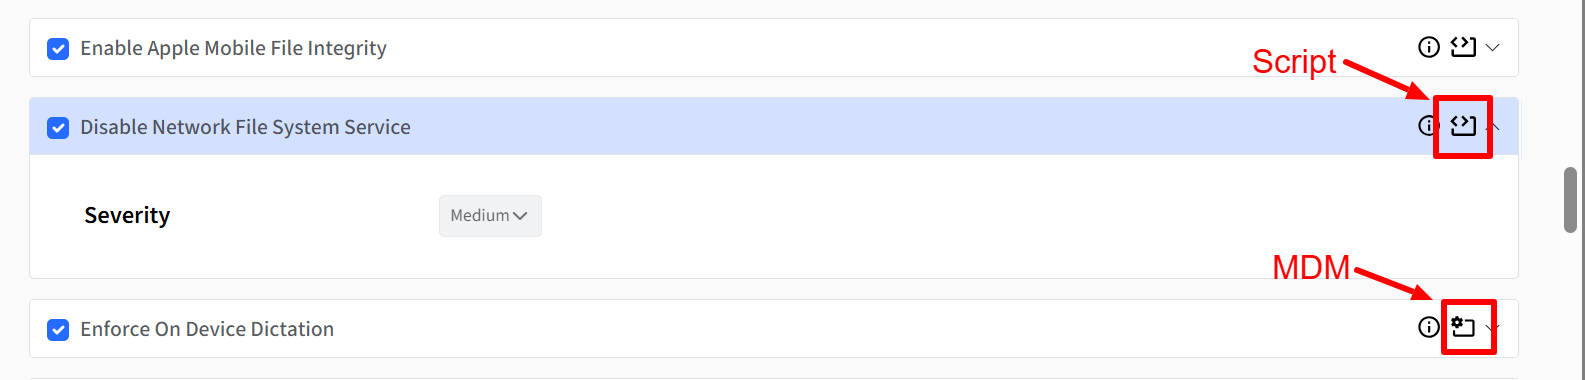
Severity: The severity level for certain rules can be customized to Low, Medium, or High, with the initial setting being the Scalefusion-defined severity. Note that rules with severities defined from CIS benchmarks are non-editable, whereas rules with Scalefusion-defined severities can be modified.
Rule Value (ODV - Organization Defined Value): Organization Defined Value (ODV) refers to a custom, organization-specific setting or value that you can configure for a particular compliance rule. On few rules you can also provide a Rule Value.
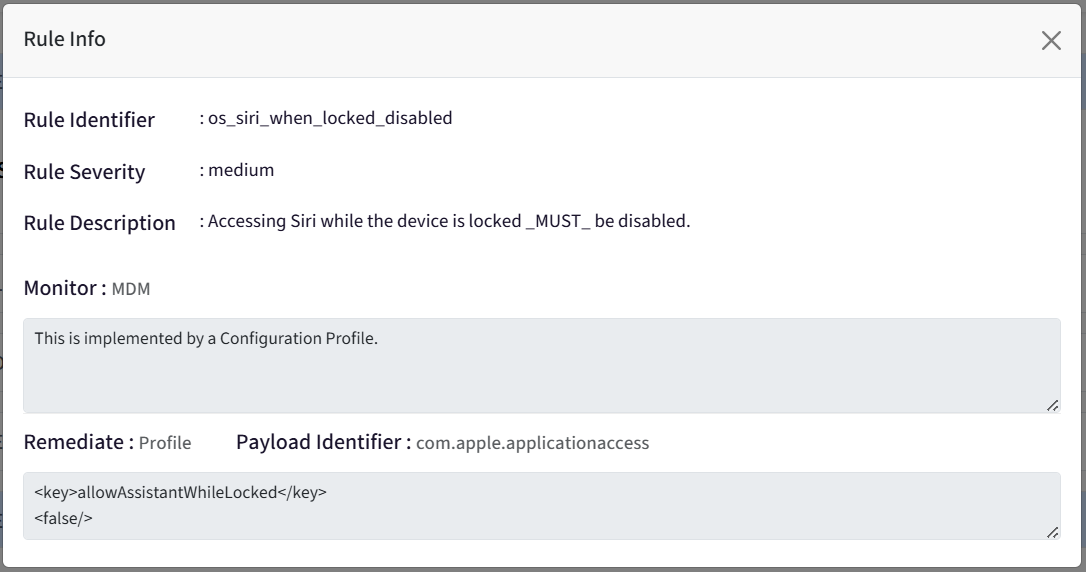
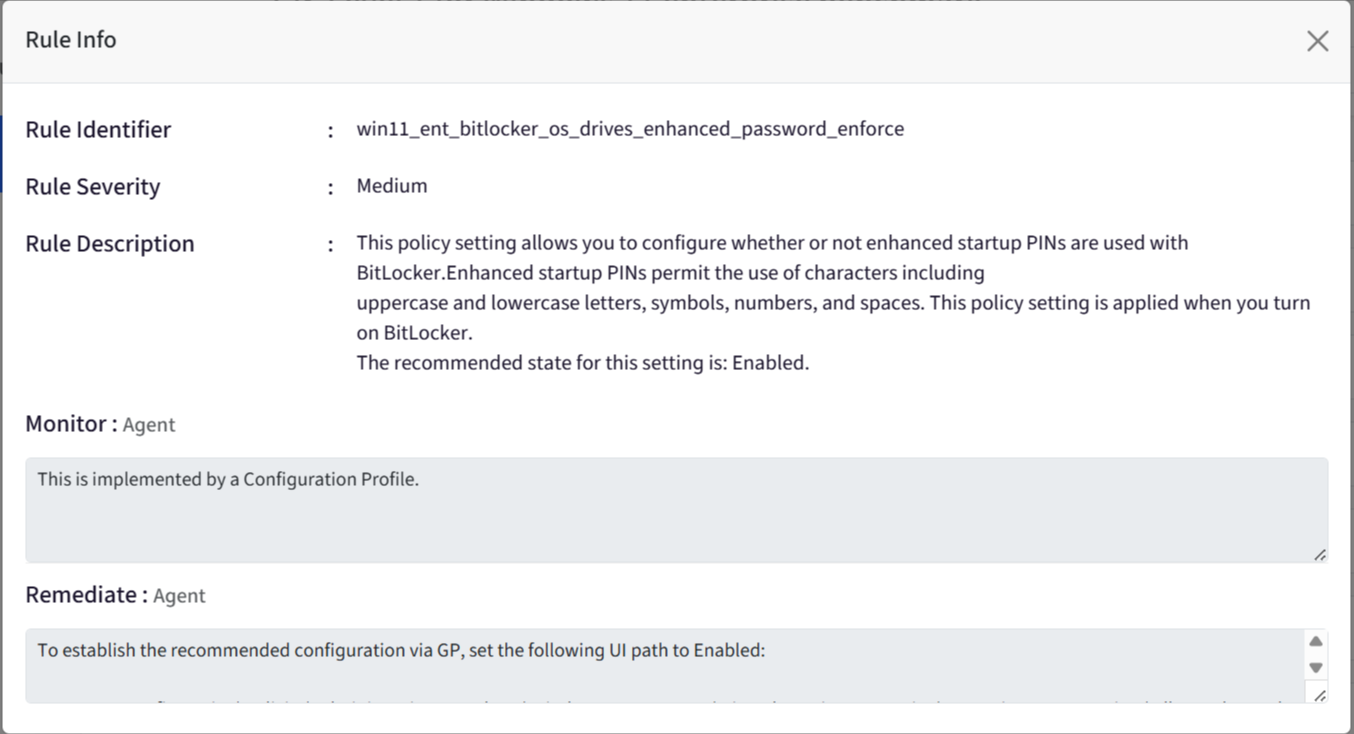
Info Icon: Clicking on the i button opens the Rule Info dialog. The Rule Info dialog displays following:
Rule Identifier: Displays Rule Identifier
Rule Severity: Displays Rule Severity (as selected)
Rule Description: Displays the rule description
Monitor: Displays the monitoring strategy for the rule (Profile or Script)
Result: Displays the expected result with datatype (if Monitoring Strategy is Script)
Remediate: Displays the remediation strategy for the rule
Payload Identifier: Displays the payload identifier value (if Remediation Strategy is Profile)
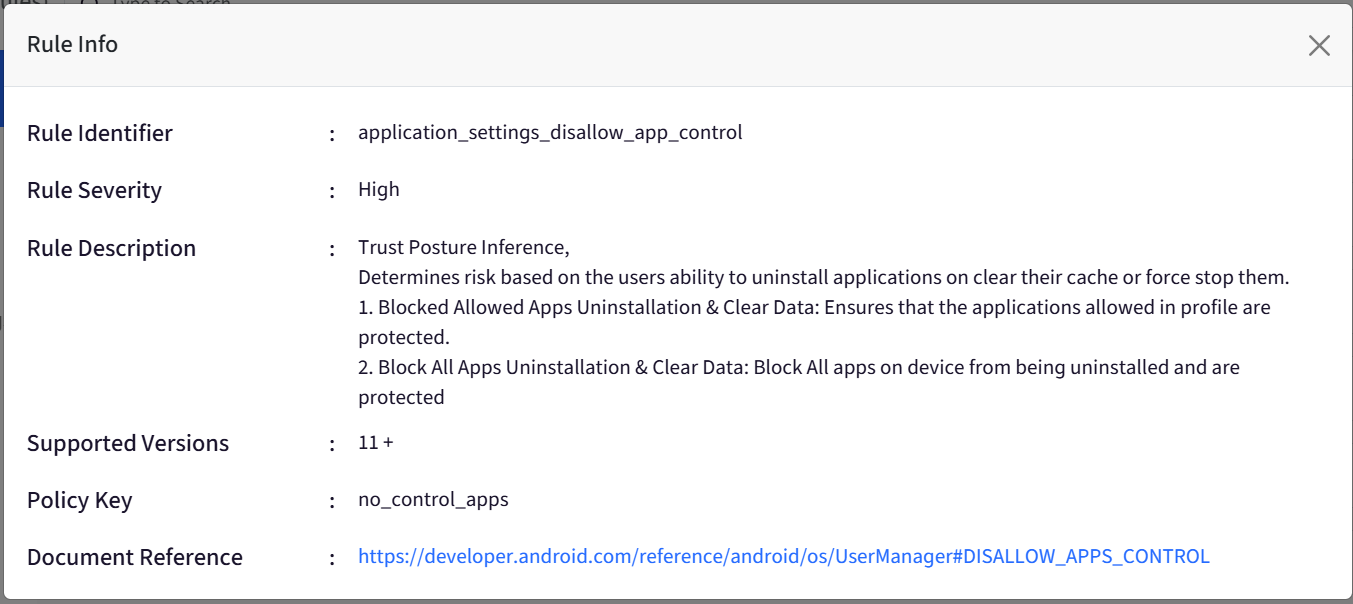
Rule Identifier: Displays Rule Identifier
Rule Severity: Displays Rule Severity (as selected)
Rule Description: Displays the rule description
Supported Versions: The Android Versions on which the rule is supported
Policy Key: Displays the Policy Key
Document Reference: Link to the reference document
Rule Identifier: Displays Rule Identifier
Rule Severity: Displays Rule Severity (as selected)
Rule Description: Displays the rule description
Monitor: Displays the monitoring strategy for the rule
Remediate: Displays the remediation strategy for the rule
Payload Identifier: Displays the payload identifier value
Step 3: Publish Policy Group
Once you have defined the rules for your Policy Group, you need to publish it to specific device profiles to apply the compliance settings. Follow these steps:
Locate the desired Policy Group in the list.
Under the Actions column for that Policy Group, click Publish.
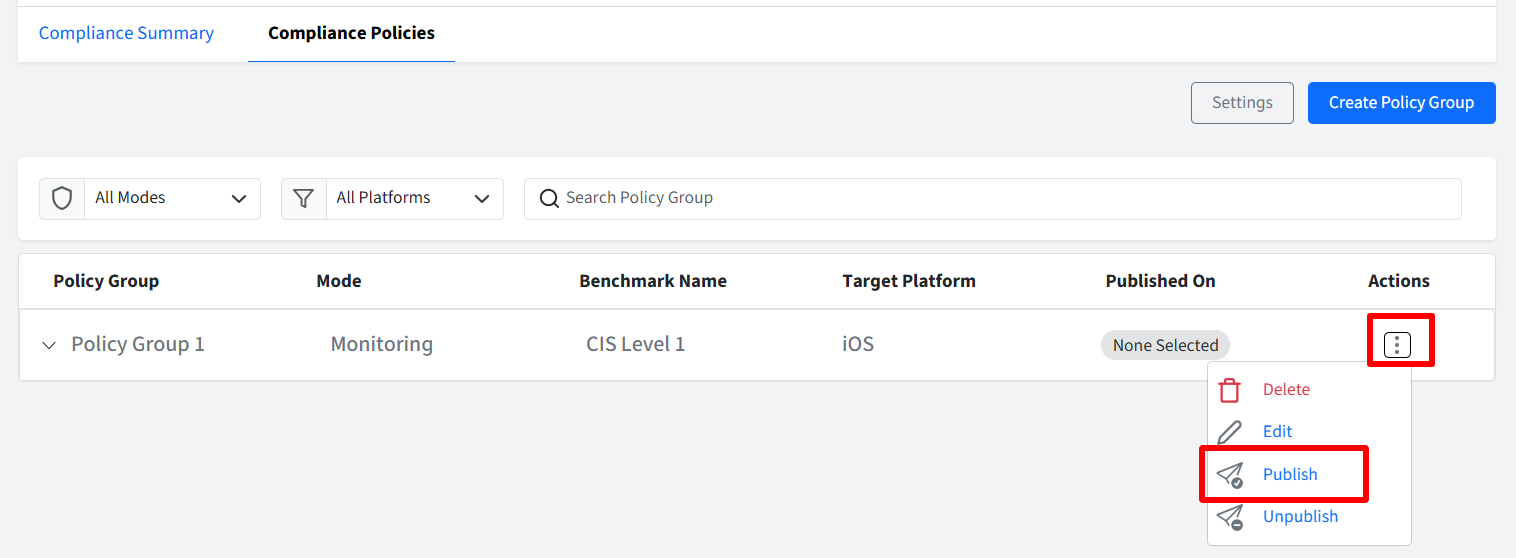
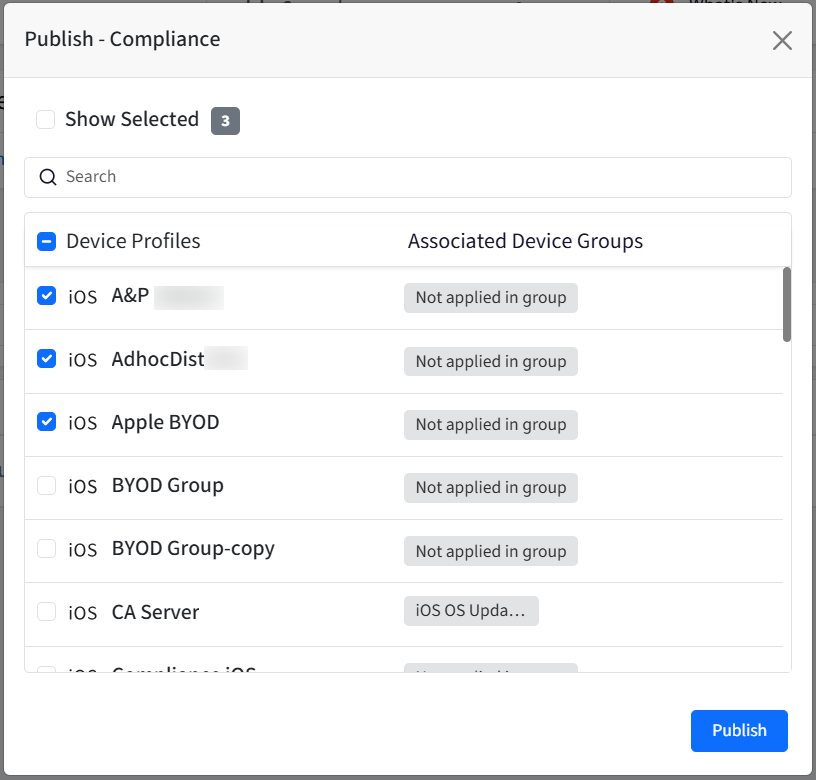
The Publish Policy Group dialog will appear.
Select the specific device profiles to which you want to apply this Policy Group.
Click Publish to deploy the Policy Group to the selected profiles.
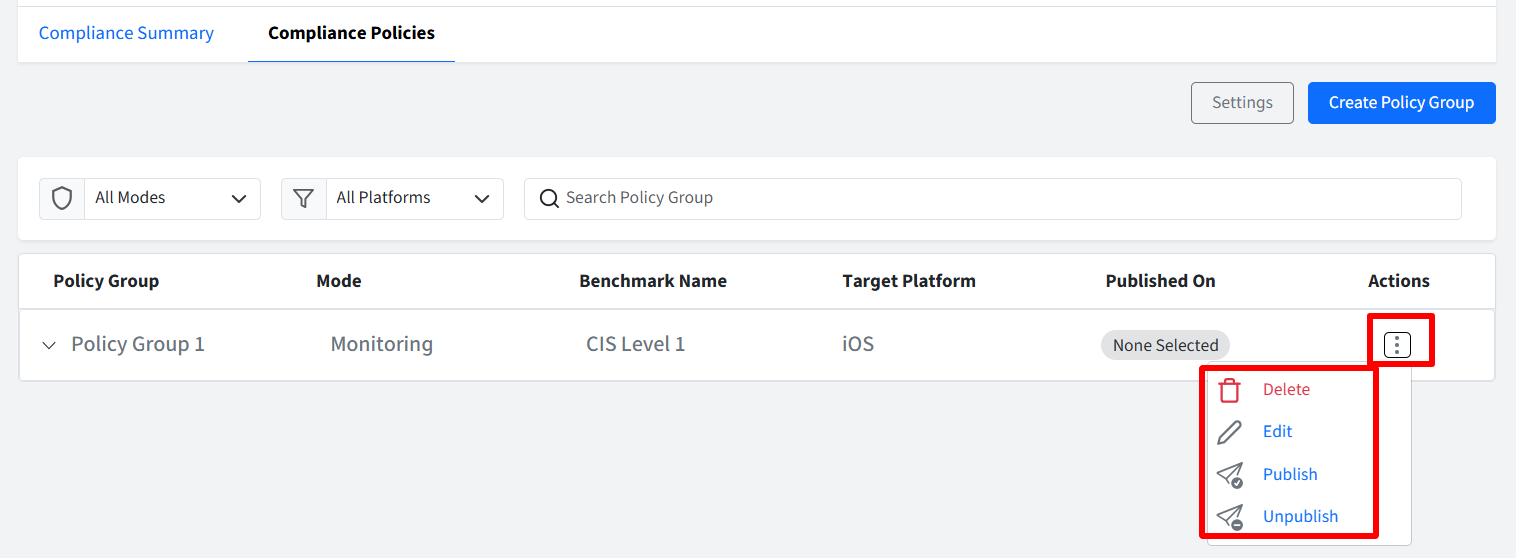
Managing Published Policy Groups:
In addition to publishing, you can also manage existing Policy Groups using the Actions menu:
Delete: Removes the Policy Group entirely.
Edit: Allows you to modify the rules and settings within the Policy Group.
Unpublish: Removes the Policy Group from the device profiles it is currently applied to.
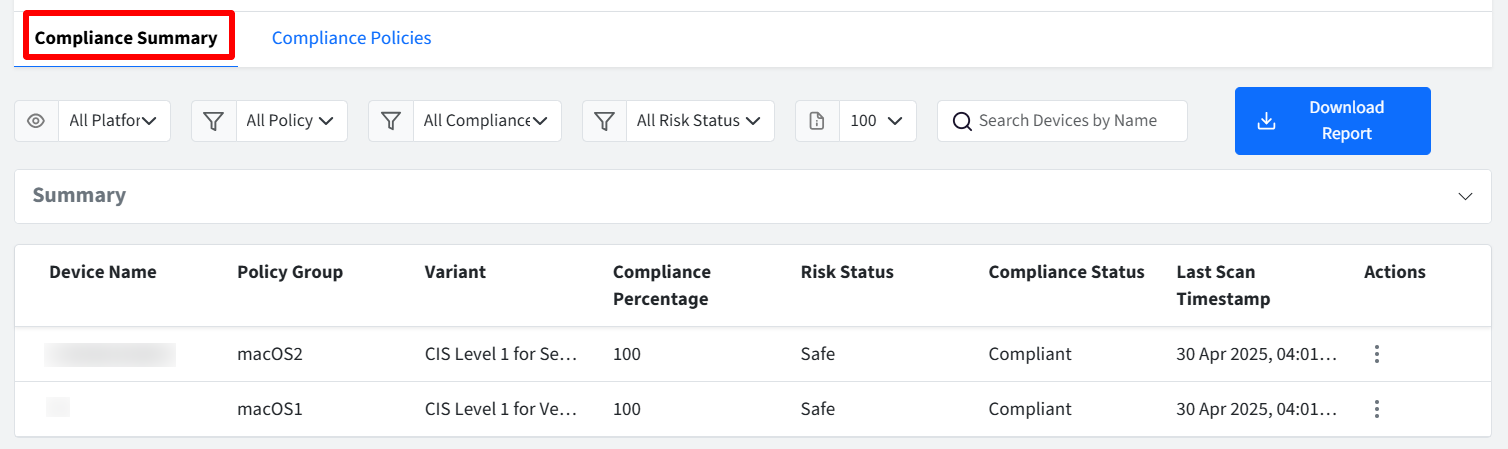
Step 4: Compliance Summary
Once a Policy Group is published to device profiles, the Compliance Summary section provides a detailed, device-centric view of compliance statuses. Here, you can monitor the overall compliance of your device inventory and access granular, rule-level details for individual devices via the Actions menu.
Filters to Report Compliance Status
The Compliance Summary page offers various filters and reporting options to help you analyze and manage device compliance effectively.
Platform: Displays list of platforms (iOS, macOS, Android, Windows)
Policy Group: Displays a dropdown list of all Policy Groups created within the Compliance Management section.
Compliance Status
All: Displays devices with any compliance status.
Compliant: Shows only devices that are currently compliant with the applied policies.
Non-Compliant: Shows only devices that are currently non-compliant with the applied policies.
Pending: Shows devices for which compliance status evaluation is in progress or has not yet been completed.
Risk Status
All: Displays devices with any risk status.
Safe: Shows devices with no identified compliance risks.
Low: Shows devices with low-level compliance risks.
Medium: Shows devices with medium-level compliance risks.
High: Shows devices with high-level compliance risks.
Page Count: Select the number of items (devices) to display per page (100, 200, or 300).
Search Bar: Enter keywords to search for devices by their name or by the name of the benchmark applied to them.
Clear Filter: This will remove all applied filters and reset the Compliance Status list to its default state. This button is visible only when one or more filters are currently applied.
Download Report: This will generate and download a report of the current Compliance Status view in CSV format. Example CSV:
sample_compliance_status_report_updated.csv(This file will contain the compliance details of the devices based on the currently applied filters and displayed columns).
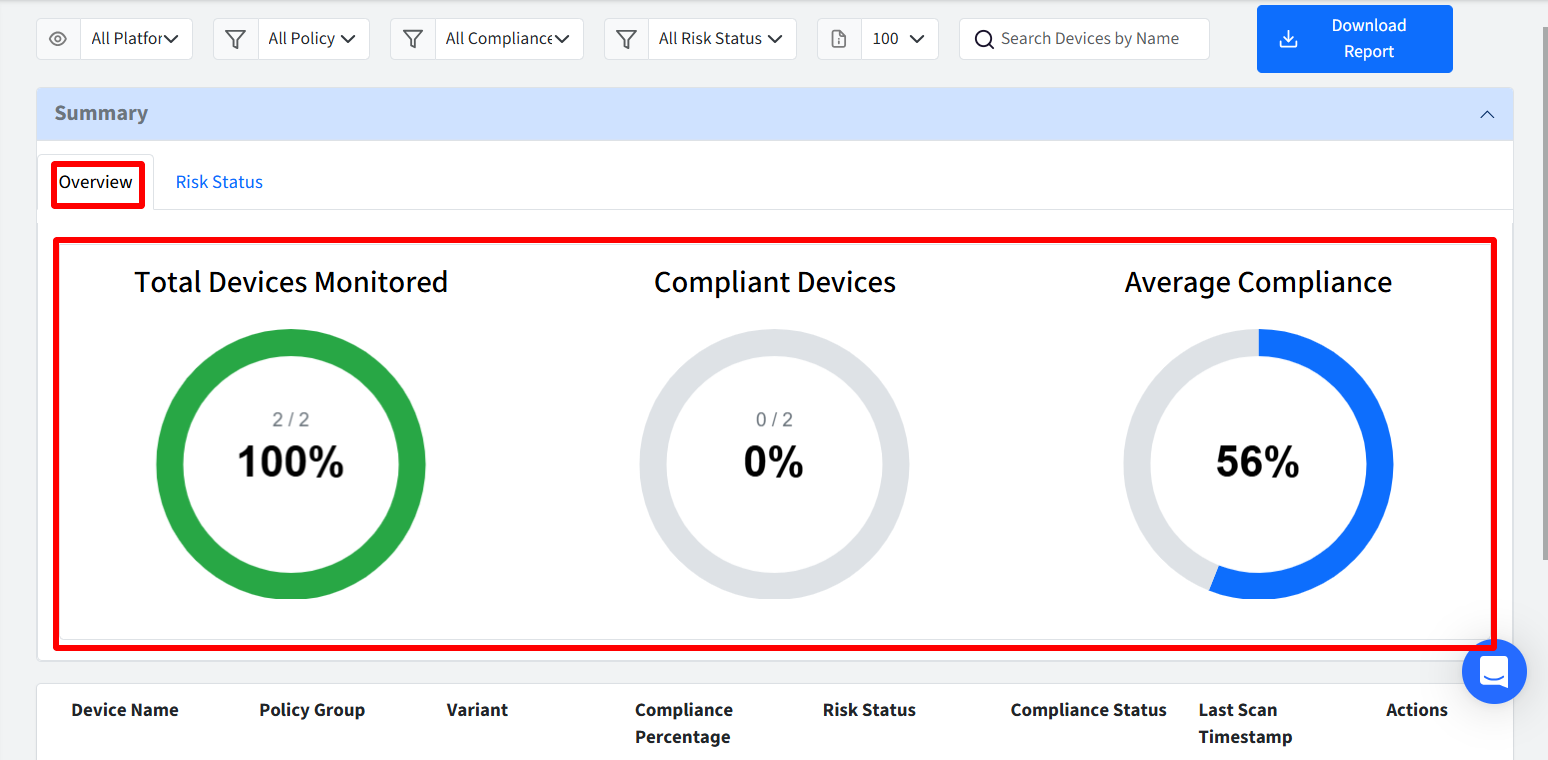
Overview
This section provides a visual summary of your device compliance risk status, dynamically updating based on any filters you have applied. The Overview section shows the following:
Total Devices Monitored (%): It is the No. of devices monitored / Total Devices
Compliant Devices (%): Compliant Devices are the devices that are 100% compliant and calculated as Compliant Devices / Monitored Devices
Average Compliance: Displays the average compliance percentage of the monitored devices
Risk Status
This visual breakdown allows you to quickly identify areas of concern and prioritize remediation efforts for devices posing the highest security risks. Please note that the data presented here dynamically reflects the devices that currently meet your applied filter criteria. Following are the components in this section:
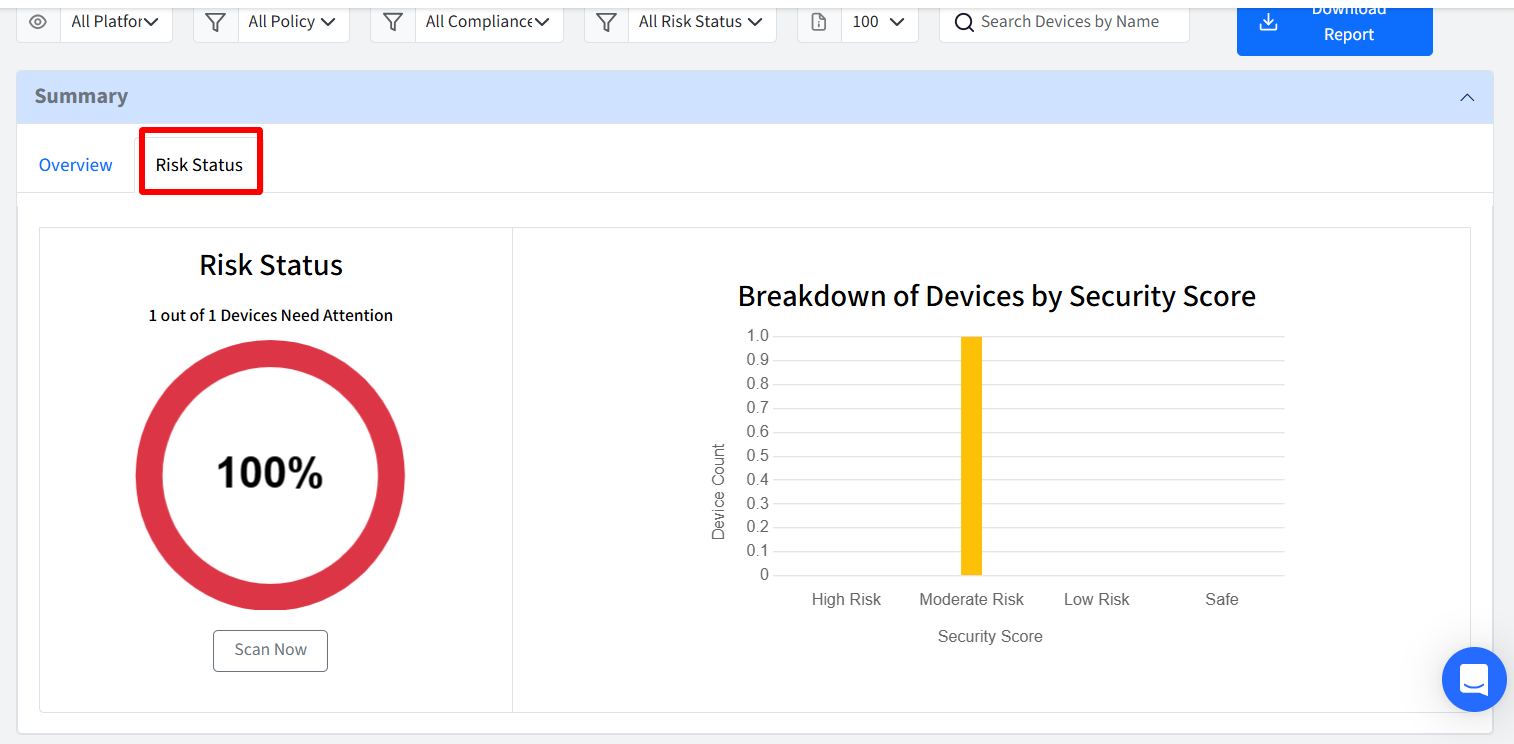
Devices Need Attention: Displays the percentage of high and moderate-risk devices (Devices at risk out of Total devices)
Scan Now: This will immediately initiate a compliance scan on your desktop devices. For iOS devices, clicking this will fetch the latest compliance commands for evaluation.
Breakdown of Devices by Security Score:
This section visually breaks down your device fleet based on their calculated security scores and associated risk levels, providing a clear understanding of your overall compliance posture.
High Risk (Security Score: 0 - 29): Displays the high-risk devices
Moderate Risk (Security Score: 30 - 69): Displays the moderate-risk devices
Low Risk (Security Score: 70 - 99): Displays the low-risk devices
Safe (Security Score: 100): Displays the safe devices
Compliance Status Table
The Compliance Summary page displays a table providing a comprehensive overview of the compliance posture of your managed devices. The columns and their descriptions are as follows:
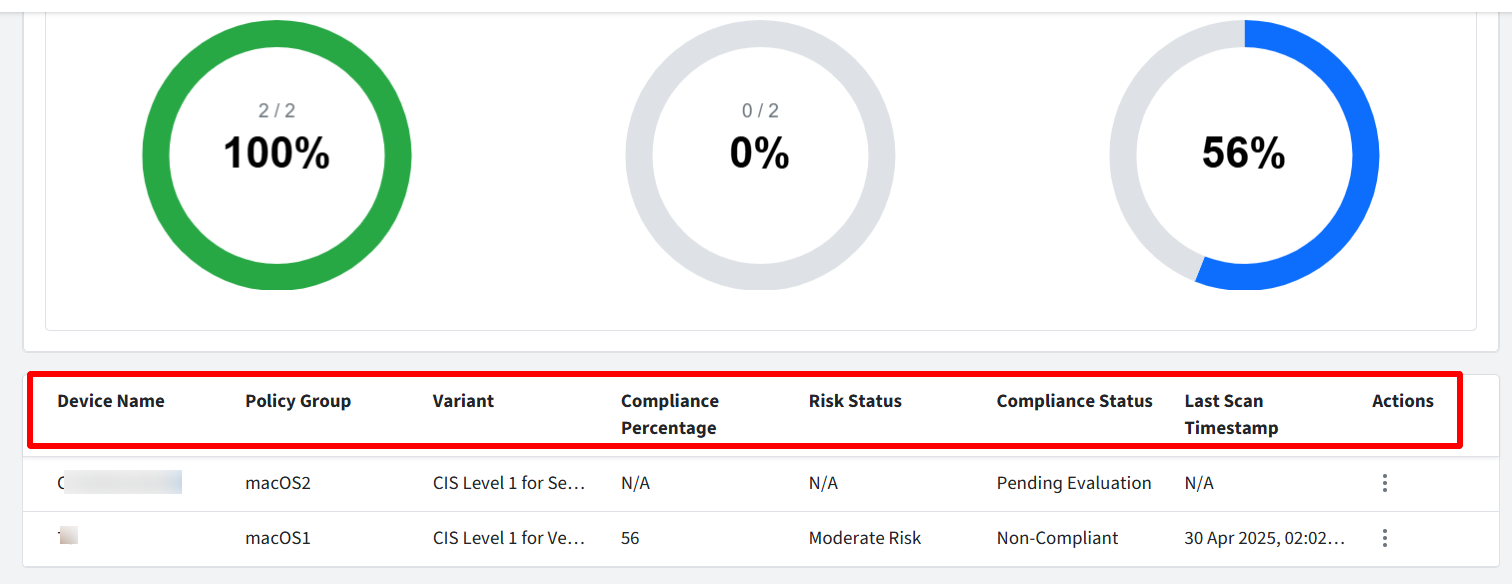
Device Name: The name assigned to the managed device.
Policy Group: The name of the Policy Group that is currently applied to the device.
Variant: The name of the specific variant of the benchmark that is applied to the device through the Policy Group.
Compliance Percentage: The compliance percentage of the devices using Passed rules/Total rules
Risk Status: The calculated risk status of the device, as determined by the compliance evaluation process. If the risk evaluation is still pending, N/A will be displayed. Possible values include Safe, Low, Medium, and High.
Compliance Status: Displays the result of the most recent compliance scan performed on the device. Possible values are:
Compliant: The device meets all the requirements defined in the applied policy.
Non-Compliant: The device does not meet one or more of the requirements defined in the applied policy.
Pending: The compliance scan is currently in progress or has not yet been completed.
Last Scan Timestamp: The date and time when the last compliance scan was completed for the device. The timestamp will be displayed in the format DD-Month-YYYY HH:MMAM/PM (e.g., 30-July-2024 02:15PM).
Actions: Clicking the three dots under Actions will show the following option:
Rule-wise Summary: This will open the Rule-wise Summary dialog, providing a detailed breakdown of the device's compliance status for each individual rule within the applied benchmark. This will be grayed out and unavailable if the Compliance Status is Pending or if the device has not yet been scored for compliance.

On Device
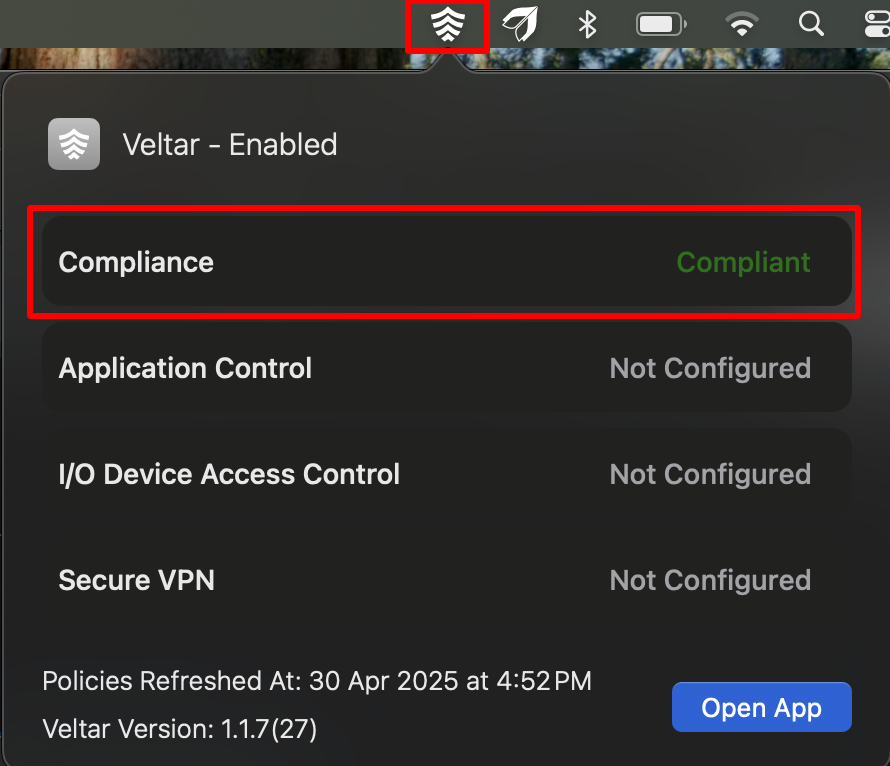
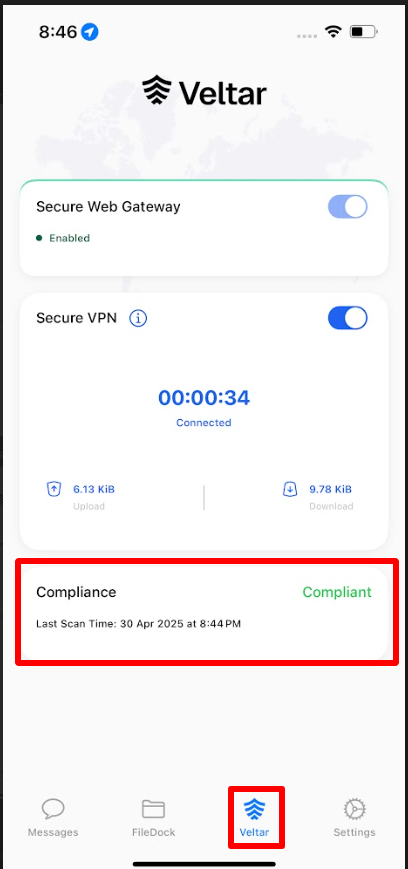
On publishing the configuration from Scalefusion Dashboard, the Compliance along with its current status will be visible on the device under Veltar section.
Notice Veltar icon on the top bar. Clicking on it will reflect Compliance along with status.
If you open Scalefusion MDM Client, it will reflect Compliance (with status), under Veltar section
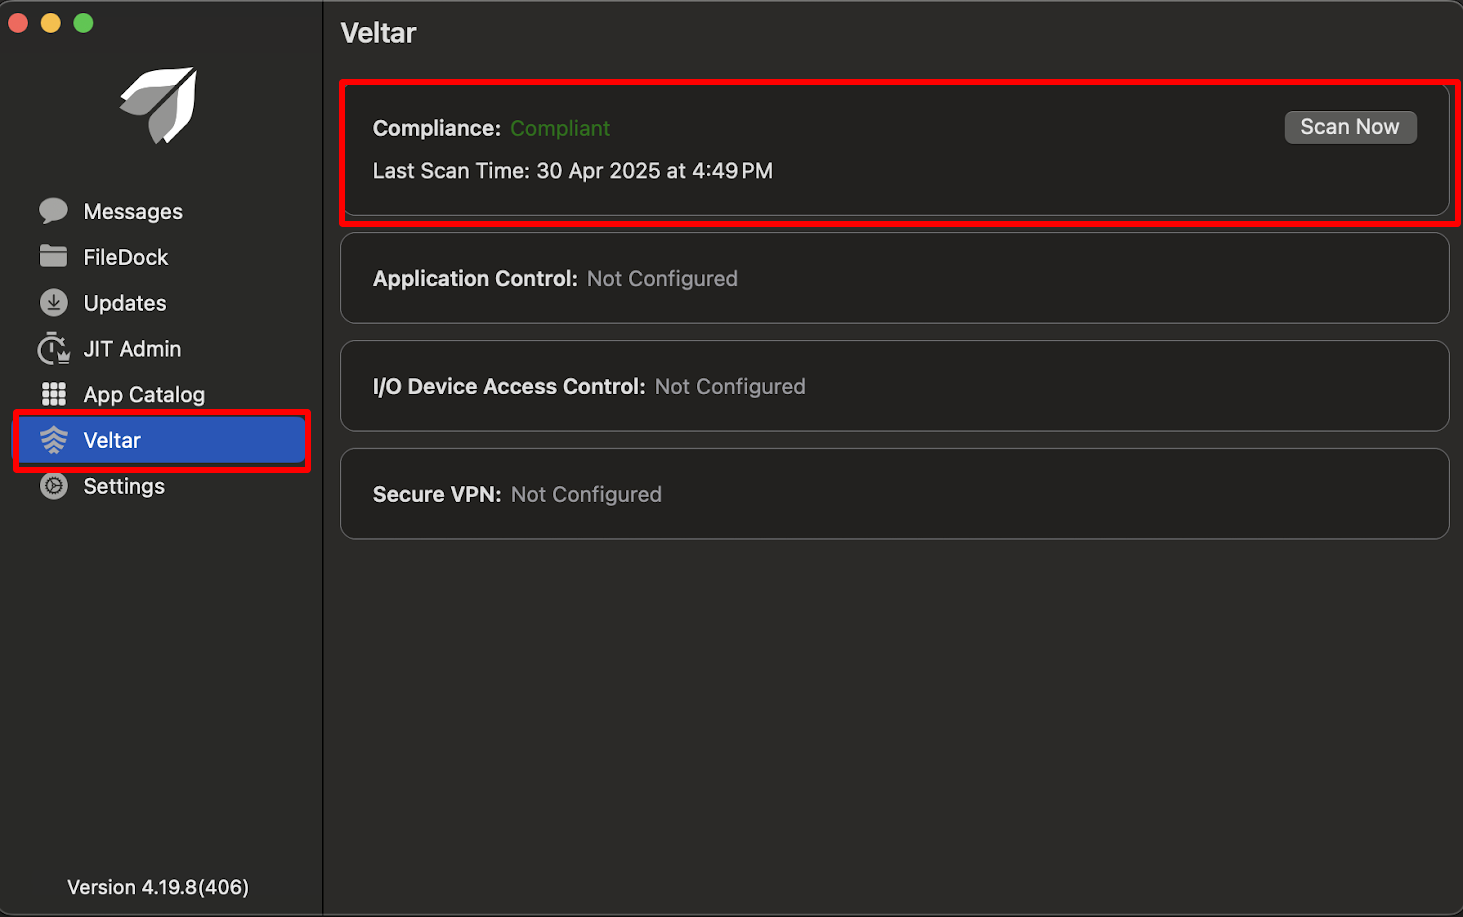
Compliance along with the current status will be displayed under Veltar section (inside Scalefusion MDM Client).
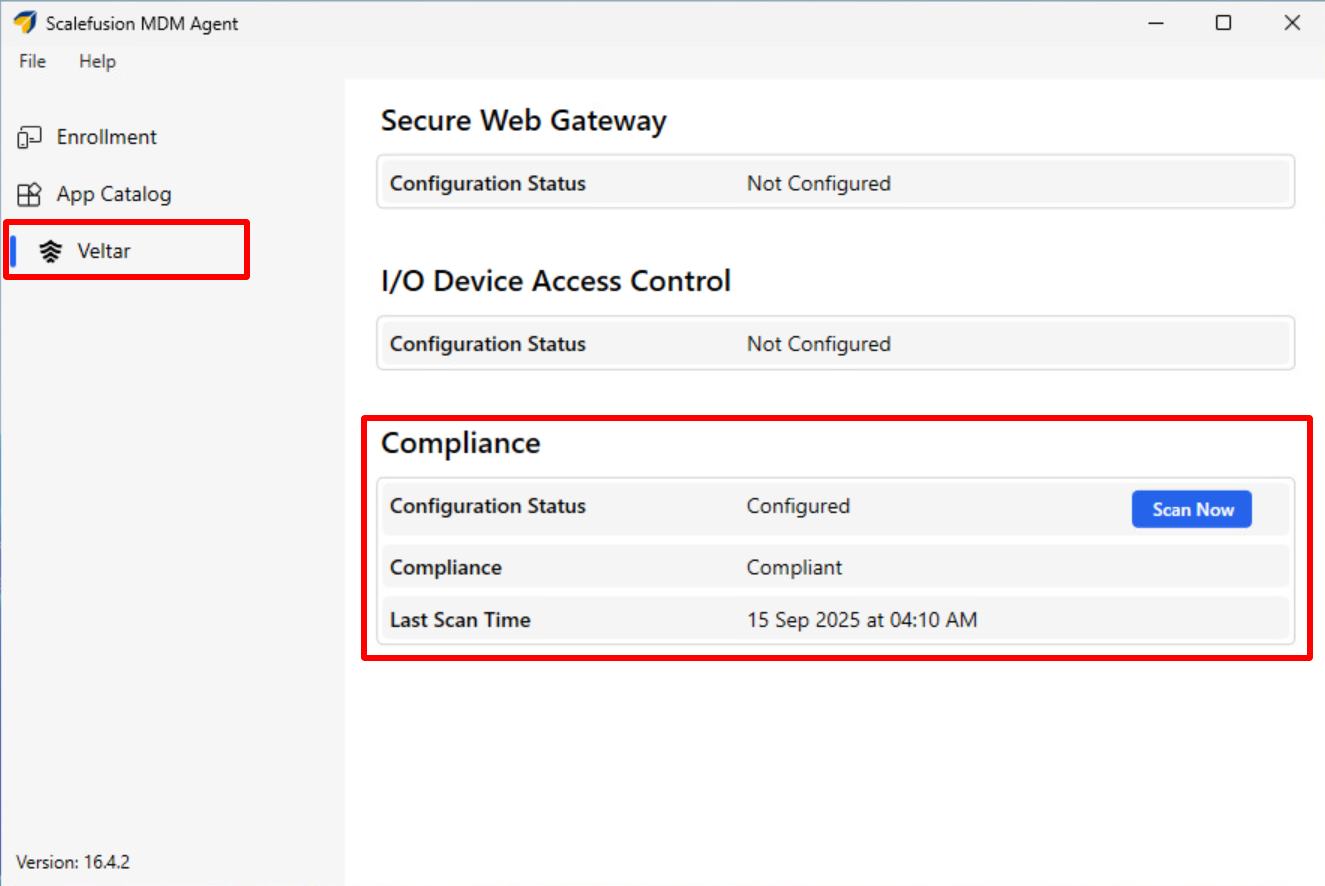
Compliance along with the current status will be displayed under Veltar section (inside Scalefusion MDM Agent).
Leveraging Compliance with Scalefusion Integrations
After configuring Compliance benchmarks within Scalefusion, you can seamlessly integrate them with various Scalefusion features. Explore the following areas to leverage your compliance configurations:
Device Details Section: View the real-time compliance status and detailed rule evaluations for individual devices directly within their device details page.
Device Details > Full Device Information: Access a comprehensive compliance overview for a specific device, including historical scan data and applied policies, within the full device information view.
Device Group & User Group > Automation Rules: Create powerful automation rules triggered by device compliance status. For example, automatically move non-compliant devices to a quarantine group or notify administrators of high-risk devices.
Known Behaviors
iOS/macOS
Initial macOS Policy Group Configuration: By default, new macOS Policy Groups will have the following rules deselected:
Enforce Filevault
Ensure Software Update is Updated and current
Filevault Rule Compliance: For the Enforce Filevault rule to achieve a Passed status, a device logout followed by a login, or a device restart, will be necessary.
Rule Reflection on User Interface: For certain rules to be accurately reflected on the device, a device restart may be required.
Filevault Remediation: Applying remediation to the Enforce Filevault rule will initiate the Filevault encryption process on the device.
Password Policy Remediation: Remediating rules related to the Password Policy will enforce the user to change the password on the device.
Windows
Unsupported Windows Versions: Compliance is not supported on the following versions of Windows:
Windows 10 (including Home Edition)
Windows 11 (Home Edition)
Windows Server 2016
Windows Server 2019
Windows Server 2016 and 2019 have already reached end of support, and Windows 10 is approaching its end-of-life. As a result, devices running these operating systems are considered non-compliant by default, regardless of other configuration or policy settings.
Domain Connectivity Requirement: On domain-joined Windows devices, compliance checks require connectivity to the domain controller. If the domain is not reachable (e.g., due to network issues or the device being offsite without VPN), compliance evaluation will fail. In such scenarios, the device may be marked as non-compliant until connectivity is restored.
FAQs
How are variants assigned to devices?
Variants are assigned based on the management capabilities of the device. In the example of iOS, a BYOD (Bring Your Own Device) device will have a different set of applicable compliance rules compared to a COD (Company-Owned Device). Scalefusion determines the suitable variant for a device based on its platform, enrollment type, and other device attributes. This ensures that only relevant compliance checks are applied to each device.
What happens if a device does not have a suitable variant available within a published Policy Group?
If a device does not match any of the available variants within a published Policy Group, that specific Policy Group will not be applied to the device. The device's compliance status for that particular benchmark will remain as "Not Applicable" and will show as Unscored. This can be a case where the OS version is not supported or because of other possible reasons.
How do changes to a device profile affect its compliance status?
When a profile change affects settings monitored by a compliance rule in an applied Policy Group, the device's compliance status for that rule will be re-evaluated during the next scan. If the Policy Group is in Monitoring mode, the profile settings will take precedence. However, if the mode is Monitor & Auto Remediation, the remediation action will override any conflicting profile changes.
What do the icons displayed in the Profile section related to Compliance signify?
The shield icon displayed in the Profile section (for certain settings) related to Compliance indicate things like that particular setting being monitored or controlled by a Policy Group.
What happens if the mode of a Policy Group is changed from "Monitor & Auto Remediation" to "Monitoring" only?
When a Policy Group's mode is changed from Monitor & Auto Remediation to Monitoring only:
Profile-Driven Rules: The remediation payloads associated with profile-driven rules will be reverted or removed from the affected devices. This means any settings that were automatically changed to achieve compliance will be set back to their original, potentially non-compliant, state based on the device profile.
Note: On Windows 11 devices, only the CSP based rules will get reverted
Script-Driven Rules: Remediation scripts, however, will not be automatically reversed. Any changes made by previously executed remediation scripts will persist on the devices.
What is the device status if compliance is published but Android Enterprise (AE) Setup is incomplete?
The device will remain in a "Pending Evaluation" state. Applications will only be published once the AE setup is finalized.
After compliance is published, what immediate actions take place on Android devices?
Essential applications will be automatically published and installed on the devices on which compliance is applied. Evaluation results may vary in timing based on the configured frequency or data received from the devices. Essential Applications include:
ADP Version
Google Play Store
Google Play Services
Google Chrome
System WebView
What happens if critical compliance applications are uninstalled or deleted?
Unpublishing such apps from the dashboard is prevented. Should a user manage to uninstall an app from the device, the system will attempt to reinstall it post two minutes to maintain compliance functionality.
What is the device status if compliance is published to devices not enrolled in EMM (Enterprise Mobility Management) or lacking Google Mobile Services (GMS)?
The device will remain in "Pending Evaluation" state.
What is the difference between the Windows Enterprise variant and the Standalone variant?
The Enterprise variant is intended for Windows 11 domain-joined machines, typically managed within a corporate environment.
The Standalone variant is designed for Windows 11 non-domain-joined machines, such as personal or workgroup devices that are not connected to an Active Directory domain.
On Dashboard, device compliance status is updated however on device Agent UI, the Compliance Status doesn’t appear to be updated. What can be the reason?
This is expected behavior. The Agent UI updates compliance status on the next device sync, which can be triggered by any of the following:
A policy change
Device log out/in
Manual policy refresh
Until the next sync occurs, the Agent UI may show an outdated status even though the backend reflects the latest compliance result.
On Windows Server 2022/2025 Domain Controller machines, why are "MS Only" rules marked as Unscored?
On Domain Controller (DC) machines, only "DC Only" rules are applicable for compliance evaluation.
The "MS Only" rules are applicable to:
Domain-joined non-DC server machines
Standalone server machines
Therefore, on DC machines, "MS Only" rules are marked as Unscored, as they do not apply in that context.