A catalog is a list or record of items systematically arranged often including some descriptive details. In similar terms, Scalefusion's macOS App Catalog provides a centralized space containing set of third party apps from where IT admins can securely manage and distribute applications to end-users' macOS devices. It is a platform that allows you to create a customized app store for managed macOS devices. Administrators can not just create catalog of apps but also categorize them, configure update settings, upload pre/post install scripts and also apply permissions as per their organization's requirements.
A range of third party apps' are synced and made available on Scalefusion Dashboard and from there they can be installed on managed macOS devices, all remotely.
This document describes the configurations required to be done on Scalefusion Dashboard side, apply them on devices that ultimately lead to the apps' installation on devices.
Pre-requisites
Supported OS: macOS 10.15 and above.
Devices should be enrolled with Scalefusion.
Latest version of Scalefusion MDM Client (agent app for macOS) should be installed on the devices.
macOS device profile should be created with the following setting configured in the profile:
Security & Privacy > General
Check Configure Gatekeeper settings and select Mac App Store and Identified developers

How it works?
On Scalefusion Dashboard, select the App(s) to be installed.
If the app is not there, add it from Catalog in Dashboard.
Create Install Configurations. You can configure the following:
Install Settings
Update Settings
Scripts
Permissions
Publish the Configuration on device profiles.
These are explained in detail below.
Steps to install apps from macOS App Catalog
Step 1: Select Apps
Sign In to Scalefusion Dashboard.
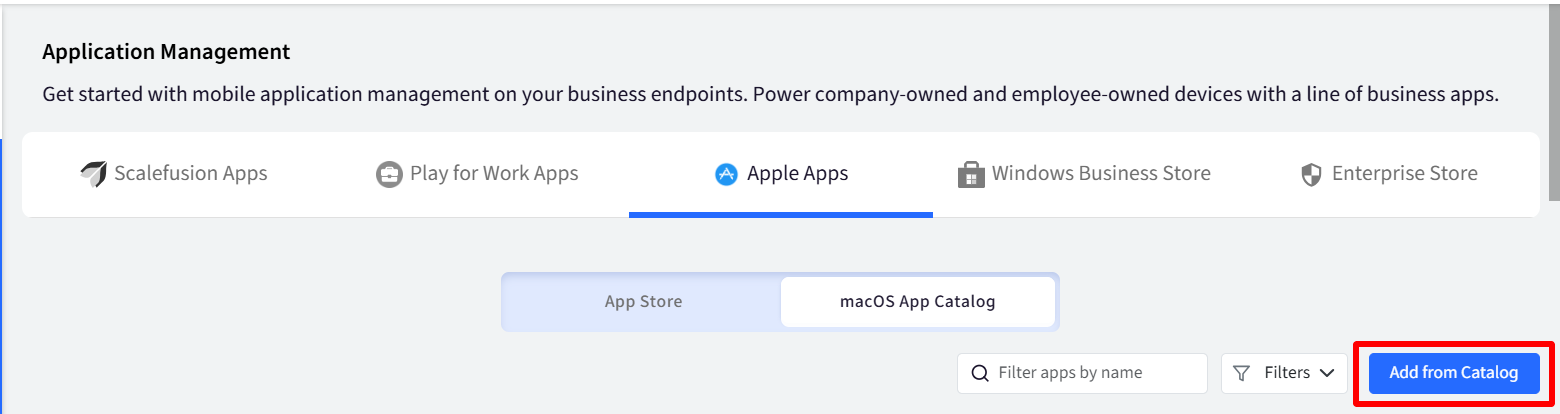
Navigate to Application Management > Apple Apps and click on the tab macOS App Catalog.

You can add the apps by clicking on Add from Catalog on the right side.
Adding apps from Catalog
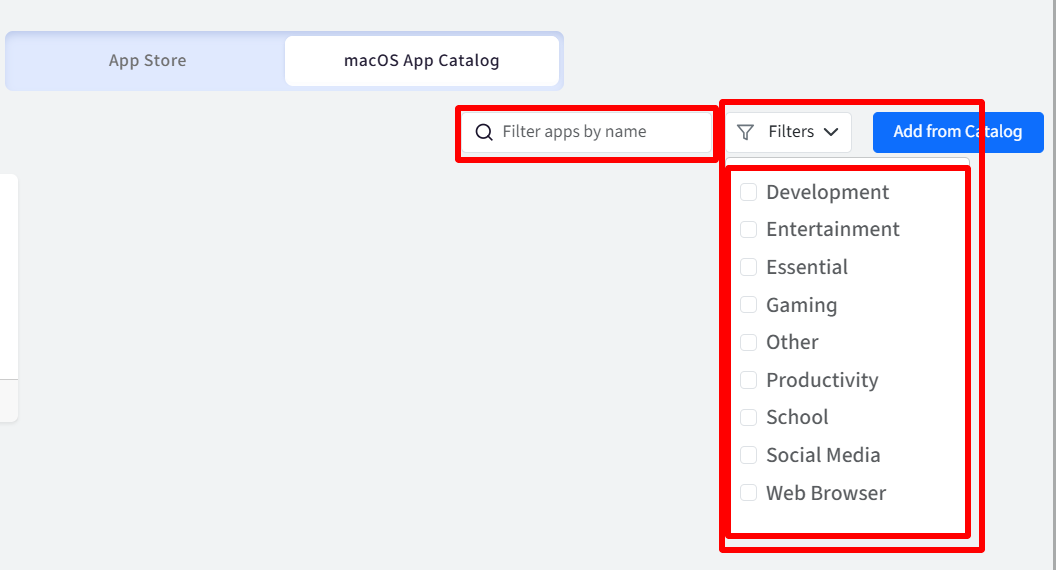
Under macOS App Catalog, click on the button Add from Catalog on the right.
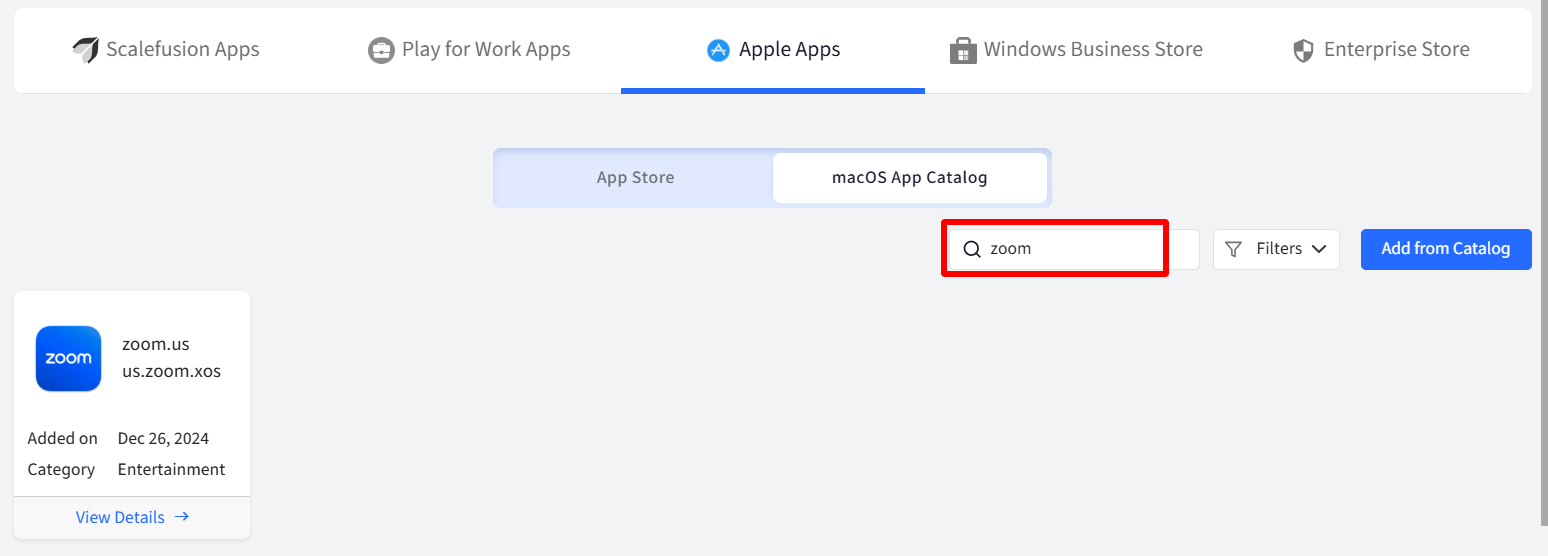
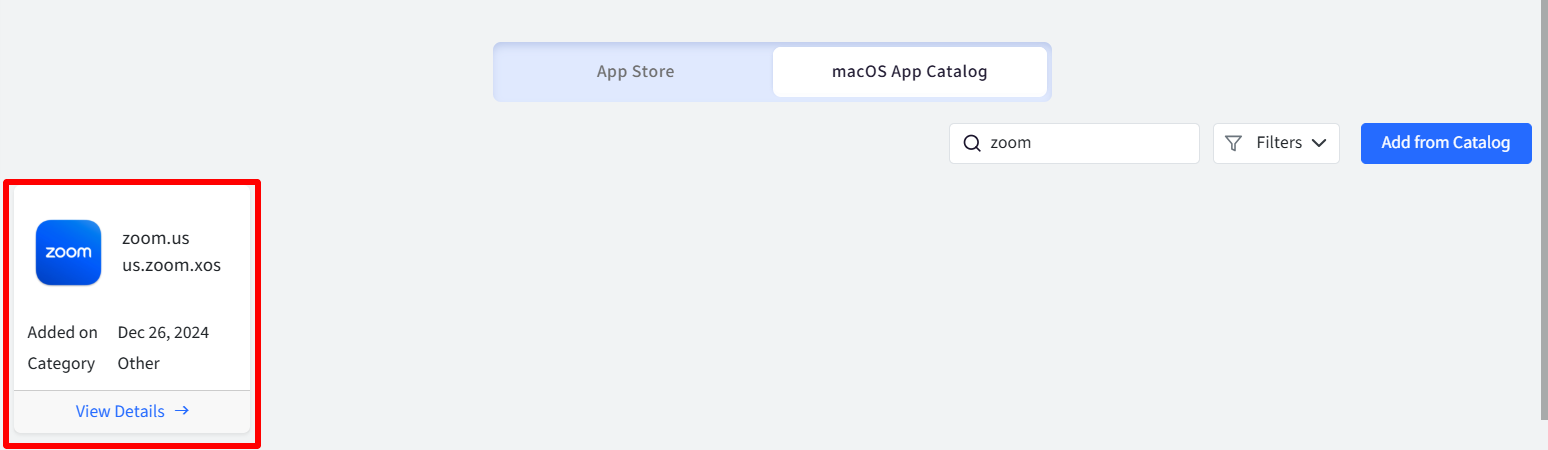
On the new page, search for the app you need to add by entering the app name in search box. The screenshots below show adding zoom app as an example.
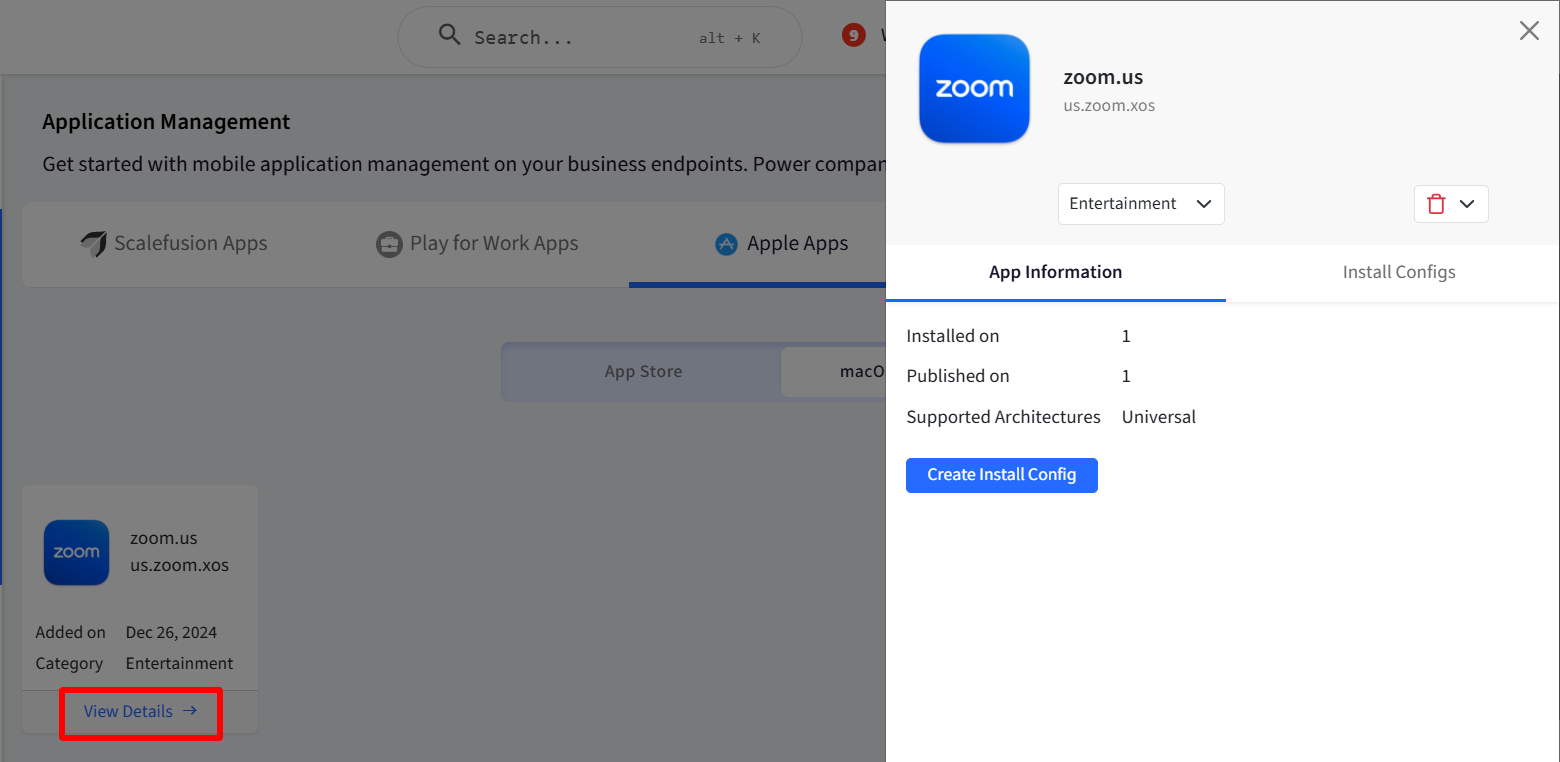
Click on View Details link below the app card. This will show the app details on the right side.
Installed On: Displays the number of devices on which the software has been successfully installed.
Published To: Displays the number of devices to which the software has been published (made available for installation).
Supported Architectures: Indicates the CPU architectures supported by the app. Possible values include:
Intel (x86)
Silicon (ARM)
Universal (Supports both Intel and ARM architectures)
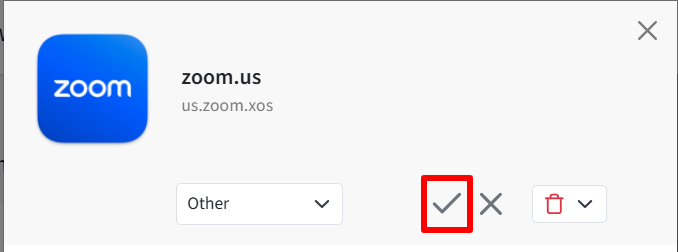
Choose category for the app by selecting the category from drop-down below app title, on the right panel and click on the check mark icon on the right.
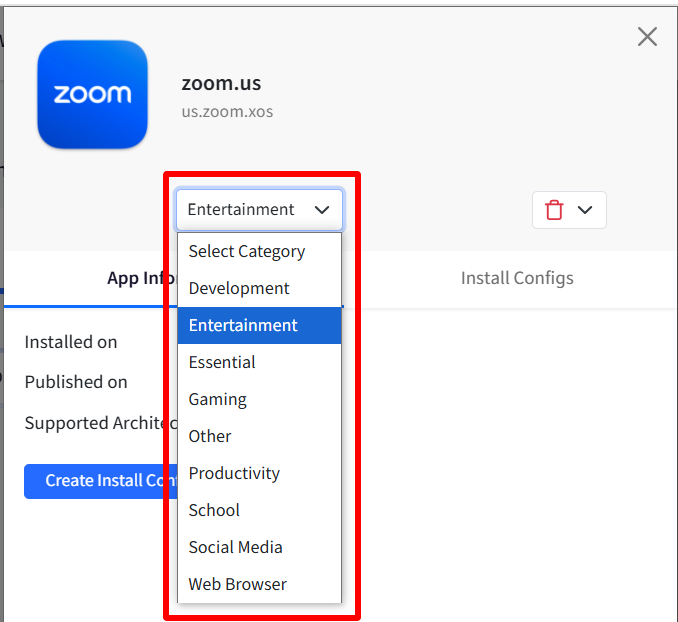
After selecting category, click on the check mark icon on the right.

The app will be added and listed in the list of apps under macOS App Catalog.
Step 2: Create Install Configurations
Now when apps are added under macOS App Catalog, next step is to create install configurations for the app. To do so,
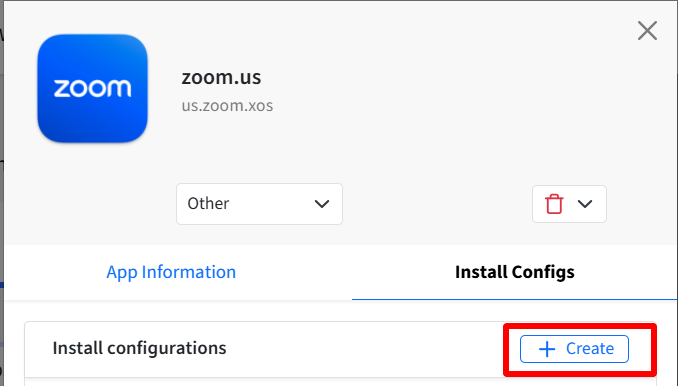
Click on View Details link below the app card, for which you want to create app configurations. This brings up the app panel on the right.
Here, you will see two tabs, viz.,
App Information: Contains a brief description of the app and a link to Create Install Configuration
Install Configurations: If any configurations are created, they are listed here. It also contains CREATE link to create Install Configuration.
You can either click on Create Install Configuration button on App Information or CREATE button under Install Configurations. Both open the Configure app window wherein you specify details to create App Install configurations.
Configurations: Clicking on create brings up the Create New Install Config window. Following are the settings you need to configure for the app. Click Save after configuring the settings.
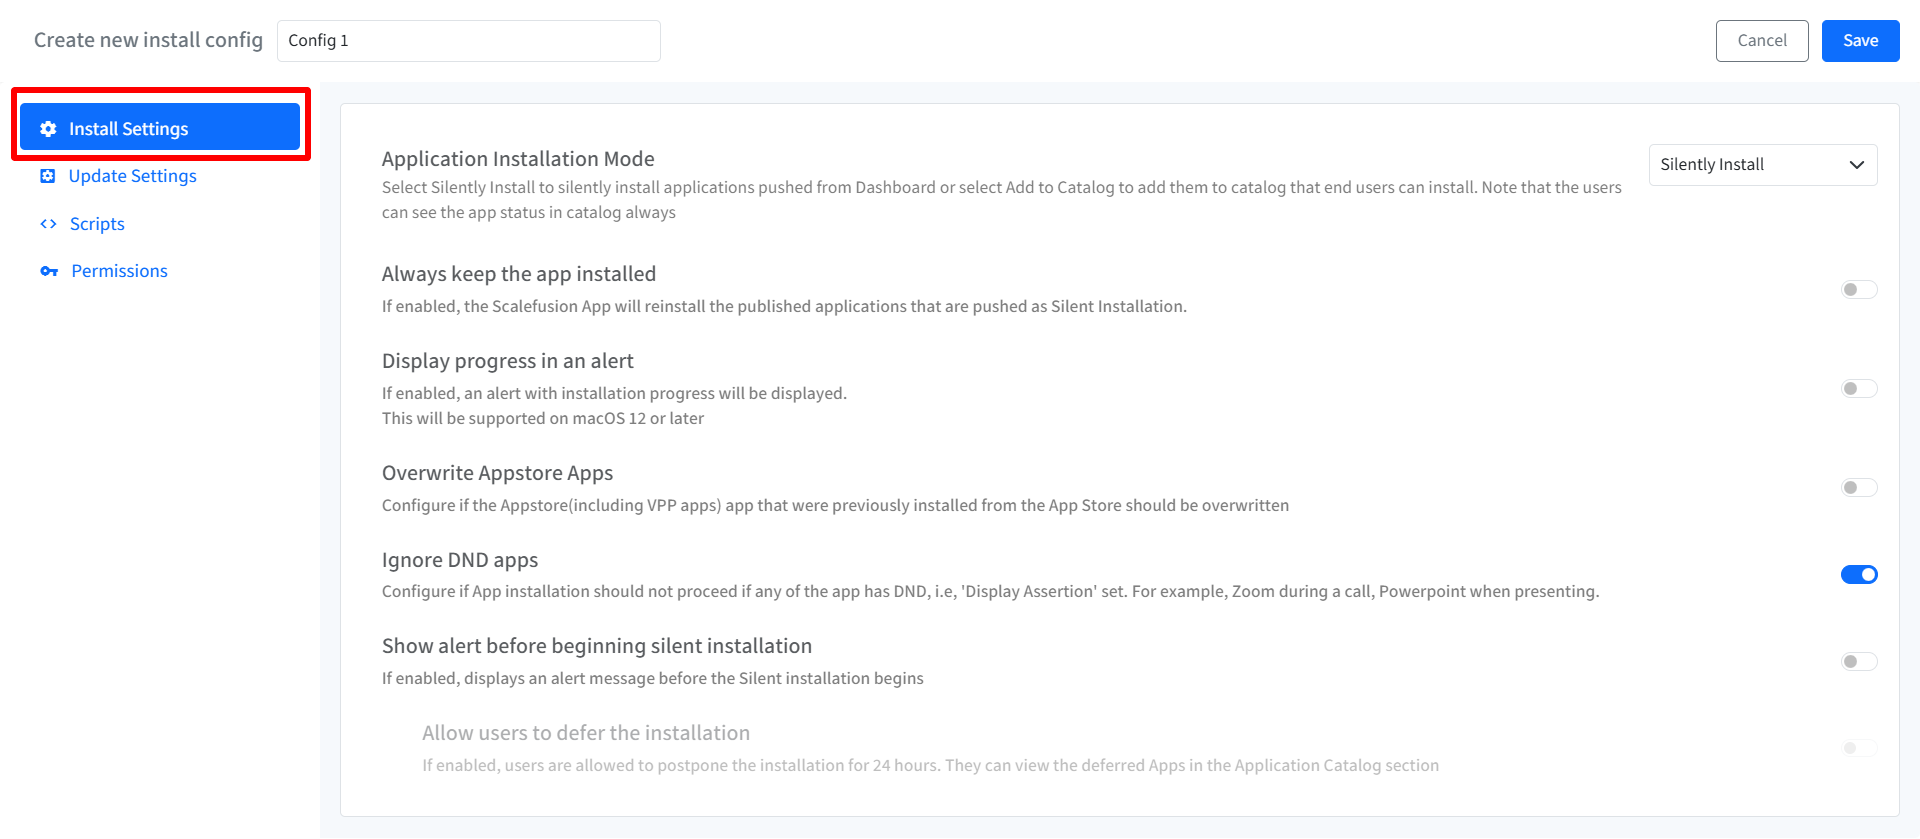
Install Settings
Install Configuration Name: Provide a name with which this configuration can be identified.
Application Installation Mode: Choose how applications are deployed:
Silently Install: Applications pushed from the dashboard will be installed silently without user interaction.
Add to Catalog: Applications will be added to the Application Catalog (displayed inside macOS agent), allowing end-users to install them at their convenience.
Note: Users can always view the application status in the catalog.
Always keep the app installed: If enabled, the app will reinstall any published applications that were deployed using the Silently Install method.
Display progress in an alert: If enabled, an alert displaying the installation progress will be shown to the user. Note: This is supported on macOS 12 and above
Overwrite Appstore Apps: If enabled, apps previously installed from the App Store (including VPP apps) will be overwritten by the deployed version. If disabled, App Store-installed apps will not be overwritten.
Ignore DND apps: If enabled, application installation will be skipped if any of the target apps have Do Not Disturb (DND) or Display Assertion set (e.g., Zoom during a call, PowerPoint during a presentation).
Show alert before beginning silent installation: If enabled, an alert message will be displayed to the user before a silent installation begins.
Allow users to defer the installation: If enabled, users will be allowed to postpone the installation for 24 hours. Deferred apps can be viewed in the Application Catalog (inside agent app for macOS).
Note: This option can only be enabled if Show alert before beginning silent installation is also enabled.
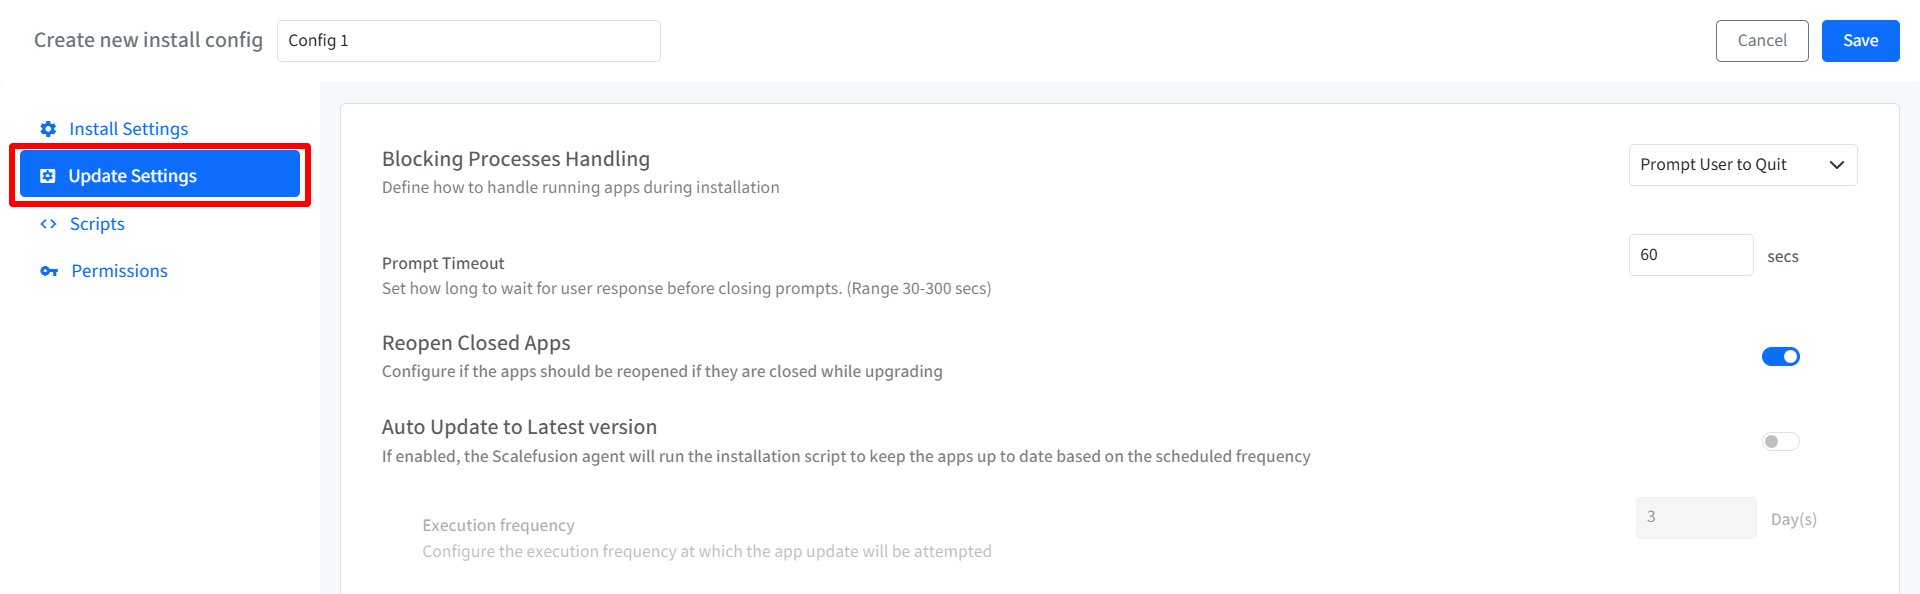
Update Settings
This section describes the settings for managing updates to third-party applications.
Blocking Processes Handling: Define how running applications should be handled during installation:
Prompt User to Quit: The user will be prompted to close any running applications that might interfere with the installation.
Terminate without Prompt: Running applications that might interfere with the installation will be terminated automatically without prompting the user.
Ignore blocking processes: The installation will proceed even if blocking processes are running. This option should be used with caution, as it may lead to installation failures or data corruption.
This setting may not work on all the apps
Fail Silently: If a blocking process is detected, the installation will fail without notifying the user.
Prompt Timeout: If Prompt User to Quit is selected for Blocking Processes Handling, use the Prompt Timeout field to set the duration (in seconds) the system will wait for a user response before automatically closing the prompt.
Reopen Closed Apps: If enabled, applications that were closed during the update process will be reopened automatically after the update is complete.
Auto Update to Latest version: If enabled, the Scalefusion agent will run the installation script according to the configured execution frequency to keep applications up-to-date.
Execution frequency: If Auto Update to Latest version is enabled, use the Execution frequency field to configure how often (in days) the system checks for and attempts to install application updates.
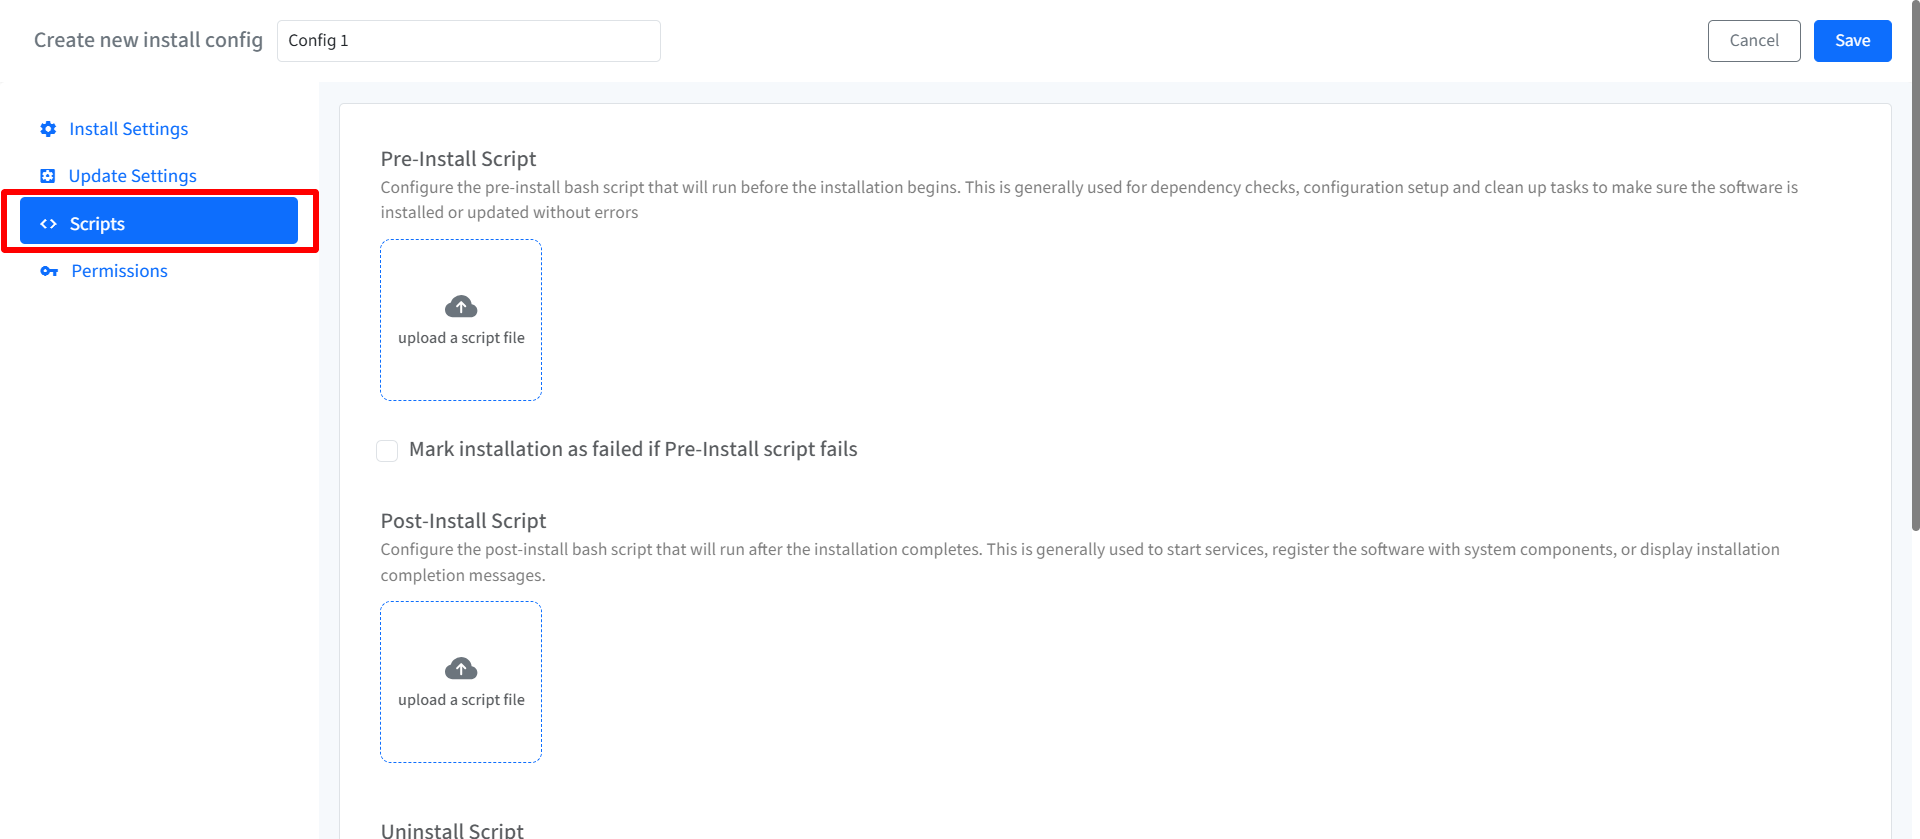
Scripts
From this section you can manage scripts related to third-party applications.
Pre-Install Script: Upload a pre-installation Bash script (.sh file extension) which will run before the application installation begins. Pre-install scripts are typically used for dependency checks, configuration setup, or cleanup tasks to ensure a smooth installation or update process. Click Browse to upload a script file.
Mark installation as failed if Pre-Install script fails: If checked, it will halt the installation process if the pre-install script encounters errors.
Post-Install Script: Upload a post-installation Bash script (.sh file extension) which will run after the application installation is complete. Post-install scripts are commonly used to start services, register the software with system components, or display completion messages.
Uninstall Script: Upload a Bash script (.sh file extension) which will run during the application uninstallation process. Uninstall scripts are typically used to remove application data or trigger the software's built-in uninstaller. If no uninstall script is provided, Scalefusion will only remove the application itself.
Important Notes on Scripting:
Verify Script Before Upload: Please review your script thoroughly before uploading it.
Script Size Limit: The maximum script file size is 2.0 GB.
Custom Property Expansion: You can leverage custom properties within your scripts. These properties will be dynamically replaced with corresponding device or user-specific values at runtime (enclosed by "%" symbols).
Permissions
From this section you can add and manage permissions for third-party applications on macOS devices. To do so,
Click the Add New button to configure app permissions.

A pop-up window Add Permission will appear. Configure the following:
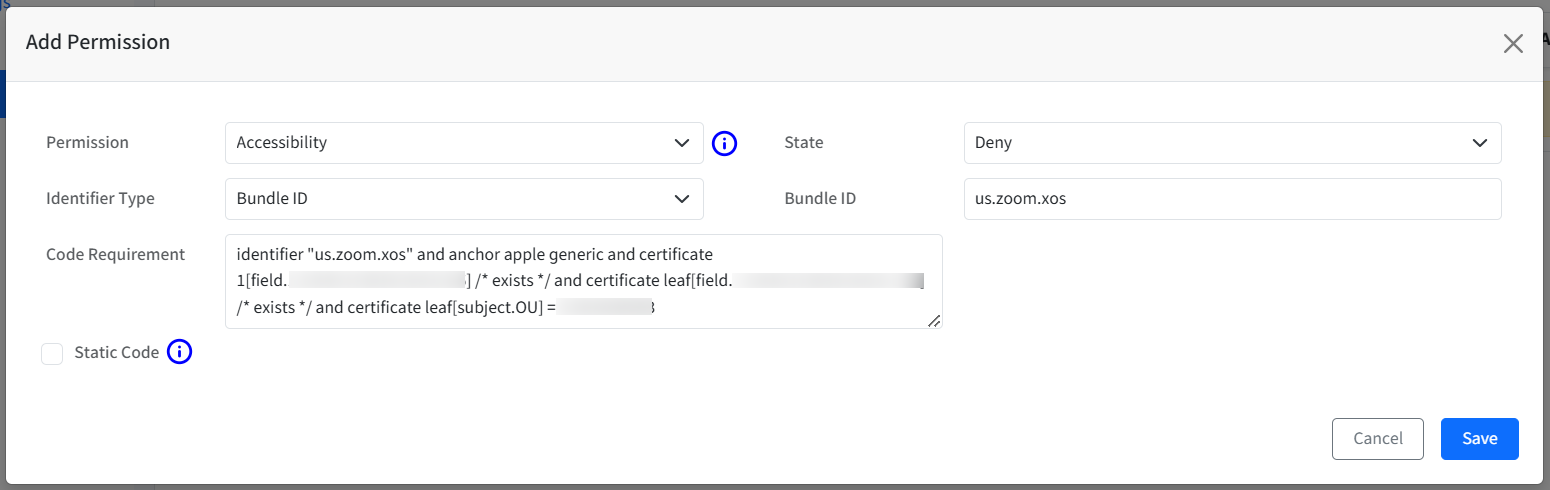
Permission: Select the permission you want to configure from the dropdown menu.
Accessibility: Grants the app access to accessibility features.
Address Book (macOS 10.15+) Grants the app access to contact information managed by Contacts app.
Apple Events: Grants the app permission to send restricted AppleEvents to other processes.
Calendar: Grants the app access to calendar information managed by Calendar app.
Camera (Deny Only): Restricts app access to the system camera. (Access cannot be granted in a profile.)
File Provider Presence (macOS 10.15+): Allows a File Provider application to know when the user is using files managed by the File Provider.
Listen Event (macOS 11+): Restricts the app from using CoreGraphics and HID APIs to listen for events from other processes. (Access cannot be granted in a profile.)
Media Library (macOS 10.15+): Grants the app access to Apple Music, music and video activity, and the media library.
Microphone (Deny Only): Restricts app access to the system microphone. (Access cannot be granted in a profile.)
Photos: Grants the app access to pictures managed by the Photos app.
Post Events: Grants the app permission to use CoreGraphics APIs to send events to the system event stream.
Reminders: Grants the app access to reminders information managed by the Reminders app.
Screen Capture (macOS 11+): Configures screen capture permission for the app. Access cannot be granted in a profile, but standard users can be allowed to set this permission.
Speech Recognition (macOS 10.15+): Grants the app permission to use system Speech Recognition and send speech data to Apple.
Full Disk Access: Grants the app access to all protected files, including system administration files.
App Management (macOS 13+): Grants the app permission to update or delete other apps.
App Data Management (macOS 14+): Grants the app permission to access data of other apps.
Desktop Folder (macOS 10.15+): Grants the app access to files in the user's Desktop folder.
Documents Folder (macOS 10.15+): Grants the app access to files in the user's Documents folder.
Downloads Folder (macOS 10.15+): Grants the app access to files in the user's Downloads folder.
Network Volumes (macOS 10.15+) Grants the app access to files on network volumes.
Removable Volumes (macOS 10.15+): Grants the app access to files on removable volumes.
Files used in System Administration (macOS 10.15+) Grants the app access to certain system administration files.
State: Select the desired permission state from the dropdown menu:
Deny: Restricts the app from using the permission.
Grant: Allows the app to use the permission. Note: Permissions cannot be granted for Camera, Microphone, Screen Capture, or Listen Event
Allow Standard User To Set System Service: For Screen Capture and Listen Event permissions only, this option allows standard users to configure permission on their devices.
Identifier Type: Choose how to identify the app to which the permission applies:
Bundle ID (default): Use the app's bundle identifier.
Path: Use the path to the app executable.
Bundle ID/Path: Enter the app's bundle identifier (if selected) or path to the executable (if "Path" is chosen). This field is pre-filled with the app's bundle ID by default and cannot be empty.
Code Requirement: Displays any code signing requirements associated with the permission. This field can be edited but cannot be empty.
For Apple Events and App Data Management permissions, you need to enter the Receiver application details as well. These include the following:
Identifier Type: Choose how to identify the app to which the permission applies:
Bundle ID (default): Use the app's bundle identifier.
Path: Use the path to the app executable.
Bundle ID/Path: Enter the app's bundle identifier (if selected) or path to the executable (if Path is chosen).
Code Requirement: Enter any code signing requirements associated with the permission.
Once you have configured the permission, it will be listed in Permissions tab with details of configuration. You can perform following actions on each permission:
Enable/Disable: Use the toggle to quickly enable or disable the permission without deleting its configuration.
Edit: Click the Edit option to modify the permission's settings. This will open the Add/Update Permission pop-up window, pre-populated with the existing configuration. You can then modify the settings as needed.
Delete: Click the Delete option to permanently remove the configured permission. A confirmation dialog will appear

Step 3: Publish App Configuration
On saving Install Configuration, the Publish App Configuration window will come up. Choose the device profiles on which you want to publish this configuration and click Publish button. If you do not want to publish the configuration at this point of time, close the publish window. You can publish it later from Actions.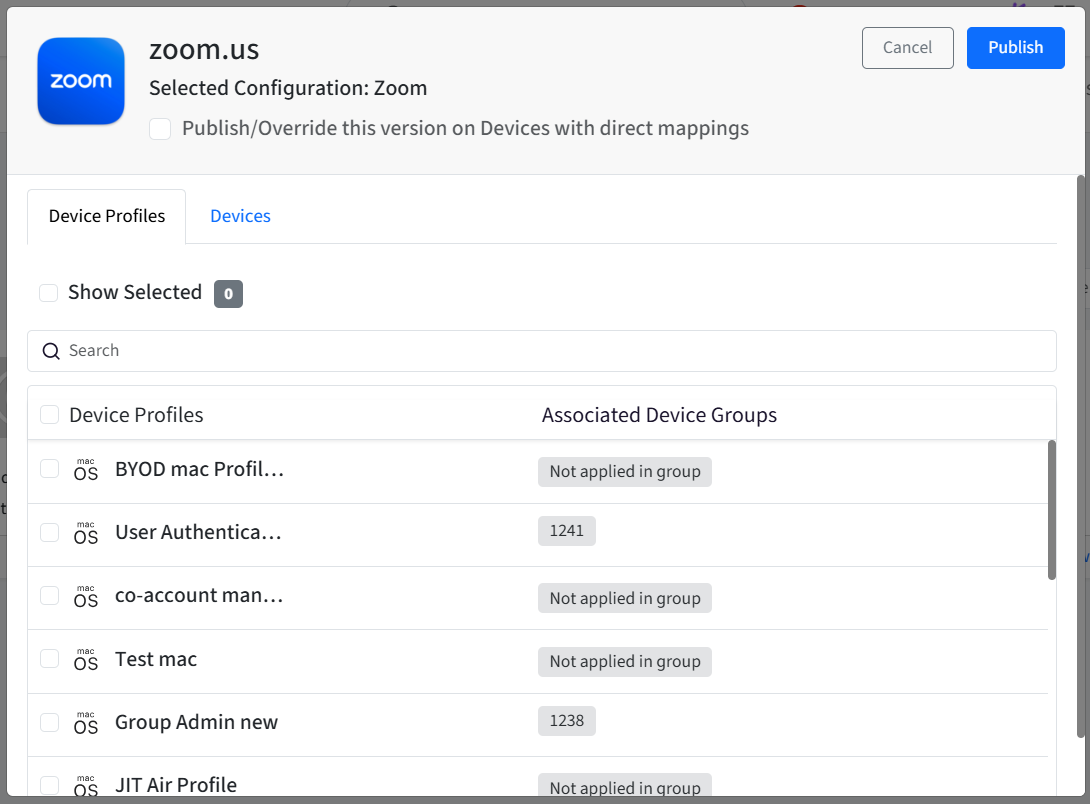
Publish on Device Groups
The app can be published to Device groups also if the Setting Enable Apps to be published to group with Profile is enabled in App Management Settings (Utilities > Global Settings > General Settings). In this case, the Publish dialog box will show all Device Groups under Groups tab. Device Profiles will only show profiles that are not associated with any group.
Actions on Configuration
Once configuration is created, it is listed under Install Configurations tab. Following actions can be performed on them. The actions can be accessed by clicking on 3 dots in front of configuration name:
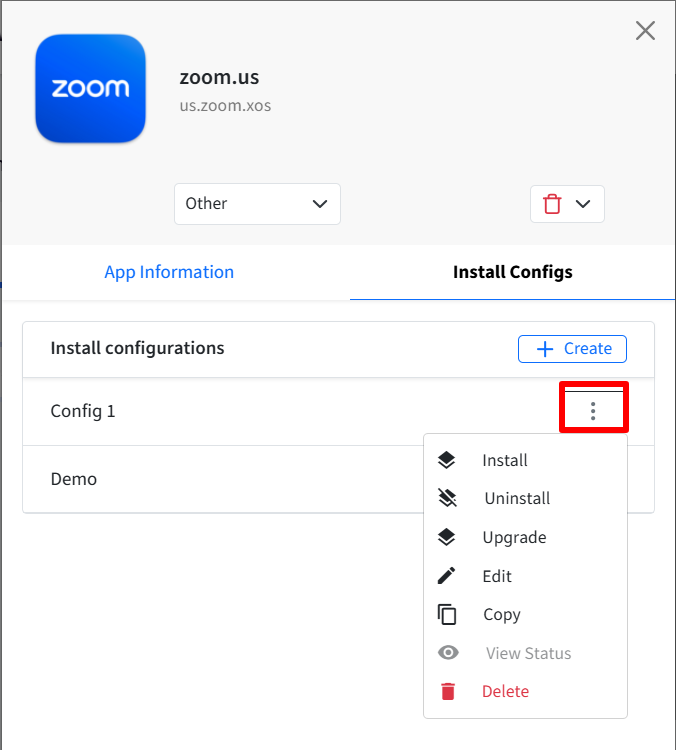
Install: This Installs the configuration to a Device Profile. Clicking on Install brings up the Publish App Configuration dialog box, where you can select the device profiles on which the App Configuration has to be published and click PUBLISH. This will push the configurations on devices and install the app.
Uninstall: It uninstalls the configuration from devices. The Unpublish App Configuration dialog box lists only those device profiles on which configuration has already been published. Select the ones from which the App Configuration has to be unpublished and click UNPUBLISH.
Upgrade: Upgrading the application will install the latest version and apply any configuration changes. Also, for other settings (scripts, auto-update, and always keep installed), you must initiate an upgrade action from the dashboard to apply changes.
Edit: With this, you can edit the installed configuration
Copy: This will create copy of the Install Configuration that is created
View Status: Shows the current status of installation of configuration across devices where it was applied. Clicking on View opens the Installed App info box where you can check the status and other details. The status is displayed under APP STATUS column. The status shows as Pending or In Progress if it is in process or displays Error if there is any error during installation.
Delete: Deletes the configuration. Once you delete this app configuration, you can no longer access your app configuration settings. If you have already published a configuration on a device profile, and now you delete it, the app will still remain installed on the device with those configurations.
If device is switched to a different device profile then the configurations (on new device profile) will apply on device.
Additional actions on the apps from Dashboard
Change Category: You can change the category of the app from Category drop-down on the right panel. To change category, select category from the drop-down and click on the right check mark.
Search & Filter: On the app catalog page, you can filter the apps based on app name or category.
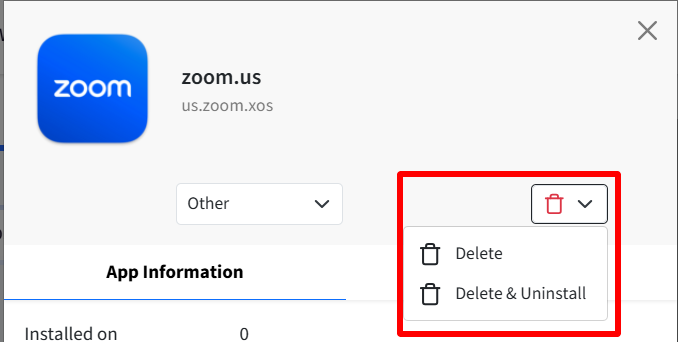
Delete: The app will be removed from macOS App Catalog only. It will not be uninstalled from the devices.
Delete & Uninstall: The app will be removed from macOS App Catalog and will be uninstalled from all devices.
Reporting
The app versions of third party apps installed from macOS App Catalog can be viewed in the App Version Report.
Known Behavior
Installed applications will not be automatically uninstalled from devices in following scenarios. IT Admins have to uninstall the applications manually:
Device is deleted from the Dashboard
Device is switched to a different profile
Device is moved to a different group
FAQs
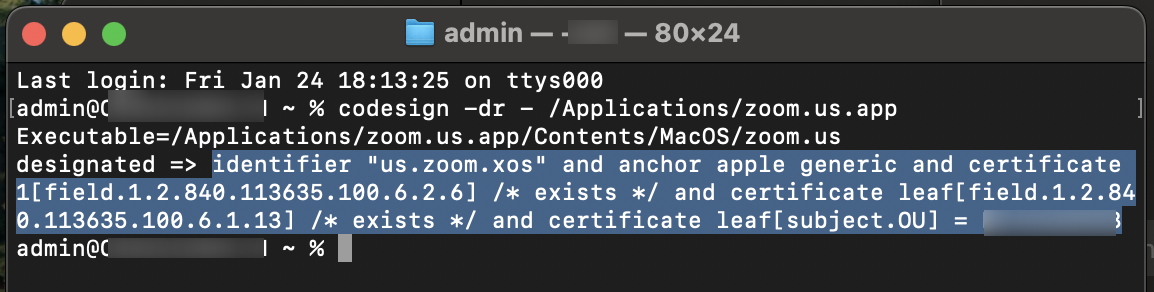
How can we fetch code requirements for Receiver Details associated with Apple Events and App Data Management permissions?
On macOS device, open terminal window and enter the command. The command is specific to the app. For example, command for Zoom app is:
codesign -dr - /Applications/zoom.us.appOnce you get the code, enter the highlighted part (shown in screenshot below) in the Code Requirement field under receiver details.