Introduction
Setting up Single Sign-On (SSO) can vary depending on the protocol, but there are several core settings that remain consistent across both SAML and OIDC configurations. In this article, we’ll explore the common foundational elements of SSO setups, helping you streamline integration regardless of the protocol you choose.
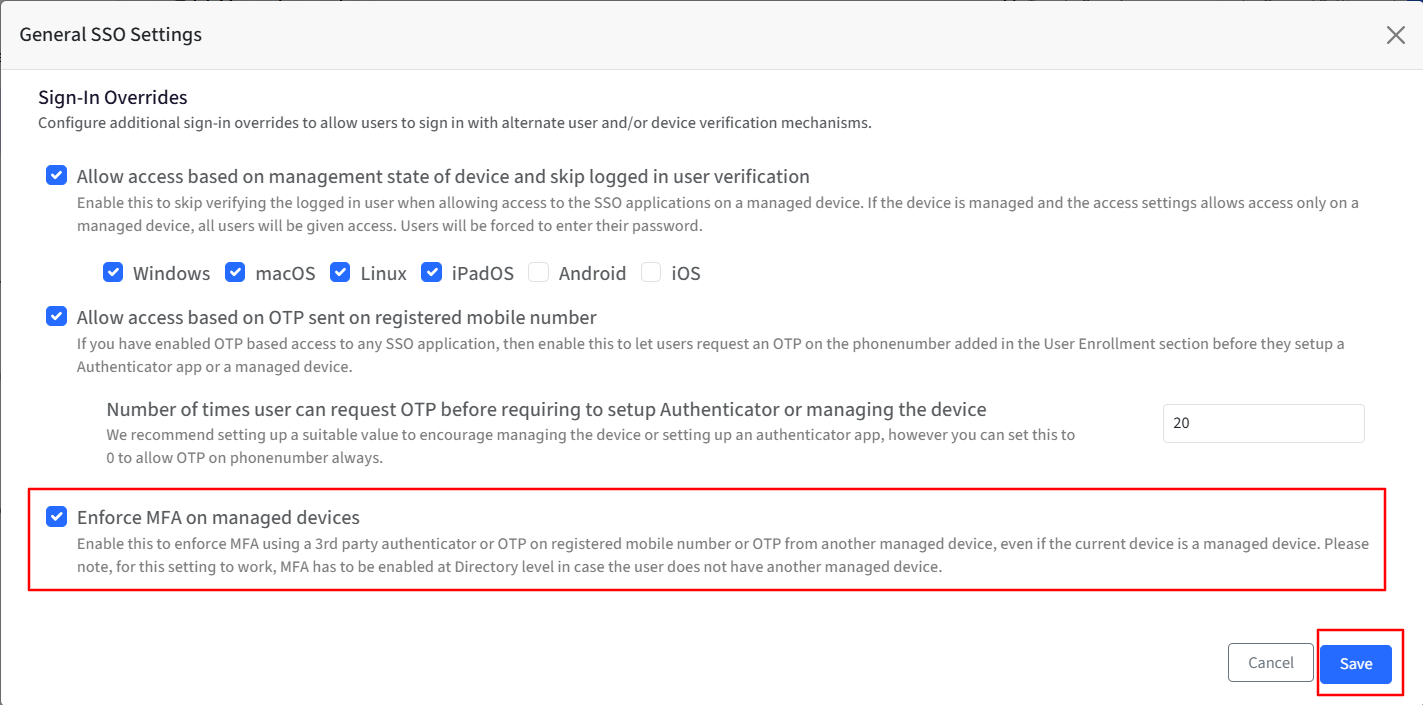
Sign-In Overrides during SSO experience
Configure additional sign-in overrides to allow users to sign in with alternate user and/or device verification mechanisms.
A. Allow access based on management state of device and skip logged-in user verification
This setting bypasses user verification when granting access to SSO applications on a managed device. It allows administrators to control access based on the device's management state without requiring the user to be re-verified. When enabled, agents will receive a device-based OTP in addition to the user-based OTP, if applicable.
This option is beneficial in shared, company-owned device scenarios where SSO configurations are applied and multiple users access the same device.
Prerequsites
Users should be added to the Scalefusion dashboard and migrated to OneIdP.
Users should be assigned to an SSO configuration.
Settings
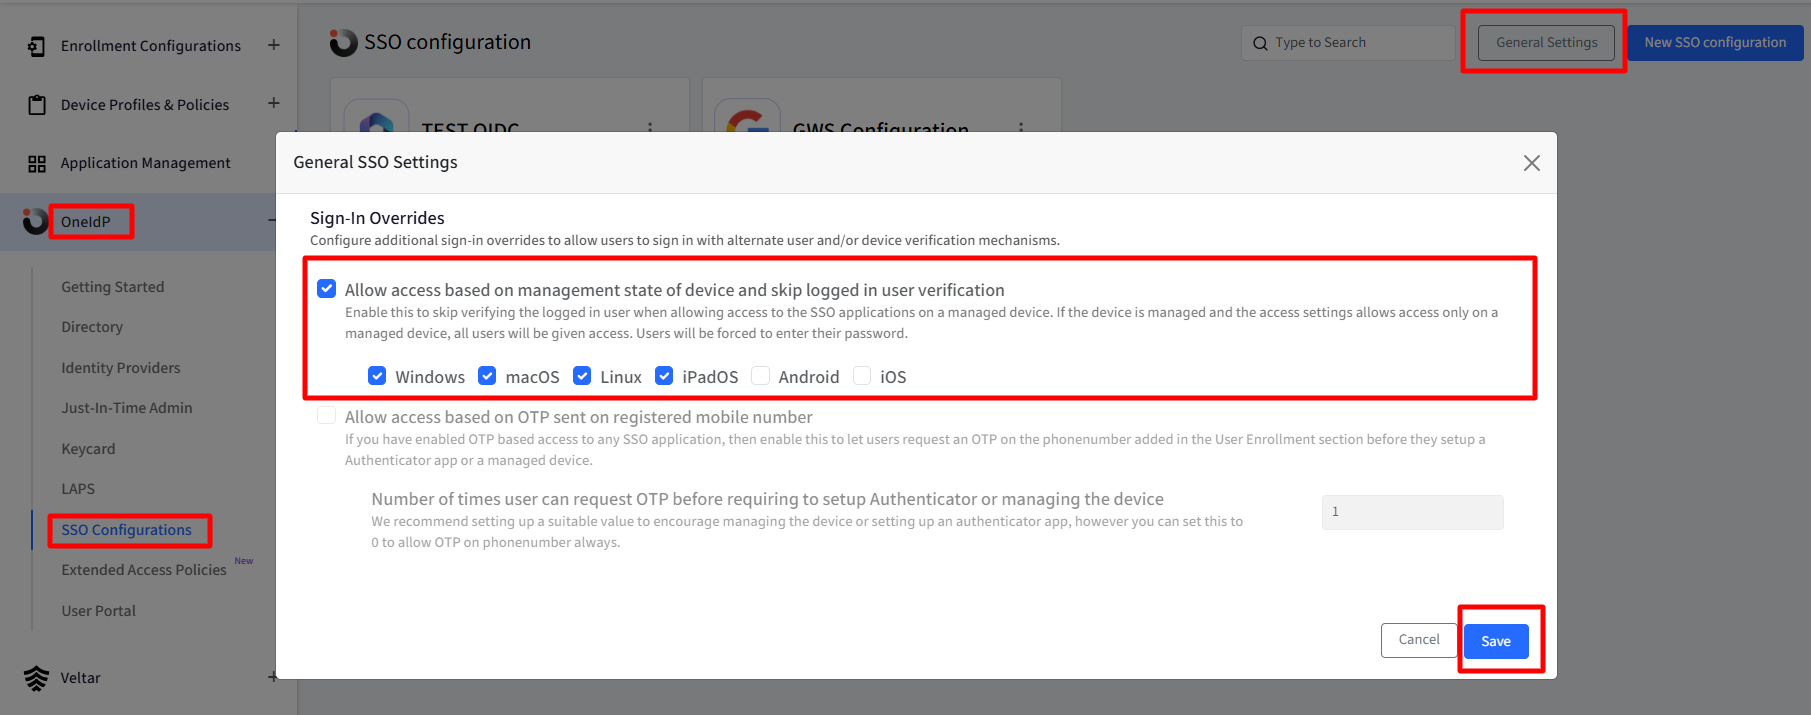
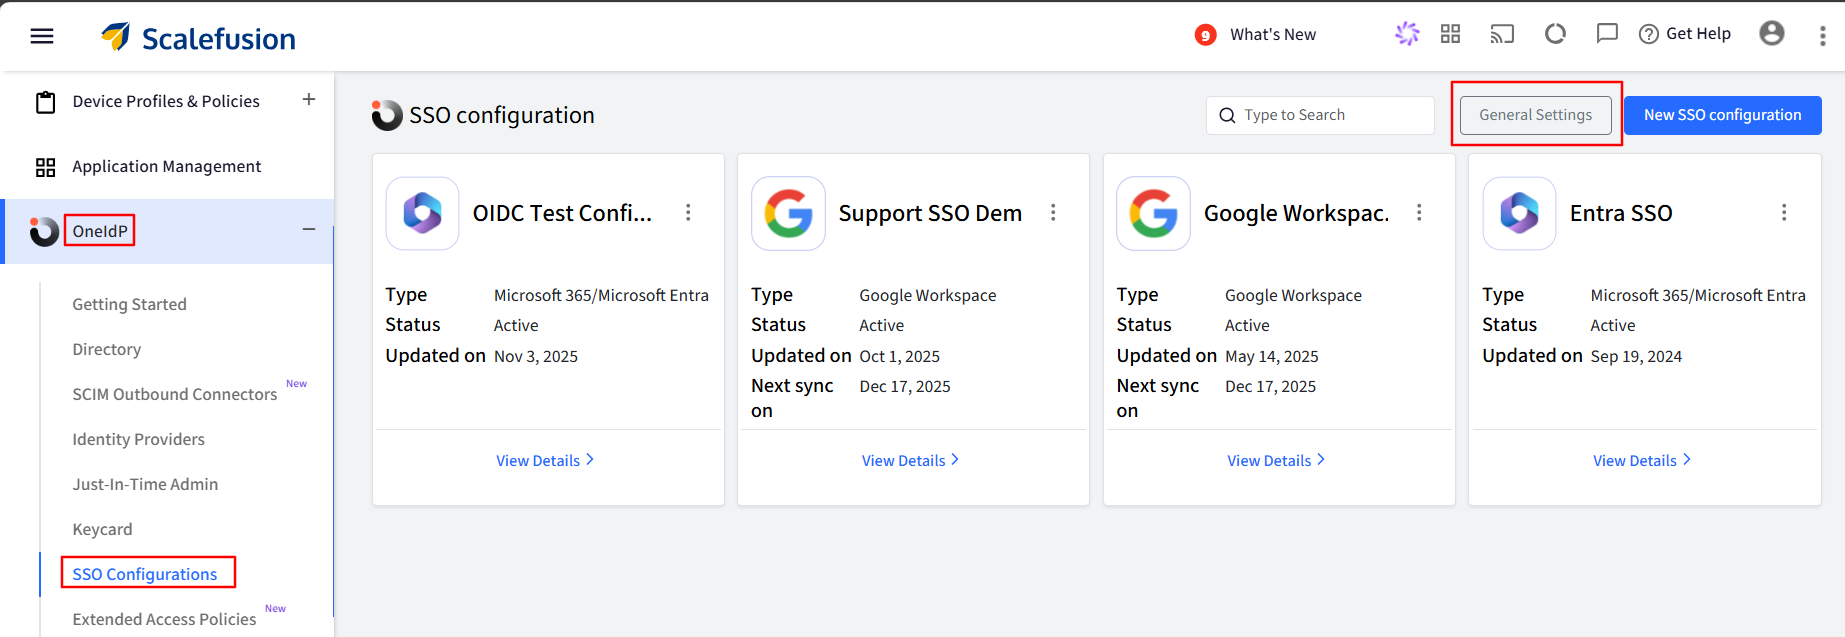
Navigate to OneIdP > SSO Configurations > click General Settings.
Select the option “Allow access based on management state of device and skip logged in user verification”.
Select the platform(s) where this setting should be applied.
Note:
By default, Android and iOS platforms are unchecked.
User experience
Users can log in to the same device and access their SSO-enabled applications. A device-based OTP is used during the SSO login process, allowing secure and seamless access tied to the managed device.
If no user is assigned to the device, a OneIdP OTP will be displayed in the Scalefusion Authenticator app on the device.
If a user is assigned to the device, a user-based OTP will be displayed in the Scalefusion Authenticator app on the device. However, other users will also be able to access their SSO-enabled applications on the device, since the access will be based on the device's management state rather than user verification.
Note:
If the 'Skip Password on Scalefusion Managed Device' option is enabled in the SSO configuration, only the user assigned to the device and signed in will be able to access applications without a password. All other users will be required to enter their password to log in to their applications.
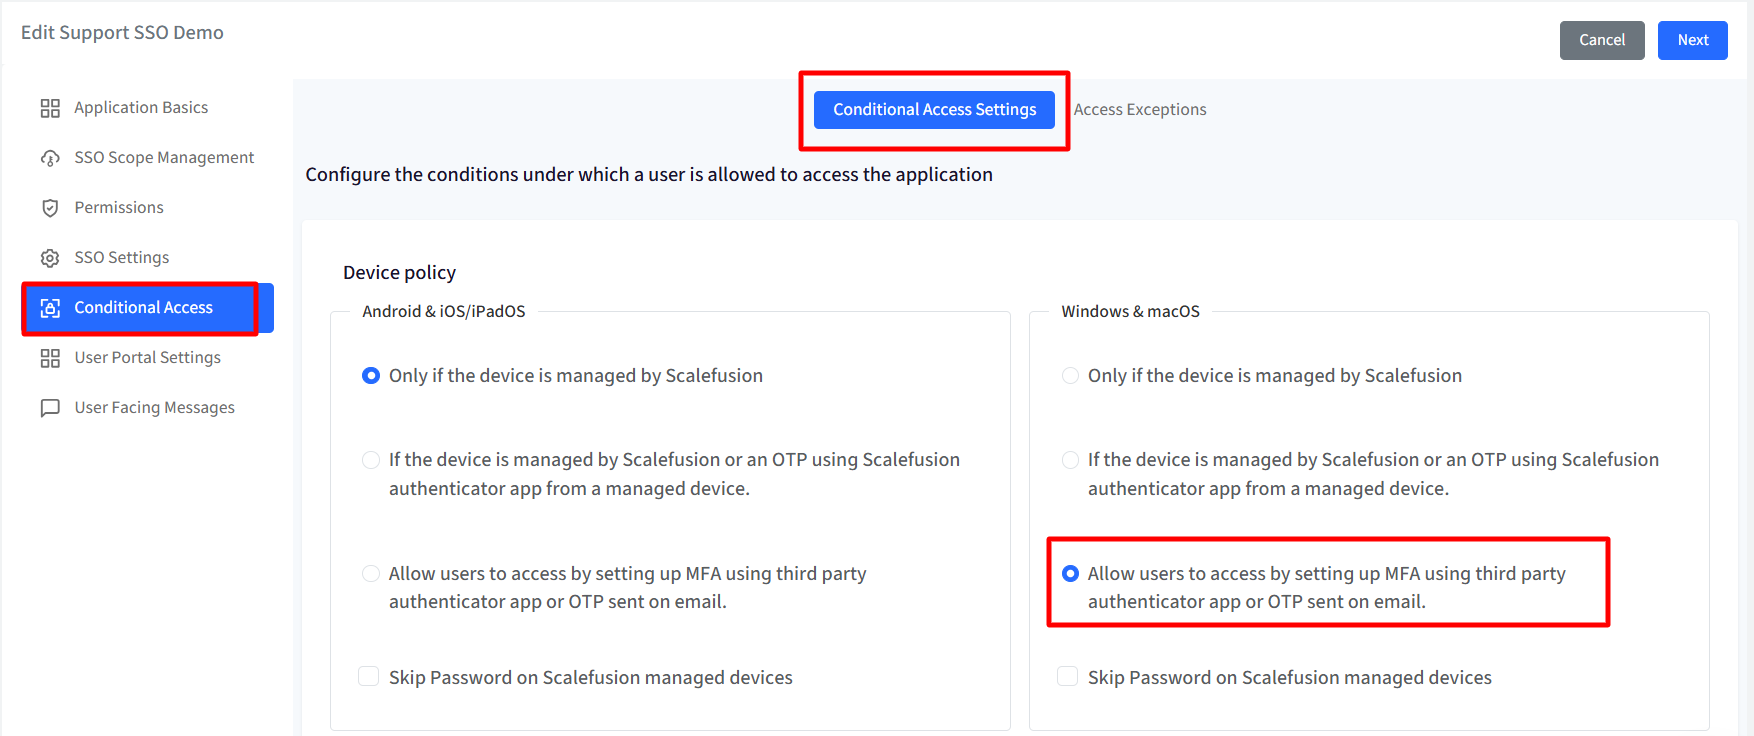
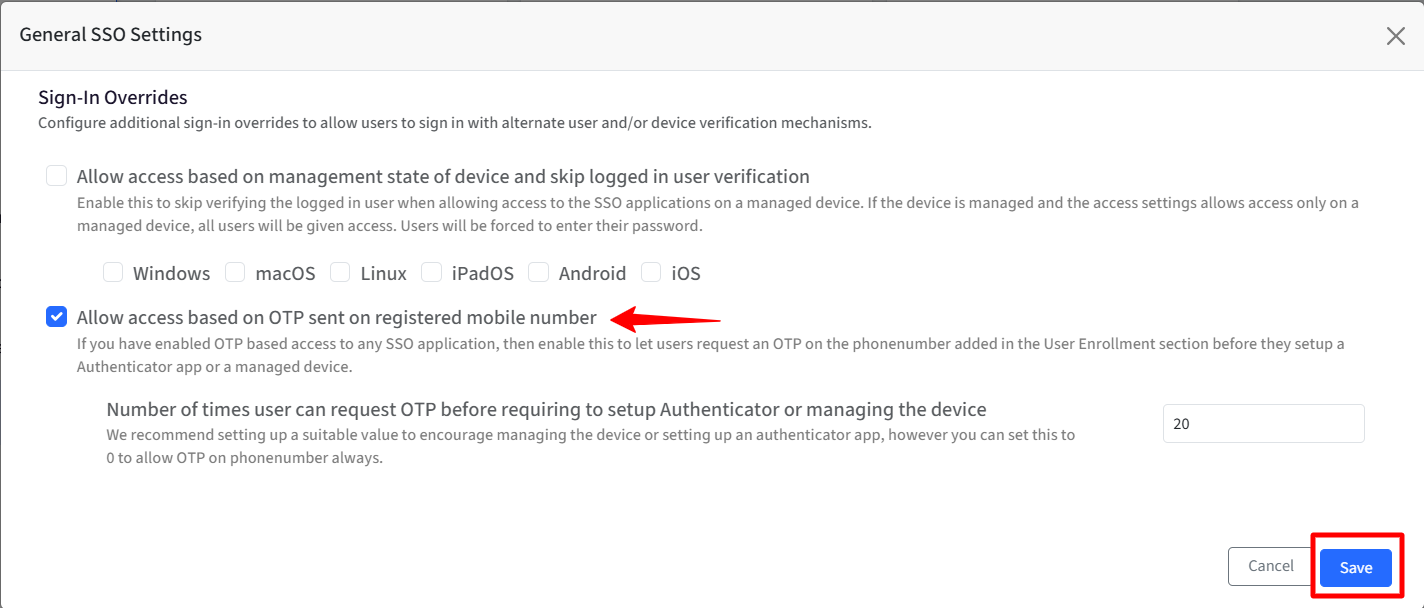
B. Allow access based on OTP sent on registered mobile number
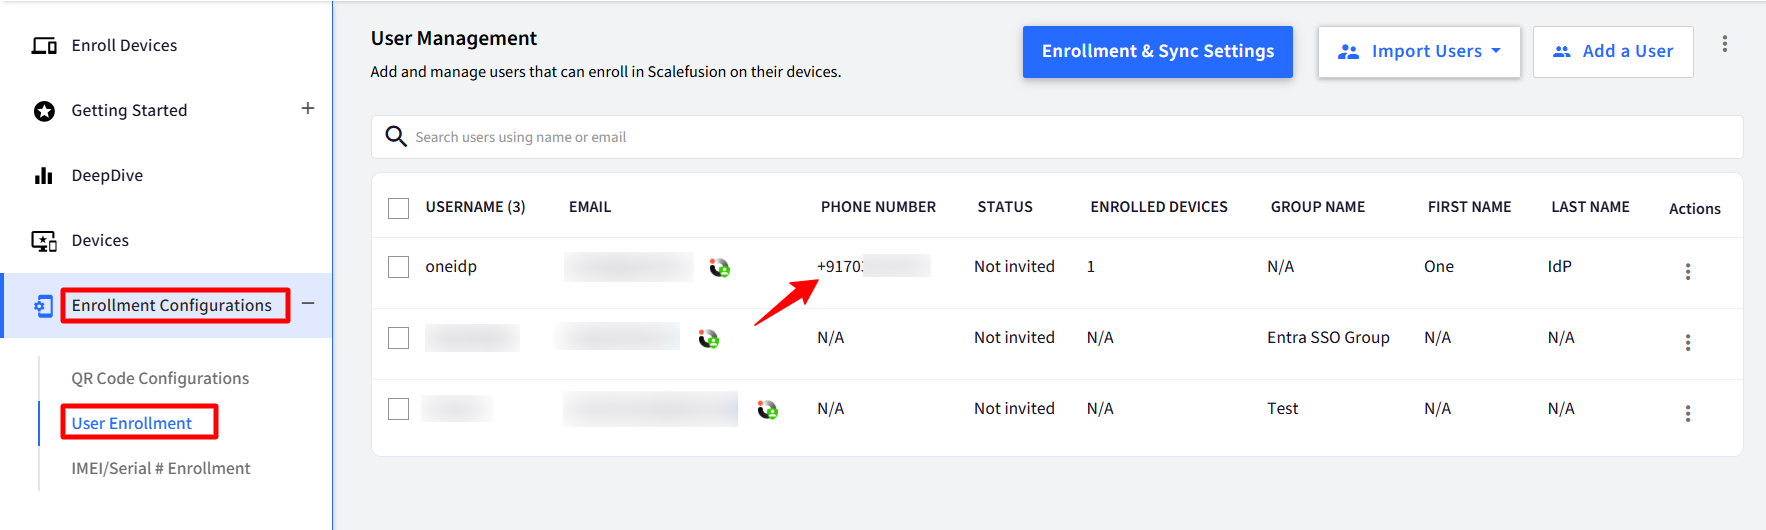
If OTP-based access is enabled for any SSO application, activate this setting to allow users to receive an OTP on the phone number specified in the User Enrollment section before setting up an authenticator app or enrolling a managed device.
Prerequisites
Phone number is added for the users in the User Enrollment section.
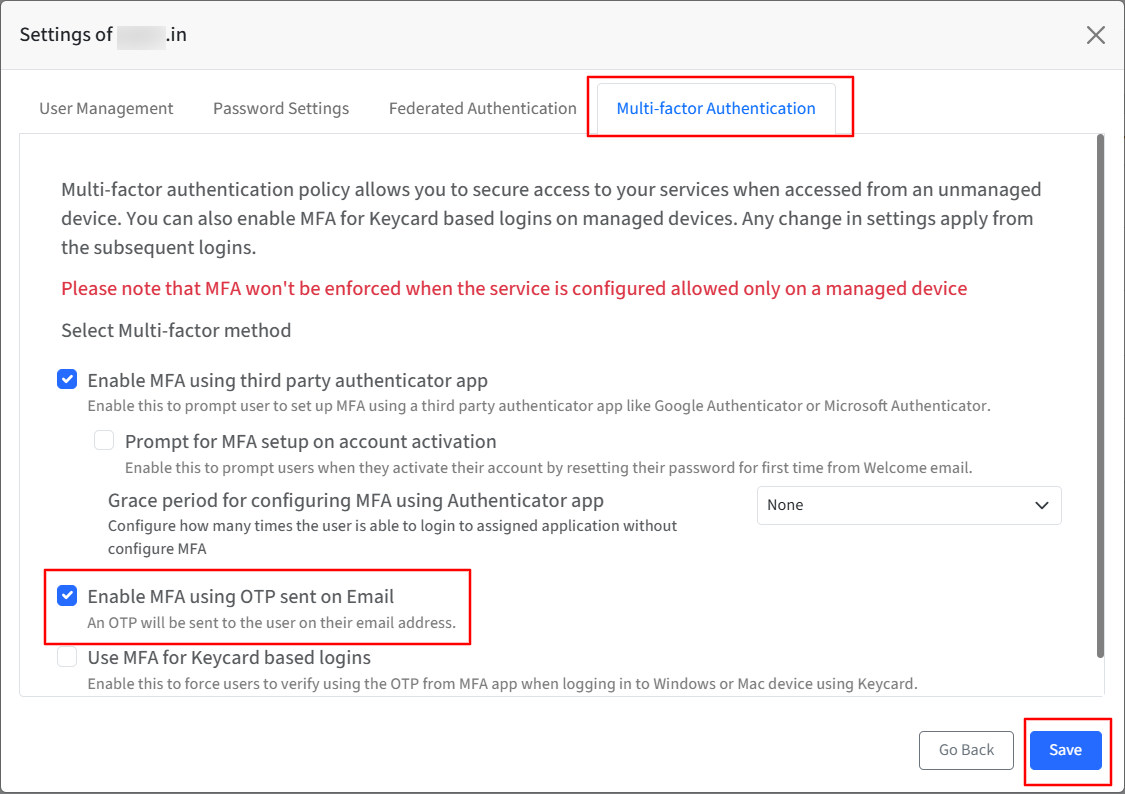
In the Directory settings, navigate to the relevant domain settings and enable “MFA using a third-party authenticator app” under the Multi-factor Authentication section.
The SMS service provider details—Twilio, in this case—must be configured under Utilities > Global Settings > General Settings > SMS Service Provider Settings.

Please ensure that “Allow users to access by setting up MFA using third party authenticator app or OTP sent on email.” option is selected in the concerned SSO Configuration, under Conditional Access Settings.
Settings
Navigate to OneIdP > SSO Configurations > click General Settings.
Select the option “Allow access based on OTP sent on registered mobile number” under Sign-In Overrides during SSO experience.
Select “Number of times user can request OTP before requiring to setup Authenticator or managing the device” to set a value of how many times a user can request for an OTP. You can set the value between 0 and 20.
Click Save.
Note:
If the user exceeds the allowed number of OTP requests, they will be prompted to set up a third-party authenticator instead.
User Experience
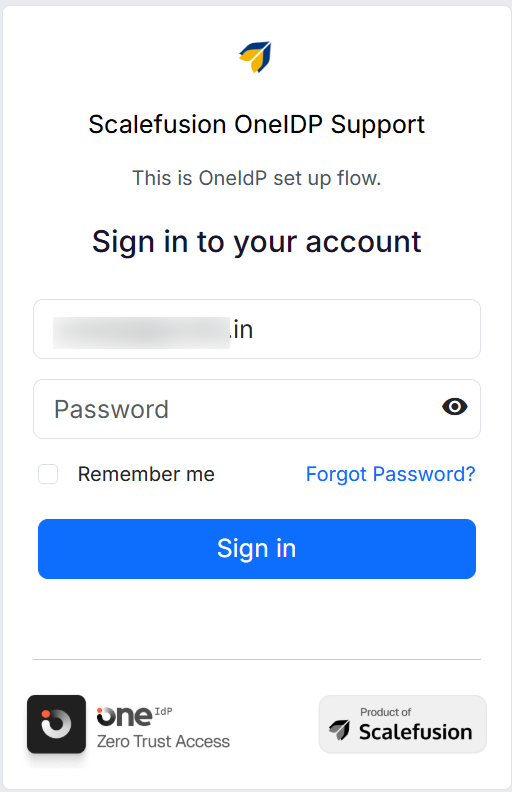
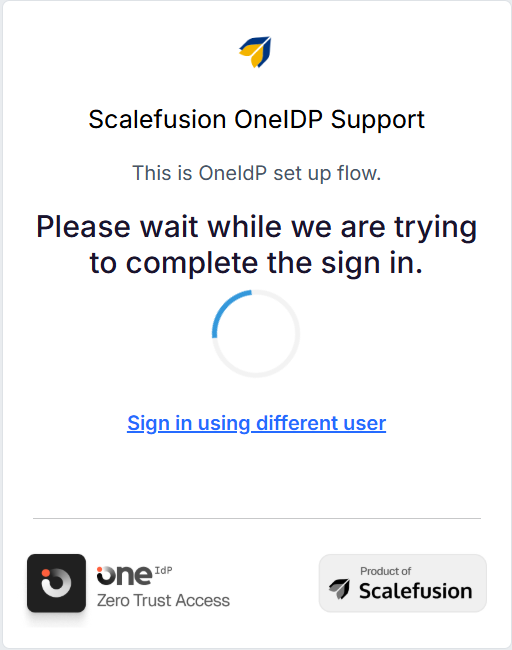
When a user attempts to access an application or service from an unmanaged device, they will be redirected to the OneIdP login screen, where they must enter their email ID and password.
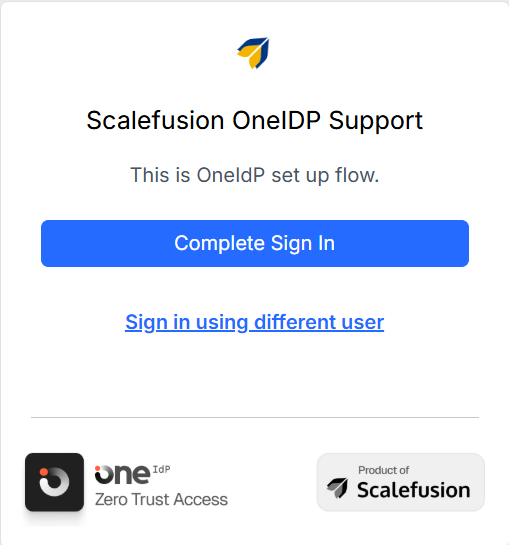
They will see the following screen. Click Complete Sign in.
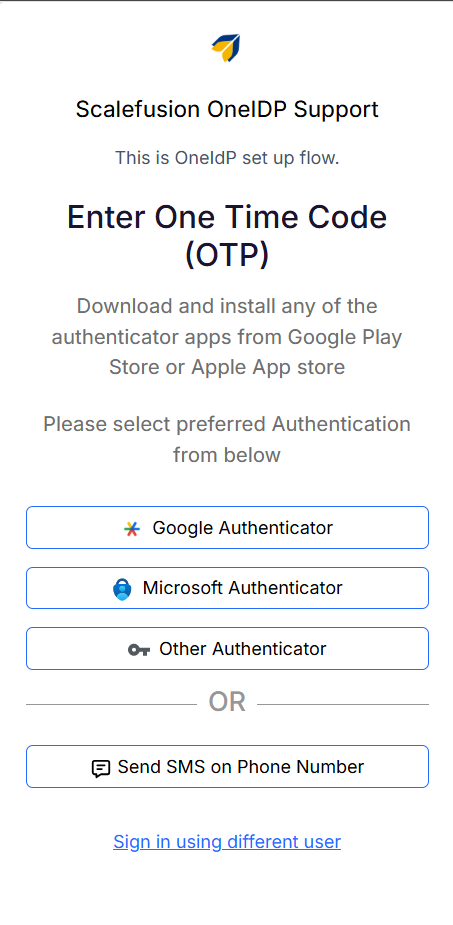
Scalefusion will perform a compliance check, after which users will be presented with the following screen.
Click Send SMS on Phone Number.
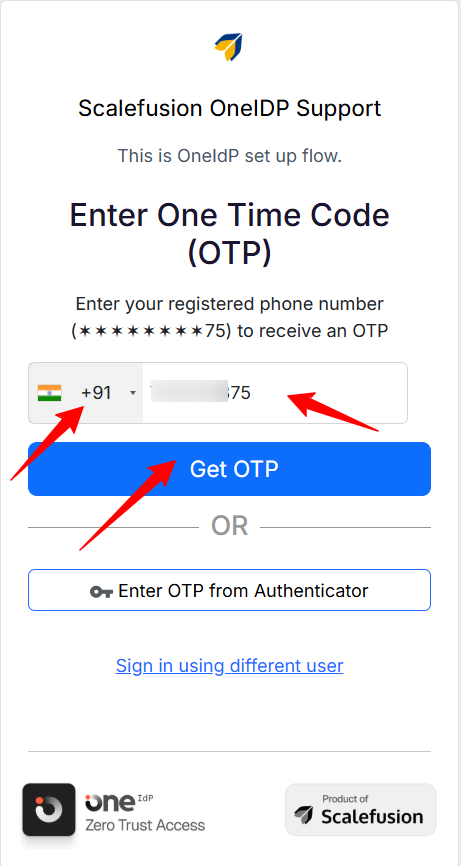
The user must enter the correct registered phone number along with the appropriate country code to receive the OTP.
At this step, the user must enter the OTP received on their registered phone number.
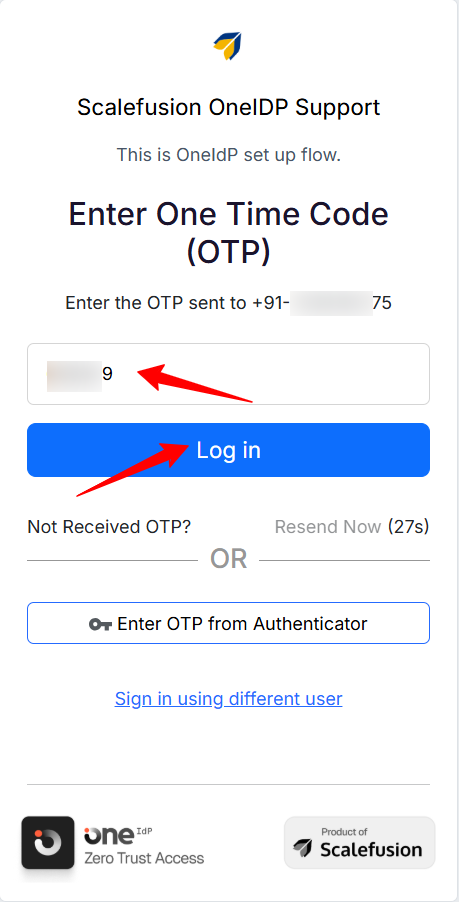
Once done, they will be able to log in.
C. Local Network Access and OneIDP
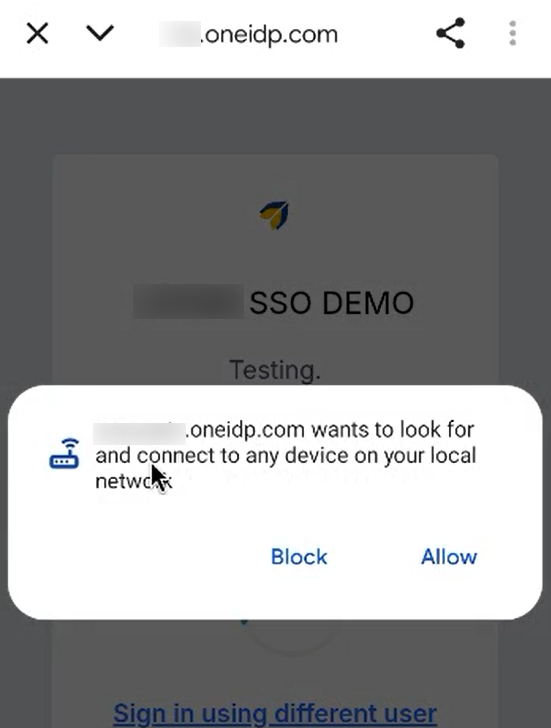
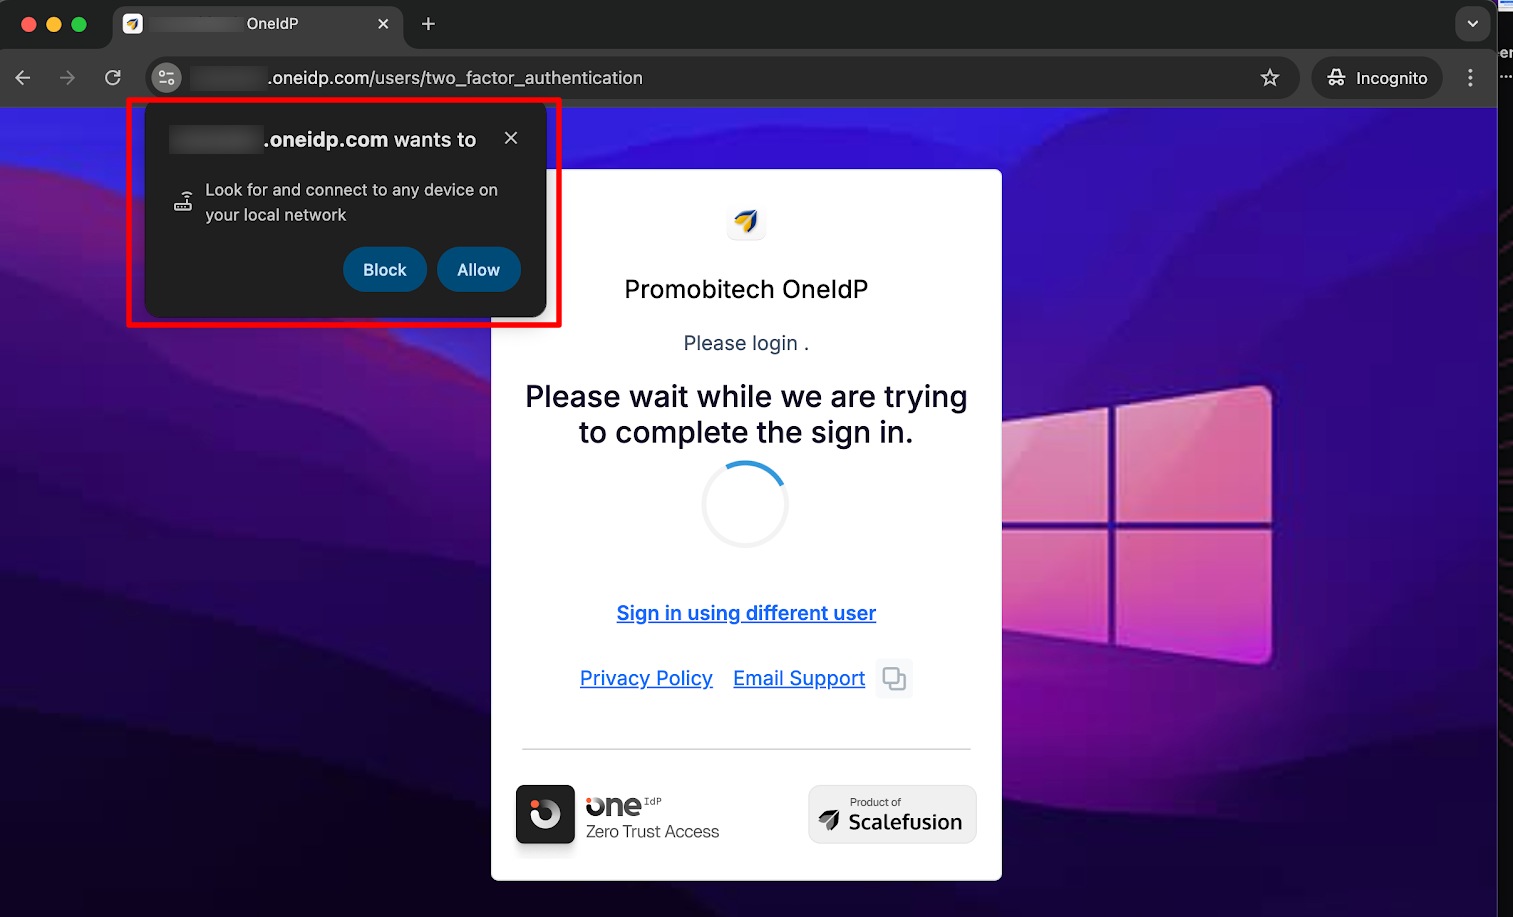
Local Network Access is a safety feature that stops websites from automatically connecting to devices on your home or work Wi-Fi network (including things running on your own computer). If a website wants to do this, Chrome will ask for your permission first. Only secure, trusted sites are allowed to request this permission. You’ll see a prompt like:
“Look for and connect to any device on your local network.” For example, when setting up a Google TV or Chromecast, the Google Home app asks for access to your local network so it can find nearby devices.
With Chrome version 142 and above, users will see a Local Network Access (LNA) permission dialog when OneIDP needs to communicate with services running on the device or local network. This prompt may appear both when using the OneIDP mobile/desktop app and when accessing OneIDP through the Chrome browser.
The dialog presents Allow and Block options (as shown in screenshots below):
Allow: grants OneIDP permission to discover and connect to its required local services (such as local authentication).
Block: blocks this communication and may prevent OneIDP from completing login or device authentication.
However, to prevent interruptions and ensure Chrome automatically grants the required Local Network Access permission, you can apply specific configurations on your Android and macOS devices. These are explained below.
On Android
Steps to Configure in Scalefusion
On the Scalefusion Dashboard, navigate to Application Management > Play for Work Apps.
Select Google Chrome.
On the right-side panel, open App Configs and click Create.

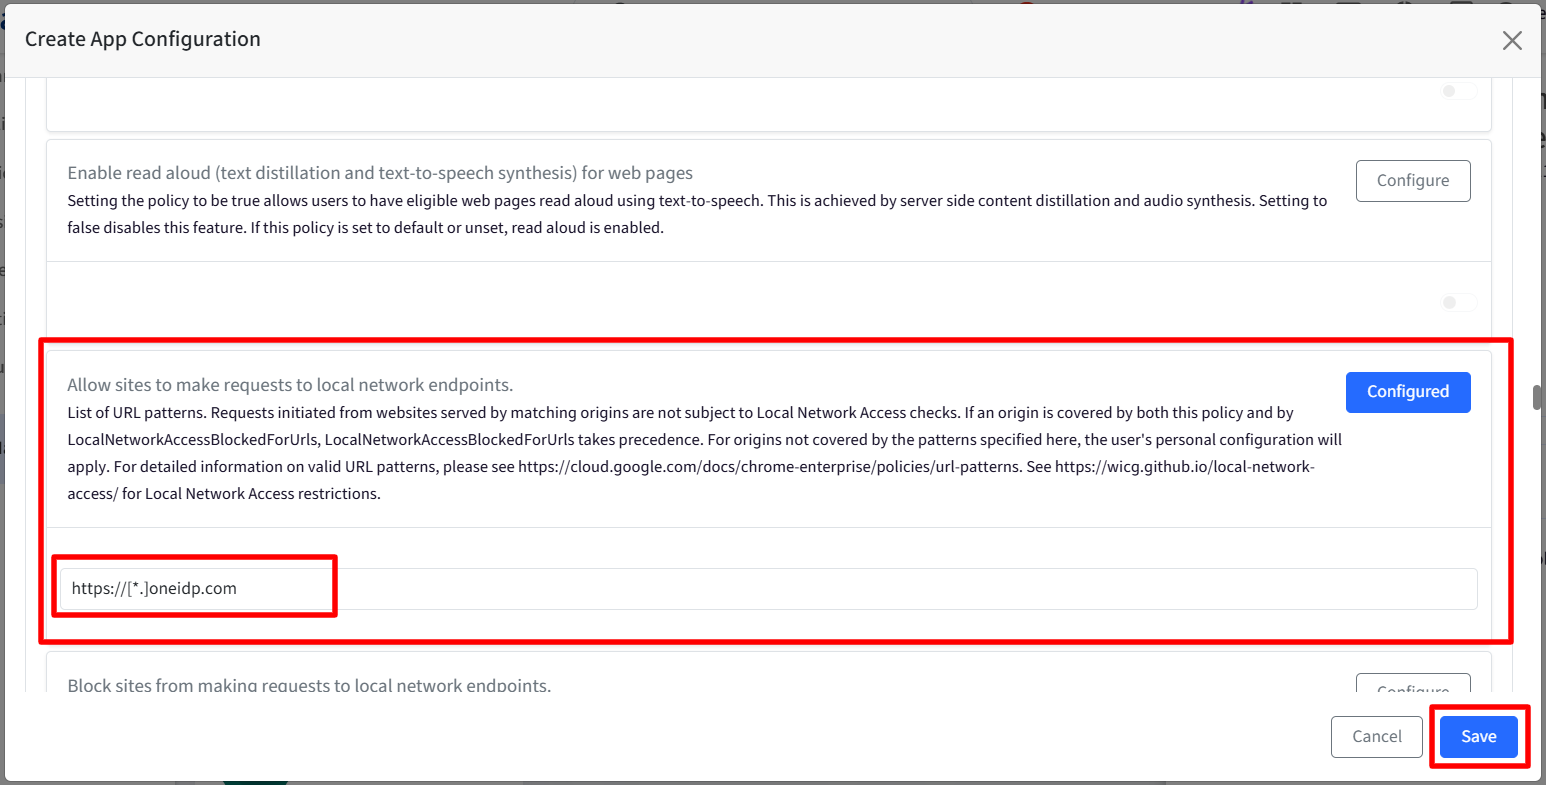
In the Create App Configuration dialog, provide App Configuration name and go to the Security tab.

Scroll down to the setting Allow sites to make requests to local network endpoints.
Click Configure and enter the following value in the text area:
Click Save.
Finally, publish the configuration.
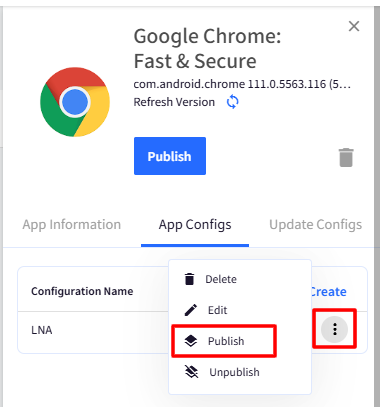
This ensures Chrome automatically grants OneIDP the necessary Local Network Access permission on managed Android devices.
On macOS
On Scalefusion Dashboard, navigate to Device Profiles.
Select a MacOS device profile and edit or create a new Mac profile to start adding the custom settings. Navigate to Custom Settings.

Copy the payload and add it to Custom Settings within the Device Profile, or click here to download the file and import it directly.
<?xml version="1.0" encoding="UTF-8"?>
<!DOCTYPE plist PUBLIC "-//Apple//DTD PLIST 1.0//EN" "http://www.apple.com/DTDs/PropertyList-1.0.dtd">
<plist version="1.0">
<dict>
    <key>PayloadContent</key>
    <array>
        <dict>
            <key>LocalNetworkAccessAllowedForUrls</key>
            <array>
                <string>https://accounts.oneidp.com</string>
            </array>
            <key>LocalNetworkAccessRestrictionsEnabled</key>
            <true/>
            <key>PayloadDisplayName</key>
            <string>Google Chrome</string>
            <key>PayloadIdentifier</key>
            <string>com.google.Chrome.27024151-47B3-4E0F-992F-53CB714EC674</string>
            <key>PayloadType</key>
            <string>com.google.Chrome</string>
            <key>PayloadUUID</key>
            <string>27024151-47B3-4E0F-992F-53CB714EC674</string>
            <key>PayloadVersion</key>
            <integer>1</integer>
        </dict>
    </array>
    <key>PayloadDescription</key>
    <string>LocalNetworkAccessAllowedForUrls</string>
    <key>PayloadDisplayName</key>
    <string>Scalefusion</string>
    <key>PayloadIdentifier</key>
    <string>com.promobitech.scalefusion.8A425A71-1D43-4739-B03C-F17A112E3A72</string>
    <key>PayloadOrganization</key>
    <string>Scalefusion</string>
    <key>PayloadType</key>
    <string>Configuration</string>
    <key>PayloadUUID</key>
    <string>8A425A71-1D43-4739-B03C-F17A112E3A72</string>
    <key>PayloadVersion</key>
    <integer>1</integer>
</dict>
</plist>
For detailed steps, follow our guide on adding a Custom Payload to a Device Profile and deploying it to devices.
D. Enforce MFA on managed devices
Enable this to enforce MFA using a third-party authenticator or OTP on the registered mobile number or OTP from another managed device, even if the current device is managed.
Note:
Please note that for this setting to work, MFA must be enabled at the Directory level in case the user does not have another managed device.
Navigate to OneIdP > SSO Configurations.
Click General Settings in the top right corner.
Check the “Enforce MFA on Managed devices” checkbox and click Save.
Once enabled, this will change the user’s login experience post the device compliance checks, and the user can enter:
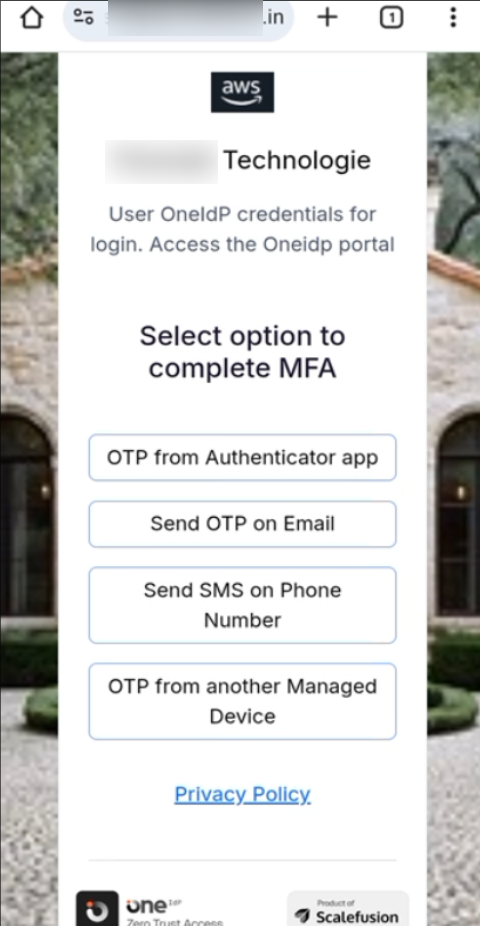
A one-time password (OTP) generated by the Scalefusion Authenticator app on another device managed by Scalefusion and associated with the user.
A one-time password (OTP) from a third-party authenticator app.
A one-time password (OTP) is sent to their mobiles - if the organization has implemented Twilio integration.
If this feature is enabled and users have no other managed devices, then they will be asked to set up a third-party authenticator.
A one-time password (OTP) is sent to their email - if the MFA using OTP sent to Email option is selected in Directory Settings.
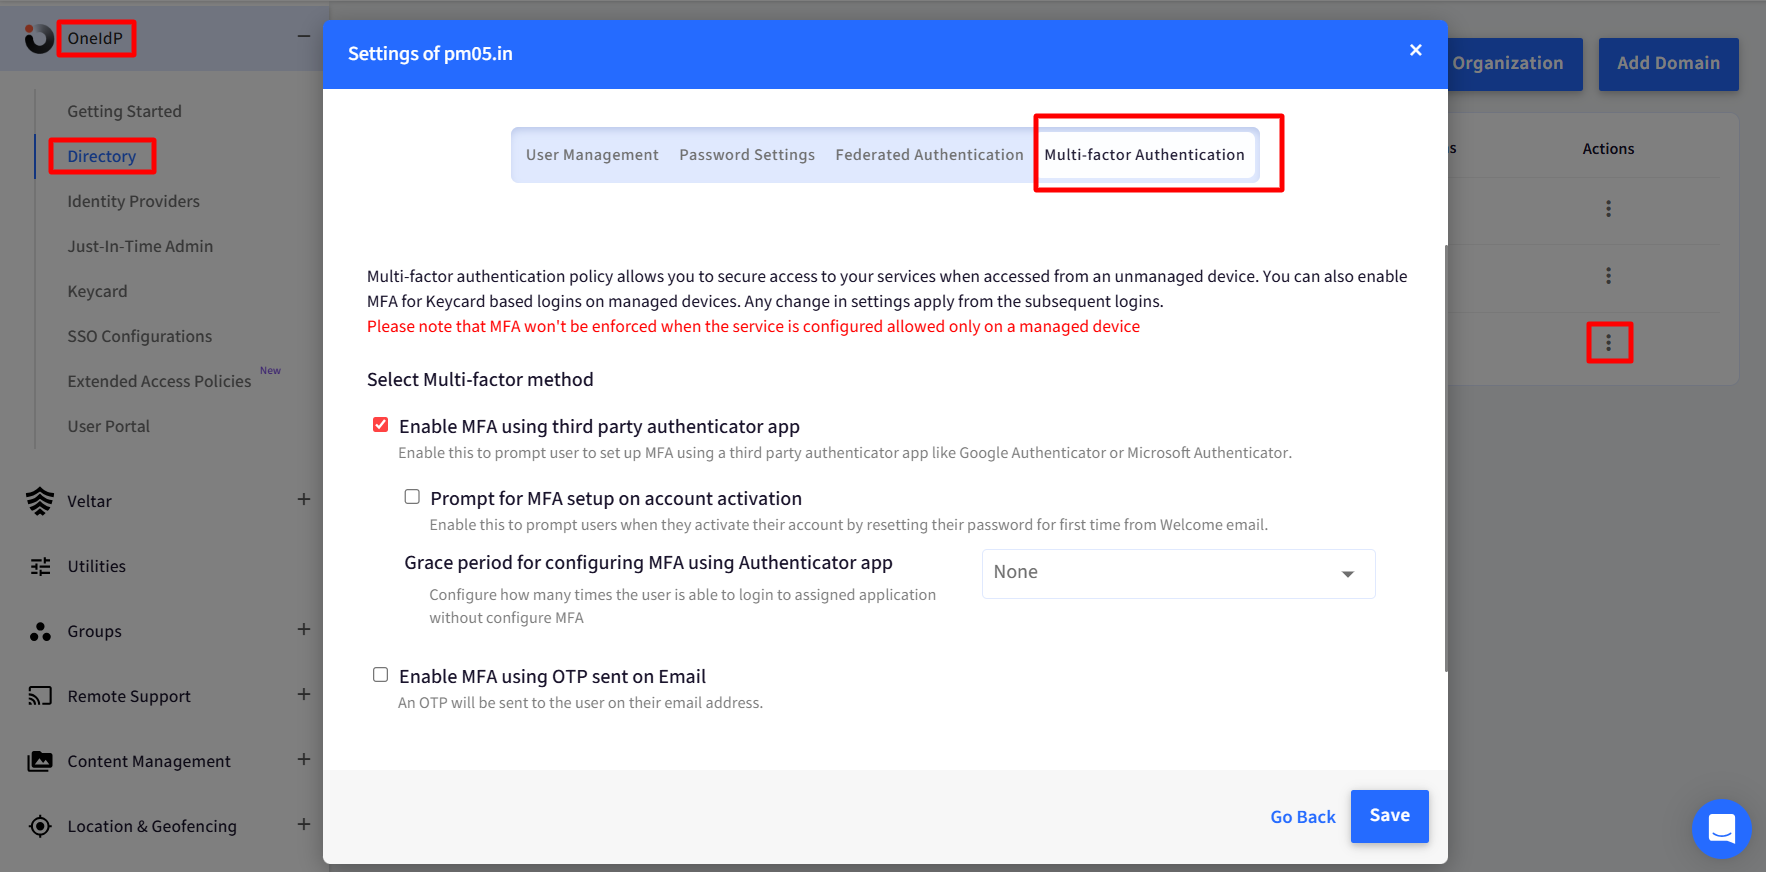
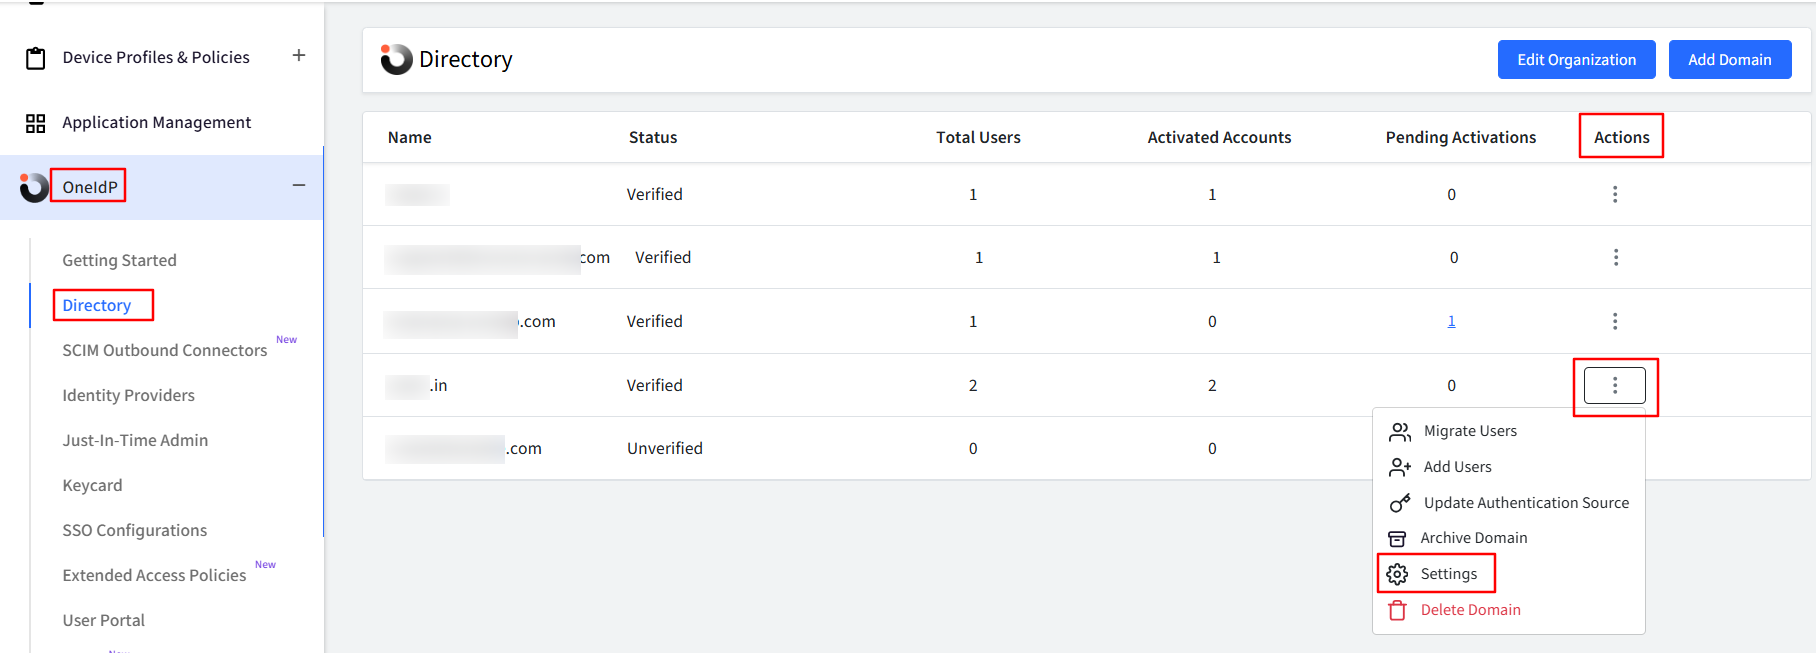
Navigate to OneIdP > Directory > click the three dots under the Actions column for the concerned domain.
Click Settings.
Navigate to the Multi-factor Authentication tab, enable the option MFA using OTP sent via email, and click Save.