SSO Configurations for Microsoft 365/Microsoft Entra
- 16 Sep 2024
- 10 Minutes to read
- Print
- PDF
SSO Configurations for Microsoft 365/Microsoft Entra
- Updated on 16 Sep 2024
- 10 Minutes to read
- Print
- PDF
Article summary
Did you find this summary helpful?
Thank you for your feedback
The first step is to create SSO Configuration in Scalefusion. This document provides a step-by-step guide for setting up SSO Configuration to configure Microsoft 365/Entra application allowing users to sign in to any Microsoft application (Service Provider) when authenticated by Scalefusion (Identity Provider) via SSO Configuration.
Pre-requisites
- The devices should be enrolled with Scalefusion as BYOD or UAE or Shared COD.
- The Custom Domain for which you are authorizing, should be verified through OneIdP.
- Users belonging to custom domain should be imported/added to Scalefusion Dashboard and migrated to OneIdP.
- IT Admins should have access to Azure (Service Providers') admin console.
Overview
For users to sign in to Microsoft 365 applications via Scalefusion's OneIdP, requires a two-step process:
- Step 1: Create SSO Configuration for Microsoft Entra/Microsoft 365 on Scalefusion Dashboard
- Step 2: Federate domain
Step 1: Create SSO Configuration for Entra
- Sign in to Scalefusion Dashboard and navigate to OneIdP > SSO Configuration
- Click on New SSO Configuration button on top right.

- This opens the SSO Configuration wizard with following tabs on the left panel:
- Application Basics
- SSO Scope Management
- Permissions
- SSO Settings
- Conditional Access
- User Facing Messages
Navigate to each tab and enter required details. You can navigate to next tab only after you have entered complete details in the current section. All are explained in detail below.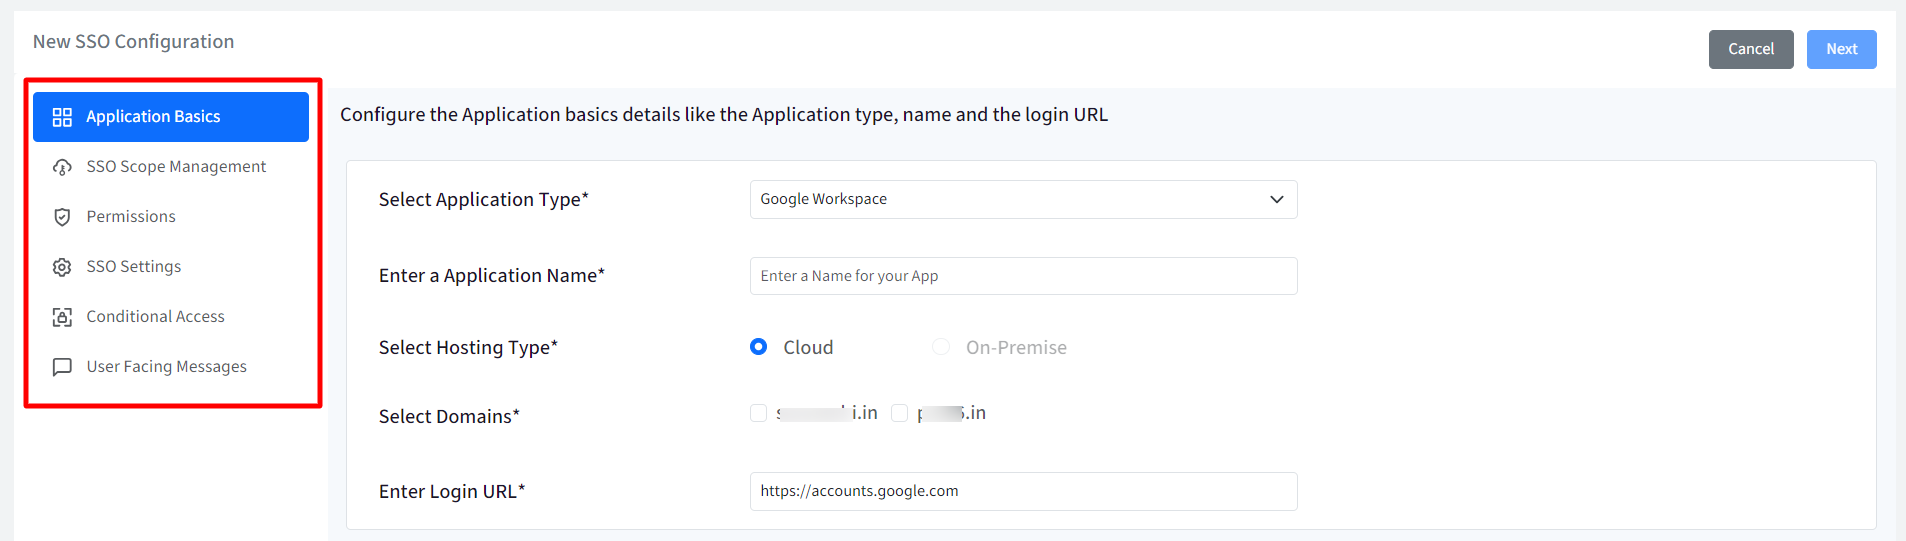


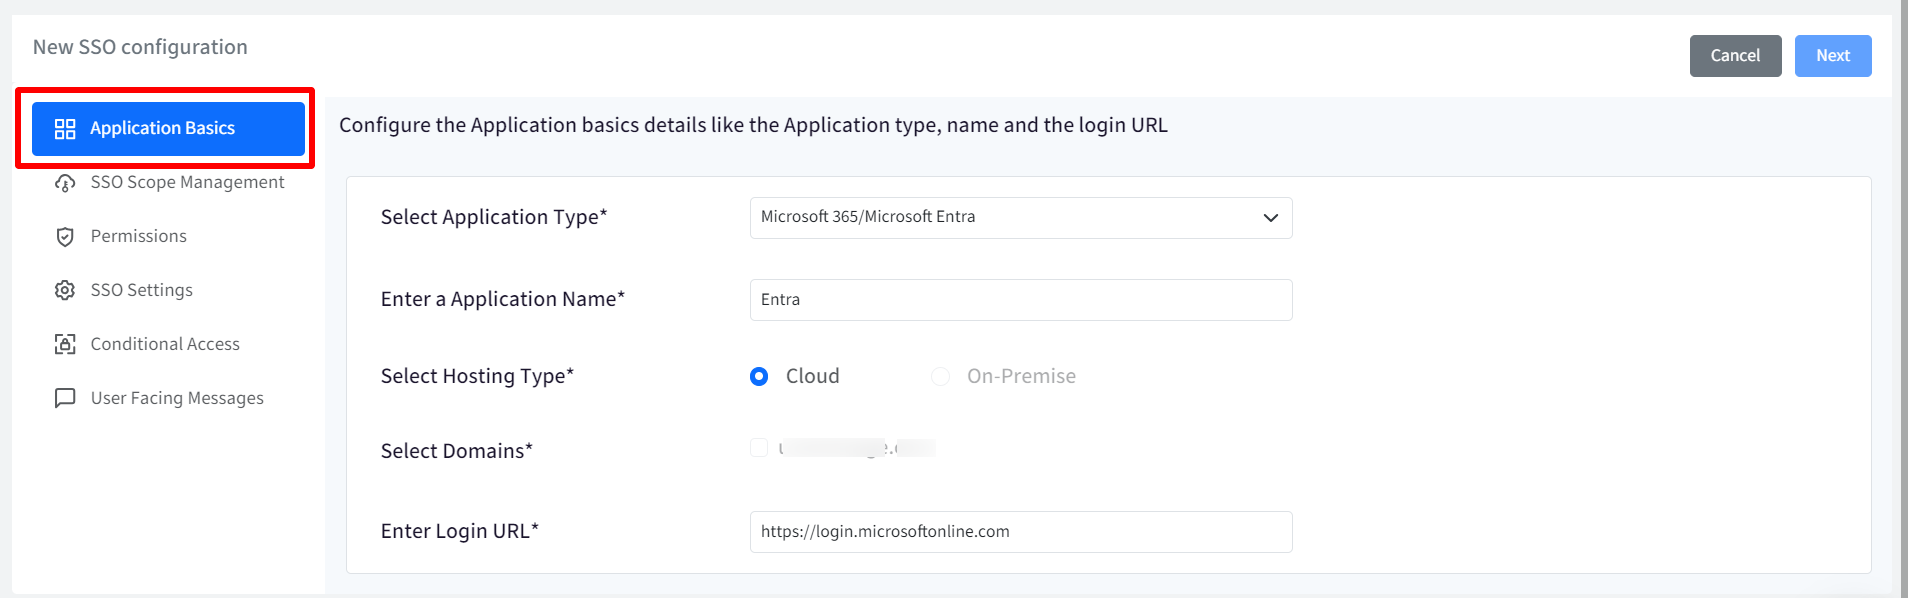
Application Basics
Configure basic application details by entering the following:
- Select Application Type: Select Microsoft 365/Microsoft Entra as application type from the drop-down.
- Enter Application Name: Enter a name for your App which will be an identifier for your configuration. The name must be at-least 5 characters long. The maximum allowed length is 128 characters.
- Select Hosting Type: This will be pre-selected as Cloud
- Select Domains: All the custom domains you have configured and verified using OneIdP, will be listed here. Select the domain(s) which you want to be SAML SSO enabled. You cannot select more than one domain for Entra.
- Enter Login URL: Provide URL that you use to sign in to that service. In case of Entra, it will be pre-populated as https://login.microsoftonline.com
Once you have entered all details click Next
SSO Scope Management

With SSO scope management you can configure the procedure for managing the users who will be accessing this application. It basically allows how SAML settings for the users are going to be managed. Following are the settings:
User assignment
SSO Configuration would allow only assigned users to access the app. Choose one from the following options:
- Allow all users imported to Scalefusion to access the application: All users (belonging to the domain) imported to Scalefusion and migrated to OneIdP will be allowed to access the application.
- Allow only assigned users to access the application: Only the user(s) whom you have assigned the SSO configuration, will be allowed to access the application. With this option, after SSO configuration is created, you need to manually select and assign the users.
- Revoke access for all users once when the configuration is saved: If this is checked, the access is revoked from the users who are currently assigned with the configuration. As a result, it will invalidate all user sessions and logout users from their current running session.

- Revoke access for all users once when the configuration is saved: If this is checked, the access is revoked from the users who are currently assigned with the configuration. As a result, it will invalidate all user sessions and logout users from their current running session.

Enforcement Rules
From here, you can configure and enforce users that at what point of time SSO Configuration should invalidate the current session and logout users. Following options can be selected:
- Immediately on User Assignment and post grace period if applied: Once SSO configuration is assigned to user
- Immediately on User Un-Assignment: When user is unassigned the SSO configuration
- Immediately on Deleting this configuration: When SSO configuration is deleted from Scalefusion Dashboard


Click Next
Permissions
Here, you need to grant permissions by signing in with an admin account on Azure portal:
- Click on Grant Permissions button at the bottom.
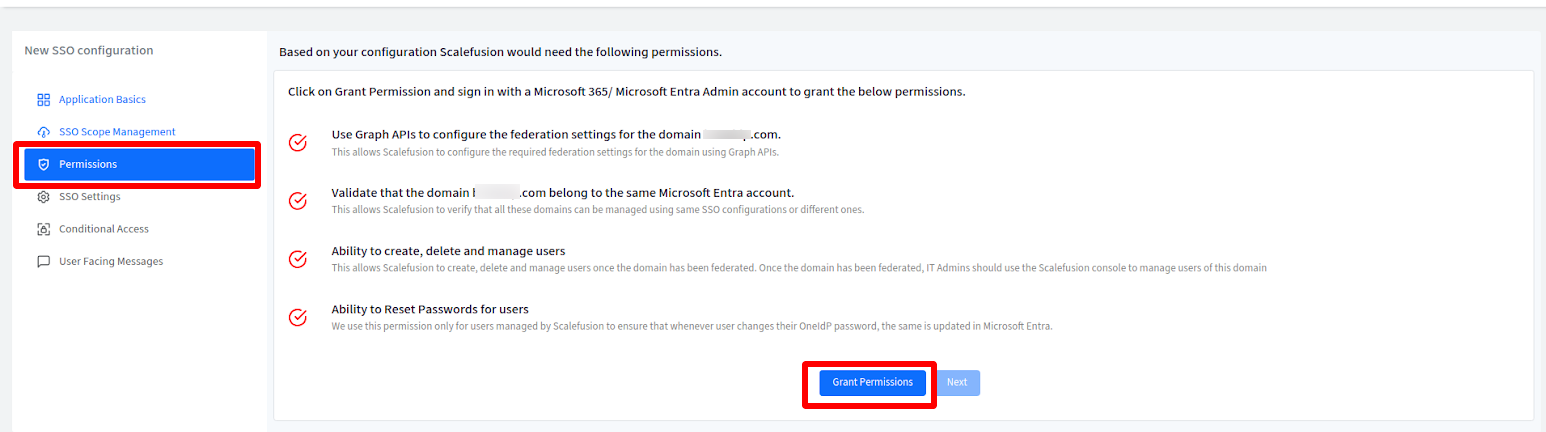
- This will redirect you to Azure login portal (https://login.microsoftonline.com). Sign in with your Azure admin credentials.
- After signing in to Azure portal, you will be redirected back to Scalefusion Dashboard with permissions granted.
- Note the check mark in front of each permission turns to green color. This indicates that the permissions have been granted.
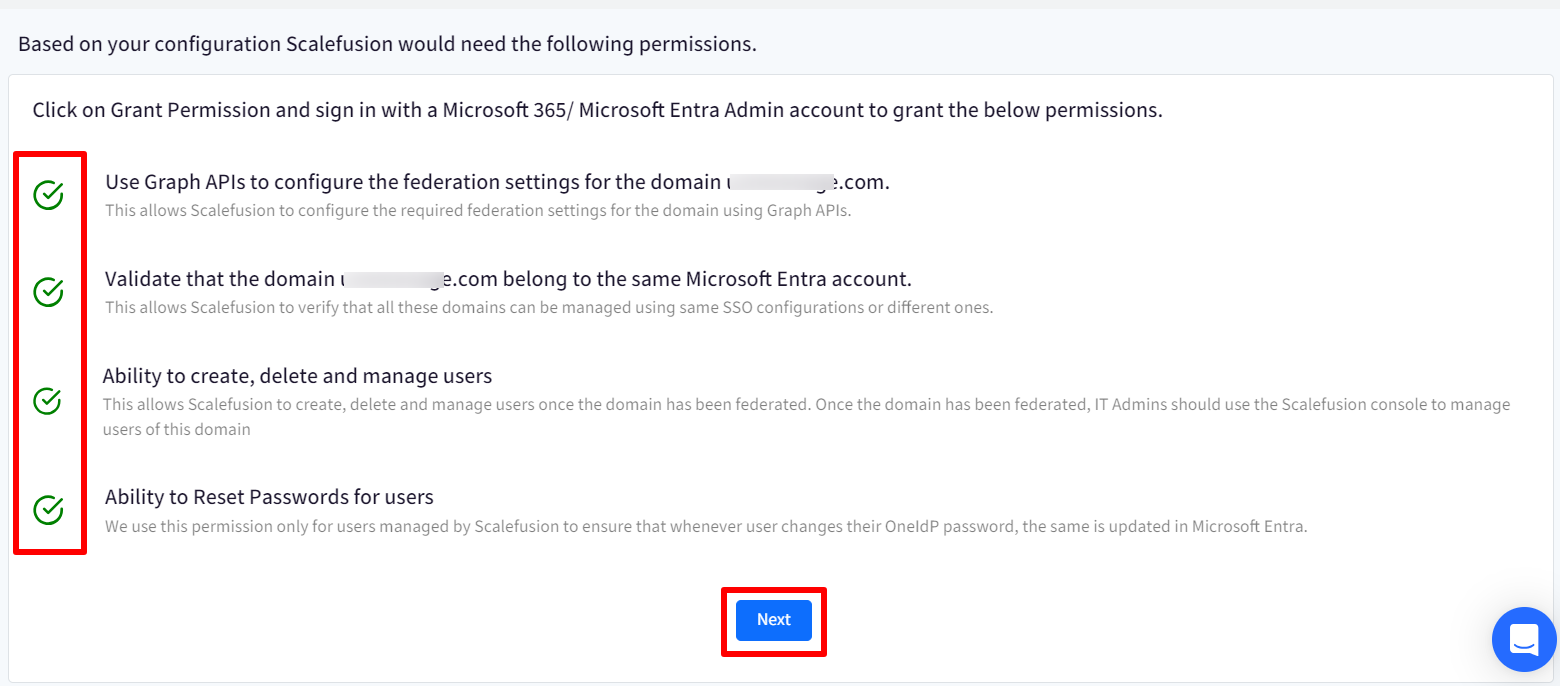


Click Next
SSO Settings
Settings are pre-filled in this section.
Click Next
Conditional Access
From this section you can define the additional conditions on the basis of which users will be allowed/disallowed from accessing the application on device. This is divided into following sections:
- Conditional Access Settings
- Access Exceptions
Conditional Access Settings
Device Policy
- For Android, iOS/iPad OS, Windows & macOS, Linux: Choose one from the following two conditions:
- Only if the device is managed by Scalefusion: The application will be accessible only on devices managed (enrolled) by Scalefusion
- If the device is managed by Scalefusion or an OTP using Scalefusion Authenticator app from a managed device: The application is accessible if any of the following conditions is met:
- Device is managed by Scalefusion: If device is managed you will not be asked to enter OTP for authentication, or
- If device is unmanaged, OTP is required for authentication. OTP can be taken from Authenticator app installed on a Scalefusion managed device.
Note: The left side panel is for configuring Device Policy on Android & iOS/iPad OS and right side is for Windows & macOS and Linux below them. Hence, you can configure separate device policies based on platform.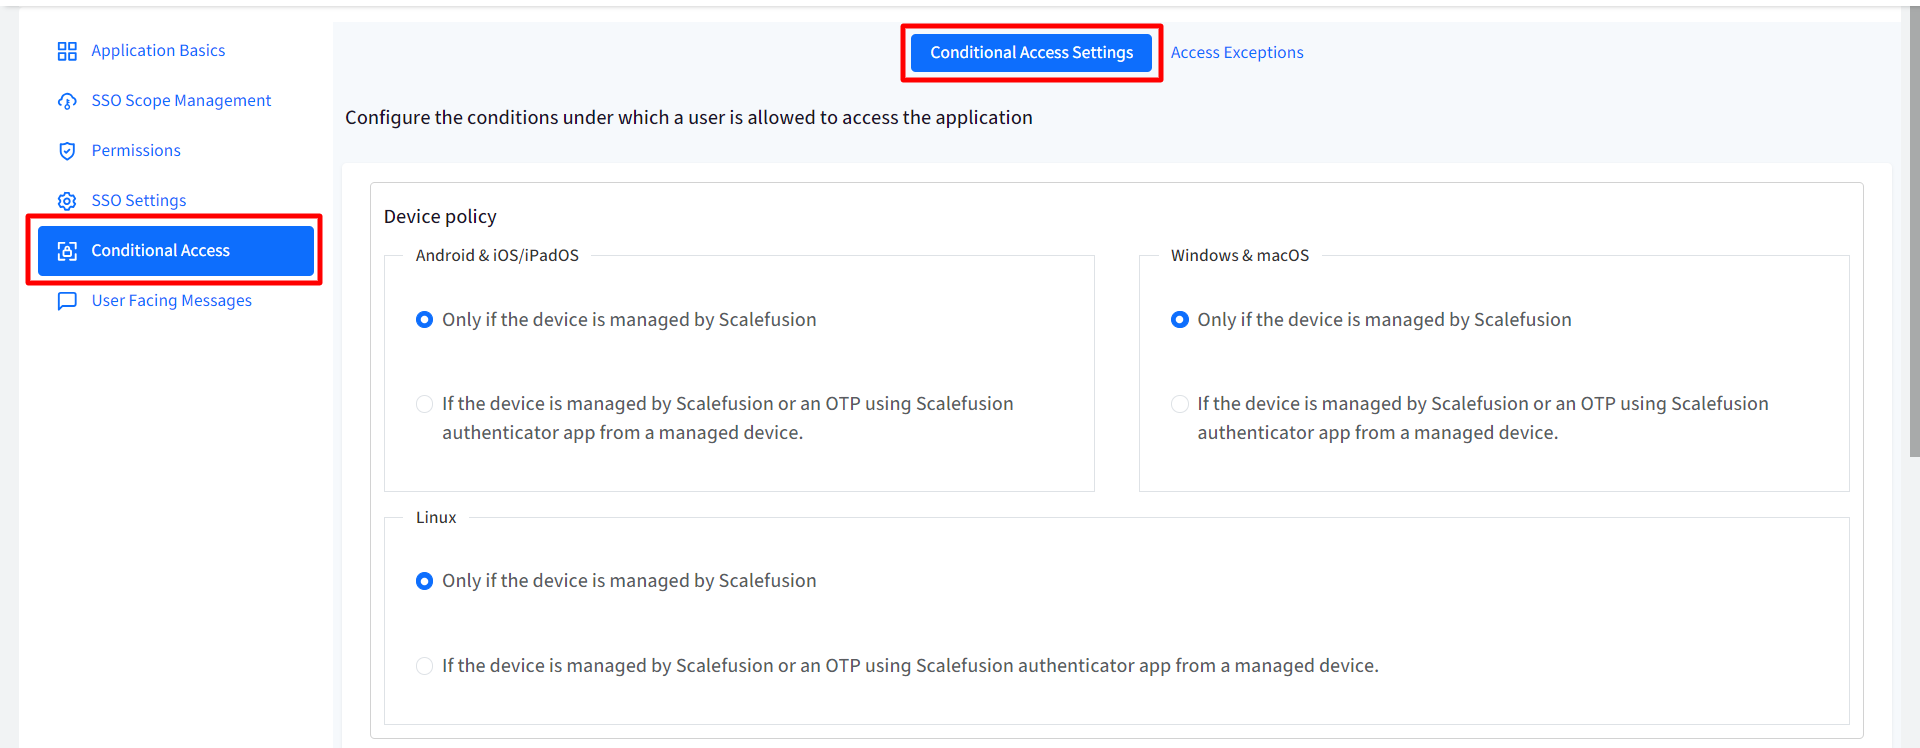

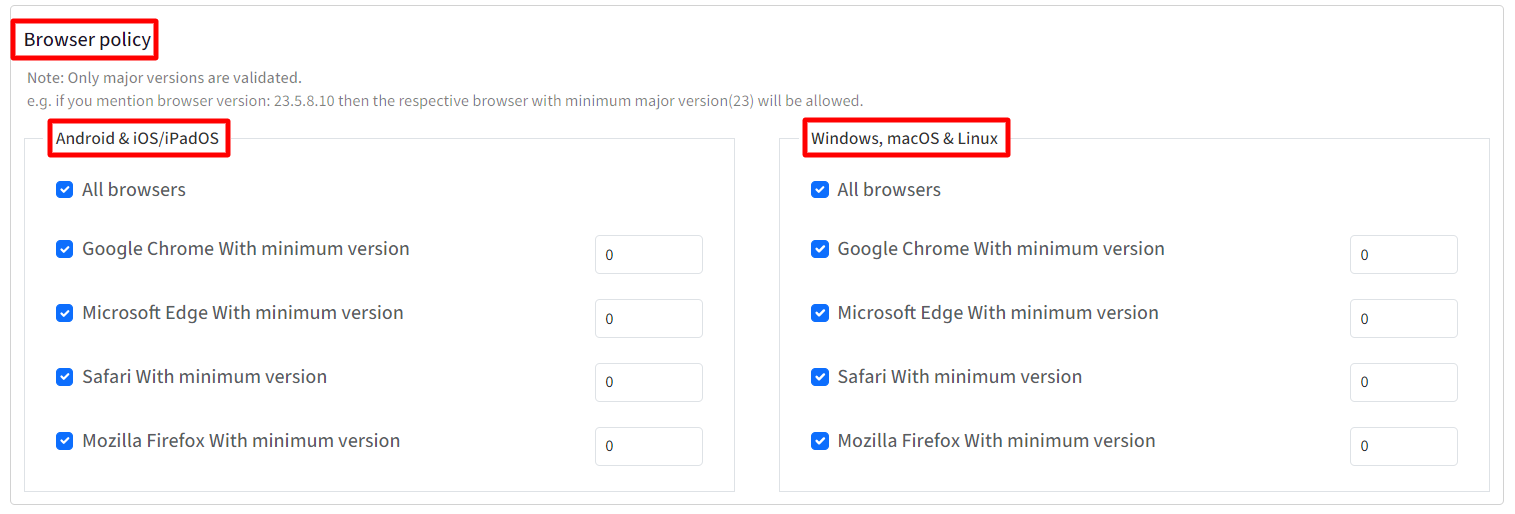
Browser Policy
From here, you can select one or more browsers and specify minimum versions on which you want to allow the access to the application. Following are the options:
- All Browsers
- Google Chrome with minimum version
- Microsoft Edge with minimum version
- Safari with minimum version
- Mozilla Firefox with minimum version
Important Points on Browser Policy:
- By default all browsers are allowed.
- Only major versions are validated. For eg. if you mention browser version: 23.5.8.10 then the respective browser with minimum major version(23) will be allowed.

After configuring Device Policy and Browser Policy, click Next
Access Exceptions
From this section you can configure the exceptions where the users are allowed to access the applications even if the conditions are not met. In general, these exceptions will be useful or addresses scenarios where :
- IT Admins have setup Android Enterprise using Google Workspace Or
- IT Admins have setup Apple User Enrollment with ABM/ASM federated to Google Workspace
Following are the exceptions that can be configured:
- Enrollment Exceptions
- Allow users to access the application till they enroll their first device: Allows users to access the application till they enroll at-least one device. This option is helpful in conditions where the enrollment steps requires them to authenticate with the service provider. With this, you can also configure the following:
- Maximum sessions allowed per user: Configure no. of sessions that should be exempted. It can range from 1 to 3. Ideally 1 session per user is recommended.
- Configure the OS where the exceptions are applied: Select the platform(s) on which this exemption would be allowed to users.
- Allow users to access the application till they enroll their first device: Allows users to access the application till they enroll at-least one device. This option is helpful in conditions where the enrollment steps requires them to authenticate with the service provider. With this, you can also configure the following:
- User Exceptions
Here you can add the users who are always exempted from the conditions and will never be asked to manage their device. Enter comma separated email addresses of users or click on Add Users on the right and in the new window, select the users who should be exempted.
Note: These users still need to sign in with their OneDirectory credentials if they fall under the SSO Scope, however the conditions will not be enforced.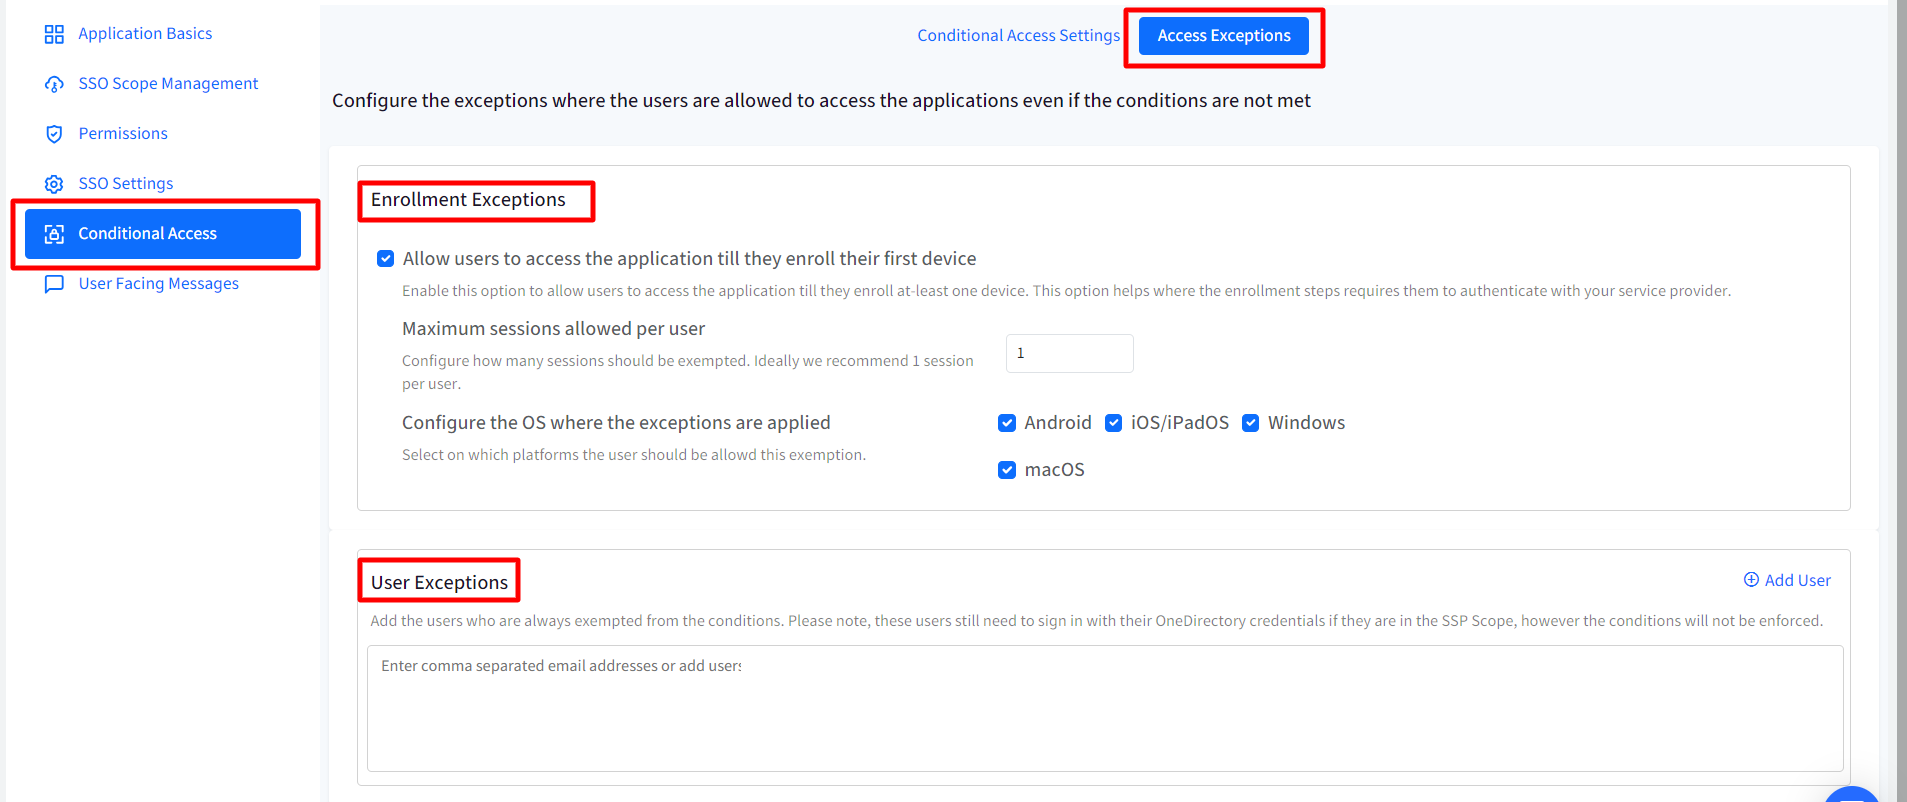

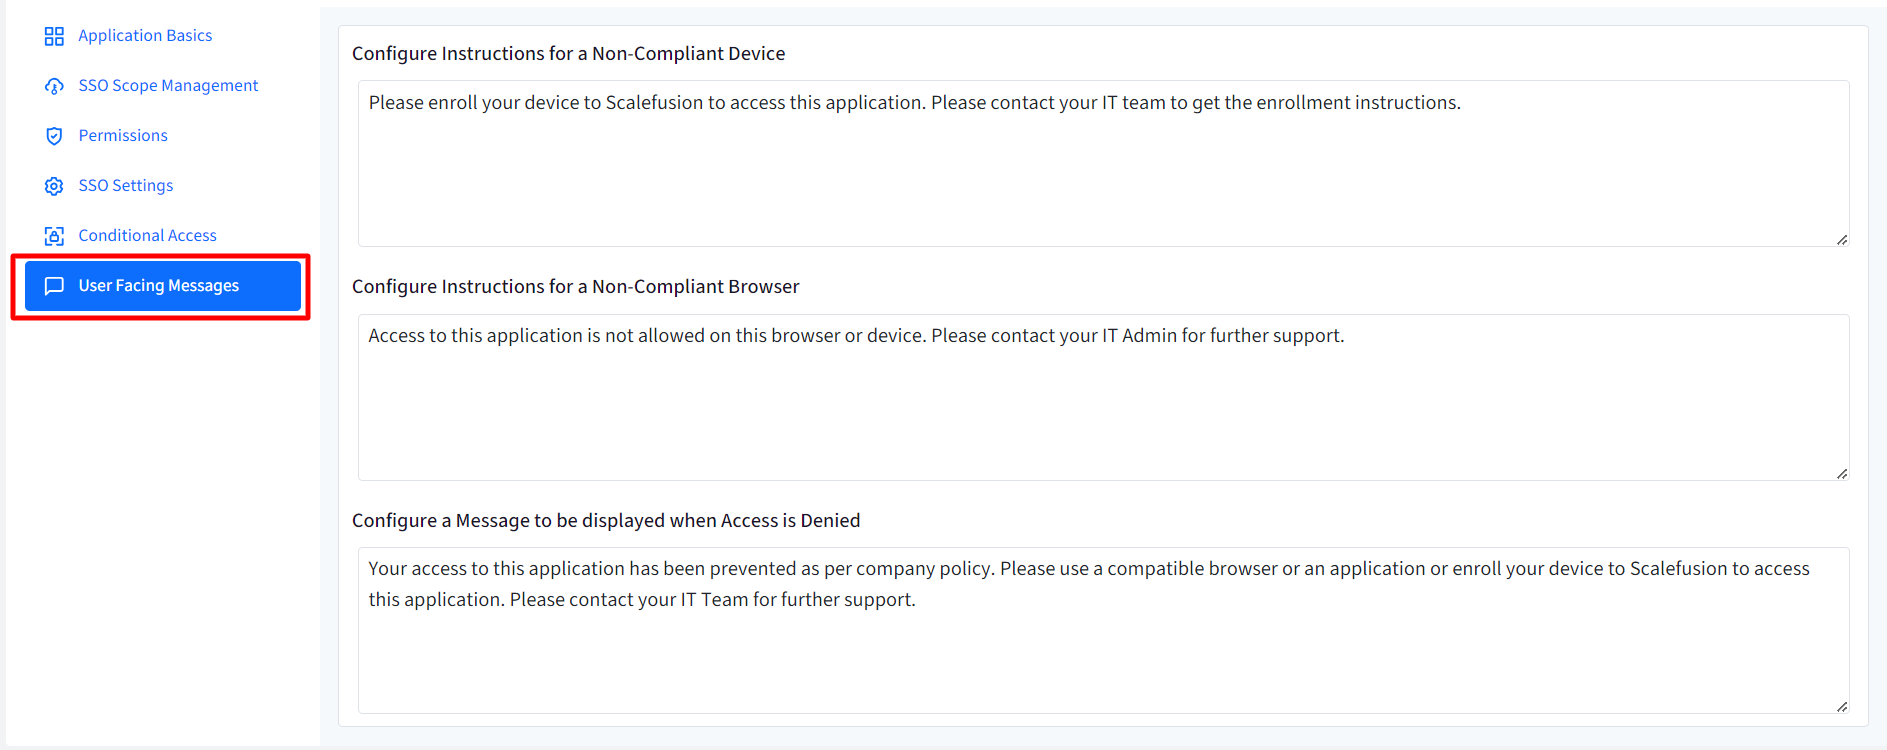
User Facing Messages
User Facing Messages helps admins configure messages that end users may be shown when they are unable to access the application if any of the compliance conditions are not met. You can configure messages under following:
- Configure Instructions for a Non-Compliant Device: This message is shown when the device is not compliant and needs to be enrolled to Scalefusion
- Configure Instructions for a Non-Compliant Browser: Shown when the browser is not compliant as per configurations
- Configure a Message to be displayed when Access is Denied: Any other cases where access to application is denied.
There are some pre-configured messages displayed on Dashboard which you can edit as per requirement.
After configuring user facing messages, click on Save
The SSO configuration is created and listed on SSO Configuration page as a separate card with the name you have defined. You can create multiple SSO configurations in the same manner.
The next document explains how the configurations can be managed and other actions you can perform through SSO configurations.
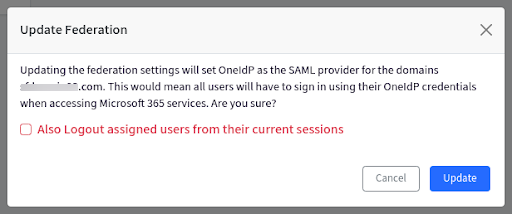
Step 2: Update Federation
Once SSO Configuration for Entra is created, next step is to federate the domain configured for SSO. Updating the federation settings will designate Scalefusion's OneIdP as the SAML provider for the domain that is SSO enabled, requiring all users belonging to the domain, to sign in with their OneIdP credentials to access Microsoft 365 services.
To do so,
- Click on the three dots next to SSO config name (created for Entra) and click on Update Federation.
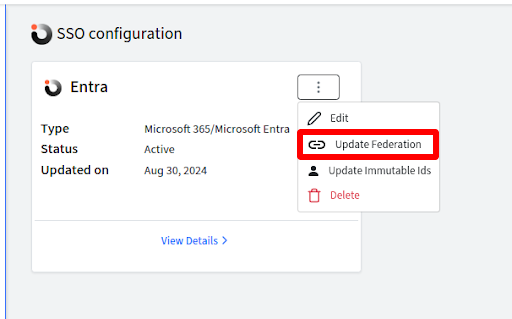
- Following confirmation dialog will come up. Click on Update.
- If you select the flag Also Logout assigned users from their current sessions, the users will be logged out from their currently running session and they have to login again with their OneIdP credentials.
- If you select the flag Also Logout assigned users from their current sessions, the users will be logged out from their currently running session and they have to login again with their OneIdP credentials.
- This completes the process of SSO Configuration and users can sign in to Microsoft365 apps with Scalefusion's OneIdP credentials.


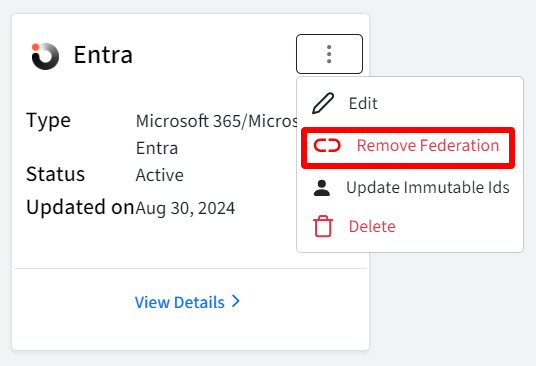
Remove Federation
Federation Settings once applied, can also be removed at any point of time. Removing federation will remove the SAML configuration from the domains (configured for Entra SSO) and users will no longer be able to sign in to Microsoft 365 applications with their OneIdP credentials. To remove federation,
- Click on the three dots next to SSO Config name and click on Remove Federation. While removing federation, you can select the flag Also Logout assigned users from their current sessions

Update Immutable Ids: Microsoft 365 requires each user to have an Immutable ID for proper SAML federation. Scalefusion's OneIdP automatically assigns these IDs, but if some users experience any issues in signing in, this option attempts to update their Immutable IDs. Immutable Ids can be updated by clicking on three dots next to SSO config name.
Updating Immutable Ids is an optional step and can be performed only if users face any issues in signing in.
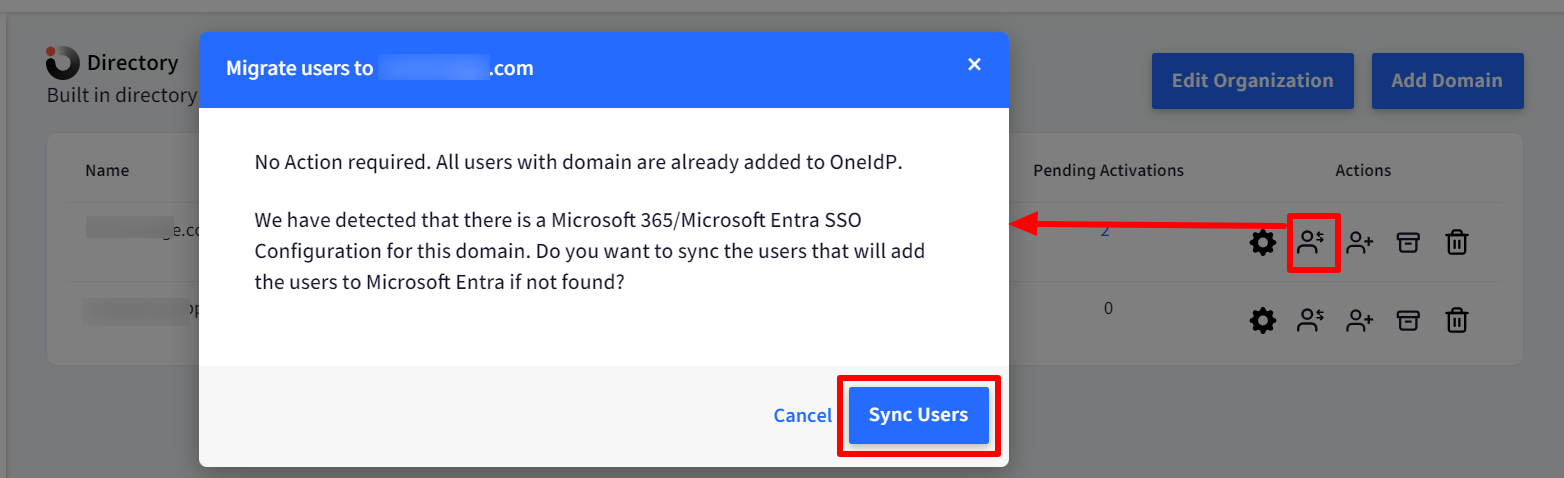
User Management for federated Domains
- Once a domain is federated, Admins cannot create new users from Entra (Azure Directory) portal.
- For federated domains, user creation, updation and deletion will be handled by Scalefusion
- Users added to OneIdP (created through Scalefusion Dashboard) can be added to Entra portal by using Sync Users option. To sync users, navigate to OneIdP > Directory > Actions > Migrate Users (for Entra federated) domain

Known Behaviors
- Configuration: Entra SSO can only be configured for a single domain. If you have multiple domains, you'll need to configure Entra SSO separately for each one. Group-based SSO and grace periods are not applicable. Admins must grant SSO application permissions.
- Compatibility:
- Entra SSO is compatible with Android 8 and later.
- Windows:
- If your domain is federated (connected to another identity provider), Auto Pilot enrollment (OOBE) won't work for Windows devices. As a result, new Windows devices won't be automatically enrolled in your MDM solution.
- In Multi-App kiosk and Single App in Agent mode, users will be able to sign in to MS Office applications if the setting Show option to relax Kiosk mode and sign-in to Microsoft Office application in device profile (Windows Device Profile > Settings > Scalefusion Agent Settings > Kiosk Settings) is enabled.
- Users won't be able to log in to the Outlook app in Agent Kiosk mode.
- macOS Scalefusion Agent v3.17.7 and later support redirection and authentication silently.
- User Management: Deleting a federated Apple ID from the dashboard also deletes it from Entra, but not from Apple School Manager. This can cause AUE enrollment errors.
- Error Handling:
- Entering wrong password on the OneldP page in standalone apps triggers a "Could not connect to Service" error on Windows.
- Access exceptions:
- User Exceptions must be configured for AUE (Apple)
- Enrollment and/or User exceptions must be configured for Entra-joined (Windows) enrollments.
- Logout Behavior: The logout action doesn't work for the office365 website. Manual logout from standalone apps doesn't decrease the session count on the SSO app's View details page.
- User Sync: Syncing creates Entra Portal users with random passwords for users found on the Scalefusion dashboard but not on Entra. Admins must reset these passwords from the Scalefusion dashboard.
Frequently Asked Questions
Question: Can I use Scalefusion's OneIdP-based SSO with Microsoft AD Connector to sync users from On-Prem AD to Entra AD?
Answer: Yes, you can use OneIdP-based SSO in conjunction with Microsoft AD Connector (also known as support to Hybrid Entra environments) to provide single sign-on capabilities for users synced from On-Prem AD to Entra AD, . However, there are certain limitations to this which can be enumerated as:
- User creation: Administrators cannot directly create users in On-Prem AD from Scalefusion. Newly created users will appear in Entra AD.
- Two-way sync: If your Microsoft AD Connector is configured for two-way sync, it is responsible for synchronizing changes with On-Prem AD.
- Password sync: Any password changes made to OneIdP users will not be synchronized to Microsoft Entra or On-Prem AD.
- Multiple domains: If your Microsoft account manages multiple domains, even if only one is managed by On-Prem AD, these restrictions apply to all domains under that account.
Was this article helpful?