- 19 Dec 2025
- 17 Minutes to read
- Print
- PDF
How to Setup Google SSO (Single Sign-On) Integration
- Updated on 19 Dec 2025
- 17 Minutes to read
- Print
- PDF
This document provides a step-by-step guide for setting up SSO Configuration to configure Google Workspace, allowing users to sign in to any Google Workspace application like GMail, Google Drive etc using their OneIdP credentials and securely access these services.
Pre-requisites
The devices should be enrolled with Scalefusion as BYOD or UAE or Shared COD.
The Custom Domain for which you are authorizing, should be verified through OneIdP.
Users belonging to custom domain should be imported/added to Scalefusion Dashboard and migrated to OneIdP.
IT Admins should have access to Google (Service Providers') admin console.
Steps
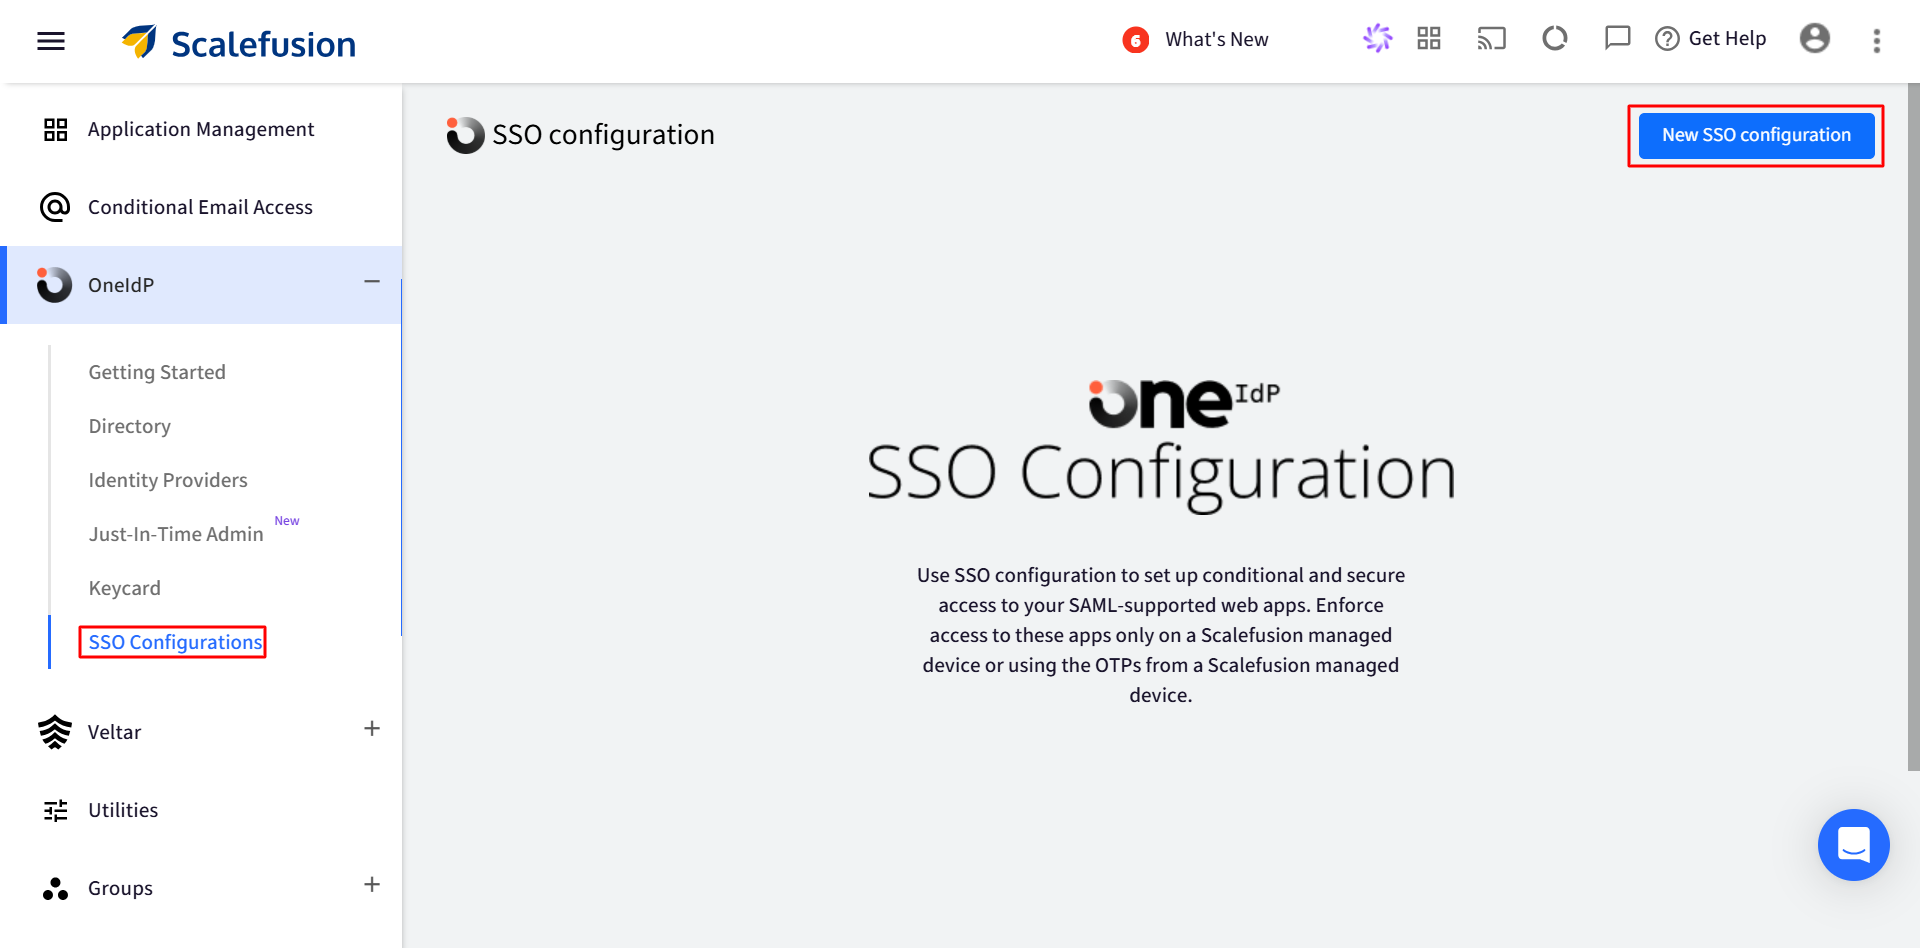
Sign in to Scalefusion Dashboard and navigate to OneIdP > SSO Configuration
Click on New SSO Configuration button on top right.
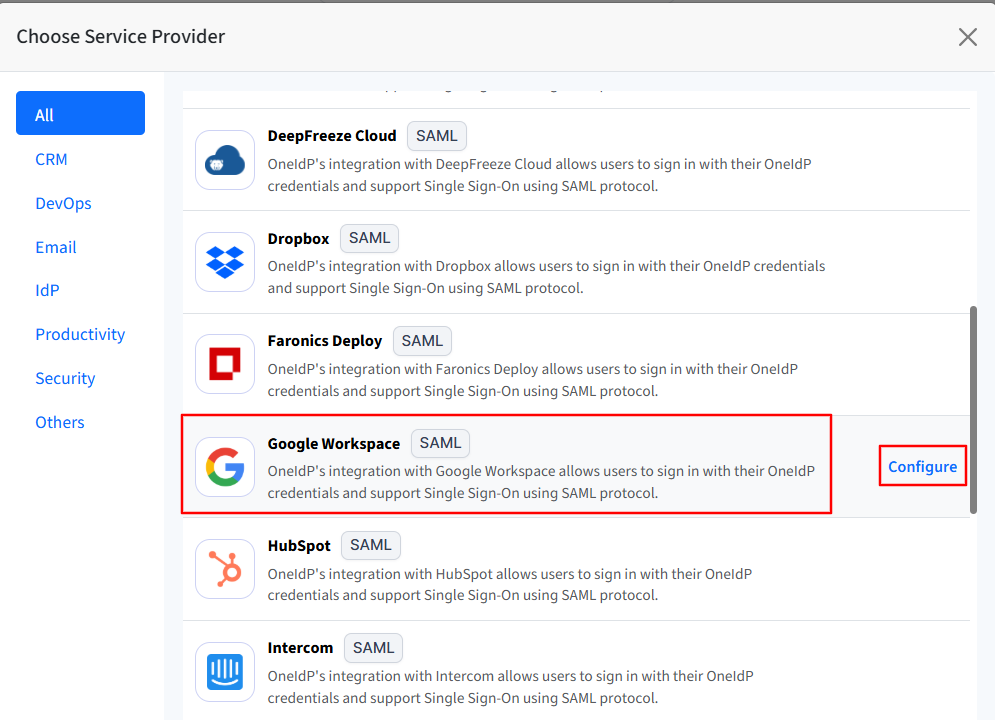
After clicking New SSO Configuration, a window will appear. Search for Google Workspace in the list, select it, and then click Configure.
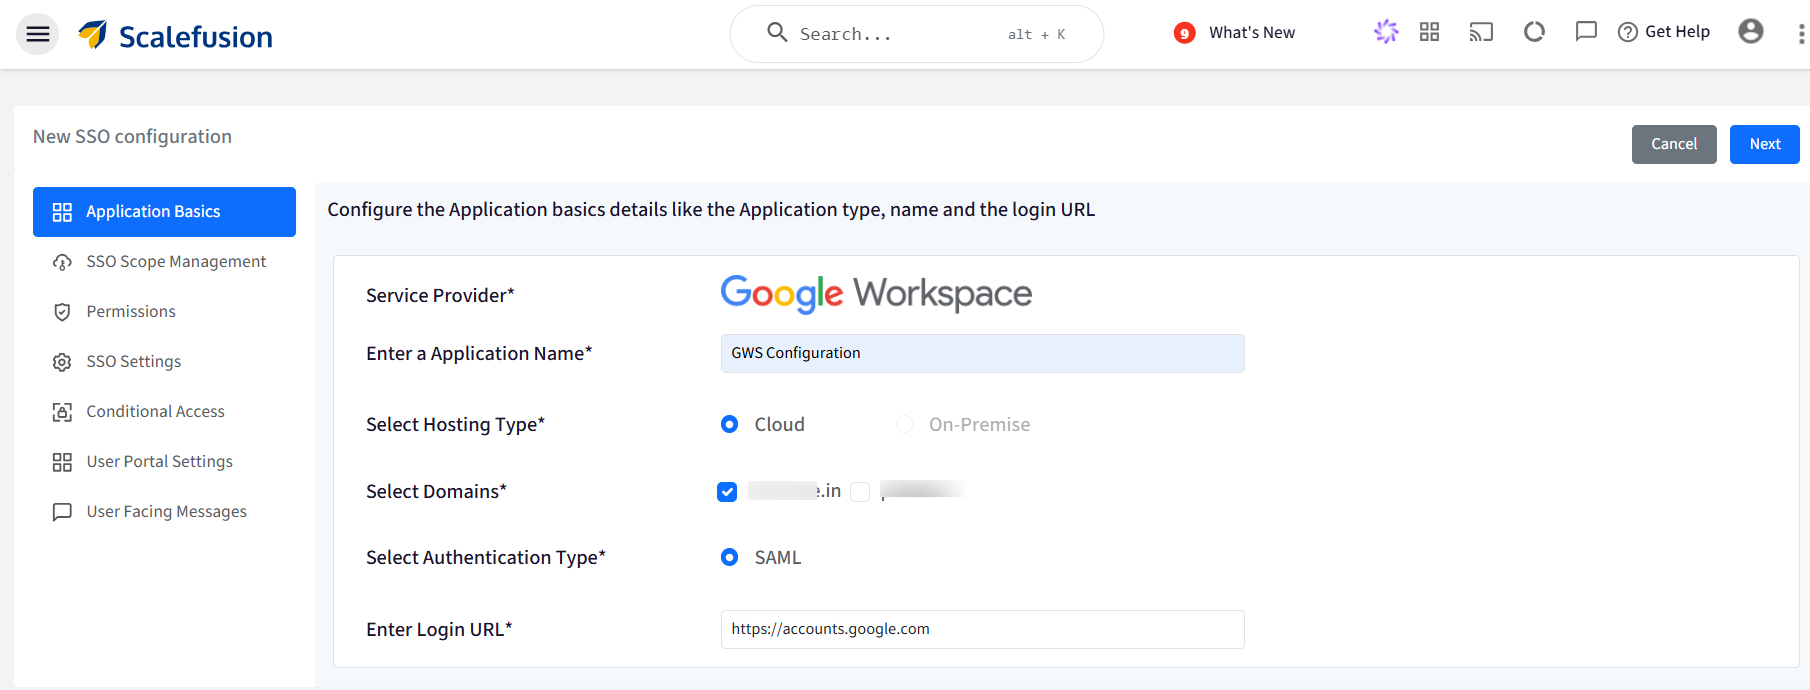
This opens the SSO Configuration wizard with the following tabs on the left panel:
User Facing Messages
Navigate to each tab and enter the required details. You can navigate to the next tab only after you have entered complete details in the current section. All are explained in detail below.
Application Basics
Configure basic application details by entering the following:
Enter Application Name: Enter a name for your App which will be an identifier for your configuration. The name must be at-least 5 characters long. The maximum allowed length is 128 characters.
Select Hosting Type: This will be pre-selected as Cloud
Select Domains: All the custom domains you have configured and verified using OneIdP, will be listed here. Select the domain(s) which you want to be SAML SSO enabled. You can create multiple SSO configurations with same domains.
Select Authentication Type: This will be pre-selected as SAML.
Enter Login URL: Provide URL that you use to sign in to that service. In case of google, it will be pre-populated as https://accounts.google.com
Once you have entered all details, click Next
SSO Scope Management
With SSO scope management, you can configure the procedure for managing the users who will be accessing this application. It basically allows for how SAML settings for the users are going to be managed. The following are the settings:
Select User Scope
Select one from the following options basing on how you intend to use the SAML settings. It is recommended to create a group in your application and applying these settings to only a group of users. Select one from the following:
Groups based on Users (or subset) Imported to Scalefusion (Default)
We will apply settings to All Users (Not Recommended)
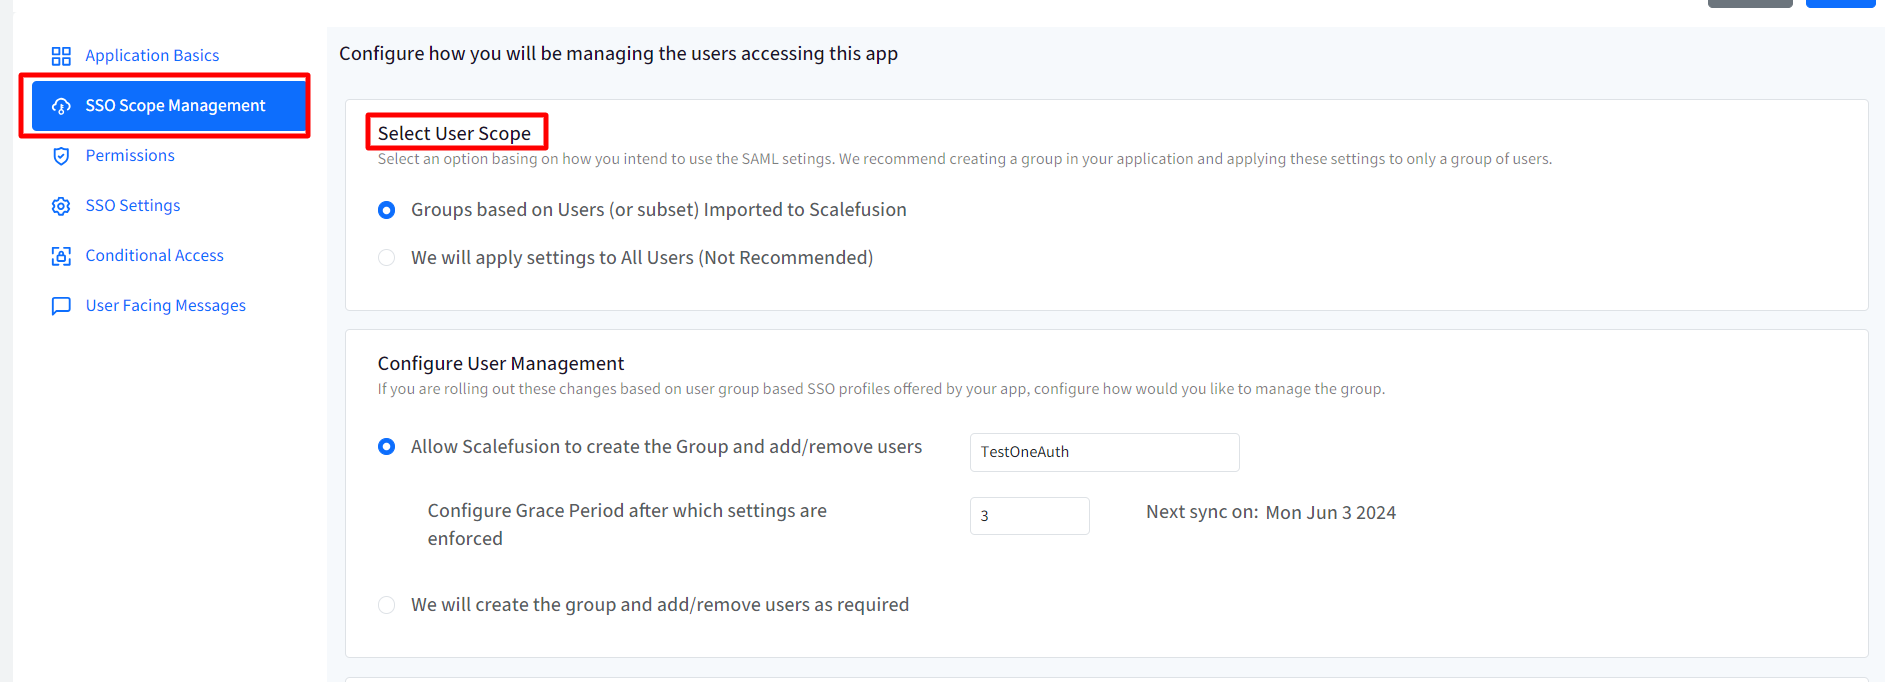
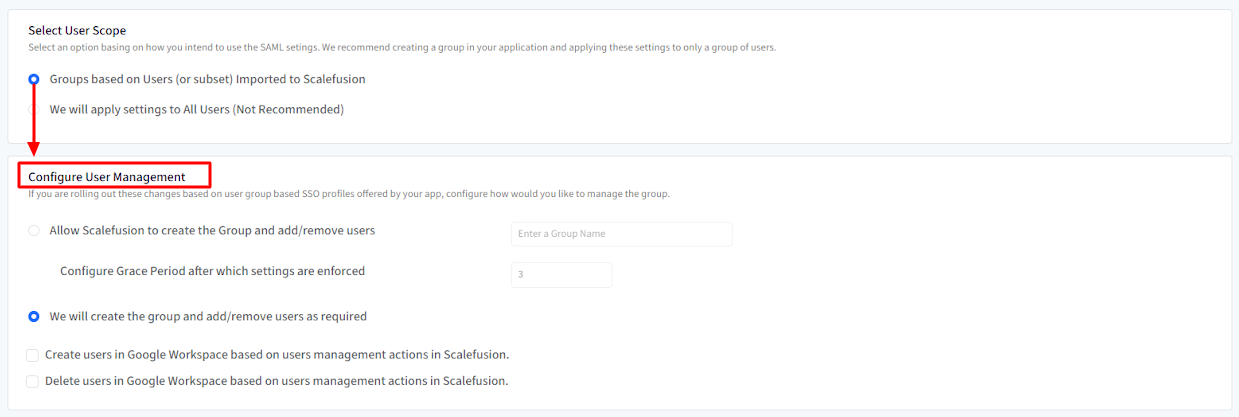
Configure User Management
If you intend to roll out the changes based on user-group based SSO profiles offered by your app, configure how would you like to manage the group. Hence, these settings will be enabled and become configurable only when groups based on users imported to Scalefusion, is selected as User scope in the setting above. Choose one from the following two options:
Allow Scalefusion to create the Group and add/remove users: Enter the name of Group. With this, a group with the name you have mentioned, will be created on the admin console and users will be moved to that group.
Configure Grace Period after which settings are enforced: Enter the time (in days) after which SSO Configuration settings will be enforced on users. Grace period can be anywhere from 2 to 30 days.
We will create the group and add/remove users as required: The group can be created on the console and users can be moved to the group as per requirement.
Create users in Google Workspace based on users management actions in Scalefusion: User accounts in Google Workspace will be automatically created or updated based on actions performed on user accounts within the Scalefusion platform. The actions can be creating a new user or modifying existing user details. For eg. A new user added in Scalefusion creates corresponding user account in Google Workspace.
Delete users in Google Workspace based on users management actions in Scalefusion: When a user account is deleted within the Scalefusion platform, the corresponding user account in Google Workspace will also be automatically deleted.
User assignment
SSO Configuration would allow only assigned users to access the app. Choose one from the following options:
Allow all users imported to Scalefusion to access the application: All users (belonging to the domain) imported to Scalefusion will be allowed to access the application
Allow only assigned users to access the application: Only the user(s) whom you have assigned the SSO configuration, will be allowed to access the application. With this option, after SSO configuration is created, you need to manually select and assign the users.
Revoke access for all users once when the configuration is saved: If this is checked, the access is revoked from the users who are currently assigned with the configuration. As a result, it will invalidate all user sessions and logout users from their current running session.

Enforcement Rules
From you can configure and enforce users that at what point of time SSO Configuration should invalidate the current session and logout users (only for Google Workspace). Following options can be selected:
These rules can be applied only on Google Workspace users
Immediately on User Assignment and post grace period if applied: When grace period is applied and user gets automatically added in the group on the admin console.
Immediately on User Un-Assignment: When user is unassigned the SSO configuration
Immediately on Deleting this configuration: When SSO configuration is deleted from Scalefusion Dashboard

Click Next
Permissions
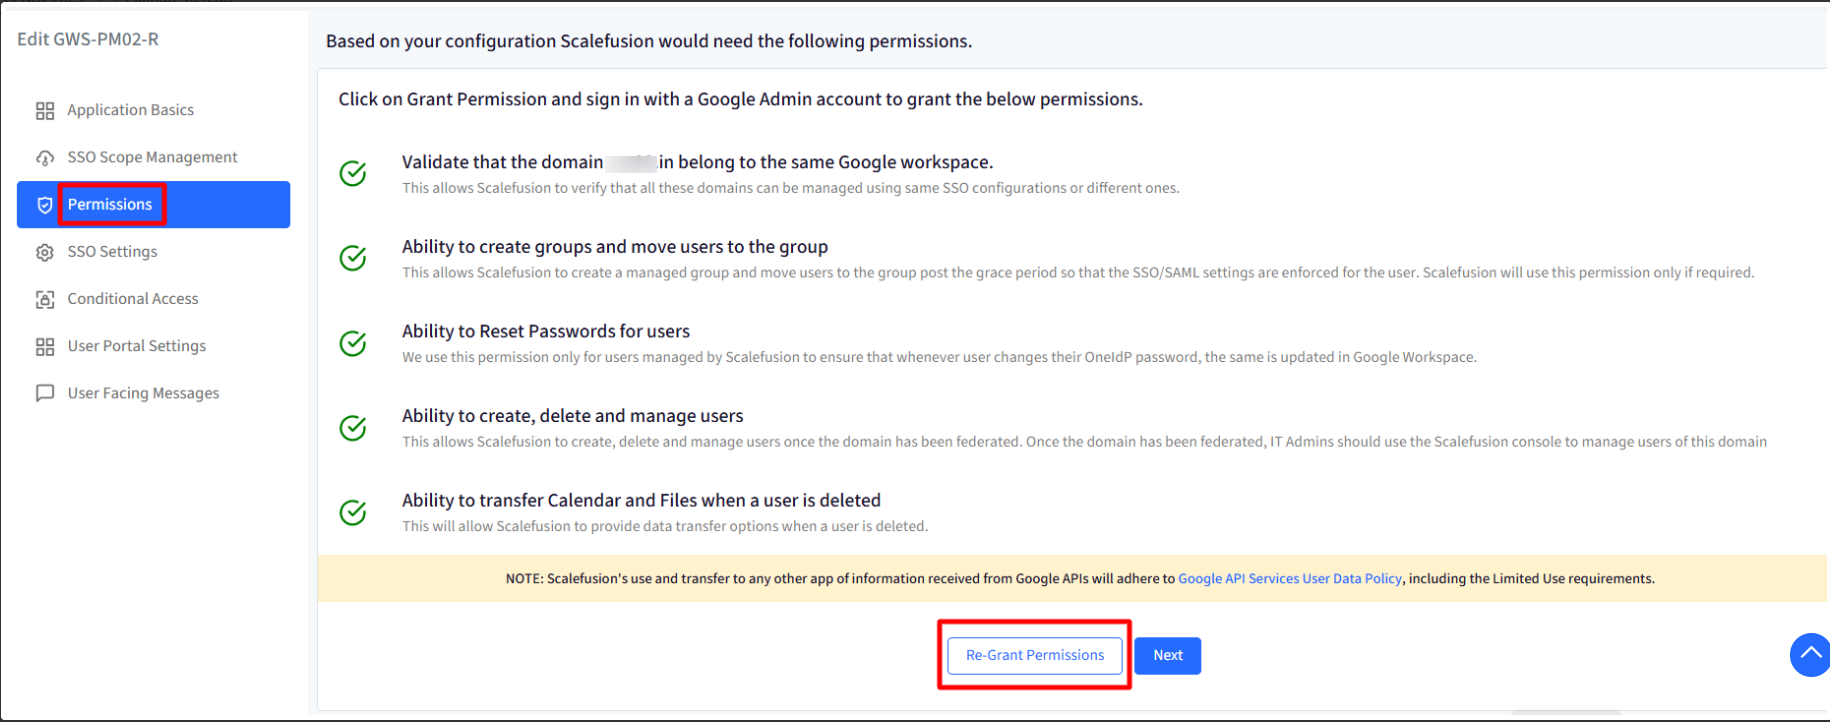
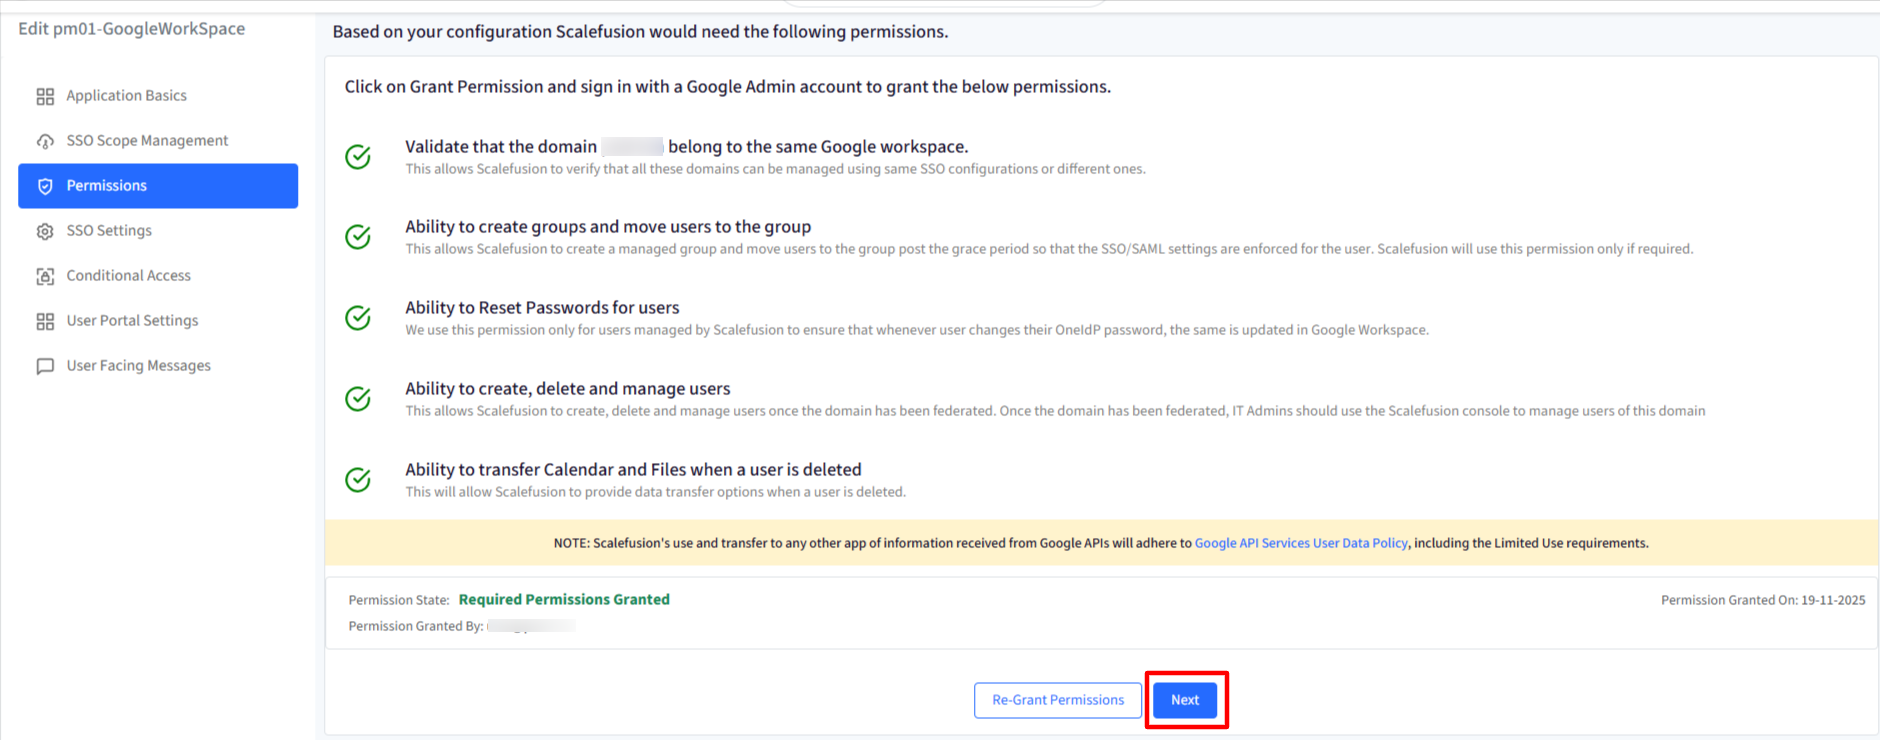
Here, you need to grant permissions by signing in with a Google Admin account:
This step needs to be performed only in the case of Google Workspace
Click on Grant Permissions button at the bottom.
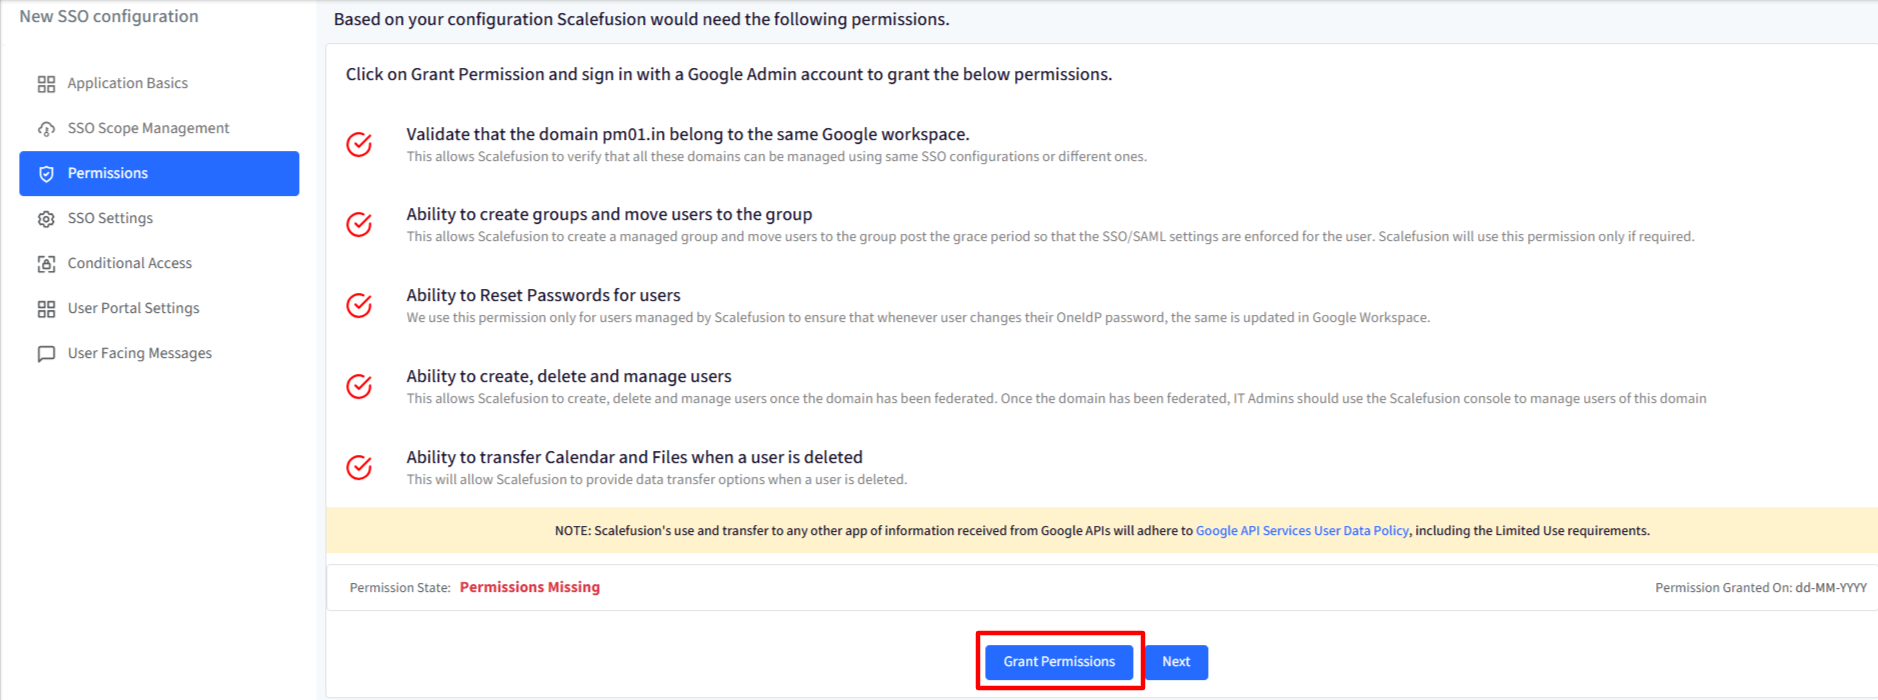
This will redirect you to the Google Admin account (https://accounts.google.com).
Sign in with your Google Workspace admin account credentials belonging to the same domain for which you are creating the SSO configuration, and grant the permissions listed below,
View and manage your Domains

OneIdP needs this permission to verify that the domain for which you are configuring the SSO configuration belongs to the Google Workspace tenant that you are signing with.
View and manage group subscriptions and provisioning of groups
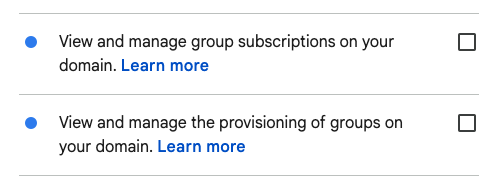
OneIdP needs this permission to create a group where SSO configuration has been applied and add/remove users to the group dynamically.
However, if you want to manage the user scope that is user assignment and un-assignment automatically, then you can avoid granting this permission.
View and manage the provisioning of users in your domain

OneIdP uses this permission to reset the password of the users when an IT Admin attempts to reset the password from Scalefusion Console.
This permission is also used to change/update the password when user tries to update their password from Google Account settings.
Manage data access permissions for users

OneIdP uses this permission to logout the users on devices which are not managed or when a device does not meet the compliance criteria.
View and manage data transfer between users in your organization.

This permission will allow Scalefusion to provide data transfer option when user is deleted.
Permissions Guidance
OneIdP does not use any of the permissions to read or share any of the user or corporate data. The usage is limited to the documented use-case mentioned above.
We strictly recommend granting all permissions to ensure that you are securing access to the services in all cases, the choice is left to the IT Admin to skip granting certain permissions, once they are sure of the features or use-cases that would not be supported because of the lack of permissions.
After signing in to Google Admin, you will be redirected back to the Scalefusion Dashboard with permissions granted.
Note the check mark in front of each permission turns green. This indicates that the permissions have been granted. Click Next to go to the next step. You can also see which account granted the permission and the current status of that permission.
Note:
If you sign in with a different domain while granting permissions, the following error will be displayed. For instance, if you are configuring SSO for xzz.com but sign in using admin@abc.com during the permission-granting process, this error will occur.
Note:
Existing configurations will not be affected; however, it is recommended that you regrant the permissions using the correct domain.
For this you will see Re-Grant Permission button in the Permission section in the existing SSO configuration.
SSO Settings
This section allows admins to configure the Service Provider (Google Workspace) settings and obtain the SSO URLs which will be added to the Google Admin Console.
Enter the Service Provider details on Scalefusion Dashboard, as provided in the web-console of your service provider SSO/SAML section
Service Provider Entity ID: If your service provider has given you an Entity ID, also known as an audience or identifier, please enter it here. Otherwise, leave it blank to have it automatically decoded from the incoming request.
Service Provider ACS URL: If your service provider has provided an ACS URL, sometimes also called a destination or recipient, then please enter it here, else leave it blank to auto-decode it from the incoming request
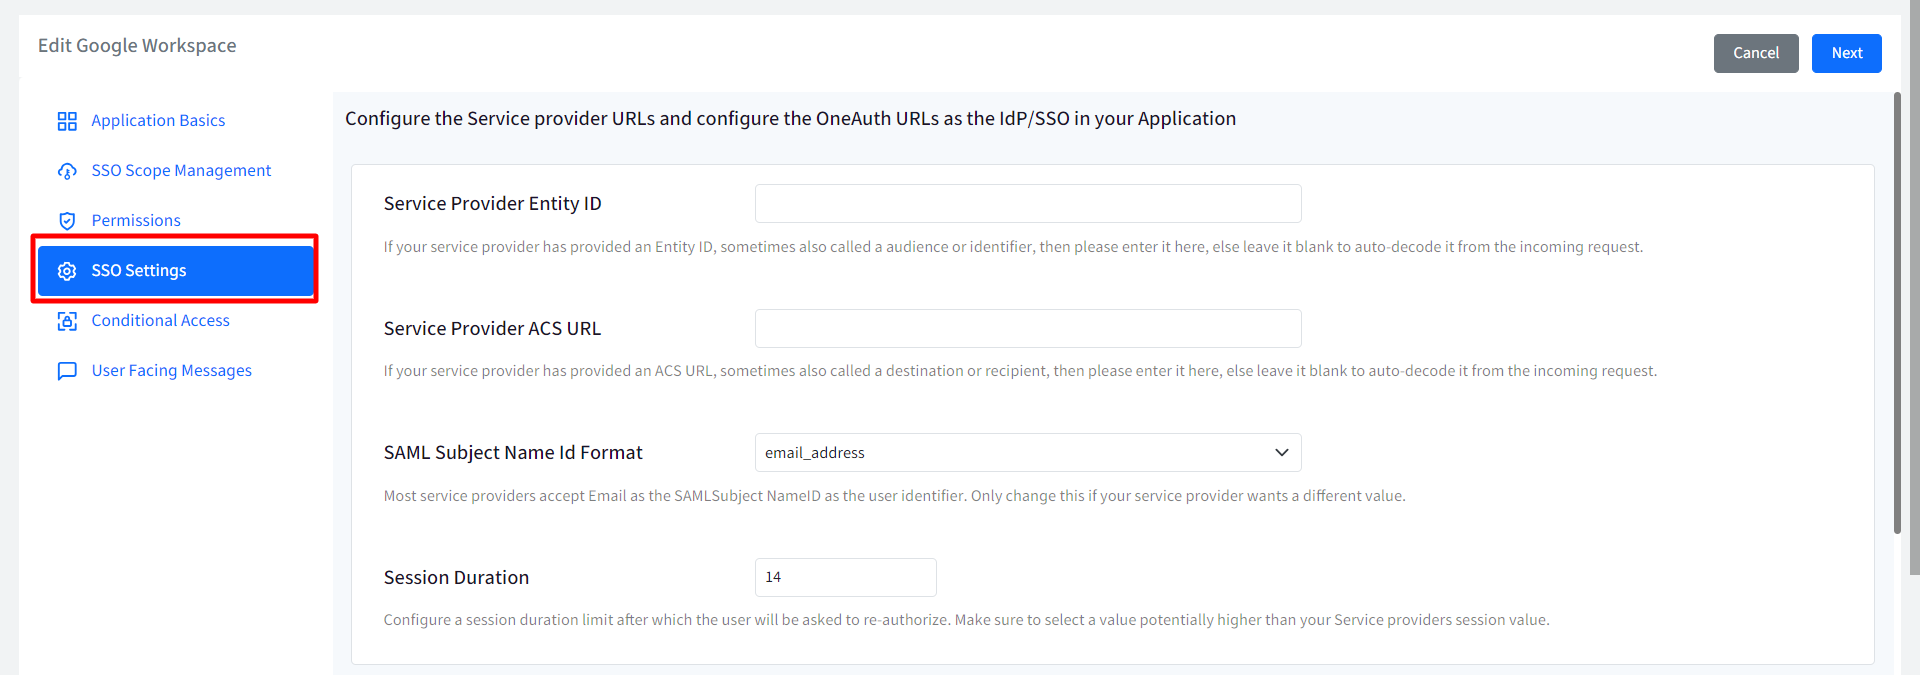
Note: Entity ID and ACS URL is present in the third-party SAML SSO profiles created on google admin console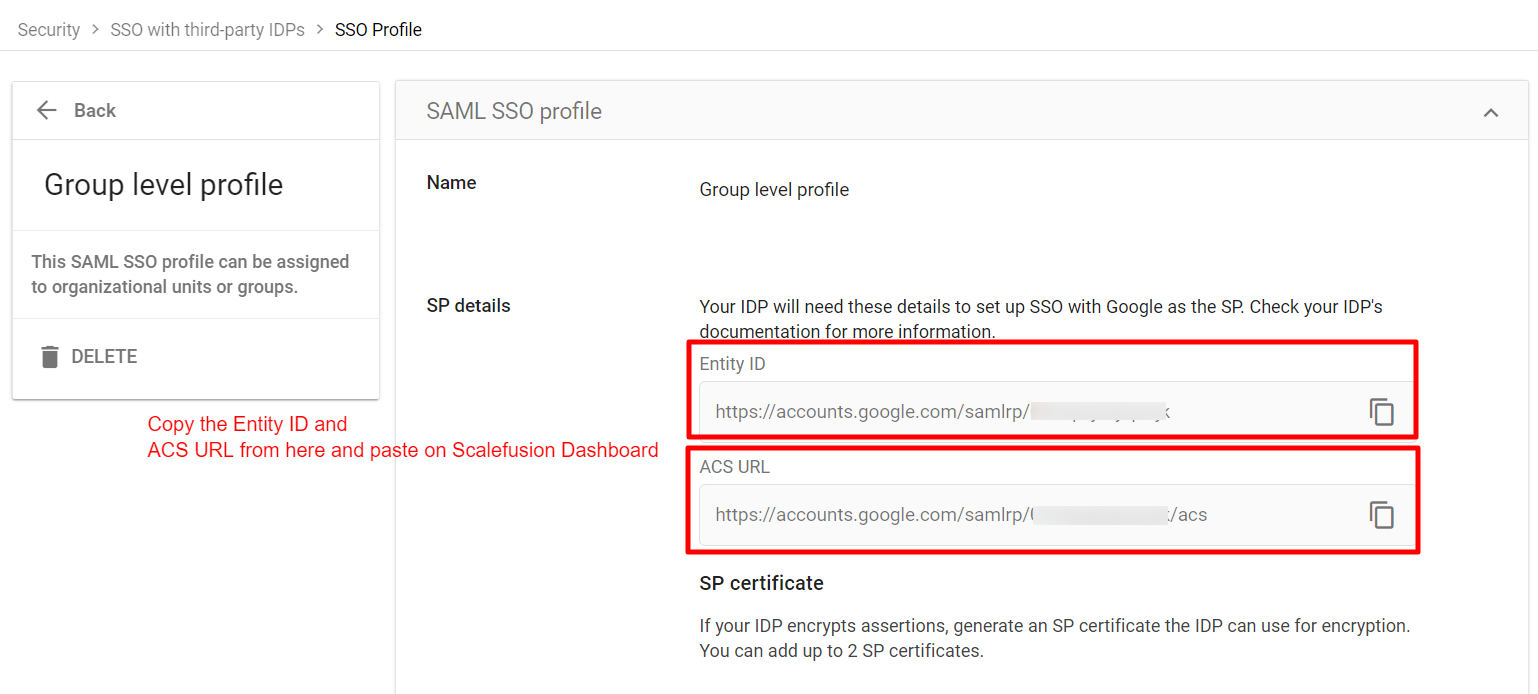
SAML Subject Name Id Format: Most service providers accept Email as the SAML Subject NameID as the user identifier. Change this only if your service provider wants a different value. Select E-mail or username from the drop-down.
Session Duration: Configure the duration (in days) after which the user will be asked to re-authorize. Make sure to select a value potentially higher than your Service providers' session value. It can be anywhere from 5 to 90 days.
OneIdP Entity ID: It is the Entity ID of Identity Provider (Scalefusion in this case). Copy this URL from Scalefusion Dashboard and paste it as the Entity ID of the Identity provider on google admin console. To be entered when you add a new SAML profile on the admin console and assign it to groups or organizational units.
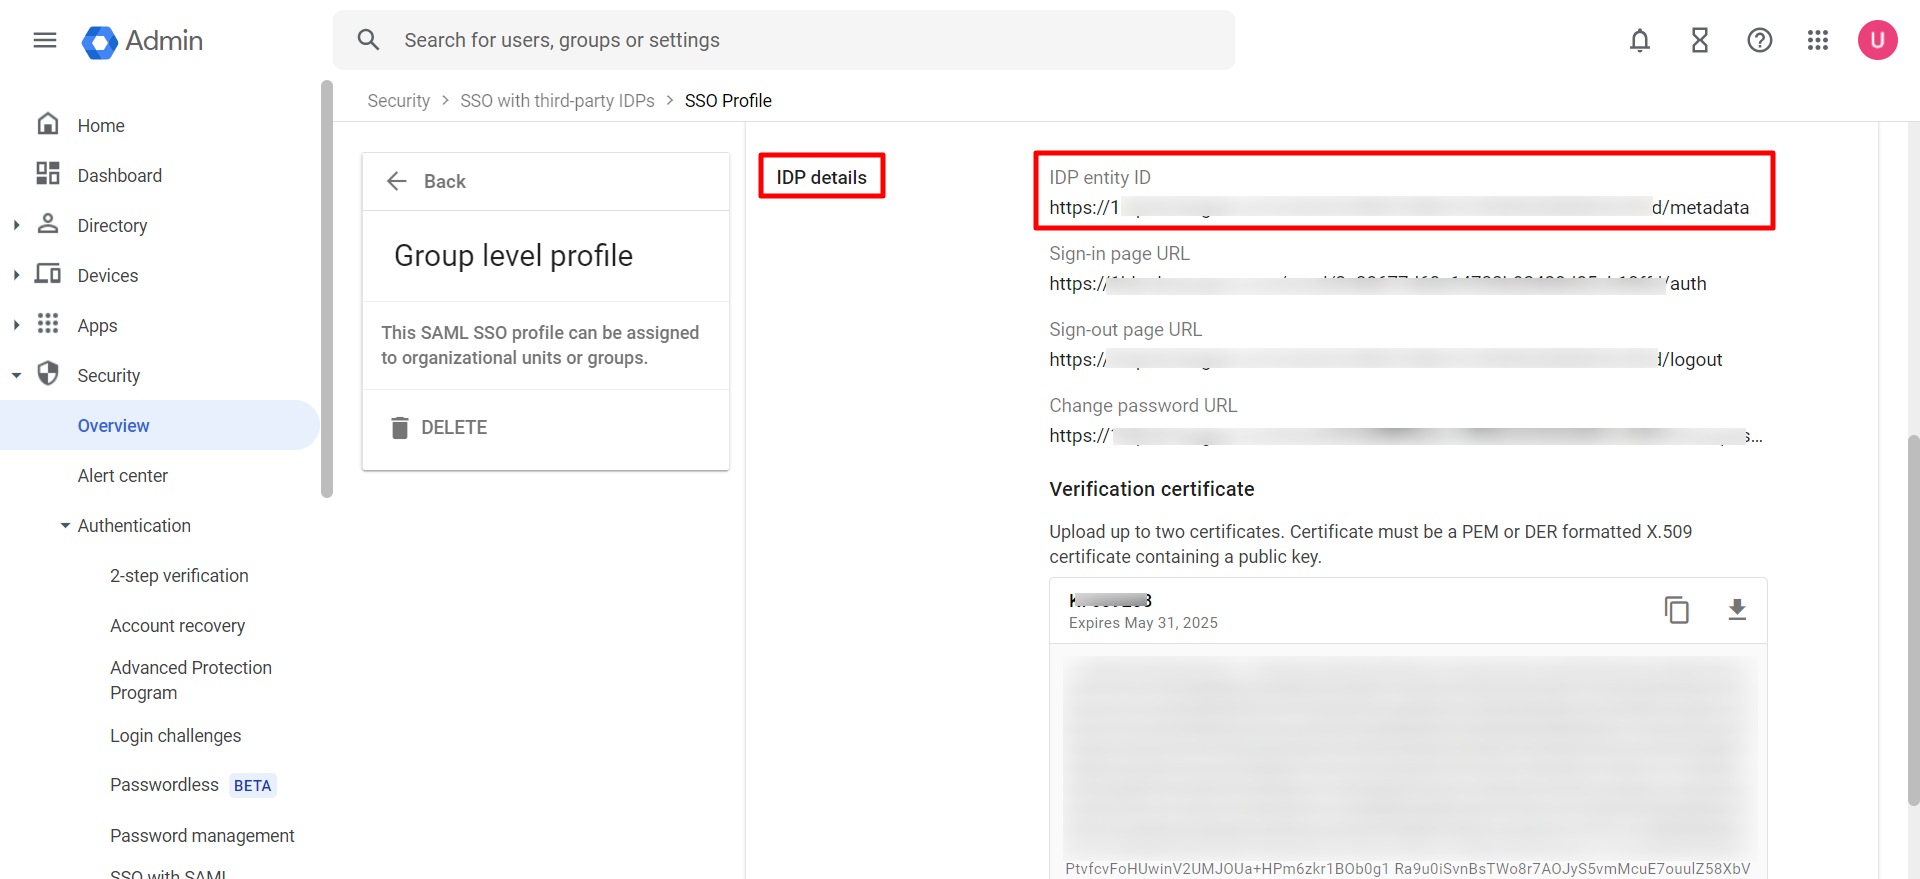
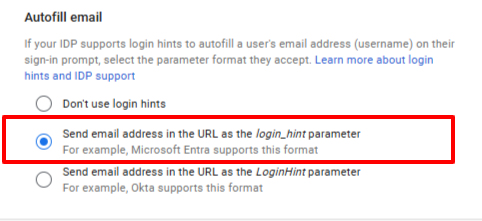
Create or edit SAML Profile and select Send email address in the URL as the login_hint parameter to auto-fill the email id on the OneIdP login page:
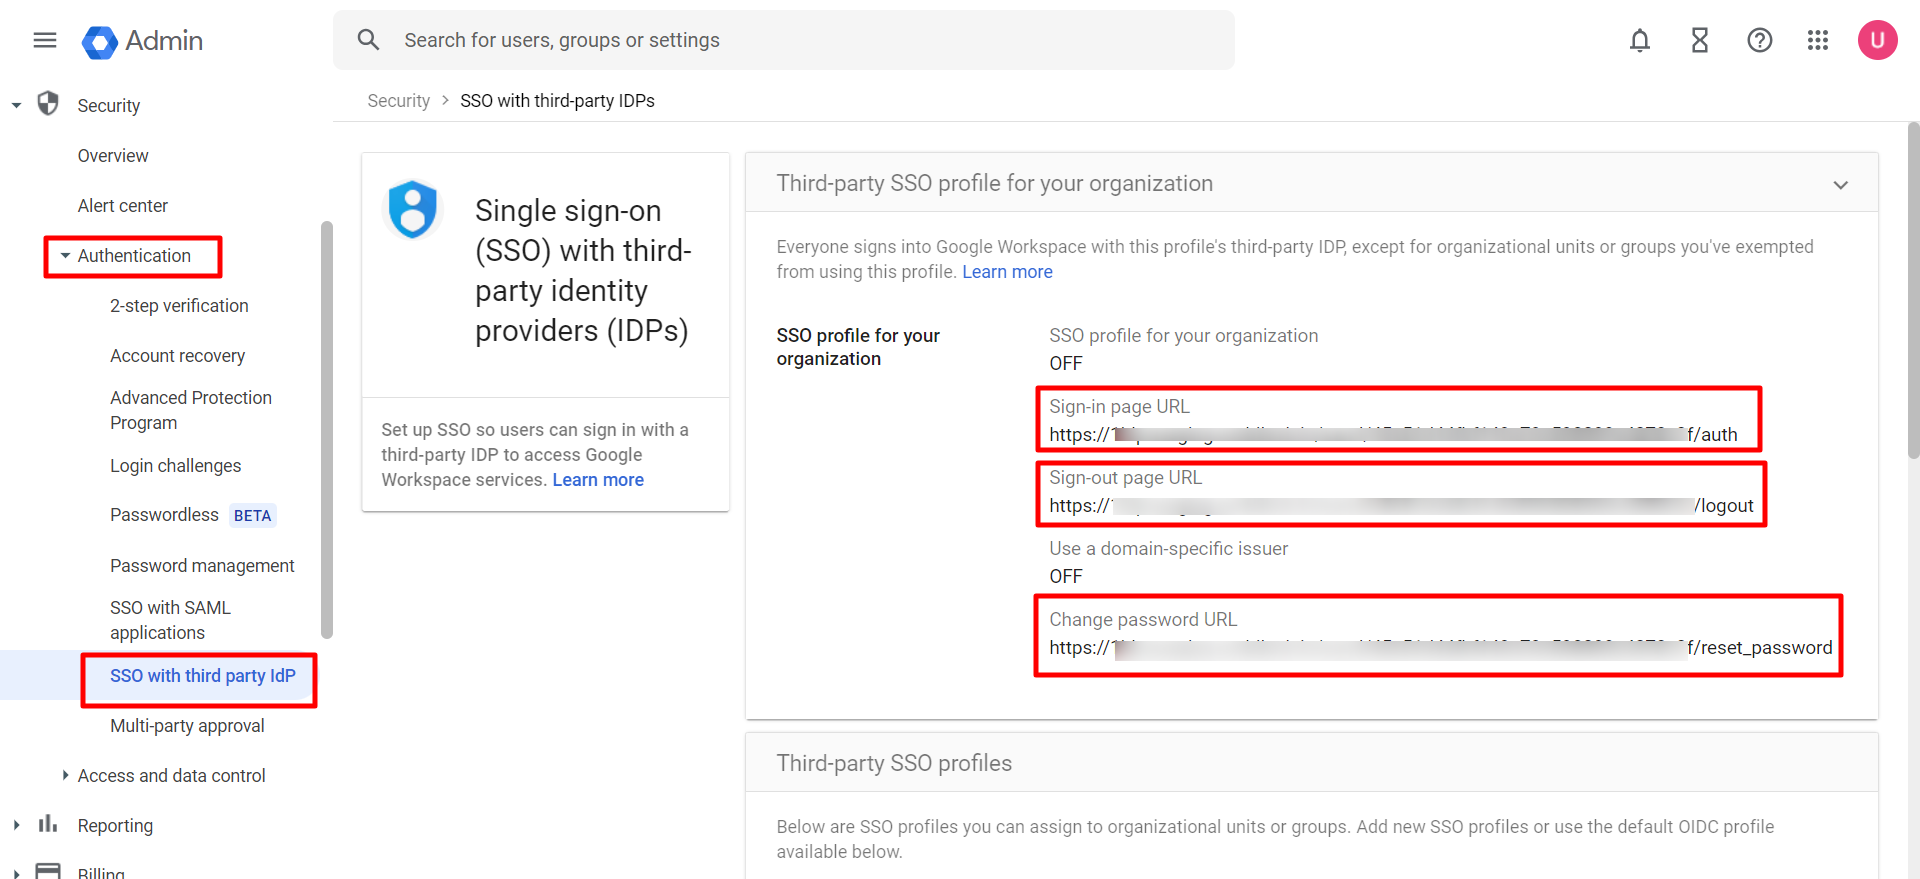
OneIdP SSO URL: Copy this URL from Scalefusion Dashboard and paste it under the Sign-In page URL on google admin console (Security > Authentication > SSO with third-party identity providers IDPs)
OneIdP SLO URL: Copy this URL from Scalefusion Dashboard and paste it under the Sign-Out page URL on google admin console (Security > Authentication > SSO with third-party identity providers IDPs)
OneIdP Change Password URL: Copy this URL from Scalefusion Dashboard and paste it under the Change Password URL on google admin console (Security > Authentication > SSO with third-party identity providers IDPs)
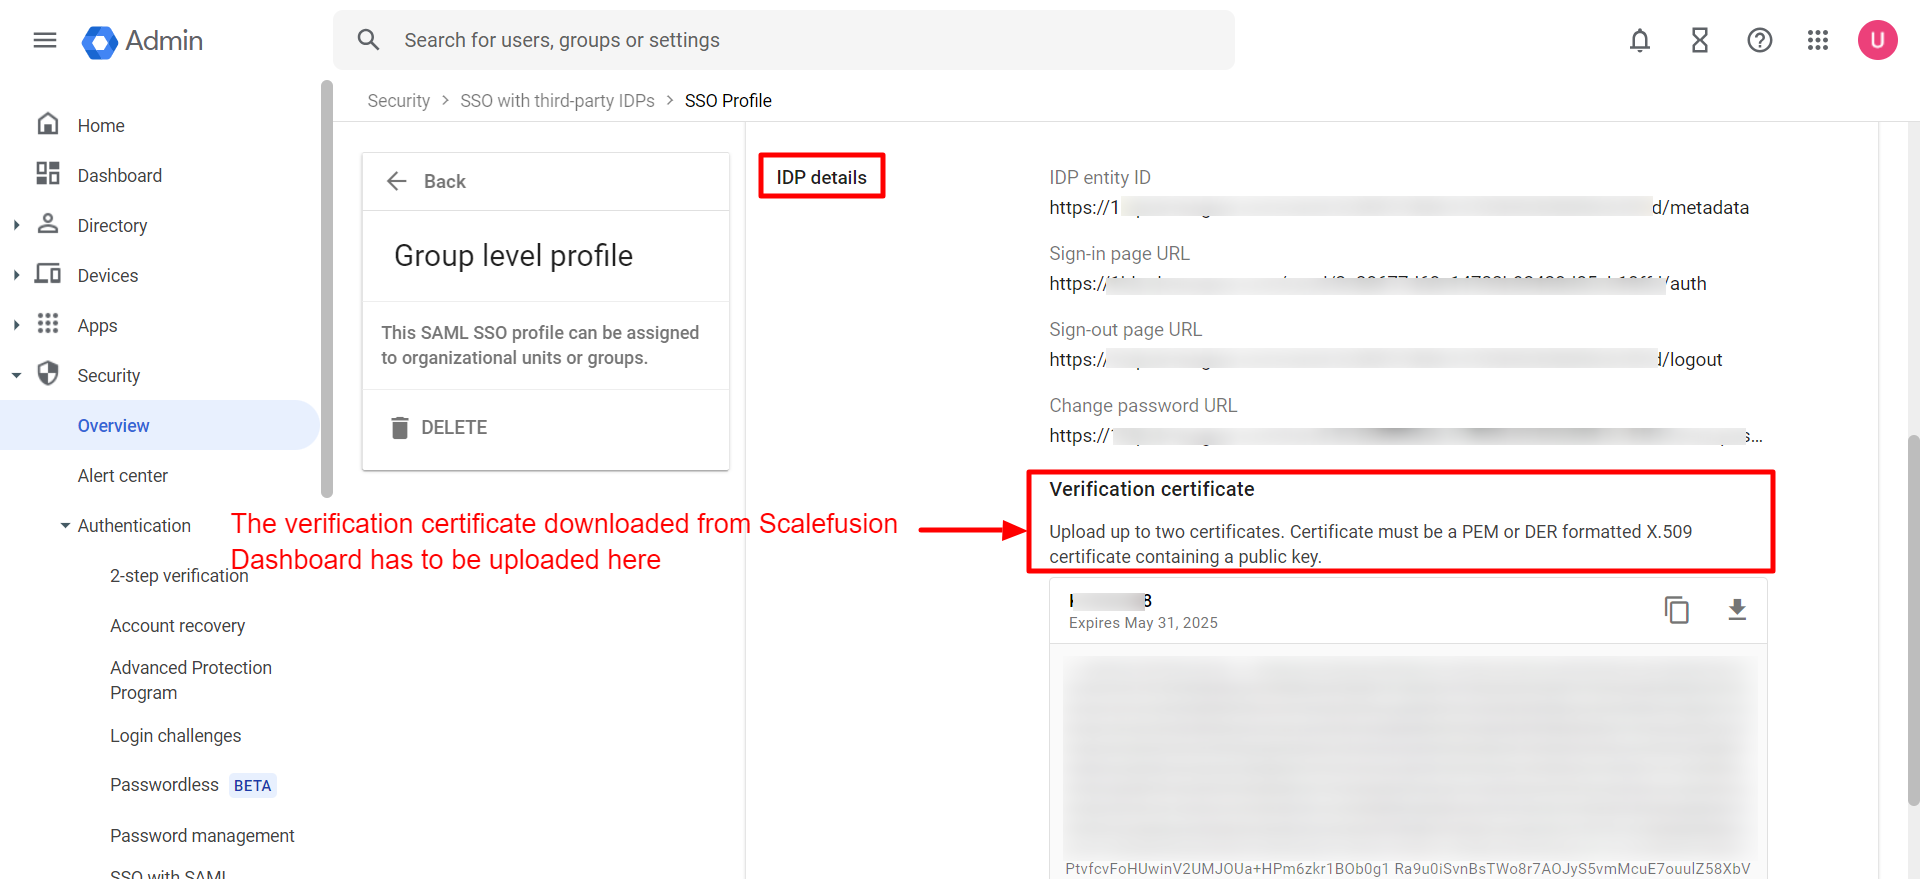
OneIdP Verification certificate: This certificate is used to sign the response to your service provider (i.e. Google Workspace). Download the certificate by clicking on the download icon on Scalefusion Dashboard. This certificate has to be uploaded at the time of adding a new SAML SSO profile on the admin console.
Click Save.
Conditional Access
From this section you can define the additional conditions on the basis of which users will be allowed/disallowed from accessing the application on device. This is divided into following sections:
Conditional Access Settings
Access Exceptions
Conditional Access Settings
Device Policy
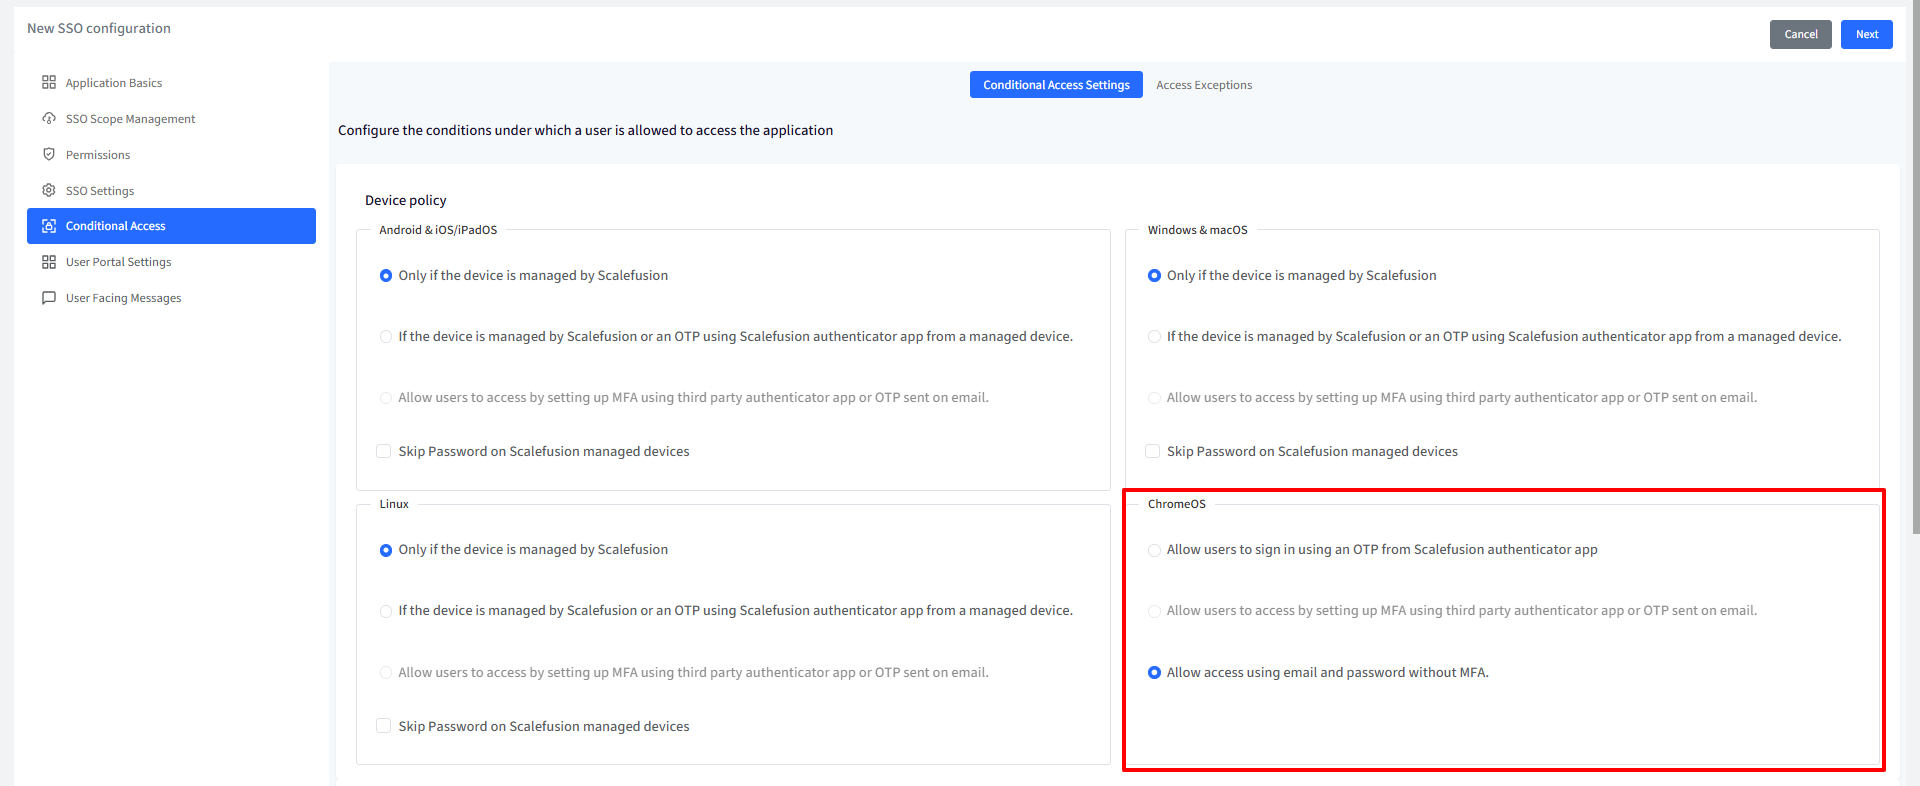
For Android, iOS/iPad OS, Windows & macOS, Linux: Choose one from the following two conditions:
Only if the device is managed by Scalefusion: The application will be accessible only on devices managed (enrolled) by Scalefusion
If the device is managed by Scalefusion or an OTP using Scalefusion Authenticator app from a managed device: The application is accessible if any of the following conditions is met:
Device is managed by Scalefusion: If device is managed you will not be asked to enter OTP for authentication, or
If device is unmanaged, OTP is required for authentication. OTP can be taken from Authenticator app installed on a Scalefusion managed device.
Allow users to access by setting up MFA using third party authenticator app or OTP sent on email:
Note:
This option will be enabled if MFA is enabled in Directory Settings.
Device is managed by Scalefusion: If device is managed user will not be asked to enter OTP for authentication.
If device is unmanaged, OTP is required for authentication. OTP can be taken from any 3rd party authenticator app or an OTP received via email, based on the MFA settings in Directory Settings.
Note: The left side panel is for configuring Device Policy on Android & iOS/iPad OS and right side is for Windows & macOS and Linux below them. Hence, you can configure separate device policies based on platform.
Skip Password on Scalefusion managed devices: When enabled, this option allows users to access applications on managed devices without the need to enter a password during sign-in.
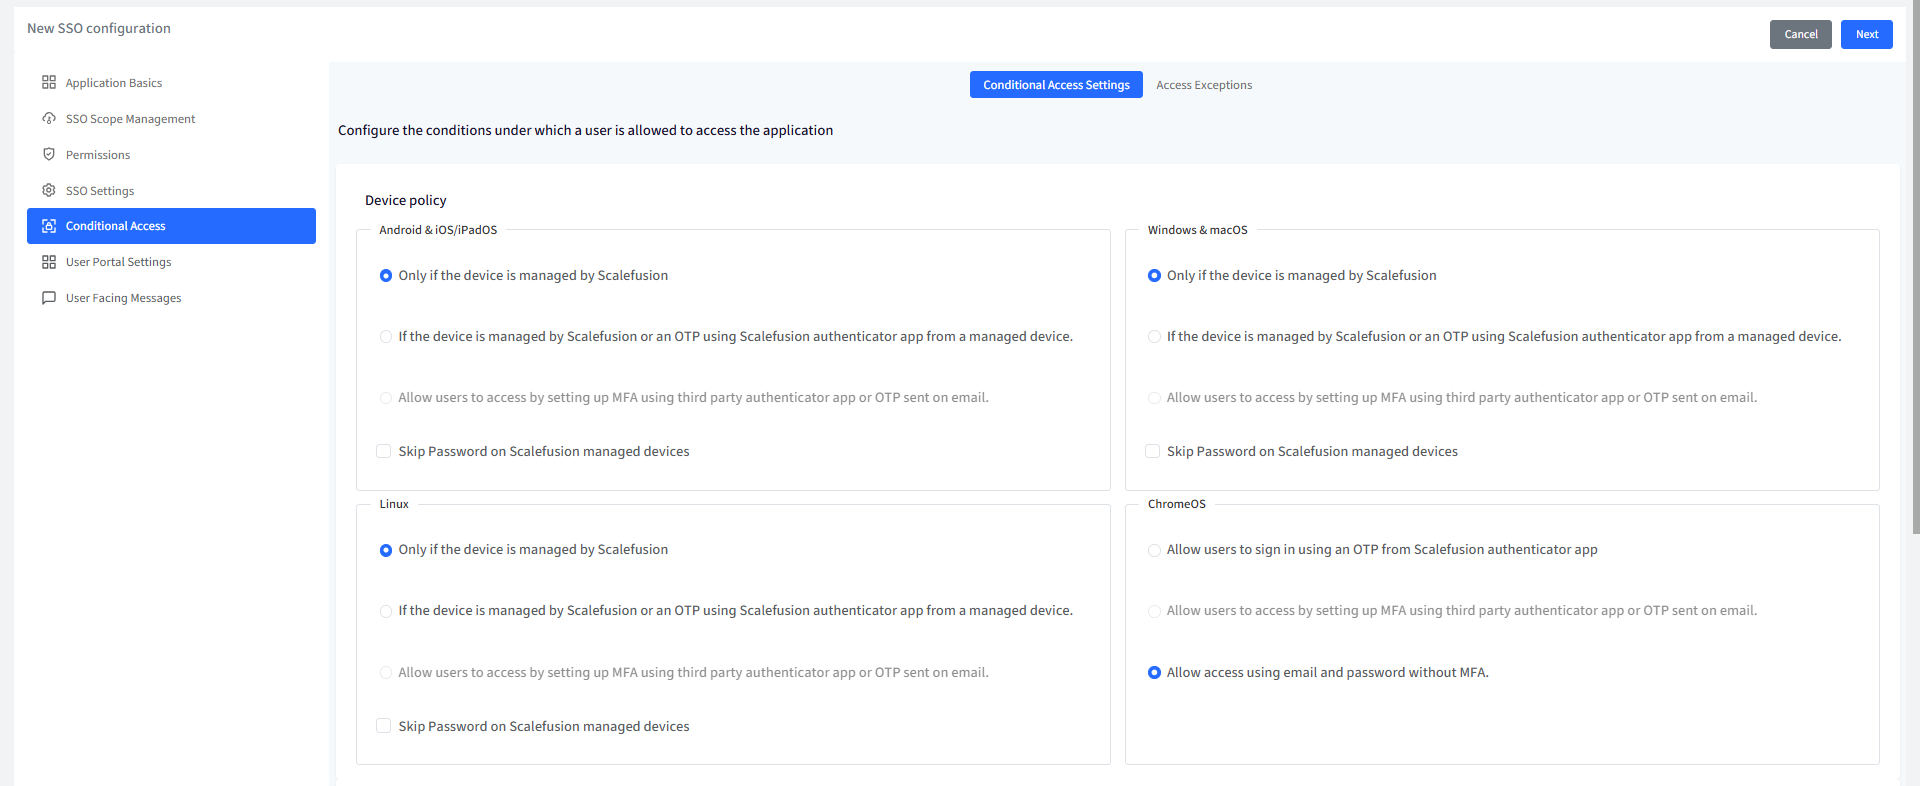
2. For ChromeOS: Choose one from the following two conditions:
Allow users to sign in using an OTP from Scalefusion authenticator app: OTP can be taken from Authenticator app installed on a Scalefusion managed device.
Allow users to access by setting up MFA using third party authenticator app or OTP sent on email:
Note:
This option will be enabled if MFA is enabled in Directory Settings.
OTP is required for authentication. OTP can be taken from any 3rd party authenticator app or an OTP received via email, based on the MFA settings in Directory Settings.
Allow access using email and password without MFA: Authorization check will not happen, and users can login directly with their email and password.
Browser Policy
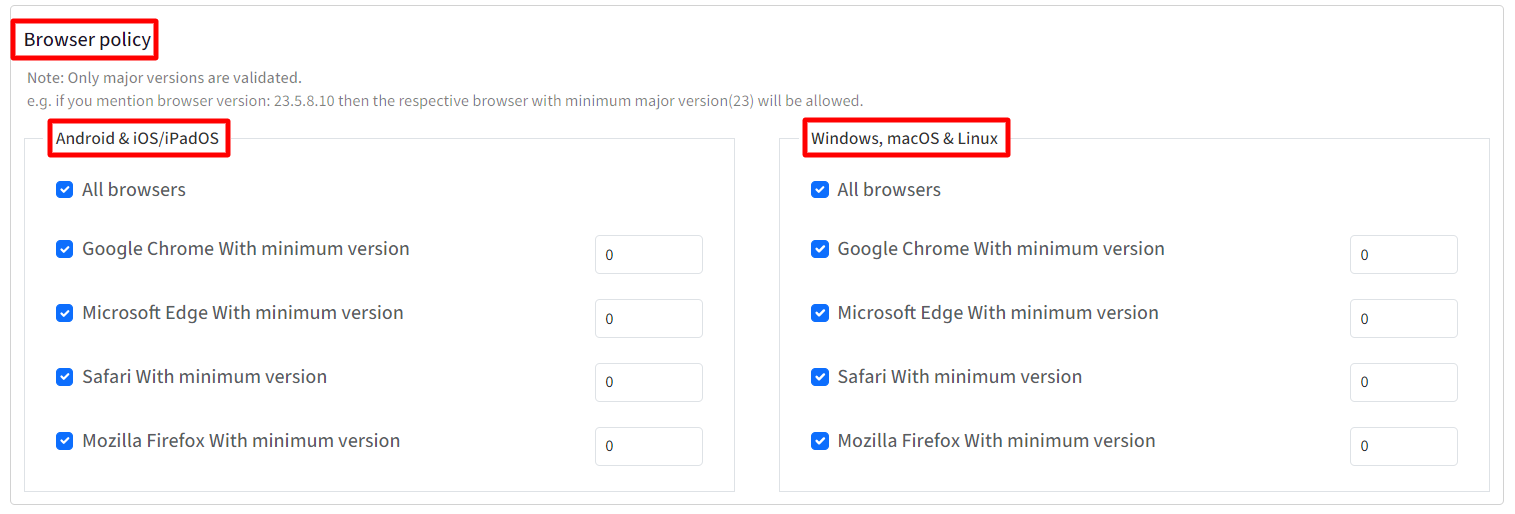
From here, you can select one or more browsers and specify minimum versions on which you want to allow the access to the application. Following are the options:
All Browsers
Google Chrome with minimum version
Microsoft Edge with minimum version
Safari with minimum version
Mozilla Firefox with minimum version
Important Points on Browser Policy:
By default, all browsers are allowed.
Only major versions are validated. For e.g. if you mention browser version: 23.5.8.10 then the respective browser with minimum major version (23) will be allowed.
After configuring Device Policy and Browser Policy, click Next
Access Exceptions
From this section you can configure the exceptions where the users are allowed to access the applications even if the conditions are not met. In general, these exceptions will be useful or addresses scenarios where :
IT Admins have setup Android Enterprise using Google Workspace Or
IT Admins have setup Apple User Enrollment with ABM/ASM federated to Google Workspace
Following are the exceptions that can be configured:
Enrollment Exceptions
Allow users to access the application till they enroll their first device: Allows users to access the application till they enroll at-least one device. This option is helpful in conditions where the enrollment steps requires them to authenticate with the service provider. With this, you can also configure the following:
Maximum sessions allowed per user: Configure no. of sessions that should be exempted. It can range from 1 to 3. Ideally 1 session per user is recommended.
Configure the OS where the exceptions are applied: Select the platform(s) on which this exemption would be allowed to users.
User Exceptions
Here you can add the users who are always exempted from the conditions and will never be asked to manage their device. Enter comma separated email addresses of users or click on Add Users on the right and in the new window, select the users who should be exempted.
Note: These users still need to sign in with their OneDirectory credentials if they fall under the SSO Scope, however the conditions will not be enforced.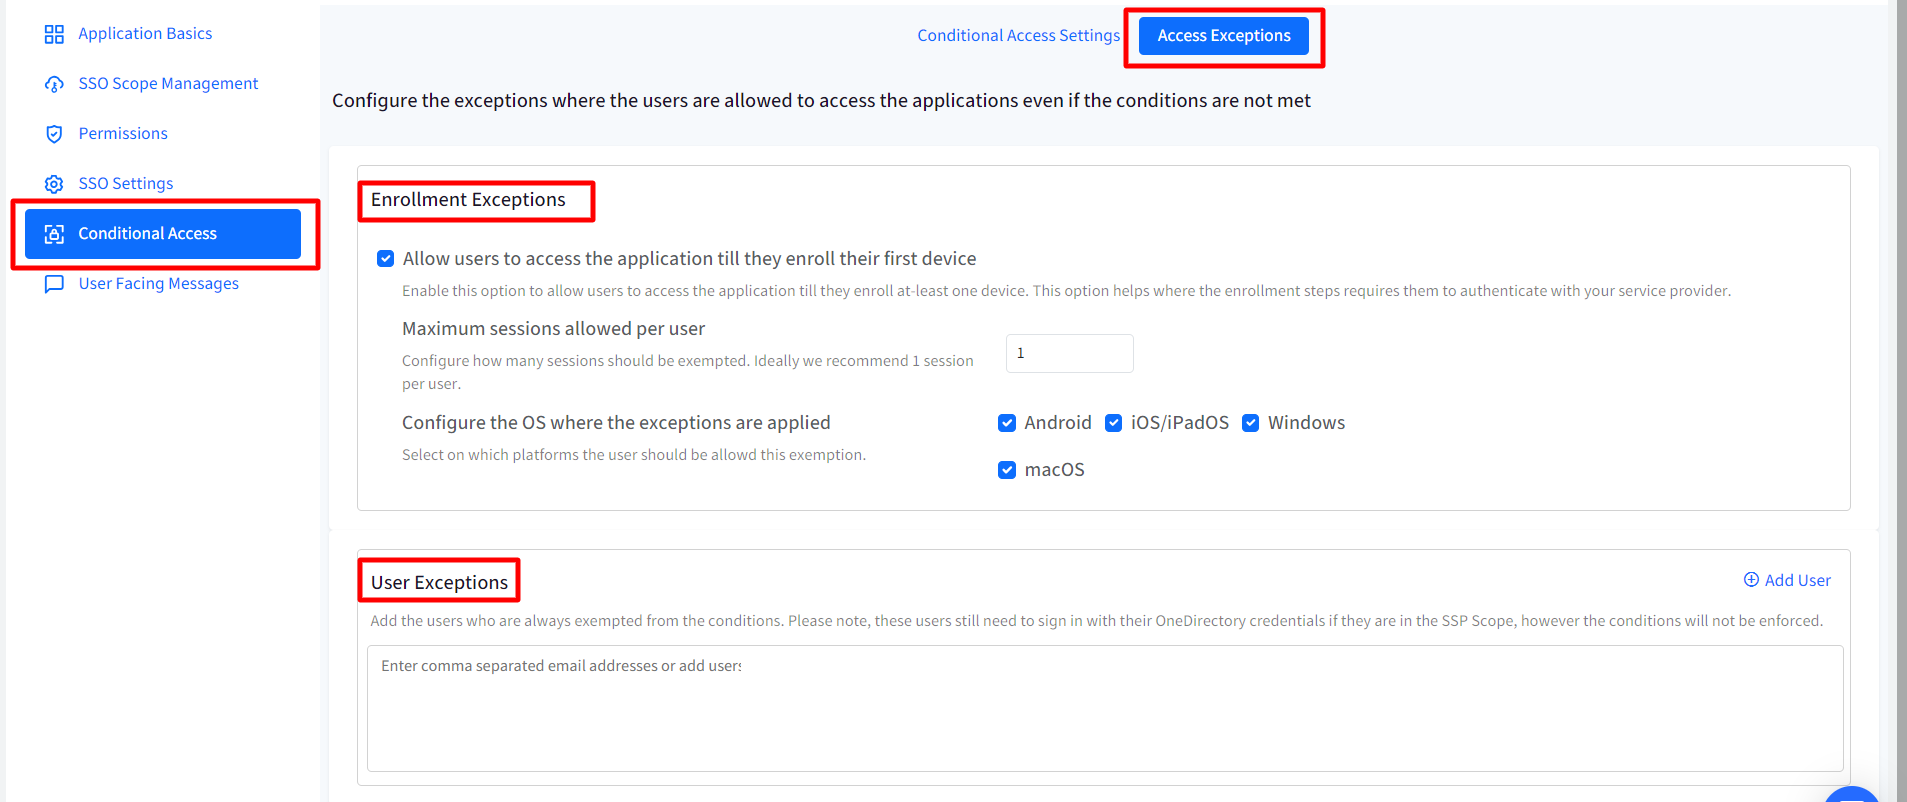
User Facing Messages
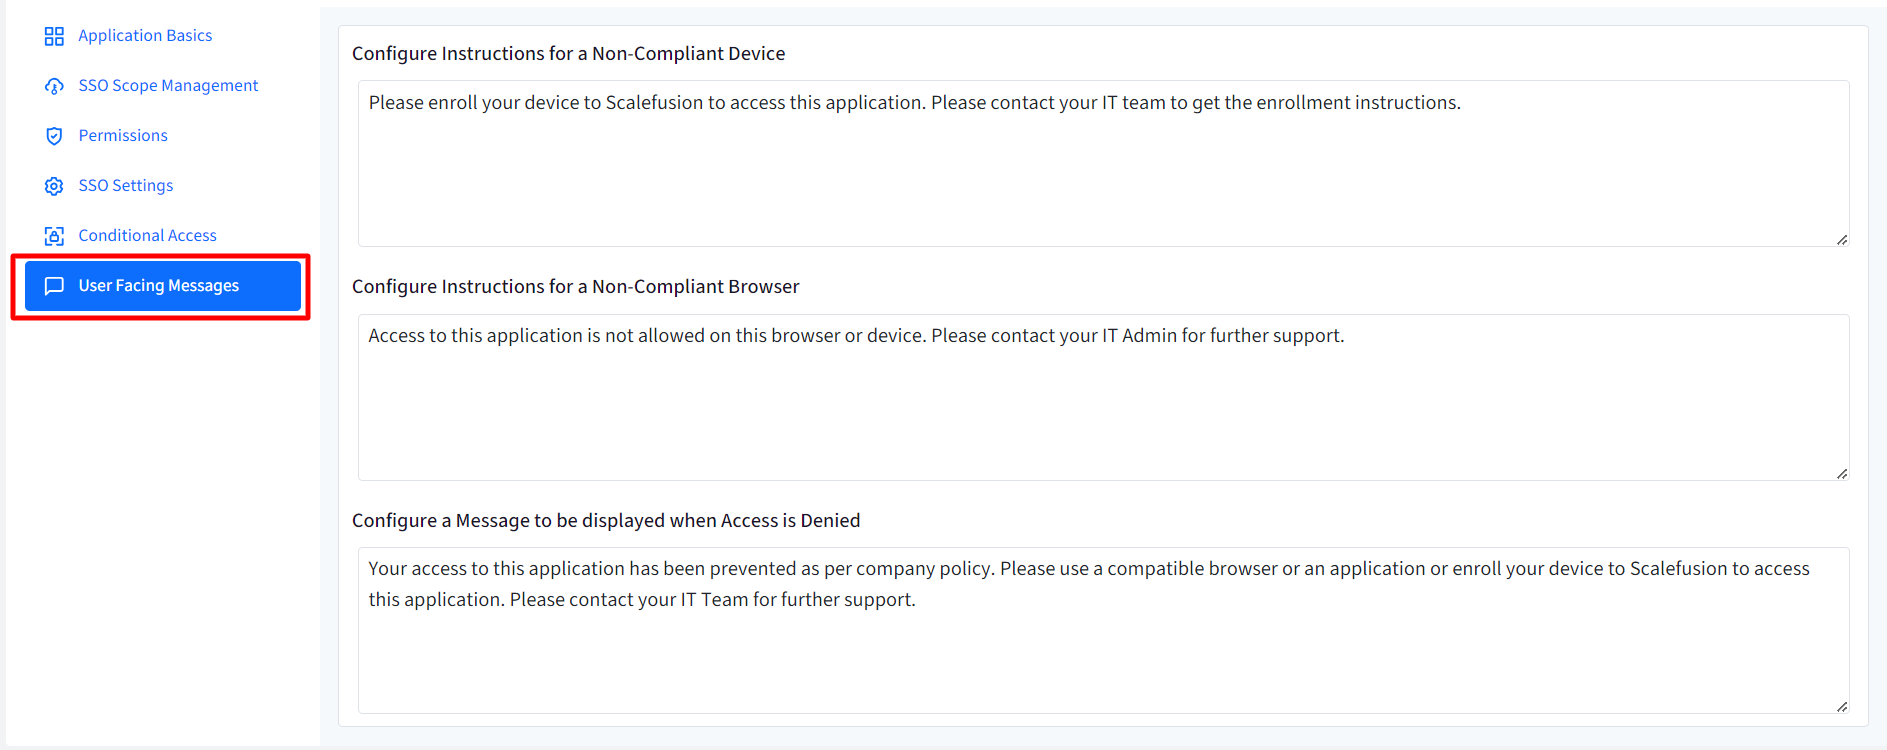
User Facing Messages helps admins configure messages that end users may be shown when they are unable to access the application if any of the compliance conditions are not met. You can configure messages under following:
Configure Instructions for a Non-Compliant Device: This message is shown when the device is not compliant and needs to be enrolled to Scalefusion
Configure Instructions for a Non-Compliant Browser: Shown when the browser is not compliant as per configurations
Configure a Message to be displayed when Access is Denied: Any other cases where access to application is denied.
There are some pre-configured messages displayed on Dashboard which you can edit as per requirement.
After configuring user facing messages, click on Save
The SSO configuration is created and listed on SSO Configuration page as a separate card with the name you have defined. You can create multiple SSO configurations in the same manner.
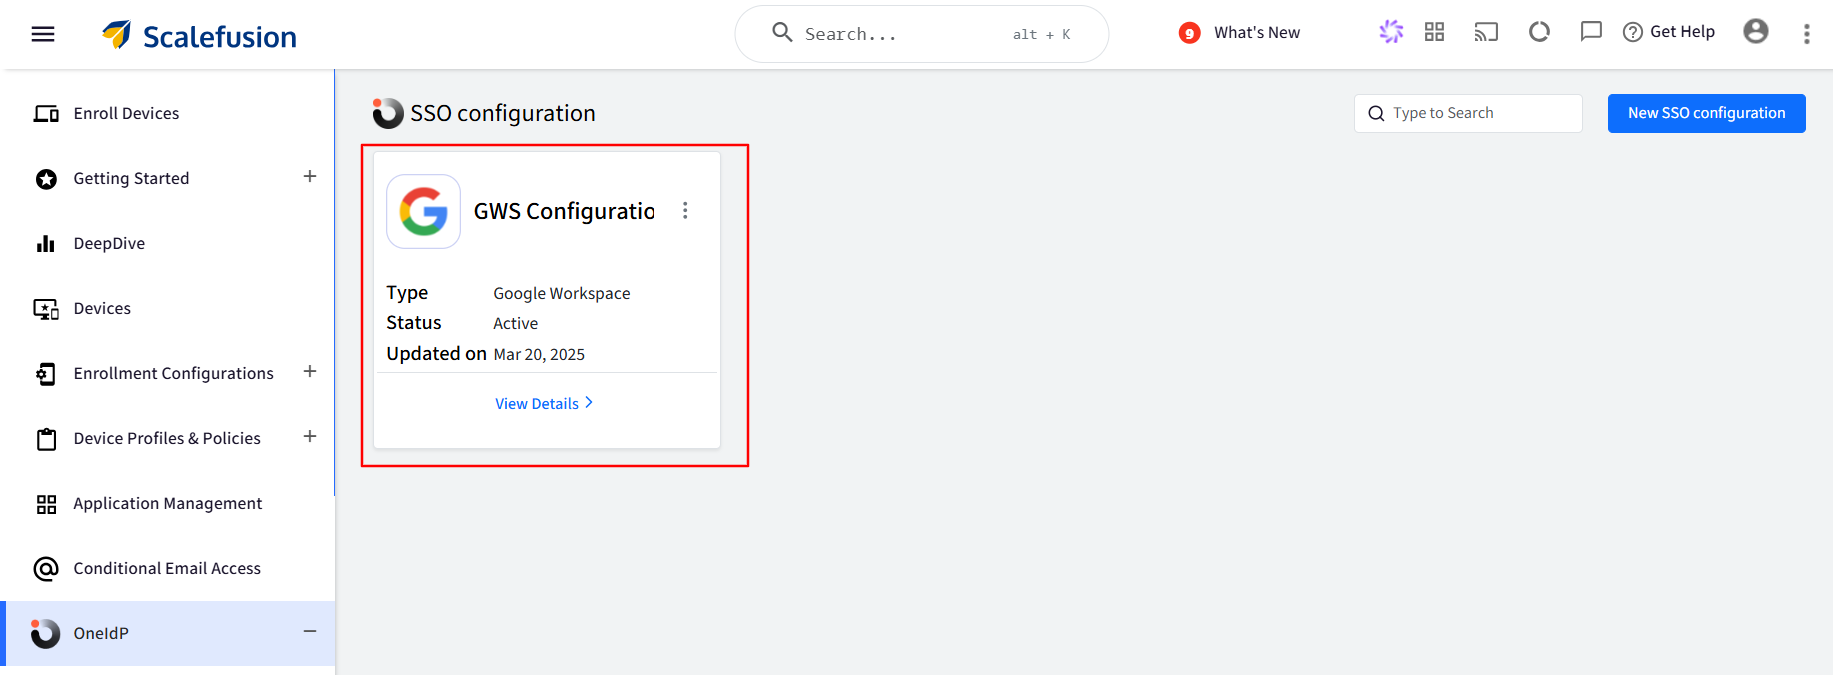
The next document explains how the configurations can be managed and other actions you can perform through SSO configurations.
Transfer of user data while deleting GWS user
When a user exits your domain-verified organization, you can delete their Google Workspace account, which will revoke their access to all associated services and data. Before the account is deleted, you can transfer essential company data to another user. Google Workspace provides this facility to Admins.
Now, with Scalefusion, you also have the option to transfer important company data (such as files and calendar events) to another user’s account ensuring that no critical business data is lost during the account deletion process.
Prerequisites
Ensure that the user(s) is migrated to OneIdP on the Scalefusion Dashboard.
Ensure that the user is present in the Google Workspace (GWS) portal.
Ensure that the “Ability to transfer Calendar and Files when a user is deleted” permission is granted in the Permissions section in the SSO configuration.
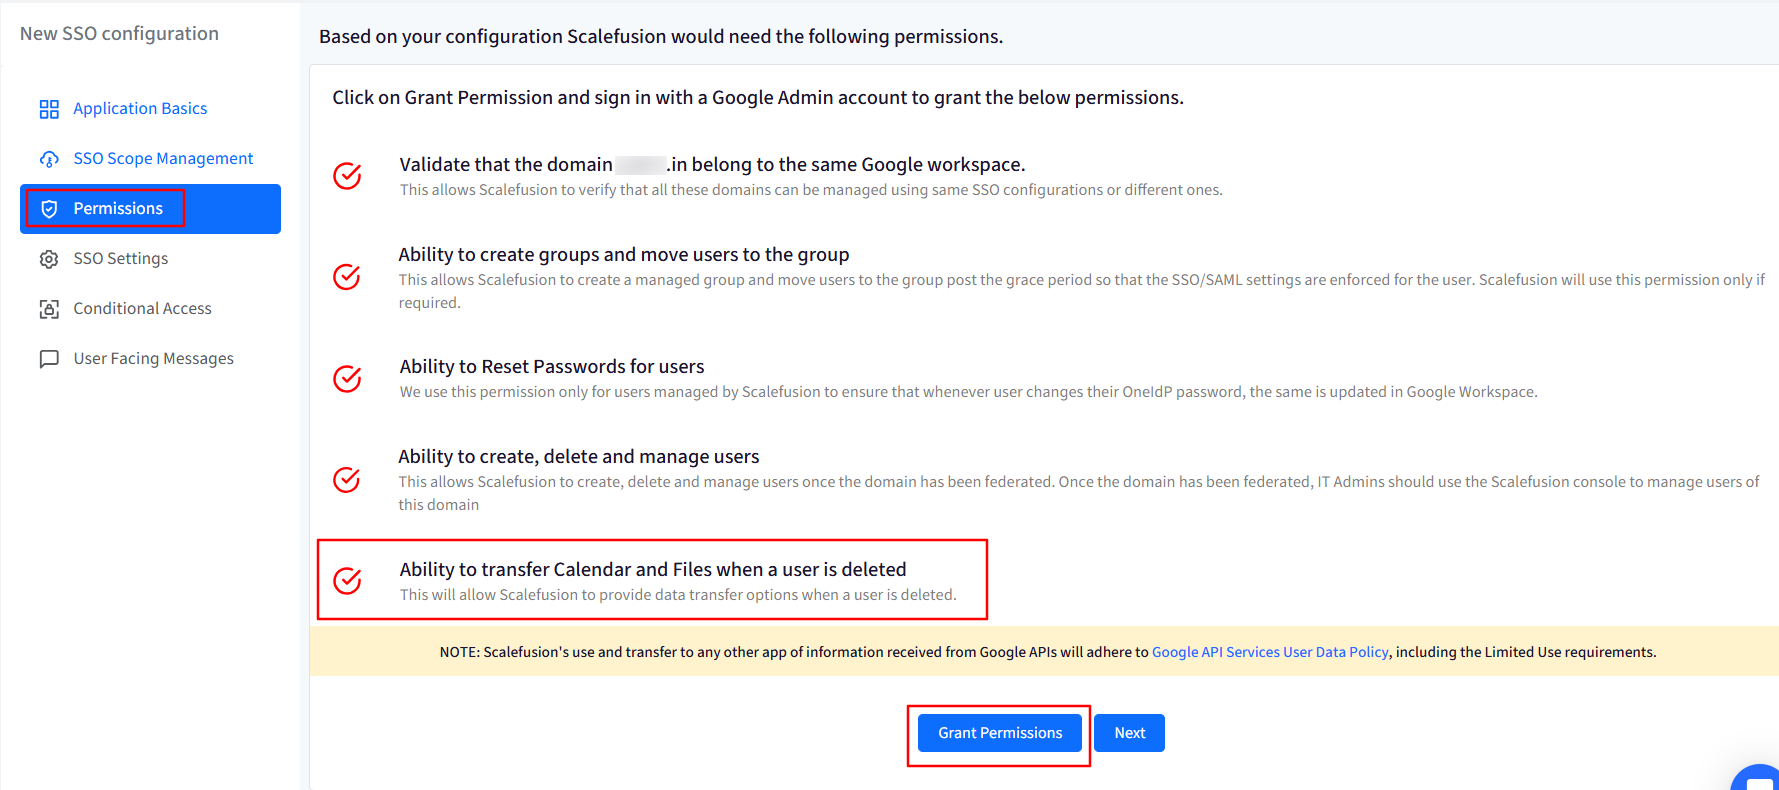
Ensure that the “Delete users in Google Workspace based on users management actions in Scalefusion” option is selected in the SSO Scope Managment section in the SSO configuration.

Steps to delete the user & transfer the data on Scalefusion dashboard
Navigate to Enrollment Configurations > User Enrollment section.
Click on the 3-dots under Actions for the concerned user and click on Delete User.
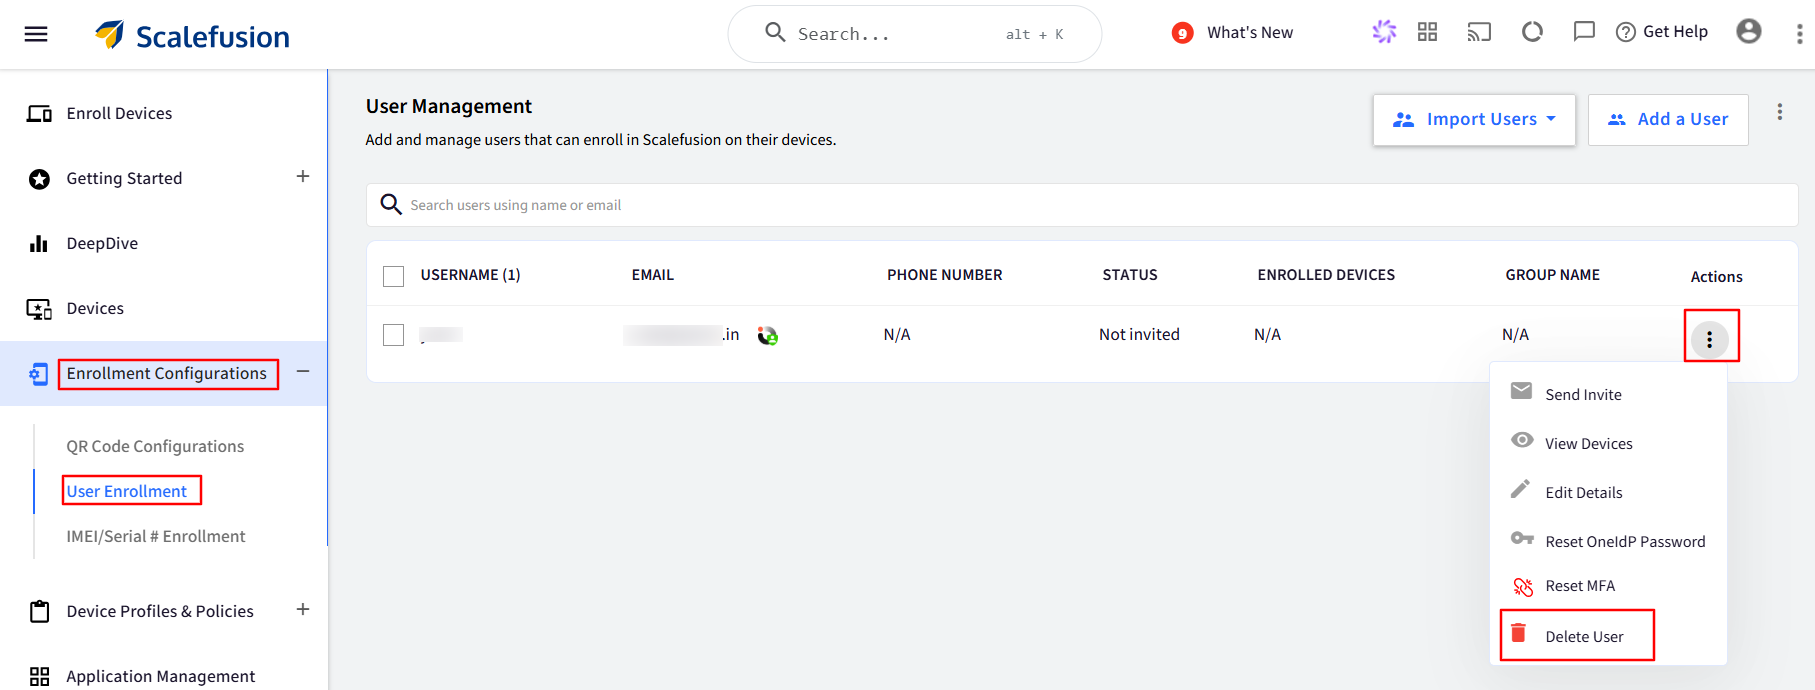
You will see a dialog box pop-up as shown below.
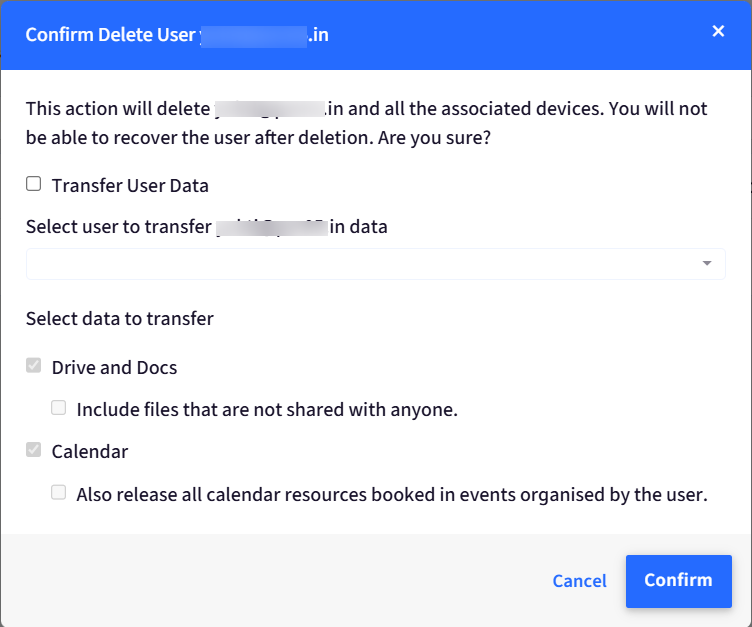
Select Transfer User Data option and select the user to transfer the data from the drop down list.
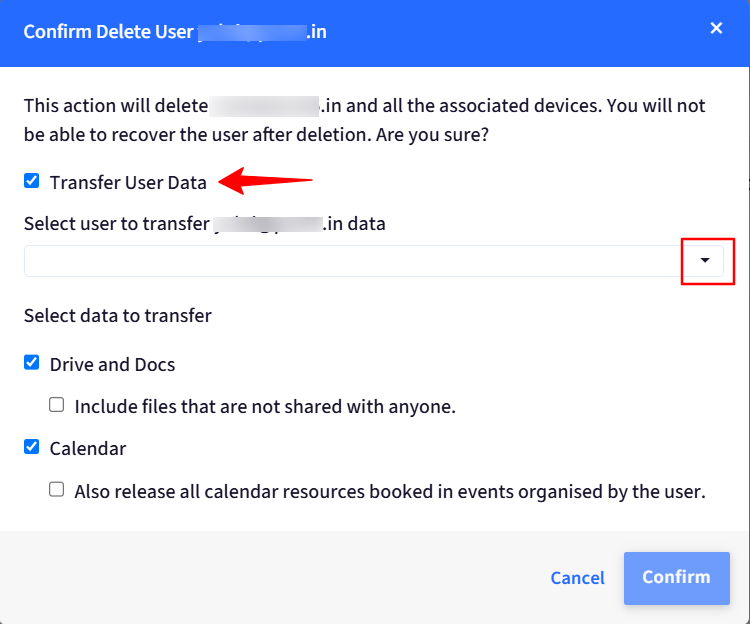
Select what data is to be transferred and click on Confirm.
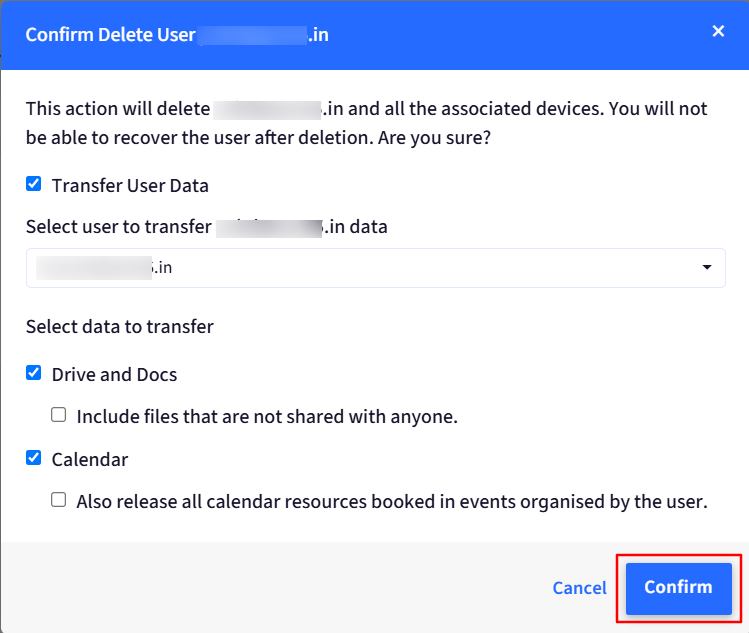
You will be asked to enter your Scalefusion dashboard Pin or password. Enter the same and click on Submit.
Next, you will see a pop-up dialog box showing that data is being transferred.
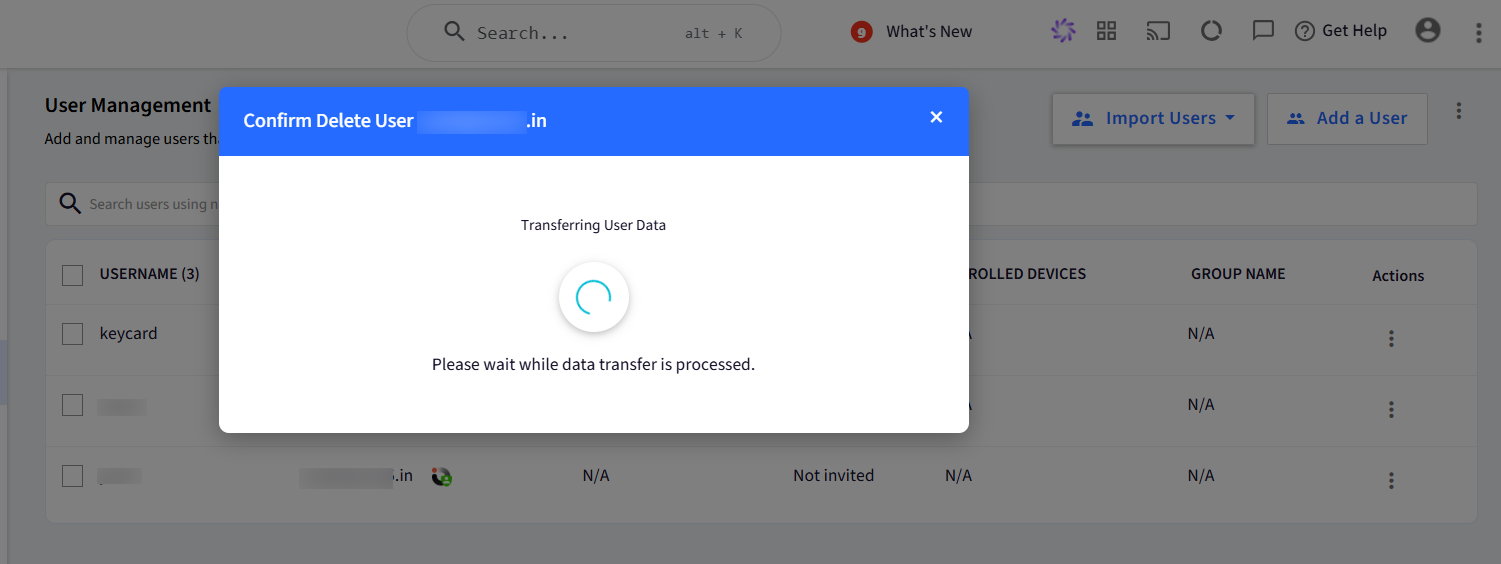
Once this is successful, the user will be deleted from the Scalefusion dashboard as well as the GWS portal.

Points to Note:
It might take 2 minutes or more, depending on the amount of data to be transferred, for the transfer and deletion of user. The Transfering User Data prompt might disappear however, in the background the data transfer will continue.
During this time the user will be soft deleted and after successful data transfer the user will be deleted from the Scalefusion dashboard after 4 hours.
Note:
When a user is soft deleted:
You cannot send an invite to user from Enrollment Configuration > User Enrollment.
User Authenticate enrollment, BYO, COPE enrollment is blocked for that user.
You cannot add that user to a User group.
You cannot apply SSO configuration to that user.
The user will not be able to login through OneIdP.
You cannot assign that user to any device on Scalefusion dashbaord.
You cannot add the same user manually or from CSV until it gets permanently deleted from Scalefusion dashboard.
The user will also not show in the list in data transfer pop up target user’s list.
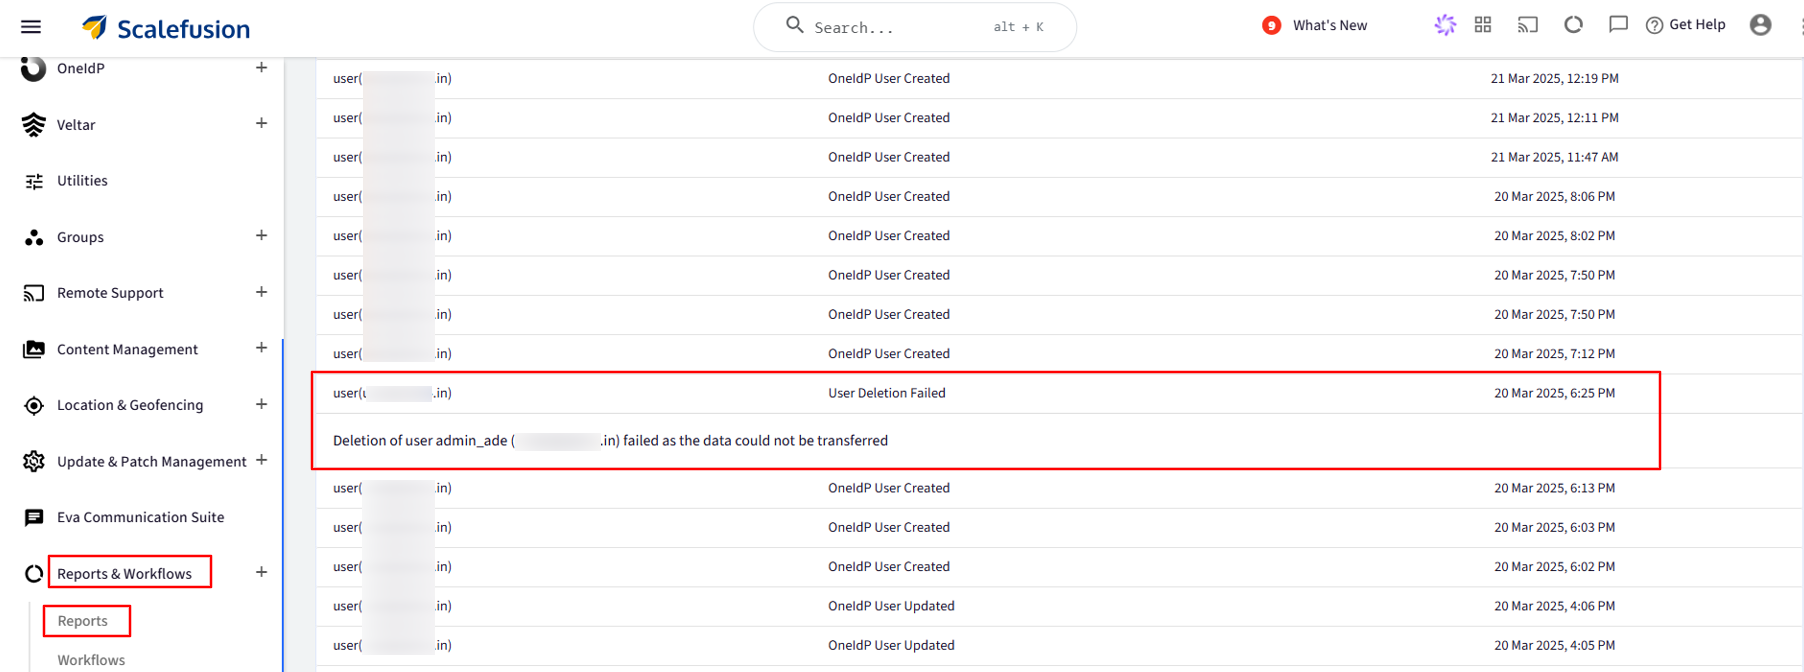
In case the data transfer fails, you will be able to see it in the Reports > OneIdP Activity report.
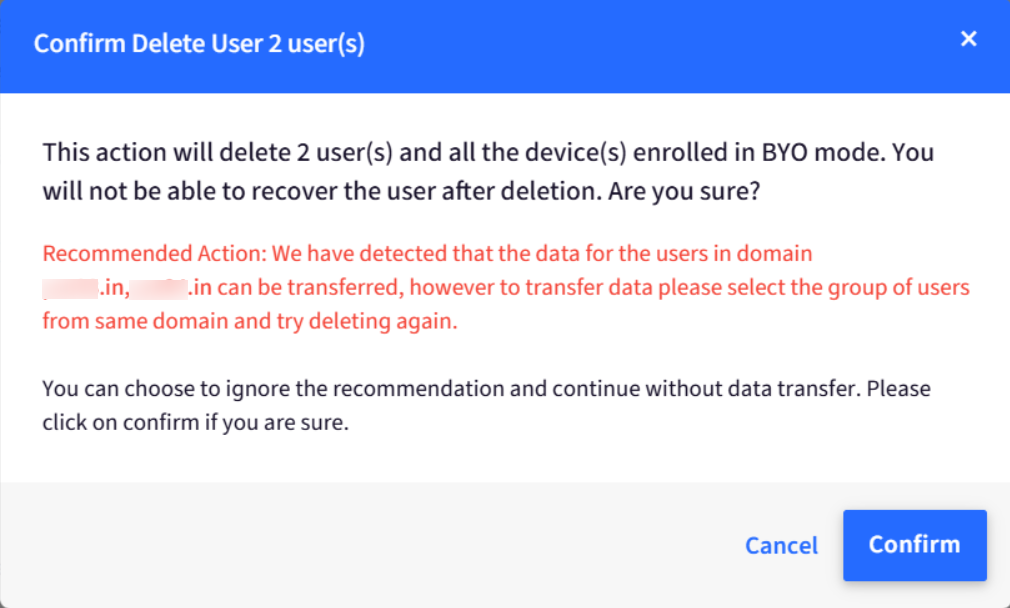
You can also delete the users in bulk and transfer the data, however, the users must belong to same domain other wise you will see the following pop-up dialog box. The following things will happen if you continue:
The user data will not be transferred.
On Company-owned devices, the user will be unassigned from the device but it will not be deleted.
On BYO devices, the work profile will be removed from the devices.
Frequently Asked Questions
Question 1: I'm unable to access my emails using the native mail app on iOS/iPad devices or Gmail on Android devices with SSO configuration. What should I do?
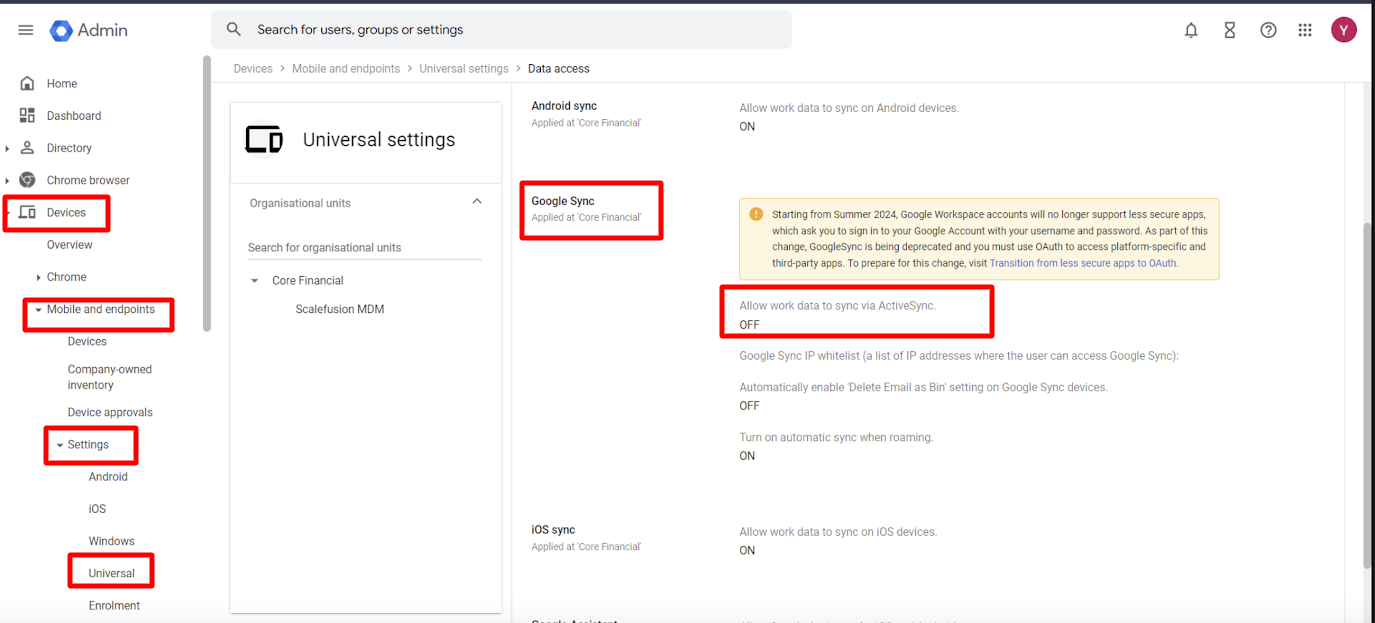
Answer: For accessing mails via native mail app on iOS/iPad devices and for using Gmail on Android devices with SSO Configuration, Google sync should be turned off on Google Admin Console. Google Sync uses Microsoft Exchange ActiveSync to let your users synchronize their work mail, contacts, and calendars to platform-specific and third-party apps on their mobile devices. To turn off Google sync:
In the Google Admin console, on the left side menu, navigate to Devices > Mobile & endpoints > Settings > Universal.
Under Data Access, go to Google Sync.
Uncheck Allow work data to sync via ActiveSync.
Click Save.
Question 2: We are getting API authentication failure Error 400 (Admin Policy Enforced) while Importing Users from Google Workspace or Granting Permissions for Scalefusion. What can be the reason?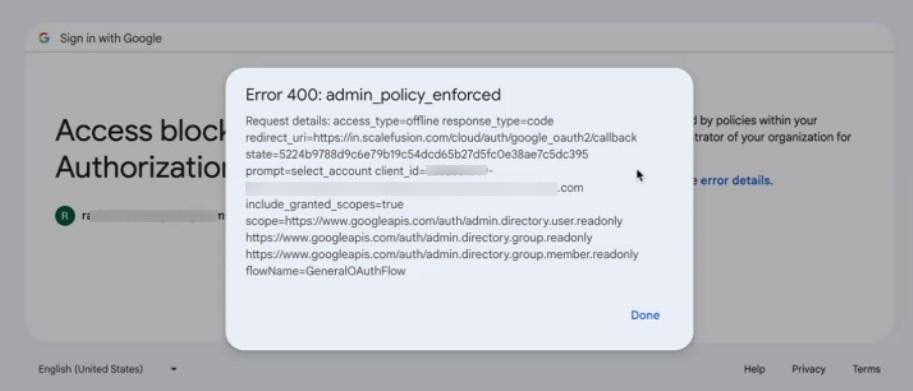
Answer: This happens because the third-party signing is blocked by Google Workspace. To resolve this, you will need to enable API access in the Google Workspace portal. To do so,
Log in to the Google Workspace Admin Console.
Navigate to Security > API Controls > Manage Google Services.
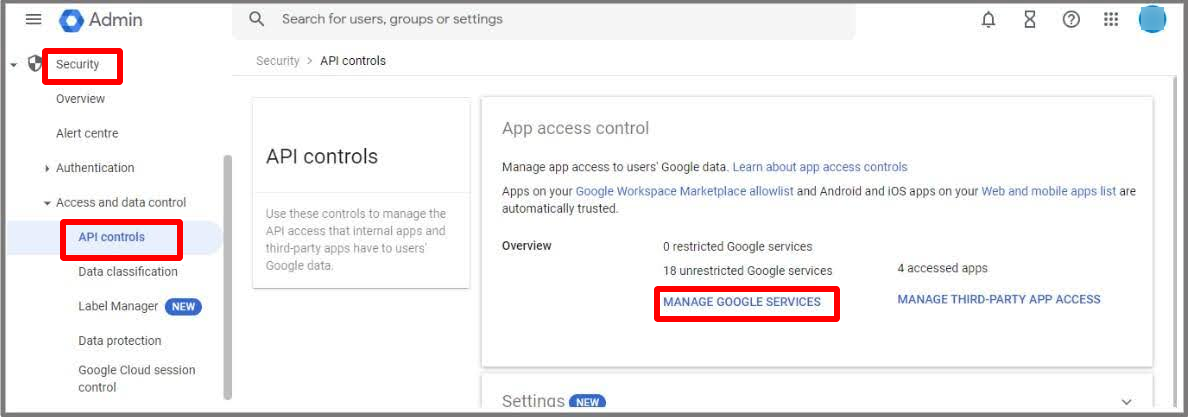
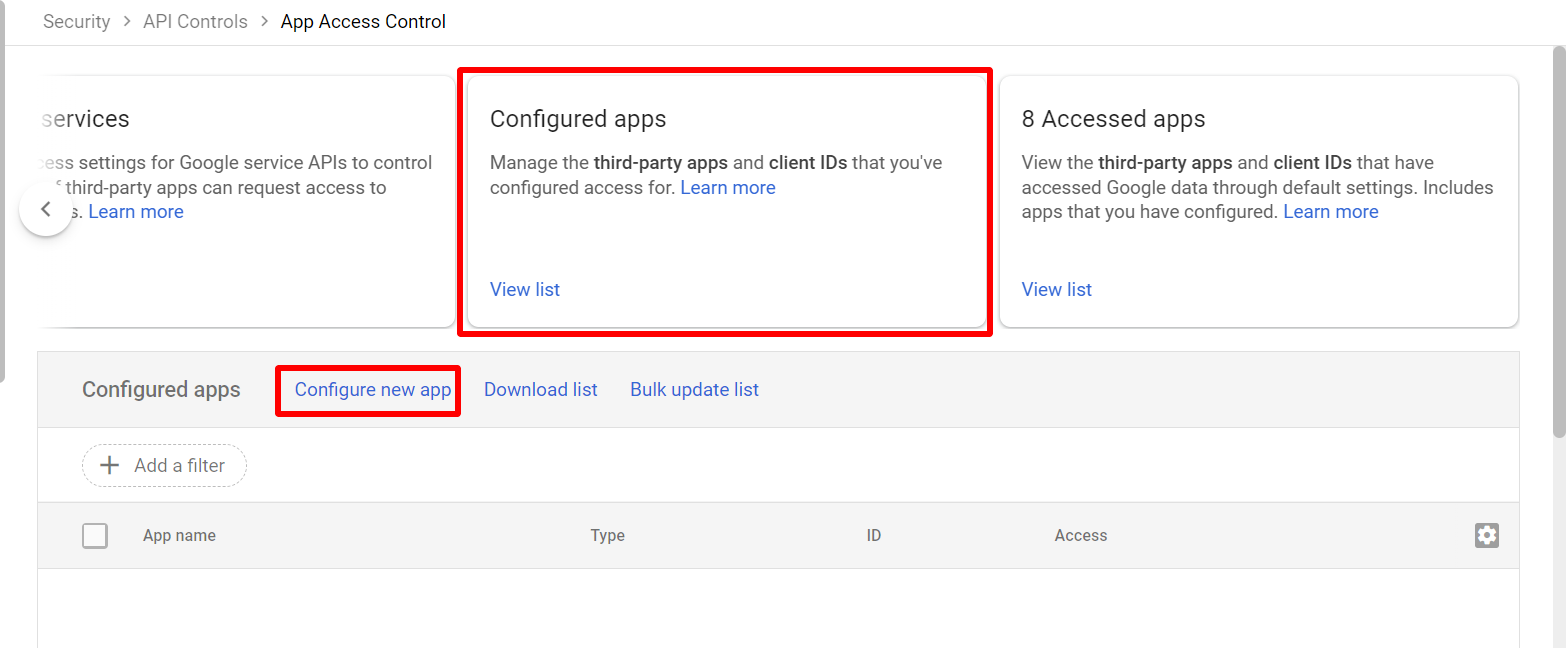
Click on Accessed apps card.

In Accessed apps, please check if Scalefusion and OneIdP is added in the list of apps. If not, you need to add them from Configured Apps section. To do so,
Click on the Configured Apps card and click on Configure New App under it.
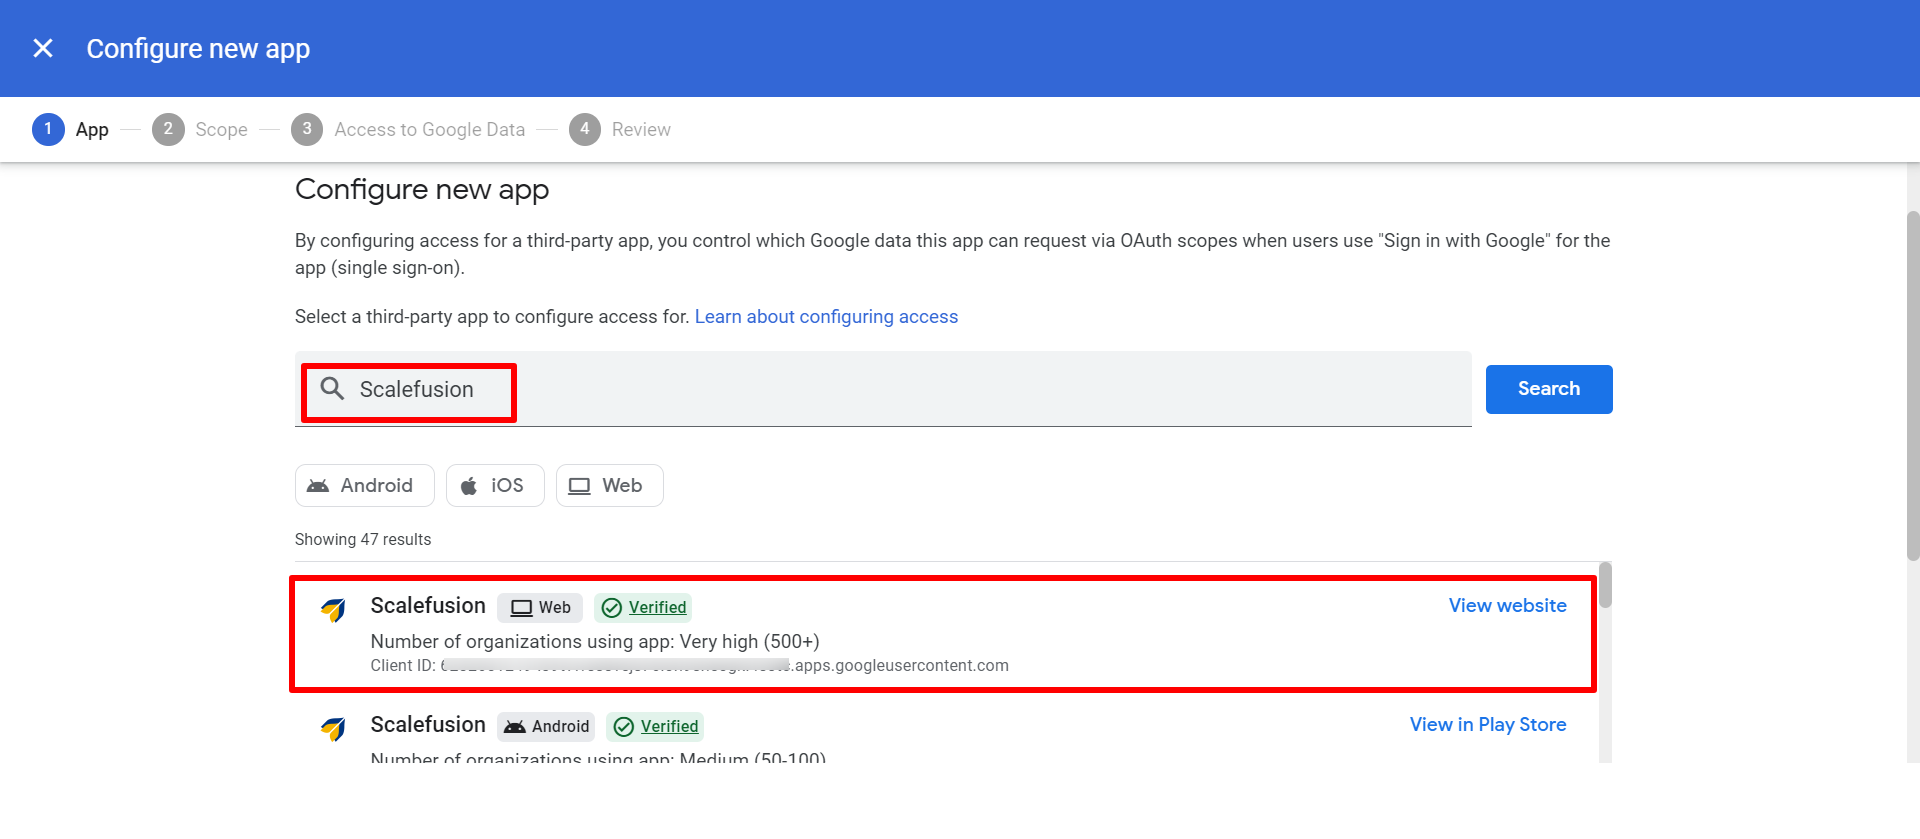
In the Configure New App window, search the app by entering Scalefusion in search field. The search results will appear in the list below. Click on Scalefusion from the list of apps.
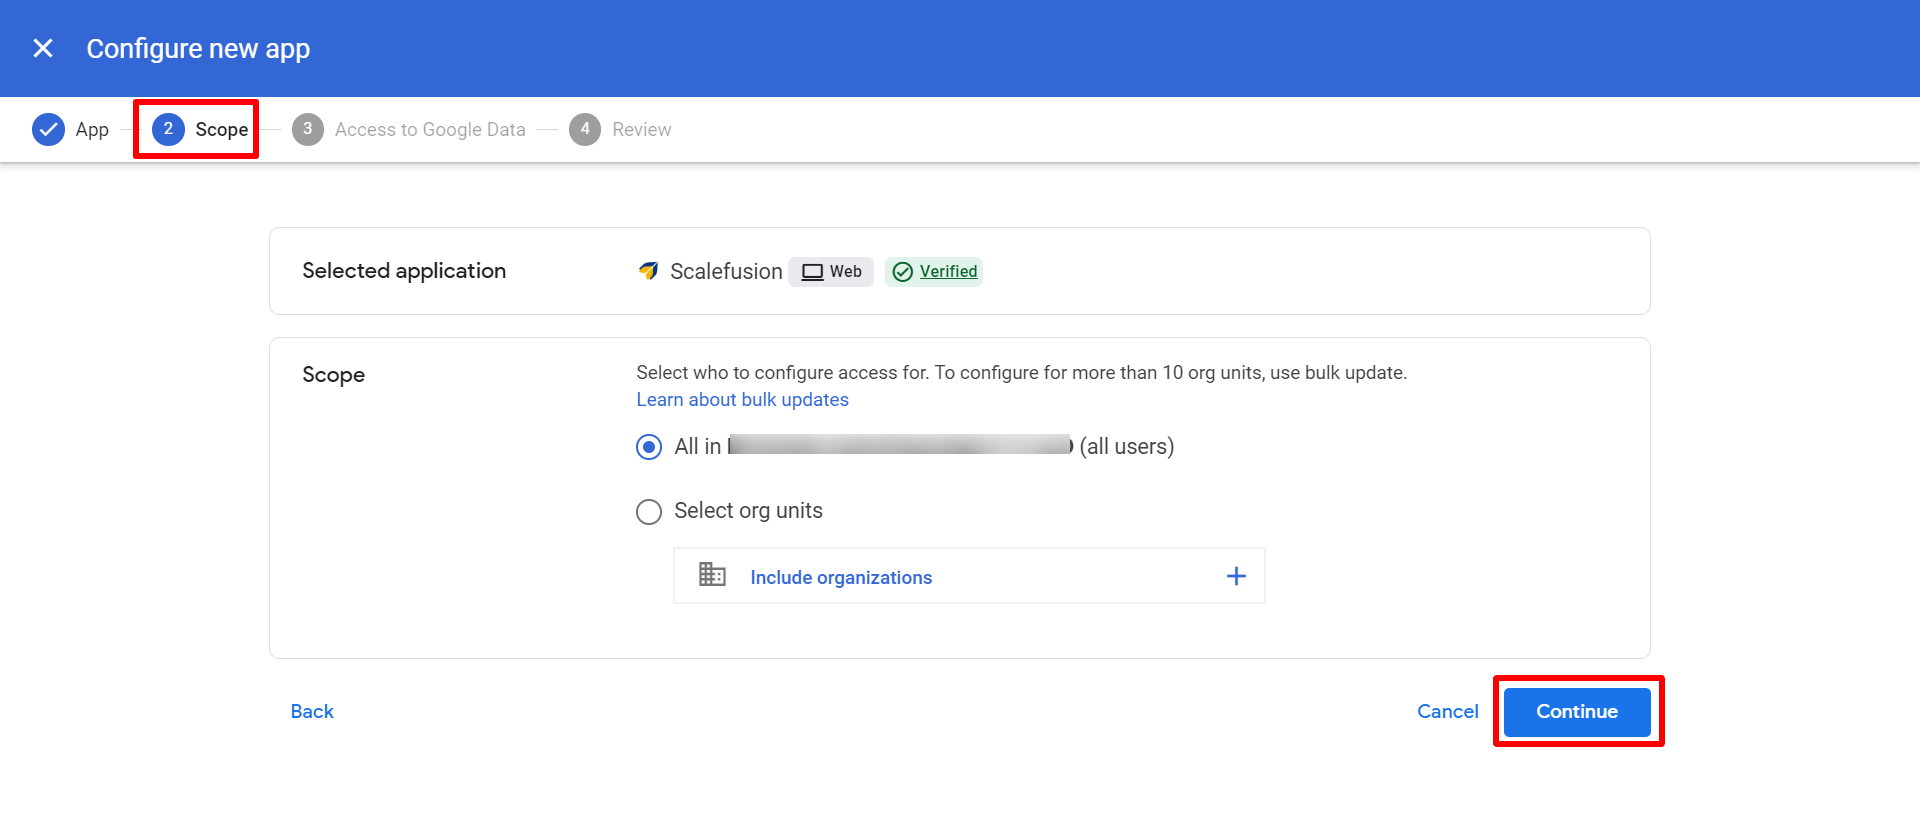
Click Continue on the next page
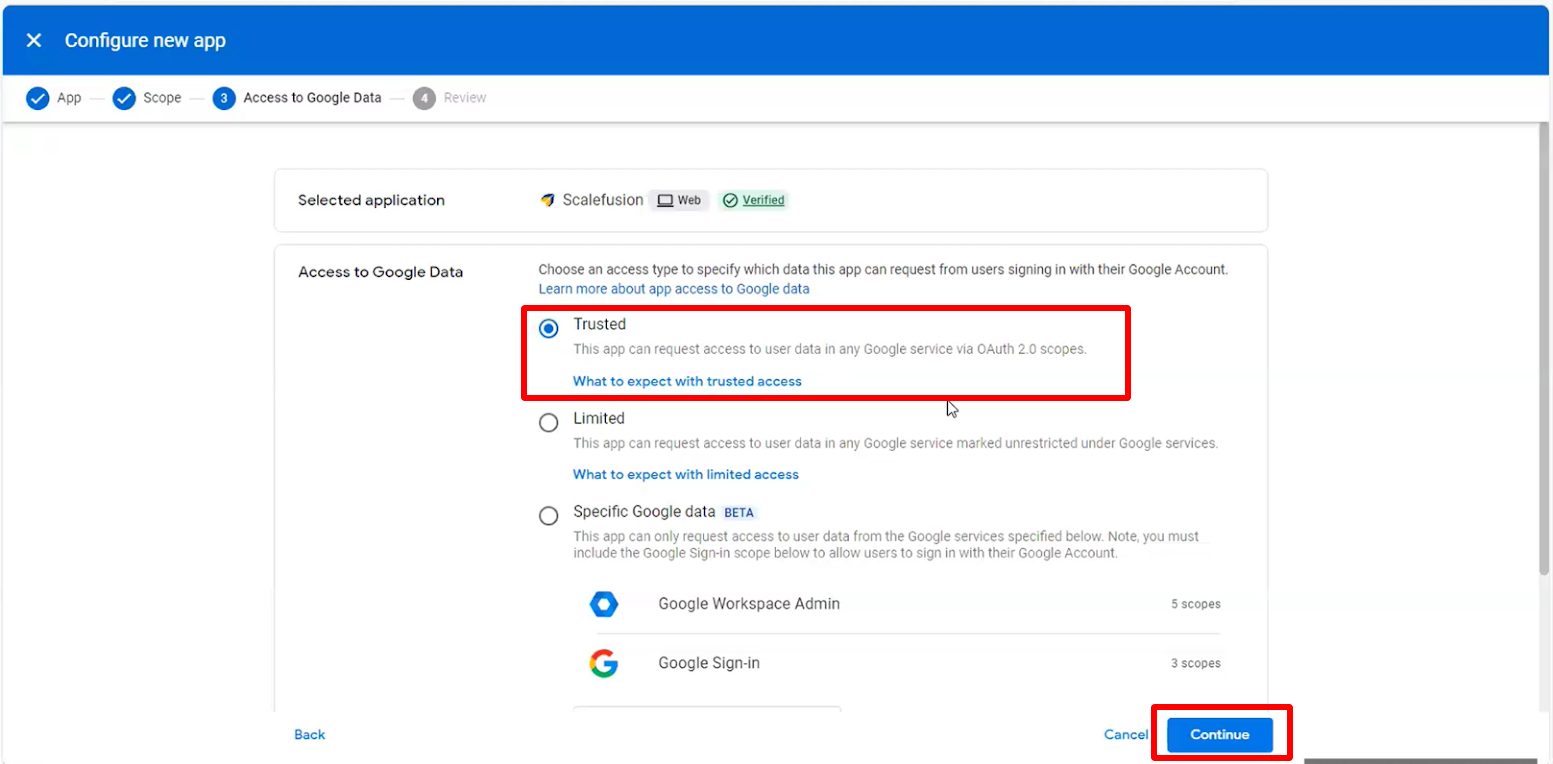
On the next page, under Access to Google data select Trusted and click Continue
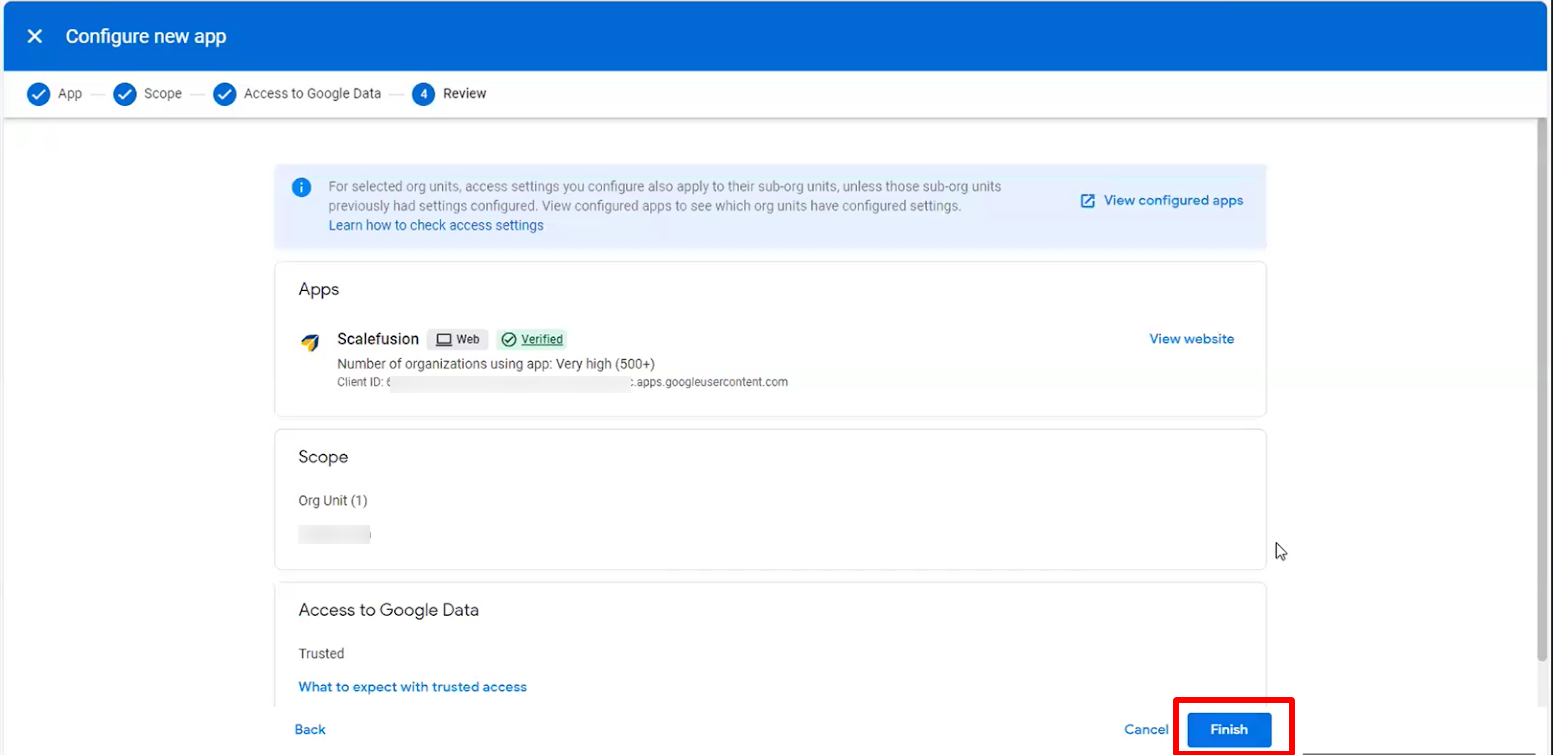
You will get the confirmation page. Here, click on Finish
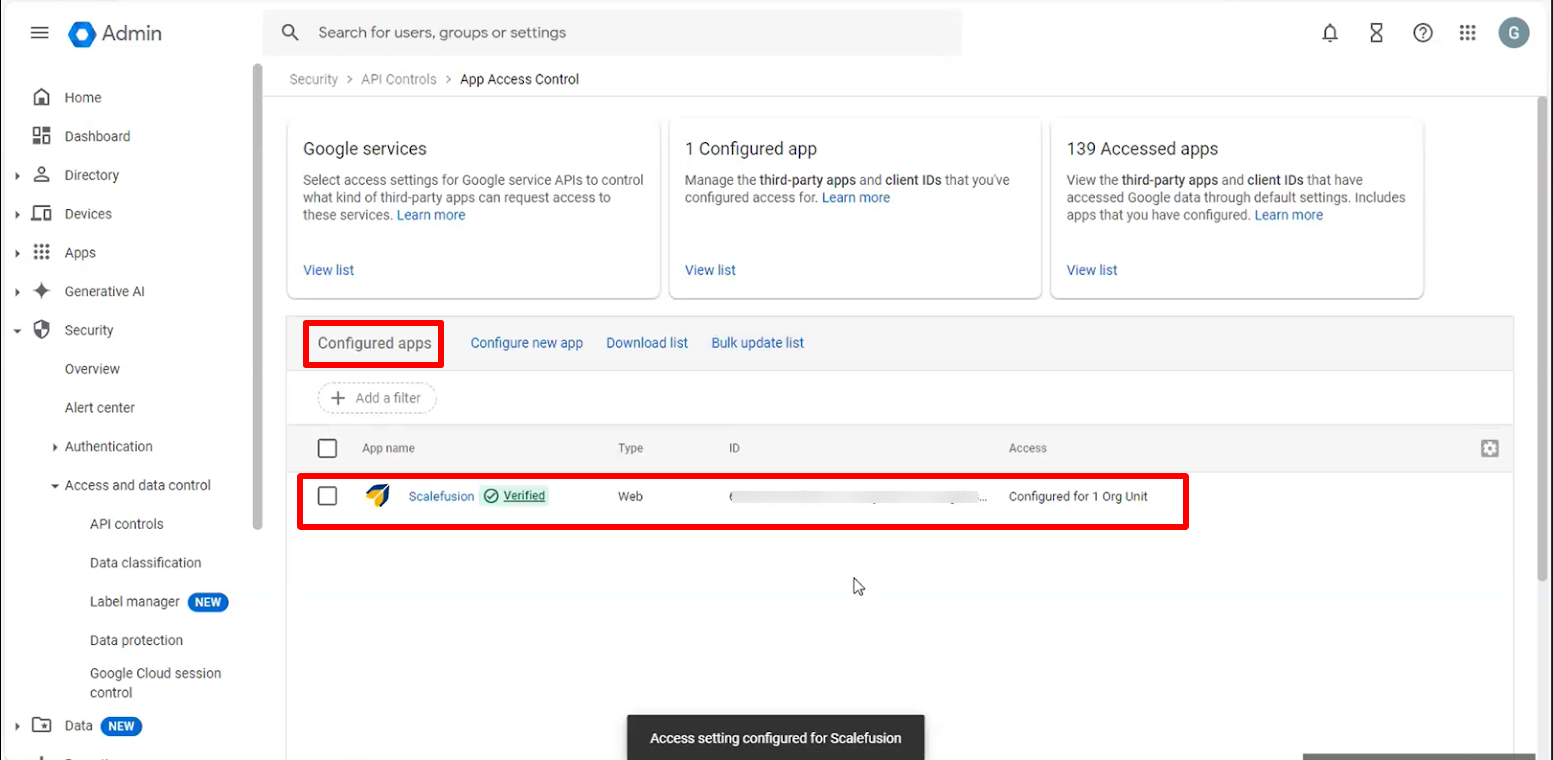
Scalefusion will now start showing up in Configured Apps
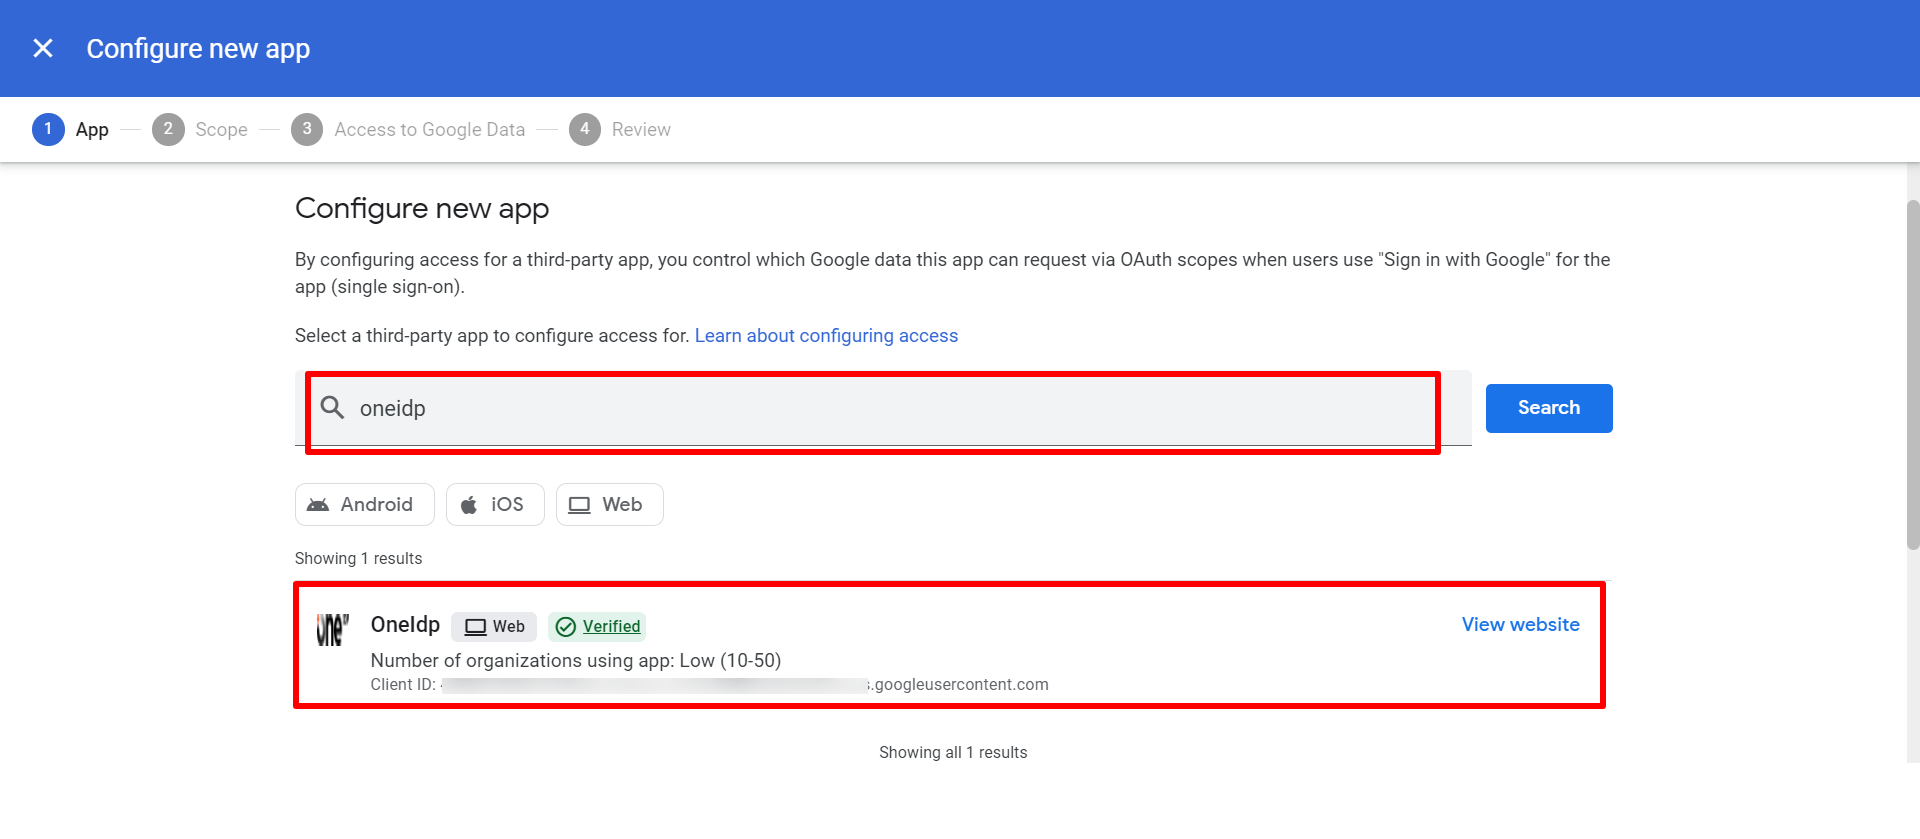
Please follow the same steps as above to add OneIdP under Configured Apps section.
You should not be receiving the error now.


