- 09 Aug 2024
- 9 Minutes to read
- Print
- PDF
Shared Company-Owned Devices
- Updated on 09 Aug 2024
- 9 Minutes to read
- Print
- PDF
Shared Company-Owned devices refer to smartphones or tablets owned by an organization or business that are being used by multiple individuals. These devices can be found in a variety of settings, such as educational institutions, corporate workplaces, healthcare facilities, and public spaces like libraries, shopping malls, etc., where these shared devices may be used to provide access to specific apps or services that are needed by multiple users.
There are several advantages to organizations using Shared devices, such as Cost effectiveness, Improved Productivity, Easier maintenance, and Greater accessibility, to name a few. Leveraging Scalefusion's User Group Management and User Authenticated Enrollment features, IT Admins can prioritize user-based devices and utilize their AD integrations for better management instead of treating devices with mapped users.
Before You Begin
- Complete the Android Enterprise setup on the Scalefusion dashboard.
- The device(s) have to be enrolled using any one of the following methods- Six (6) times Tap method, afw#mobilock, IMEI/Serial Based enrollment, Zero-touch, and KME enrollment methods.
- You should be subscribed to a Business or Enterprise plan.
How it works
In a nutshell, the following is an overview of the steps involved in configuring an Android device as a shared device:
- Add users to User Management
- Create User Group(s)
- Configure Settings for Shared Devices
- Create QR Code Configuration
- Enroll the devices
- Dashboard view of Shared Devices
These are explained in detail below.
Step 1: Adding users to User Management
- Navigate to Enrollment Configurations > User Enrollment.
- You can either use the Add a User button to add the users or upload a list of users in the form of a CSV file.
- In case the account is a G Suite or O365 account, you can import the users from the respective G Suite/O365 consoles.
- Refer to the Import Users and User Group guide to know more about importing G Suite/O365 users.

- Refer to the Import Users and User Group guide to know more about importing G Suite/O365 users.
- Once the user details are added, the user or the list of users will now show on the dashboard.
- Unlike BYOD enrollment, you will not need to send an invite to these users.
- The next step will be to create a QR Code Configuration to set up the User Authenticated Enrollment mode.You can also use AAD, PingOne, Okta, and Google Workspace for the authentication of users.
Step 2: Creating User Group(s)
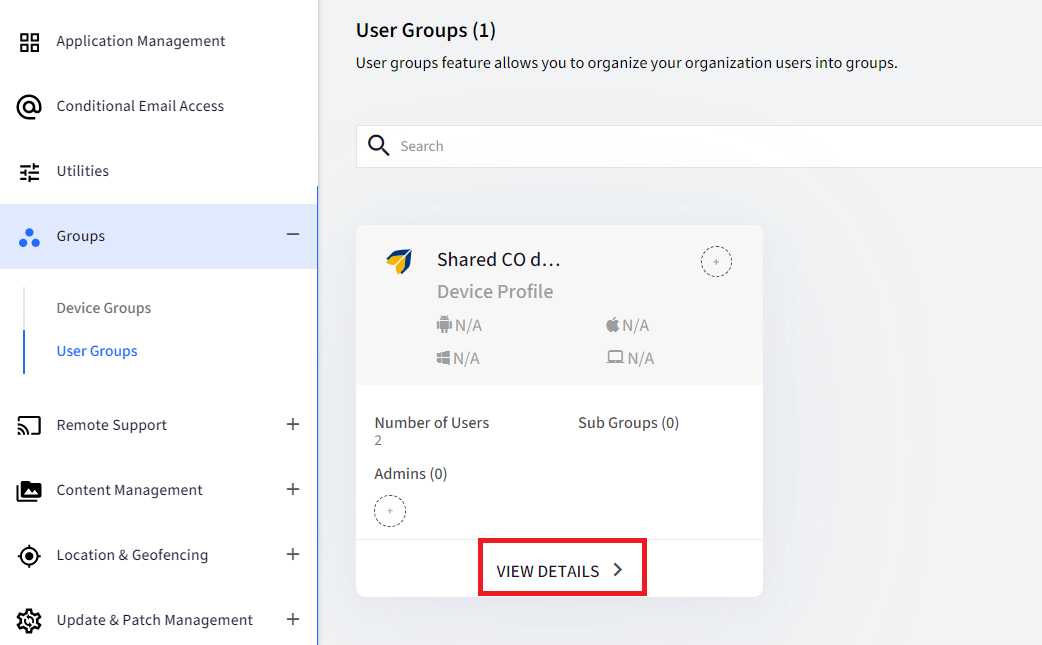
- Navigate to Groups > User Groups and click on the Create New Group button.

- This will open the group creation wizard and select the Users who will be sharing the devices in this User Group from the list of users that have already been added or imported as per Step 1.

- Once users are selected, choose a Device Profile in the Company Owned tab on the next screen. The Company Owned tab is important as this will distinguish company-owned devices from BYOD devices and help you to seamlessly enroll Shared devices.
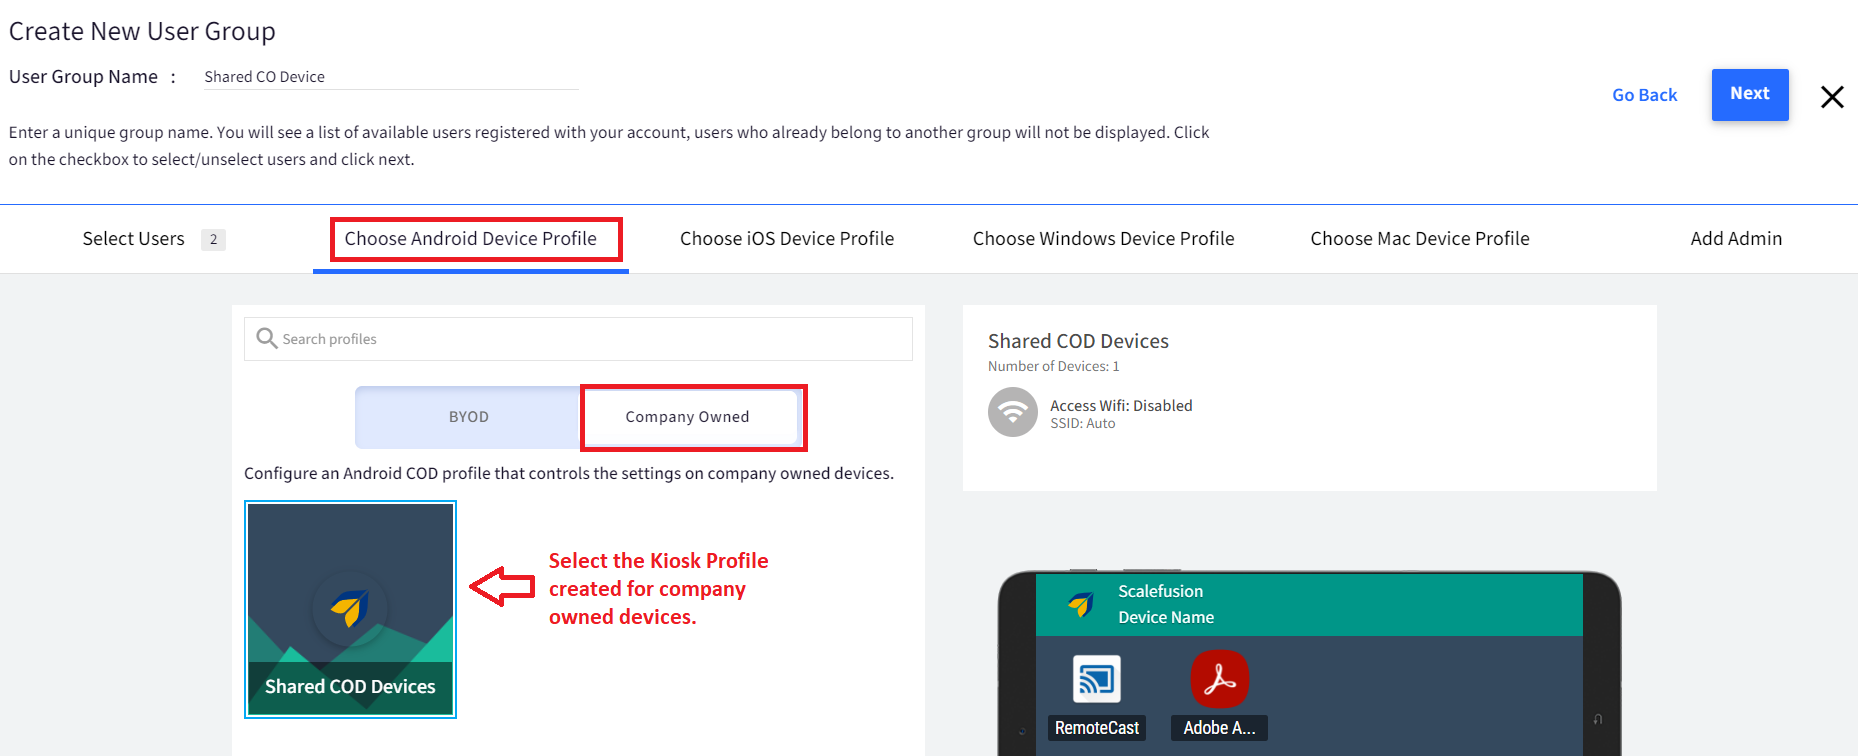
- Click on the Next button to go to the Add Admin tab or directly click on the Add Admin tab and click on the Create User Group button to finish creating the User group for Shared Company-Owned devices.

Step 3: Configure Settings for Shared Company-Owned Devices
- Once the User Group is created, click on View Details to configure the Shared Devices Settings.
- Following are the options provided to configure the settings:
- Allow Company Devices to be Shared between Users in this Group: All the users added to this group will be allowed to share devices and will be presented with a Sign in/out option on the device.
- Allow Admin Sign-In Option: You will be able to enroll the device using the Exit passcode when enrolling the device with the User Authentication Enrollment method.
- Auto Sign Off the Signed user after configured hours: You will be able to set a time (in hours), after which the signed user will be automatically signed out.

- Configure Alert message before Signing out: You can add a custom message that will be shown to signed-in users on the shared devices 5 minutes before they are to be automatically signed out.
- Clear Application Data on Every Sign-In: This option will help clear the app data of the allowed apps after every successful user Signs in on the shared devices.
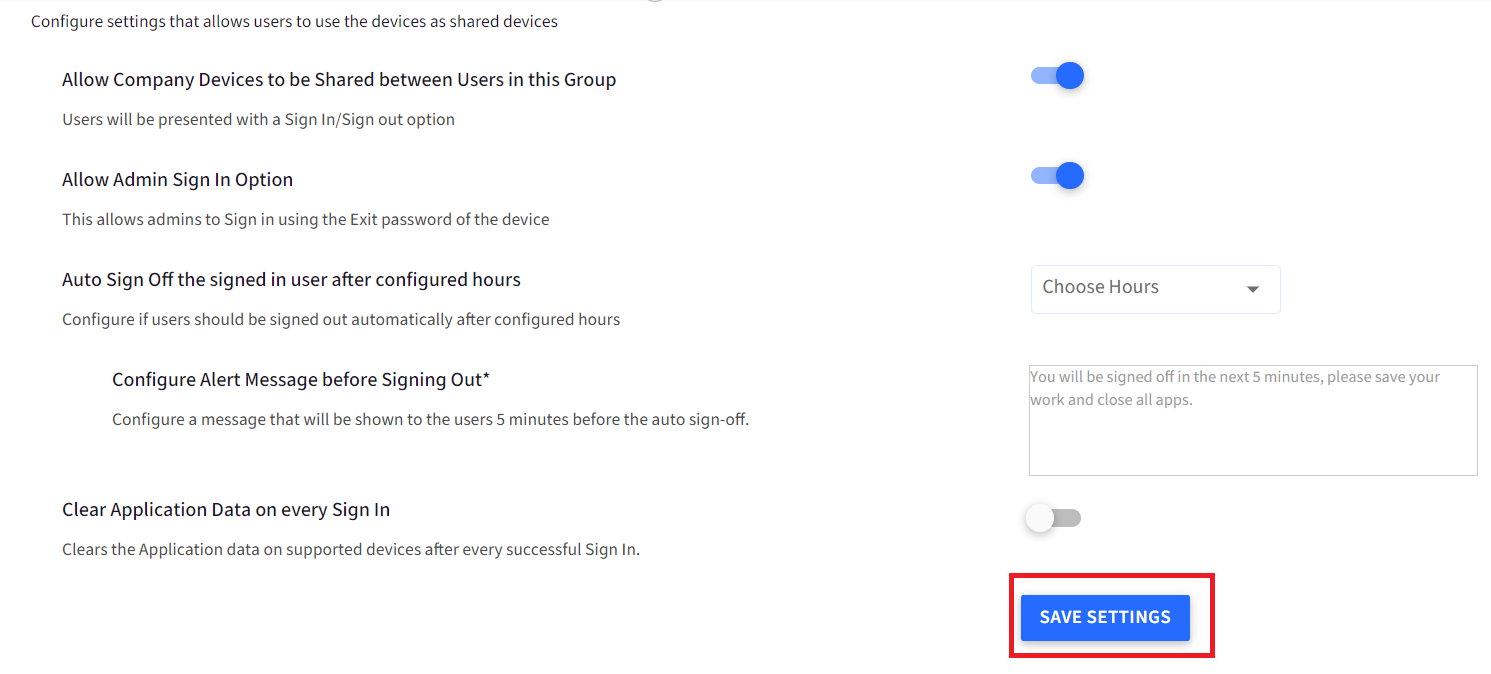
- Once the settings are configured, click on the Save Settings button to save them.
Step 4: Creating a QR Code Configuration
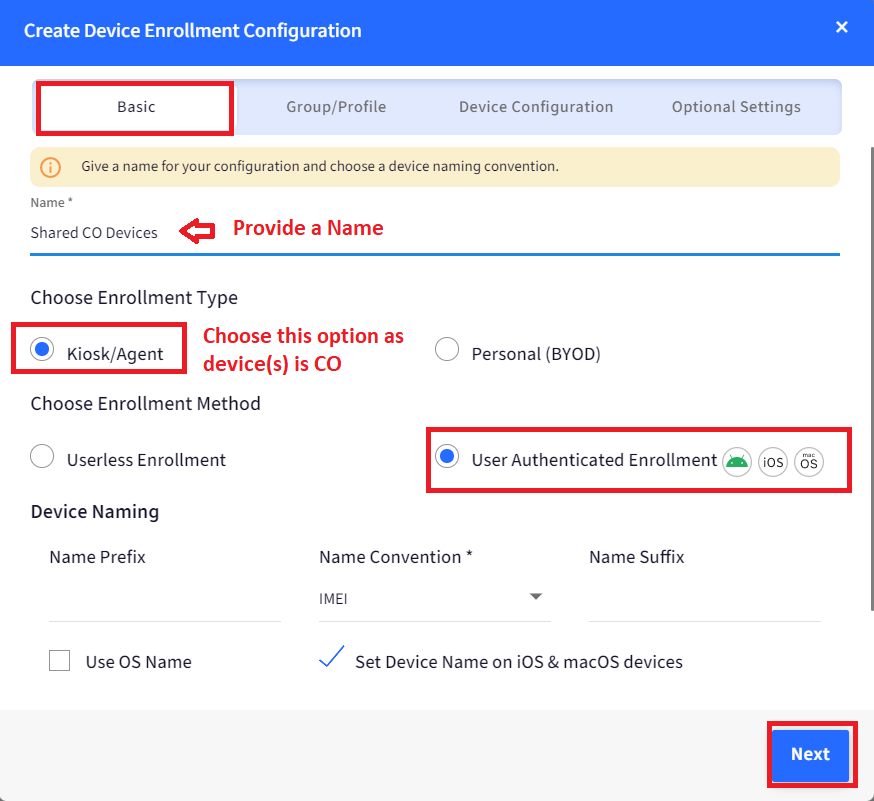
For Shared Company-Owned devices, the Enrollment method will always be User Authenticated Enrollment. Therefore, while creating the QR code, it is imperative to select the User Authenticated Enrollment option.
- Navigate to Enrollment Configurations > QR Code Configurations > click on the Create button.
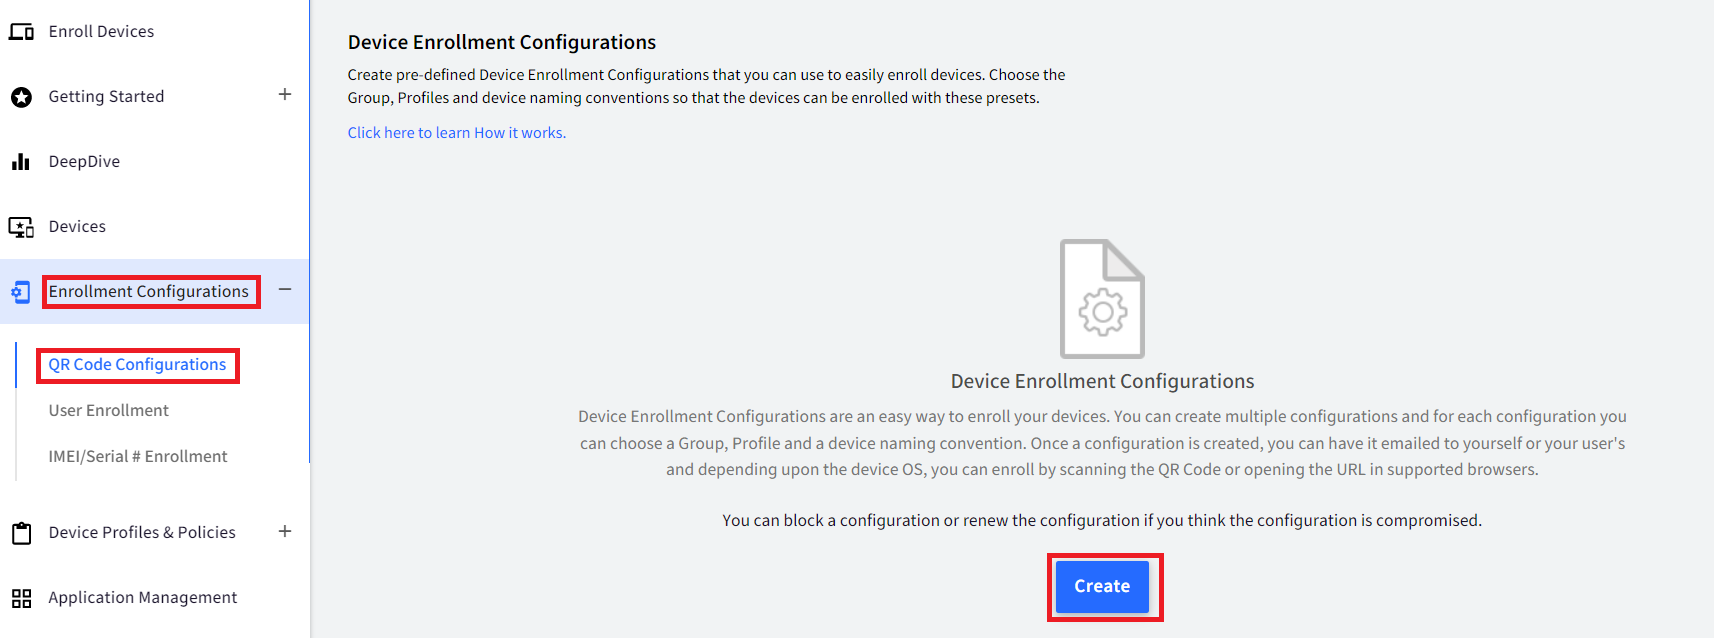
- By default, the Enrollment Method is selected as Userless Enrollment. To change it, select the option User Authenticated Enrollment.
- Give this configuration a name, Choose Enrollment type as Kiosk/Agent, and Choose Enrollment method as User Authenticated Enrollment.
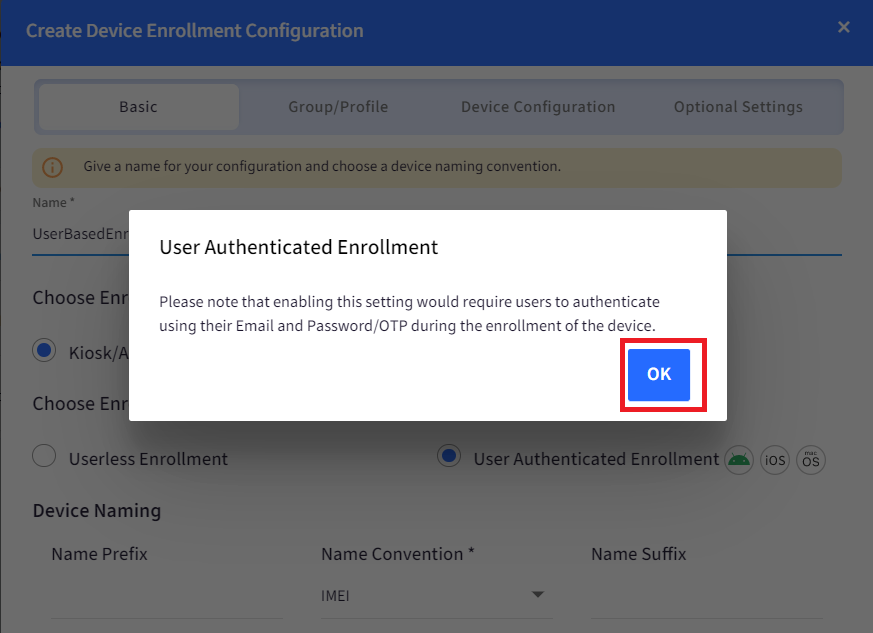
- You will see a pop-up message as shown below, click on OK and click on Next to Choose the User Group created for Shared devices as per Step 3.
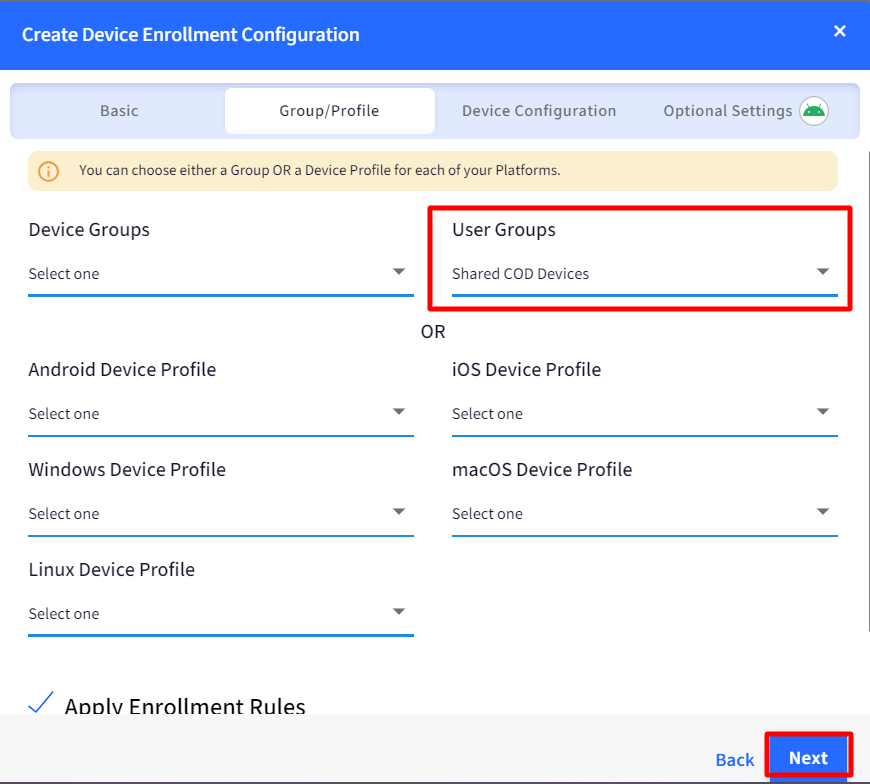
- In the Group/Profile section, select a user group from the User Groups dropdown.

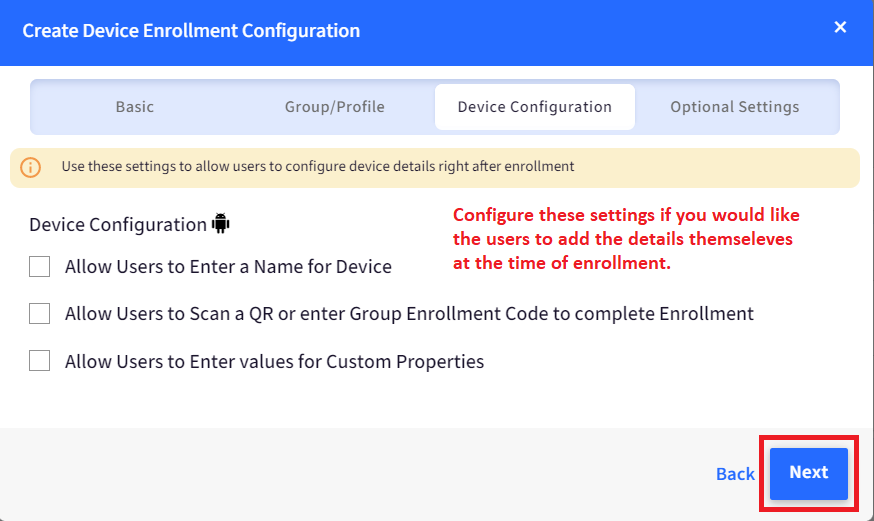
- You can configure the Device configuration settings to allow users to add device details at the enrollment itself.
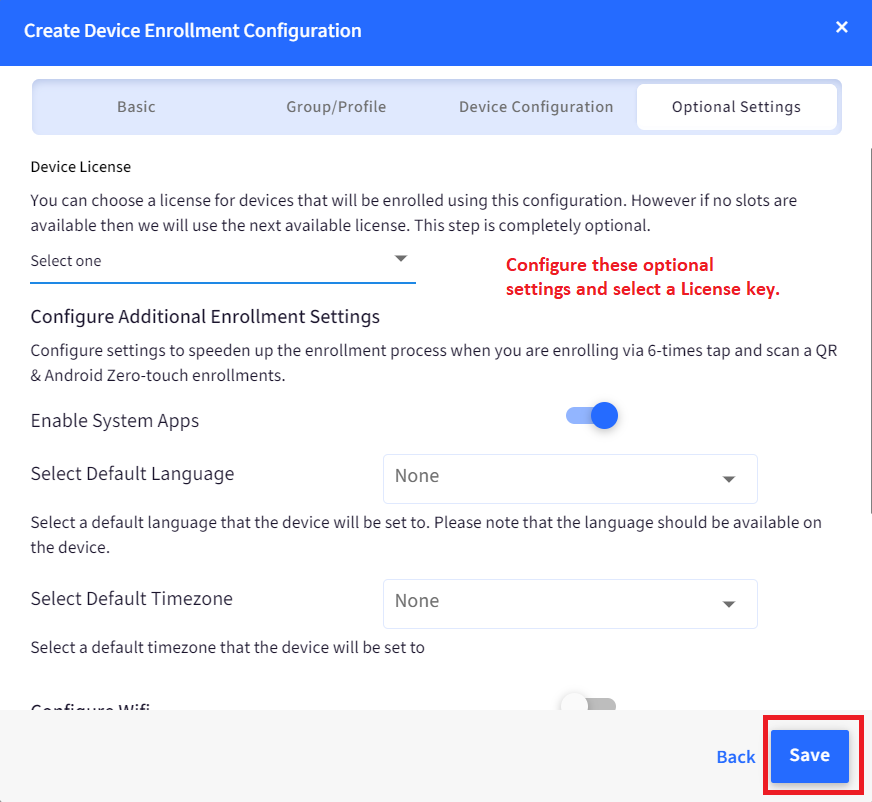
- Configure the Optional Settings and click on the Save button.
- Now this QR code configuration is ready to enroll the Shared devices. You can enroll the Company-Owned devices as Shared devices via Six (6) times Tap, afw#mobilock, Zero-touch, and KME enrollment methods.
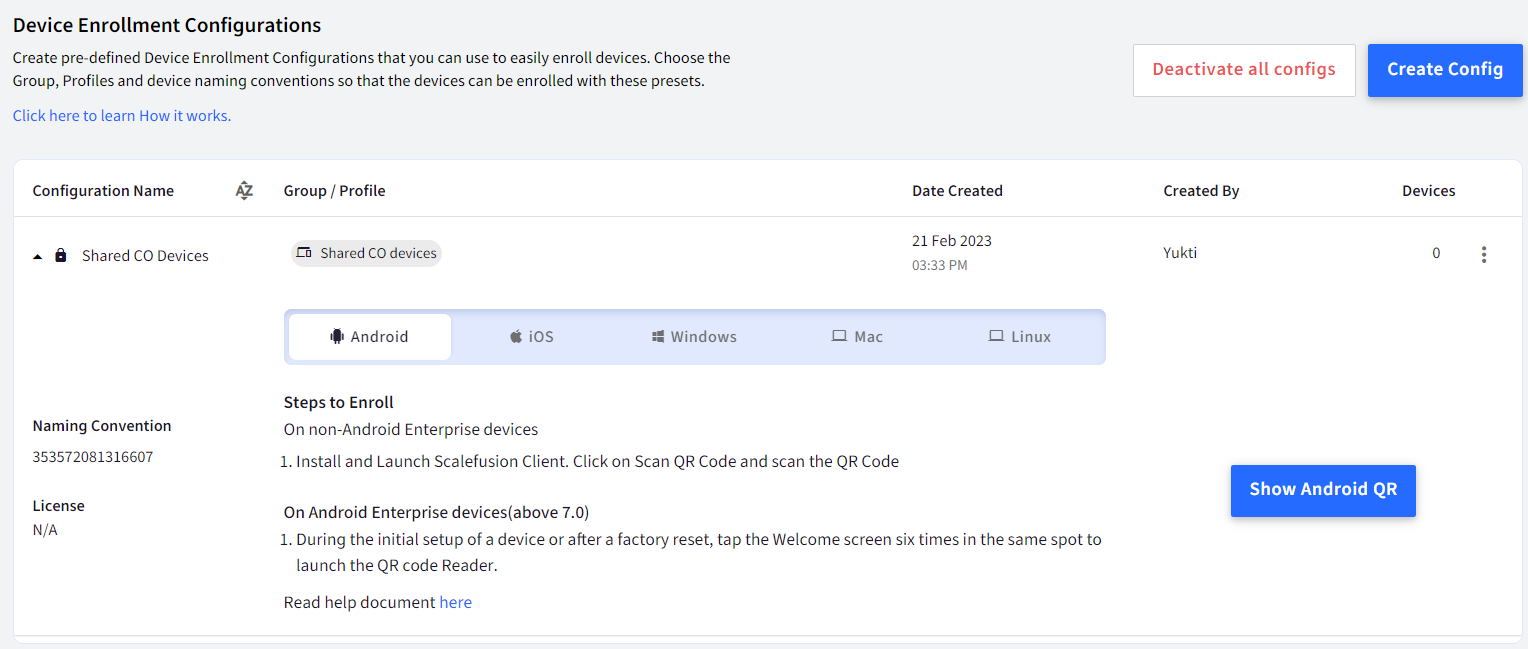
Step 5: Enrolling the devices
- The first time you are enrolling Company-Owned devices as Shared devices, follow the enrollment process as defined for Six (6) times Tap, afw#mobilock, Zero-touch, and KME, IMEI/serial-based enrollment methods.
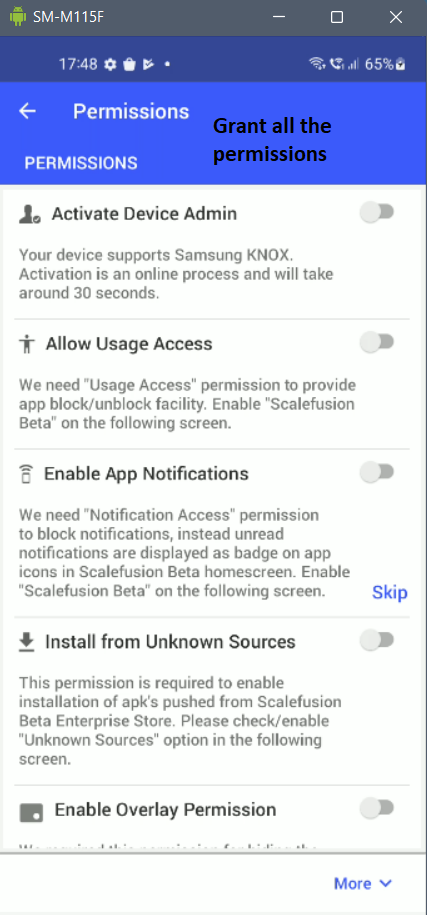
- At the Scalefusion permissions screen on the device, you will have to enable all the permissions and click on Next.
- After granting all the permissions, you will now see a new screen to enter an email address to authenticate and complete the enrollment. This is the default flow of the User Authenticated Enrollment process.
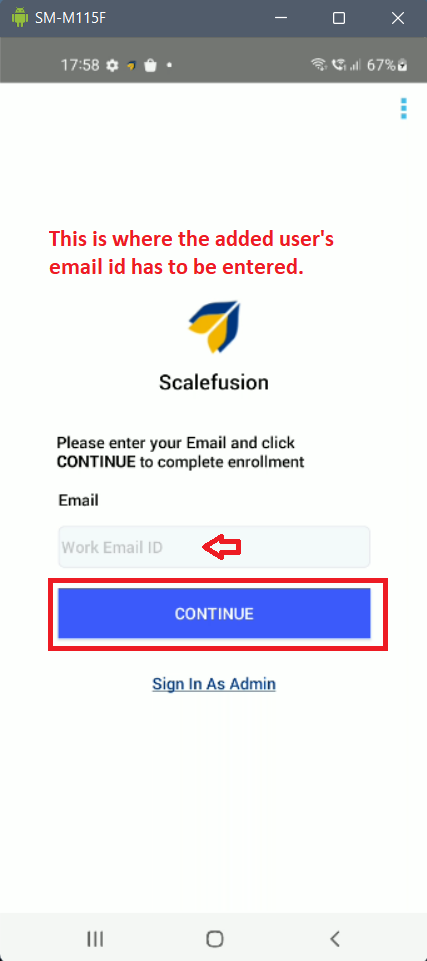
- In case you plan to enroll the devices and not authenticate the user yet so that you can ship the devices to users who will, in turn, enter their email IDs and OTP to authenticate at a later stage; you can use the option Sign in as Admin at the time of enrolling the devices.

- Once you tap on the Sign in as Admin option, you will be asked to enter the exit passcode as set in the Device Profile.
- On adding the exit passcode, the device will enroll without the Authentication for the time being, and the next time the device is rebooted, the users will again see the Authentication page and will be asked to enter their email address and OTP.
- If you prefer to authenticate the user, they will enter the user's email address and agree to the Organization’s Terms and Conditions.

- On the next screen, IT Admins will have to enter an OTP that is sent to the email address entered before.
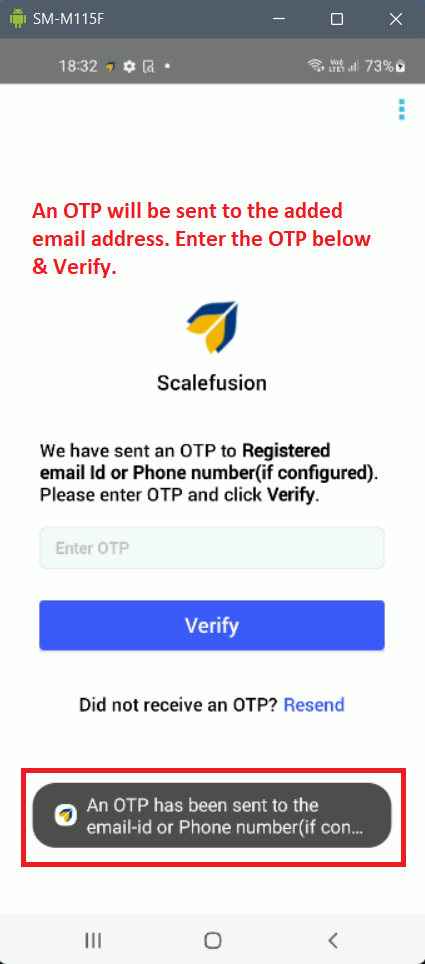
- Once OTP is verified, the enrollment process will be completed.
- On the device, users will see an additional option to Sign Out (in the 3-dots menu), which indicates that the device is a Shared device, and different users added to the concerned User group will be able to sign in and use the device.
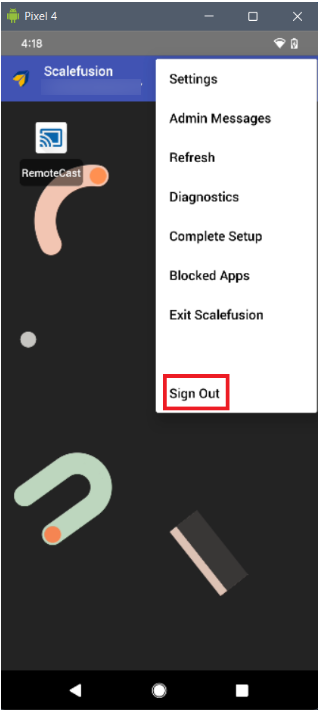
- Once a user is done using the device, they can use this SignOut option to log out of the device, and another user can Sign in. The next user will again see the screen where they will have to enter their email address and OTP, just like the User Authenticated Enrollment process shown in the above steps.
Dashboard View of Shared Devices
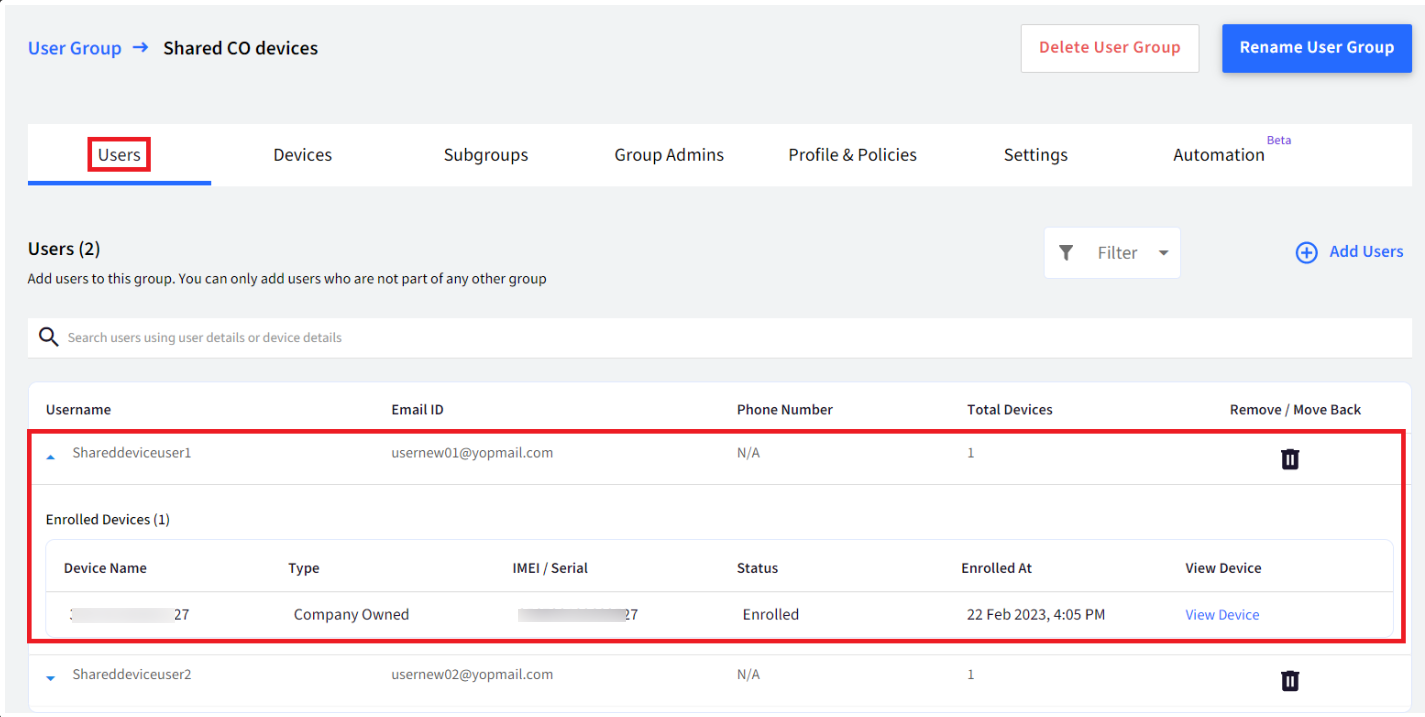
- On the dashboard, under User Groups > Users, you will be able to see the details of which user has logged into which device and at what date and time.
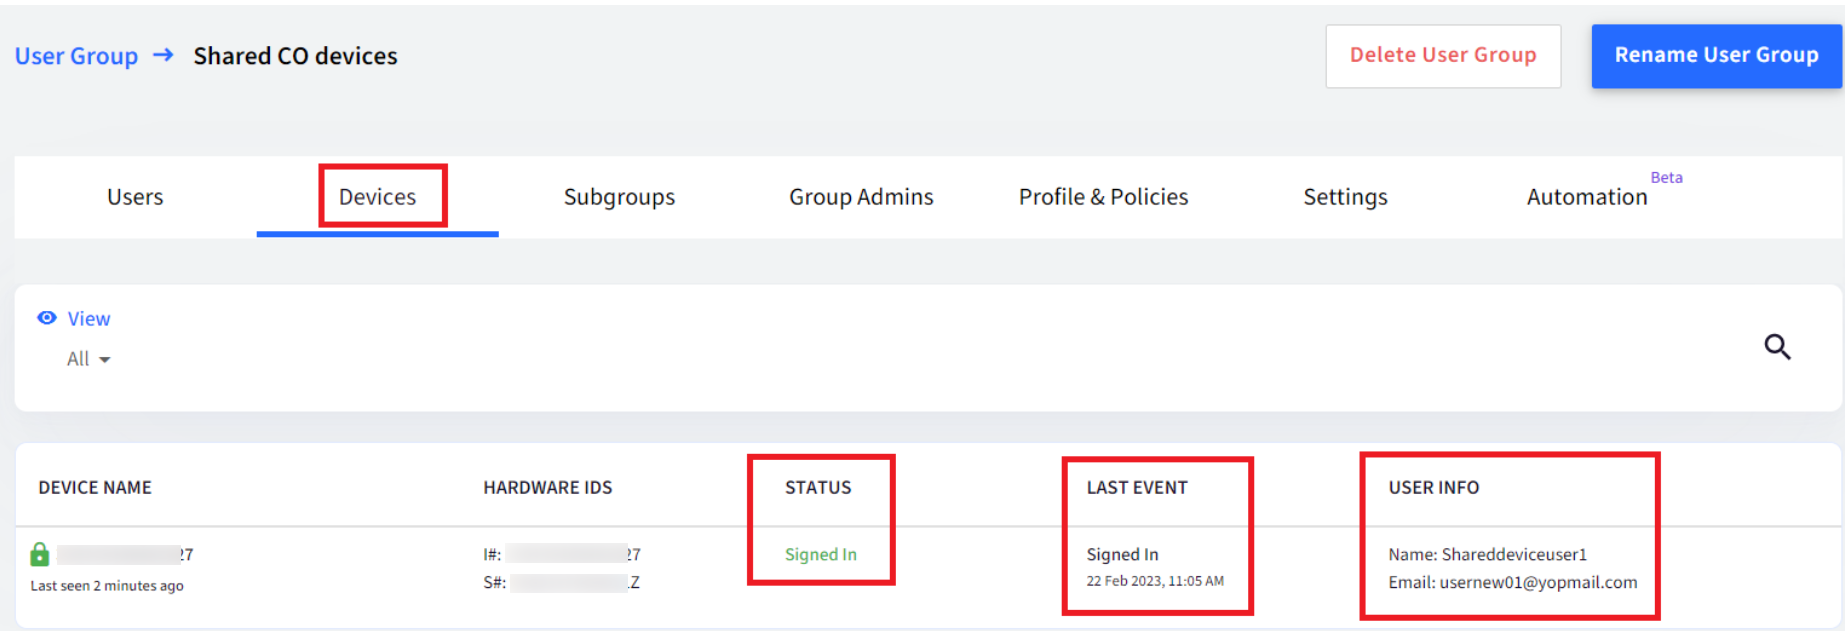
- In the Devices tab, you will be able to see which user is currently signed in or signed out from the concerned device.
- In the Profile & Policies tab, you will see 2 sections- BYOD and Company owned. The Company Owned tab is for Shared Devices and will show the Device Profile assigned to Shared Devices, or you can assign a Device Profile.
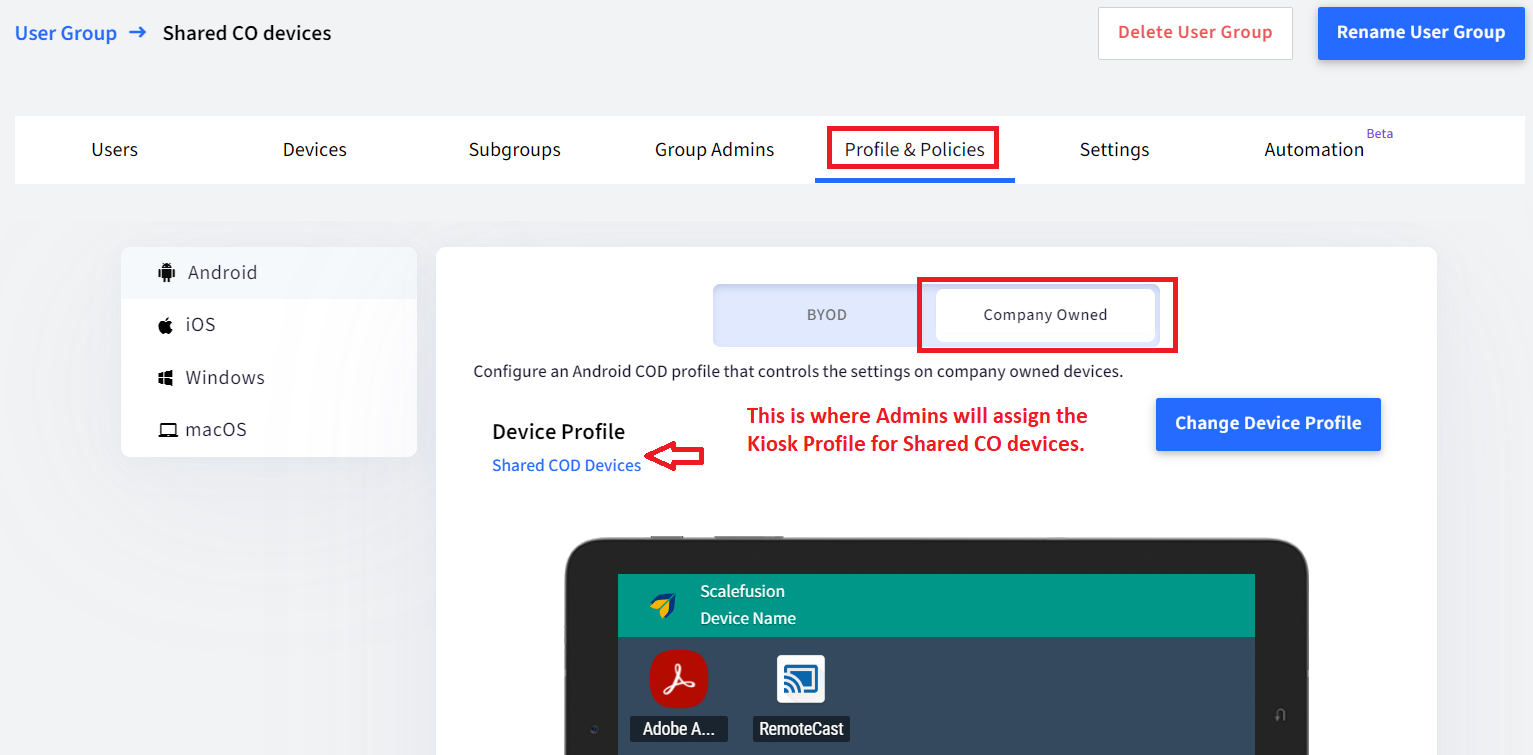
- You can also set Global-level Settings for the Shared Devices User Groups by clicking on the Settings button on the User Group homepage.

- Allow Users to Sign in from Multiple Devices: Enable this option to allow users to sign in from multiple devices using their email IDs.
- Allow Users from different groups to sign in on the same device: Enable this option to allow users belonging to different User Groups to sign in on a Shared Device. By default, only users in the same User Group can sign in if sharing has been enabled.

Make a non-user Authenticated device a Shared device
If you have devices that are already registered with Scalefusion in Kiosk mode but were not enrolled via User-based authentication and want to use them as Shared devices or assign a user to them, you can do so by following these steps:
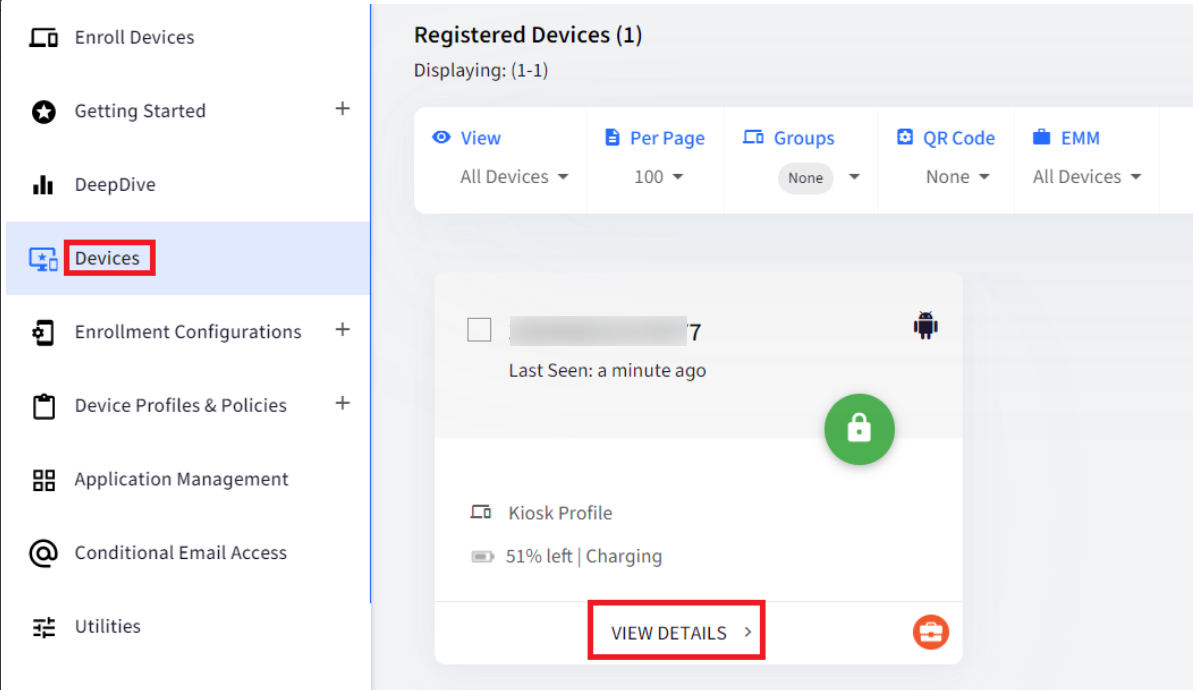
- Navigate to the Devices section and click on View Details for the concerned device(s).
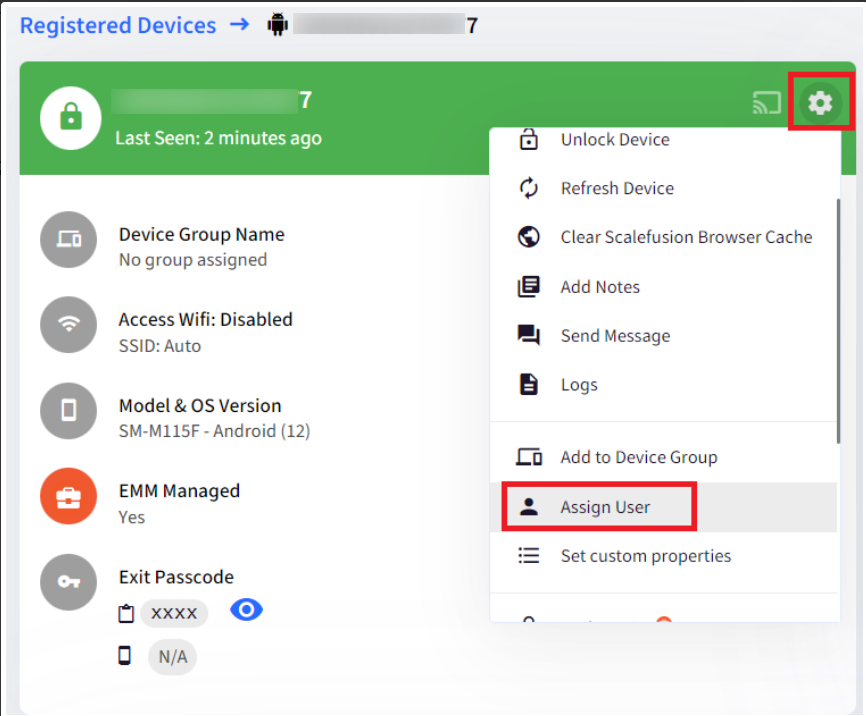
- Click on the Gear icon and scroll down to the Assign User option. 
- Select the user in the new window and click on Save.
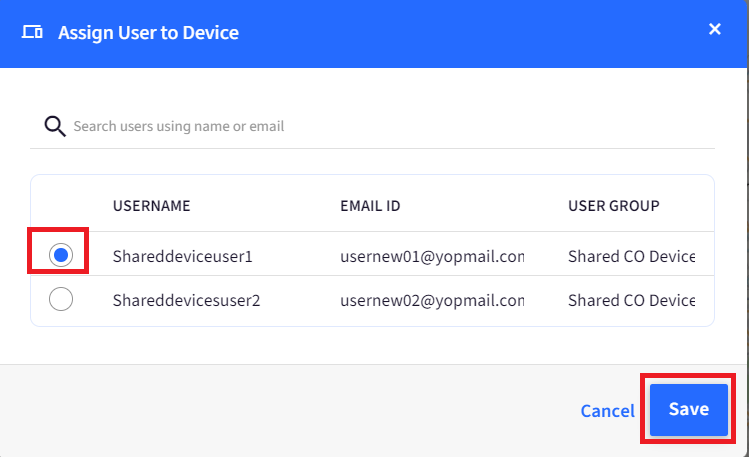
- You will be able to see the device in the User Group section under the users created for the Shared Devices.
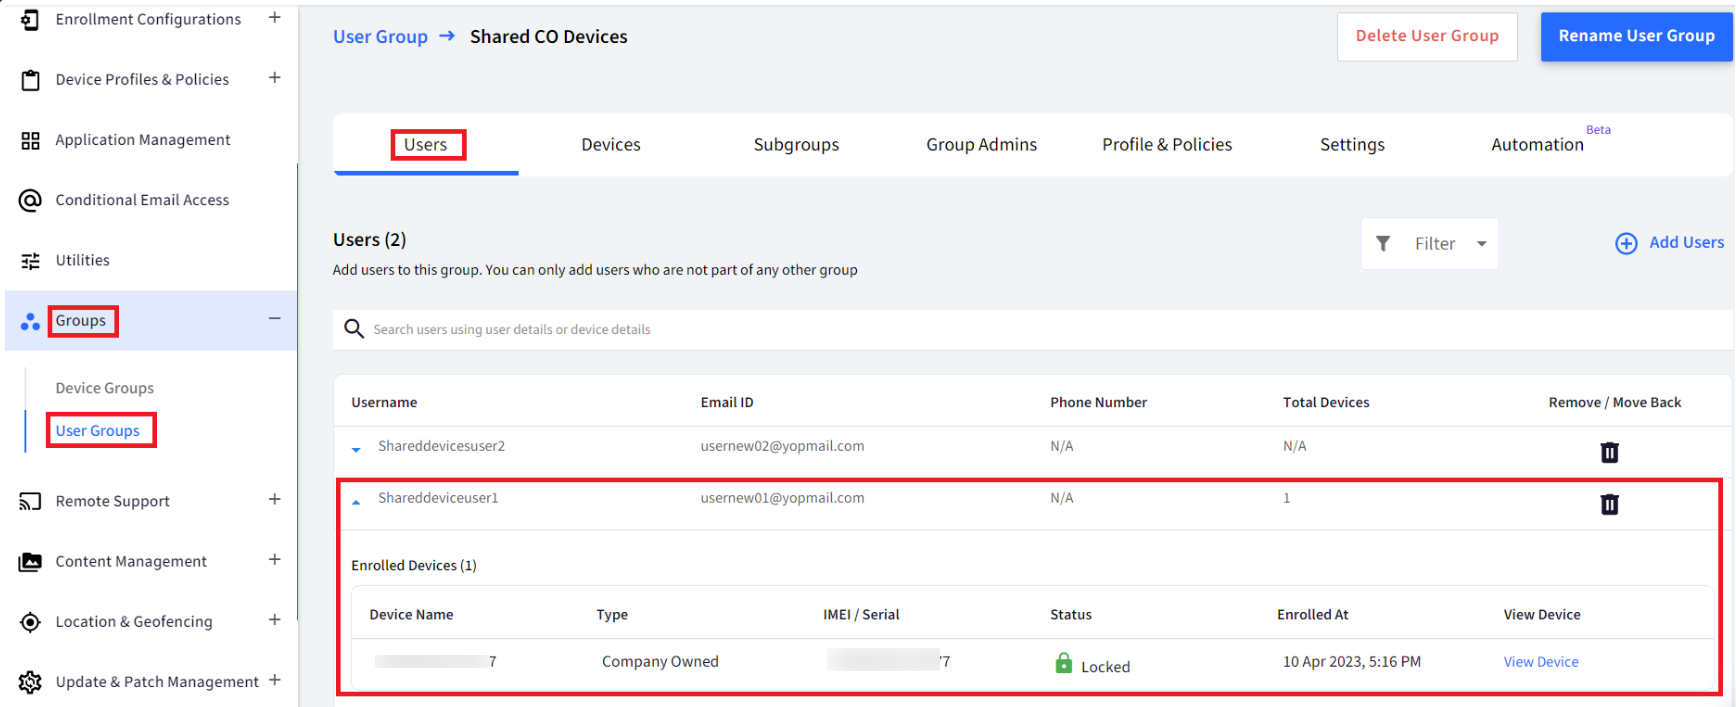
- As soon as you Assign the User to a device, on the device, the end user will see the screen where they will have to enter the email ID and the OTP to authenticate, just like the User Authenticated Enrollment process as shown in Step 5.
- Once the end user authenticates the email ID, the device will become a Shared device, and the users that are part of the User Group will be able to use the device.
Reporting
When there are company-owned devices shared among multiple users, it's crucial to have a reporting system in place. This allows you to monitor user activities on these devices and ensure everything is running smoothly. So, reporting is essential to keep track of what's happening on these devices and address any issues that may arise.
Devices Section
- The User sign-in information will be available in the reports: Download Custom CSV and Download Complete CSV under the Registered Devices section in the Devices Section.


- The Table View on the dashboard can also be customized to show User details.


Reports
You can view and download the User Activity details from Reports.
Navigate to Reports & Workflows > Reports > Screen Time report.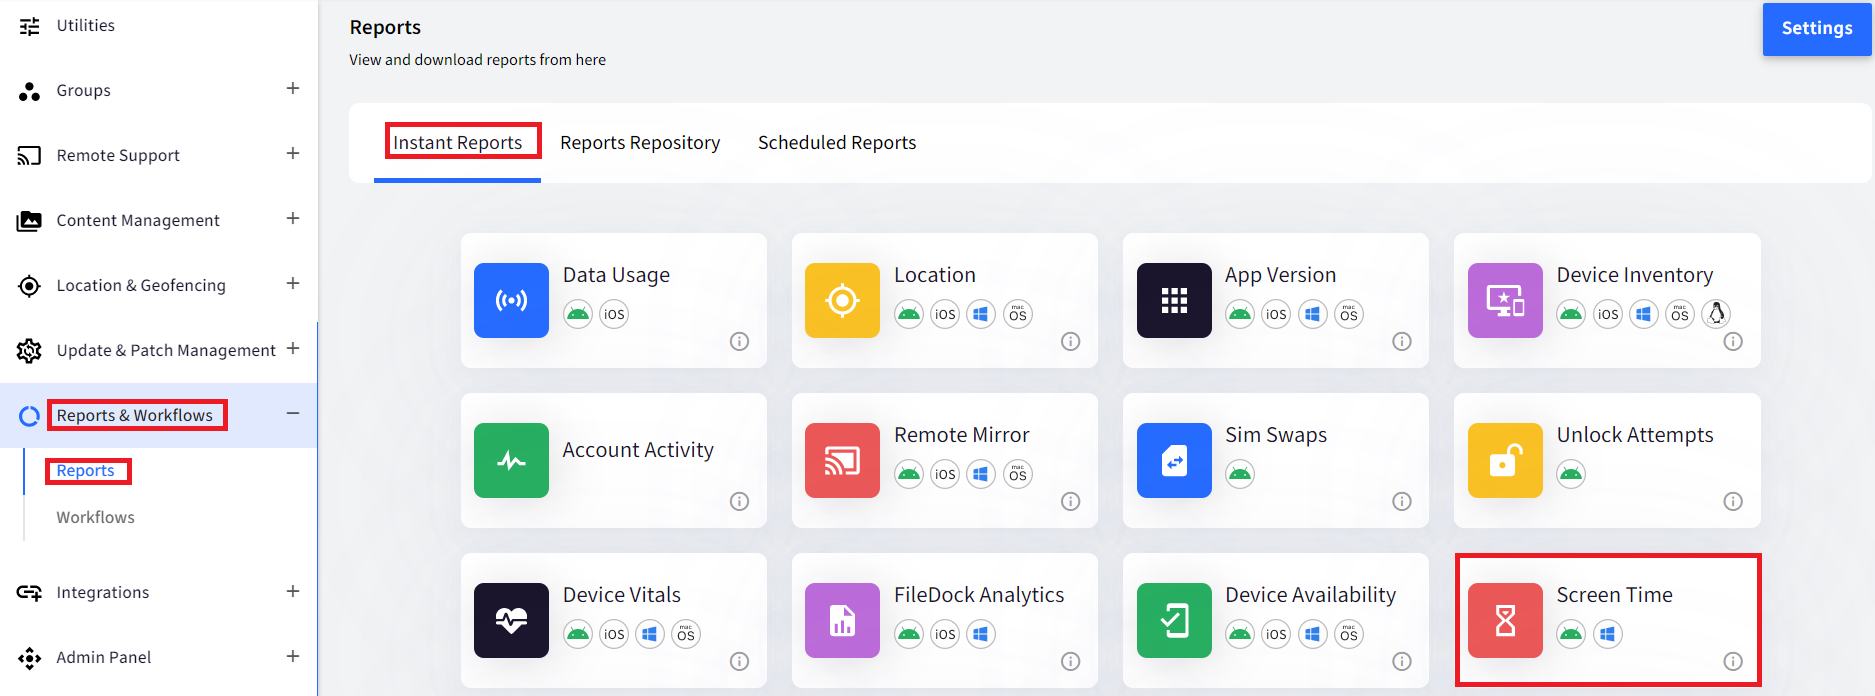
- Select Activity: Select either User Activity or User Activity Details option to view and download the user details of the Shared devices.
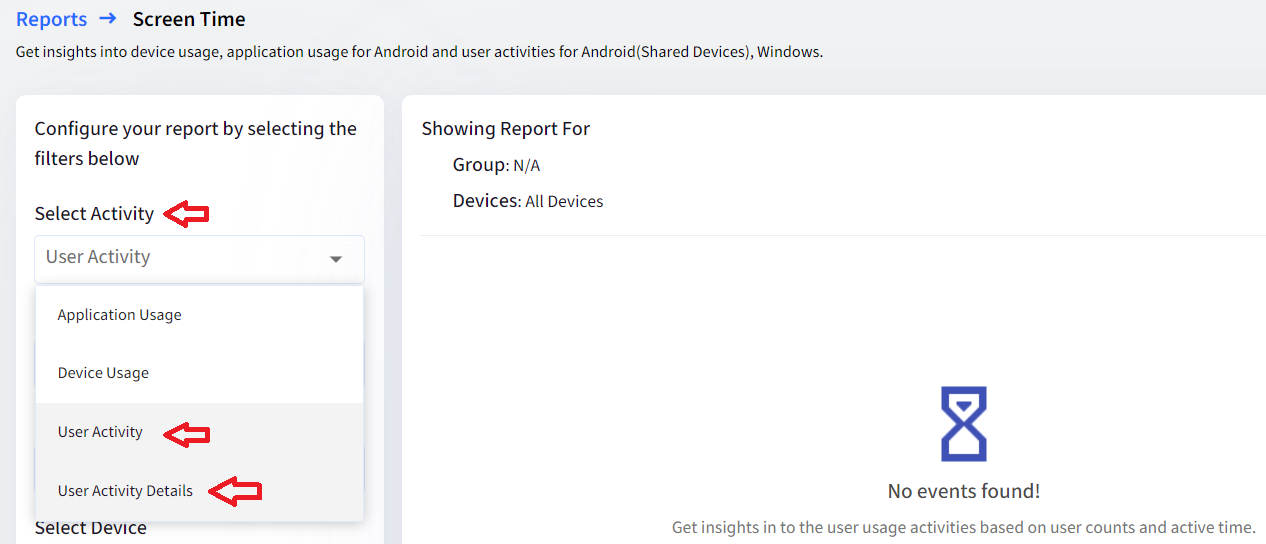
- Select Platform: This field is mandatory. Select Android here to view the details for Shared devices.

- Select User Group: Select the User Group that is created for Shared Company-Owned devices.
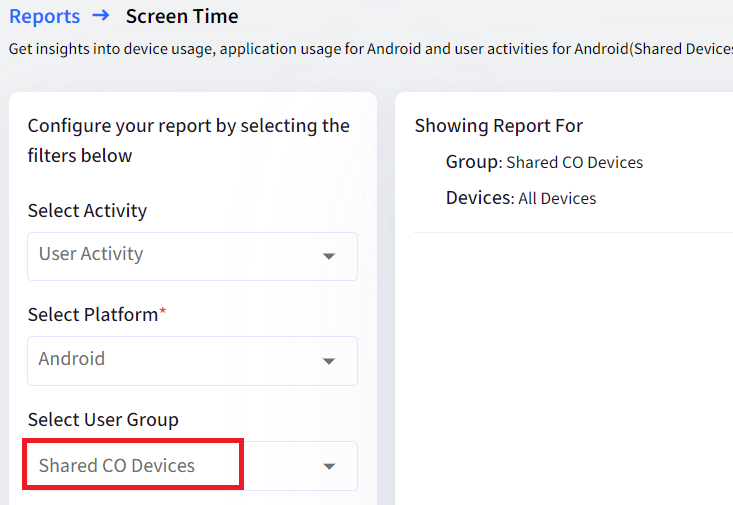
- Select Device: You can filter down the report to a single device or all the devices in the selected User Group.
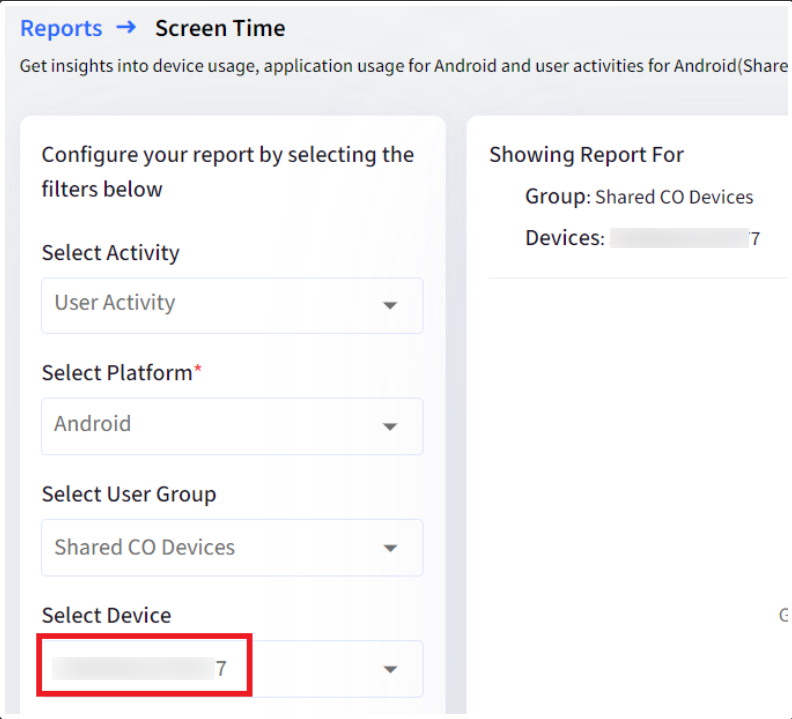
- Select User: You can further filter down the report to show the details about a single user or all the users in the selected User Group.
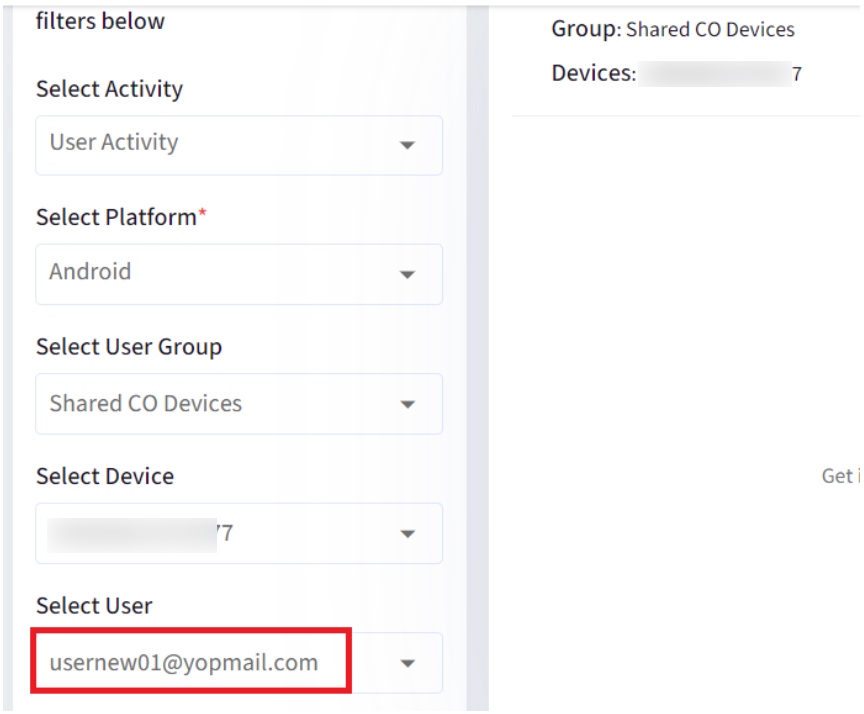
- Select Date Range: Select a date range for which the report should be shown.
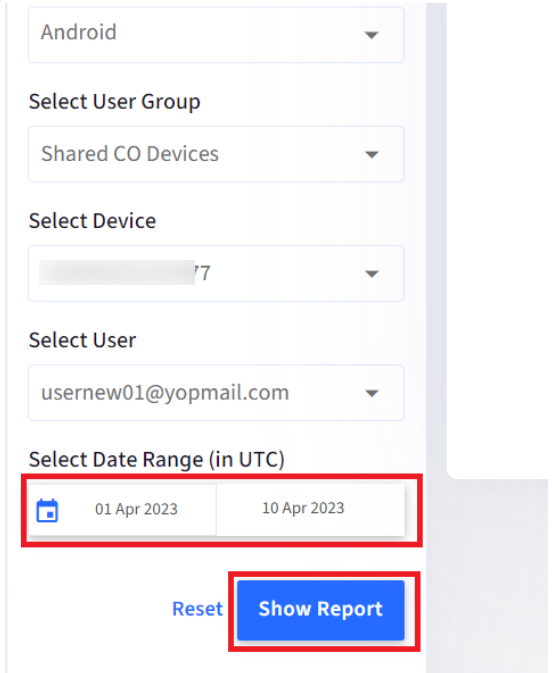
- If the User Activity is selected, then it will show the details of the current user that is signed in on the device.

- Clicking on the eye icon under Actions will show further details of the User Activity.

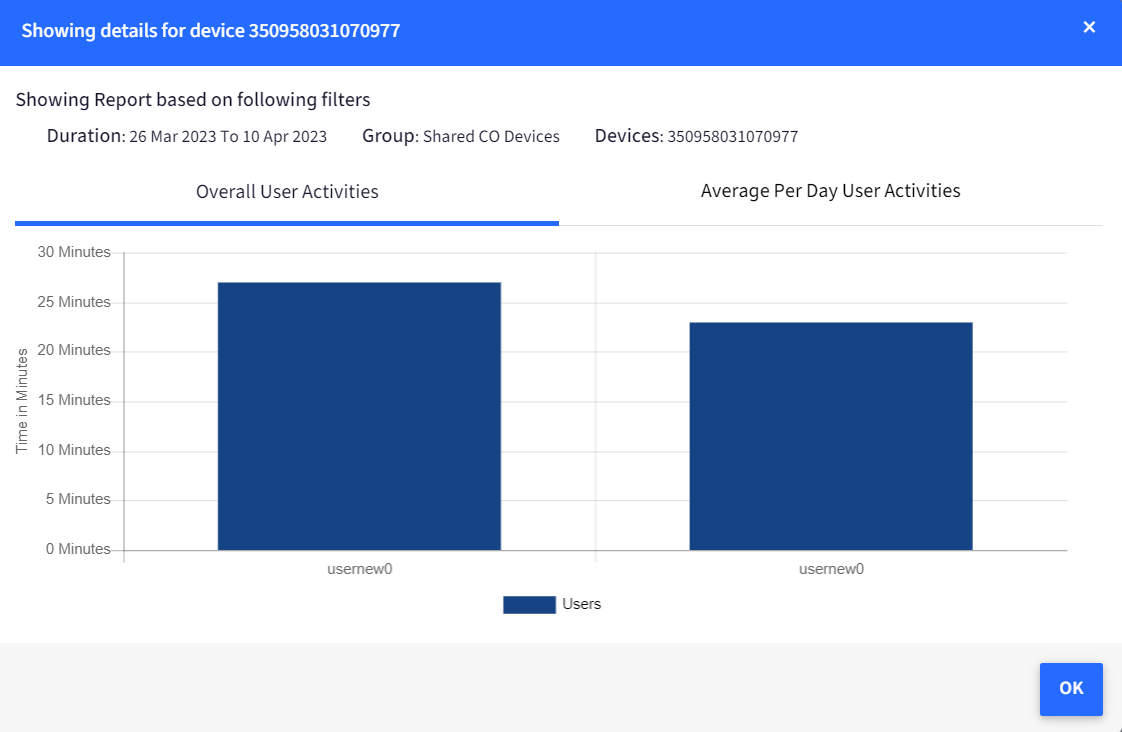
- Clicking on the Download icon under Actions will download the report just for the selected device/user.

- Download report: Clicking on this button will download the complete report for all the devices that are part of the selected User Group.
- Schedule Report: This will allow you to receive periodic User Activity reports via email.
- Clicking on the eye icon under Actions will show further details of the User Activity.
- If the User Activity Details option is selected, then the report will show the data for all the users that logged in or out from the device. 
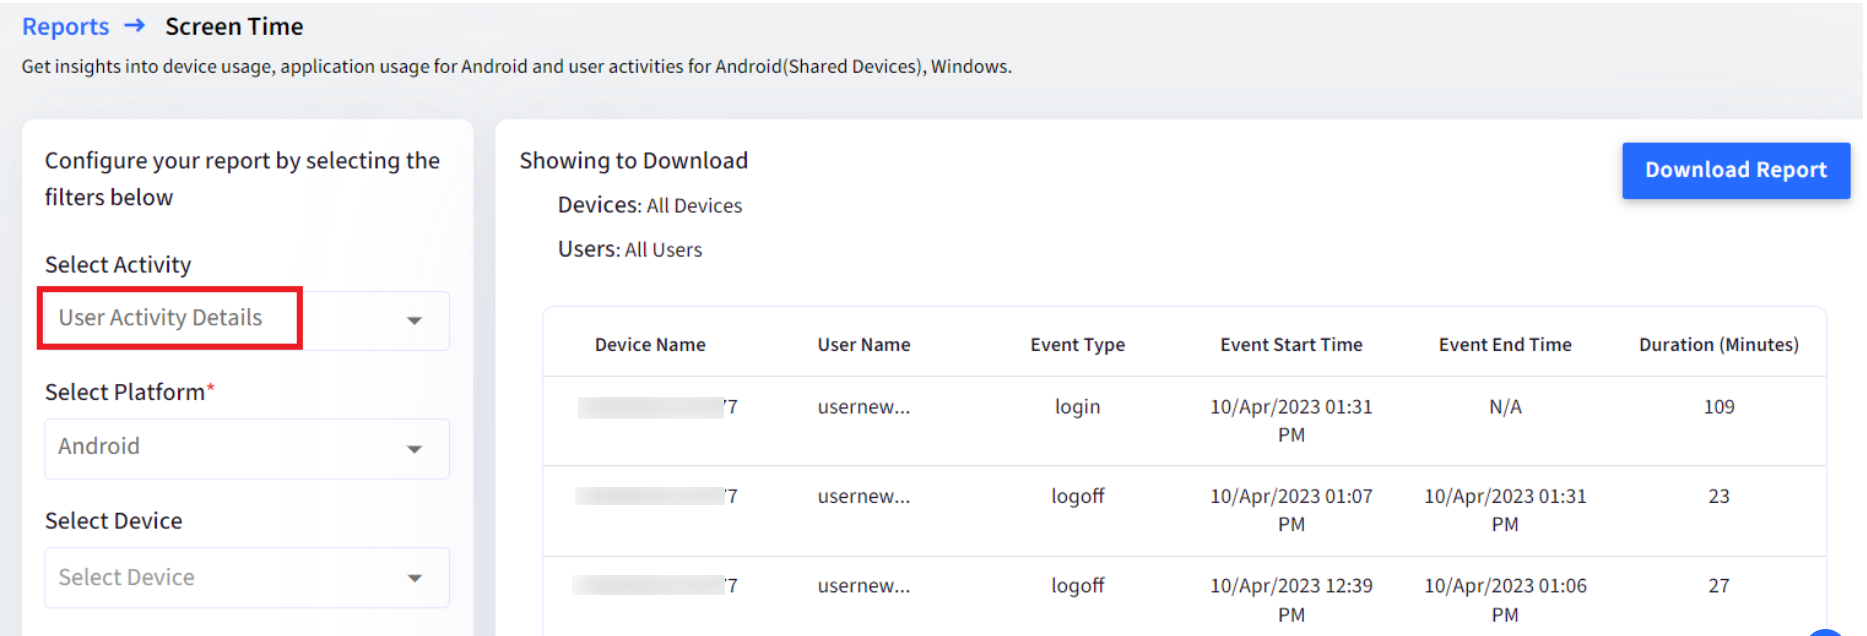
- You can filter down the User Activity Details report further for a single Device, User and also based on the Event type: Login, Logoff or All.
- You can also download the User Activity Details report by clicking on the Download Report button.


