An additional feature to Reports is to be able to schedule them at set intervals so as to get alerts over email and also enable downloading them all for business use. With the Scheduled Reports feature on Scalefusion Dashboard, admins can create a schedule for a report, receive it over email, download it as CSV and also perform other actions.
Let us learn in the document how all this can be achieved.
Who can access
- License Plan: Scheduled reports will be accessible to those who have subscribed to Legacy Enterprise or Enterprise Plan. For those who are subscribed to plans other than this, the icon to upgrade would be available.
- Roles: Account Owner and Co-account manager will have access to Scheduled reports and Report Repository. Those who are in a custom role will get access to Scheduled Reports if the Scheduled Reports flag is enabled for them in Permissions.
Which Reports can be scheduled?
The following Reports can be scheduled:
- Screen time
- App Version
- Device Availability
- Battery History
- Device On/off
- Location Distance
How Does it Work
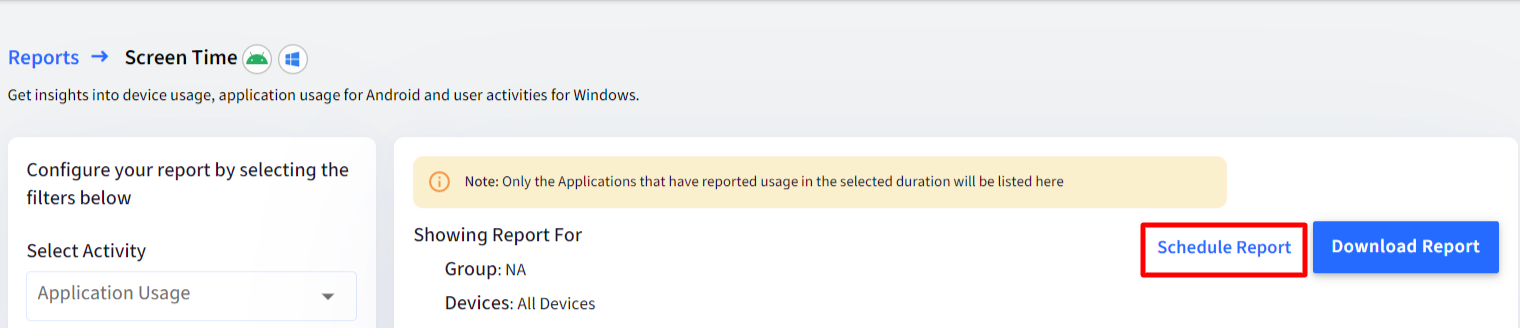
- On the Scalefusion Dashboard in the Reports section, configure Report Schedule via the Schedule Report link present inside reports (listed above) in Instant Reports or through Scheduled Reports > Create Schedule
- Based on the schedule configured, an email would be sent to the selected users with a link to download the report. The report gets downloaded in CSV format. Links in Emails expire after 6 hours.
- The scheduled reports are also listed in the Scheduled Reports section, from where actions like rescheduling, deleting, deactivating etc., can be performed.
- The generated report will also be available under the Reports Repository. The reports will be available in the repository for 30 days only for download. Any link shown in reports repository as a result of a scheduled report is valid for 6 hours only.
Scheduling Report
- Sign in to Scalefusion Dashboard
- Navigate to Reports & Workflows > Reports or click on the Reports icon on the top bar
- There are two ways to create a Report schedule:
- Navigate to the Instant Reports section and click on the Schedule Report link inside each of the reports listed above. The Schedule Report link is visible once you generate a report.
- Navigate to the Scheduled Reports section and click on the button Create schedule

- Navigate to the Instant Reports section and click on the Schedule Report link inside each of the reports listed above. The Schedule Report link is visible once you generate a report.
- Using any of the methods above, a Create Schedule dialog box opens. Refer to the table below to configure the Report scheduleThe fields Report, Select Device Group and Select Device are not available when you schedule a report from the Instant Reports section because they are already selected as filters there.
- After configuring all settings for the Report schedule, click Save. Email will be sent to the selected user(s) at set intervals with a link to download the report.
| Fields | Description |
| Name | Enter a name with which the schedule is identified |
| Report | Select the report from the drop-down for which you want to configure the Report Schedule This field is available only when you are creating a schedule from the Scheduled Reports section |
| Show Report For | For the App Version report, select whether the report has to be scheduled for (Select one from the following):
|
| Select Device Group | Lists Device Groups and Sub-Groups in which devices are present. Select a device group/sub-group. After scheduling the report, if the device group gets empty, that is, devices are removed from the group, then the scheduled report is marked as invalid and does not get generated next time. |
| Select Device | Lists all the enrolled devices. If a Group is selected, then it lists only the devices which are part of that group. Select a device. If the list of devices is long, you can even search devices by name, IMEI number, serial number etc. |
| Frequency | Select the frequency at which the reports should be generated from the following:
|
| Time Zone | Select the time zone from the drop-down |
| Time | Select the time at which the report should be scheduled to be sent |
| Send To | Select the admin role(s) to whom the scheduled reports should be sent:
|
| Subject | Give the subject of the email. By default, the subject is set as Report Name - DateTime that you select. This can be changed. |
| Email Body | In the text area, the Email body can be composed. There is already a pre-composed text specified here which can be replaced with the text you want to send as an email, along with a download link for the report.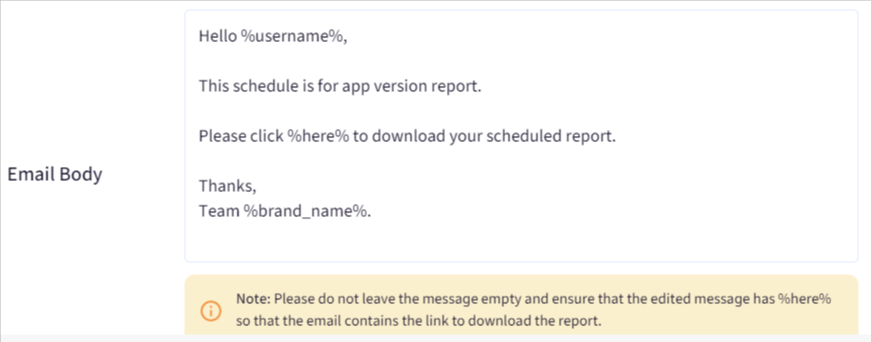 |

View Scheduled Reports
All the scheduled reports can be viewed under Scheduled Reports with summarized information of the report schedule:
- Name
- Report Type
- Frequency
- Last Run
- Next Run
- Created On
- Other details as per selections made while configuring the Reports' schedule

Actions on Scheduled Reports
The following Actions can be performed over a scheduled report. These are accessible by clicking on the three dots under the Actions menu:.png)
- Reschedule: This opens the Create Schedule dialog box where you can make changes to the reports' schedule
- Deactivate: If you deactivate, the Scheduled Report will not be executed
- Soft Delete: The scheduled report will get deleted from the Scheduled Reports section, but it will still be available in the Reports Repository
- Delete: The scheduled report will get deleted both from the Scheduled Reports section as well as the Reports Repository section. After deleting, the user will not be able to download the report from the download link in the email.
Report Repository
All the reports generated as per schedule are listed under Reports Repository along with the following additional details, as shown in the screenshot below. The reports are available in the repository only for 30 days. After that, they automatically get deleted.
The following actions can be performed on scheduled reports from the Reports Repository:
- Download: Clicking on the download icon downloads the report in CSV format.
- Delete: Deletes the report from the Reports Repository. After deleting from here, the user will not be able to download that particular report from the download link in the email.
- Once you have Scheduled a report on the dashboard and an email is sent as per the schedule. This email has a link to download the report with a validity of 30 days.
- In case you are downloading a scheduled report from the Report Repository and there was a timeout. In such cases, an email will be sent to the Account owner's email inbox. This email has a link to download the report with a validity of 48 hours.