ROPC (Resource Owner Password Credentials) is an authentication method that allows users to sign in to OneIdP using their Microsoft Entra ID credentials.
With ROPC, the user's Microsoft Entra ID username and password are validated directly with Microsoft Entra ID. This allows organizations using Microsoft Entra ID as their identity source to authenticate users through the OneIdP login page using their existing Entra ID password.
OneIdP also supports configuring ROPC with Microsoft Entra ID Conditional Access policies using a custom API and application registration. This helps organizations using Conditional Access policies manage ROPC authentication without affecting the background authentication required by OneIdP.
To use ROPC as an Identity Provider, you need to follow these steps:
Step 1: Create an application registration and configure a custom API.
Step 2: Create another application registration that uses the custom API and its scope.
Step 3: Exclude the newly created custom API from Conditional Access policies that are applied to All Cloud Apps.
Step 4: Configure Microsoft Entra ID ROPC as an Identity Provider on the Scalefusion Dashboard.
These are explained in detail below
Step 1: Create an Application Registration with a Custom API
Log in to the Microsoft Entra Portal: (https://portal.azure.com/#home)
Navigate to App registrations.
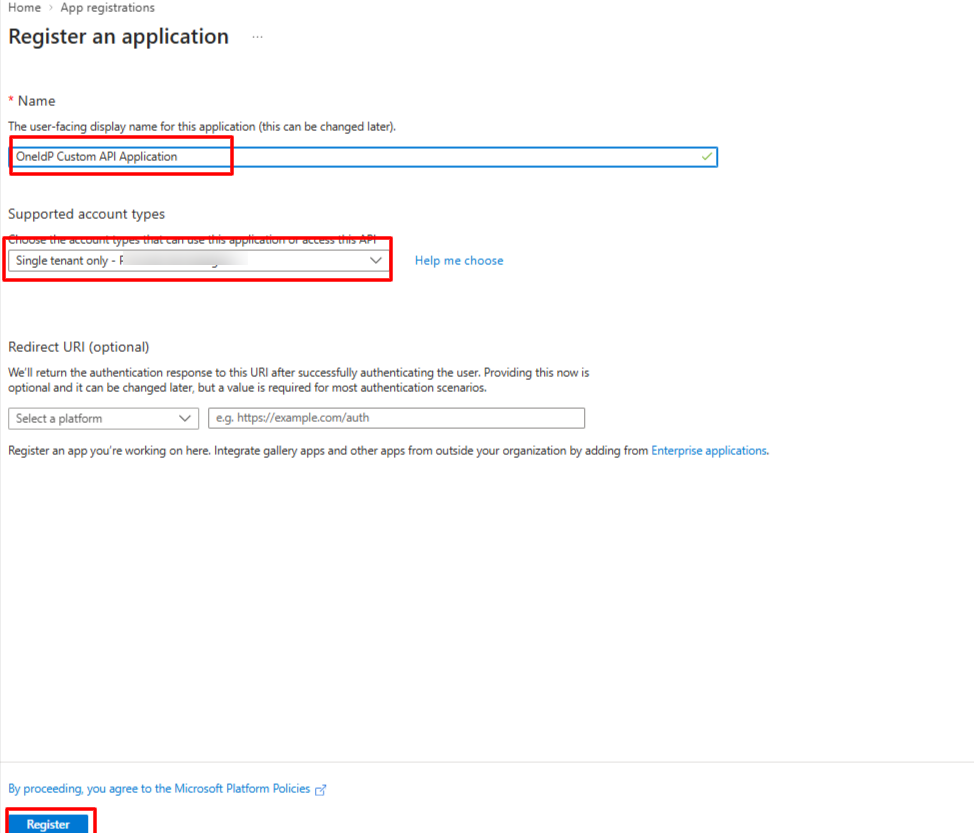
Click + New registration and enter the following details and click Register.
a. Name: OneIdP Custom API Application
b. Supported account types: Accounts in this organizational directory only (Single tenant)
c. Redirect URI: Leave blank (do not configure)
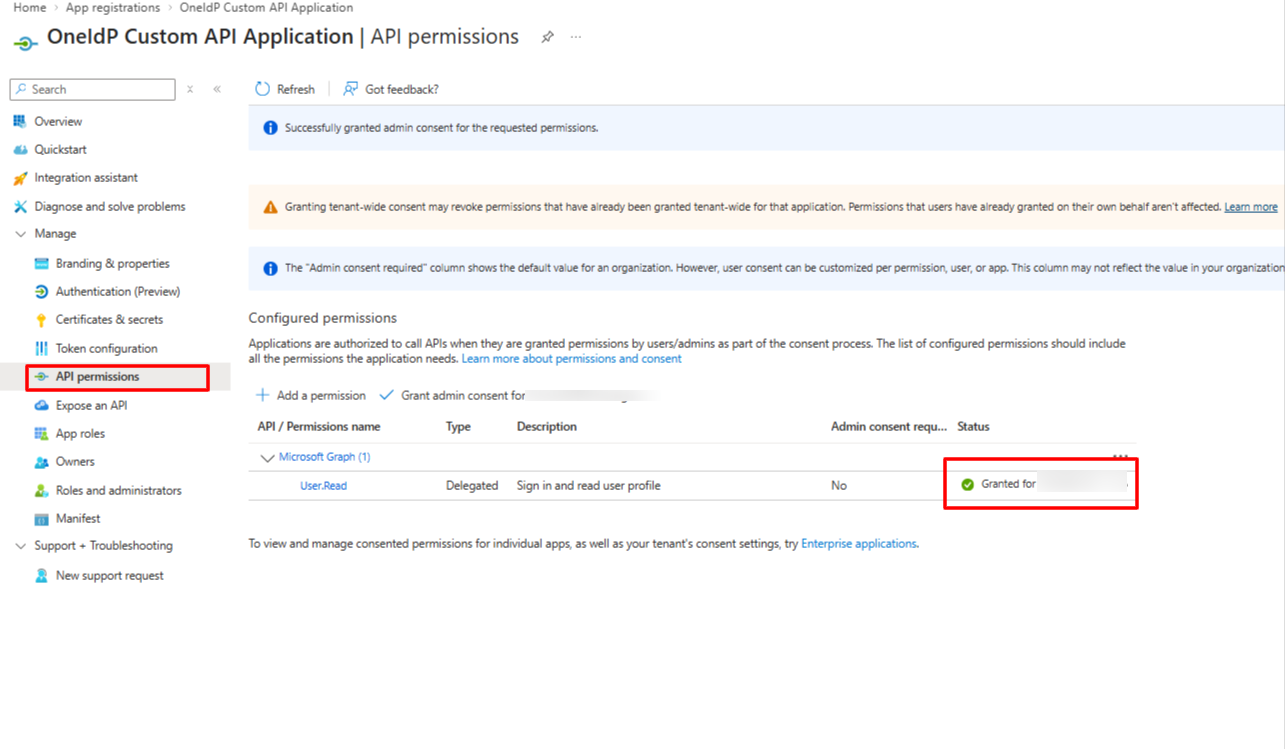
4. In the left sidebar, select API permissions and ensure admin consent is granted for User.Read
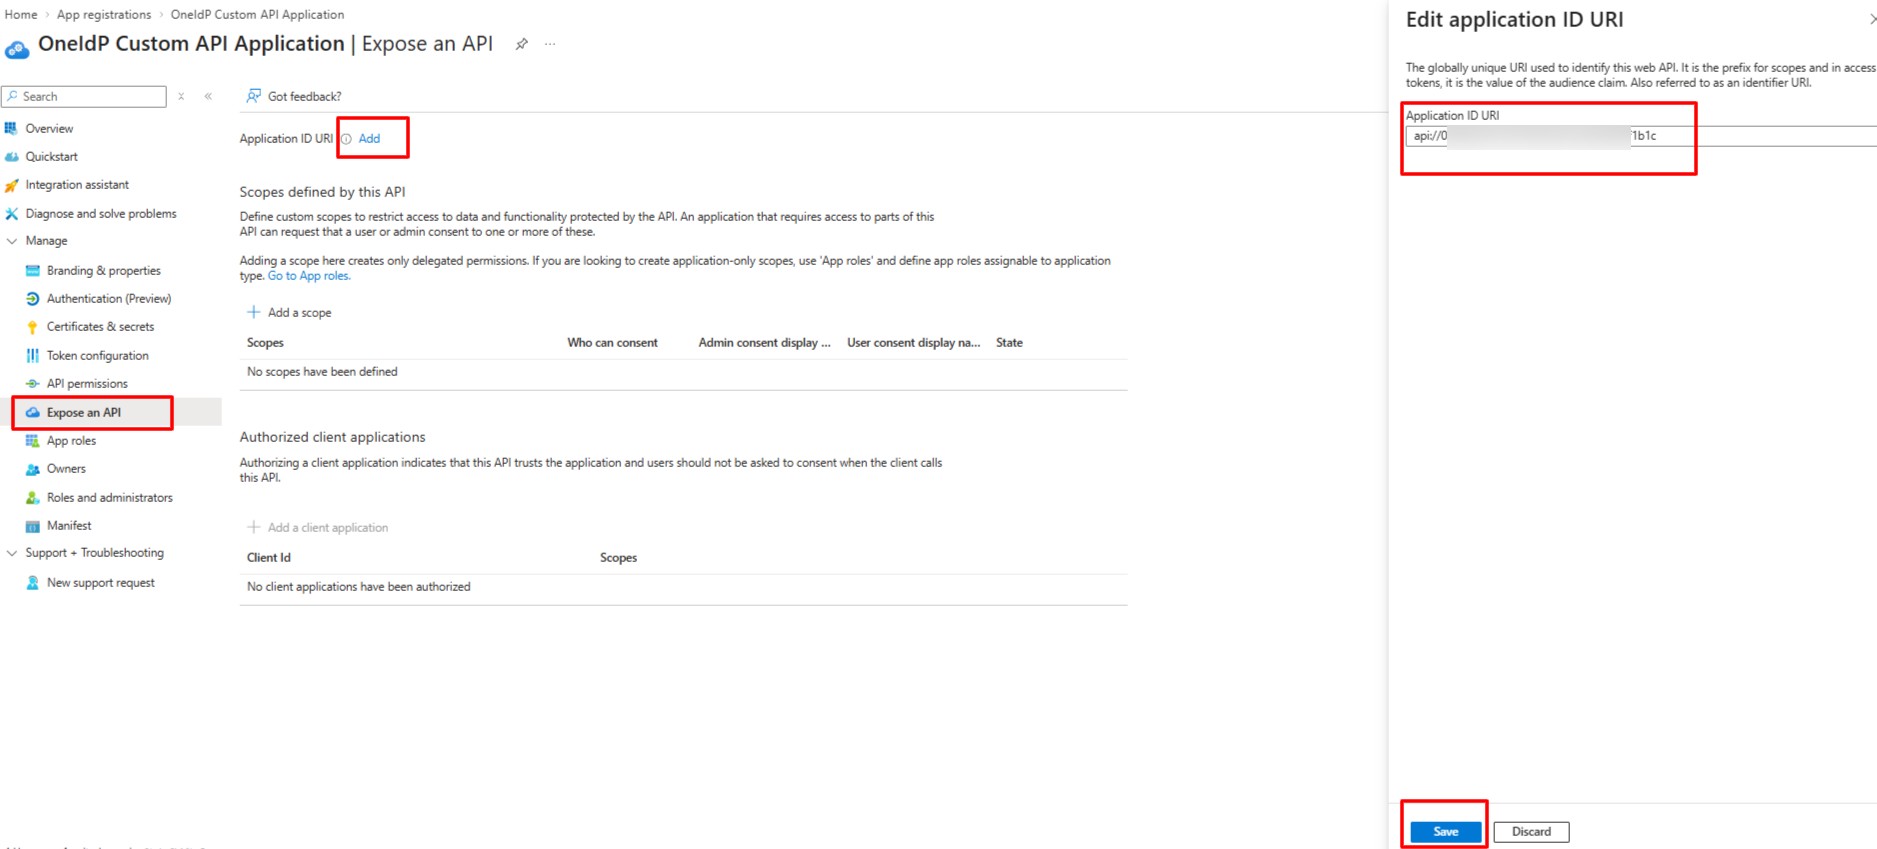
5. In the left sidebar, select Expose an API. Click Add next to Application ID URI (accept the default value) and click Save.
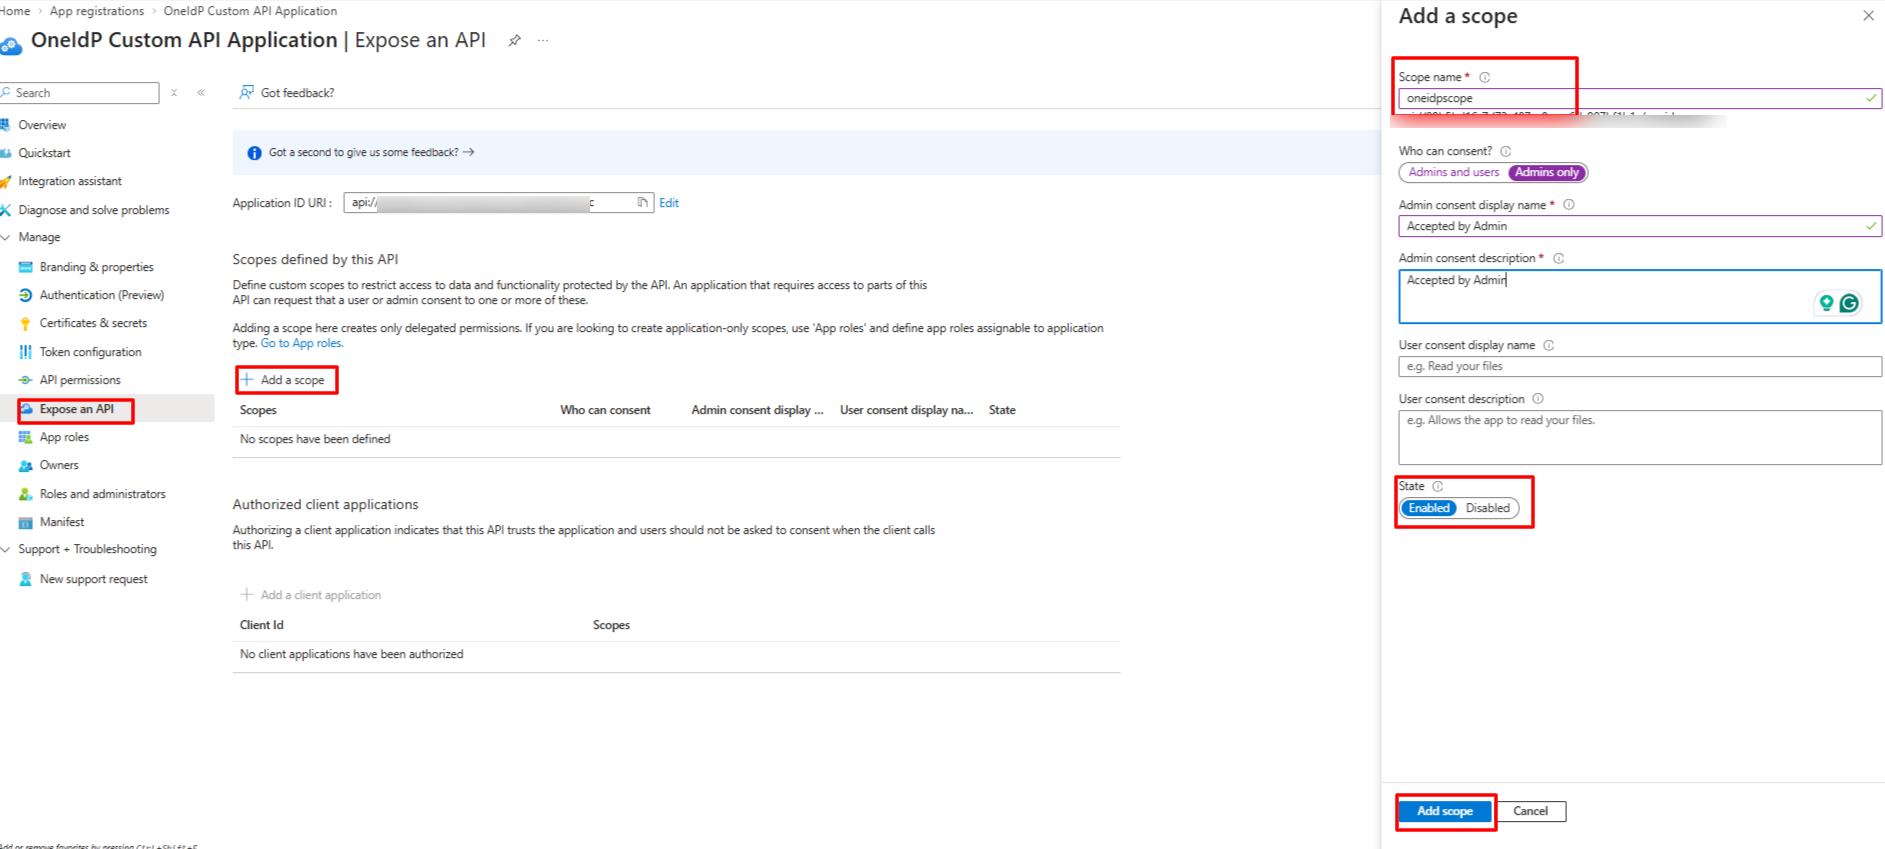
6. Click + Add a scope and configure:
a. Scope name: oneidpscope
b. Who can consent: Admin and users (or Admins only)
c. Fill in the required Admin consent display name and description.(ex - Accepted by Admin )
d. Ensure State is set to Enabled.
e. Click Add scope.
7. Copy the generated Scope URI and save it for your OneIdP Identity Provider configuration.
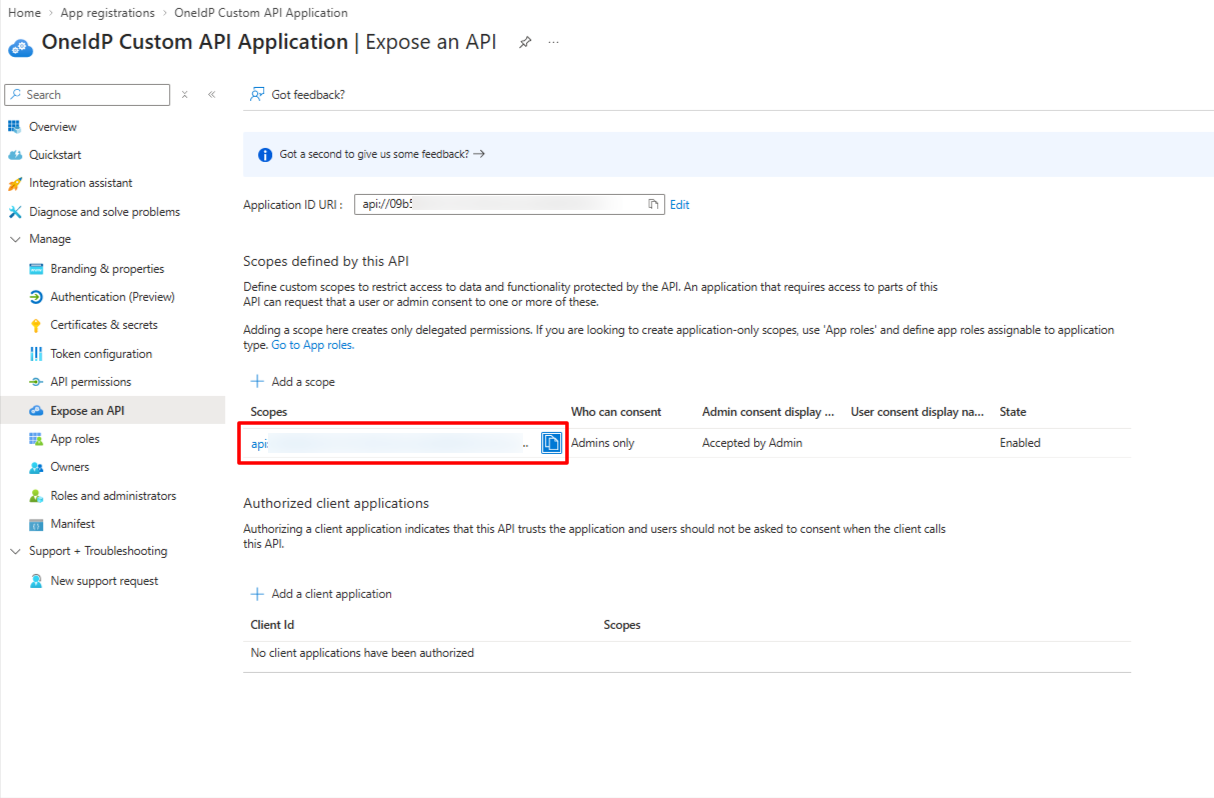
This application allows the application that calls the custom scope to borrow additional API permissions.
Step 2: Create an Application Registration to Call a Custom Scope
Log in to the Microsoft Entra Portal: (https://portal.azure.com/#home)
Navigate to App registrations.
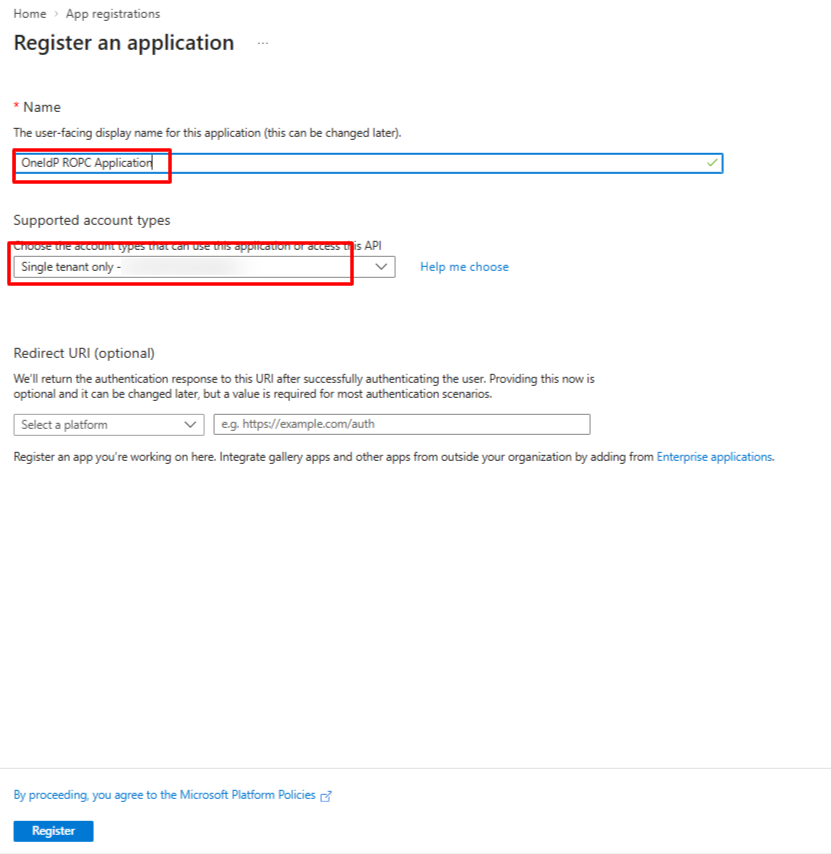
Click + New registration and enter the following details and Click Register.
a. Name: OneIdP ROPC Application
b. Supported account types: Accounts in this organizational directory only (Single tenant)
c. Redirect URI: Leave blank (do not configure)
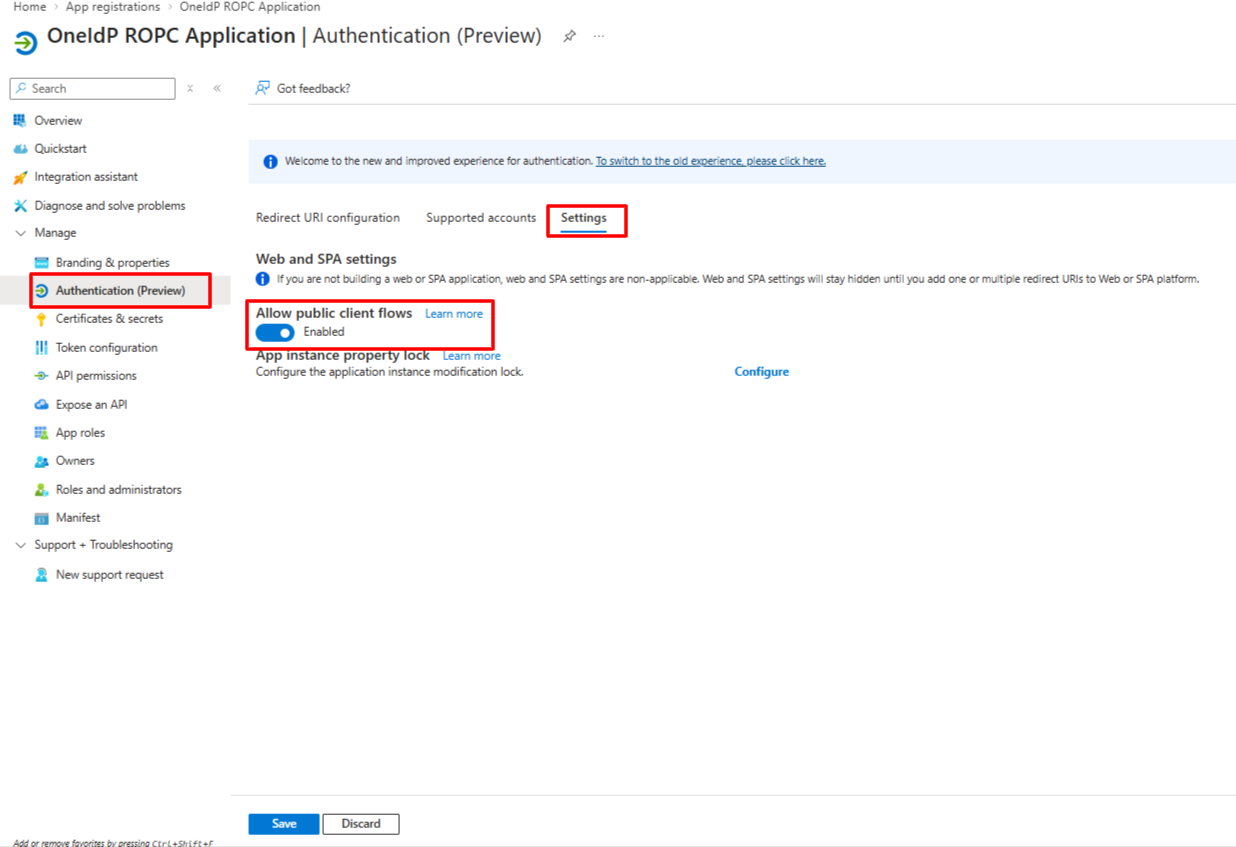
4. Enable Public Client Flows:
a. In the left sidebar, select Authentication.
b. Under Settings, enable the toggle Allow public client flows,
c. Click Save.
5. Configure API Permissions:
a. In the left sidebar, select API permissions. Click Grant admin consent for User.Read.
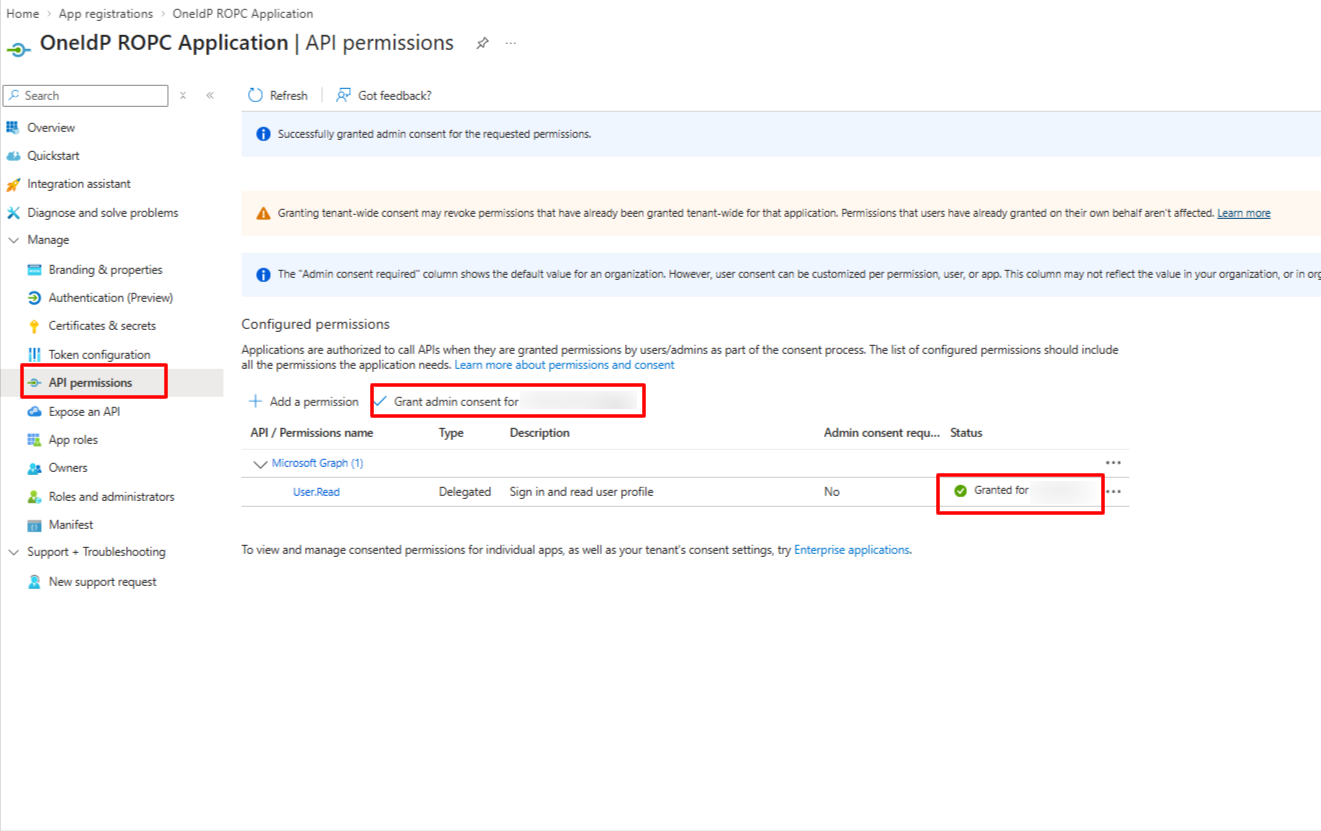
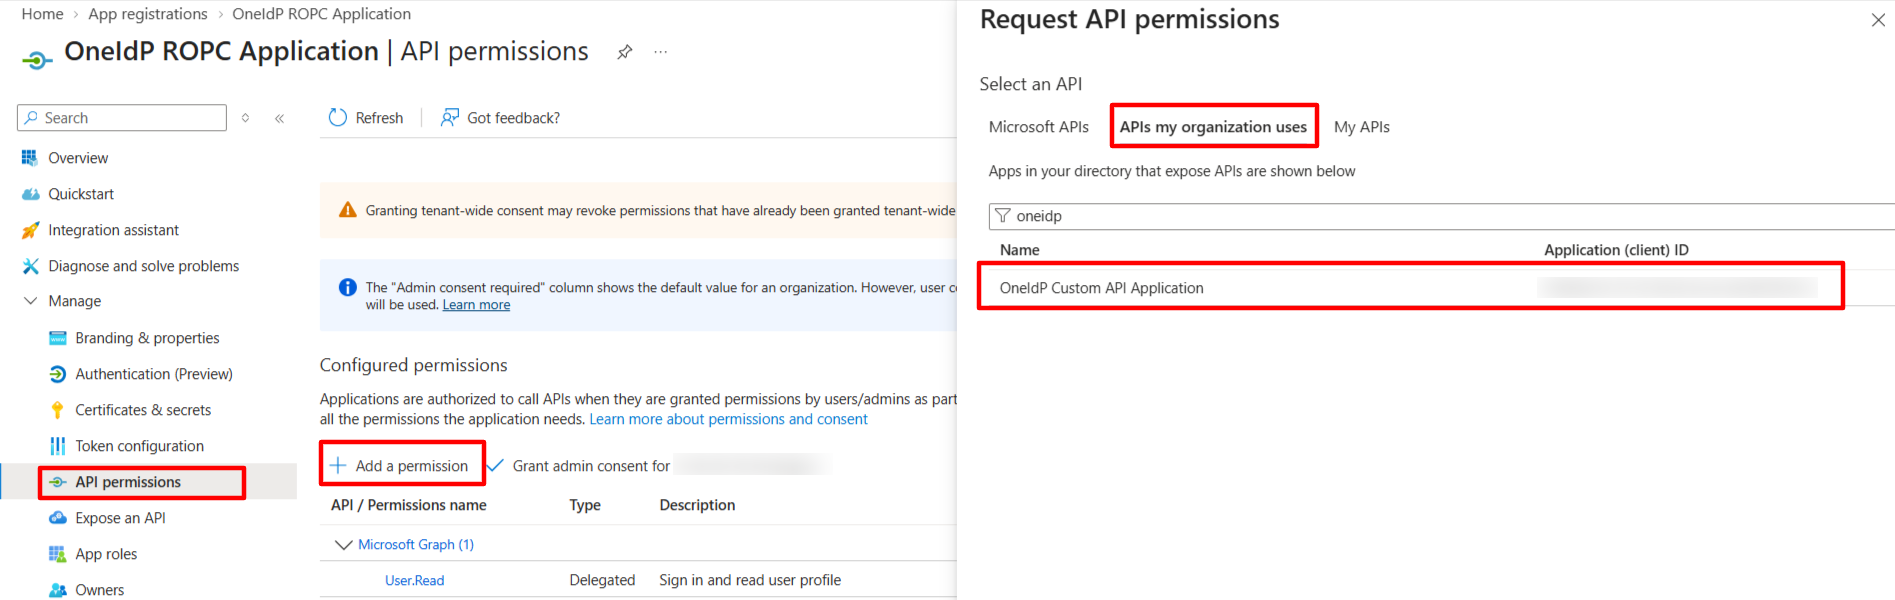
b. Click + Add a permission and choose the APIs my organization uses tab. Search for and select OneIdP Custom API Application.
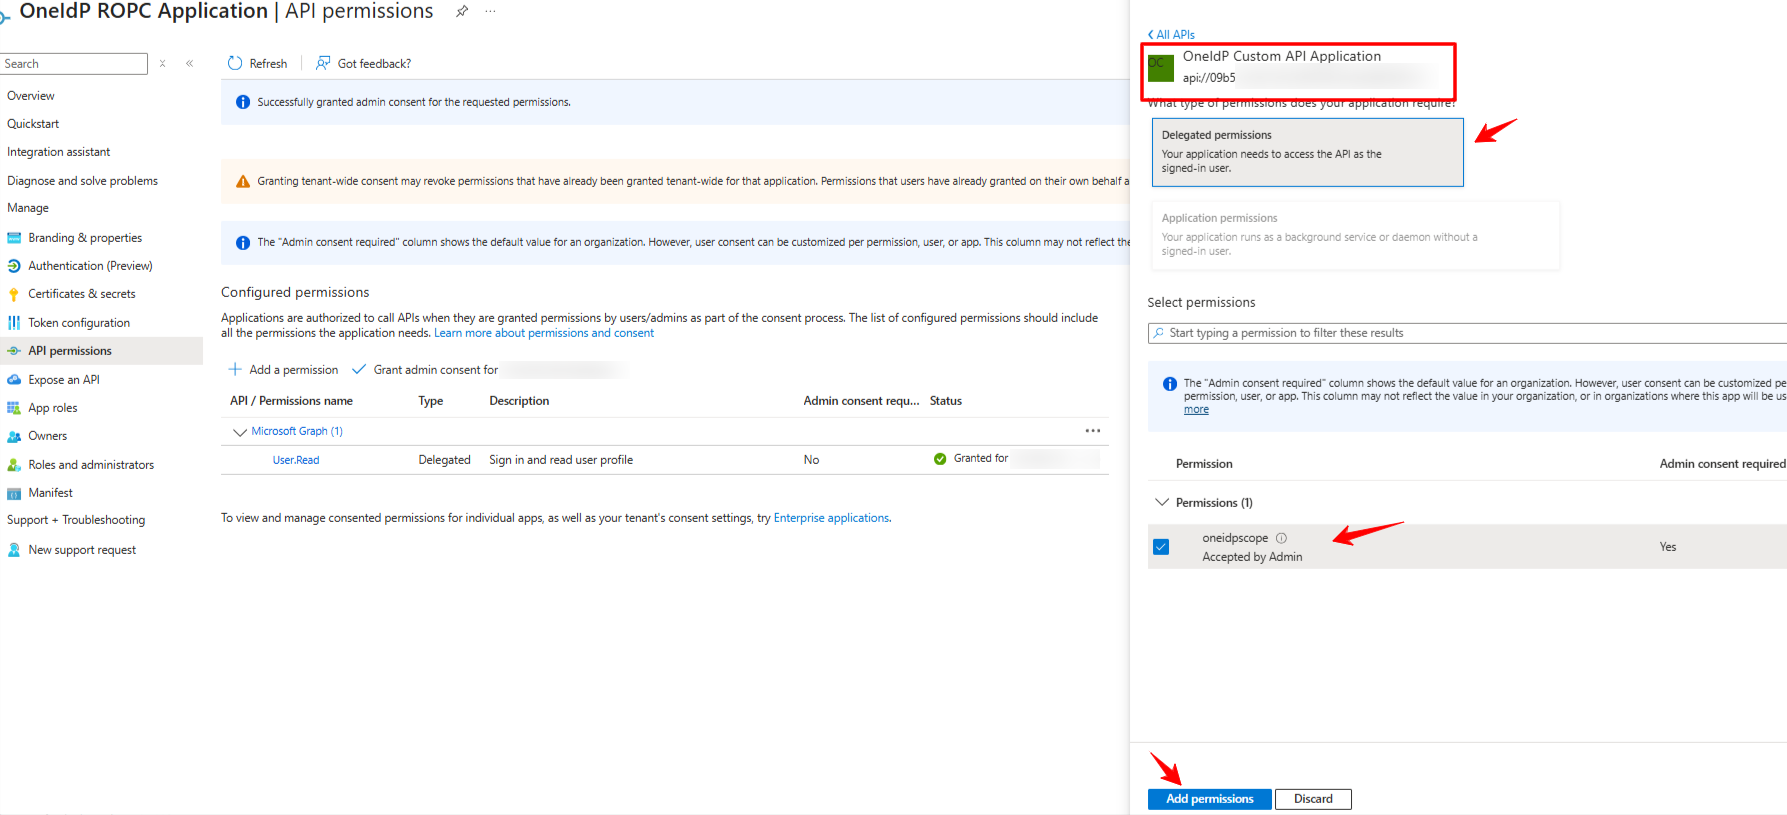
Select Delegated permissions, check the box for oneidpscope, and click Add permissions.
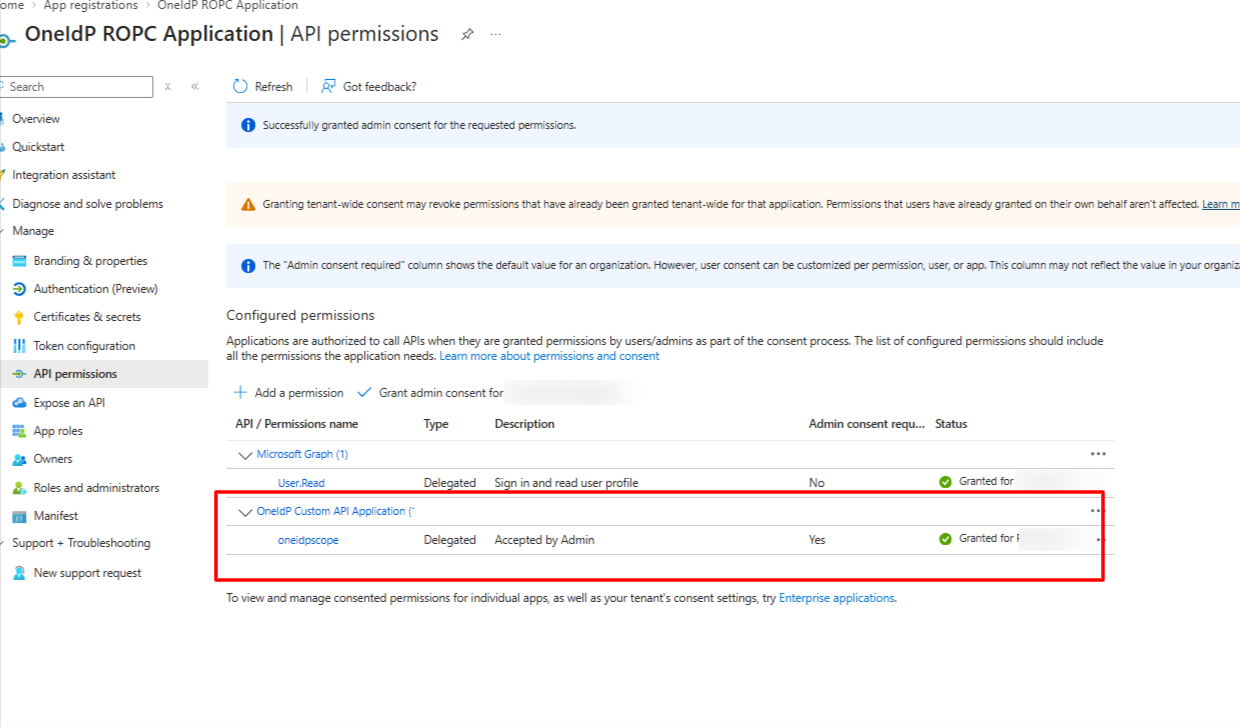
d. Click Grant admin consent for the same.
Step 3: Excluding the Custom API app from Conditional Access Policies
Log in to the Microsoft Entra Portal. Navigate to Microsoft Entra Conditional Access.
Locate and click on any active policy where Target resources include All cloud apps.
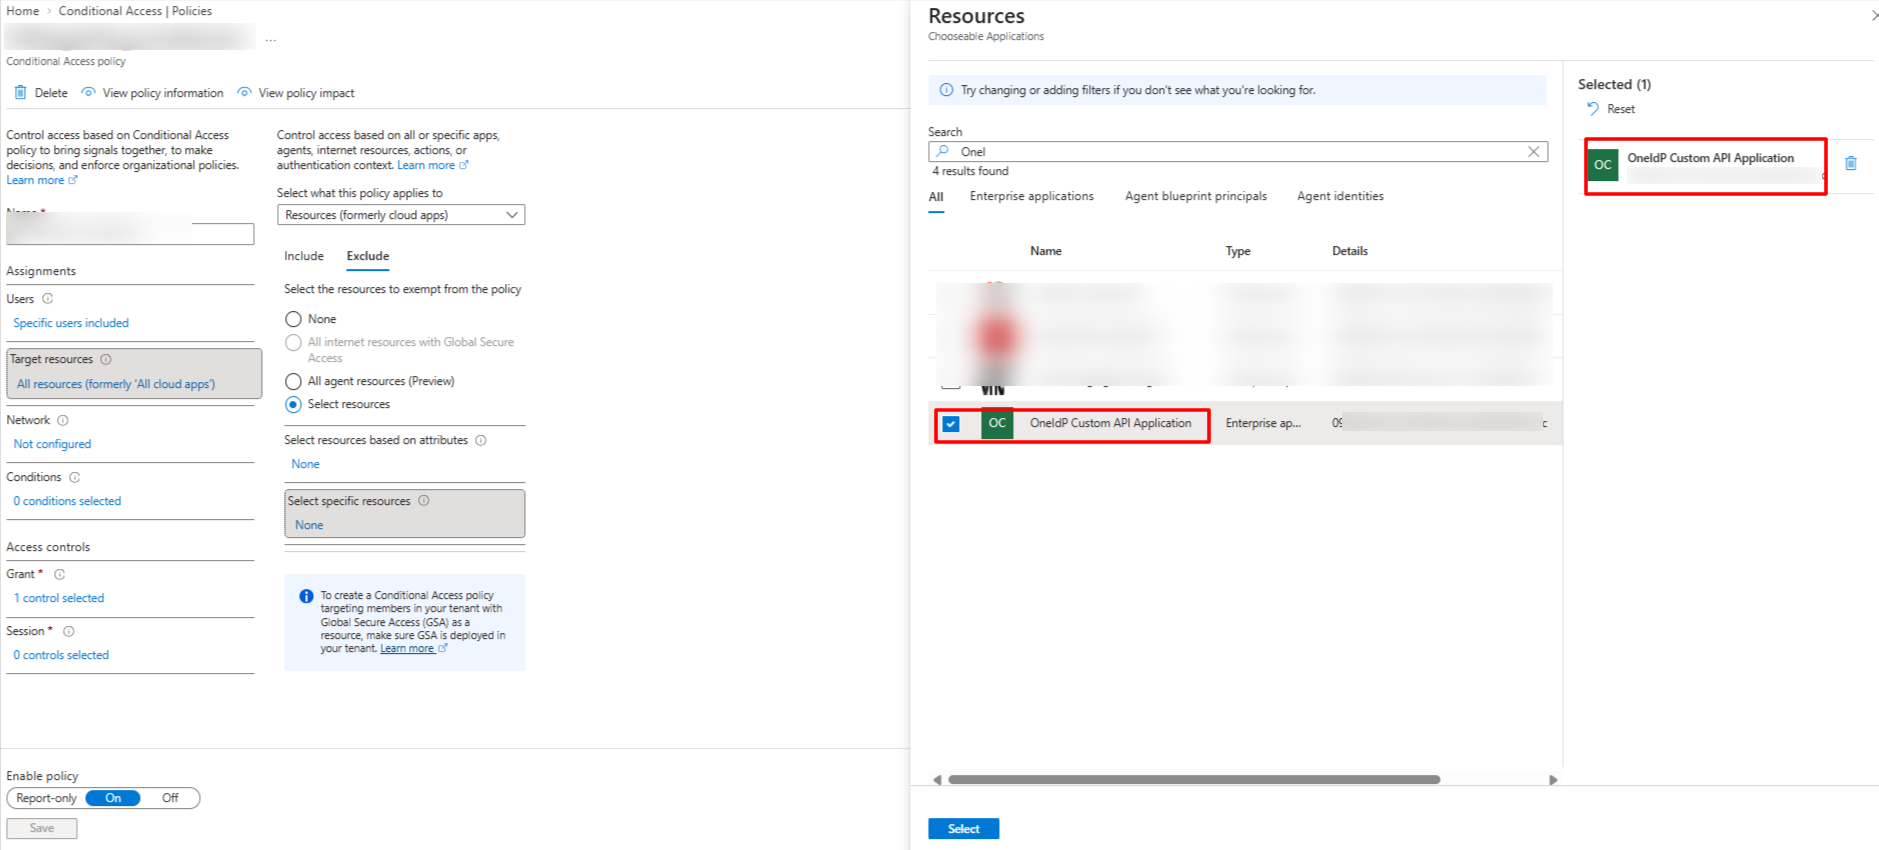
Under Target resources, click the Exclude tab.
Select Exclude cloud apps > Select Specific Resources.
Search for and select OneIdP Custom API Application
Click Select and then click Save.
Repeat this exclusion process for any other active Conditional Access policies scoped to All cloud apps.
Step 4: Configure Microsoft Entra ID ROPC as an Identity Provider on the Scalefusion Dashboard
Navigate to OneIdP > Identity Provider.
Click the New Provider button.
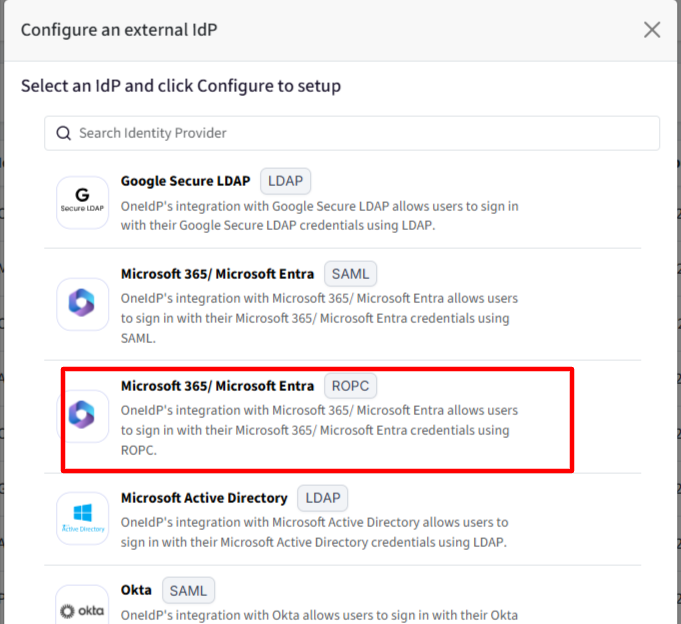
Select Microsoft 365/Microsoft Entra – ROPC and click Configure.
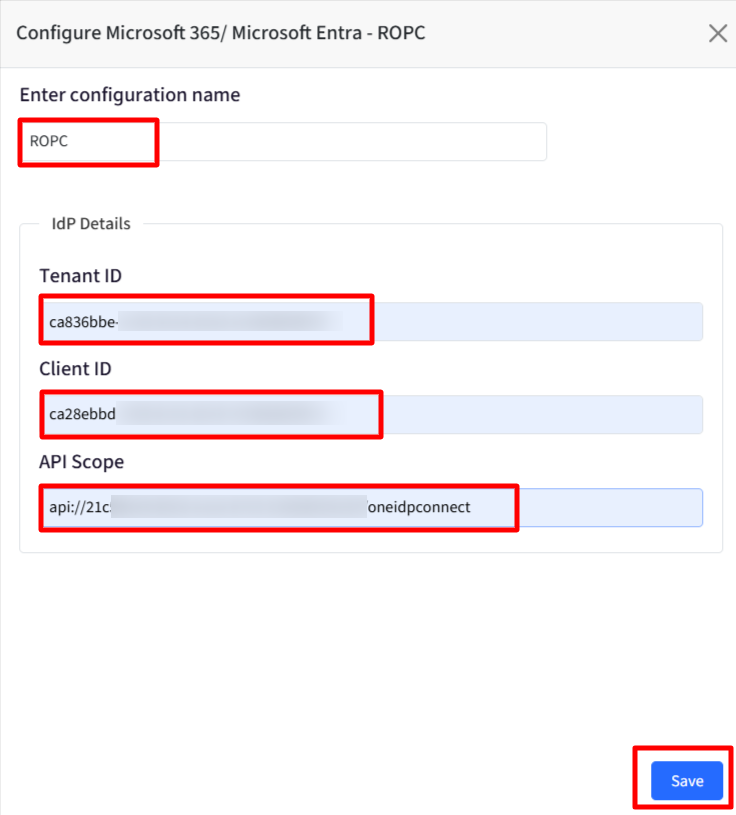
Enter a name for the Identity Provider configuration to easily identify it.
Enter the Tenant ID of your Microsoft Entra ID account.
Enter the Client ID of the OneIdP ROPC Application created in Step 2.
API Scope: Enter the API scope configured in the OneIdP Custom API Application created in Step 1.
Click Save to complete the configuration.
User Login Flow
When the user enters their email on the service login page, they will be redirected to OneIdP. From there, OneIdP will redirect the user to the chosen identity provider (Microsoft 365/ Microsoft Entra - ROPC, in this case) for authentication. Once the identity provider authenticates the user, then user will be asked for OneIdP Compliance. Once the compliance is pass then user can access the service.
Note:
If a user's password is reset from the Microsoft Entra admin portal, the user must set a new password before attempting to log in through OneIdP.
If the user has not completed the password change, authentication through OneIdP will fail, and the user will not be able to log in.