Scalefusion Remote Cast and Control feature allow the admin/ group admin to remotely view and control the device’s screen in real-time. This gives the admin remote access to the registered devices and troubleshoots any issues with the devices which are on the field used by agents or are setup as standalone kiosks.
Before you Begin
- Make sure that you have either an Enterprise Plan or Business Plan subscription, or if you are IN-Trial, then you have requested access for this feature.
- An Android device that has been enrolled in Scalefusion MDM.
- To test Control, please use either Samsung, Sony, LG or one of the devices where we have an OEM partnership.
Feature vs Support Matrix
The following table lists the features and the support matrix,
| Feature | Description | Support |
| Casting device screen | This feature allows you to mirror the screen of remote Android device. | Any Android 5.1 Device |
| Remote Control | Remotely Control the device screen. |
|
| VoIP Calling | Make a voice Call to the Device | Any Android 5.1 Device |
| Keyboard & Clipboard Redirection | This feature allows you to use your computer's keyboard to type in a controlled device's input fields. | Only Remote Control supported devices |
| Sync Files | Allows admin/ group admin to push a file from their system to a connected device and/or pull a file from a connected device to their system even when a remote cast session is not initiated. | Any Android device version 5.1 or above |
Step 1: Install & Setup Remote Cast Android Client
The first step to use Remote Cast on Android devices is to install & setup the client. Please follow the steps below to do the same,
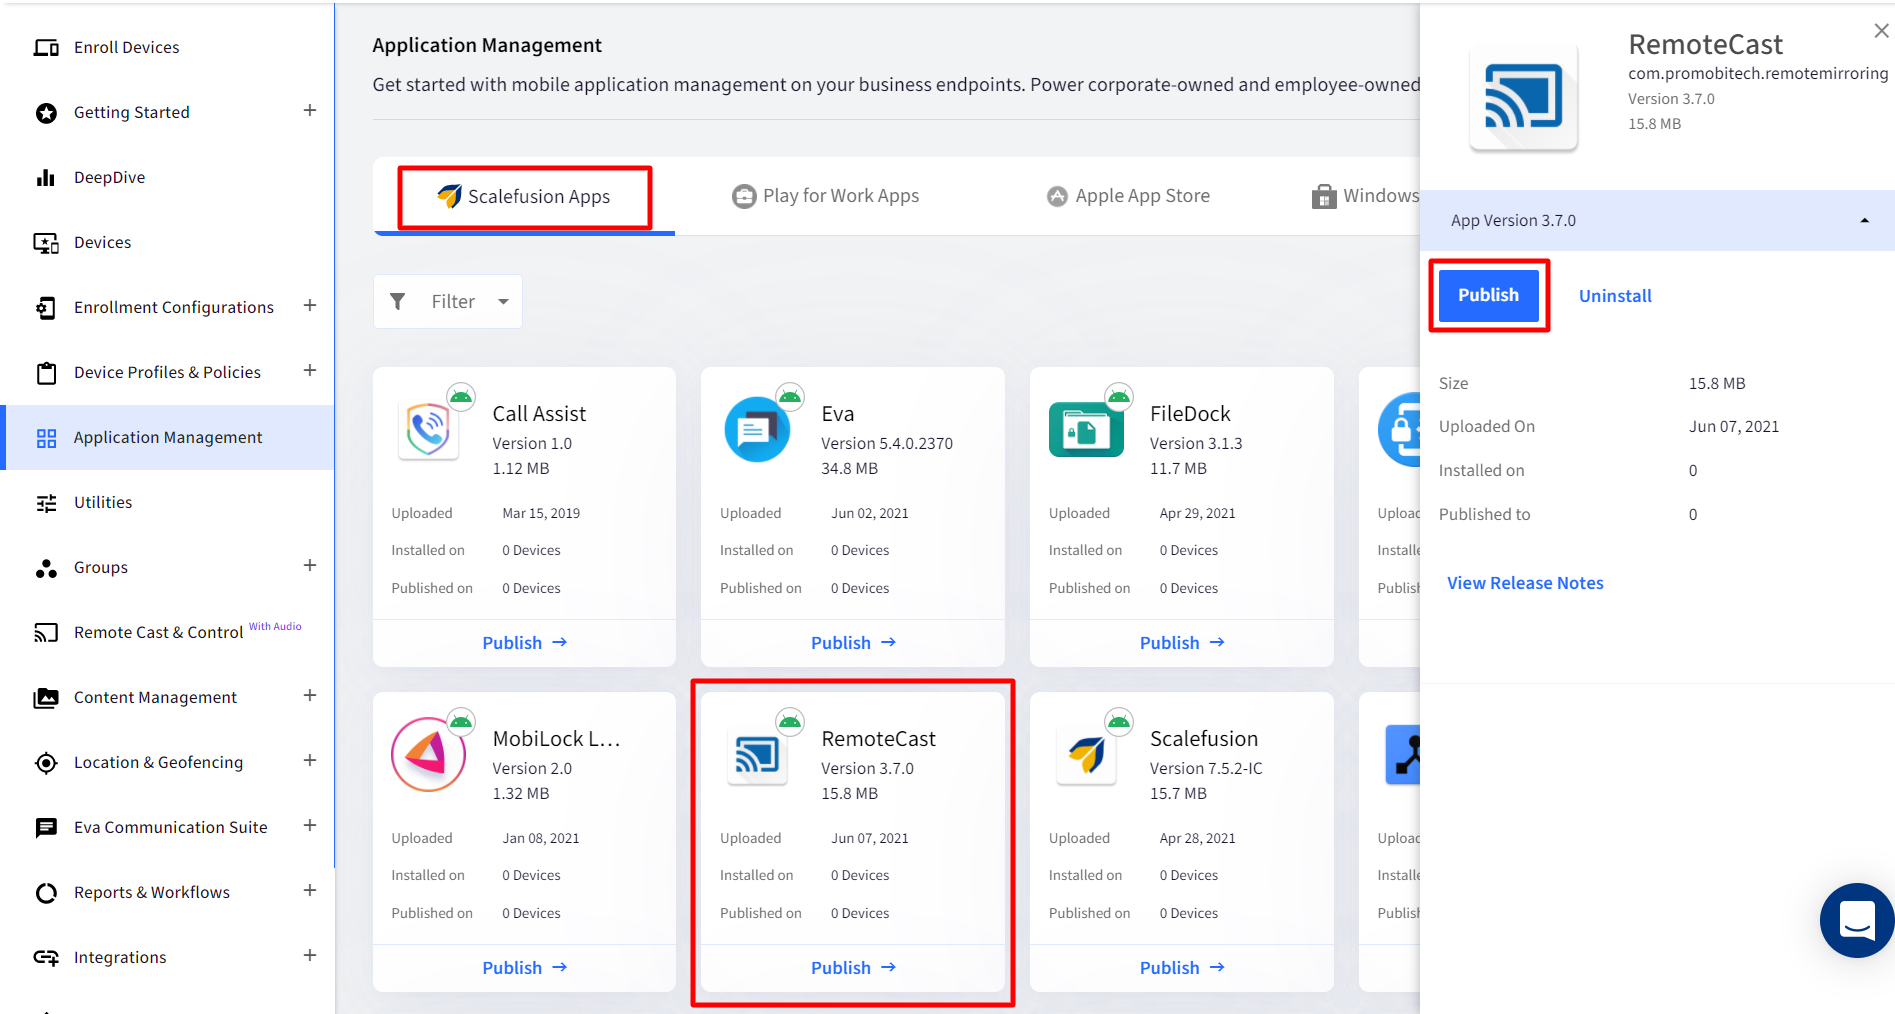
- Navigate to Application Management > Scalefusion Apps. Click on Scalefusion Remote Cast App for Android and select PUBLISH.
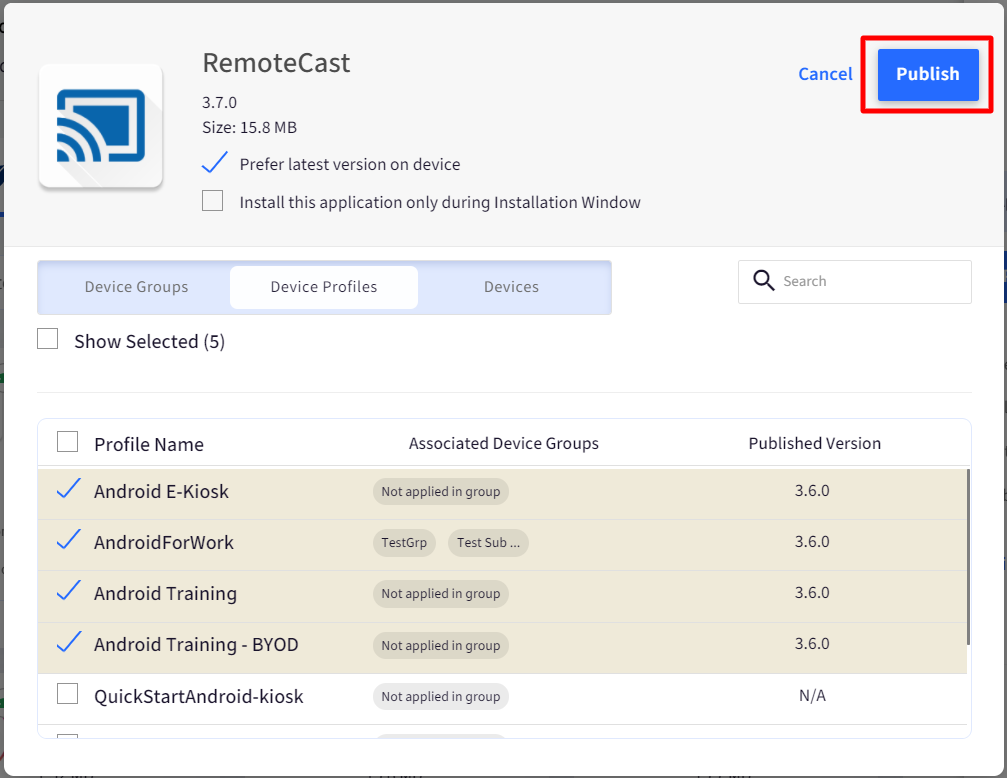
- Select the profiles where you want to install the application. Click on PUBLISH to confirm the installation.
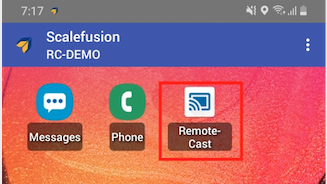
- On the Device, wait for the App to be downloaded. Once the app is downloaded, click on it it start the installation.
- The application will be silently installed on supported devices.
- The application will be silently installed on supported devices.
- Launch the Remote Cast app. The first time you launch it, you need to grant the required permissions to start using Remote Cast and its features. Click on GRANT PERMISSION on each card and grant the permissions. The permissions are,
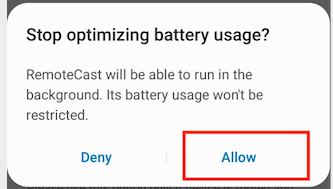
- Battery Optimization Exception: Exempt RC app from battery optimization. This helps to cast the device even when it is in locked state.
- Audio Permission: Grant the Microphone permission. This will be used for VoIP calls.
- Draw Over Other Apps: Grant the permission to allow RC app to draw overlays on the device.
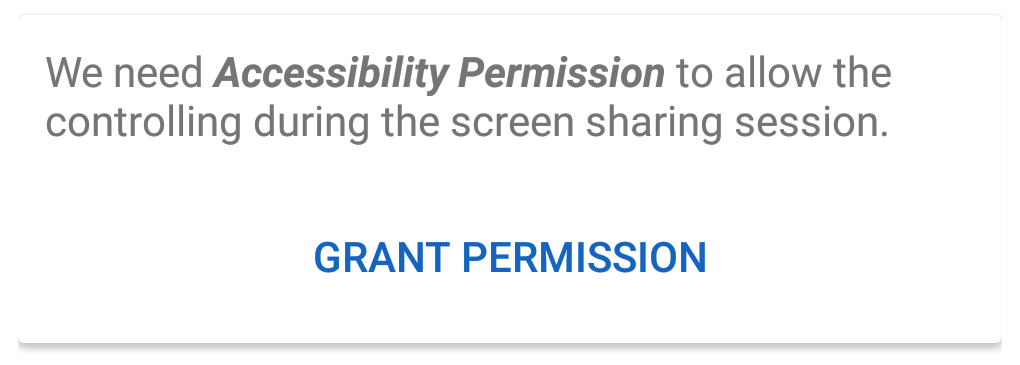
- Accessibility Permissions: Grant this permission to allow the device to be remote controlled. This setting is applicable on Android devices with OS 7.0 and above.
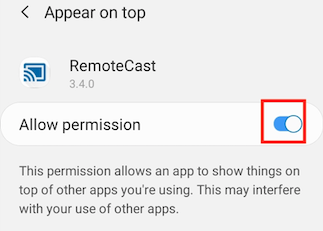
 Once the permission is granted, the following screen comes up. In this, tap on Remote Cast and set it to On.
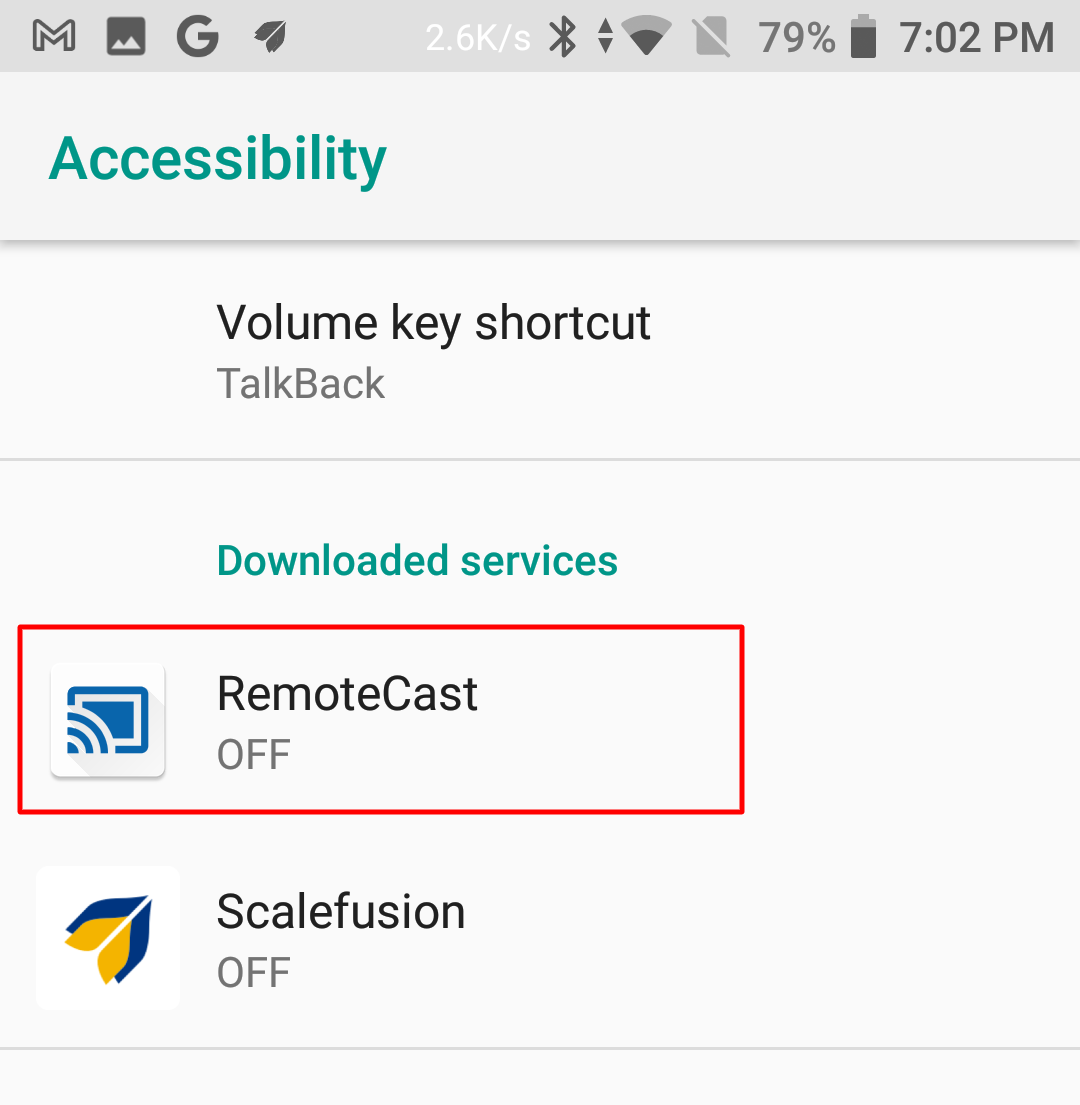
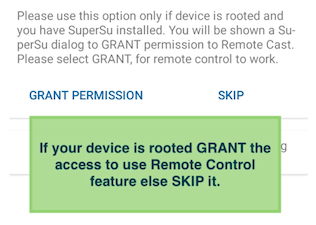
- Grant Root Access: If your device is rooted, then grant this permission so as to use the Control feature.
- Battery Optimization Exception: Exempt RC app from battery optimization. This helps to cast the device even when it is in locked state.
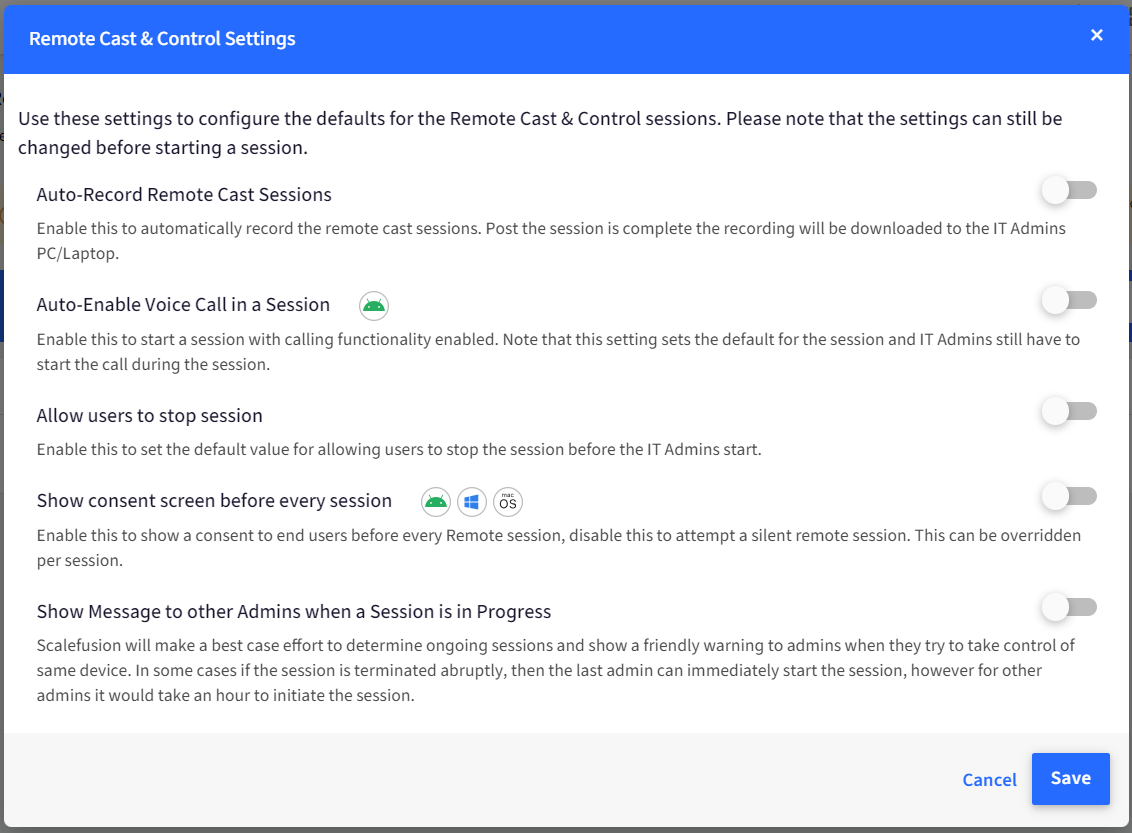
Remote Cast & Control Settings
When Remote Cast is used in security and privacy domains like tablets with kids or with people in hospital care, if somebody takes a remote cast session, companies normally want to enforce recording of that session as a checkpoint for the agent taking the RCC session to make sure that everything is recorded.
To enable this, the following settings have been provided that can be configured from the Dashboard before starting a session and can be used as global settings for all admins.
The settings can be accessed from the Settings button available in Remote Cast & Control on the Scalefusion Dashboard. Clicking on Settings opens a dialog box where admins can configure them.
| Setting | Description |
| Auto-Record Remote Cast sessions | Enabling this automatically records the remote cast sessions. After the session is completed the recording gets downloaded to the IT Admins PC/Laptop. If this setting is ON, session recording cannot be stopped. |
| Auto-Enable Voice Call in a Session | Enabling this starts a session with calling functionality enabled. This setting sets the default for the session. IT Admins still have to start the call during the session. |
| Allow Users to stop the session | This setting, when enabled, allows users to stop the session from their end. |
| Show consent before every session | Enable this setting to get the user's consent before starting a remote cast session, or else the session starts directly. The user gets a popup before the start of the session. Once configured, this setting can also be overridden by the admin from the Dashboard as soon as the session is initiated. On the right of the screen, there is a toggle Show Consent for this. |
| Show Message to other Admins when a Session is in Progress | If this setting is enabled, IT admins get an alert when another admin tries to take access of a device that already has an ongoing session. In some cases if the session is terminated abruptly, then the last admin can immediately start the session, however for other admins it would take an hour to initiate the session. |
Step 2: Initiating a Remote Cast & Control Session
Once you have set up the Remote Cast application as described in Step 1, follow the steps below to initiate a casting session.
- Clicking on Remote Cast & Control on the Dashboard will show you the list of devices that support casting and control.
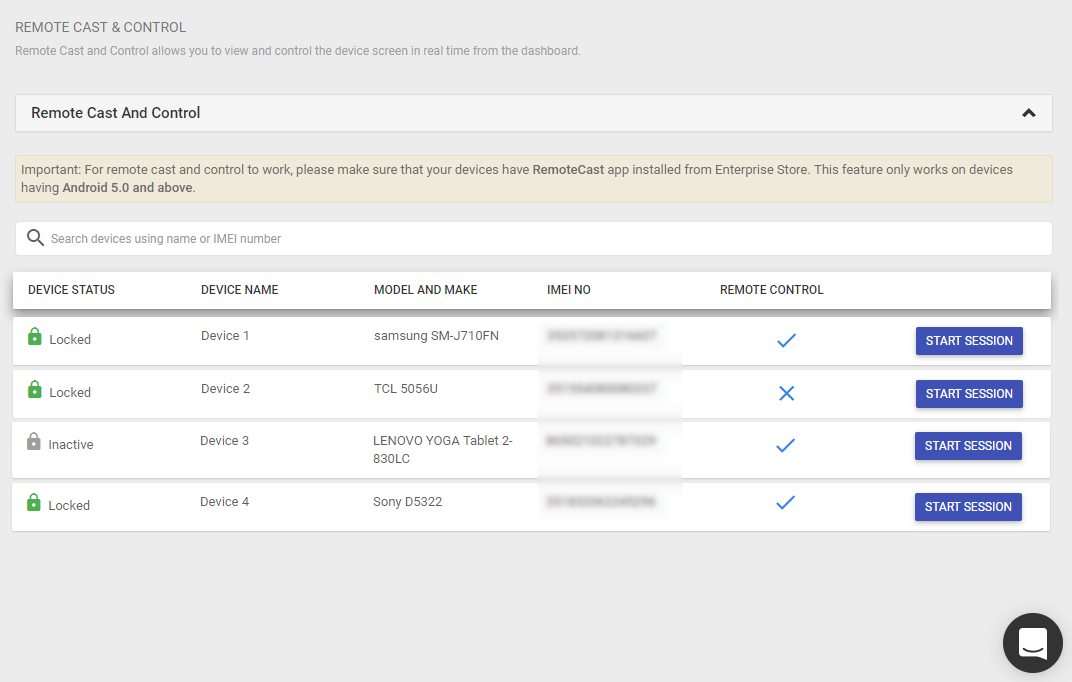
- The Remote Control column indicates if the device supports the control feature or not. A cross (X) indicates that the device does not support, and a tick (V) mark indicates that the device supports control.
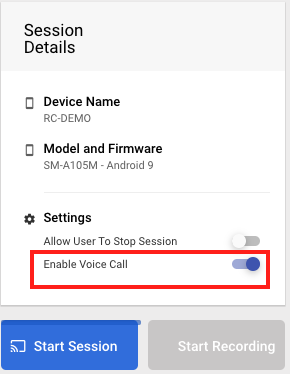
- Click on the Start Session option next to the device you want to start a screen-sharing session with. You will be navigated to the screen casting page with the following components,
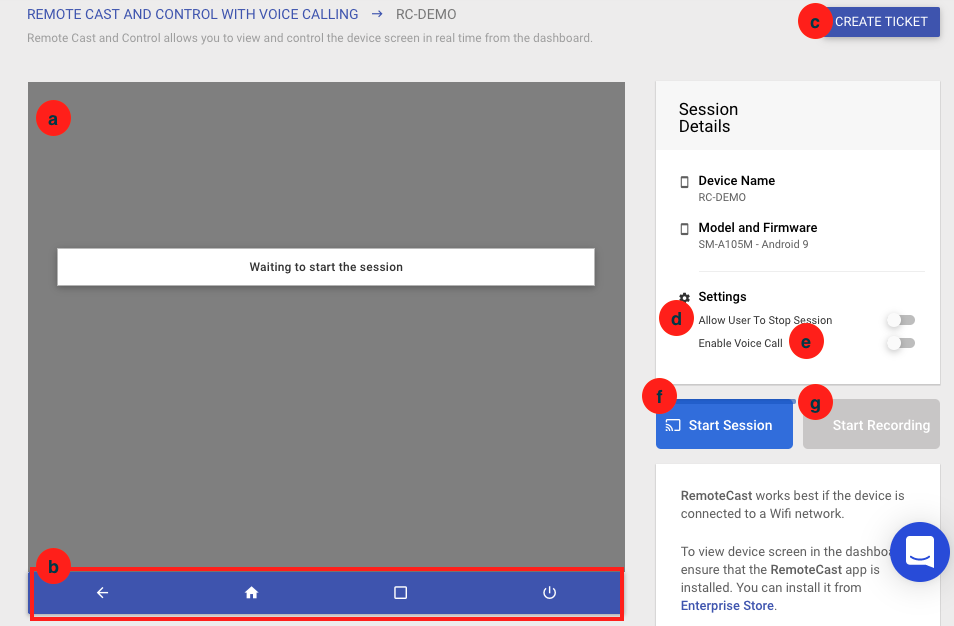
- Cast Console: The area where the mirrored screen appears.
- Navigation Keys: Control panel to send navigation and power-off events.
- CREATE TICKET: Create a Service Desk ticket - Supported only if you have integrated your ITSM tool.
- Allow User to Stop Session: Shows the user a stop button so that they can quit the session. This needs to be enabled/disabled before the session is started.
- Enable Voice Call: Enable this to be able to use voice calls in the ongoing session. This needs to be enabled/disabled before the session is started.
- Start Session: Click on this button to start the session.
- Start Recording: Use this option to start recording the session once it is started.
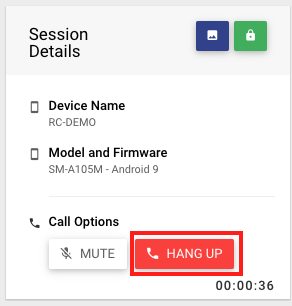
- Device Level Actions: During a remote session, if the admin wants to perform actions like rebooting the device or locking/unlocking the device, then they can do it from the same screen. Clicking on the Settings button on the control panel pulls a menu with the following actions to choose from:
- Refresh device
- Reboot Device
- Full Device Information
- Lock/Unlock Device
- Click on START SESSION to start the session. Android Security measures enforce that the end user has to accept a Remote session on the device. On the device, the following screen would be displayed, Please click OKAY.
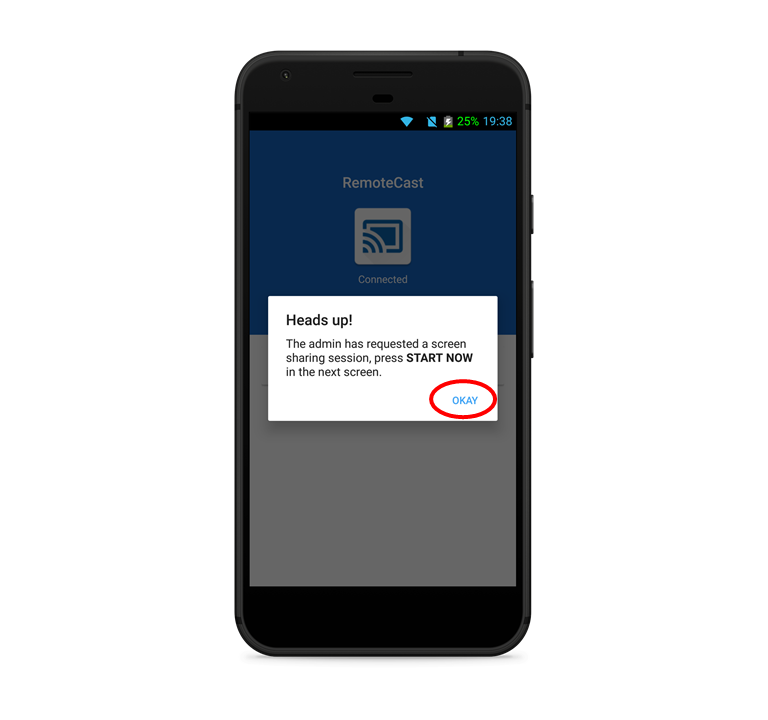
- Click on the START NOW option to start the Remote Cast session.
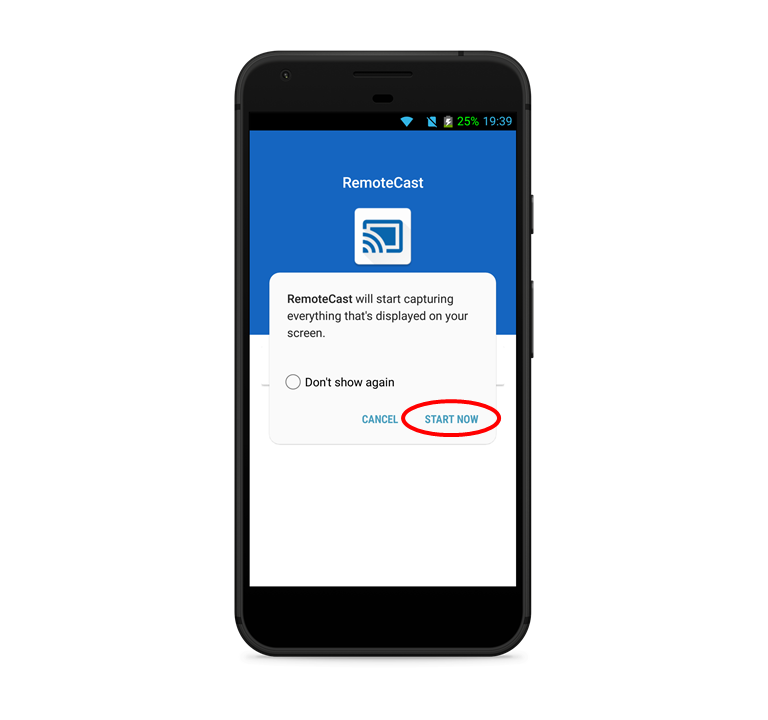 We suggest setting up Remote Cast on Android before the corporate-owned device is deployed on the field and clicking, Don't Ask again so that the pop-up is not shown again.
 - If the steps from 1 to 4 are completed properly, then the screen that is currently running on the device will be shown on the dashboard. The options while in an ongoing session are,

- Control: If the device supports control, then you can click anywhere on the screen to control it.
- Back: Use this option to simulate Back key behavior.
- Home: Use this option to simulate Home key behavior.
- App Switcher/Recent Apps: Use this option to simulate app-switcher or recent key behavior.
- Power Off: Use this option to simulate power button behavior.
- Full Screen: Use this option to go full screen.
- Snapshot: Use this option to take a snapshot.
- Lock/Unlock: Use this option to Lock/Unlock the device.
- Stop Session: Use this option to stop the session.
- Start Recording: Use this option to start the recording of the screen.
VoIP Calling
VoIP calling allows you to have an internet-based call while you are taking a screencast session. Please follow the steps below to use this feature,
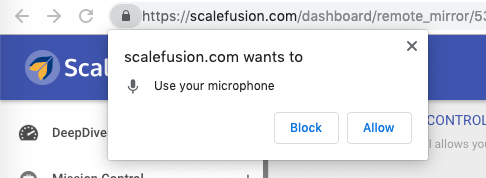
- Enable the Voice Call option before you start the session.
- On your browser, you will be asked for Microphone permission. Click Allow.
- Click the CALL button on the Dashboard.
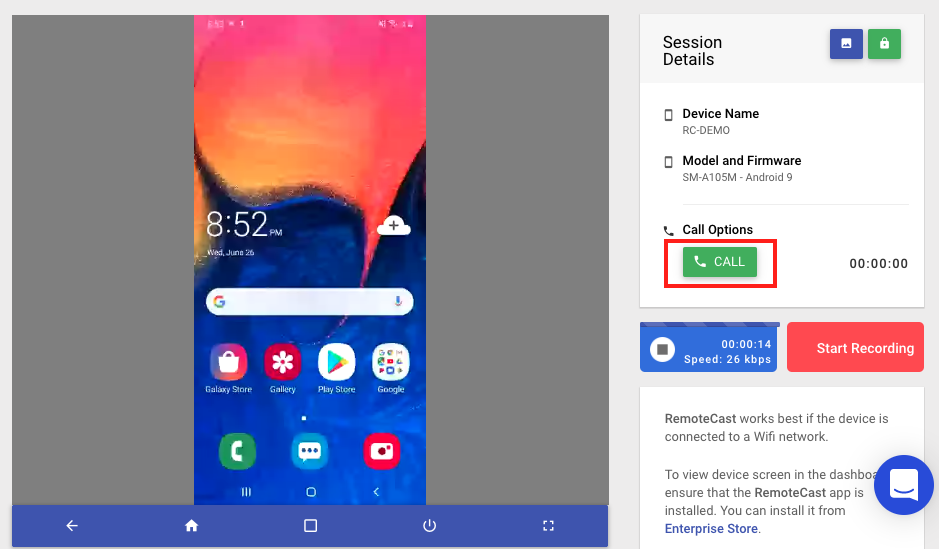
- The users will see an Incoming call notification. Clicking on accept will start the voice session.
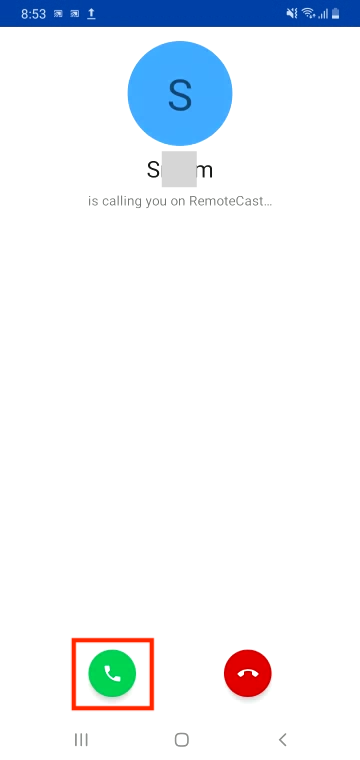
- To disconnect the call, either click Hang Up or the user can click the End Call option on the device.
Root folder Access on Android OS 11 and above
On Android devices with OS version 11 and above, a few additional settings are required to enable the access of the root (data) folder over a Remote Cast session. Here are the steps:
Prerequisite
- RemoteCast app v4.1.1 or above should be installed on Android devices
Step1: Add application in Android Device Profile
- On the Scalefusion Dashboard, navigate to Device Profiles & Policies > Device Profiles
- Go to the Android Device Profile (in which the app has to be added) and Edit it.
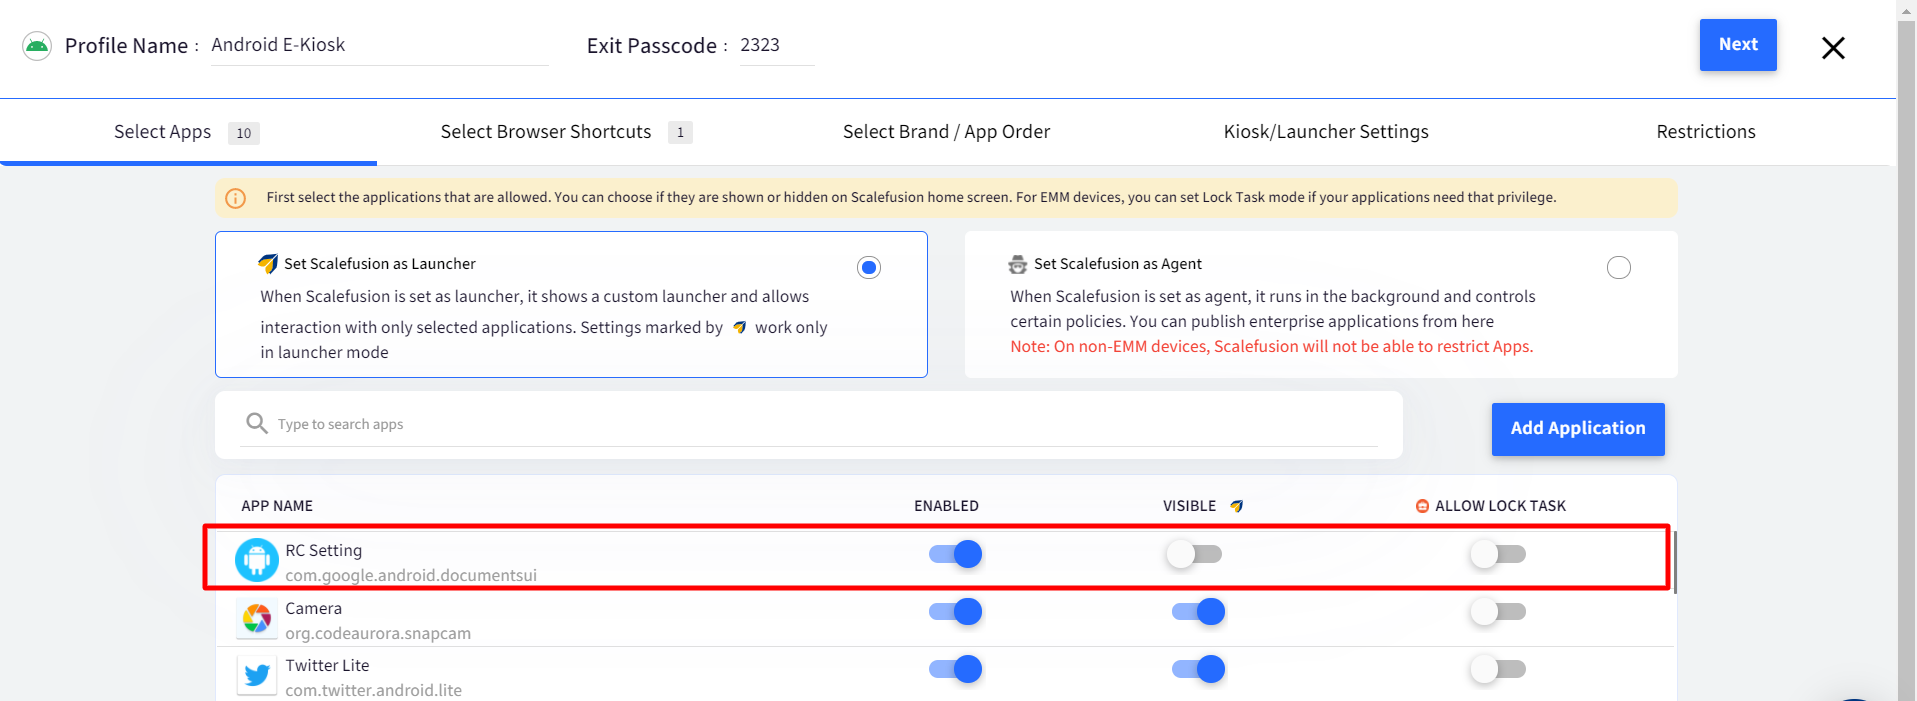
- In the Select Apps section, click on the button Add Application
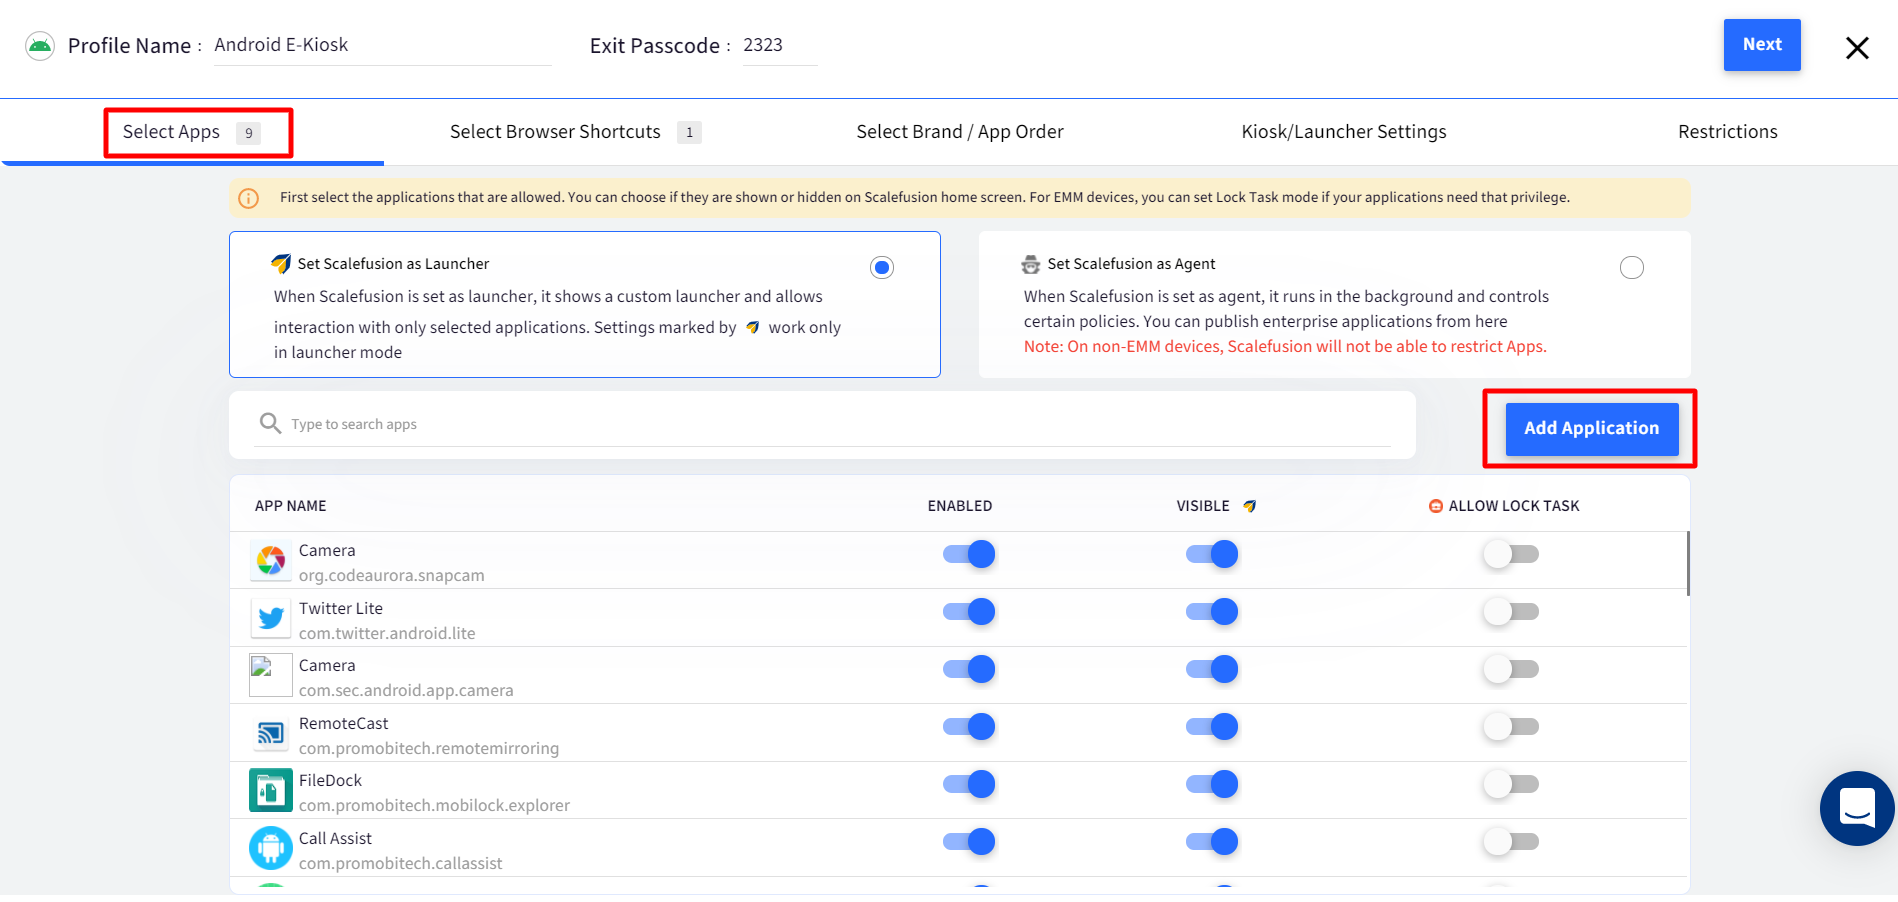
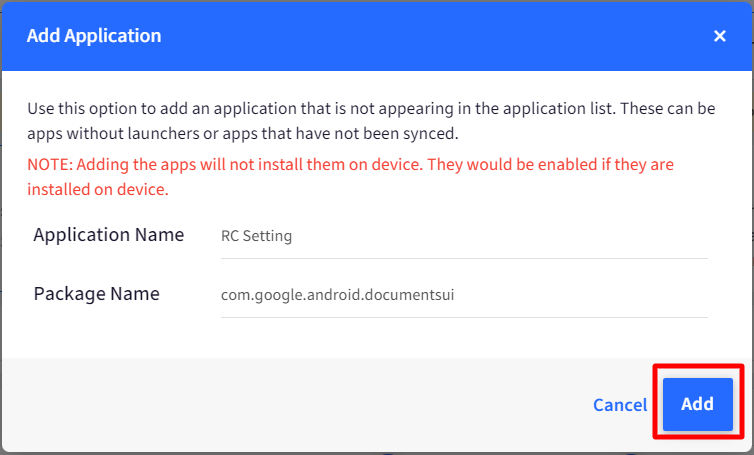
- This opens a new dialog box. Enter the following:
- App Name: Enter the name of the application (For example, RC Setting)
- Package Name: Enter package name as com.google.android.documentsui
- The application gets added and is available in the list of apps in the device profile in the Enabled state.
- Save/update the profile. All the devices with this device profile will have the app-enabled.
Step 2: Publish Remote Cast App and Grant Permissions
- On Scalefusion Dashboard, navigate to Application Management > Scalefusion Apps, publish the latest version of the Remote Cast app and select the device profile in which the application has been added (step #1 above)
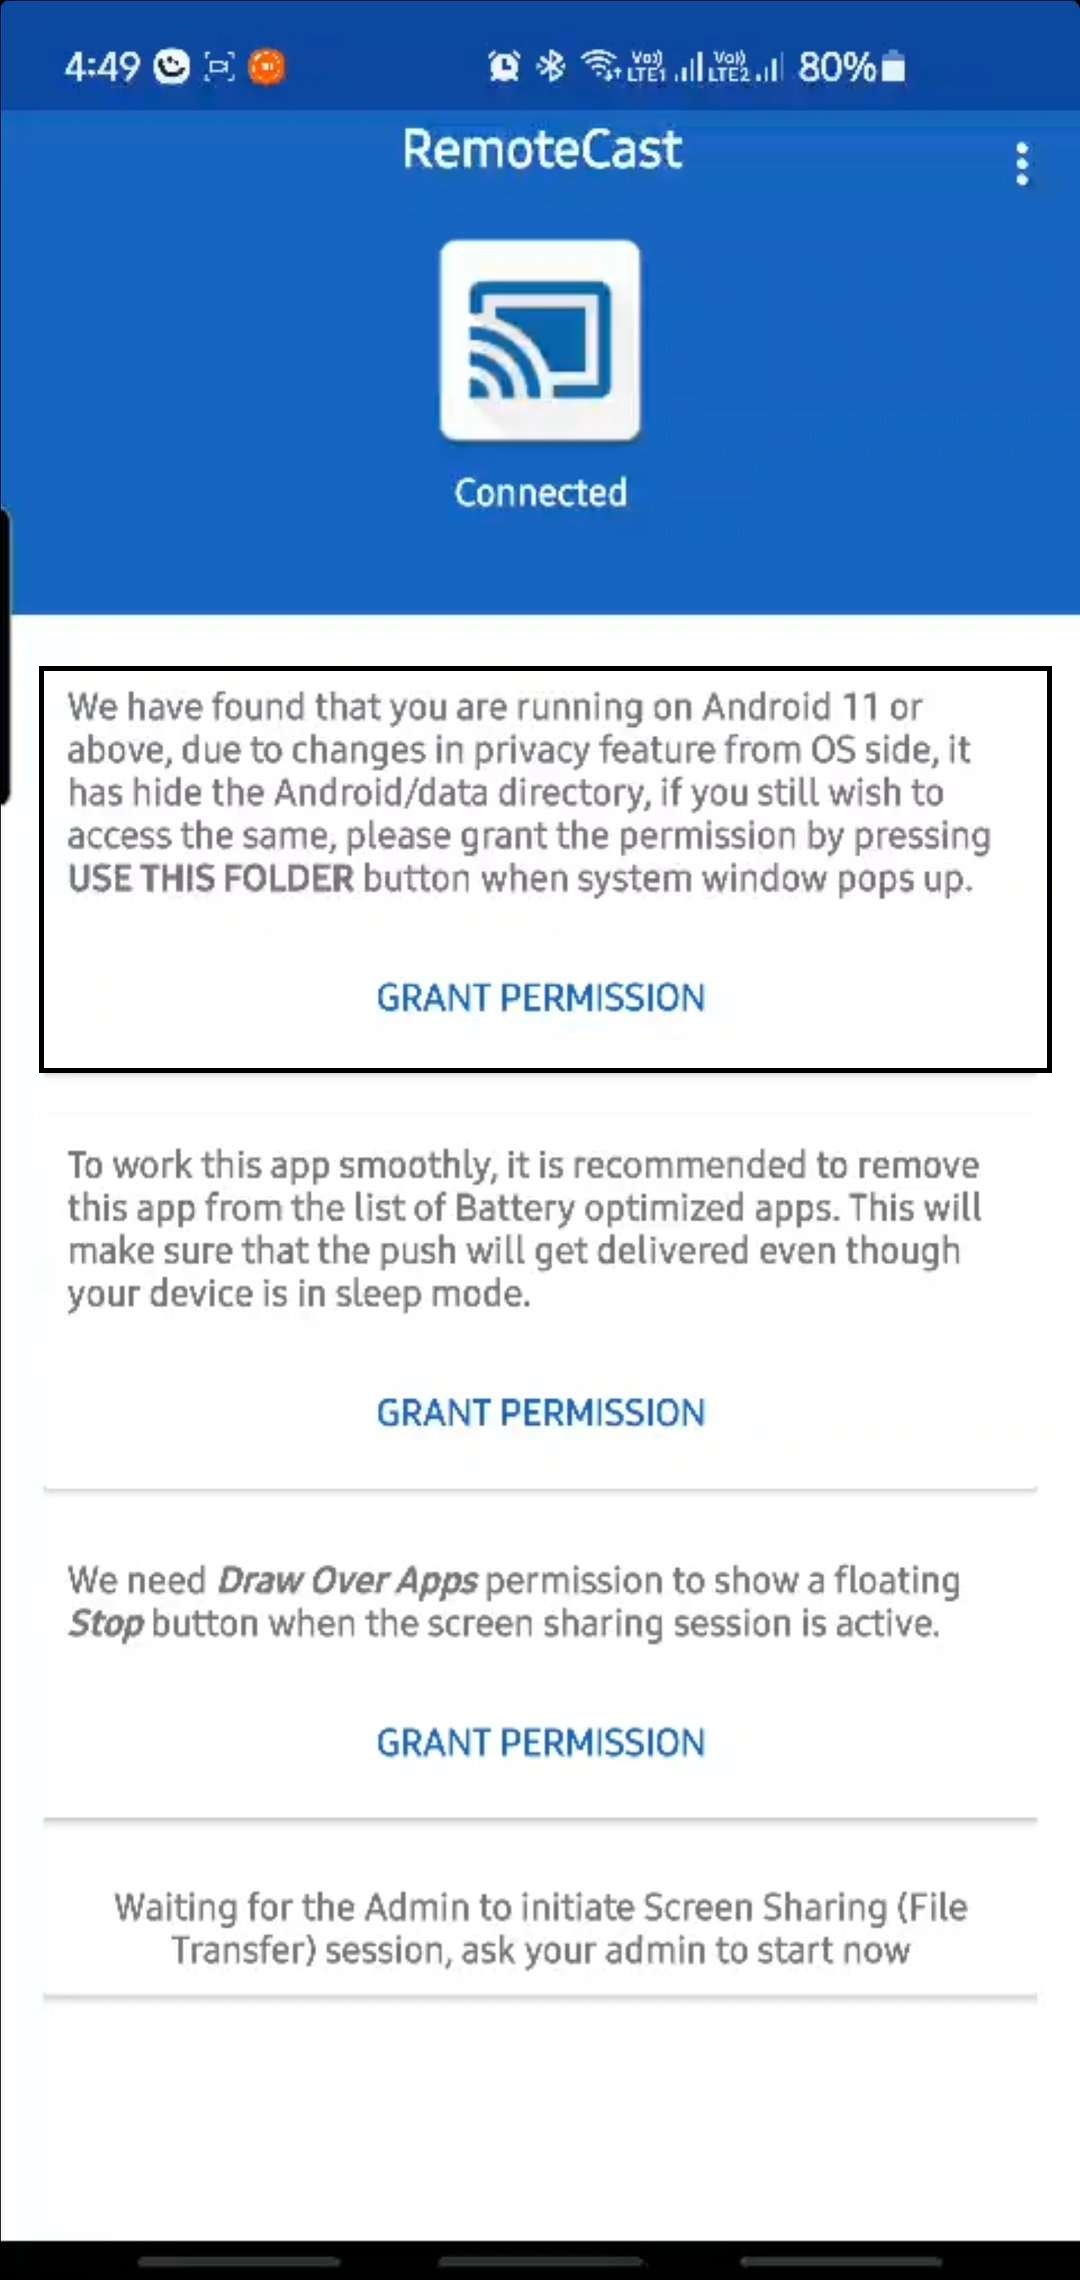
- Launch the Remote Cast application on the device or launch it via the Remote Cast session on Scalefusion Dashboard.
- There will be an additional permission to be granted. Click Grant Permission on the newly added permission as shown below
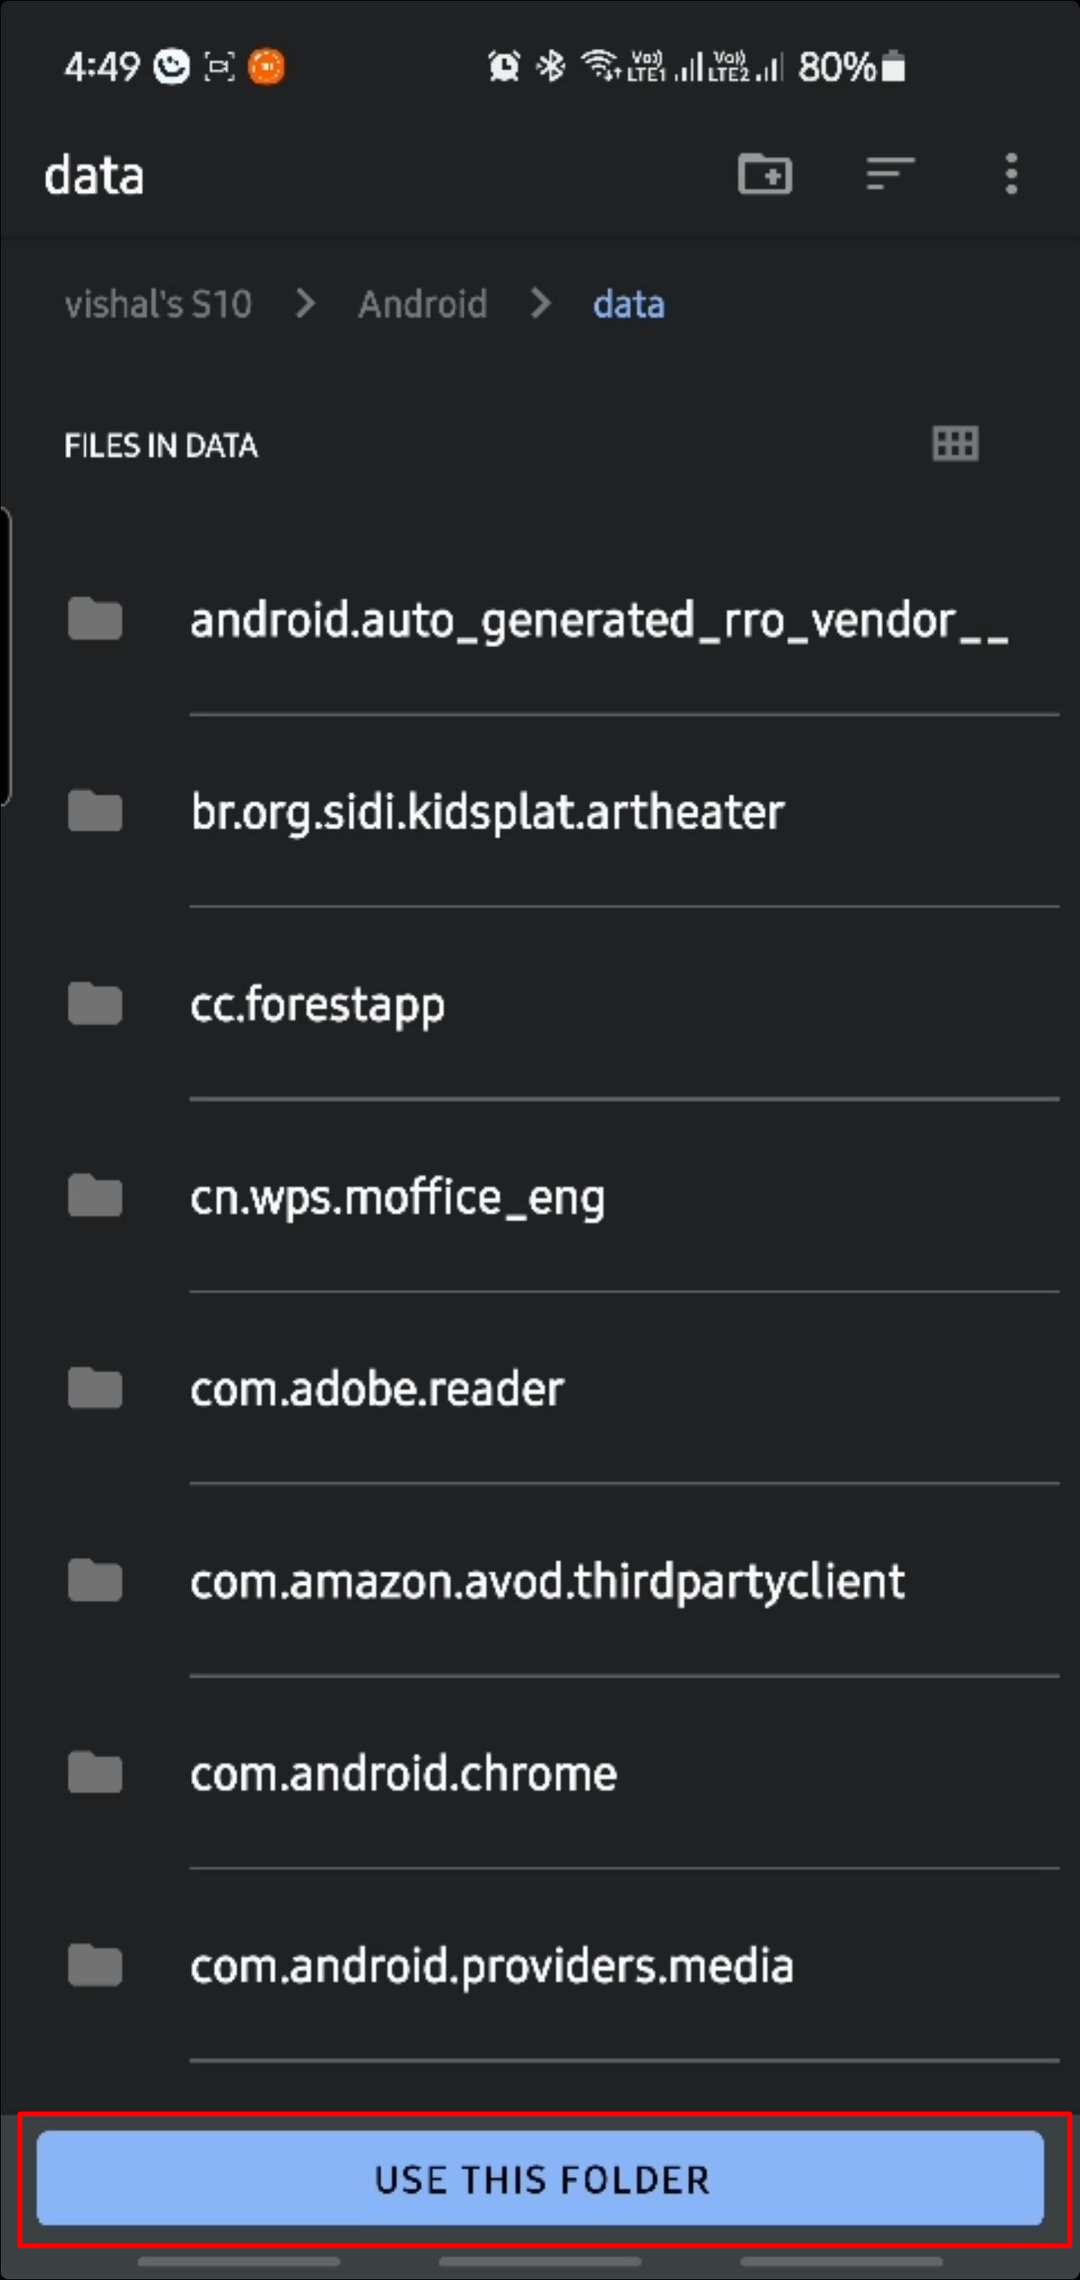
- You will get the following screen. Tap on Use this Folder.
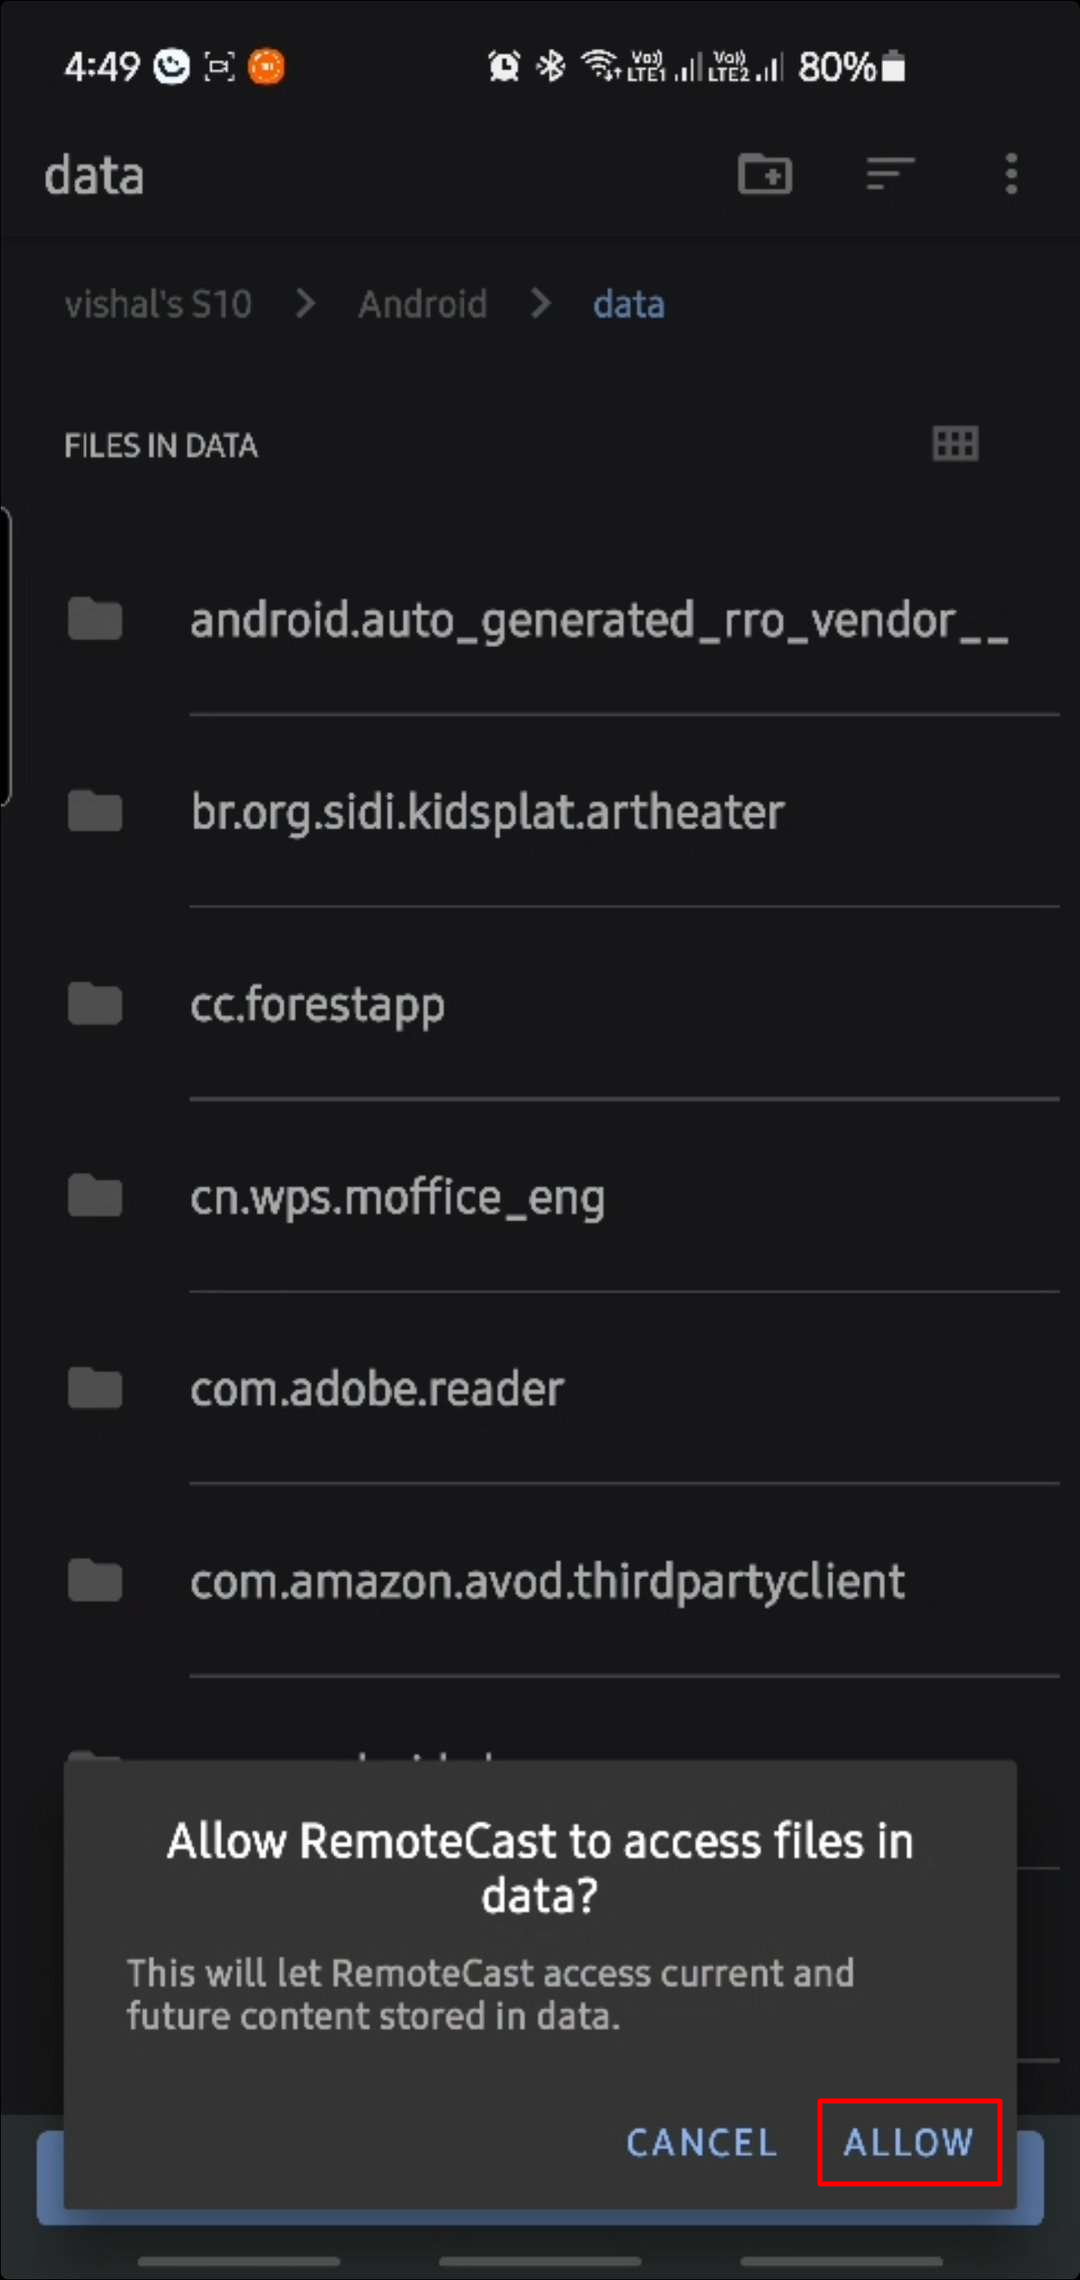
- Click Allow
- Enable the rest of the permissions displayed on the Remote Cast screen described here.
- Hereafter you can access the Android/data folder and pull the files remotely over a remote cast or a file session.
Frequently Asked Questions
Question: What are the special steps that we need to get control of remote access?
Answer: There are no special steps, but you need to grant the root access to the Remote Cast app while setting up the device.
Question: What are the brands/devices where Remote Control is supported?
Answer: The following devices support Remote Controls,
- Samsung Device with Knox Support
- Sony Devices with Enterprise SDK support
- LG Devices with LG Gate SDK support*
- Lenovo Tablets*
- HP Prime series*
- Honeywell*
- Zebra Devices with MX version 8.3 and above and OS version*
- Any other partner OEM with custom SDK/platform signing for Wingman app*
Question: What is the Wingman app Do we have a custom OEM device? Can we control the devices?
Answer: We have built an add-on application - Wingman, that can be used to get control of devices. However, the add-on application needs to be signed by the system signature of the device. This can be done by OEM/ODM only, so if you are an OEM or have a direct partnership with OEM, do let us know, and we will share the unsigned apk.
Question: We got the Wingman app signed from our OEM/ODM; what are the next steps?
Answer: Please share the Wingman app with us, and we will make it available for your devices. Once it is available, navigate to Enterprise > My Apps > Scalefusion Apps and publish the Wingman application. Once the app is published on the device, install the application. The device will now start supporting control.
Do reach out to us at support@scalefusion.com if you have any questions or are facing any issues during setup or usage of this feature.
.jpg)