With Pre-stage Setup, Automated Device Enrollment (ADE), simplifies the macOS setup experience for end users while giving IT administrators greater control over device and account provisioning out of the box. Administrators can configure the account setup experience based on their organization’s requirements, including Platform SSO (PSSO), Keycard, or Primary Account provisioning. For primary and administrator accounts, they can define account types and details, automatically create administrator accounts, hide auto-created accounts, and designate an administrator account as the managed/enrolled user.
This article explains how to configure macOS Pre-stage Setup through the Scalefusion Dashboard, including PSSO, Keycard, and account provisioning settings, and describes how these configurations affect the user experience during device setup.
Pre-Requisites
A valid Scalefusion Dashboard account.
A Mac device that is purchased under ADE program.
ADE Setup should be done on Scalefusion Dashboard.
Steps
Login to Scalefusion Dashboard.
Navigate to Getting Started > Apple Setup > Automated Device Enrollment.
Click on Configure Device Setup Settings
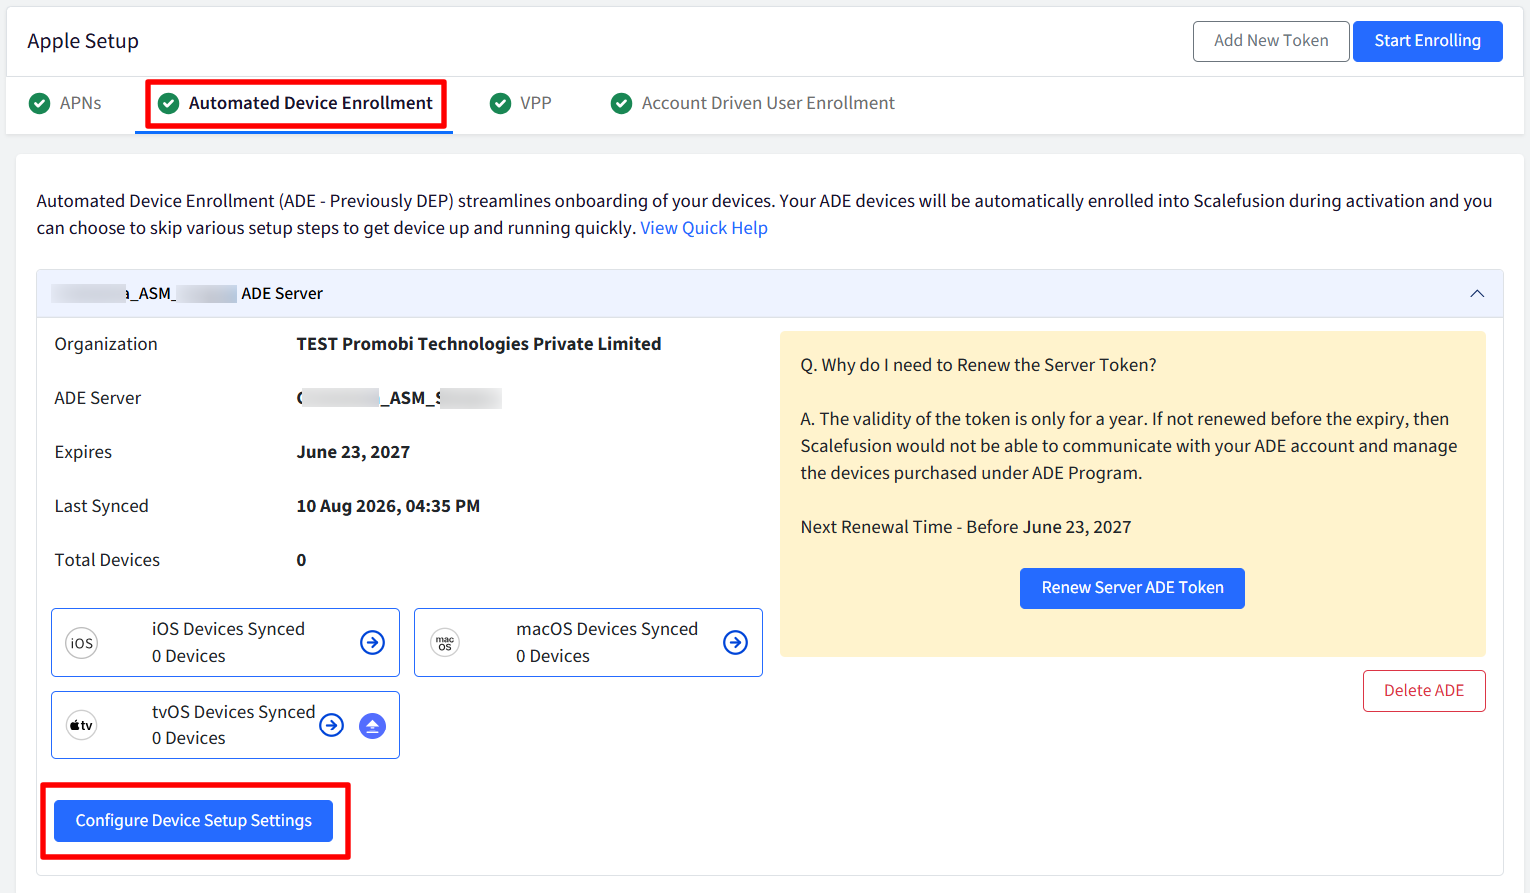
Scroll down and navigate to macOS Pre-stage Setup.
Account Setup Experience
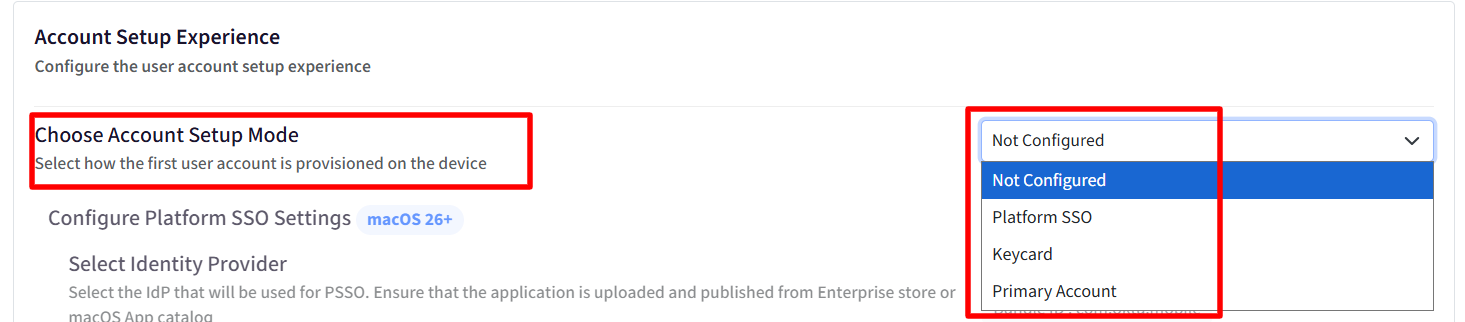
Select how the initial user account is provisioned on the device:
Choose Account Setup Mode:
Not Configured: No primary user account setup mode is forced.
Platform SSO: Platform SSO during Setup Assistant enables users to authenticate with their organization's identity provider (IdP) while setting up a new Mac. Instead of creating a local account manually, users sign in using enterprise credentials, allowing Platform SSO to automatically provision and configure the local user account on the device.
Keycard: Requires users to complete Keycard setup during enrollment.
Primary Account: Manually creates a local account on the device.
Select a Fallback Mechanism: Select a fallback mechanism for older macOS devices where PSSO is not supported. Options include None, or Primary Account.
Applicable only when "Choose Account Setup Mode" is set to Platform SSO.

Configure Platform SSO Settings
Pre-Requisites
Account Setup Mode: Set Choose Account Setup Mode to Platform SSO.
Platform SSO extension is configured and published to profile (Device Profiles & Policies > Advanced Configurations > macOS)
The corresponding IdP application (Microsoft, Okta etc.) is uploaded and published from the Enterprise Store or macOS App Catalog.
Supported OS: The device must be running macOS 26 or later.
Configurations
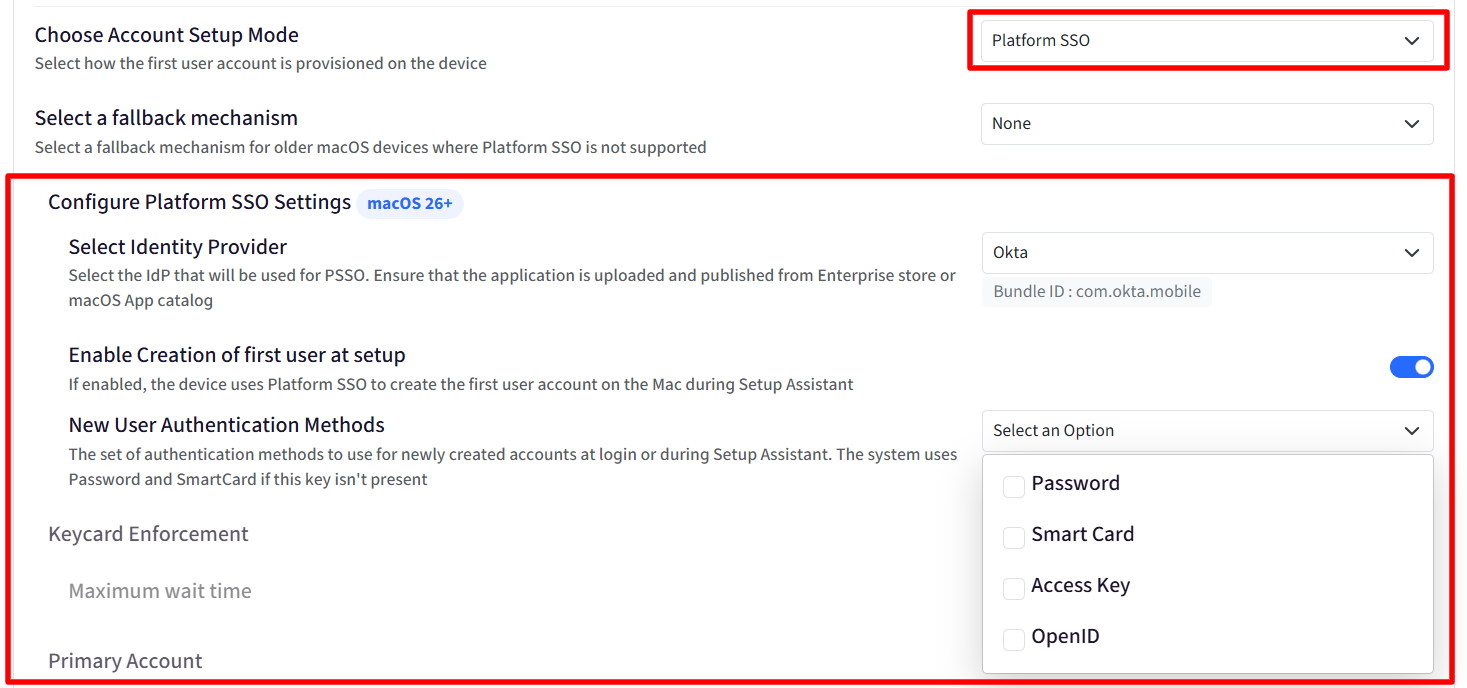
Select Identity Provider: Select the IdP used for PSSO (Microsoft or Okta). Ensure the corresponding application is uploaded and published from the Enterprise Store or macOS App Catalog.
Enable Creation of First User at Setup: Toggle on to allow Platform SSO to create the first user account on the Mac during Setup Assistant.
New User Authentication Methods: Choose the authentication method(s) for newly created accounts. Options include Password, Smart Card, Access Key and OpenID.
If Access Key is selected, configure the following:
Access Key Reader Group Identifier
Access Key Terminal Identity UUID
Allow Access Key Express Mode
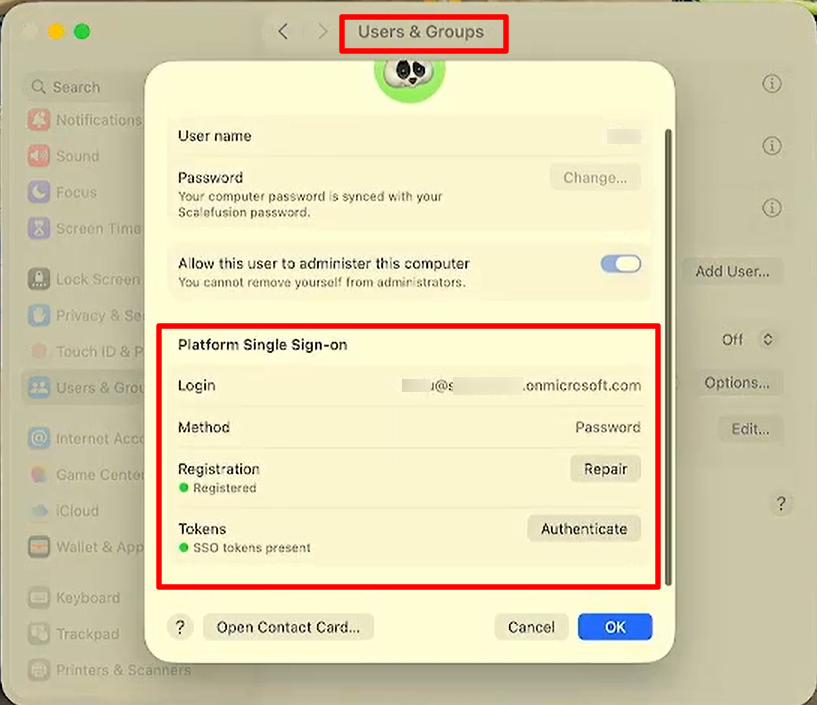
Once enrolled, the PSSO configurations will show up in User & Accounts section on the mac device
Keycard Settings
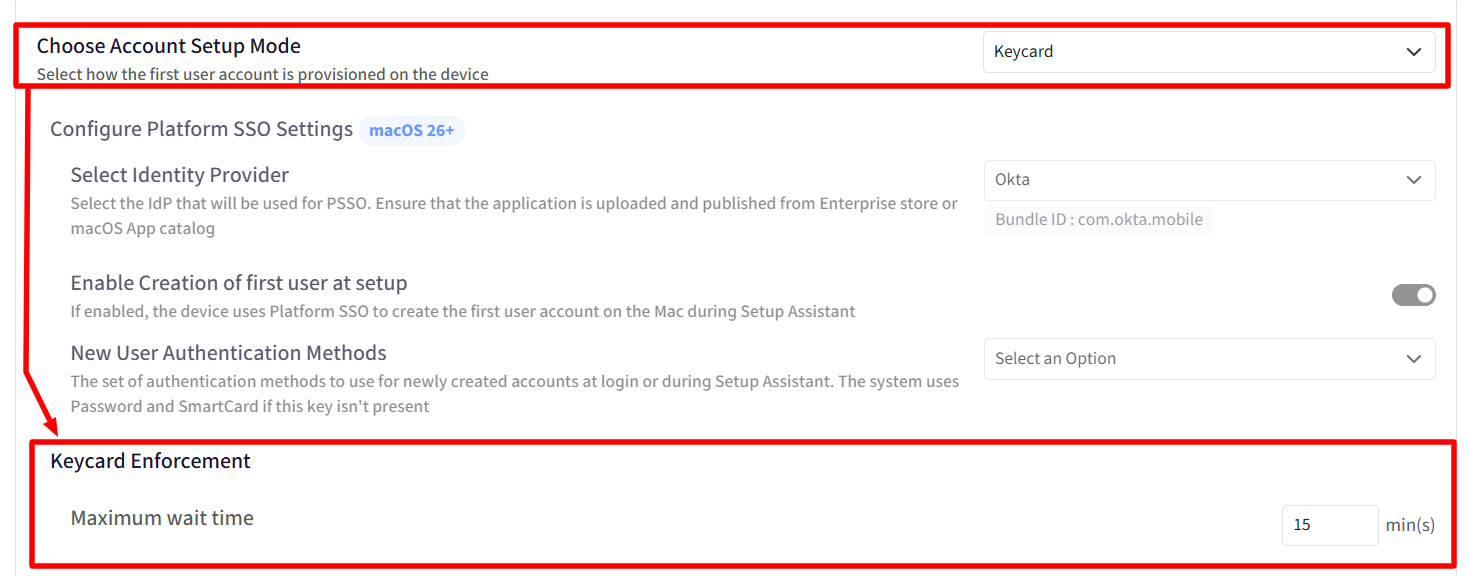
This setting ensures that users must complete their Keycard setup before they are allowed to continue with the rest of the enrollment process. It helps enforce secure authentication setup at an early stage and also enhances the user experience, by allowing them to sign in using their IdP account details right when setting up the device instead of creating a local account thereby keeping both the account name and password in sync with their IdP credentials right from the first time use.
Enabled when "Choose Account Setup Mode" is set to Keycard.
This setting is applicable if Keycard is published on the macOS device(s)
If the PSSO configuration and Keycard are published on the same profile, the Keycard settings will not be applied to that profile.
Maximum Wait Time: Enter the timeout (in minutes) for Keycard setup to complete before continuing with enrollment (Value must be between 1 and 30 minutes; default is 15 minutes).
Primary Account creation
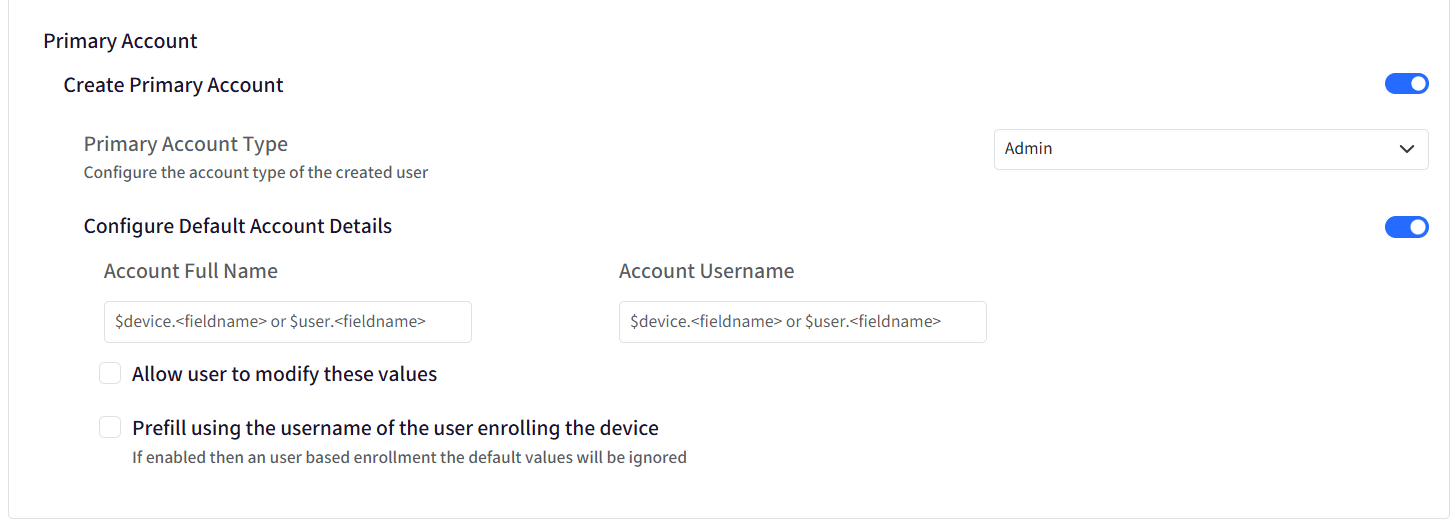
This section is configurable only if "Choose Account Setup Mode" is set to Primary Account.
For Primary Account Creation, select one from the following options:
Create Primary Account: Toggle this to on and provide the details to create primary account:
Primary Account Type: Configure the account type of the created user by selecting one option from the drop-down:
Admin
Standard
Configure Default Account Details: The primary account on the device will be created with the details you provide here:
Account Full Name
Account Username
Note:Spaces are not allowed in username and allowed special characters are dot(.), underscore(_) and hypen(-)Password needs to be set by the user at the time of setup
Allow user to modify these values: If enabled, users can modify the account details from the device
Prefill using the username of the user enrolling the device: This setting is applicable in case of User Authenticated enrollment. If enabled, the primary account details will be of the user who is enrolling the device instead of default account details (Account Full Name and Account Username) provided here.
Admin Account creation
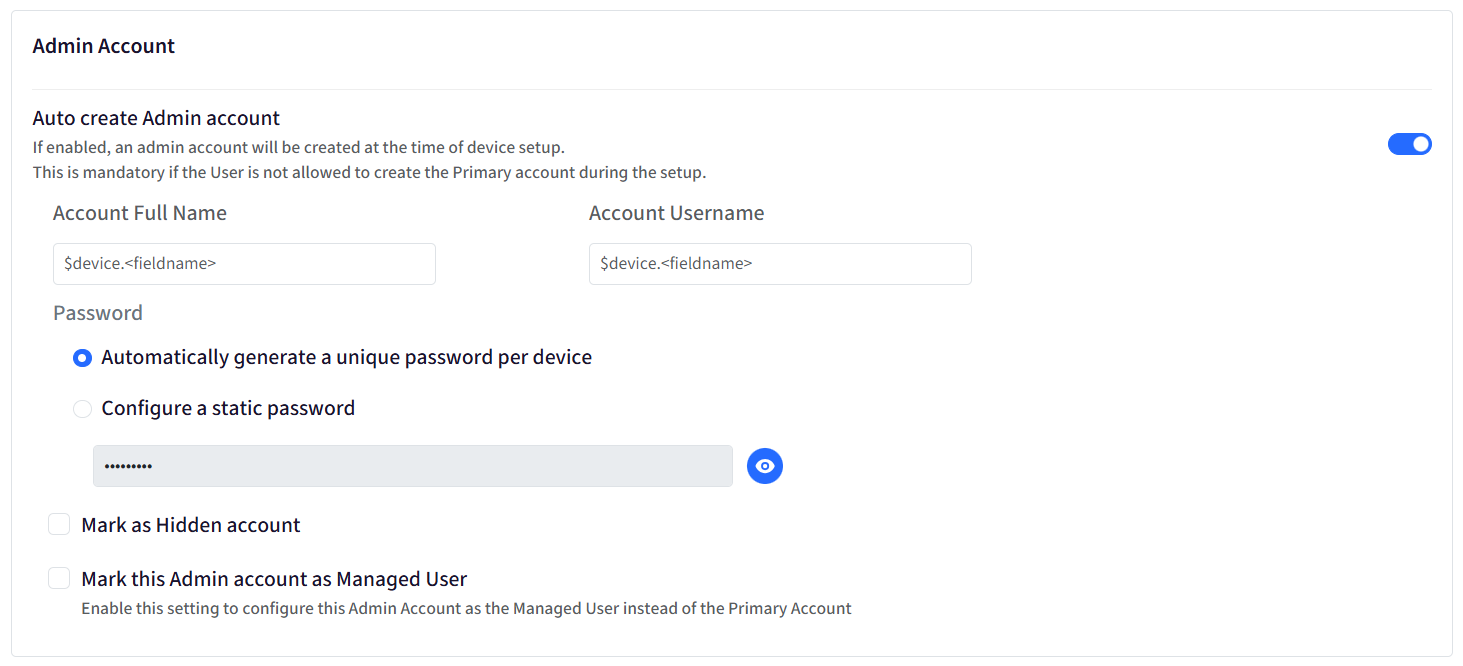
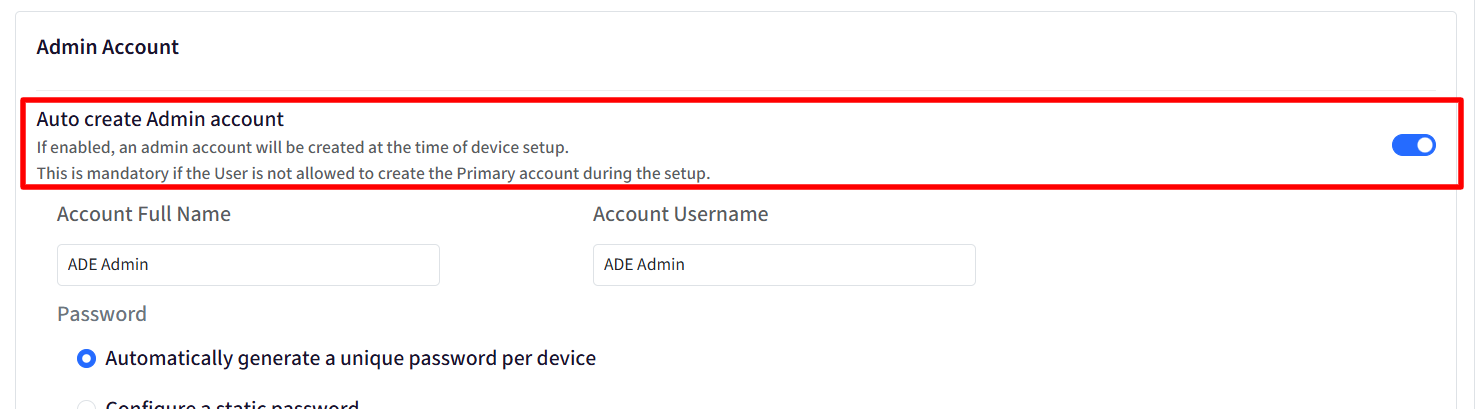
Auto create Admin account: Enable this and provide following details to automatically create an admin account at the time of device setup:
This setting is enforced, that is, it is mandatory to auto create admin account if,
Create Primary account is disabled, Or
In Default account details, Primary Account Type is selected as Standard
Account Full Name
Account Username
Password: The configured password will be visible in the User Account Managementsection on the Device Details page. Select one of the options from below:
Automatically generate a unique password per device
Configure a static password: Enter a password for logging in with admin account.
Password should be 8 characters or more and should adhere to Organization's password policy
Mark as Hidden Account: With this enabled, the admin account will be created but won't be visible on the device.
Mark this Admin account as Managed User: Configures and marks the auto-created admin account as Managed/Enrolled User instead of the primary account that is created.
User accounts will not be created automatically through scripts or UAM commands until a successful login is detected.
Once a user completes an online login, the system allows the user account to be created, ensuring the login process has been completed successfully.
Important Points to Note
You can have a Primary account as admin type and also have an auto created admin account at the same time.
In User Account Management section, the auto created admins will reflect as ADE Admin under Account Type. This account cannot be changed to a standard user or deleted.
Custom Properties are also supported while providing account full name and account username for primary as well as admin account.
For primary account, both $device and $user custom properties are supported.
For ADE admin accounts, only the default $device custom properties are supported.
Managed user will not get created if you have chosen not to create a primary account and have also disabled the setting Mark this Admin account as Managed User under Auto-create admin account settings.
How it Works on Device
The prestage settings configured become applicable while setting up a macOS device after unboxing or hard reset, once you are on Remote Management screen. This is explained with the help of few cases
Primary account creation
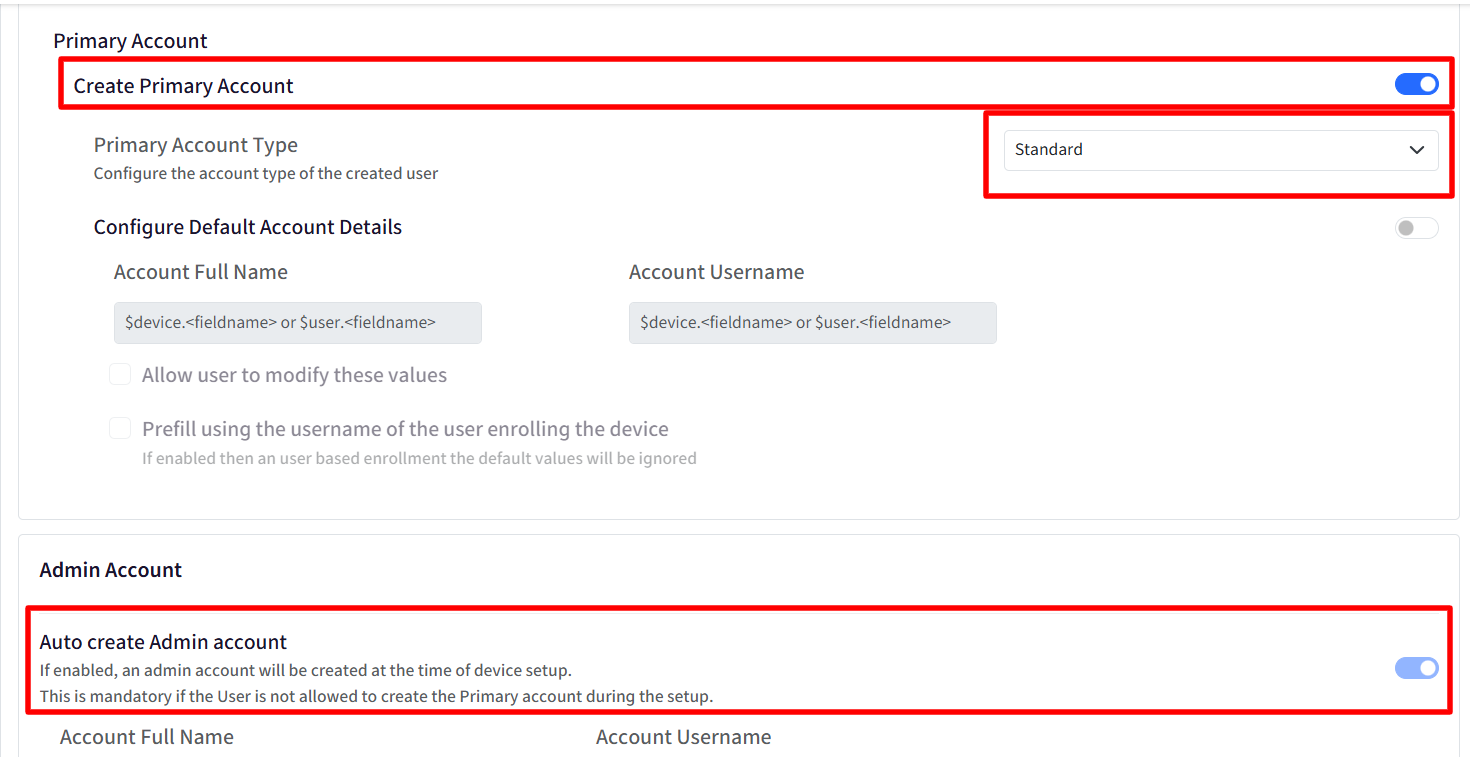
For example, you have configured the following settings on Dashboard:
Create Primary account as Standard user type
Auto-create admin account
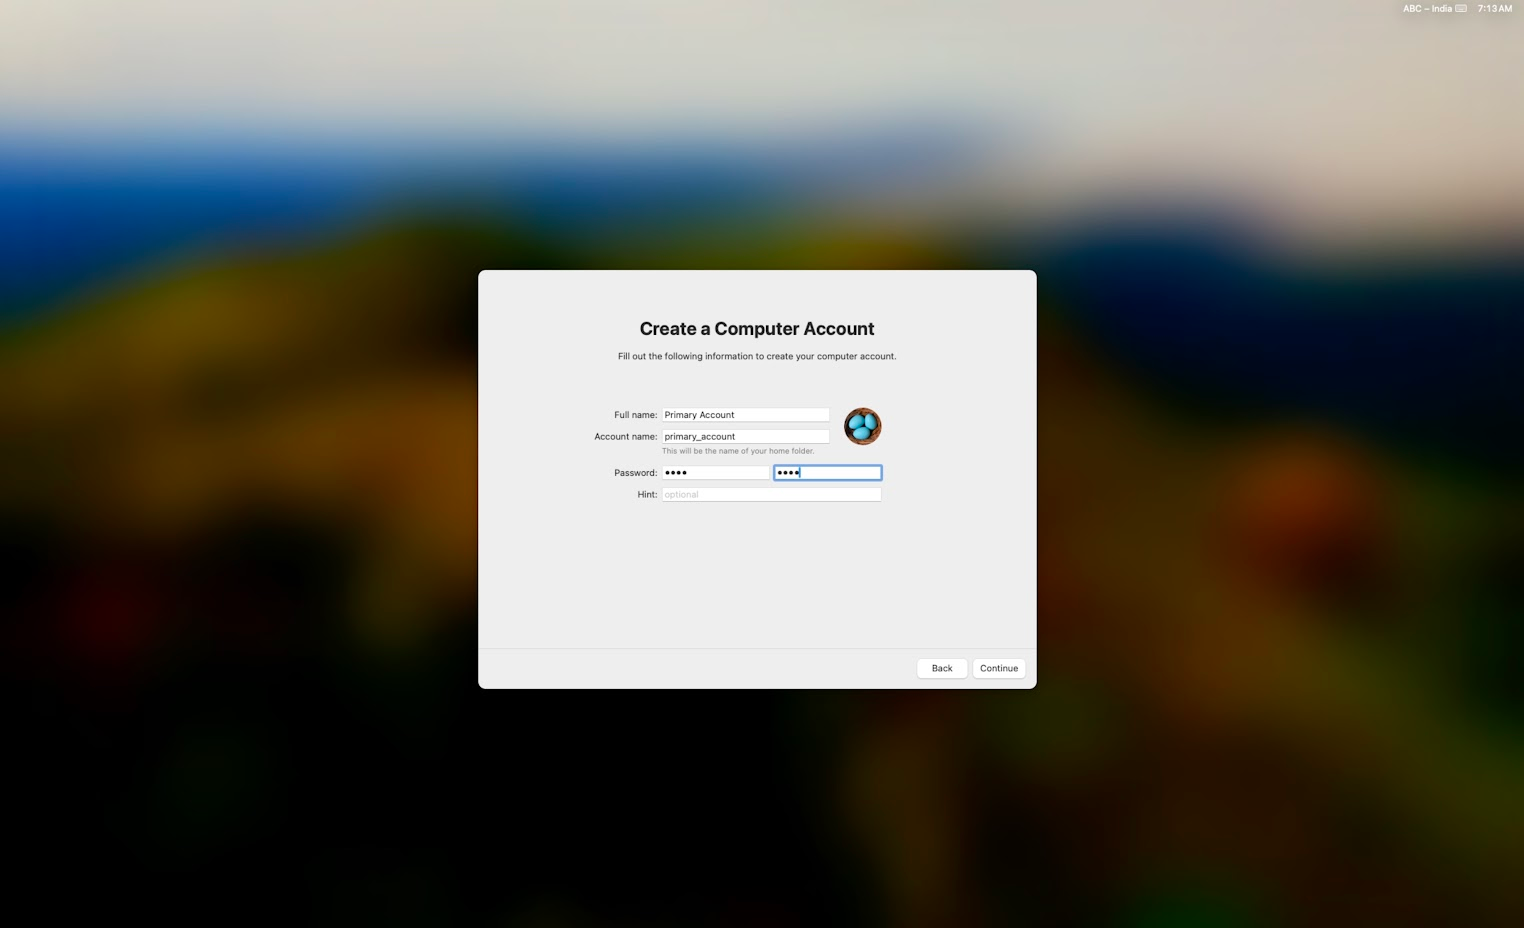
On device,
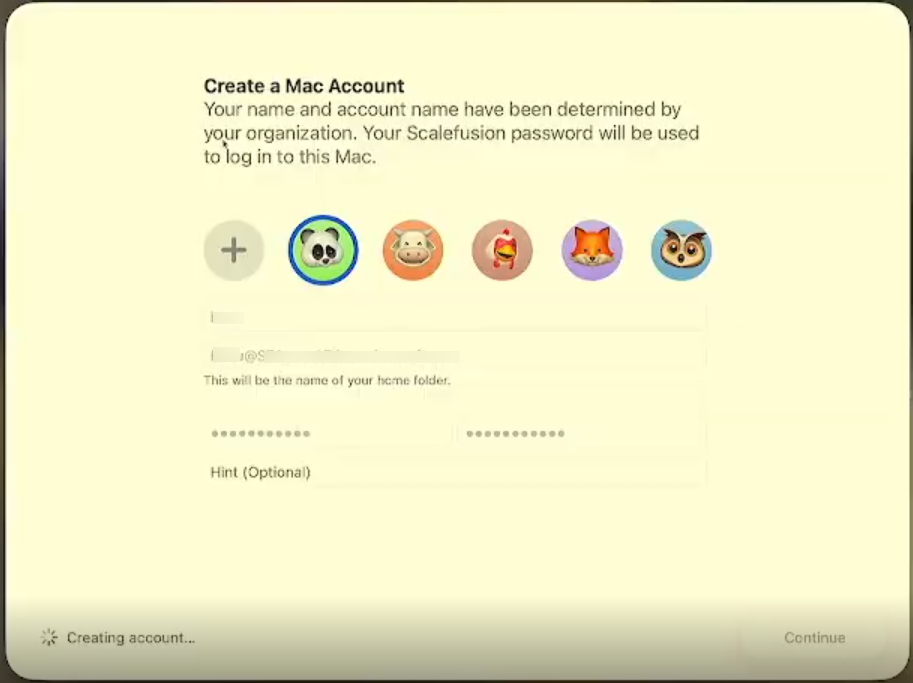
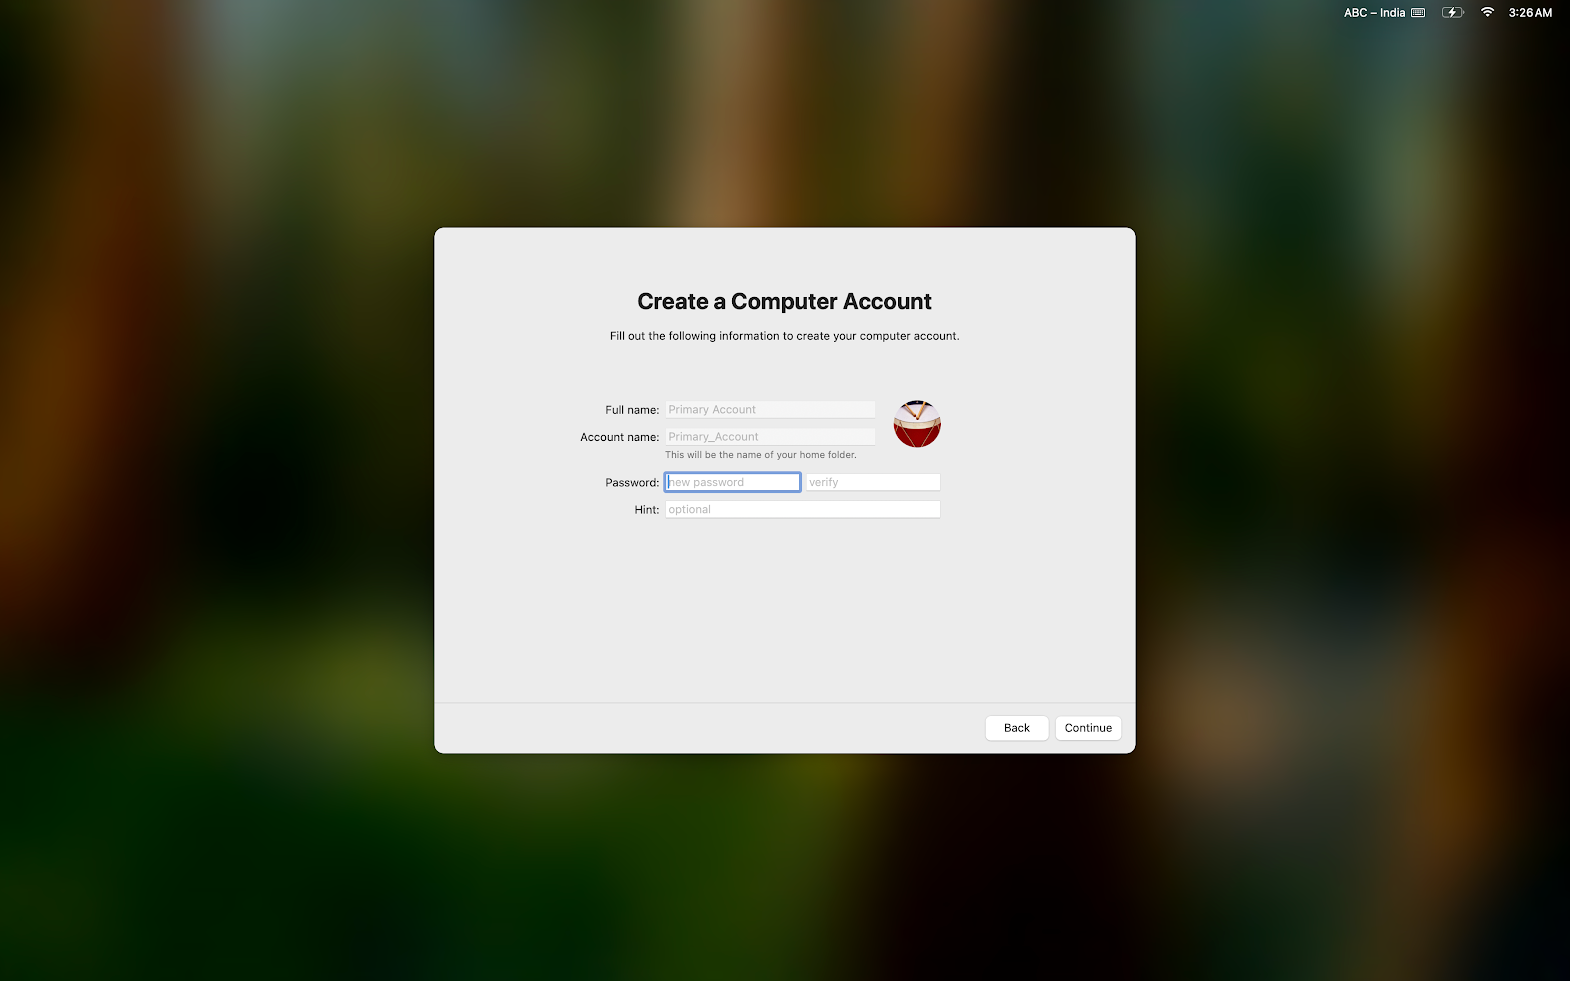
The primary account details (as set on Dashboard) will be prefilled on device during setup.
Password needs to be set by the user at the time of setup
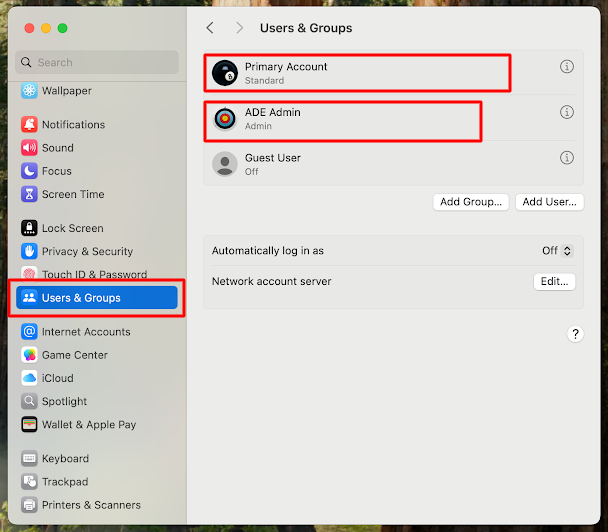
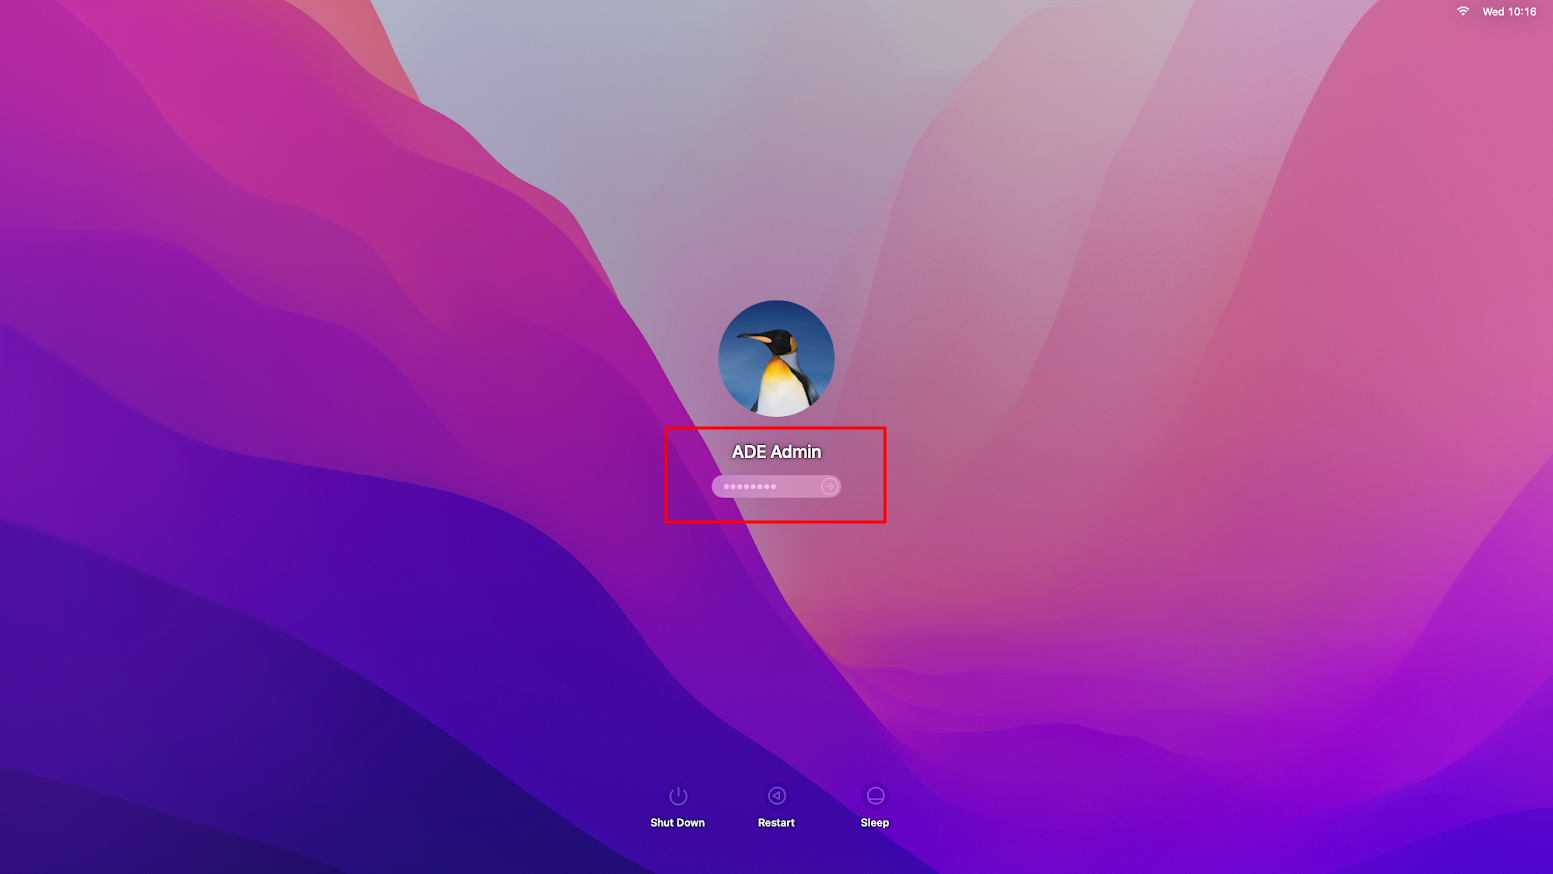
The admin account will be automatically created.
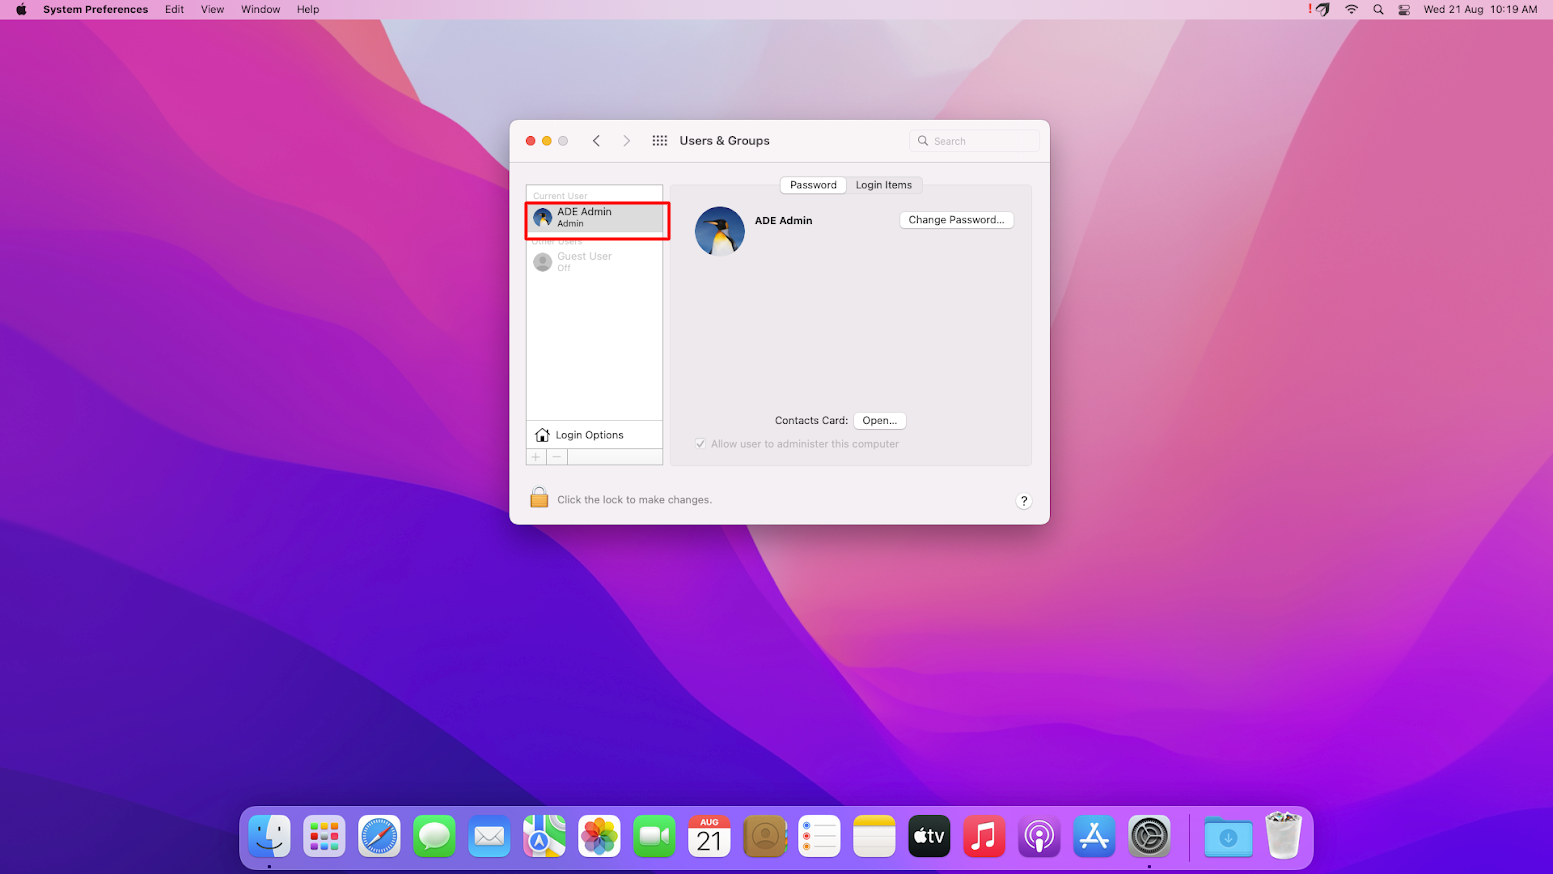
After completion of setup, notice the primary account and admin account will reflect under Users & Groups section on device.
Primary Account creation where user cannot modify details
Settings on Dashboard
Create Primary account as Standard user type
The setting Allow user to modify these values is disabled
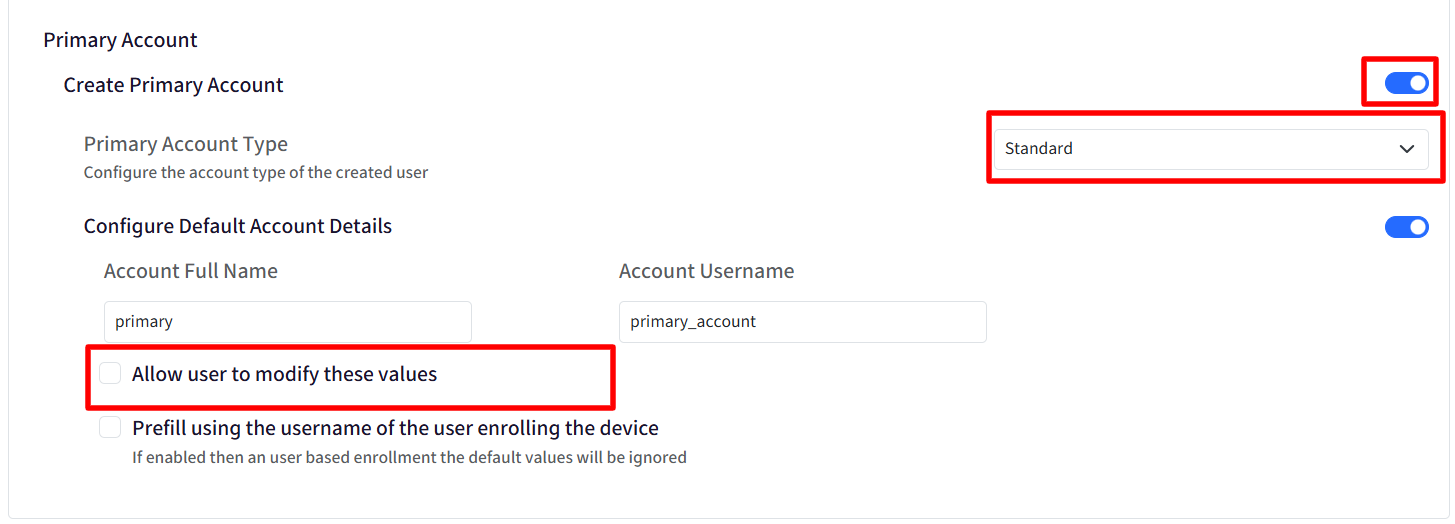
On device,
The primary account details (as set on Dashboard) will be prefilled on device during setup and will not be editable by the end user.
Admin account creation
Enabled auto create admin account.
On device,
The admin account will be created and displayed during setup.
On completion of setup process, notice that the account will be displayed in Users & Groups section on the device.
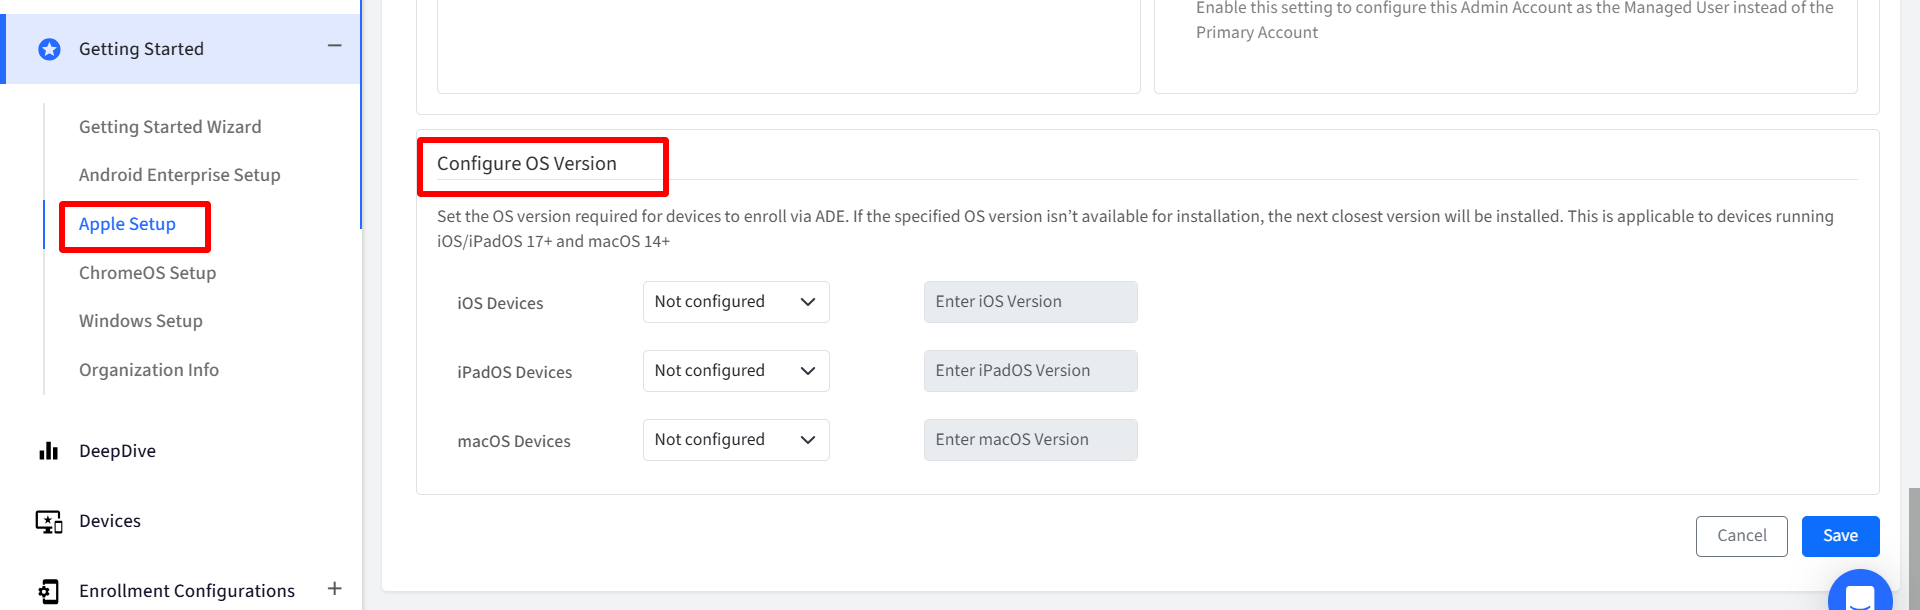
Configure OS Version
On iOS, iPadOS and macOS, IT administrators can enforce minimum OS version requirements to enroll devices via Automated Device Enrollment (ADE). This means that devices must meet the specified minimum OS version to proceed with enrollment. For example, if the minimum OS version is set to macOS 14.5, devices with older versions (e.g., macOS 14.2) will be prompted to upgrade before enrollment can complete.
Pre-requisites / Minimum OS Requirements
iOS/iPadOS 17+
macOS 14+
How to Configure Minimum OS Version for ADE Enrollment
To configure minimum OS version requirements for devices enrolling via Automated Device Enrollment (ADE):
Navigate to Getting Started > Apple Setup > Automated Device Enrollment.
Click on Configure Device Setup Settings
Scroll down and navigate to Configure OS Version section and configure the following:
iOS Devices: Select one option from the drop-down:
Not Configured: No minimum OS version is enforced.
Set a Minimum OS Version: Specify a minimum iOS version required for enrollment. In the text field next to this option, specify the minimum OS version.
Update to Latest OS Version: Automatically updates devices to the latest available iOS version.
iPadOS Devices: Select one option from the drop-down:
Not Configured: No minimum OS version is enforced.
Set a Minimum OS Version: Specify a minimum iPadOS version required for enrollment. In the text field next to this option, specify the minimum OS version.
Update to Latest OS Version: Automatically updates devices to the latest available iPadOS version.
macOS Devices: Select one option from the drop-down:
Not Configured: No minimum OS version is enforced.
Set a Minimum OS Version: Specify a minimum macOS version required for enrollment. In the text field next to this option, specify the minimum OS version.
Update to Latest OS Version: Automatically update devices to the latest available macOS version.
Important Points to Note
Please note that when using options minimum OS version or Update to Latest Version, devices will only be prompted to update under the following conditions:
Available Update: A compatible OS update is available for the device.
Minimum OS Version: The device's current OS version is below the specified minimum version.
Patch Level: If the device's OS version matches the minimum version but has an older patch level, an update will be triggered.
If no suitable update is found, the device will not be forced to update.
When is the OS Update Prompt Displayed?
During setup, once you get past Remote Management screen you will get this kind of prompt if you have configured minimum OS version.
Note: The screenshot below is from a macOS device
