The devices enrolled through Scalefusion MDM are sometimes not located in one single place. However, there are mechanisms on the Scalefusion Dashboard through which the locations of devices and other related details can be identified. Location reports give an account of all location-related information tracked under the Scalefusion Dashboard in a systematic form.
This document gives a description of all location-related reports.
We have the following location reports:
- Location
- Geo-Fence Logs
Who can access
The reports are tied up to the plan that a customer purchases and hence divided into three categories:
- Basic: All customers in the Pro and Business plans. New Users are allocated Basic during the trial period
- Legacy: All customers in a non-enterprise plan
- Advanced: All customers in the Enterprise plan
Location
Location Report is a collection of two reports:
| Report | Description | Platforms | Subscription Plan |
| Location | Gives complete location information of the selected device | Android, iOS, Windows, Linux | All Plans |
| Distance Report | Distance traveled by the device during the selected timeframe, along with the total time it was in motion and details of pitstops. | Android, iOS | Enterprise (Modern, Legacy or Trial) |
These are explained in detail below:
Location Report
The location report gives complete location information of the selected device.
- Navigate to Reports & Workflows > Reports and click on Location
- Select Filters
Filter Description Select Report Select Location Report from the drop-down Date & Timeframe Select a date and time frame (From and To) for which you want to check Location details. By default, the current date is selected
Note - You can only run the location report for one day at a time. For consolidated location data over multiple days, please use our Developer APIs to programmatically fetch the records.Select Device Select a device from the drop-down 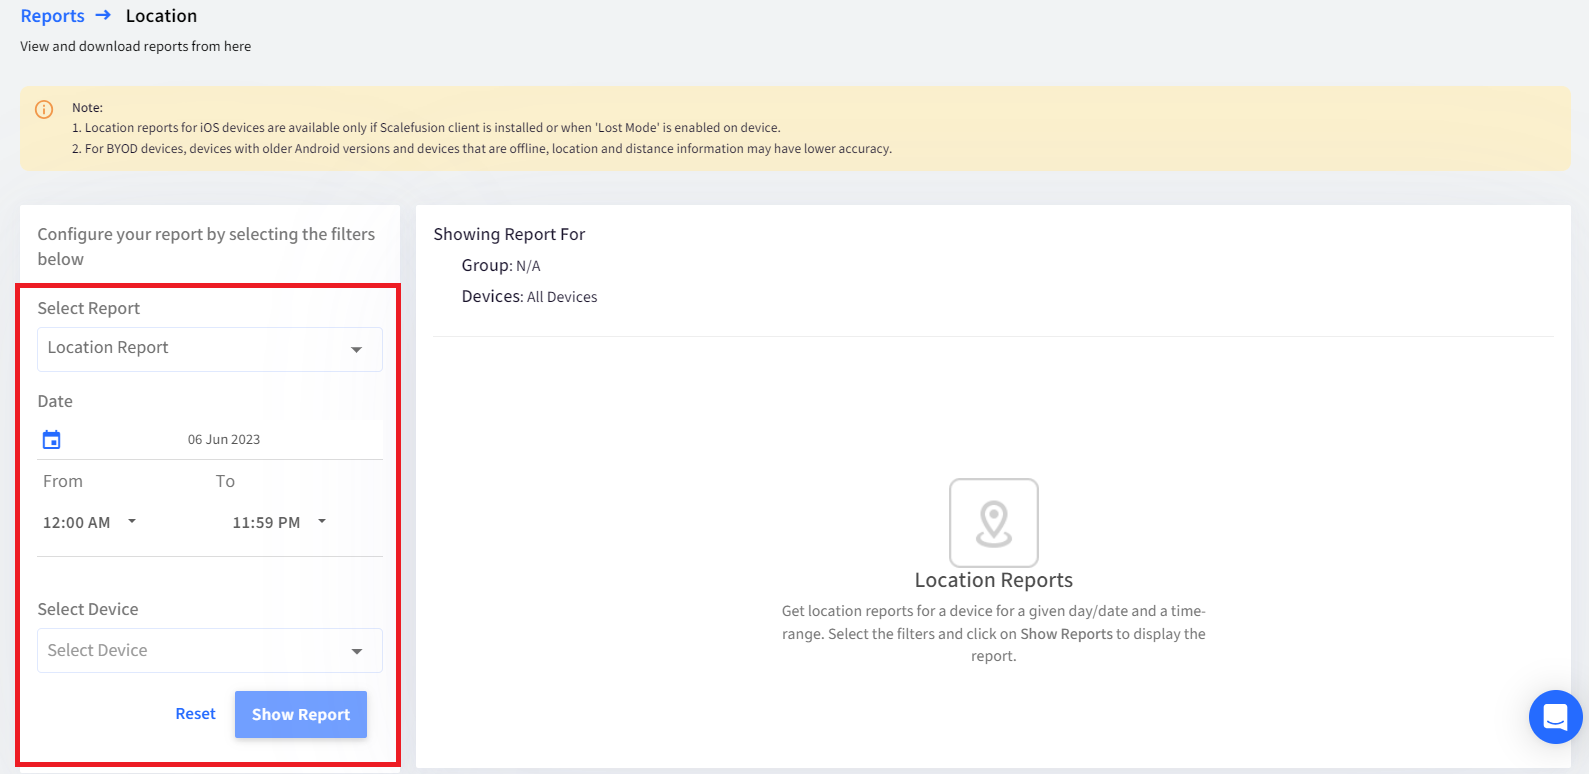
Report Output
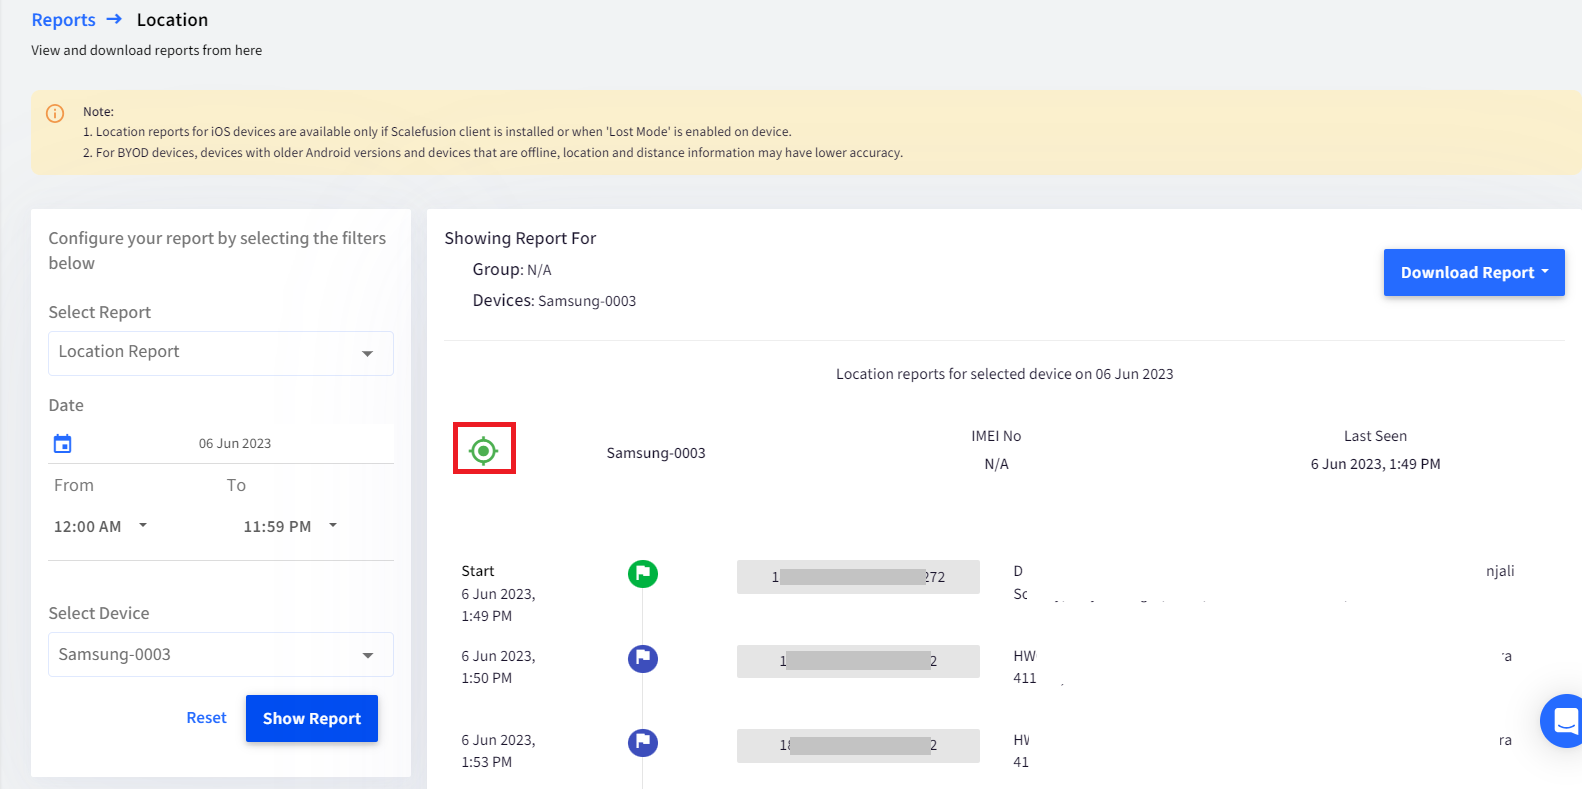
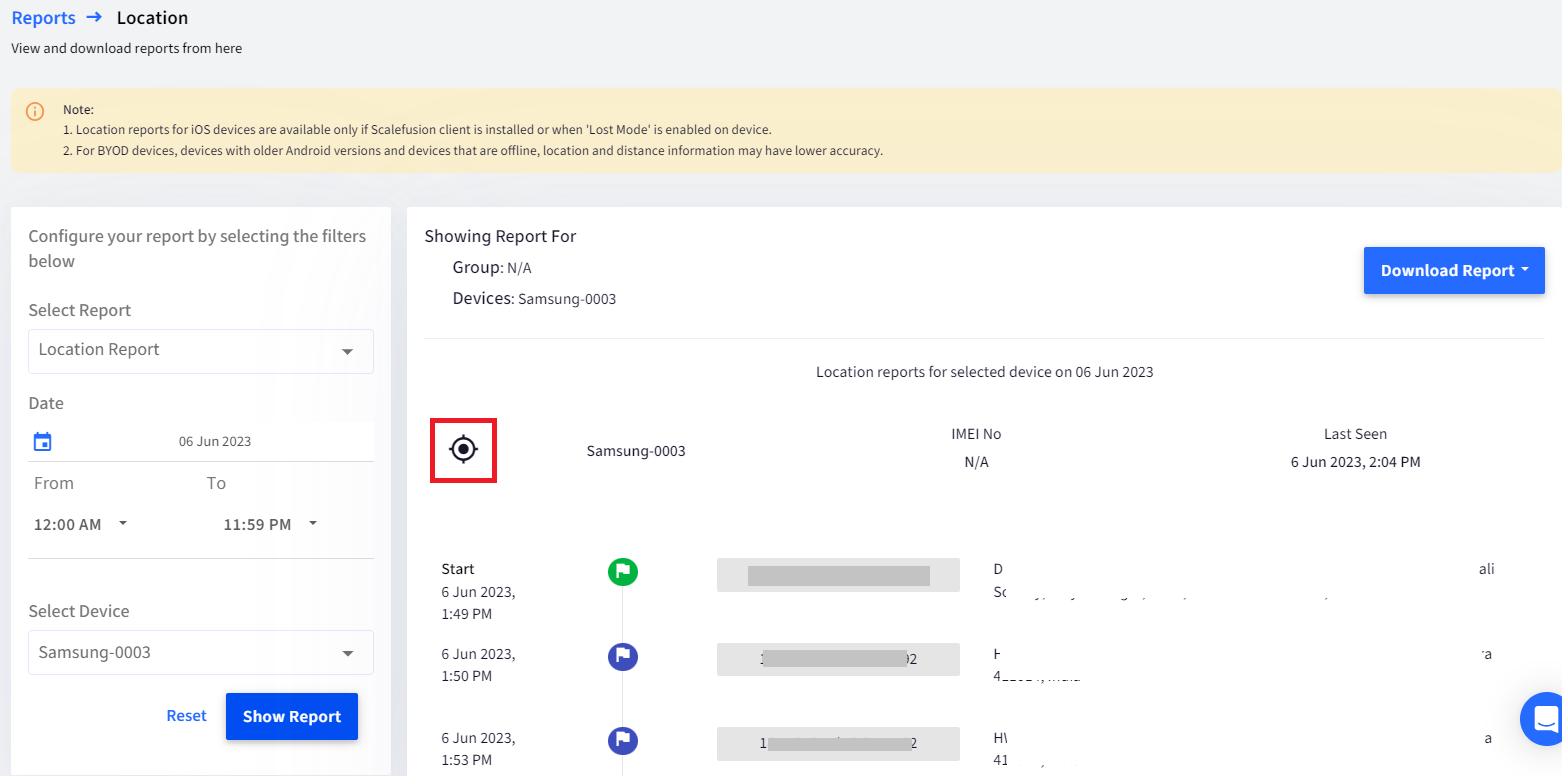
Once you select the device, all the location details will show up:
- IMEI number
- Last Seen date and time,
- Location coordinates (Latitude and Longitude)
- Address
An icon on the top left in the results indicates the Location Tracking setting of the selected device:
- If Location Tracking is Enabled - It is Green
- If Location Tracking is Disabled - It turns Grey (this is if the location tracking is disabled at a later)
Additional Features
- Download: The Location report can be downloaded in CSV format from the 'Download Report' button on the top right.For iOS devices, Location reports are available only if the Scalefusion client is installed or when 'Lost Mode' is enabled on the device.
Distance Report
This report shows the distance traveled by a device during the selected timeframe, along with the total time it was in motion and details of pitstops. It mainly helps dispatchers and logistics industry admins to reconcile and track at what locations the device was not moving and for how long during the distance traveled.
Prerequisites for iOS
Please ensure the following settings are pre-configured on iOS devices:
- Location permission should be set to Always allow
- Precise location setting should be enabled (Settings > Scalefusion > Location permission > Toggle on Precise location)
Steps to access
- Navigate to Reports & Workflows > Reports and click on Location
- Select Filters
Filter Description Select Report Select Distance Report for Android & iOS from the drop-down Select Group Lists Groups and Sub-Groups created. Select a group/sub-group. Select Device Lists all the enrolled devices. If a Group is selected, then it lists the devices which are part of that group. If not, select a device for which you want to see the report. Select Date Select the Date Range for which you want to check the report. 
- After selecting filters, click on Show Report
Report Output
Based on selected filters, the following details will show up with respect to the distance traveled by the device: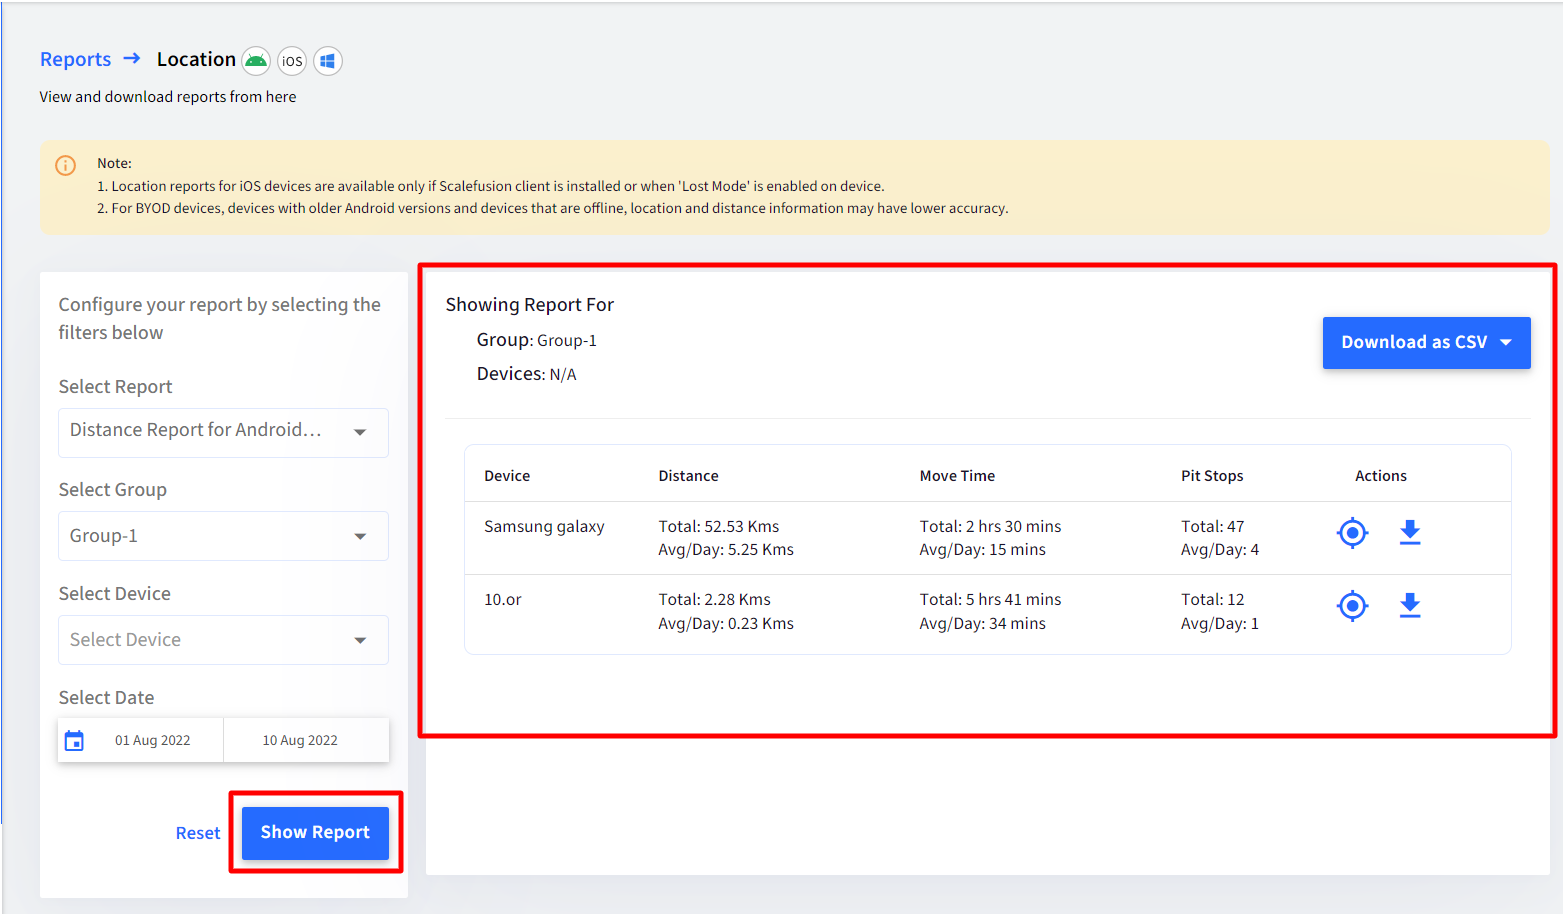
- Device: The name of the device
- Distance: Total and average distance per day (in km) traveled by the device
- Move Time: Out of the total distance traveled, the time duration for which the device was in motion and its average move time per day.
- Pit Stops: Displays the number of times the device was not moving and the average pit stops per day.
- Actions: The following actions can be performed on each device:
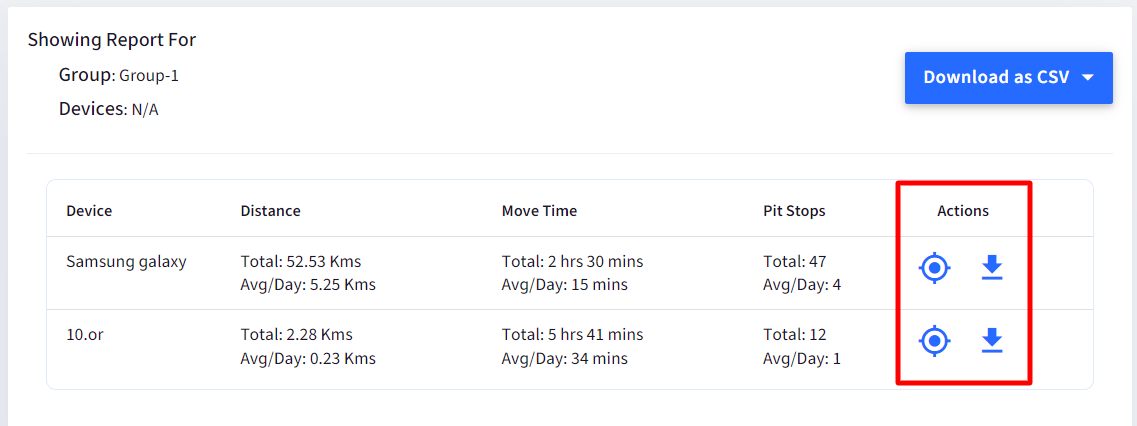
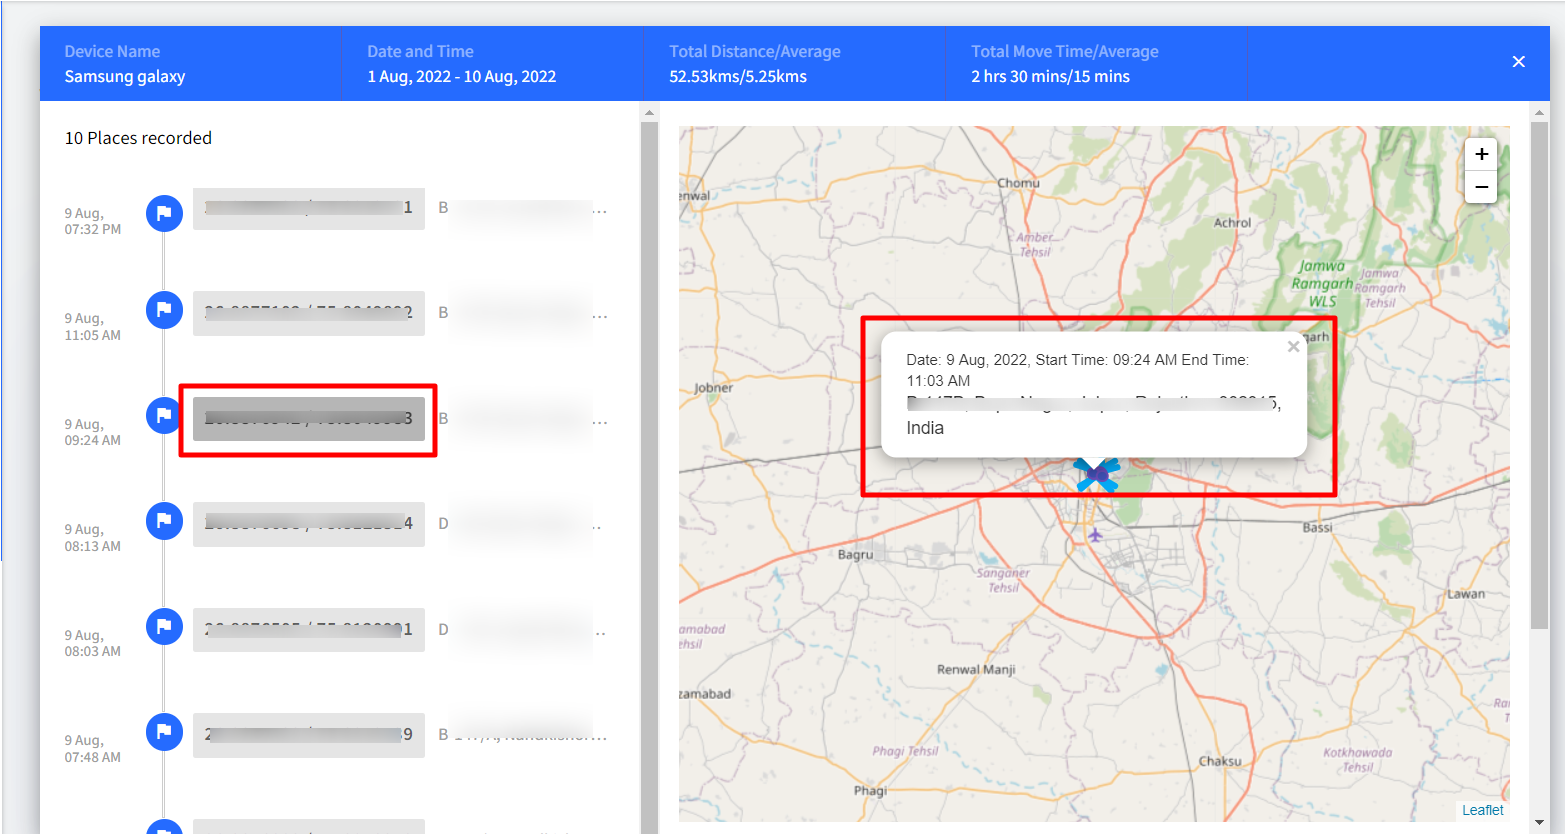
- Show map view: For a more granular view with information on pitstops, click on the location icon, which opens the map view where it shows the pitstop's details, distance traveled, and total move time.To know at what particular location it stopped, click on the latitude/longitude details, and the details can be seen on the map giving location, start time, end time, and more.
- Download: Clicking on the download icon downloads a report of the details of the distance traveled by the device in CSV format.If there are no pitstops, the download and download details will be disabled
- Show map view: For a more granular view with information on pitstops, click on the location icon, which opens the map view where it shows the pitstop's details, distance traveled, and total move time.
Additional Features
- Download: A report can be downloaded in CSV format from the Download as CSV button on the top right. You can download three types of Distance reports:
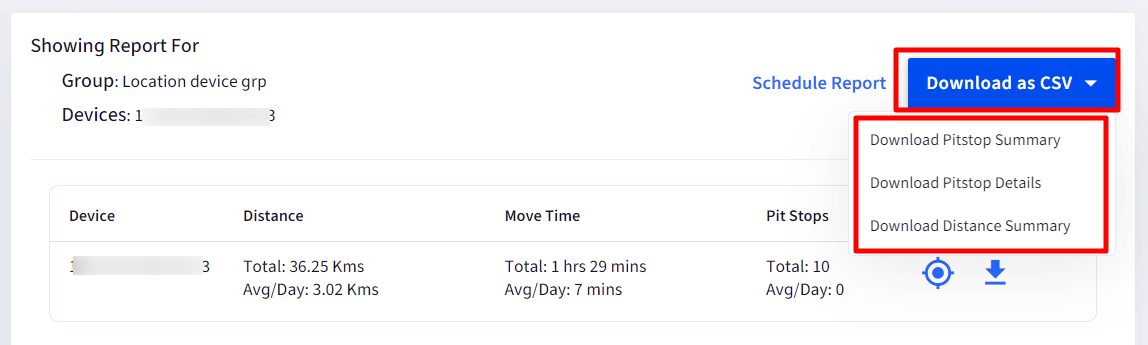
- Download Pitstop Summary: Downloads a summarized report of the device(s), mainly showing all the information that is displayed as report output on the dashboard.

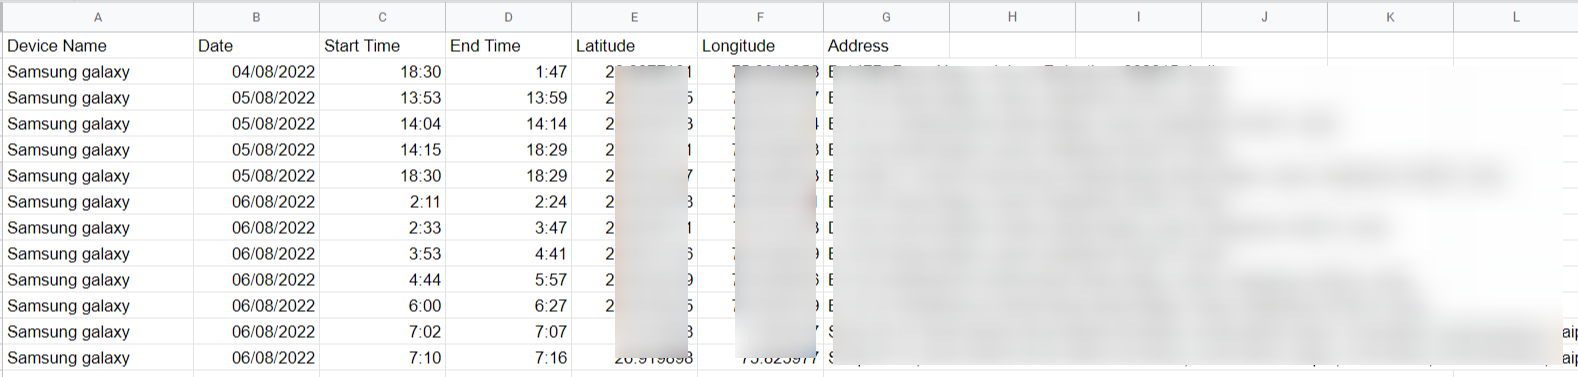
- Download Pitstop Details: Gives a day-wise distance report of all devices. The following information is displayed:
- Device Name
- Date
- Start Time
- End Time (The end time is shown up to the Pitstop)
- Latitude
- Longitude
- Address
- Download Distance Summary: Gives summary of distance travelled, a day-wise break down of the distance travelled by all or selected devices/groups. It also shows Average Distance and Total Distance travelled (in kms.)
 The syncing with the Dashboard occurs only once at the end of the day (every 24 hours), based on the device's local time. Hence changes in distance travelled will be reflected on the next day.
- Download Pitstop Summary: Downloads a summarized report of the device(s), mainly showing all the information that is displayed as report output on the dashboard.
- Reset filters: The filters selected can be cleared and re-selected. The Reset button clears all filters.
For Android, it is recommended to configure the following settings on the Scalefusion Dashboard for getting close to accurate results with respect to Distance:
- Set high accuracy for Location mode.
- Location tracking mode > Fleet tracking > 1 min
- Location Sampling frequency > High
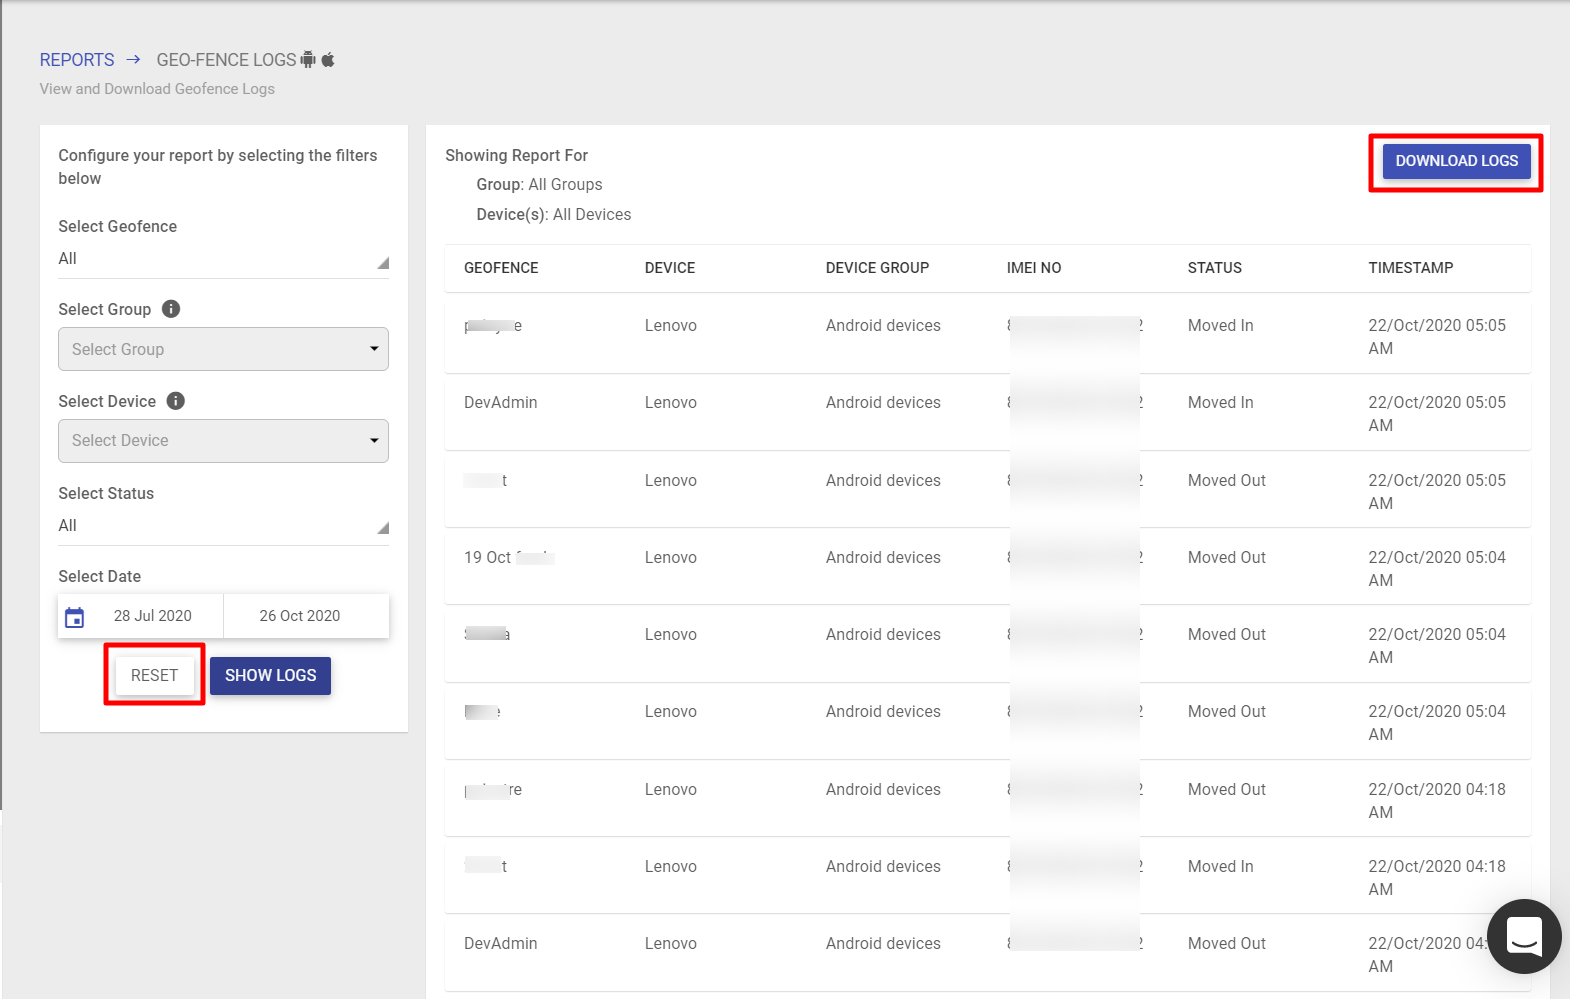
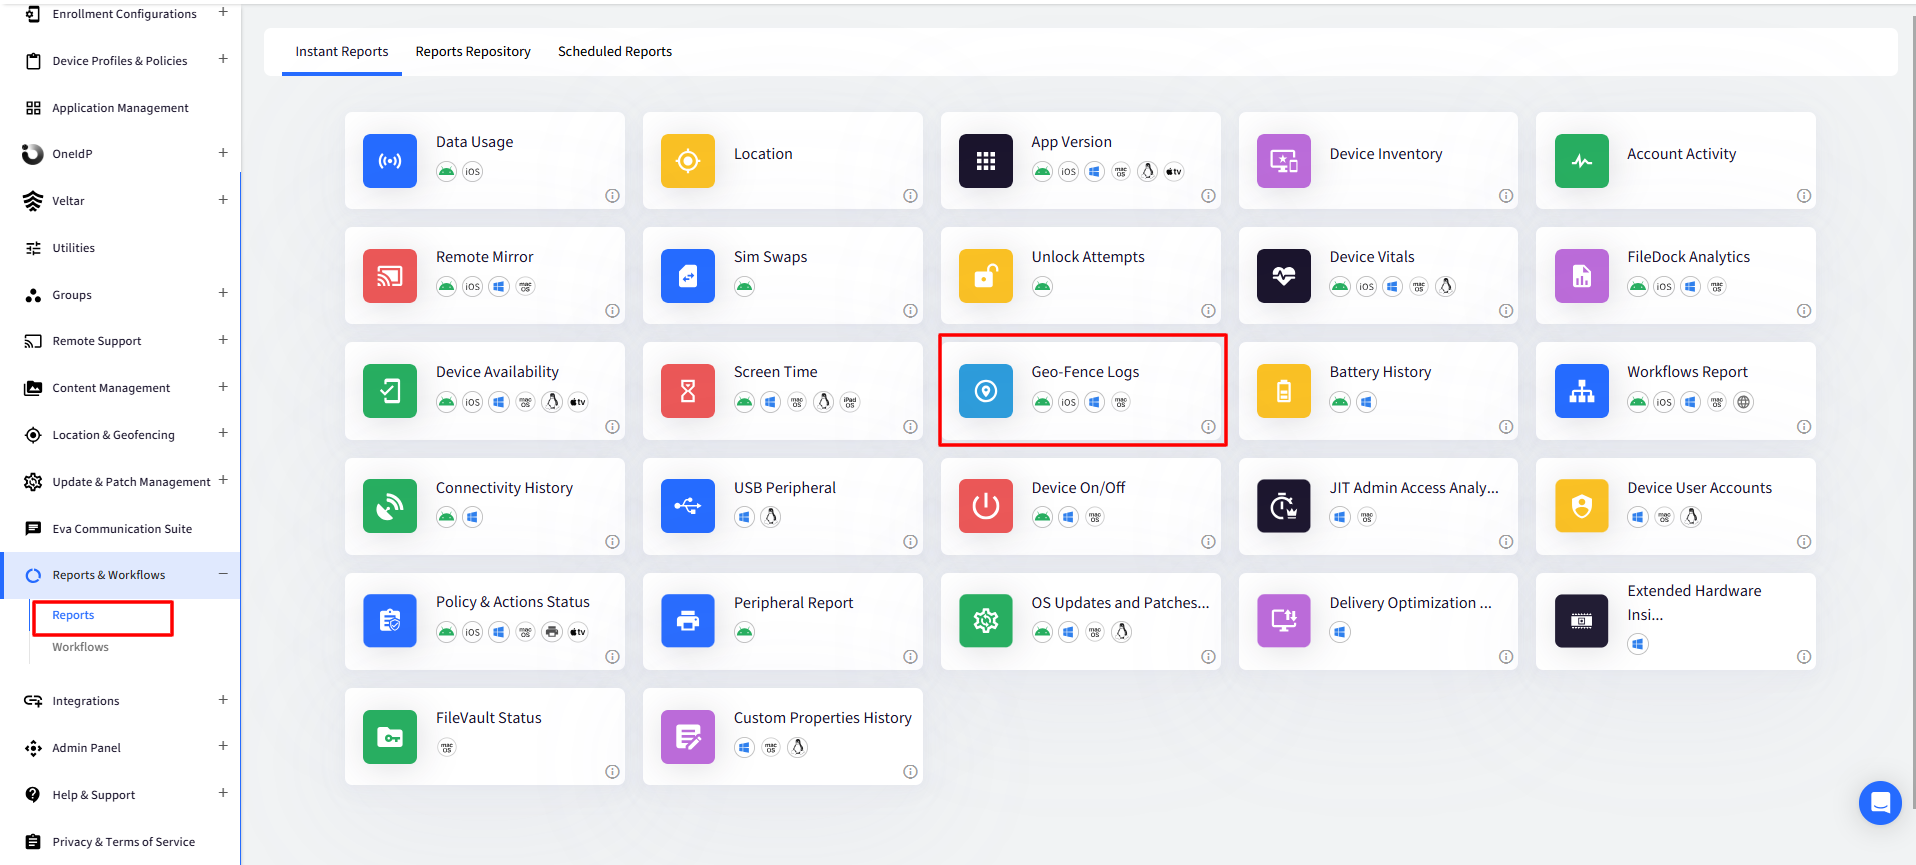
Geo-Fence Logs
Geofences can be created on the Scalefusion Dashboard by defining Latitudes, Longitudes, Radius, etc., and then applied on enrolled devices. This enables the admin to capture the device's move-in/out activities. Geo-Fence Logs report tracks and lists all geofence-related details.
Platforms: Android, iOS, Windows, macOS
Category: Advanced
Steps:
- Navigate to Reports & Workflows > Reports and click on Geo-Fence Logs
- Select Filters
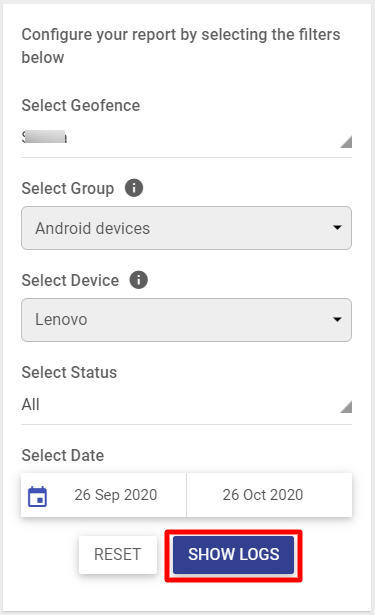
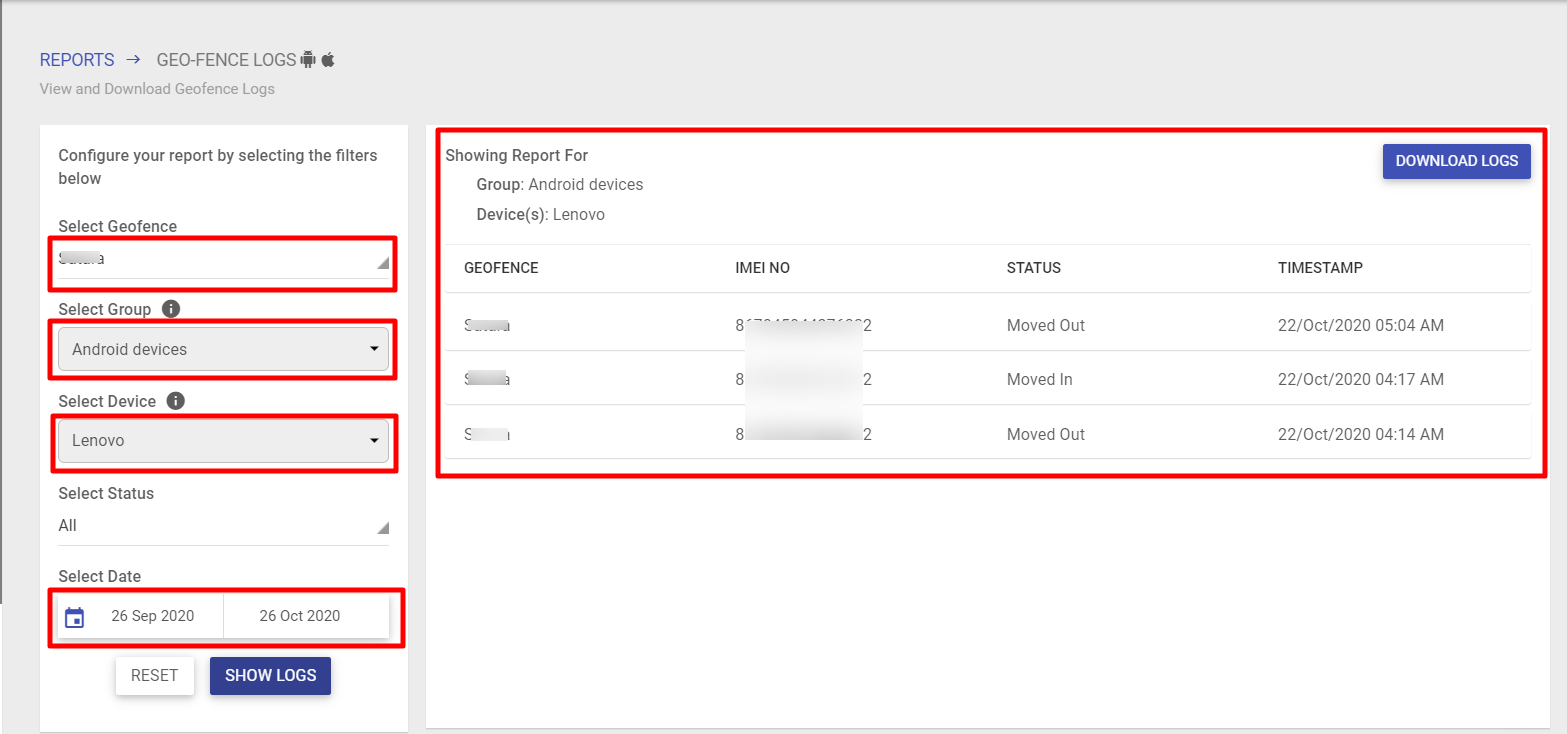
Filter Description Select Geofence The Geofences created by the user under Location & Geofencing -> Geo-Fencing are listed here. By default, All is selected; that is, the logs for all geofences are displayed. You can select one for which you want to view the logs. Select Group Lists those Device Groups and Sub-Groups on which the devices have geofence logs reported. You can select one Device Group. Select Device Lets you select a particular device for which you want to see the geofence logs. Only those devices on which geofence logs are reported are listed here. Select Status If you want to see the report for Moved In or Moved Out status separately, you can select the status here. By default, All is selected. That is, a report for both status types is displayed. Select Date Select the Date Range. - After selecting the filters, click on SHOW LOGS
The report will be generated.
Report Output
The following details are displayed in tabular format on clicking Show Logs:
- Geofence Name: The name of Geofence
- Device Group
- Device
- IMEI No: IMEI no. of the device on which Geofence activity took place
- Status: Status of geofence activity, that is, Moved In / Moved Out
- Timestamp: The exact date and time at which the Geofence activity took place. The time will display as per the user's preferred time zone selected in Account Details on the Scalefusion dashboard. However, if the user has not set any timezone, then it will display in UTC timezone by default.If Device Group and/or Device is selected in filters, they will not display in the report output. However, they will be reflected in the downloaded CSV
Additional Features
- Download Logs - These geofence logs can be downloaded in CSV format by clicking the DOWNLOAD LOGS button.
The naming convention of the downloaded CSV files is automatically given based on the selected filters. For example, for a Geofence Logs Report with the following filters:
Geofence Name - Japr
Device - QS_kiosk-02
Date - From 26th July To 24th October
The filename assigned would be
Japr_QS_kiosk-02_geofence_logs_report_26-07-to-24-10
- Reset filters - The filters selected can be cleared and re-selected. The Reset button clears all filters.