- 02 Dec 2024
- 19 読む分
- 印刷する
- PDF
Workflows - Compliances
- 更新日 02 Dec 2024
- 19 読む分
- 印刷する
- PDF
Overview
These types of Workflow are useful to set alerts on device vitals and metrics and then associate actions when the particular compliance is hit. The actions can be set to send emails or to alert the user to take an action. In this section, we will see the Workflow of type Compliance Tasks available and how they work.
The Workflows of type Compliance Tasks require the Devices to be Online and are based on the information that the device periodically syncs with the Dashboard and in a state to receive Push commands.
On the Android platform, the Compliance workflows work when the devices are in Offline mode.
The Workflow of type Compliance tasks follow certain rules that apply to all of them. These are,
- These Workflows can be created at a Platform/OS level or at a Global level.
- When these Workflows are created at a Platform/OS level, these can be set on Device Groups.
- When these Workflows are created at a Global level, they work on all the devices in the inventory. There can be only one Global Workflows that can be created for each type except for Geofence Workflows.
- These Workflows are based on the Dashboard timezone or the timezone that you select. That is the trigger when the set time is reached based on the selected timezone.
- These Workflows are based on the periodic synchronization of information from devices and hence require the devices to be online.
Set a Battery Compliance
- What does it Do: This allows you to create compliance based on battery level for all of the devices in inventory or to the devices in a group. You can have the information emailed to the selected Email settings. Additionally, choose an action to warn/alert the user via a Broadcast message.
- Supported Platforms: 

- Prerequisites:
- For Platform/OS level compliance, needs at least one Device Group with the devices of the platform/OS added to the group.
- For Global level compliance, no device groups are required.
- How to Create:
- Navigate to Reports & Workflows > Workflows
- To create a platform-level compliance, click CREATE FLOW > OS/Platform > Battery Compliance
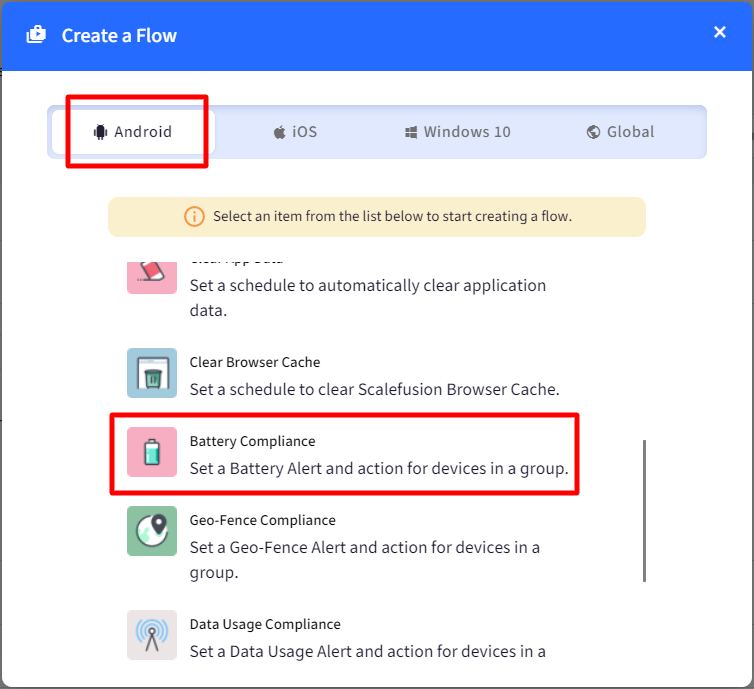
- To create a global level, click CREATE NEW > Global > Battery Compliance
- To create a platform-level compliance, click CREATE FLOW > OS/Platform > Battery Compliance
- Navigate to Reports & Workflows > Workflows
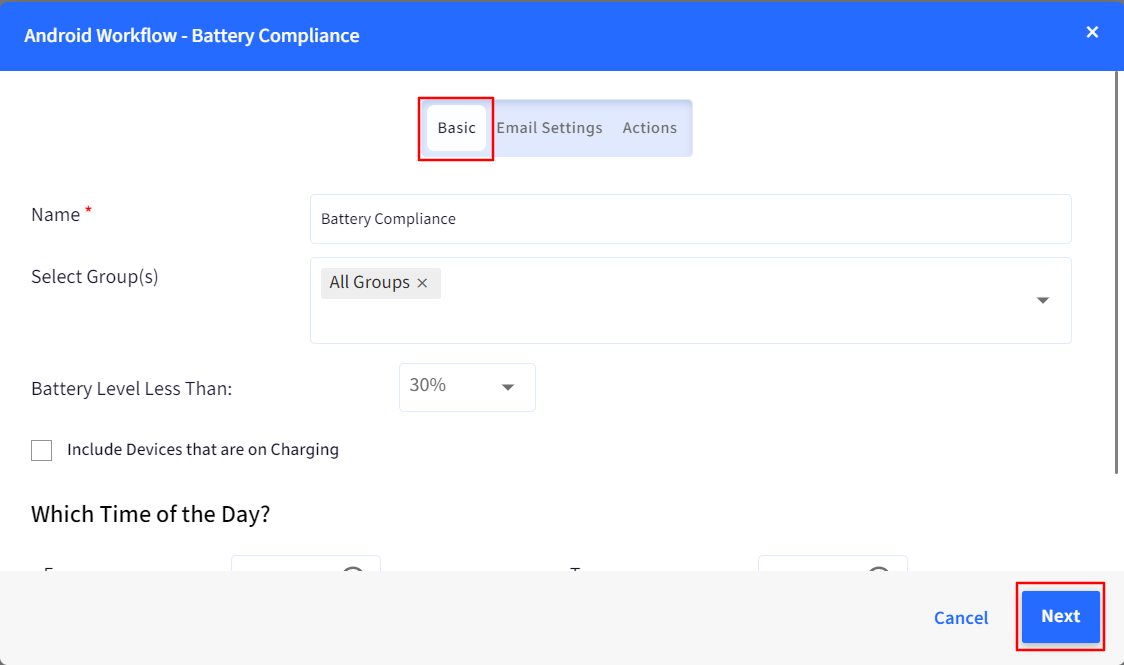
This will open a new window with three tabs: Basic, Email Settings and Actions.
- Basic
- Name: Name for the Workflow.
- Select Groups: Select one or more groups where this Workflow works. This is available only for Platform/OS-level workflow.
- Battery Level Less than Choose a % of the battery level below which you want this Workflow to work. The battery level can be selected from 5% to 95%.
- Include Devices that are on Charging: Choose if you want this workflow to work for devices that are in charge.
- Time of the Day & Timezone: Select the time of the day and the timezone during which you want this to be monitored.
B. Email Settings
Here you can configure the email IDs to which an email notification will be sent for this Workflow. You can choose Global Email Settings in which case the email will go to Account owner, Co-account owner and Admins. Or you can choose Custom Email Settings and provide email IDs to which the notification will go.
You can also set a Frequency at which the emails will be sent. You can set it for Daily or for selected days of the week.

C. Actions
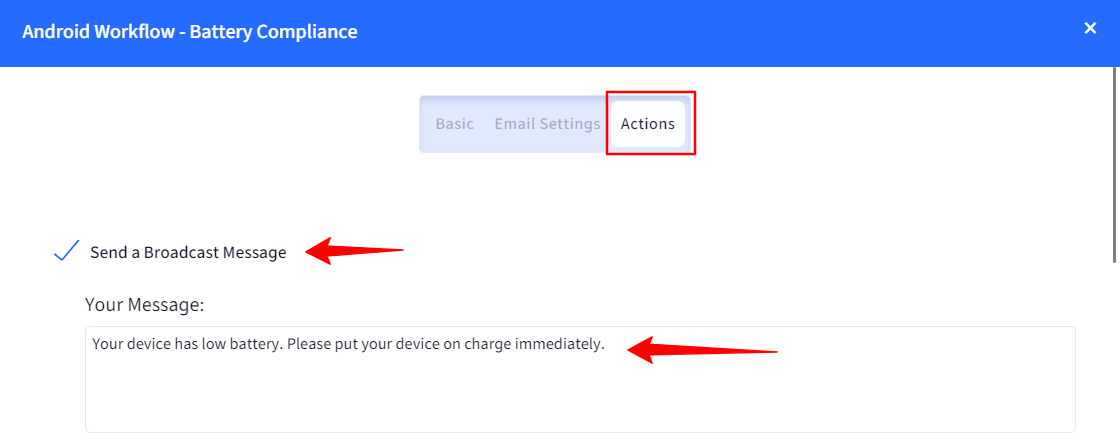
In this tab, you can configure the Actions that should take place on the device if the battery goes below the set battery level.
- Send Broadcast Message: Select this if you want to send a message to the User/Device to alert them to recharge the device. If selected, please enter the message to be sent.
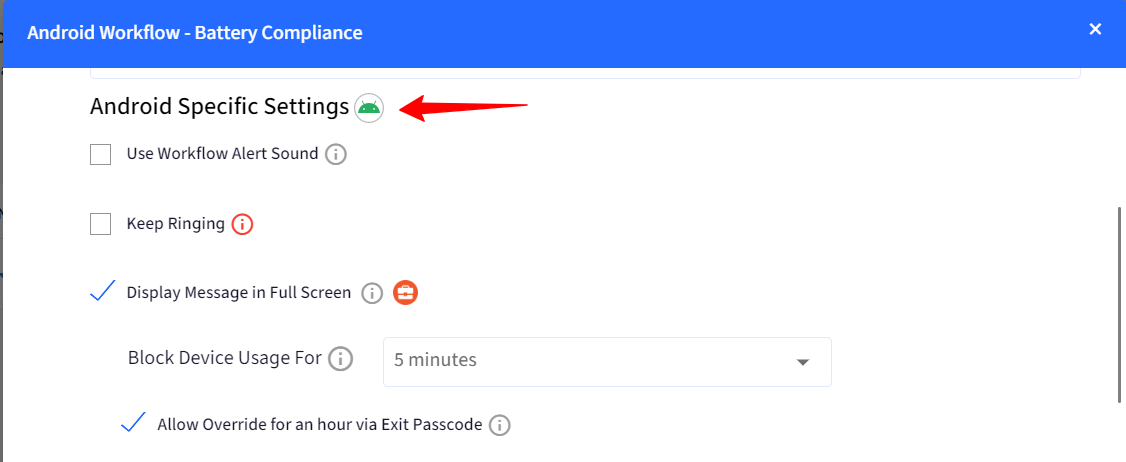
- Android Specific Settings: These settings are exclusive to Android devices.
- Use Workflow Alert Sound: Enable this to use the workflow alert sound configured in branding.
- Keep Ringing: Enable this to keep playing the sound on the device.
- Display Message in Full Screen: Enable this to display the message in full screen instead of a dialog on the device. This will work only on the EMM-managed devices.
- Block Device Usage for: Configure the duration for which the device should be blocked.
- Allow Override for an hour via Exit Passcode: Enable this to show an option that allows to dismiss the full screen message using exit passcode.
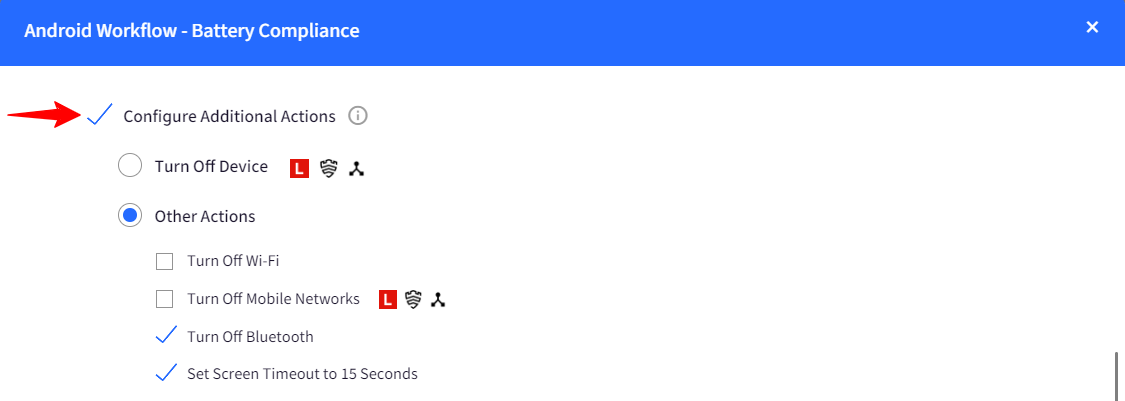
- Configure Additional Actions: You can configure additional actions to take place on the device:
- Turn Off Device: Will work only on Lenovo devices, Samsung Knox supported devices and Wingman supported devices.
- Other Actions such as,
- Turn Off Wi-Fi
- Turn Off Mobile Networks: Will work only on Lenovo devices, Samsung Knox supported devices and Wingman supported devices.
- Turn Off Bluetooth
- Set Screen Timeout to 15 seconds
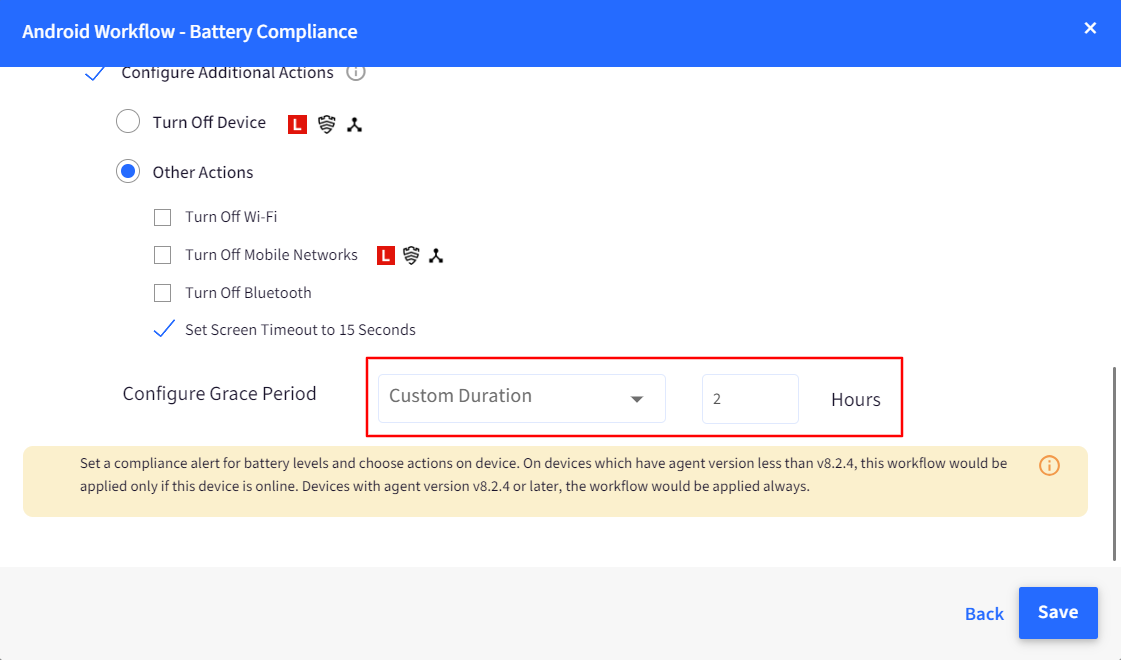
- Configure Grace Period:You can define a grace period before the selected actions are applied to the device. For instance, if a device's battery level drops to 30% and remains uncharged, the specified actions in the workflow (such as turning off the device) will be executed after the grace period expires. You can set the grace period from 5 minutes to 72 hours.
- Custom Duration: You can also set a custom duration for the Grace period apart from the timings mentioned in the drop-down list. In the drop-down list, select the Custom Duration option and enter the time next to it (in hours).
- Custom Duration: You can also set a custom duration for the Grace period apart from the timings mentioned in the drop-down list. In the drop-down list, select the Custom Duration option and enter the time next to it (in hours).
4. Workflow Action Menu
By clicking on the 3 dots menu in the main Workflow page, the following actions can be performed:
- Edit: Use this option to edit the Workflow.
- Report: Provides the report on historical runs of this Workflow.
- Run Now: Runs this compliance workflow on the current device information.
- Delete: Deletes the Workflow.

Set a Geo-Fence Compliance
- What does it Do: This allows you to create compliance based on Geo-Fence events like Moved In and Moved Out. At a group level, you can select the groups that you want to monitor, and at a Global level, all the created geo-fences are monitored.Note: Geo-Fence alert on a Group works only if that Group has Geo-Fence applied. Otherwise, it will not work.
- Supported Platforms: Android, iOS, Windows, Global
- Prerequisites:
- For Platform/OS level compliance, needs at least one Device Group with the devices of the platform/OS added to the group and a Geo-Fence applied.
- For Global level compliance, no device groups are required, and a minimum of one Geo-Fence is to be created.
- How to Create:
- Navigate to Reports & Workflows > Workflows
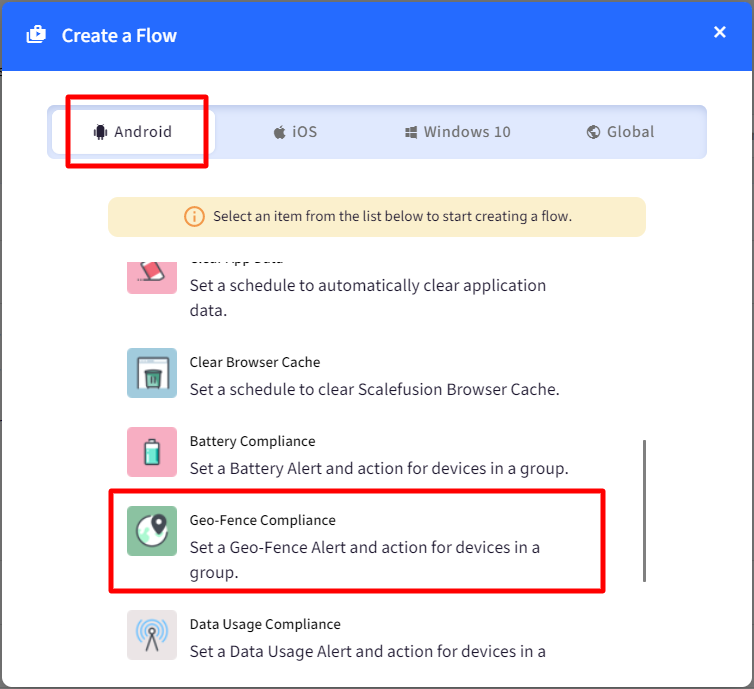
- To create platform-level compliance, click CREATE FLOW > Android > Geo-Fence Compliance
- To create a global level, click CREATE NEW > Global > Geo-fence Compliance
- To create platform-level compliance, click CREATE FLOW > Android > Geo-Fence Compliance
- Enter the following Details,
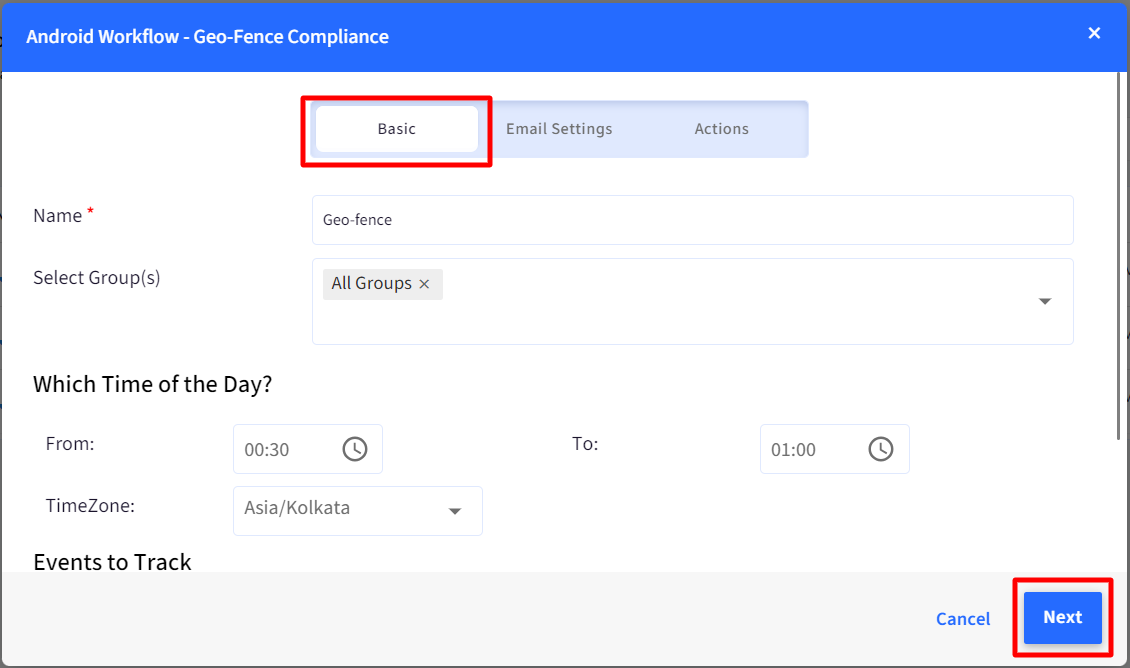
- Basic
- Name: Name for the Workflow
- Select Groups*: Select one or all groups where this Workflow works. This is available only for Platform/OS-level workflow.
- Time of the Day & Timezone: Select the time of the day and the timezone during which you want this to be monitored.
- Events to Track: Choose the events that you want to track, that is, either Moved Out and Moved In or both.
- Email Settings
- Send Emails: Select this if you want email notifications for the alerts.
- Frequency: Choose the frequency of emails between Daily or Selected Days.
- Recipient List: Select if you want to select the emails to the Global list or enter custom emails here.
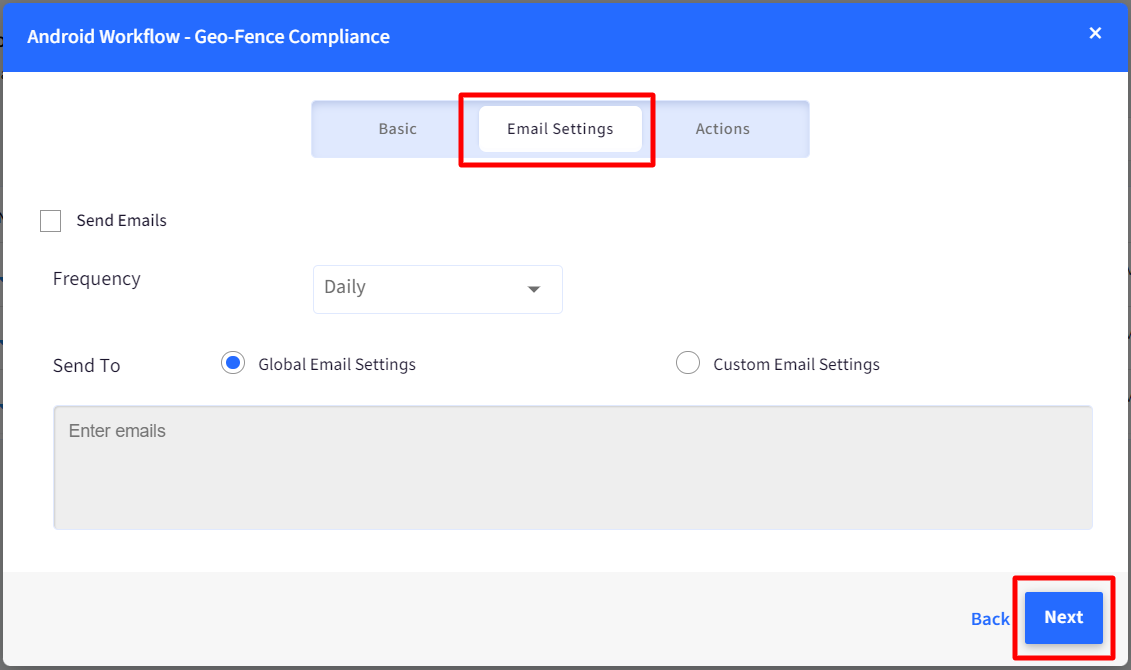
- Actions
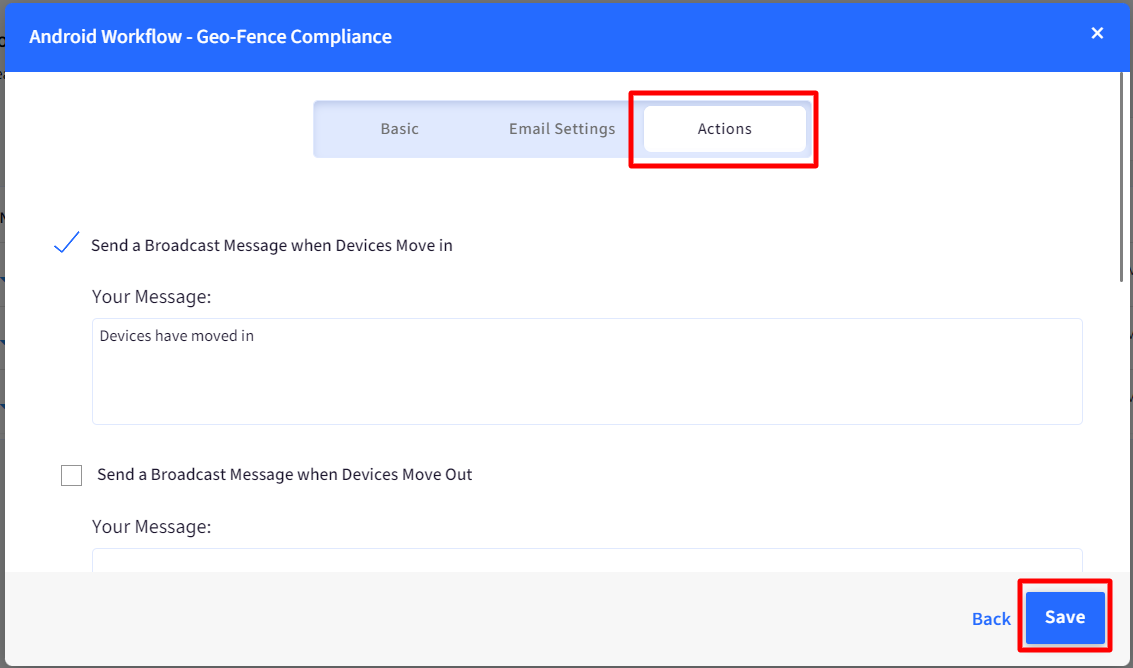
- Send a Broadcast Message: Select this if you want to send a message to the User/Device to alert them to of the compliance violation. If selected, please enter the message to be sent. You can compose separate messages for Move In and Move out events.
- Android Specific Settings: You can also configure additional settings for Android Devices to alert users. These settings are enabled only when there is Move Out event.
- Basic
- Click SAVE once done.
- Navigate to Reports & Workflows > Workflows
- Example: Clicking on a Workflow shows the expanded view and gives additional details. In the example, Workflow is shown in the illustration below,
- This Workflow monitors the moved-in and moved-out events on the selected device group.
- The Success and Failed indicates how many devices the Broadcast Message was pushed.

- Action Menu: By clicking on the 3 dots menu, the following actions can be performed,
- Edit: Use this option to edit the Workflow.
- Report: Provides the report on historical runs of this Workflow.
- Delete: Deletes the Workflow.
- GeoFence Compliance if defined at Global level overrides the Platform level Compliance alerts.
- If you have one Global and two compliances at Platform (Android) level with some group(s), then the ones created at Platform (Android) level will be ignored for sending emails as there is a Global level Workflow already present.
- The reason is that the Workflow at Global level covers all devices and therefore, individual alerts for group-level occurrences are not sent out.
- If you want different alert frequency for each group, you will have to delete the global one and create one for each group or a set of groups.
- If you have one Global and two compliances at Platform (Android) level with some group(s), then the ones created at Platform (Android) level will be ignored for sending emails as there is a Global level Workflow already present.
Set Network Compliance
- What does it do: This Workflow allows you to create compliance based on the network that a device is connected to. You can choose to send emails when the device becomes non-compliant, switch Device Profile, send a message to the device and carry out various other actions.
2. Prerequisites:
- A Device Group should be applied on the devices.
- A Geofence based switch profile workflow should not be applied to the Device Group.
- A Time-based workflow should not be applied to the Device Group with Geofence.
- You would need 2 Android Device Profiles to switch between.
3. How to create the Workflow.
- Navigate to Reports & Workflows > Workflows.
- Click on Create Flow button.
- In the Android tab, select the Network Compliance.
This will open a new window with three tabs: Basic, Email Settings and Actions.
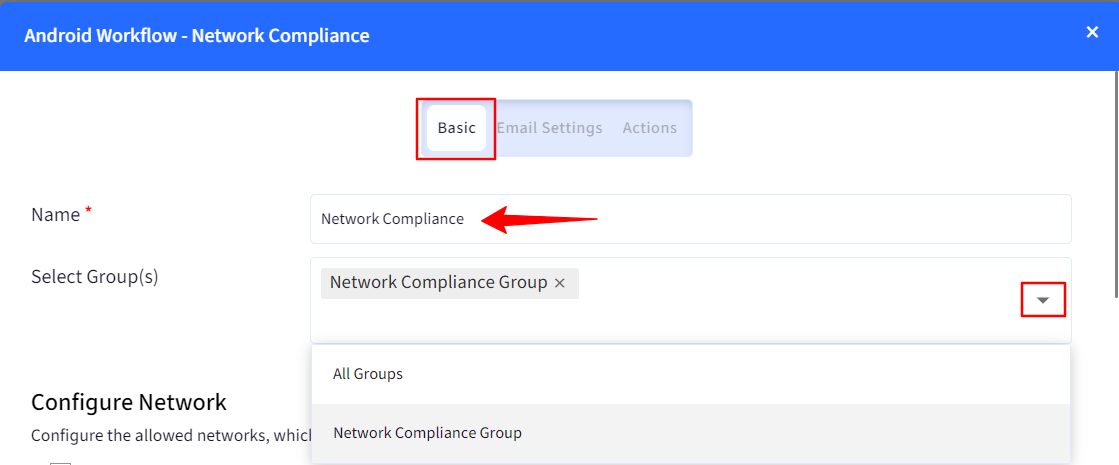
- Basic
- Name: Provide a name to this Workflow.
- Select Group(s): Here you can select a Group or multiple groups.
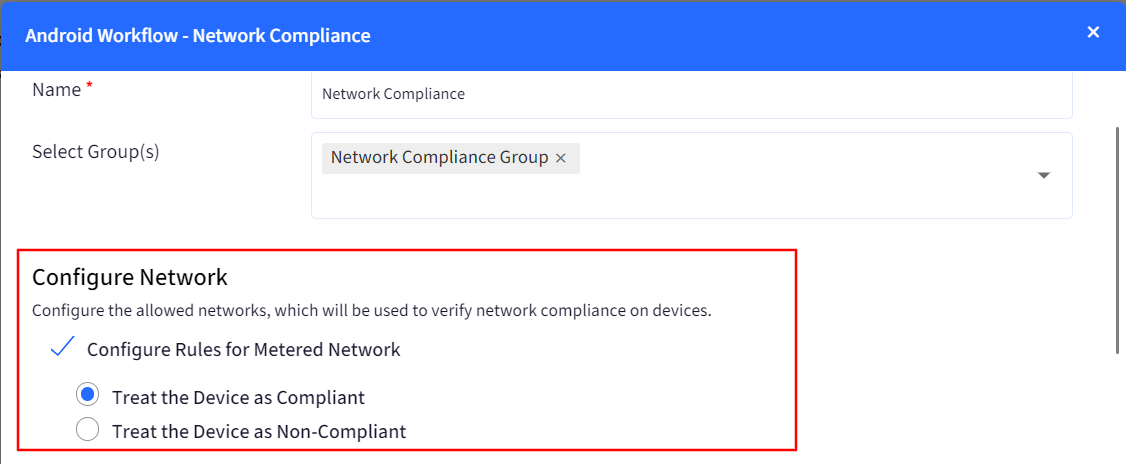
- Configure Network: Here you can configure the allowed network(s) to which device should be connected to and which will be used to verify network compliance on devices.
- Configure Rules for Metered Network: Select this option if you would like to verify device compliance based on the cellular network, that is if the devices should be marked compliant or not if they are connected to cellular data or not.
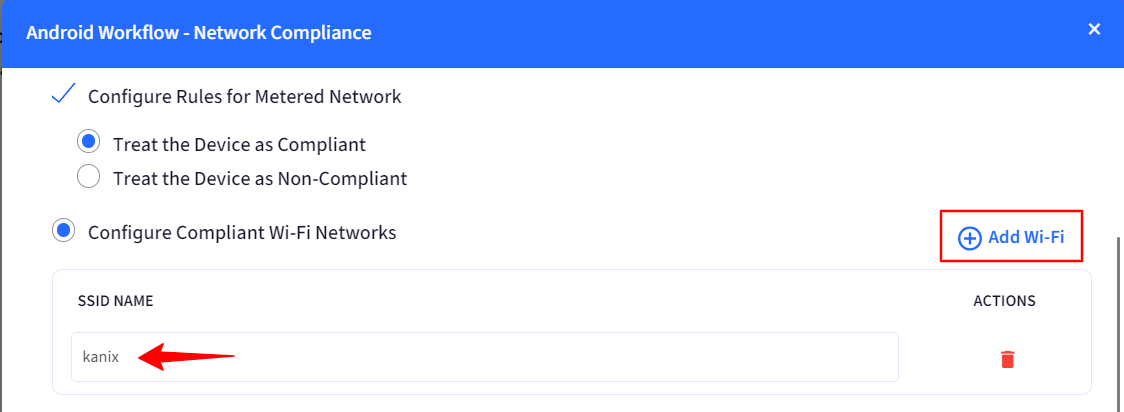
- Configure Compliant Wi-Fi Networks: Select this option if you would like to verify device compliance based on the Wi-Fi network that devices are connected to. You can add multiple SSIDs.
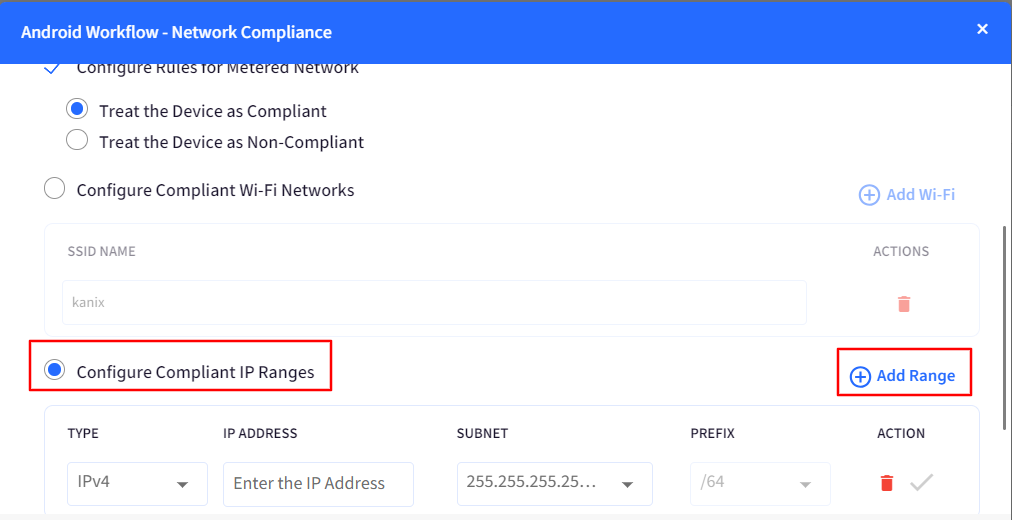
- Configure Compliant IP Ranges: Select this option if you would like to verify device compliance based on the IP Ranges that devices are connected to. You can add multiple Ranges.
- Configure Rules for Metered Network: Select this option if you would like to verify device compliance based on the cellular network, that is if the devices should be marked compliant or not if they are connected to cellular data or not.
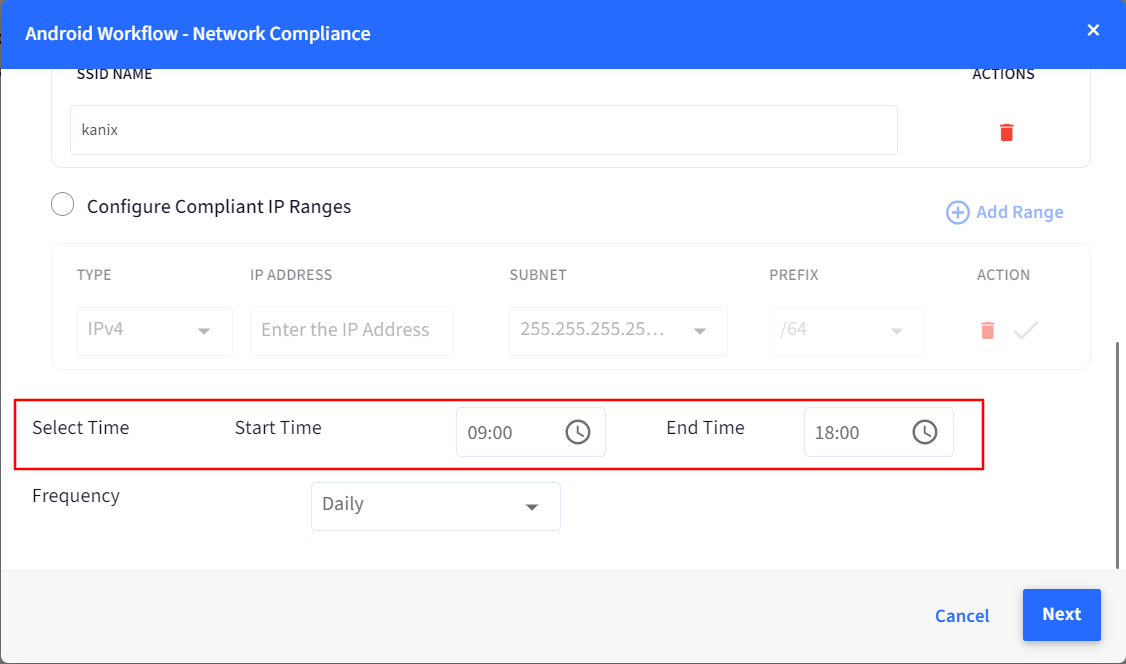
- Select Time: You can set a Start time and End time during which the devices will be checked for compliance.
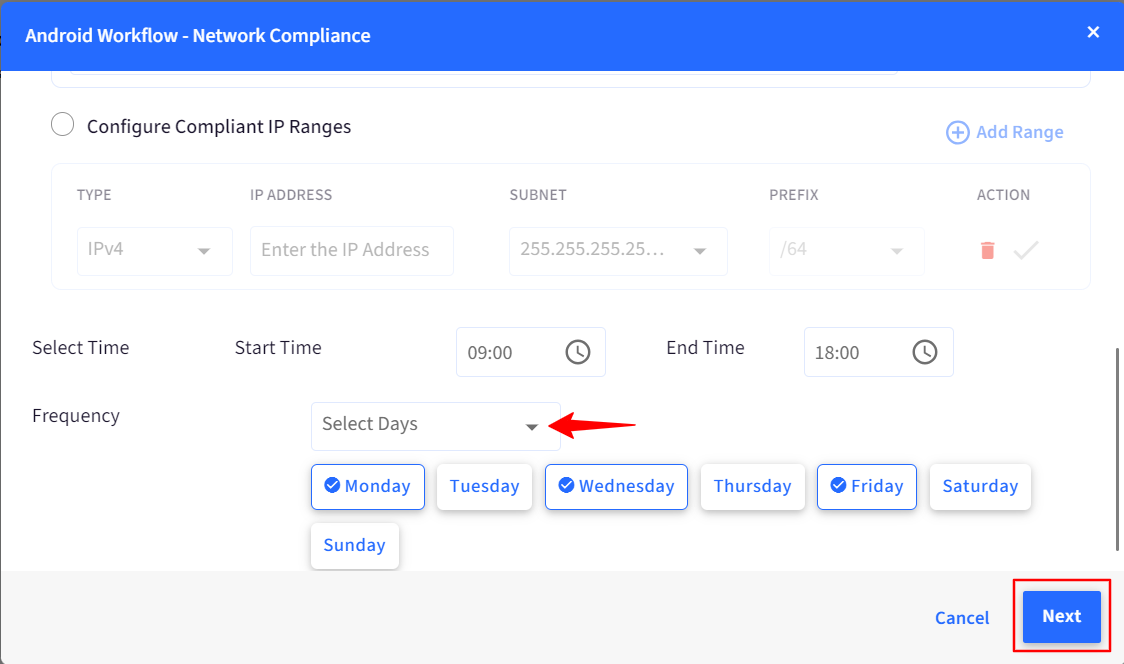
- Frequency: You set a frequency at which the devices will be monitored. You can choose Daily or selected days.
B. Email Settings
Here you can configure the email IDs to which an email notification will be sent for this Workflow. You can choose Global Email Settings in which case the email will go to Account owner, Co-account owner and Admins. Or you can choose Custom Email Settings and provide email IDs to which the notification will go.

C. Actions
In this tab, you can configure the Actions that should take place on the device if it becomes compliant or non-compliant.
- Configure Profile: Here you can set which Profile will be applied on the device in case it is complaint or if it becomes non-compliant.
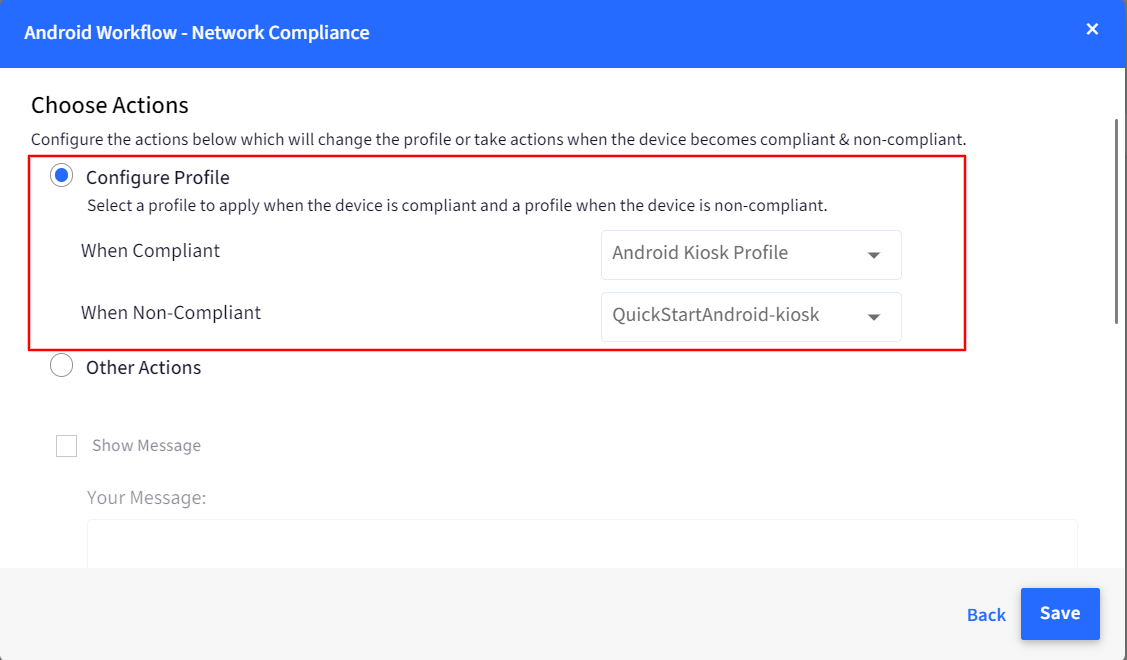
- Other Actions: Here you can configure the following options:
- Show Message: Select this option to show a custom message on the device.
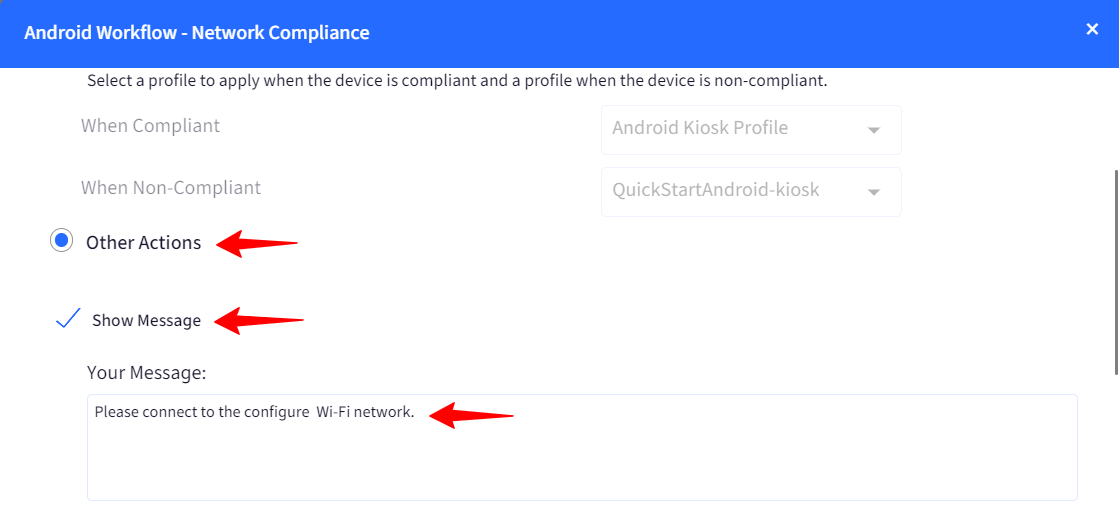
- Android Specific Settings: The actions mentioned here will work on Android devices.
- Use Workflow Alert Sound: Enable this to use the workflow alert sound configured in branding.
- Keep Ringing: Enable this to keep playing the sound on the device.
- Display Message in Full Screen: Enable this to display the message in full screen instead of a dialog on the device. This will work only on the EMM-managed devices.
- Block Device Usage for: Configure the duration for which the device should be blocked.
- Allow Override for an hour via Exit Passcode: Enable this to show an option that allows to dismiss the full screen message using exit passcode.
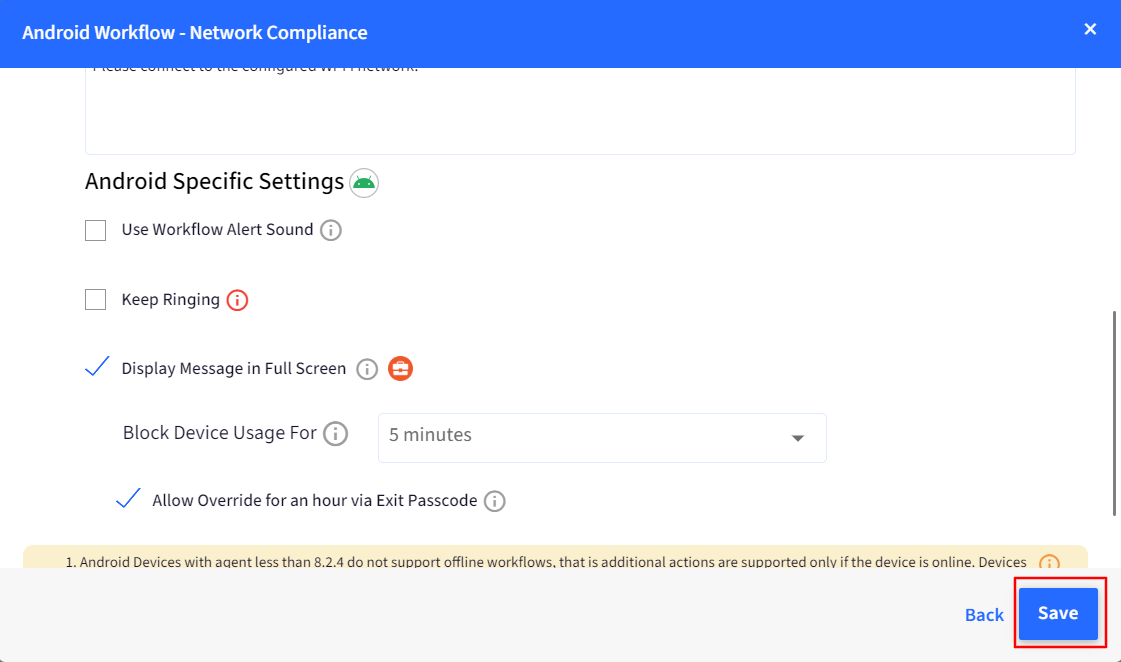
- Show Message: Select this option to show a custom message on the device.
4. Workflow Action menu
By clicking on the 3 dots menu in the main Workflow page, the following actions can be performed:
- Edit: Use this option to edit the Workflow.
- Report: Provides the report on historical runs of this Workflow.
- Delete: Deletes the Workflow.

- Navigate to Reports & Workflows > Reports > Instant Reports.
- Click on Workflow Report > select the parameters and click on Download Report button.

Set a Data Usage Compliance
- What does it Do: This allows you to create compliance based on Data usage of the devices as reported by Scalefusion clients on Android & iOS. You can choose to send emails when the data usage exceeds and/or send a message to the device informing the user about the data usage alert.Note: Data usage system APIs and requires the Android & iOS clients to be running always. The data collected might not exactly match with operator/career billing and is an approximate value.
- Supported Platforms:

- Prerequisites:
- For Platform/OS level compliance, needs at least one Device Group with the devices of the platform/os added to the group.
- For Global level compliance, no device groups are required and works on all devices in inventory.
- How to Create:
- Navigate to Reports & Workflows > Workflows
- To create platform-level compliance, click CREATE FLOW > Android/iOS > Data Usage Compliance
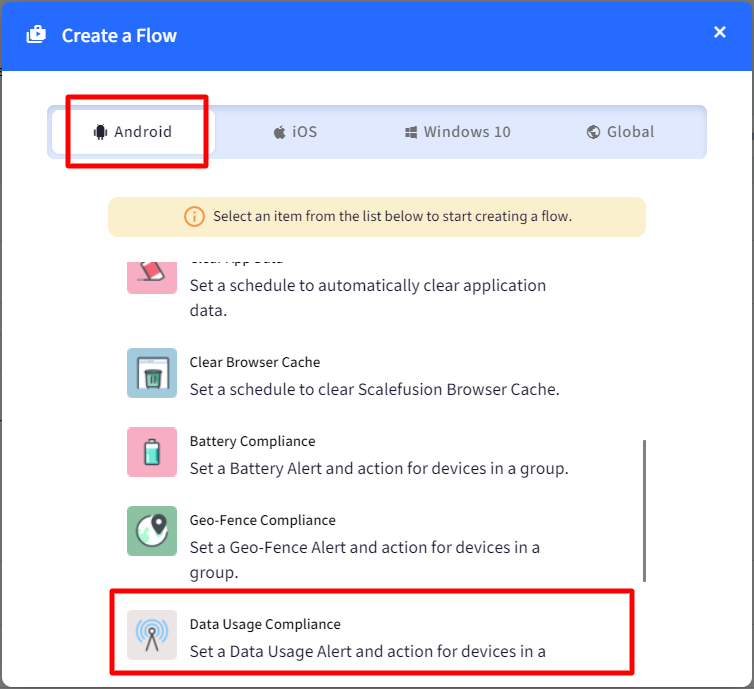
- To create a global level click CREATE NEW > Global > Data Usage Compliance
- To create platform-level compliance, click CREATE FLOW > Android/iOS > Data Usage Compliance
- Enter the following Details,
- Name: Name for the Workflow
- Select Groups*: Select one or more groups where this Workflow works. This is available only for Platform/OS-level workflow.
- Data Usage: To monitor data consumption, select one out of Wifi, Mobile Data and Total Data usage. Using this admin will be able to set alerts to know the data consumption done over wifi or mobile data.
- Data Threshold: Select the Data threshold after which the workflow should trigger.
- Billing Cycle Starts On: Choose the start of the billing cycle to start tracking the usage.
- Profile Switch: Select this if you want to apply/switch profile when data usage has reached a specified data threshold. Once this option is selected, you need to choose the profile for the device when data usage (as defined in Data Threshold) is:
- Within the Data Limit
- Exceeds Data Limit
Profile Switch feature is applicable on Android and iOS, not on Global. A group can have only one Switch profile applied. - Send Emails: Select this if you want email notifications for the alerts.
- Frequency: Choose the frequency of emails between Daily or Selected Days.
- Recipient List: Select if you want to select the emails to the Global list or enter custom emails here.
- Send a Broadcast Message: Select this if you want to send a message to the User/Device to alert them to of the compliance violation. If selected, please enter the message to be sent.
- Click SAVE once done.
- Navigate to Reports & Workflows > Workflows
- Example: Clicking on a Workflow shows the expanded view and gives additional details. In the example, Workflow is shown in the illustration below,
- This Workflow monitors the data usage of the devices in the selected group and sends alerts if consumption exceeds 100MB.
- The Success On and Failed On indicates how many devices the Broadcast Message was pushed.
- The Last Run and Next Run indicate the last time the task was run and the scheduled next run, respectively.

- Action Menu: By clicking on the 3 dots menu, the following actions can be performed,
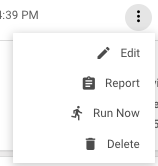
- Edit: Use this option to edit the Workflow.
- Report: Provides the report on historical runs of this Workflow.
- Run Now: Runs this compliance workflow on the current device information.
- Delete: Deletes the Workflow.
Set Security Incident Compliance
- What does it Do: This allows you to create compliance based on security incidents that track the Force exits using a password on Corporate devices or SIM Swaps on the devices as reported by Scalefusion clients on Android & iOS. You can choose to send emails when the incident occurs and/or send a message to the device informing the user about the incident.
- Supported Platforms:

- Prerequisites:
- For Platform/OS level compliance, needs at least one Device Group with the devices of the platform/OS added to the group.
- For Global level compliance, no device groups are required, and it works on all devices in inventory.
- How to Create:
- Navigate to Reports & Workflows > Workflows
- To create platform-level compliance, click CREATE NEW > Android > Security Incident Compliance
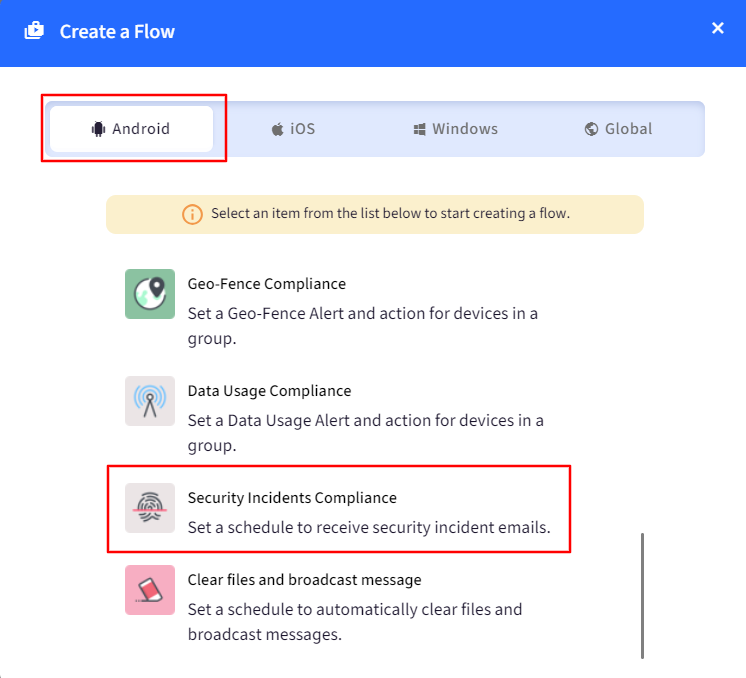
- To create a global level, click CREATE NEW > Global > Security Incident Compliance
- To create platform-level compliance, click CREATE NEW > Android > Security Incident Compliance
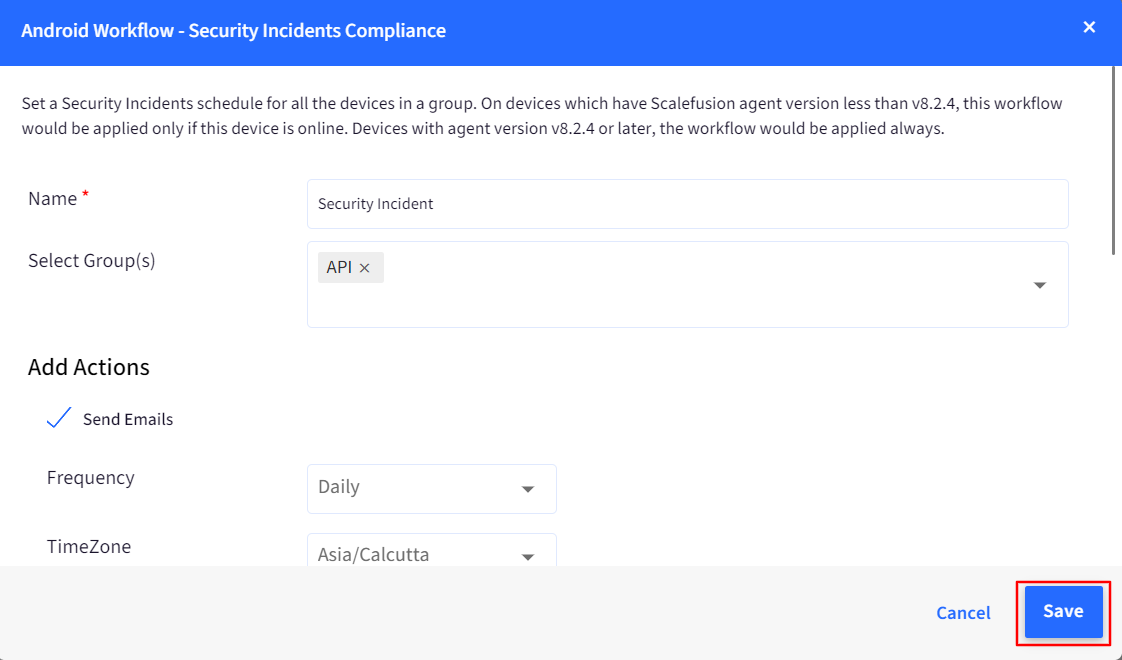
- Enter the following Details,
- Name: Name for the Workflow
- Select Groups*: Select one or more groups where this Workflow works. This is available only for Platform/OS-level workflow.
- Send Emails: Select this if you want email notifications for the alerts.
- Frequency: Choose the frequency of emails between Daily or Selected Days.
- Recipient List: Select if you want to select the emails to the Global list or enter custom emails here.
- Send a Broadcast Message: Select this if you want to send a message to the User/Device to alert them to of the compliance violation. If selected, please enter the message to be sent.
- Click SAVE once done.
- Navigate to Reports & Workflows > Workflows
- Example: Clicking on a Workflow shows the expanded view and gives additional details. In the example, Workflow is shown in the illustration below,
- This Workflow monitors the security incidents on the devices in the selected group and sends alerts.
- The Success On and Failed On indicates how many devices the Broadcast Message was pushed.
- The Last Run and Next Run indicate the last time the task was run and the scheduled next run, respectively.

- Action Menu: By clicking on the 3 dots menu, the following actions can be performed,
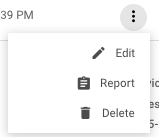
- Edit: Use this option to edit the Workflow.
- Report: Provides the report on historical runs of this Workflow.
- Delete: Deletes the Workflow.
Set an Inactivity Compliance
- What does it Do: This allows you to create compliance based on the inactivity of the device and monitors the inactive devices across the inventory based on the duration selected.
- Supported Platforms: All the platforms, including Linux.
- How to Create:
- Navigate to Reports & Workflows > Workflows
- Click on CREATE NEW > Global > Inactivity Compliance
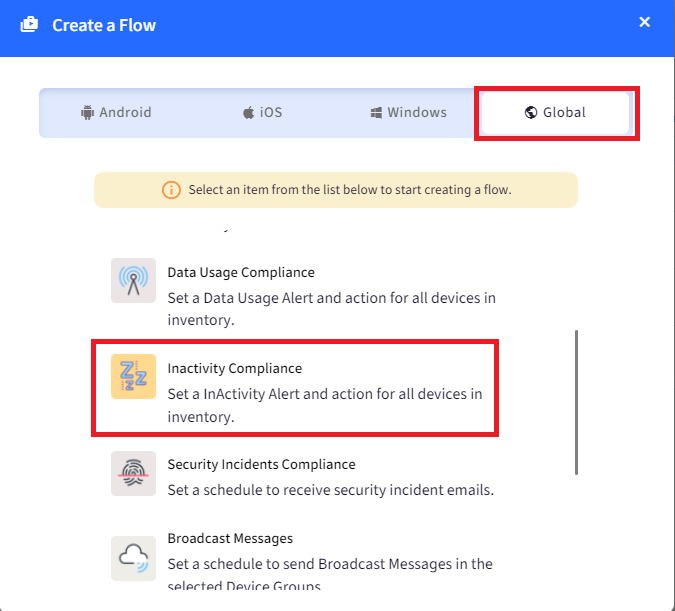
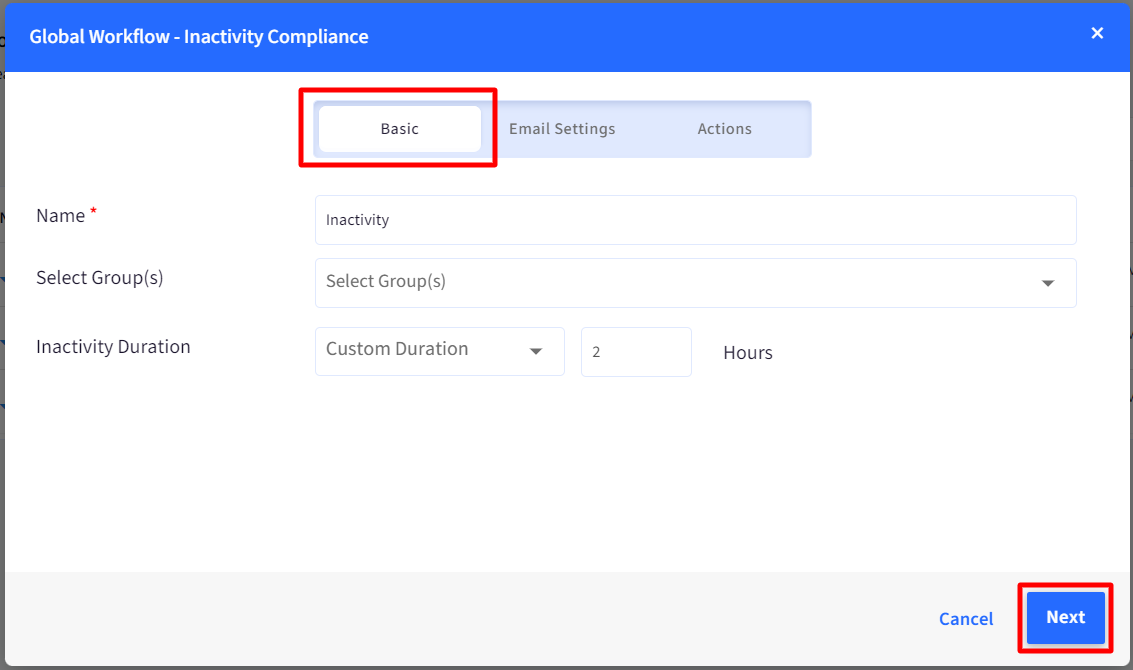
- Enter the following Details,
- Basic
- Name: Name for the Workflow
- Select Groups(s): Choose all groups or the group(s) for which you would like to configure the workflow.
- Inactivity Duration: Select the duration for inactivity after which the workflow will be triggered. You can also choose Custom duration and specify the duration in the text box next to drop-down. The custom duration can be up to 1440 hours.
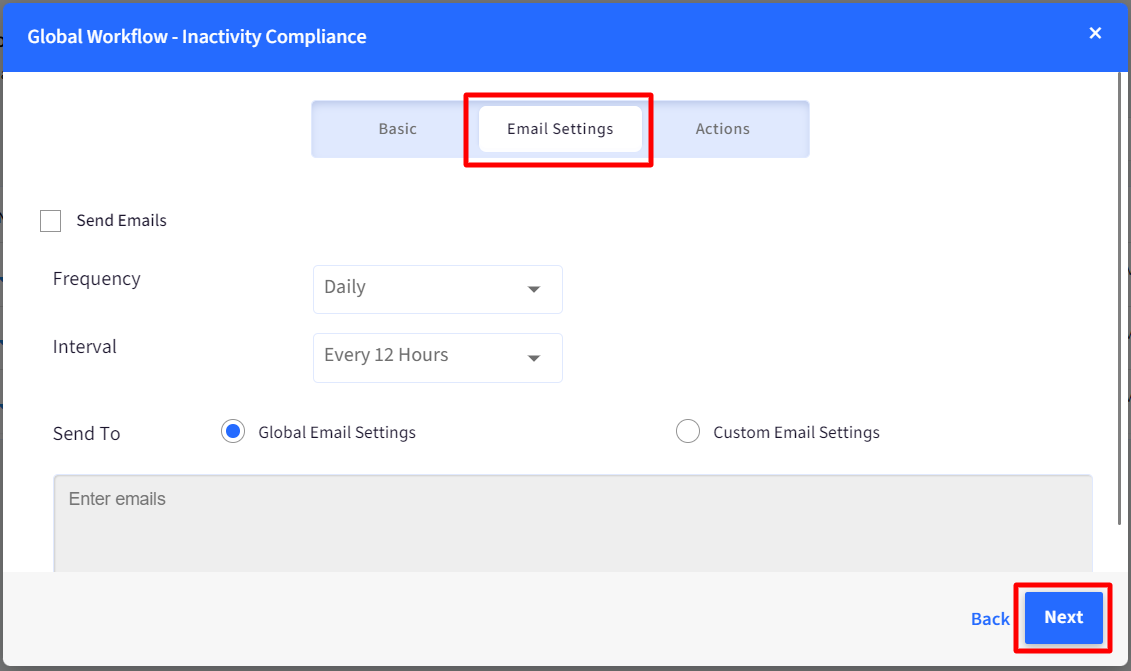
- Email Settings
- Send Emails: Select this if you want email notifications for the alerts.
- Frequency: Choose the frequency of emails between Daily or Selected Days.
- Interval: Choose the interval at which the emails will be sent.
- Send To: Select if you want to select the emails to the Global list or enter custom emails.
- Actions: These settings will only work on Android devices.
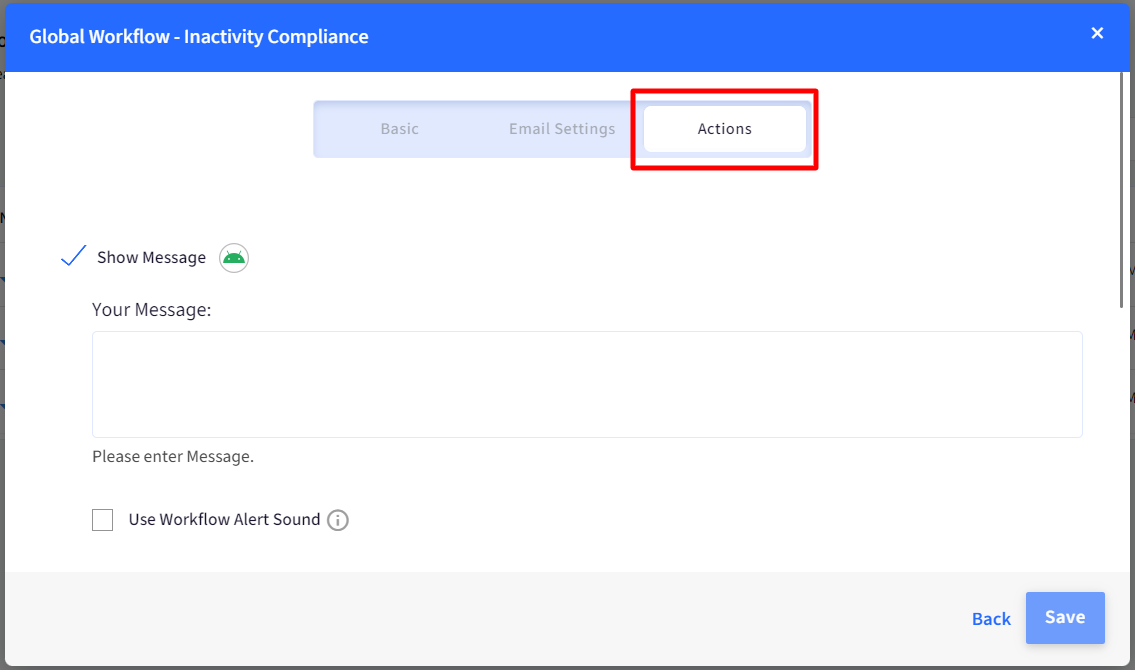
- Show Message: An effort to wake up the device is made by sending a Broadcast Message. This is not guaranteed to be delivered when the device is inactive.
- Use Workflow Alert Sound: Enable this to use workflow alert sound configured in Branding. To know more about Branding on Android devices, please refer to our guide here.
- Keep Ringing: Enable this to keep playing the sound. Please note that this may cause the sound to play to be played indefinitely with no means to silence it.
- Display Message in Full Screen: Enable this to show the message in full screen instead of a dialog on the device. Please note that this setting will only work on EMM-managed devices.
- Block Device Usage For Configure for what duration the device usage should be blocked.
- Allow Override for an hour via Exit Passcode: Enable this to show an option to dismiss the full-screen message using the Exit Passcode.
- Configure Additional Actions: Select an action to be performed on compatible devices if it is inactive. The options are:
- Clear App Data
- Reboot Device
- Factory Reset Device
- Configure Grace Period: If any of the Additional actions (clear app data/reboot/factory reset) are selected, you can set grace period after which the action will take place in case of inactivity. You can also provide custom duration.

- Basic
- Click SAVE once done.
- Example: Clicking on a Workflow shows the expanded view and gives additional details. In the example, Workflow is shown in the illustration below,
- This Workflow monitors the device pings to see if they are connected to the internet/dashboard and marks the device as Inactive for the selected duration, which is 6 hours.
- The Last Run and Next Run indicate the last time the task was run and the scheduled next run, respectively.
- Action Menu: By clicking on the 3 dots menu, the following actions can be performed,
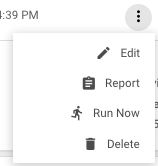
- Edit: Use this option to edit the Workflow.
- Report: Provides the report on historical runs of this Workflow.
- Run Now: Runs this compliance workflow on the current device information.
- Delete: Deletes the Workflow.
Set a Storage Compliance
- What does it Do: This allows you to create compliance based on the storage of the device and monitors the storage space on devices across the inventory based on the level selected.
- Supported Platforms:
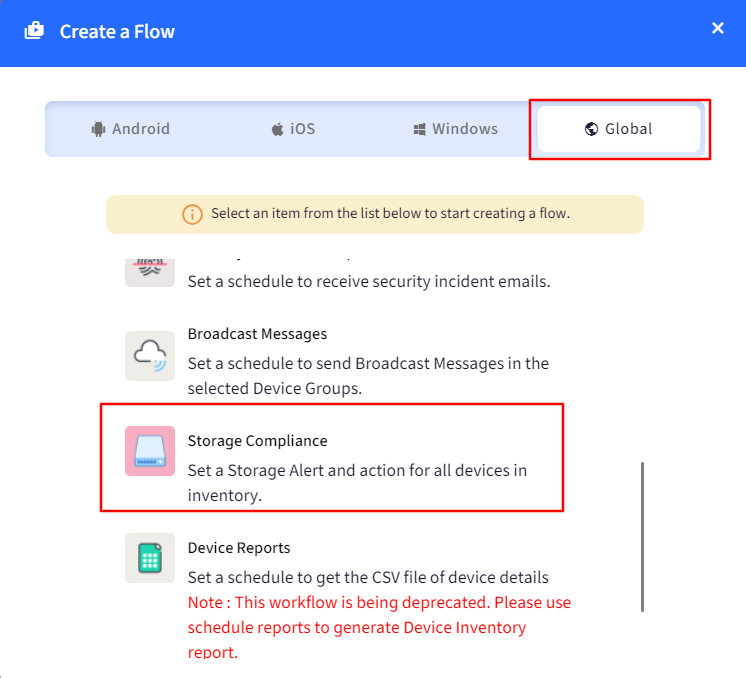
 Note: The Workflow is available/listed in the Global section.
 - Prerequisites:
- This compliance can be set on all devices in the inventory and/or devices in selected groups.
- How to Create:
- Navigate to Reports & Workflows > Workflows
- Click on CREATE NEW > Global > Storage Compliance
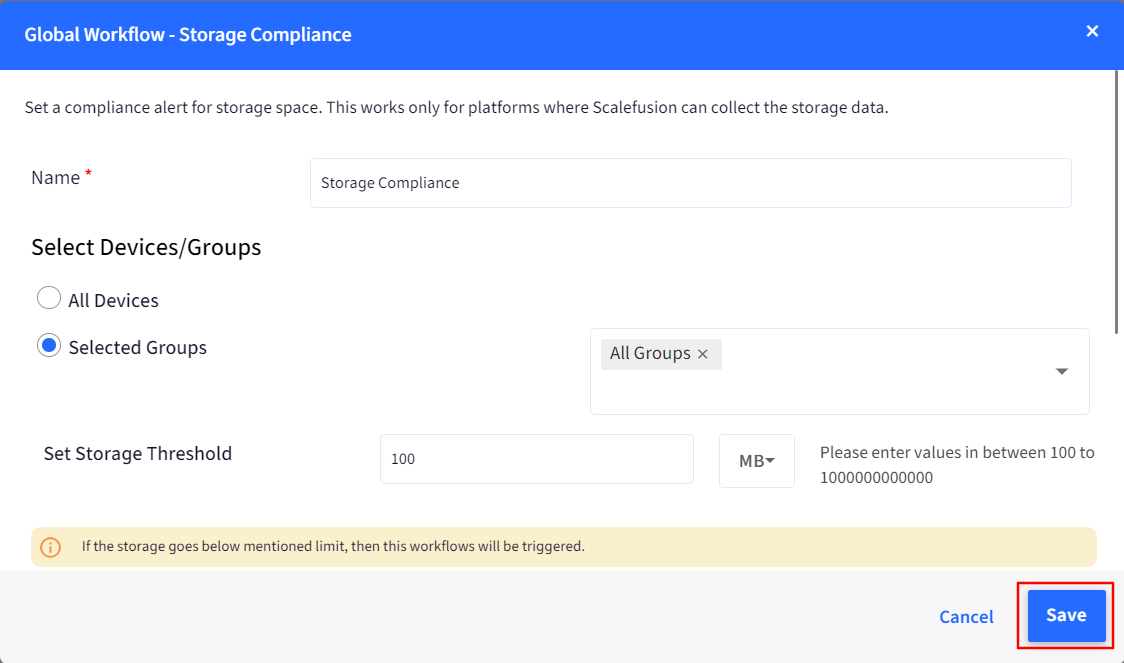
- Enter the following Details,
- Name: Name for the Workflow
- Scope: Choose the scope of this workflow between All Devices or Devices in the selected groups.
- Storage Threshold: Set a threshold to monitor. When the device storage is below this level, an alert will be generated.
- Monitor External Storage on Android devices: Enable this to monitor the external storage as well for threshold calculations.
- Send Emails: Select this if you want email notifications for the alerts.
- Frequency: Choose the frequency of emails between Daily or Selected Days.
- Recipient List: Select if you want to select the emails to the Global list or enter custom emails here.
- Storage Compliance At Select a time when you would want to receive the summary emails.
- Click SAVE once done.
- Example: Clicking on a Workflow shows the expanded view and gives additional details. In the example, Workflow is shown in the illustration below,
- This Workflow monitors the storage space of All Devices and sends an email if space goes below 100 MB.
- The Last Run and Next Run indicate the last time the task was run and the scheduled next run, respectively.

- Action Menu: By clicking on the 3 dots menu, the following actions can be performed,
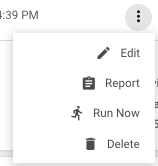
- Edit: Use this option to edit the Workflow.
- Report: Provides the report on historical runs of this Workflow.
- Run Now: Runs this compliance workflow on the current device information.
- Delete: Deletes the Workflow.
Android Specific Additional Settings
For sending a broadcast message as an alert when compliance is not met, there are some additional features (settings) that can be configured to show the Broadcast message as an alert on Android devices. These are applicable to the following Compliance Workflows:
- Geofence Compliance
- Battery Compliance
- Security Incident Compliance
- Inactivity ComplianceThese settings are configurable when the Send Broadcast message is selected
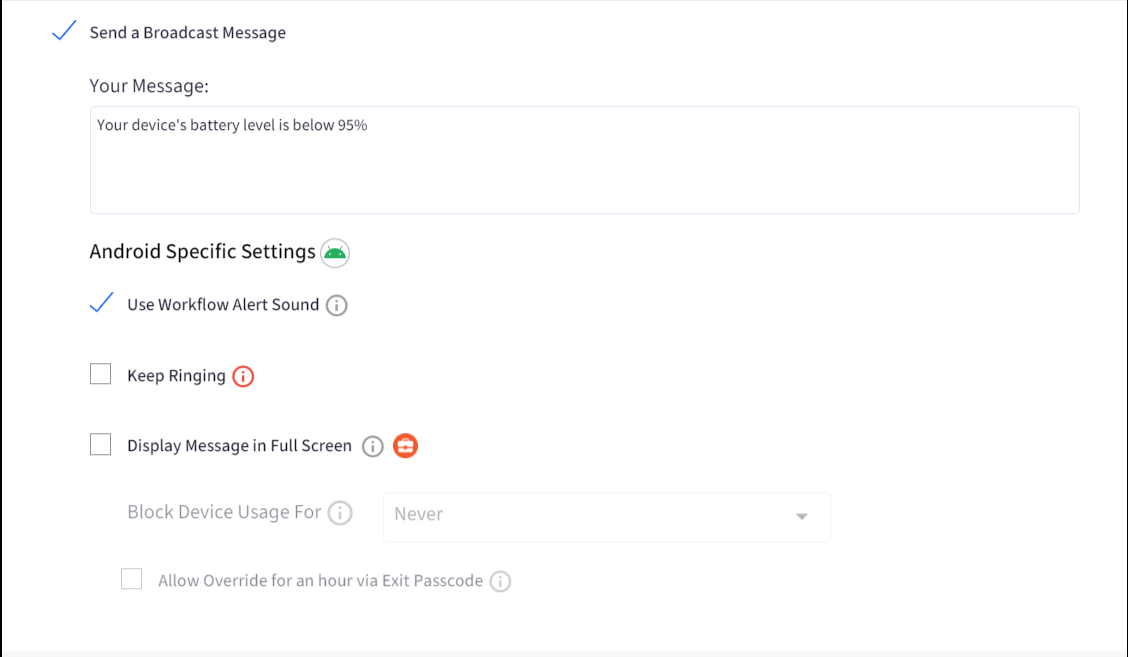
| Setting | Description |
| Use Workflow Alert Sound | If enabled, the workflow alert sound configured under branding is played as an alert. |
| Keep Ringing | The alert sound keeps ringing. This may cause the sound to be played indefinitely, and there may be no means to make it silent. |
| Lock Screen | Locks the screen, but only if there is a PIN/Password set on the device.
|
| Display Message in fullscreen | This setting cannot be applied if the Lock Screen setting is enabled. Enabling this displays the broadcast message on the devices in full screen instead of a dialog box. It works only on EMM-managed devices. |
| Block Device Usage For | Configure a time duration for which the device usage will remain blocked. The following are the choices:
|
| Allow override for an hour via Exit passcode | Enabling this setting shows an option that allows you to dismiss the full-screen message using an Exit passcode. This setting is disabled till Block Device Usage Foris selected It is shown for all workflows except the Security Incident Compliance Workflow |


