- 10 Sep 2024
- 18 読む分
- 印刷する
- PDF
Windows Profile Settings
- 更新日 10 Sep 2024
- 18 読む分
- 印刷する
- PDF
The Settings section in Device Profile lets IT Admins configure additional settings, which can then be applied to managed Windows devices. This document briefs all the Settings that can be configured in a Windows Device Profile.
Before You Begin
- Windows Device Profile should be created on the Scalefusion Dashboard. To create a Windows device profile, please visit Windows Device Profile.
- Windows OS 7 and 8.1 devices should be enrolled with the Scalefusion MDM agent.
- Iconography - The settings that work on both modes, that is, Modern Management and Agent-based, are identified by iconography where the Windows icon is for modern management and the Scalefusion icon is for Agent enrolled devices.
No iconography against a setting would mean it is supported only in modern management mode.
Settings
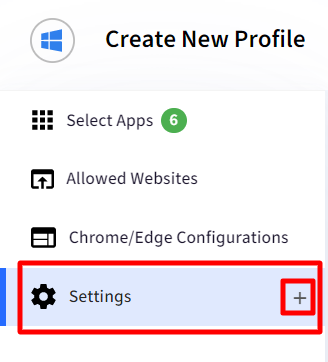
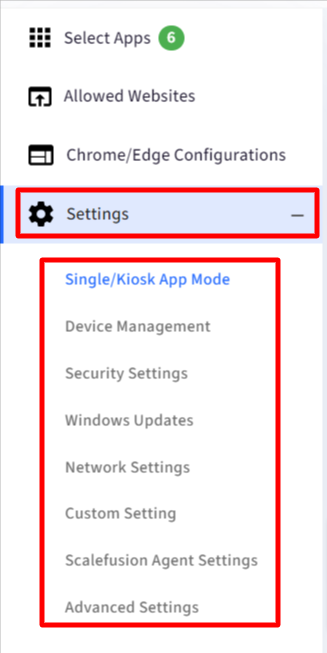
- Create a new Windows Device Profile or edit an existing one and click on the + sign next to Settings on the left panel.

- All Settings can be accessed under different headings.

These are described below:
Single/Kiosk App Mode
Use this option to set an application to run always and set the Windows Device in Kiosk app mode. Please refer to our help document here.
Device Management
Branding
Branding allows you to apply a home and/or lock screen wallpaper to your enterprise devices.
| Feature | Description | Supported on |
| Home & Lock Screen Wallpaper | You can create custom branding under the Device Profiles & Policies > Branding section and then apply it in the Device Profile. You will be able to select branding that is compatible with Windows. Only Home screen wallpaper can be set on Win OS 7 and 8.1 devices. |
|
Email & Exchange
From here, you can configure Exchange ActiveSync settings for your profile.
| Feature | Description | Supported on |
| Exchange Settings | Select the Exchange Configuration(s) that you have created in the Windows Utilities section so that they will be published to the devices in this Profile. |
|
| Email Settings | Select the Email Configuration(s) that you have created in the Windows Utilities section so that they will be published to the devices in this Profile. |
|
Certificates
All the certificates configured via Device Profiles & Policies > Certificate Management are listed here, and the admin can select the ones that have to be associated with this Device profile.
Security Settings

With these policies, you can secure your Windows devices
| Setting | Description |
| Bitlocker | BitLocker is Microsoft’s built-in full-volume encryption feature which is designed to protect data by providing encryption for the hard disk volumes. To configure BitLocker settings and apply these settings to the Windows 10 managed devices, click here. |
| Windows Information Protector | Scalefusion helps you protect enterprise data on managed Windows 10 devices by providing Windows Information Protection policies or Enterprise Data Protection policies as they were earlier called. To learn more about creating a Windows Information Protection Policy, click here. |
| Windows Hello | Windows Hello for Business lets users access their device(s) using a PIN or Biometric authentication. To learn more about how Windows Hello settings can be configured and applied to end user's devices, please click here. |
| Windows Defender | Microsoft's Windows Defender, now known as Microsoft Defender Antivirus, provides real-time protection of Windows devices against software threats like viruses, malware, and spyware across email, apps, the cloud, and the web. To configure Windows Defender policies, please click here. |
| Windows AI For Windows AI Settings: a. Devices should be Modern managed. b. Device should be restarted after applying policy. c. All Windows AI settings are applicable on Windows Insider Preview builds at present. | Configure following settings related to Windows AI features:
|
Windows Updates
Scalefusion lets the IT Admins configure the OS update policy on the managed Windows 10 devices so that they can ensure that the rollouts are controlled. There are two ways in which OS updates can be configured and controlled. To learn about the various policies on offer around OS updates, please follow these:
- Scalefusion Agent Based Settings: Configured from OS & Update Patch Management and applicable if you have installed Scalefusion MDM agent.
- Windows MDM-Based Settings: These are based on Windows MDM CSP
Network Settings
Wifi & Network
| Feature | Description | Supported on |
| Allow the Device to connect Wifi | Choose to allow or restrict users to connect to Wifi. |
|
| Auto Configuring a Wi-Fi | If you have created a Wi-Fi configuration, then you can apply it to a Device Profile. |
|
| Allow users to configure Wi-Fi | Use this option to allow/deny the end users to configure a new Wi-Fi connection on the device. |
|
| Allow Auto Connect to WifiSense | Control if Wi-Fi Sense should be used and connect automatically to shared networks or not. |
|
| Allow VPN Connections | Control if a user is allowed to connect to VPN connections |
|
| Allow VPN usage on Cellular Data | Control of cellular data should be used to connect to VPN connections |
|
| Allow VPN roaming on Cellular Data | Control if VPN should be allowed on roaming Cellular data. |
|
VPN
Scalefusion provides the necessary mechanisms to remotely configure the VPN and publish to the Windows devices managed by Scalefusion. To learn about the VPN settings, please visit this document.
Custom Settings
By using the Custom Settings feature, IT Admins can use a top-notch XML editor and push a CSP directly to the devices. To understand how to configure and push a custom settings payload to the device, please click here.
Scalefusion Agent Settings
Under this, you can configure settings which will take effect only if Scalefusion MDM agenthas been installed on the device.
Management Settings
| Setting | Description |
| Remove Local Admin Privileges for Enrolled User | Enabling this setting removes admin privileges for the enrolled user and makes the user a standard user with no admin rights. The enrolled user cannot perform any of the admin actions then. Note:
|
| Auto Enroll to Modern Management | Enable this option if you are enrolling your devices via Agent-based enrollment and want the devices to automatically enroll into Scalefusion modern management. This allows you to leverage both agent and modern management features on an agent-enrolled Windows device. |
| Remove/Migrate device from 3rd party MDM (Modern Management). | A sub-setting of the above setting helps you easily migrate from your existing/older MDM solution. Enable this to remove the modern management of your older MDM and migrate them to Scalefusion completely. Please note,
|
Kiosk Settings
| Setting | Description |
| Show System Tray | Enable this to show a custom system tray panel with basic indicators of time, network and volume. Please note that this panel does not display 3rd party apps. |
| Show option to relax Kiosk mode and sign-in to Microsoft Office application | This setting is applied if you have done SSO Configuration for Microsoft 365/Entra. If enabled, users will be able to sign in to Microsoft Office applications in Multi-App kiosk and Single App in Agent mode. It allows users to temporarily relax Kiosk mode. Kiosk mode can be relaxed using a setting inside Scalefusion MDM Agent app which becomes available on enabling this setting. |
Location Settings
Configure Location Settings on the device profile, which gets applied to the devices on which the profile is applied. When configured, they override the settings that have been set through Location & Geofencing > Location Settings on the Dashboard.
| Setting | Description |
| Override Global Location Settings | If this is enabled, the settings that have been set through Location & Geofencing > Location Settings on the Dashboard get overridden. This also enables the rest of the Location settings and makes them configurable. |
| Attempt to automatically Enable Location. | With this setting toggled on, Scalefusion attempts to automatically enable location if it is set to off on the Windows device. |
| Enable/Disable Location Tracking | Enable this setting to turn on Location tracking and set other configurations. |
| Location Tracking Mode | There are three modes for tracking Location:
|
| Location Collection Frequency | Choose a frequency in which the locations should be synced with the server and reflected on the dashboard. Frequencies differ on the basis of the Location Tracking Mode you have chosen. |
| Select Location API | Select the preferred location method, which will be used to capture the location, from the following:
|
Important Notes on Location Settings:
- On Windows OS 7 & 8.1machines, the following Location APIs will work:
API Type Windows 7 Windows 8.1 .Net API - Yes WinRT API - - Google Maps API Yes Yes WebKit API Yes Yes - Location Services in Device Profile (Advanced Settings > General Settings > Security & Search) should be either set to Allow or None.
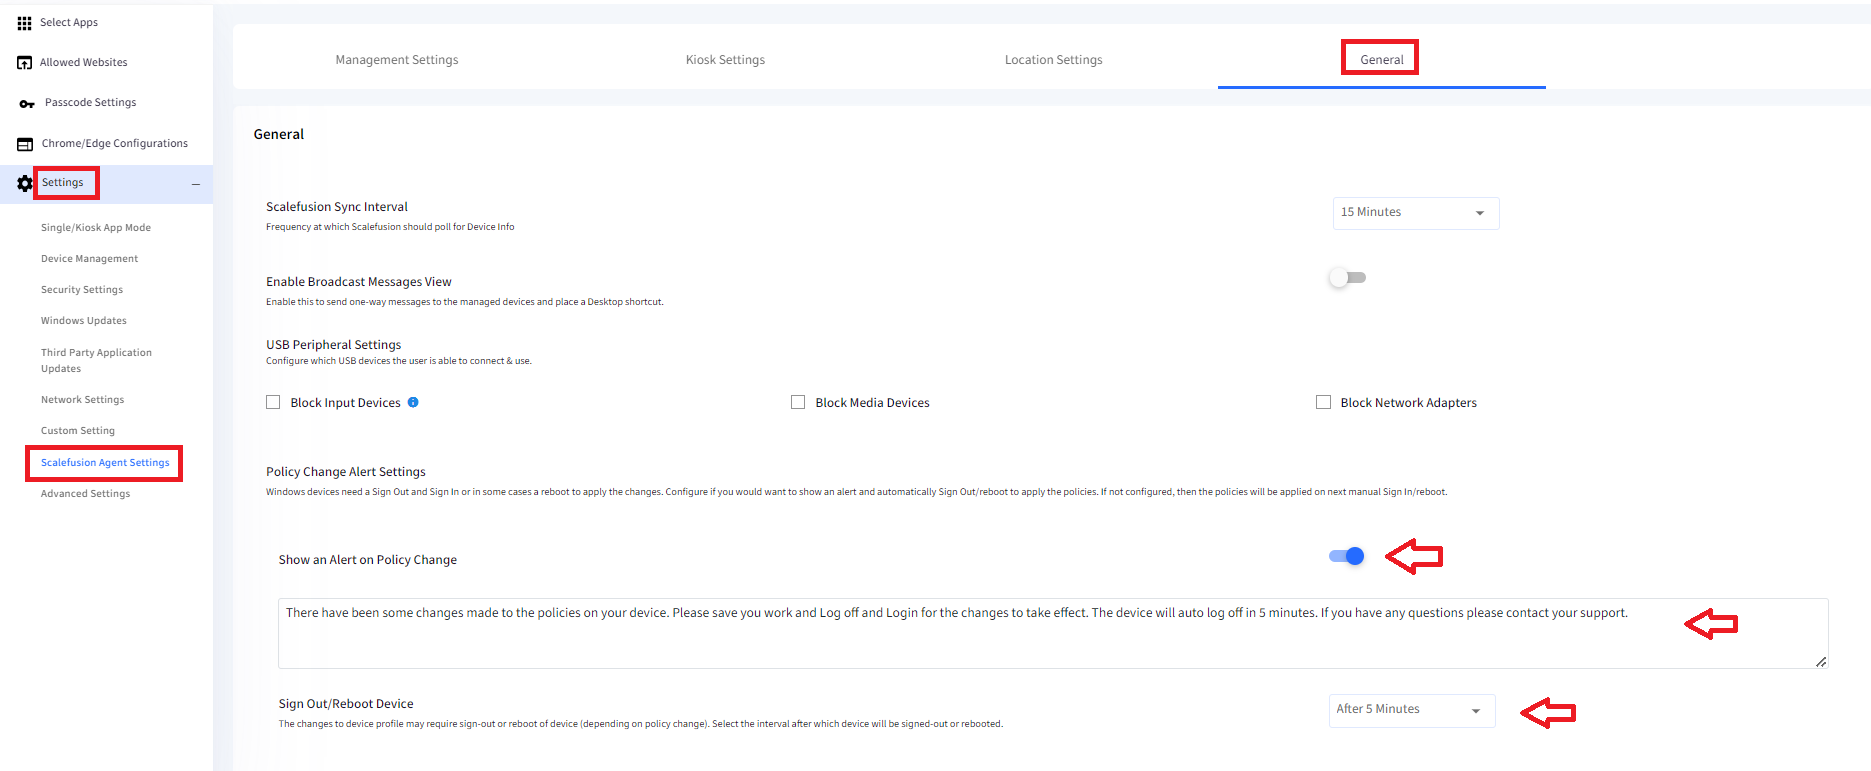
General
| Setting | Description | Supported Devices |
| Scalefusion Sync Interval | Select the frequency in which Scalefusion syncs and updates the Device Info. The frequency levels can be:
| NA |
| Enable Broadcast Messages View | Enable this to be able to send one-way messages to managed Windows devices. With this setting enabled, IT admins can send Broadcast messages to Windows devices from the Utilities > Broadcast Messages section on Dashboard. | NA |
| USB Peripheral Settings | Check the following USB device types if you want to block the user from connecting and using them:
|
|
| Policy Change Alert Settings | At times, Windows devices need to reboot, or user might have to sign-out and sign-in to apply the policy changes. You can now configure a custom alert message for your users so that they are aware that they will be forced signed-out or the device will reboot for the new policies to apply. If this option is not configured, then the policies will be applied on the next manual sign-in/reboot.
|
|

Advanced Settings
Policy Targets
Certain policies can be applied at the Device level, that is, for all users or only the enrolled user. There may be cases where you want to block Google Chrome browsing only for the enrolled user and not other users. This is possible for supported policies by choosing a Policy Target between Device or Enrolled User. The supported policies are as below,
- Allowed Websites
- Chrome/Edge Configurations
- VPN Policy
- Settings App Policies
Select the target (Device or enrolled user) from the drop-down on which you want to apply the target.
- By default, the policies are applied at the device level.
- On Windows Home (10 & 11), only the VPN Policy will work.
- Configure Settings App, Edge Browser and General Settings will not work on Windows Home (10 & 11).
 Configure Settings App
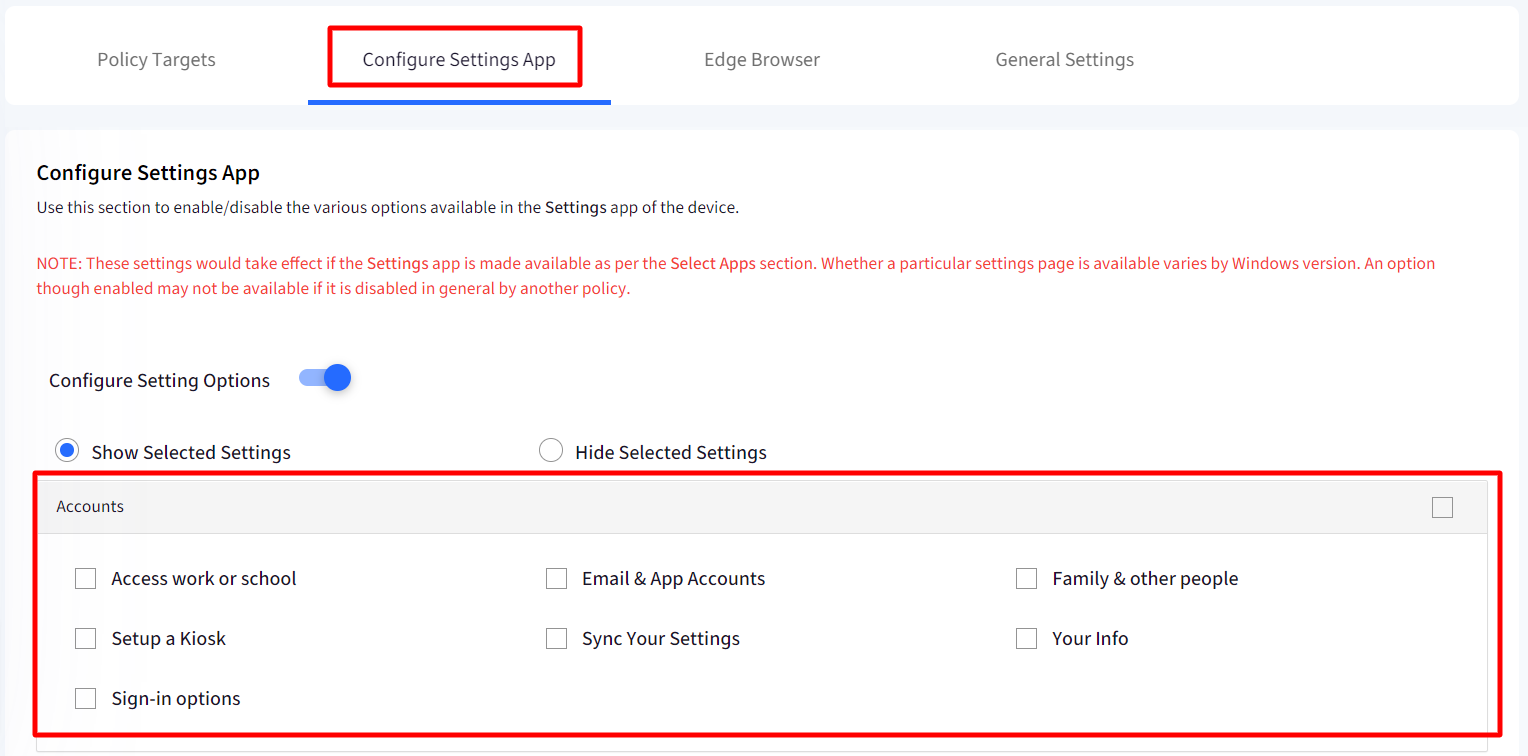
Under Configure Settings App, IT Admins can control the Settings appgranularly. That is, within the Settings app, they can choose which options to show or hide. Each section can be completely hidden, or part of it can be hidden.
To configure:
- Toggle on the Setting Configure Settings Options. Only then rest of the settings be enabled.

- Once you set Configure Settings Options to ON, choose one of the following options:
- Show Selected Settings: Shows the selected applications and items underneath in the Settings app
- Hide Selected Settings: Hides the selected applications and items underneath in the Settings app

- The applications and settings are listed as follows. Select the ones that you want to show/hide on the managed devices.To select all, check the box on the right of the Setting's name.

- Accounts
- Apps
- Cortana
- Devices
- Ease of access
- Extras
- Gaming
- Home page
- Mixed reality
- Network and internet
- Personalization
- Privacy
- Surface Hub
- System
- Time and language
- Update and security
- User accounts
Edge Browser
| Feature | Description | Supported on |
| Cookie Policy | Choose a cookie Policy for Microsoft Edge. You can either allow the user to control or define a strict policy for cookies. |
|
| Start Page URL | Specify a start URL that will be launched whenever the Edge browser is opened. |
|
| Auto Fill | Allow: Forces the autofill feature: Prevents using Autofill. User-Control: Let users choose to use the Autofill feature to populate the form fields automatically. |
|
| Pop-Ups | Allow: Force pop-ups on all sites and turn off the Pop-up blocker. Restrict: Turn on the Pop-up Blocker which will block all the pop-ups. User-Control: Let users control the Pop-up blocker |
|
| Address Bar Dropdown | Allow: Let Edge show the address bar drop-down list. Restrict: Minimizes network connections from Edge to Microsoft service and hides the functionality of the Address bar drop-down list. It also disables the Show search and site suggestions as I type toggle in Settings. |
|
| Browser Extension | Allow: Let users add or personalize extensions in Edge. Restrict: Prevent users from adding or personalizing extensions. |
|
| Clear Browsing History on Close | Allow: Clear the browsing history on exit. Restrict: Do not clear the browsing history on exit. User-Control: Let users configure the setting. |
|
| Allow accessing “about:flags” | Allow: Let users access the about: flags page in Edge, which is used to change developer settings and enable experimental features. Restrict: Prevents users from accessing the About Flags page. |
|
| Allow Flash | Allow: Allow Adobe Flash to run. Restrict: Prevent Adobe Flash from running. User-Control: Let users control on a per-site basis. |
|
| Autorun Flash | Allow: If Adobe Flash is allowed, then auto-run the Flash files. Restrict: If Adobe Flash is allowed, then prevent Flash files from auto-running |
|
| Developer Tools | Allow: Allow users to use the F12 key and view the developer tools. Restrict: Prevent users from using the F12 key and view the developer tools. |
|
| In-Private Browsing | Allow: Allow in-private browsing. Restrict: Prevent in-private browsing. User-Control: Same as Allow |
|
| Save Passwords Locally | Allow: Let Edge use Password Manager to store passwords locally. Restrict: Prevent Edge from storing passwords locally. User-Control: Let users control when to save passwords locally. |
|
| Search suggestions in the Address bar | Allow: Show search suggestions Restrict: Block search suggestions User-Control: Let the user control the search suggestion behavior. |
|
| Force Fraudulent Website Warning | Allow: Force Windows Defender SmartScreen protection to prevent potential threats and prevent users from turning it off. Restrict: Turn off Windows Defender SmartScreen protection, leaving the user vulnerable to potential threats. User-Control: Let users choose if they want to use Windows Defender SmartScreen protection. |
|
| Override Fraudulent Websites warning | Allow: Let users ignore the warning and proceed to the site. Restrict: Does not allow users to ignore the warning and proceed to the site. User-Control: Same as allow. |
|
| Override malicious file warning | Allow: Allow users to download a potentially malicious file or files from unverified sources. Restrict: Restrict users to download a potentially malicious file or files from unverified sources. User-Control: Same as allow. |
|
| Allow "Do Not Track" request | Allow: Force Edge to send tracking information. Restrict: Prevent Edge from sending tracking information. User-Control: Users can choose to send tracking information to sites they visit. | Win 10 Pro
|
General Settings
General Settings: The settings can be configured under the following heads:
- System Settings
- Start Layout Settings
- Display Settings
- Folder Settings
- Application Settings
- Scalefusion Sync Interval
- Enable Broadcast Messages View
- Security & Search
System Settings
| Feature | Description | Supported on |
| Allow USB Connections & SD Card | Use this setting to allow or restrict USB connections and external storage cards. |
|
| Microsoft Feedback Notifications | Use this setting to enable or disable Microsoft feedback notifications. |
|
| Modify Data & Time | Use this setting to allow or restrict users from changing the device date & time. Note: There is a workaround where users can launch the legacy Date & Time dialog and change the settings. |
|
| Allow Bluetooth | Use this setting to allow or restrict Bluetooth connections from the device. |
|
| Allow Bluetooth Pre-pairing | Enable this setting to automatically pair with devices that were previously connected. |
|
| Allow Bluetooth Services Advertisement | Control the Bluetooth services advertisement behavior. |
|
| Install Non-Store Apps | Allow or Restrict users to install/sideload applications from unknown sources. |
|
| Store App Data in Device Memory | Force the applications to store the data in the device's memory. |
|
| Install Apps in Device Memory | Force the applications to be installed in the Device memory. |
|
| Scalefusion Sync Interval | Select an interval on how often should ScaleFusion poll should be for Device Info. This polling helps in: 1. Updating the device location 2. Updating the Inactivity time. 3. Syncing the latest policies. 4. Getting vital Device Information |
Start Layout Settings
These settings are unchecked by default.
These settings are applicable on both Modern Managed and Scalefusion Agent enrolled devices. A few settings, in particular, can only be applied on Modern Managed devices and hence marked with Windows icon only.
| Feature | Description |
| Hide Switch Account | Use this setting to hide the Switch user account option that is present on the left side of the Start menu. |
| Hide Sign out | Use this setting to hide the Sign Out button that is present on the left side of the Start menu, under the Accounts icon (or picture) |
| Hide User tile | Tiling enables users to view each of their open programs or windows within a program simultaneously, rather than having to switch back and forth. Use this setting to hide start menu tiles for all users. |
| Hide Change Account Settings | Accounts Settings allows you to manage your Microsoft Account, set your user picture, change sign-in options, change password, change PIN, connect your PC to work or school etc. It is present on the left side of the Start menu. Use this setting to hide the Change Account Settings option |
| Hide People Bar | The People feature adds a special icon to the notification area of your taskbar and allows pinning your contacts directly to the taskbar, so you can start messaging, call or compose an email just with one click. Using this option, the People bar can be hidden. |
| Hide Lock | This option which is present under Switch Account, locks the computer but keeps all the user's programs running. Hide the Lock feature through this setting. |
| Hide Hibernate | The hibernate option, which is present in Start > Power, saves the current state of your PC—open programs and documents—to your hard disk and then turns off your PC. This feature can be hidden using Hide Hibernate settings. |
| Hide Sleep | The sleep feature present in Start > Power puts your system into a low-power state and turns off your display when you're not using it. Use this setting to Hide the Sleep setting. |
| Hide Restart | This restarts your system. Use this setting to hide Restart |
| Hide Power Options | Hide all the power options present in the Start menu with this setting. |
| Hide Shutdown | The Shutdown feature, which shuts down your system, can be hidden using this option. |
| Allow End Task | Allow or disallow the End Task feature in Task Manager. |

Display Settings
The settings are supported on Windows 10 Pro and Enterprise Edition
These settings can be configured separately for devices plugged in or running on a battery
| Feature | Description |
| Configure Display Off Timeout | Display off timeout is the number of minutes Windows will wait idle with no activity while on the lock screen before timing out and automatically turning off the display. Configure the duration after which the display should timeout through this setting. |
Configure Hibernate Timeout | Specify the duration of time after sleep that the system automatically wakes and enters hibernation. |
| Configure Unattended Sleep Timeout | The System unattended sleeptimeout power setting is the idle timeout before the system returns to a low-power sleep state after waking unattended. Specify a period of time before the system automatically enters sleep after waking from sleep in an unattended state. |
| Allow Stand-By Device Sleep | Control your device's stand-by behavior by choosing one of the options:
|
| Choose Lid Close Behavior | Select what the behavior should be when the system lid is closed |
| Choose Sleep Button Behavior | Select what the behavior should be when the Sleep button is pressed |
| Choose Power Button Behavior | Select what the behavior should be when the Power button is pressed |
For Lid Close, Sleep button and Power button behaviors, the following options are available to choose from:
- User Control
- Take No Action
- Sleep
- Hibernate
- Shut Down
Configure Ctrl + Alt + Del options for Enrolled user
With this, you can control the options displayed in the Ctrl + Alt + Del menu for an enrolled user. The options are:
- Disable Task Manager
- Disable Change Password
- Disable Log Off
- Disable Lock Computer
By default, all the options are unchecked.
Folder Settings
These settings let the admin control the following folders from the start layout, that is, whether they should be pinned or disabled from the Start menu:
- File Explorer
- Documents
- Downloads
- Music
- Videos
- Pictures
- Personal
- Network
- Settings
For the above folders, the following options are available to choose from:
- User Control - Selected by default. This lets the user control the behavior of a folder
- Show - Shows the folder
- Hide - Hides the folder
Security & Search
The applications and Services that the admin can allow/restrict on managed devices.
- Camera
- Cortana
- Microsoft account Connection
- Add Non-Microsoft Accounts
- Sync Settings across Devices
- Reset Device
- Developer Unlock
- Location Services
For Developer Unlock and Location Services, the following are the settings to choose from:
- Allow
- Deny
- None
Once you have configured the settings, click on UPDATE PROFILE. For further steps like applying a device profile to Windows 10 devices, please visit the document Windows Device Profile.


 Configure Settings App


