Scheduling Tasks
- 02 Dec 2024
- 19 読む分
- 印刷する
- PDF
Scheduling Tasks
- 更新日 02 Dec 2024
- 19 読む分
- 印刷する
- PDF
The content is currently unavailable in Ja - 日本語. You are viewing the default English version.
記事の要約
この要約は役に立ちましたか?
ご意見ありがとうございます
Overview
These types of Workflow are useful for scheduling tasks that take action on the device in the selected groups. These are useful in automating Dashboard functionality based on time and days. In this section, we will see the Workflow of the type of Scheduled Tasks available and how they work.
The Workflows of type Scheduled tasks follow certain rules that apply to all of them. These are,
- For each type of Workflow, each Device Group can have a maximum of one Workflow.
- Workflows of type Scheduled Tasks are scheduled based on the Dashboard timezone or the timezone that you select. At the selected time and timezone, a push message is sent to the device.
- Workflows of the type Scheduled Tasks require the device to be online (except few workflows for Android, which also work in offline mode) at the scheduled time to receive the push.
- Newly created workflows need the device to be online at least once to sync workflow parameters with the server for offline execution.
Offline Workflow execution (applicable on Android devices):- The offline support will be available for SF Agent version 7.6 onward only. Devices on lower versions will still need to be online to execute workflows.
- Offline execution support is only for Scheduled Workflows. Instant Runs (run now) will still require devices to be online in order to execute tasks.
- The following Workflows get executed on Android devices when the device is offline:
- Reboot
- Clear App Data
- Clear Browser Cache
- Broadcast Messages
- Lock Unlock
- Clear Files And Broadcast Messages
- Switch Profile
- Geofence Switch Profile
Types of Workflows:
- Switch Profile
- GeoFence-based Switch Profile
- Publish Apps
- Lock/Unlock
- Reboot
- Clear App Data
- Clear Browser Cache
- ProSurf Clear Cache
- Broadcast Message
- Device Reports
- Switch Presentation
- Device Management Event Summary
Switch Profile
- What does it Do: This schedules a workflow that automatically changes the Device Profile of a Device Group. The devices in this group will be sent a push notification of the changes at the scheduled time.
- Supported Platforms:

- Prerequisites:
- Needs a Device Group that has the devices of the OS type for which the Workflow needs to be created.
- Needs at least 2 Device Profiles for the OS type for which the Workflow needs to be created.
- How to Create:
- Navigate to Reports & Workflows > Workflows
- Click CREATE NEW > select the OS/Platform for which you want to create the workflow > click on Switch Profile.
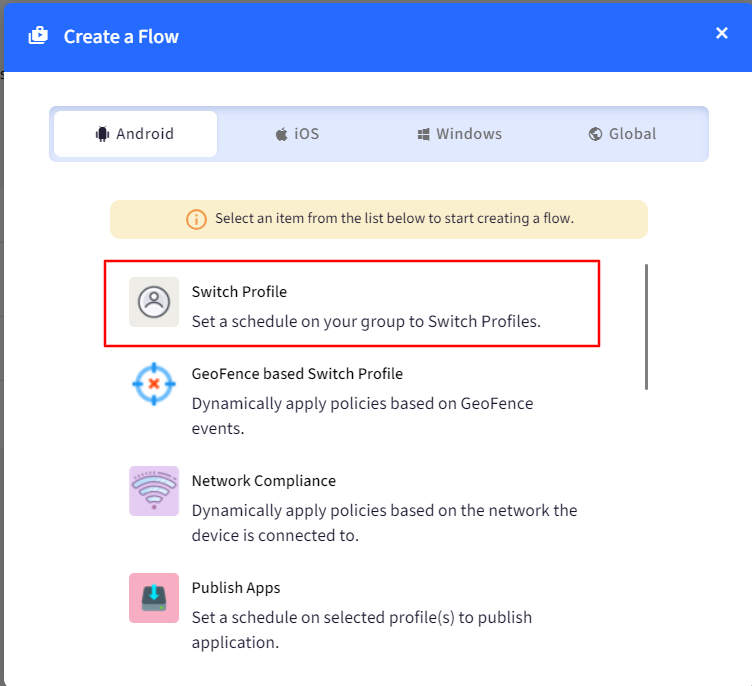
- Enter the following Details,
- Name: Name for the Workflow
- Select Groups: Select one or more groups where this Workflow works.
- Start Time: Select the start time when the first Device Profile should be applied to the group.
- End Time: Select the end time when the second Device Profile should be applied to the group.
- Timezone: Select a Timezone when this Workflow should be executed, and the devices should be sent a push.
- Frequency: Select a Frequency of the Switch Profile
- Daily: The Profiles are switched at selected times daily.
- Selected Days: The Profiles are switched only on the selected days. On the un-selected days, the Device Profile selected at the End Time is applicable.
- Select Profile for Start Time: Choose a Device Profile that should be applied at the start time.
- Select Profile for End Time: Choose a Device Profile that should be applied at the end time till the start of the next start cycle.
- Send Emails: Select if you want to be notified when the profile switch happens.
- Click SAVE once done.
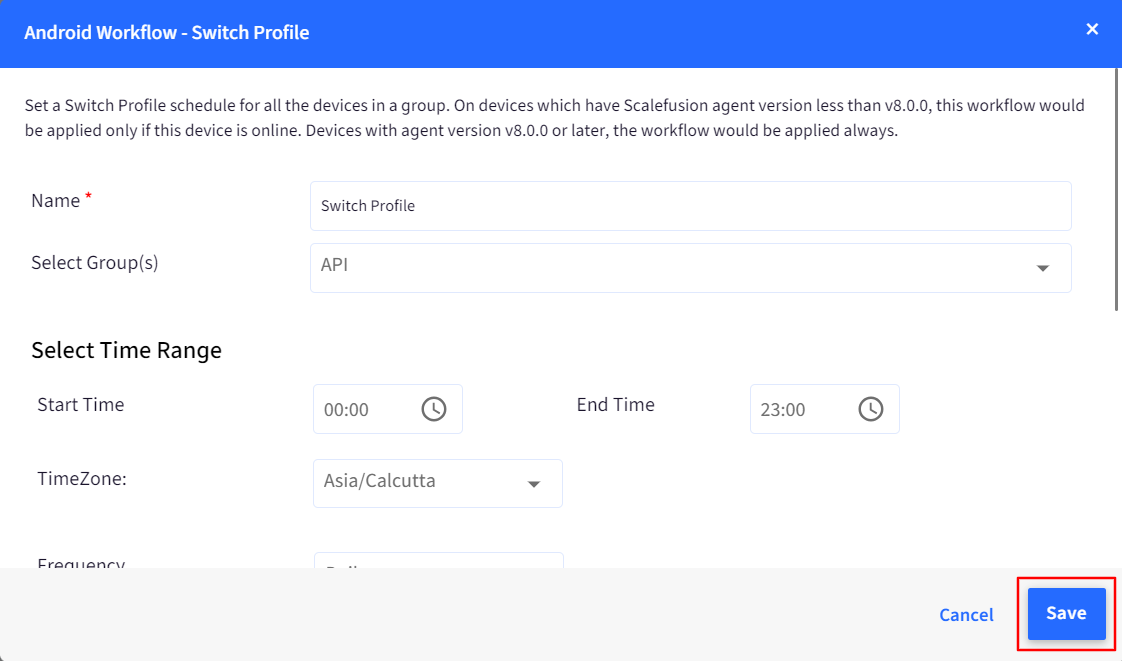
- Example: Clicking on a Workflow shows the expanded view and gives additional details. In the example, Workflow is shown in the illustration below,
- The Device Profile of the group is automatically switched at 9 AM.
- The Success On and Failed On shows the number of devices where the push was delivered and where it failed.
- The Last Run and Next Run indicate the last time the task was run and the scheduled next run, respectively.

- Action Menu: By clicking on the 3 dots menu, the following actions can be performed,
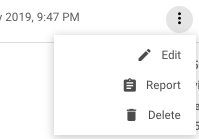
- Edit: Use this option to edit the Workflow.
- Report: Provides the report on historical runs of this Workflow.
- Delete: Deletes the Workflow.
GeoFence-based Switch Profile
- What does it Do: This schedules a workflow that automatically changes the Device Profile of a Device Group based on Geo-Fence events. The devices in this group will be sent a push notification of the changes at the change of event.
- Supported Platforms: Android, iOS, Windows
- Prerequisites:
- Device Group with devices in it should be existing
- At least 2 Device Profiles
- Geo-fence applied to the device group
- The Device Group with Geo-Fence does not have a time-based Workflow applied to it.
- How to Create:
- Navigate to Reports & Workflows > Workflows
- Click Create Flow > Android / iOS / Windows > Geofence-based Switch Profile.
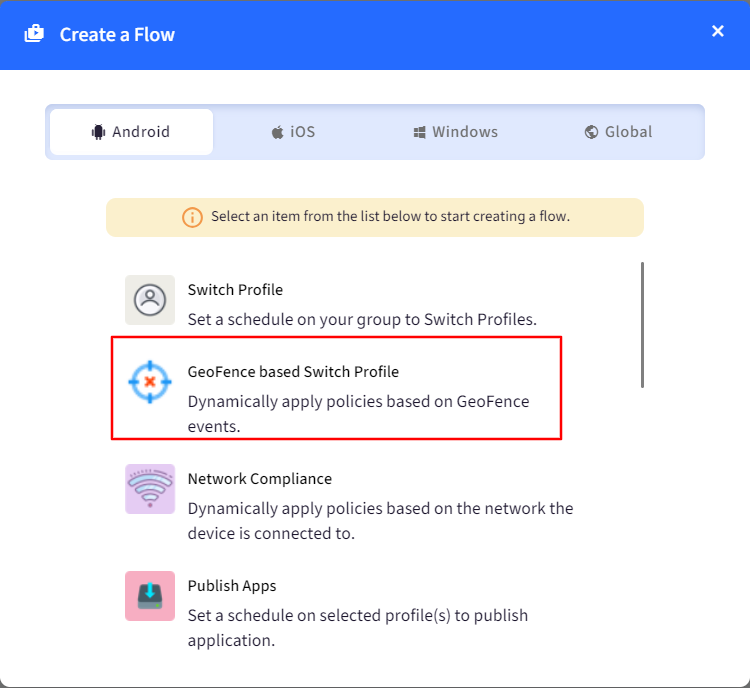
- You will get the Workflow Creator dialog box.
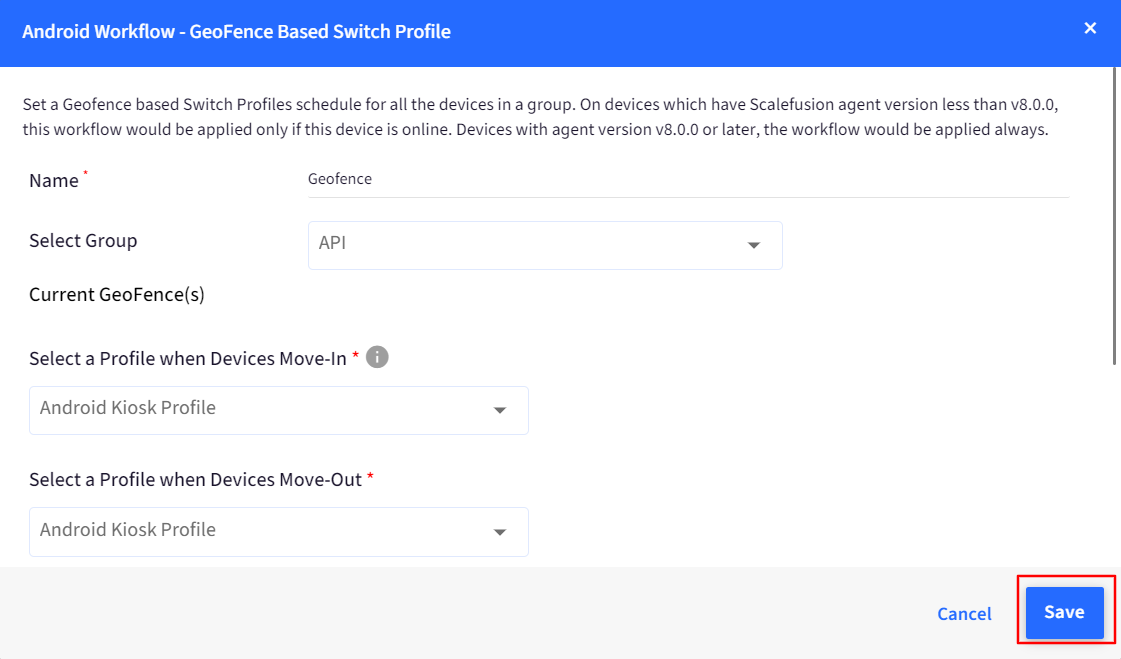
- Enter the following details to set a Geofence-based Switch Profiles schedule:
- Name: Name for the workflow
- Select Group: Select the group on which you want to apply the workflow.
- Select Move-In Profile: From the drop-down, select the profile that should be applied when the device is inside Geofence
- Select Move Out Profile: From the drop-down, select the profile that should be applied when the device is outside Geofence
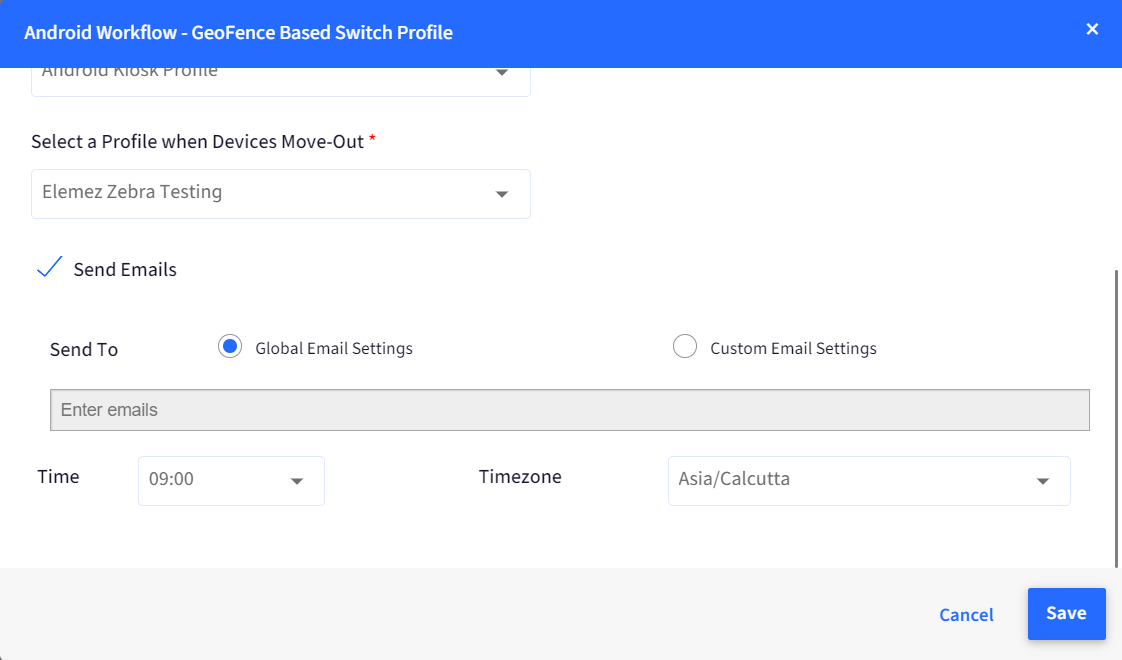
- Send Emails: You can schedule and send an email that contains a log of all the Switch profile events (move in and move out) that have taken place during one day. For this, there are two types of Email settings available:
- Global Email settings: The emails will be sent to the ones enabled under Email Settings, that is, Account Owner, Co-account Manager and/or Group Admin.
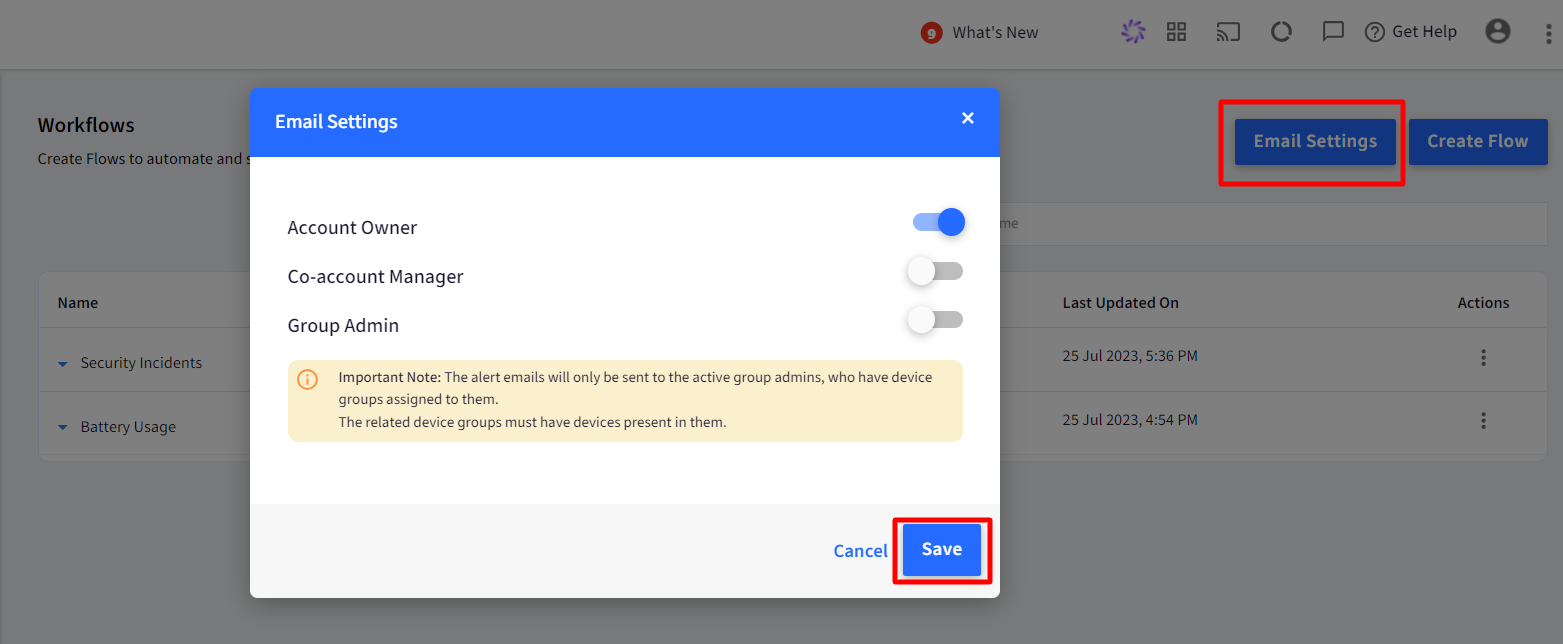
- Custom Email settings: The emails can be sent to personal email IDs. Enter email IDs in the space provided. You can enter up to ten email IDs.
- Global Email settings: The emails will be sent to the ones enabled under Email Settings, that is, Account Owner, Co-account Manager and/or Group Admin.
- You can also schedule a time at which the Switch Profile email will be delivered to the user. In the Geofence-based switch profile at, select Time and timezone from the drop-down. Once all settings are done, click Save. The workflow will get created and start showing in the list of Workflows.
- Workflow Features:
You can perform the following functions on your workflow with these additional features. They are accessible by clicking the three vertical dots on the right side.
- Edit: Make changes in the workflow settings through Edit. Clicking on this will open the Workflow Creator dialog box, where you can edit any of the details.
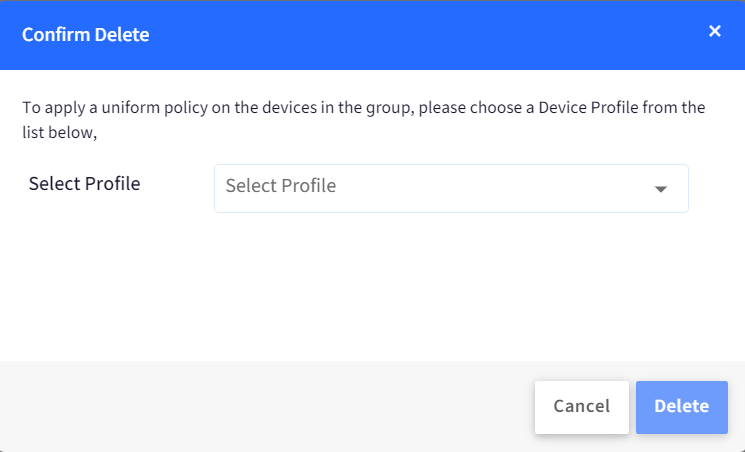
- Delete: This deletes the workflow. Clicking on Delete will show a Confirm Delete box asking you to choose a Device profile for the devices in the group. Once the workflow is deleted, all the devices in that group will be moved to this profile. The Delete button will be active when you select a device profile.
- Report: This generates a report of events (move in and move out of devices) that have taken place during the current day.

Scalefusion does not allow:
- Deleting a Device group if it is a part of a workflow
- Deleting a geofence if it is a part of a workflow
- Deleting device profiles if they are a part of a workflow
Publish Apps
- What does it Do: This schedules a workflow that automatically sends a push for publishing an app on a device at the set time and date.
- Supported Platforms: Android, iOS
- Prerequisites:
- Device Profiles are created on the OS for which the Workflow needs to be created.
- How to Create:
- Navigate to Reports & Workflows > Workflows
- Click CREATE NEW > OS/Platform > Publish Apps
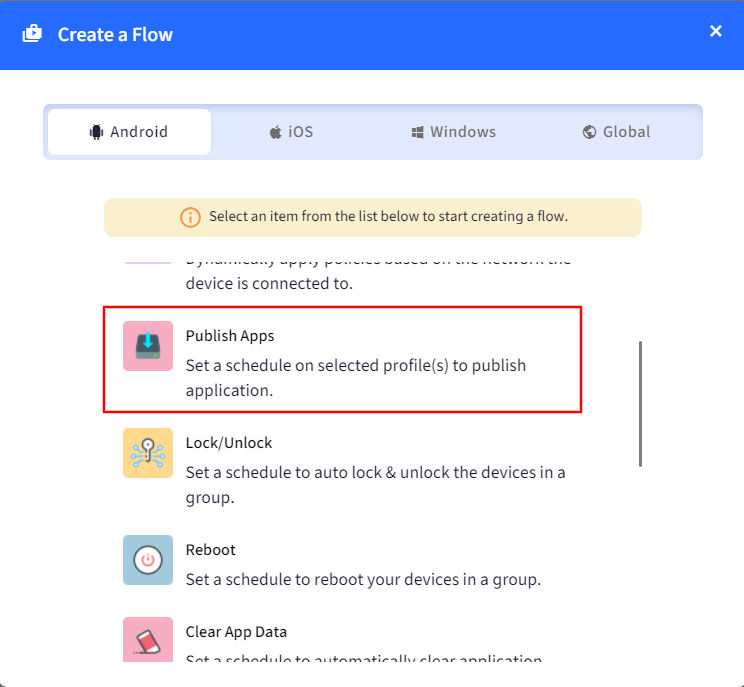
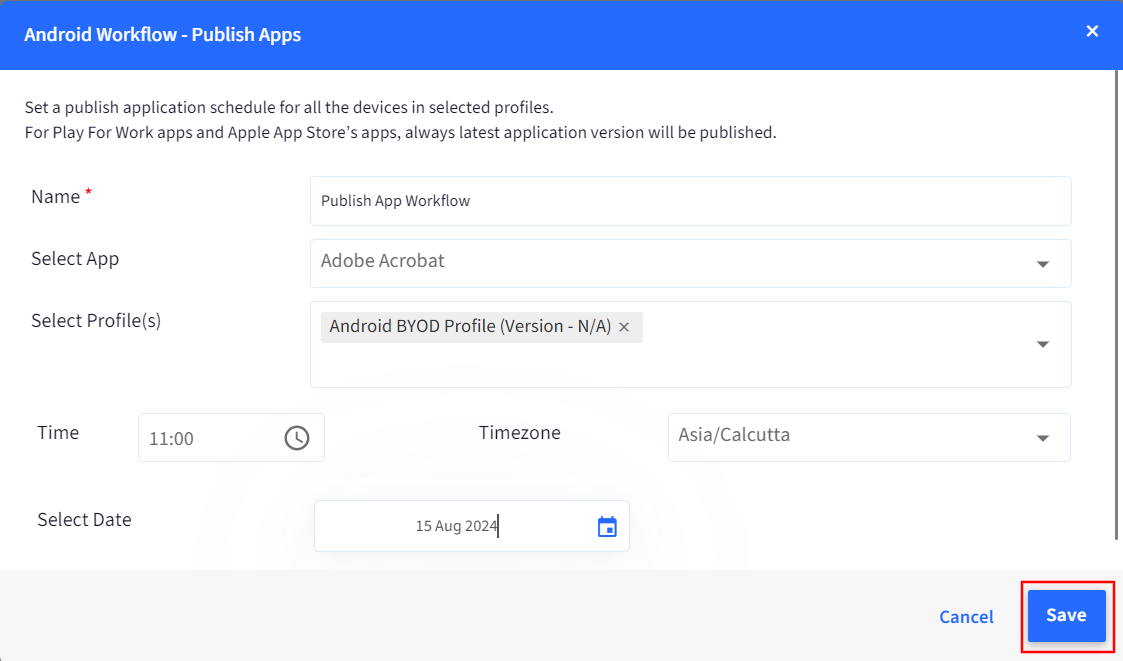
- Enter the following Details,
- Name: Name of the Workflow
- Select App: From the drop-down list, select the app which you want to publish. The Apps under Play for Work Apps, Apple App Store and Enterprise Store are listed here. You can select one app at a time.
- Select Profile(s): Select the profiles on which the app should be published
- Select Date: Choose the date on which you want to publish the app
- Time and Timezone: Select the time and timezone when this Workflow should be executed, and the devices should be sent a push.
- Click SAVE once done.
- Example: Clicking on a Workflow shows the expanded view and gives additional details. In the example, Workflow is shown in the illustration below,
- The devices on which the selected device profile (in the workflow) is applied will have the Chrome app published automatically on 05-03-2020 at 03:00 PM Asia/Kolkata timezone.
- The Success and Failed shows the number of devices where the push was delivered and where it failed.
- The Last Run and Next Run indicate the last time the task was run and the next scheduled run, respectively.

- Action Menu: By clicking on the 3 dots menu, the following actions can be performed,
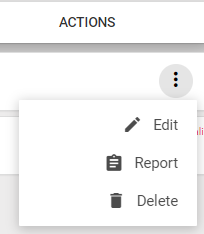
- Edit: Use this option to edit the Workflow.
- Report: Provides the report on historical runs of this Workflow.
- Delete: Deletes the Workflow.
Lock/Unlock
- What does it Do: This schedules a workflow that automatically Locks or Unlocks the devices at the scheduled time. The device will be locked between the Locked to Unlocked time and Unlocked on all other times and days.
- Supported Platforms:

- Prerequisites:
- Needs a Device Group that has the devices of the OS for which the Workflow needs to be created.
- How to Create:
- Navigate to Reports & Workflows > Workflows
- Click CREATE NEW > OS/Platform > Lock/Unlock
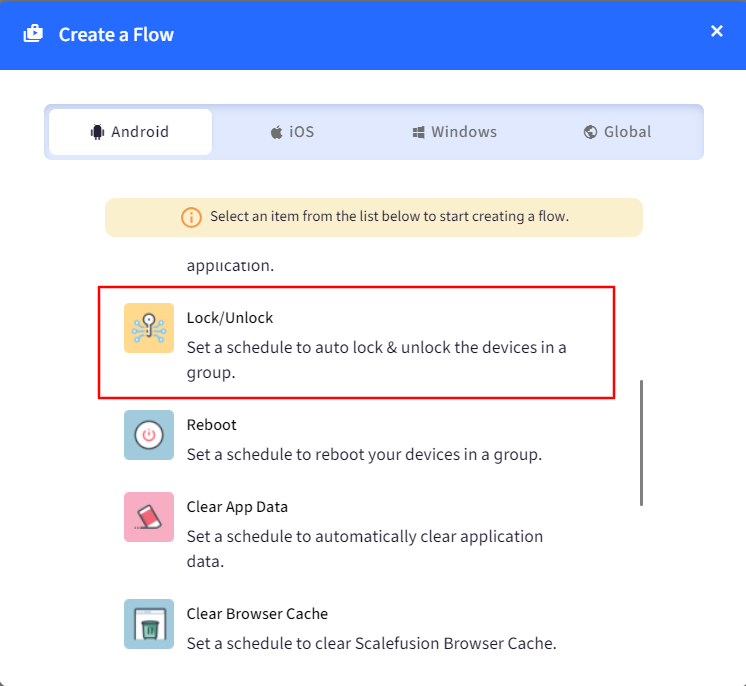
- Enter the following Details.
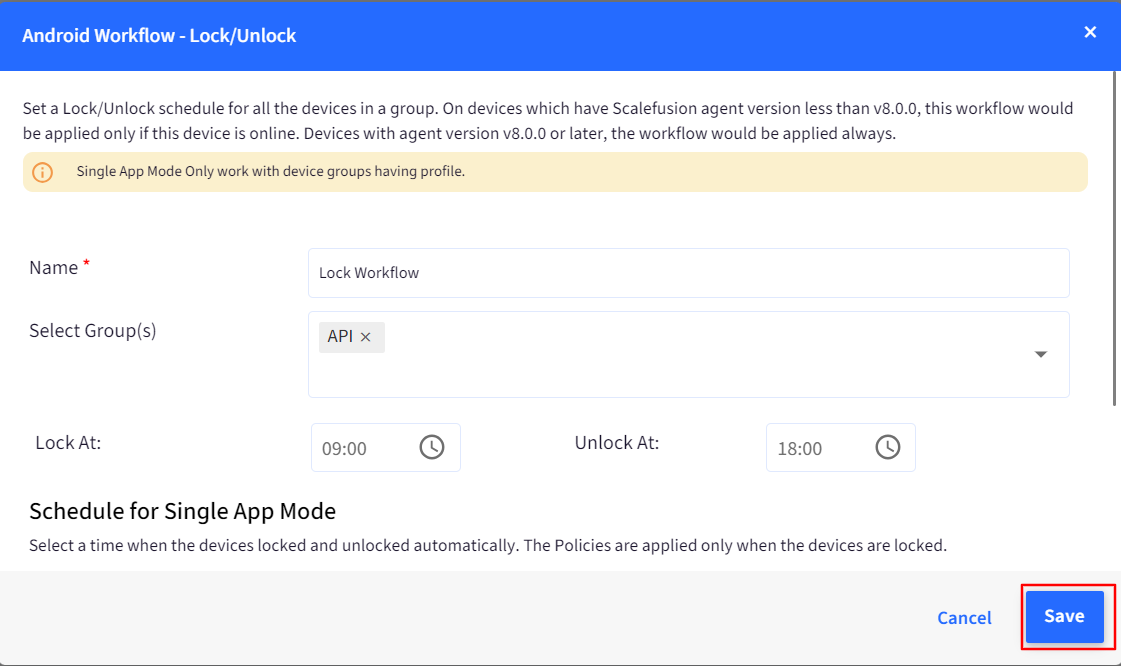
- Click SAVE once done.
- Example: Clicking on a Workflow shows the expanded view and gives additional details. In the example, Workflow is shown in the illustration below,
- The devices in the Group are automatically locked Daily at 9 AM CST and Unlocked at 5 PM CST. Additionally, if the Device Group has a Device Profile with a Single App Mode, then the Single App Mode is set to run between 9 AM to 5 PM.
- The Success On and Failed On shows the number of devices where the push was delivered and where it failed.
- The Last Run and Next Run indicate the last time the task was run and the scheduled next run, respectively.

- Action Menu: By clicking on the 3 dots menu, the following actions can be performed,
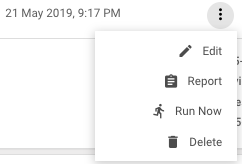
- Edit: Use this option to edit the Workflow.
- Report: Provides the report on historical runs of this Workflow.
- Run Now: Attempts to execute this Workflow at this point in time. Based on the defined schedule of the task, it will send a command to Lock the device or Unlock the device.
- Delete: Deletes the Workflow.
Reboot
- What does it Do: This schedules a workflow that automatically sends a command to reboot all the devices in the device group at the scheduled time.
- Supported Platforms:

- Prerequisites:
- Needs a Device Group that has the devices of the OS for which the Workflow needs to be created.
- The Devices in the Group should support Reboot.
- How to Create:
- Navigate to Reports & Workflows > Workflows
- Click CREATE NEW > OS/Platform > Reboot
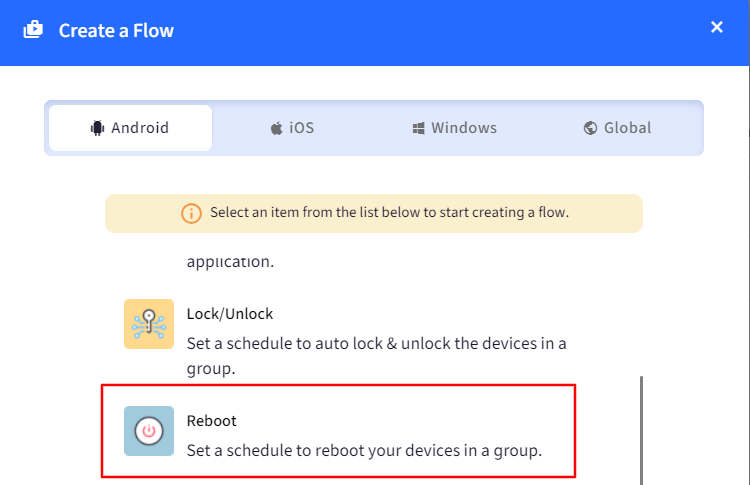
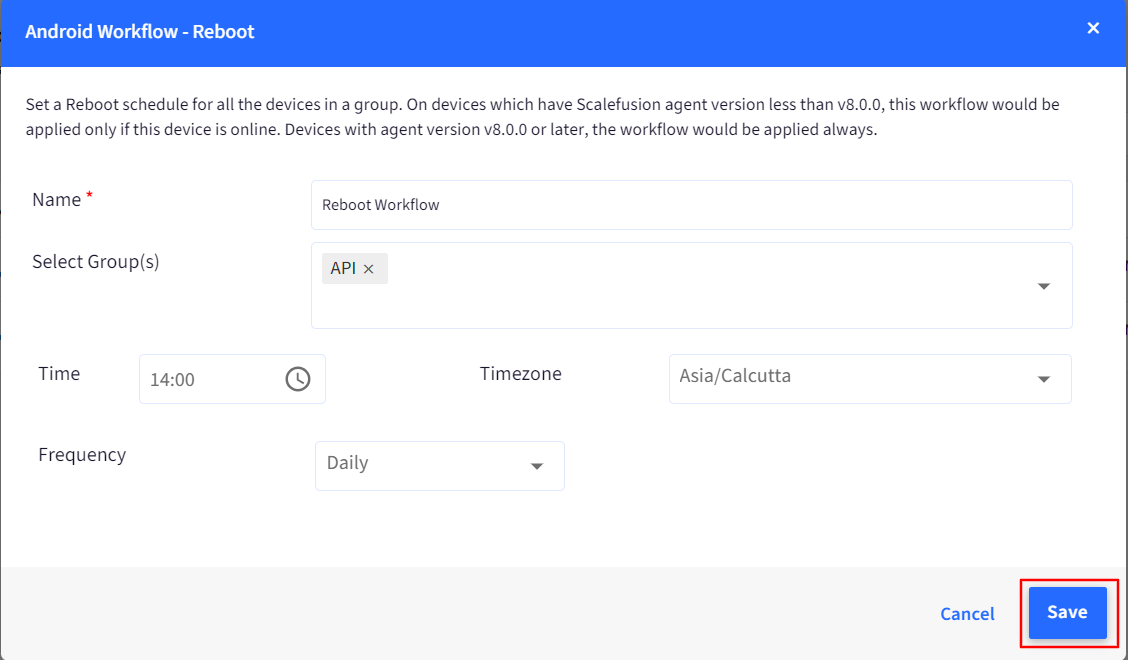
- Enter the following Details,
- Name: Name for the Workflow
- Select Groups: Select one or more groups where this Workflow works.
- Reboot Time & Timezone: Select a time and timezone when the device reboot command should be sent.
- Frequency:Select a Frequency for the reboot command to be sent,
- Daily: The Reboot command is sent every day at the scheduled time.
- Selected Days: The Reboot command is sent on the selected days at the scheduled time.
- Click SAVE once done.
- Example: Clicking on a Workflow shows the expanded view and gives additional details. In the example, Workflow is shown in the illustration below,
- A command to Reboot is sent to all Android devices in the Group at 5 AM.
- The Success On and Failed On shows the number of devices where the push was delivered and where it failed.
- The Last Run and Next Run indicate the last time the task was run and the scheduled next run, respectively.

- Action Menu: By clicking on the 3 dots menu, the following actions can be performed,
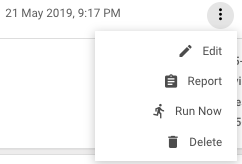
- Edit: Use this option to edit the Workflow.
- Report: Provides the report on historical runs of this Workflow.
- Run Now: Executes the workflow at this point in time and sends the command to reboot. The scheduled time in the Workflow is ignored.
- Delete: Deletes the Workflow.
Clear App Data
- What does it Do: This schedules a workflow that automatically sends a command to all the Android devices in the selected group to clear application data for the selected apps.
- Supported Platforms:

- Prerequisites:
- Needs a Device Group that has the Android Devices.
- The Devices in the Group should support Clear App Data functionality.
- How to Create:
- Navigate to Reports & Workflows > Workflows
- Click CREATE NEW > Android > Clear App Data
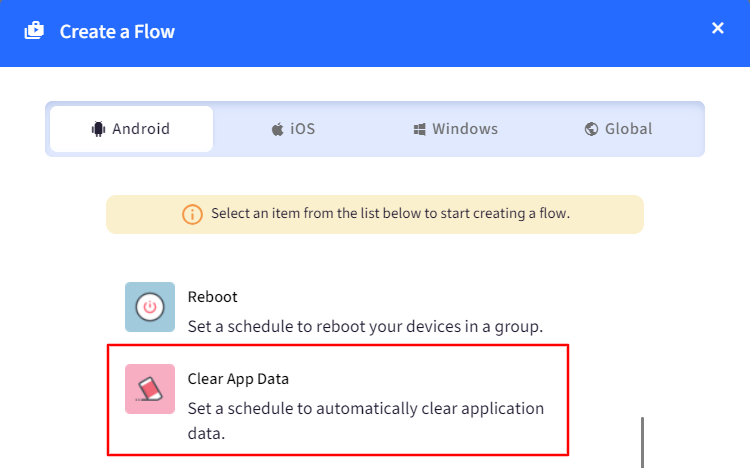
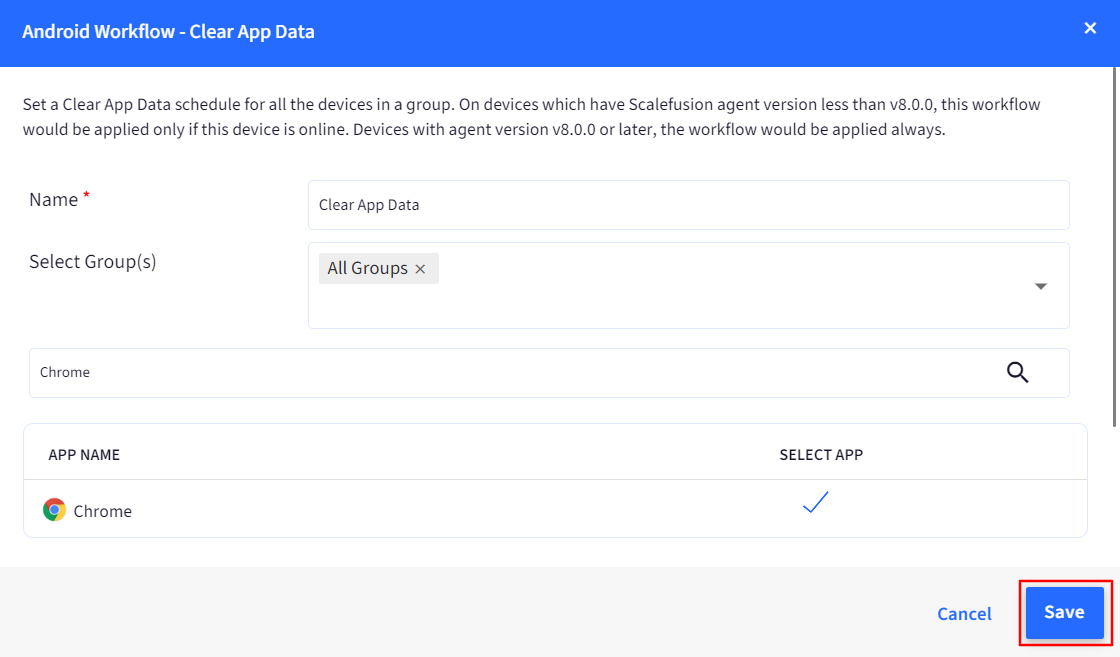
- Enter the following Details,
- Name: Name for the Workflow
- Select Groups: Select one or more groups where this Workflow works.
- Select Apps: Select the applications for which you want to clear the application data.
- Time & Timezone: Select the time & timezone when the clear app data command is sent to devices.
- Frequency: Select a Frequency for the Clear-App data command to be sent,
- Daily: The Reboot command is sent every day at the scheduled time.
- Selected Days: The Clear-App command is sent on the selected days at the scheduled time.
- Click SAVE once done.
- Example: Clicking on a Workflow shows the expanded view and gives additional details. In the example, Workflow is shown in the illustration below,
- A command to Reboot is sent to all Android devices in the Group at 5 AM.
- The Success On and Failed On shows the number of devices where the push was delivered and where it failed.
- The Last Run and Next Run indicate the last time the task was run and the scheduled next run, respectively.

- Action Menu: By clicking on the 3 dots menu, the following actions can be performed,
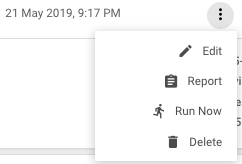
- Edit: Use this option to edit the Workflow.
- Report: Provides the report on historical runs of this Workflow.
- Run Now: Executes the workflow at this point in time and sends the command to reboot. The scheduled time in the Workflow is ignored.
- Delete: Deletes the Workflow.
Clear Browser Cache
- What does it Do: This schedules a workflow that automatically sends a command to all the Android devices in the selected group to clear the Scalefusion Browser cache.
- Supported Platforms:

- Prerequisites:
- Needs a Device Group that has Android Devices.
- How to Create:
- Navigate to Reports & Workflows > Workflows
- Click CREATE NEW > Android > Schedule Clear Browser Cache
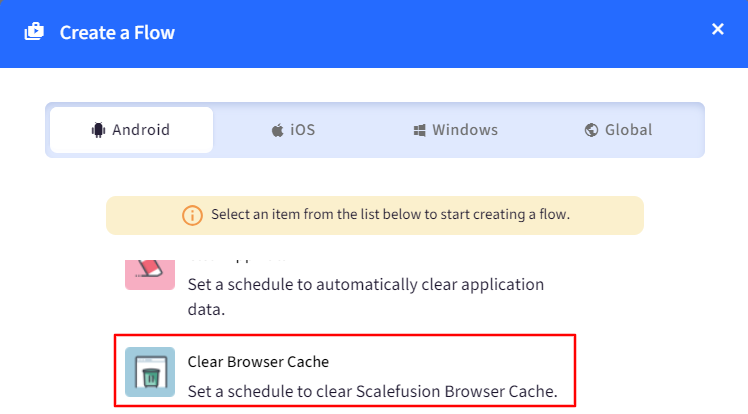
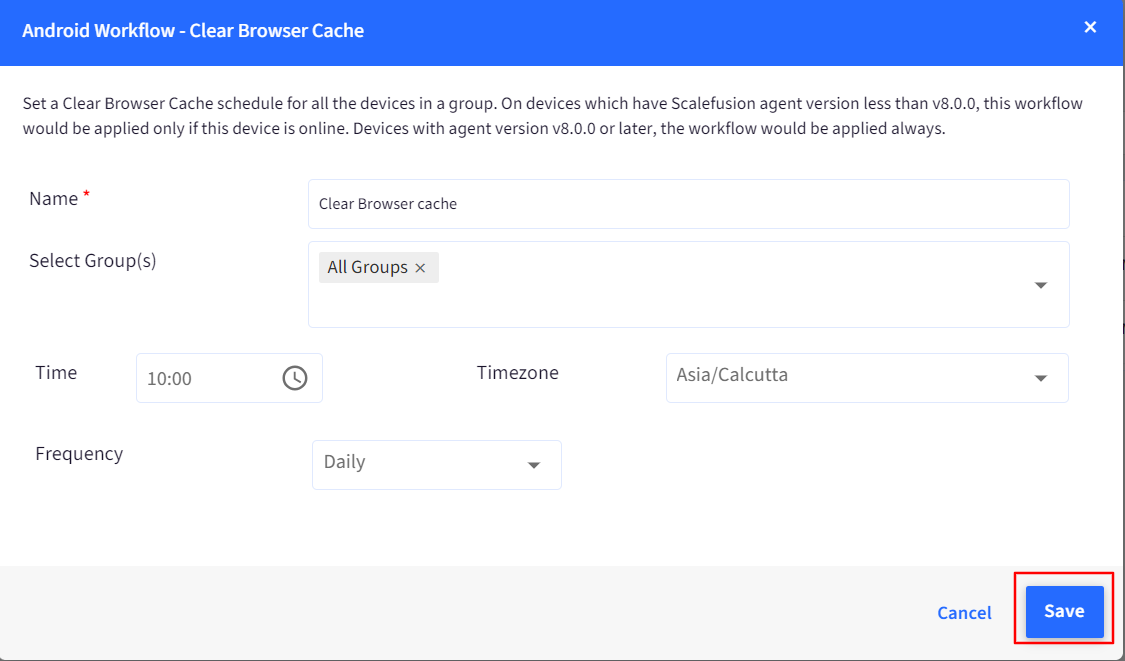
- Enter the following Details,
- Name: Name for the Workflow
- Select Groups: Select one or more groups where this Workflow works.
- Time & Timezone: Select the time & timezone when the clear app data command is sent to devices.
- Frequency: Select a Frequency for the Clear-App data command to be sent,
- Daily: The Reboot command is sent every day at the scheduled time.
- Selected Days: The Clear-App command is sent on the selected days at the scheduled time.
- Click SAVE once done.
- Example: Clicking on a Workflow shows the expanded view and gives additional details. In the example, Workflow is shown in the illustration below,
- A command to Reboot is sent to all Android devices in the Group at 5 AM.
- The Success On and Failed On shows the number of devices where the push was delivered and where it failed.
- The Last Run and Next Run indicate the last time the task was run and the scheduled next run, respectively.

- Action Menu: By clicking on the 3 dots menu, the following actions can be performed,
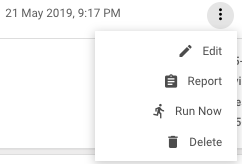
- Edit: Use this option to edit the Workflow.
- Report: Provides the report on historical runs of this Workflow.
- Run Now: Executes the workflow at this point in time and sends the command to reboot. The scheduled time in the Workflow is ignored.
- Delete: Deletes the Workflow.
ProSurf Clear Cache
- What does it Do: This schedules a workflow that automatically sends a command to all the iOS devices in the selected group to clear the ProSurf Browser cache.
- Supported Platforms:

- Prerequisites:
- Needs a Device Group that has iOS Devices.
- ProSurf browser needs to be installed on the devices.
- How to Create:
- Navigate to Reports & Workflows > Workflows
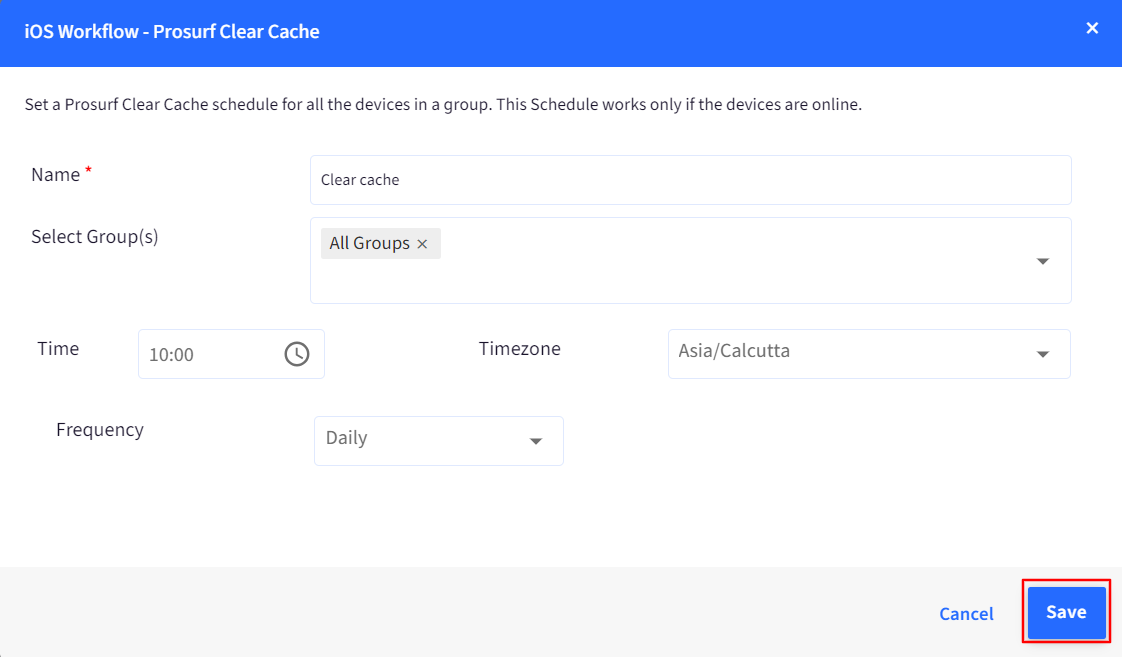
- Click CREATE NEW > iOS > Schedule Prosurf Clear Cache
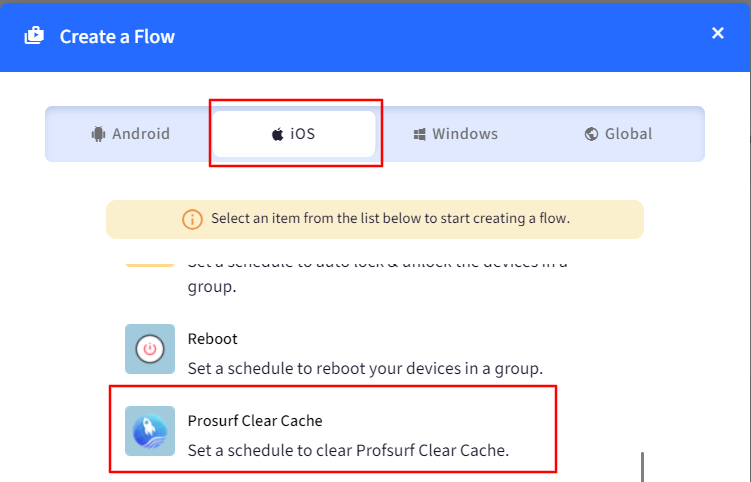
- Enter the following Details,
- Name: Name for the Workflow
- Select Groups: Select one or more groups where this Workflow works.
- Time & Timezone: Select the time & timezone when the clear app data command is sent to devices.
- Frequency: Select a Frequency for the Clear-App data command to be sent,
- Daily: The Reboot command is sent every day at the scheduled time.
- Selected Days: The Clear-App command is sent on the selected days at the scheduled time.
- Click SAVE once done.
- Example: Clicking on a Workflow shows the expanded view and gives additional details. In the example, Workflow is shown in the illustration below,
- A command to Reboot is sent to all Android devices in the Group at 5 AM.
- The Success On and Failed On shows the number of devices where the push was delivered and where it failed.
- The Last Run and Next Run indicate the last time the task was run and the scheduled next run, respectively.

- Action Menu: By clicking on the 3 dots menu, the following actions can be performed,
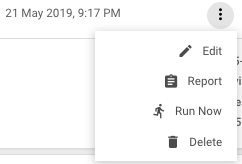
- Edit: Use this option to edit the Workflow.
- Report: Provides the report on historical runs of this Workflow.
- Run Now: Executes the workflow at this point in time and sends the command to reboot. The scheduled time in the Workflow is ignored.
- Delete: Deletes the Workflow.
Broadcast Message
- What does it Do: This schedules a workflow that automatically sends a broadcast message to all the devices in the selected group.
- Supported Platforms: Android, iOS, macOS, Windows
- Prerequisites:
- Needs a Device Group that has Android & iOS Devices.
- Scalefusion MDM agent needs to be installed and active on the devices.
- How to Create:
- Navigate to Reports & Workflows > Workflows
- Click CREATE NEW > Global > Broadcast Message
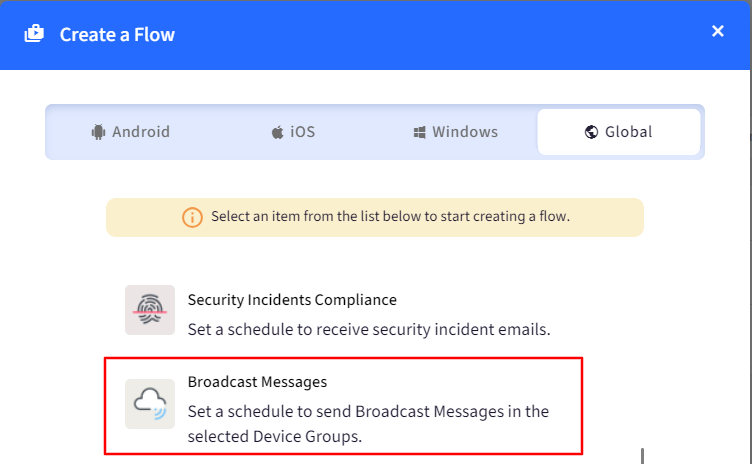
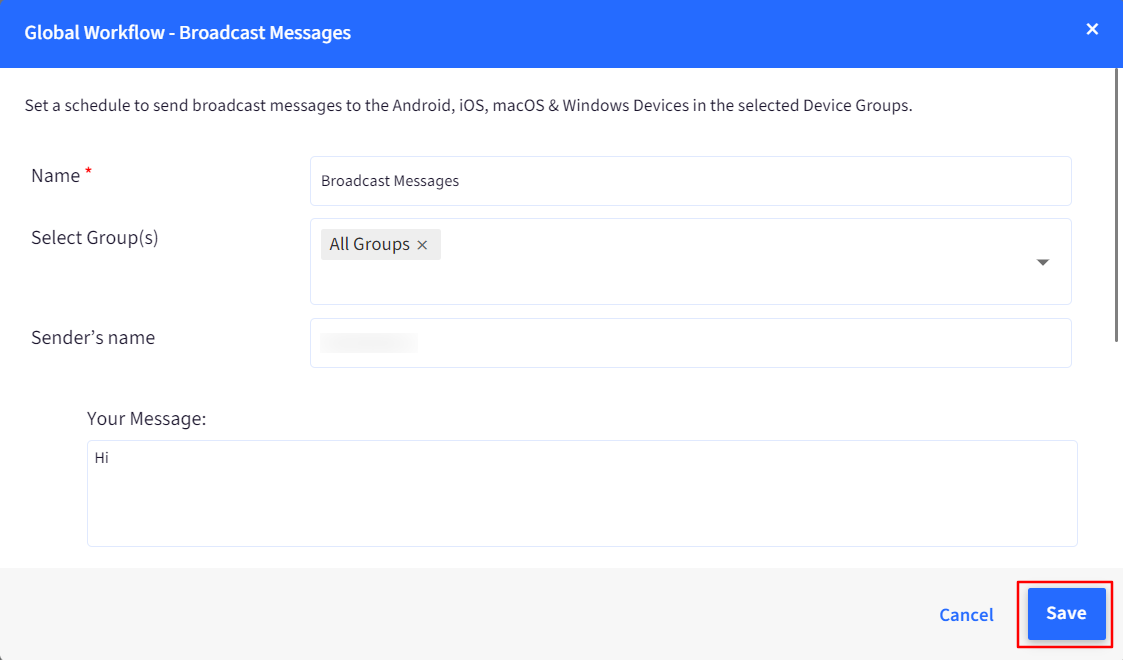
- Enter the following Details,
- Name: Name for the Workflow
- Select Groups: Select one or more groups where this Workflow works.
- Sender's Name: Configure Sender’s name
- Time & Timezone: Select the time & timezone when the clear app data command is sent to devices.
- Frequency: Select a Frequency for the Clear-App data command to be sent,
- Daily: The Reboot command is sent every day at the scheduled time.
- Selected Days: The Clear-App command is sent on the selected days at the scheduled time.
- Click SAVE once done.
- Example: Clicking on a Workflow shows the expanded view and gives additional details. In the example, Workflow is shown in the illustration below,
- A command to Reboot is sent to all Android devices in the Group at 5 AM.
- The Success On and Failed On shows the number of devices where the push was delivered and where it failed.
- The Last Run and Next Run indicate the last time the task was run and the scheduled next run, respectively.

- Action Menu: By clicking on the 3 dots menu, the following actions can be performed,
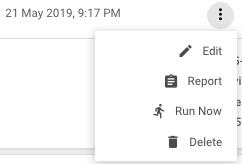
- Edit: Use this option to edit the Workflow.
- Report: Provides the report on historical runs of this Workflow.
- Run Now: Executes the workflow at this point in time and sends the command to reboot. The scheduled time in the Workflow is ignored.
- Delete: Deletes the Workflow.
Device Reports
- What does it Do: This schedules a workflow that automatically emails you a report (CSV) of the selected Device properties. This can be scheduled for all devices in the inventory or selected groups.
- Supported Platforms:

- Prerequisites:
- Enrolled Devices.
- How to Create:
- Navigate to Reports & Workflows > Workflows
- Click CREATE NEW > Global > Device Reports
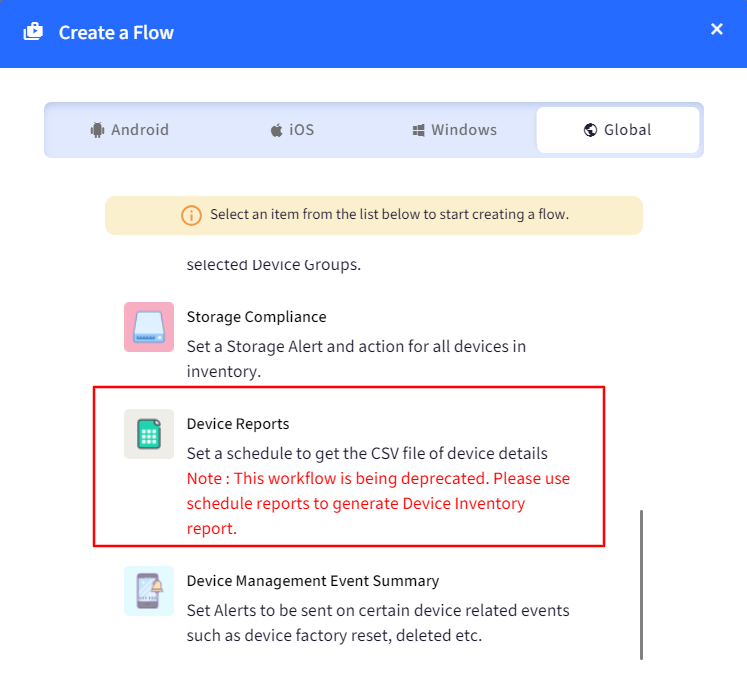
- Enter the following Details,
- Name: Name for the Workflow
- Select Groups: Select one or more groups where this Workflow works.
- Time & Timezone: Select the time & timezone when the clear app data command is sent to devices.
- Frequency: Select a Frequency for the Clear-App data command to be sent,
- Daily: The Reboot command is sent every day at the scheduled time.
- Selected Days: The Clear-App command is sent on the selected days at the scheduled time.
- Click SAVE once done.
- Example: Clicking on a Workflow shows the expanded view and gives additional details. In the example, Workflow is shown in the illustration below,
- A command to Reboot is sent to all Android devices in the Group at 5 AM.
- The Last Run and Next Run indicate the last time the task was run and the scheduled next run, respectively.

- Action Menu: By clicking on the 3 dots menu, the following actions can be performed,
.png)
- Edit: Use this option to edit the Workflow.
- Report: Provides the report on historical runs of this Workflow.
- Run Now: Executes the workflow at this point in time and sends the command to reboot. The scheduled time in the Workflow is ignored.
- Delete: Deletes the Workflow.
Switch Presentation
- What does it Do: This schedules a workflow that dynamically switches presentations on your selected device groups, based on the start time and end time you specify.
- Supported Platforms: Android, iOS, Windows
- Prerequisites:
- Device Group that has Android, iOS or Windows Devices.
- Scalefusion MDM agent needs to be installed and active on the devices.
- Two Presentations should be there
- Android and Windows Devices - FileDock should be installed and running in Single App Mode.
- iOS Devices - Scalefusion MDM client should be set in Single App Mode
- How to Create:
- Navigate to Reports & Workflows > Workflows
- Click CREATE NEW > Global> Switch Presentation.
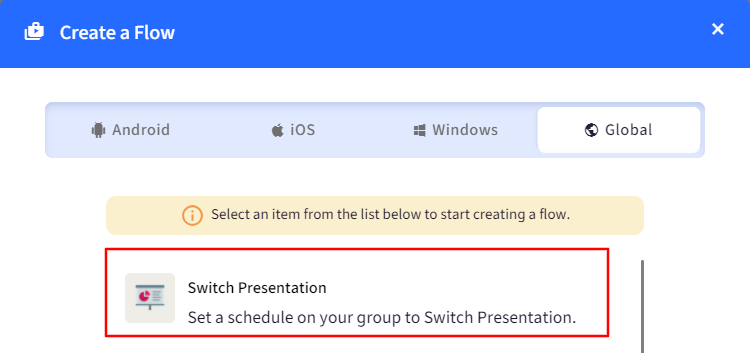
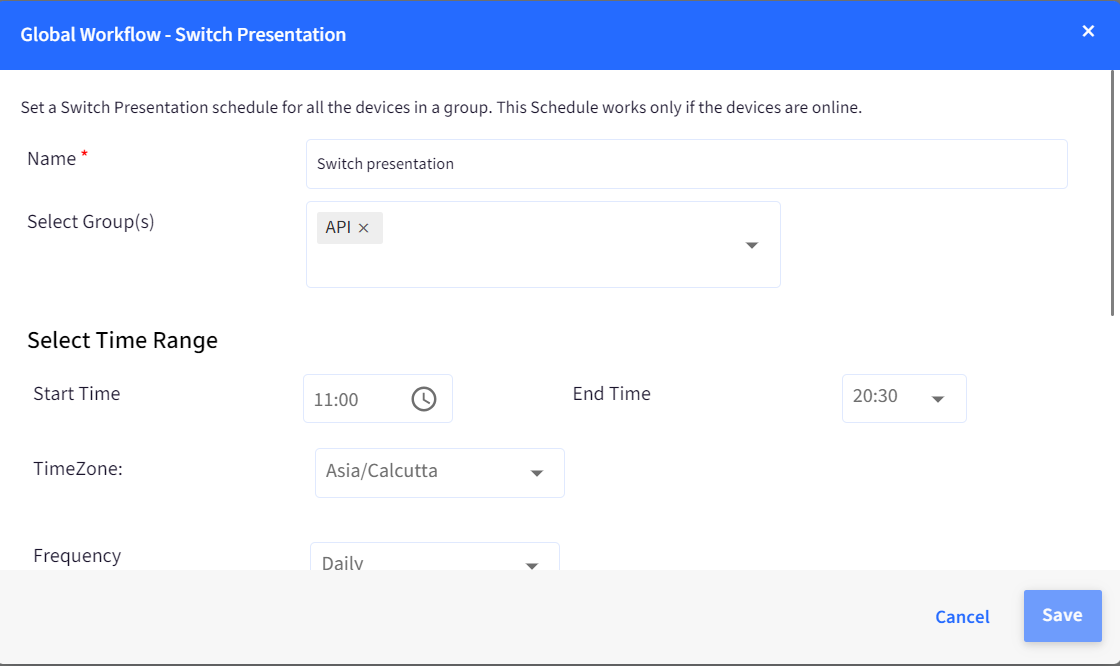
- Enter the following Details,
- Name: Name for the Workflow
- Select Groups: Select one or more groups where this Workflow works.
- Time & Timezone: Select the time & timezone when the clear app data command is sent to devices.
- Frequency: Select a Frequency for the Clear-App data command to be sent,
- Daily: The Reboot command is sent every day at the scheduled time.
- Selected Days: The Clear-App command is sent on the selected days at the scheduled time.
- Select Presentation for Start Time: Select the Presentation that should run on the grouped devices during the timeframe (Start time and End Time) you have selected
- Select Presentation for End Time: Select the Presentation which should run on the grouped devices other than the timeframe (Start time and End Time) you have selected
- Send Emails: Choose if you want to receive email reports for the Workflow after it is executed, where you can schedule and send an email that contains a log of all the Switch Presentation events that have taken place during one day.
- Click SAVE once done.
- Example: Clicking on a Workflow shows the expanded view and gives additional details. In the example, Workflow is shown in the illustration below,
- A command to Reboot is sent to all Android devices in the Group at 5 AM.
- The Success On and Failed On shows the number of devices where the push was delivered and where it failed.
- The Last Run and Next Run indicate the last time the task was run and the scheduled next run, respectively.

- Action Menu: By clicking on the 3 dots menu, the following actions can be performed,
.png)
- Edit: Use this option to edit the Workflow.
- Report: Provides the report on historical runs of this Workflow.
- Delete: Deletes the Workflow.
Device Management Event Summary
- What does it Do: With this workflow, you can set alerts to send email notifications on device management events like Device Unenrolled, Factory Reset, Deleted etc.
- Supported Platforms:

- Prerequisites:
- Device(s) should be enrolled with Scalefusion
- How to Create:
- Navigate to Reports & Workflows > Workflows
- Click CREATE NEW > Global > Device Management Event Summary
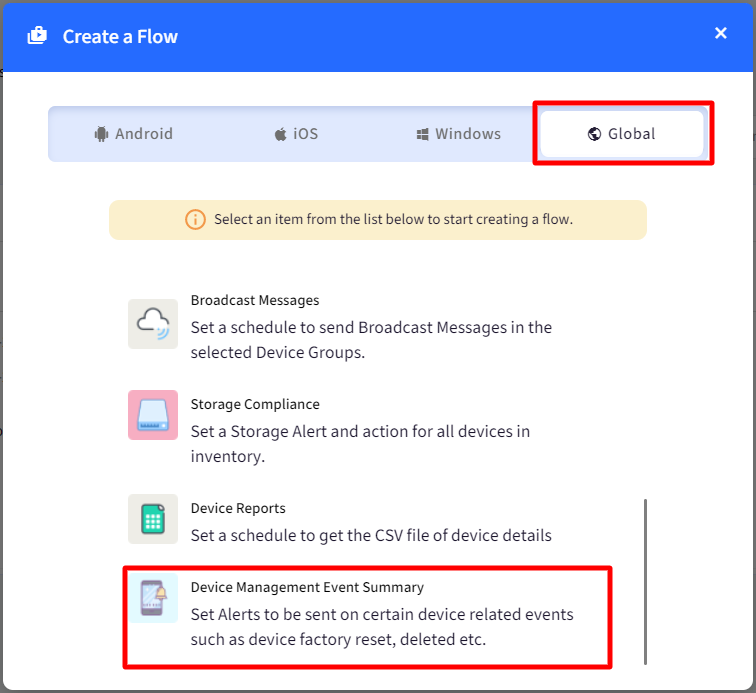
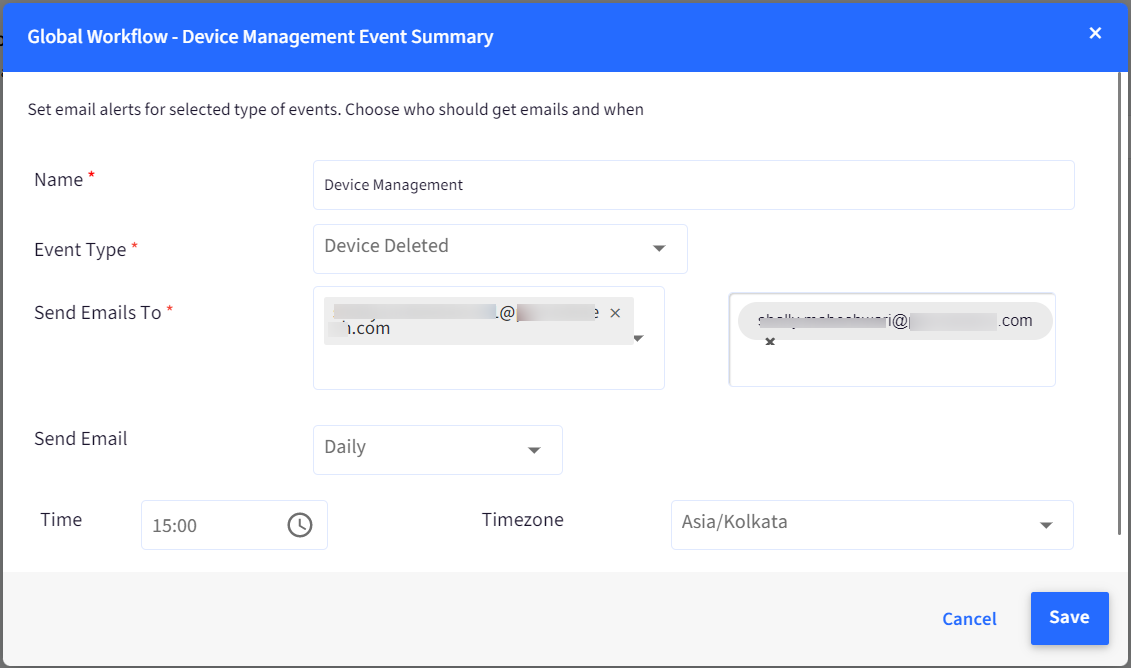
- Enter the following Details,
- Name: Name for the Workflow
- Event Type: Select one from the following events:
- The device becomes Unenrolled: Sends a list of devices that have been unenrolled where the user removes the MDM profile from the device. This is applicable on iOS, macOS and Windows devices.
- Device Factory Reset: Lists devices that have been factory reset.
- Device Deleted: Sends list of devices deleted from the dashboard.
- Send Emails To: The drop-down lists all admins registered with Scalefusion. Select the ones to whom you have to send device-related alerts. You can select multiple admins. If you want to send alerts other than admins, enter email addresses in the second field.
- Send Email: Select a Frequency for the alert,
- Daily: The selected event runs daily at the scheduled time.
- Selected Days: The selected event runs on the days you select at the scheduled time.
- Time & Timezone: Select the time & timezone when the clear app data command is sent to devices.
- Click SAVE once done.
- Example: Clicking on a Workflow shows the expanded view and gives additional details. In the example, Workflow is shown in the illustration below,
- A command to Reboot is sent to all Android devices in the Group at 5 AM.
- The Last Run and Next Run indicate the last time the task was run and the scheduled next run, respectively.

- Action Menu: By clicking on the 3 dots menu, the following actions can be performed,
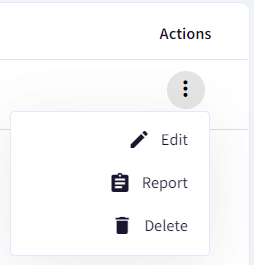
- Edit: Use this option to edit the Workflow.
- Report: Provides the report on historical runs of this Workflow.
- Delete: Deletes the Workflow.
- Here is a sample CSV showing information that you receive for devices deleted when the workflow gets executed.

Known Behaviors
- In Switch Presentation Workflow, Success/Failed indicators are redundant. As a result, count of Success/Failed is not generated in reports.
- Broadcast Message Workflow for iOS reports as Failed though it succeeds. Due to this, the count of Read vs Success for iOS does not match in the details and reports view.
- Lock/Unlock Workflow for iOS indicates both Success and Failed count simultaneously, when executed.
この記事は役に立ちましたか?


.png)


.png)


