- 30 Aug 2024
- 6 読む分
- 印刷する
- PDF
Manage ADE/DEP Devices using Scalefusion
- 更新日 30 Aug 2024
- 6 読む分
- 印刷する
- PDF
Automated Device Enrollment or ADE (formerly Device Enrollment Program or DEP) is an Apple Program that can be used to streamline the onboarding process for brand-new devices or devices that have been hard reset, automatically to an MDM server. Also with iOS 11 and the latest version of Apple Configurator tool, any device can be enrolled into the ADE program. ADE devices also give you the option to disallow the removal of MDM management from the iOS & macOS devices, thereby making the ADE program a highly recommended approach for organizations.
By configuring Scalefusion to manage your ADE devices, you can enforce them to become Supervised during the first time they are Unboxed and also enroll into the Scalefusion Dashboard.
This document guides you on how to setup Scalefusion to manage your ADE devices.
Before You Begin
- You would need an Apple Business Manager (ABM) or Apple School Manager (ASM) account
- A valid Scalefusion Dashboard account.
- An iOS or a Mac device that is purchased under ADE program
Steps
Configuring Scalefusion to Manage your ADE/DEP devices
The first step is to configure Scalefusion to allow to sync with ABM/ASM portal to get your ADE devices and let Apple know that Scalefusion will manage those devices. For this the following need to be done.
- Login to Scalefusion Dashboard.
- Navigate to Getting Started > Apple Setup.
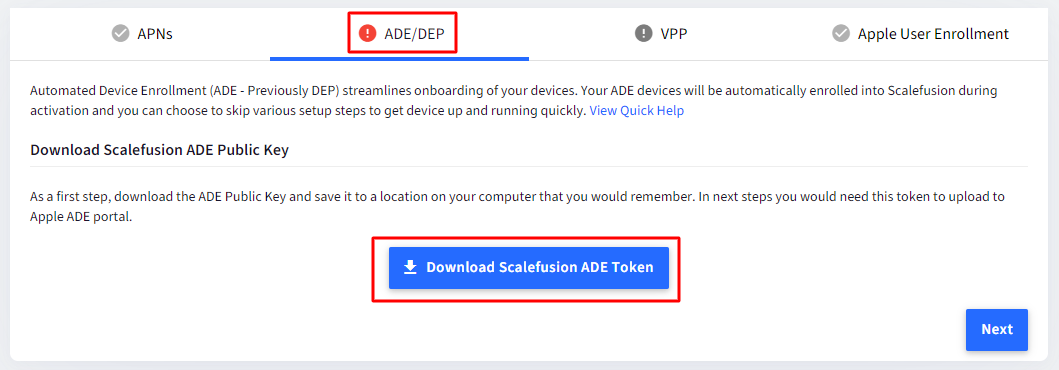
- Click on the ADE/DEP tab.

- Download Scalefusion ADE Public Key. On the next screen, click on DOWNLOAD Scalefusion ADE TOKEN. This will download ADETokenKey.pem file to your Downloads folder or to the folder that you have set as the downloads folder.
- Click NEXT.
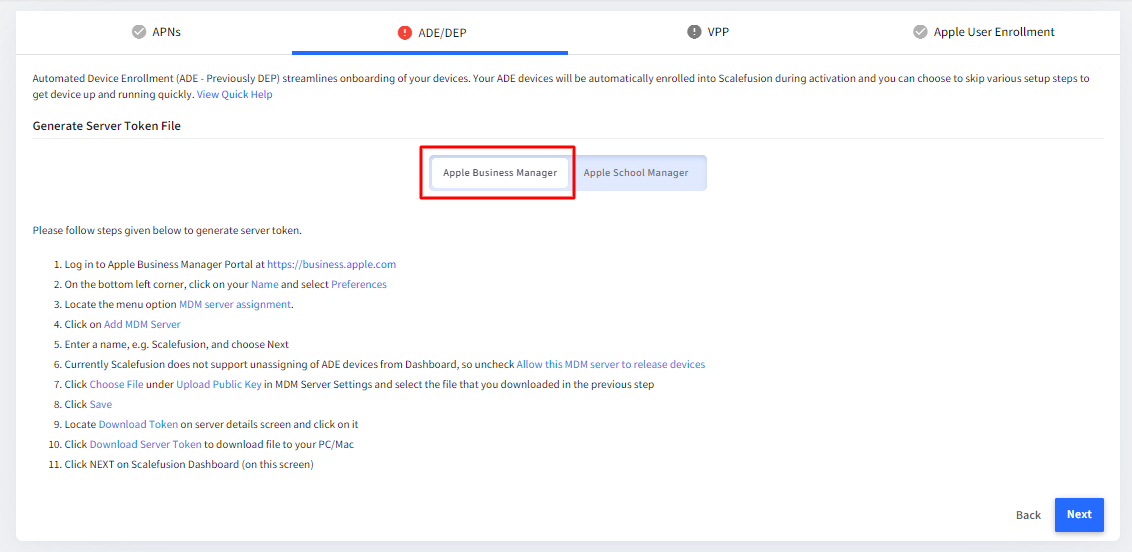
- Generate Server Token File
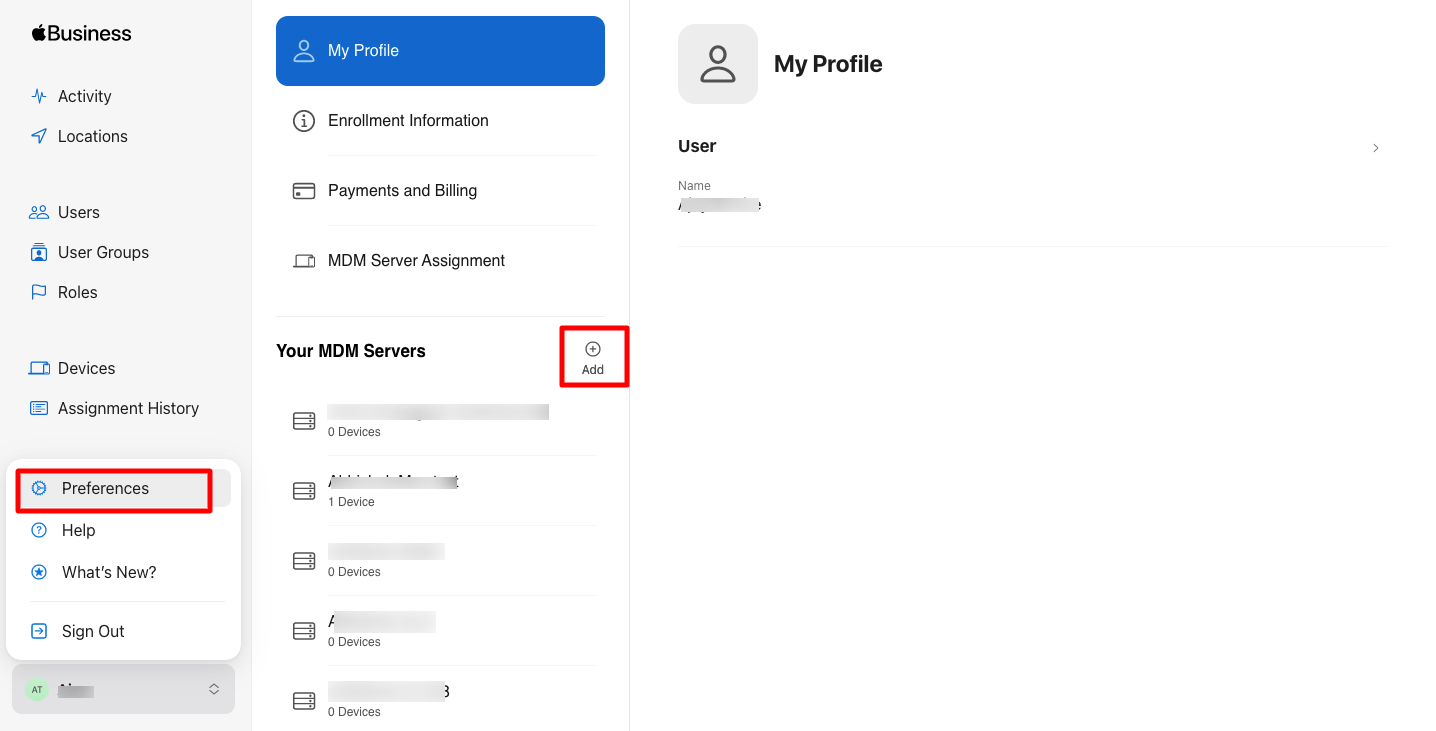
- You will need to generate server token. To do so, login to Apple Business Manager Portal at https://business.apple.com or to Apple School Manager Portal at https://school.apple.com/
- Click on Preferences (You will see Preferences on clicking your Profile name on the bottom left)
- Now under Your MDM Servers, click on Add
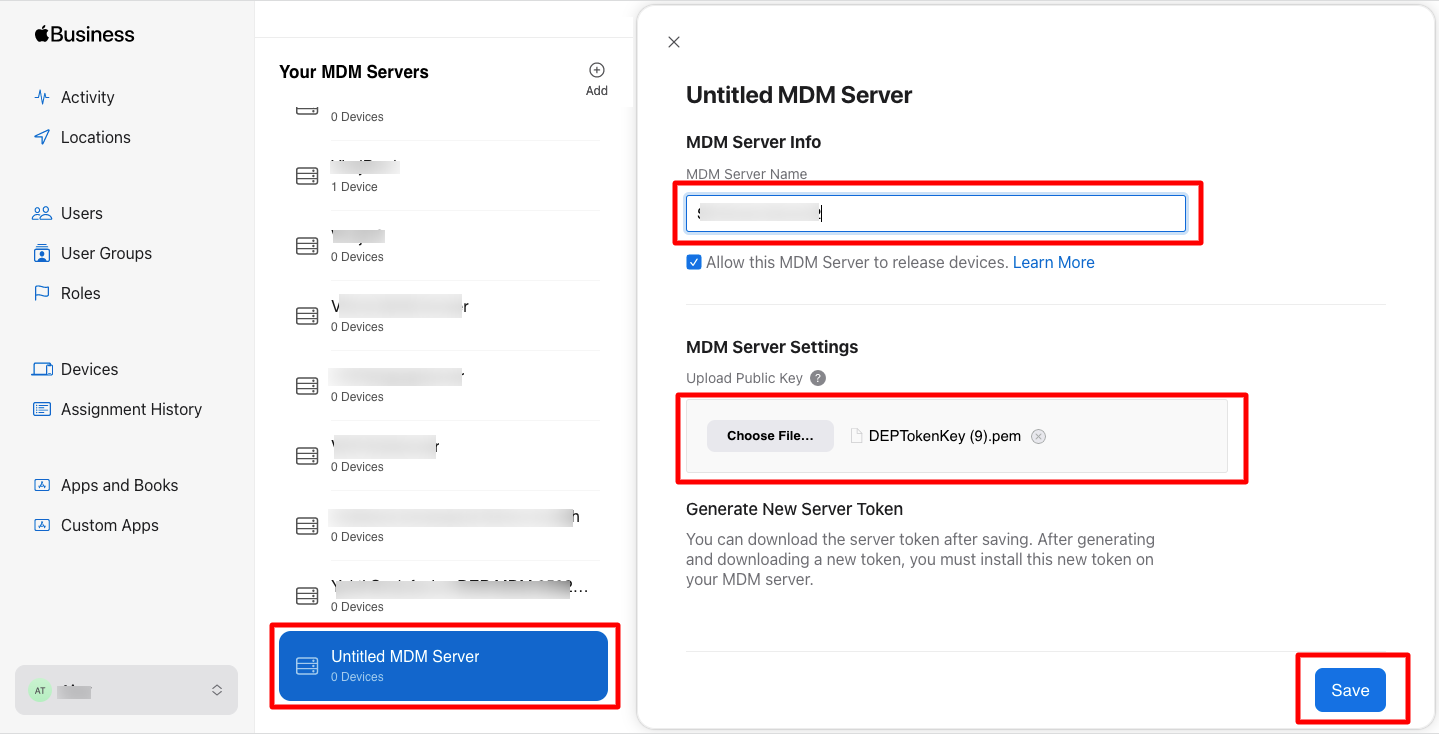
- This creates an Untitled MDM Server. Enter MDM server info: MDM Server Name: Enter a name for the MDM server under MDM Server Name Upload Public Key: Click on Choose File and select the Scalefusion ADE token (.pem file) that you downloaded from Scalefusion Dashboard at Step 4, to upload it.
- Click Save
- Download the server token file that is generated, by clicking on Download Token
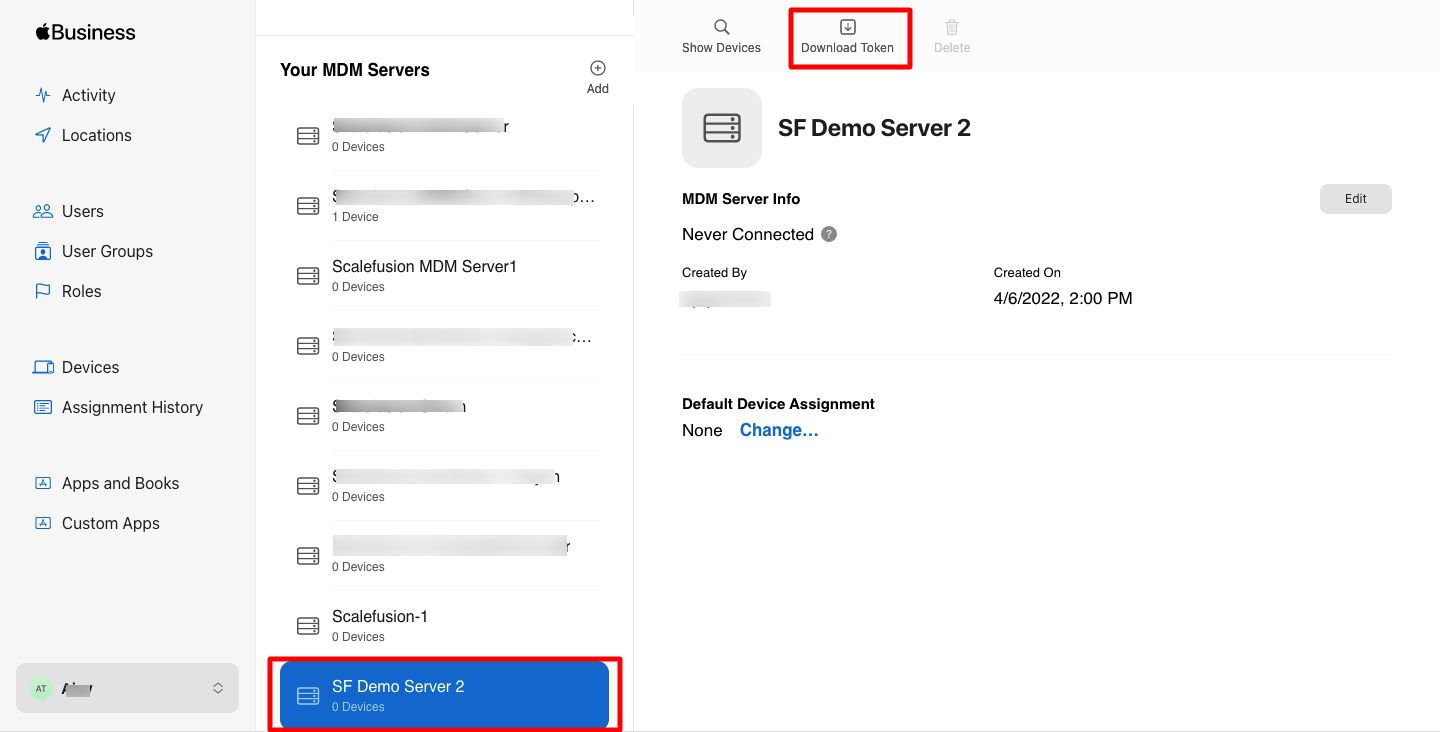
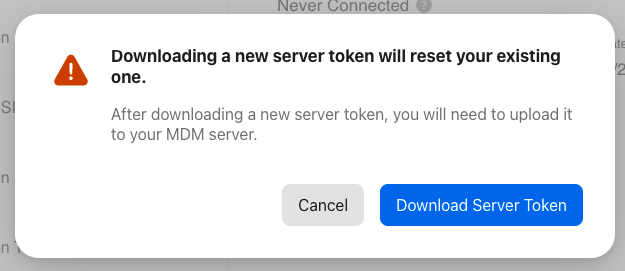
- You will get the following screen. Click on Download Server Token
- Once you have downloaded the Token file from ABM/ASM Portal, navigate back to Scalefusion Dashboard. Click Next.
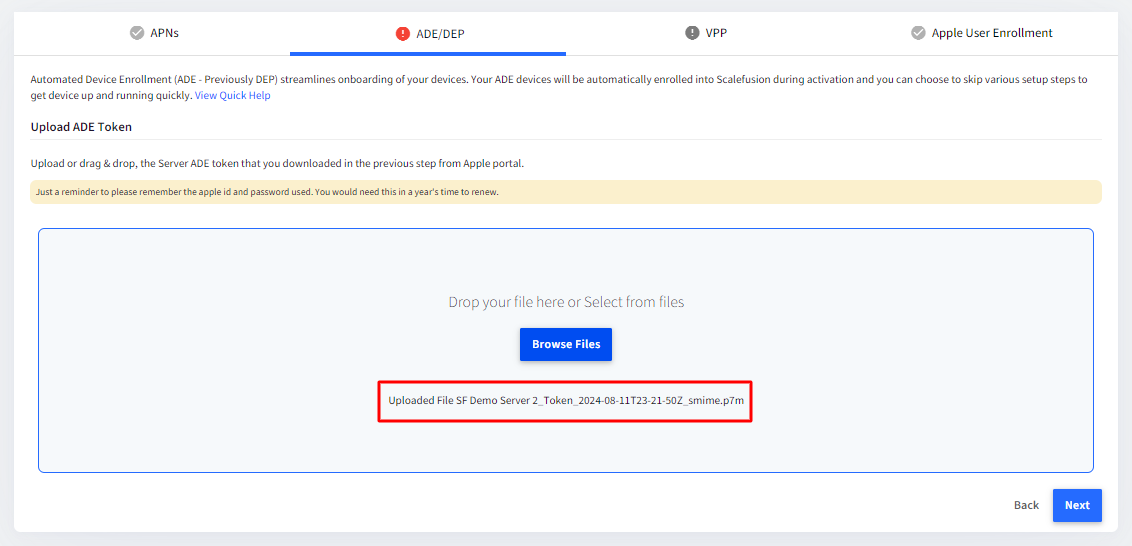
- Upload ADE token
Upload the server token file that you downloaded from ABM/ASM Portal, by clicking on Browse files. - Once you upload the file, click Next.
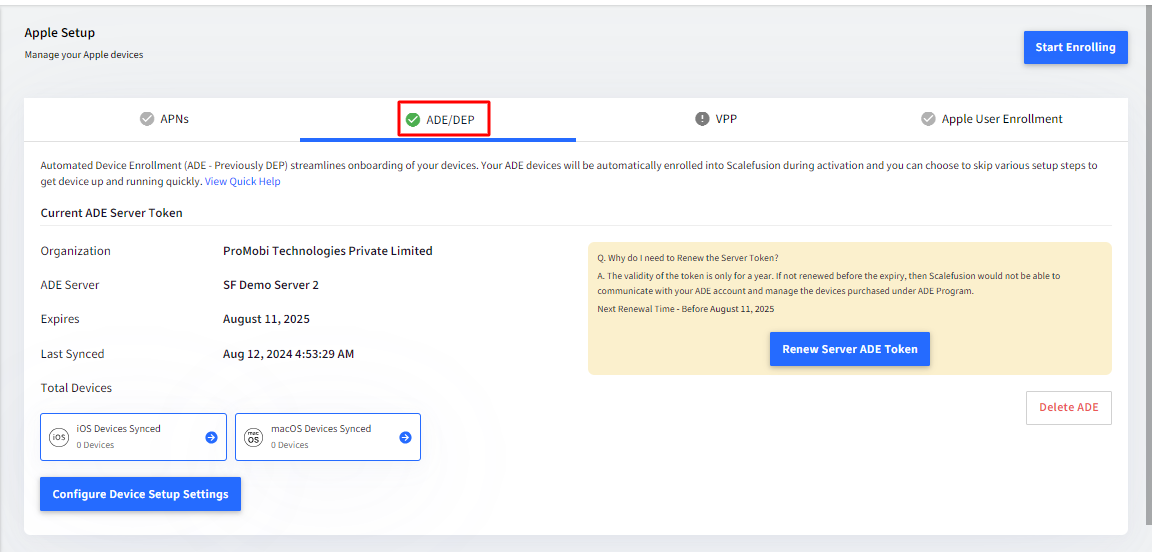
- This will complete the process and you can see the details of your organization and the name that you gave in the ABM/ASM Portal now under ADE/DEP tab.
Assigning Devices to Scalefusion Server
Now that you have setup Scalefusion MDM server to manage your DEP devices, let us assign one device so that you can see how it works. Follow the below steps to manage your existing devices using Scalefusion.
- Login to https://business.apple.com or https://school.apple.com/ using your Apple credentials.
- Once logged in, click on Getting Started next to Device Enrollment Program.
- On the left-hand side, click on Manage Devices.
- You will be shown a page where you can assign devices to an MDM server. You can:
- Assign using Serial numbers.
- Assign using Order numbers.
Upload a CSV file of Serial and/or Order Numbers.
- Enter the Serial number of the iOS or Mac device that you have and have bought under the ADE program.
- Select Assign Devices from the drop-down below.
- From the list of servers, click Scalefusion (or the name that you gave) and click OK.
- Now Login to Scalefusion.
- Navigate to Getting Started > Apple Setup > ADE/DEP. This page displays the total devices that Scalefusion has synced.
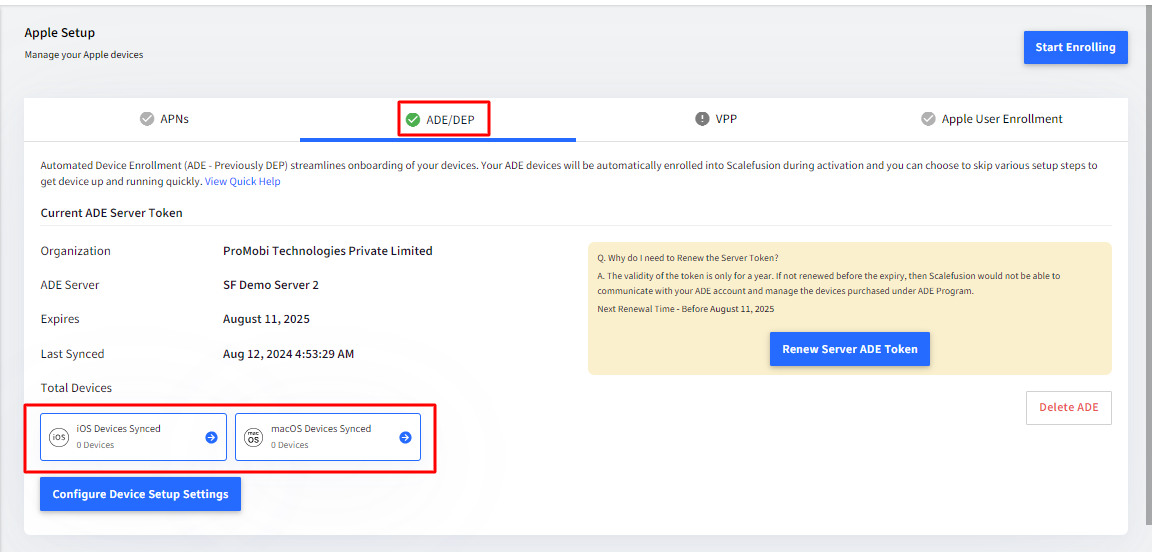
- Click on the number next to Total Devices. You will be shown a page that lists all your ADE devices that Scalefusion has synced with Apple. At this point it will be blank as Scalefusion syncs every 6 hours for new devices.
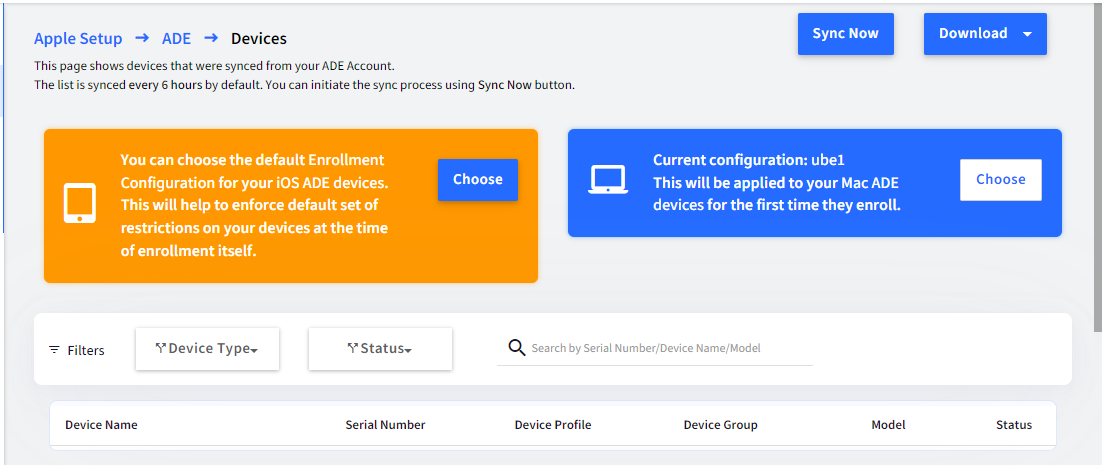
- Click on SYNC NOW to manually sync.

- Refresh the page so that you can see the device that you just assigned in Steps 5-7.
- For all your ADE devices, you can choose a QR Code configuration, so that when these devices are unboxed or hard reset, they use this configuration to be automatically setup. Click on CHOOSE and select the QR Code configuration.
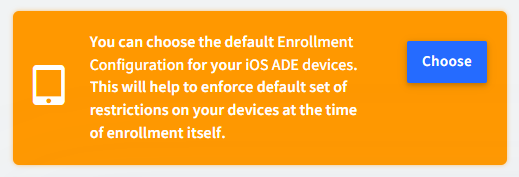
- Click APPLY.
- In addition to the default QR Code configuration that can be attached for ADE devices, you can attach per device profile/group. The way to do it is,
- Sync all your ADE devices using Sync button.
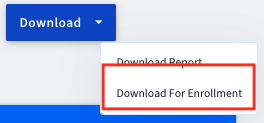
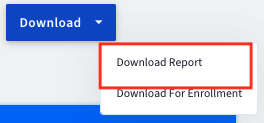
- Downloadthe Report for devices that are pending enrollment from ADE devices page.This report only gives devices that are not in enrolled state
- Enter the Profile or Group name for each device.
- Upload the CSV to IMEI/Serial# section. The CSV can be used directly in IMEI/Serial# section.
- Once these devices enroll they will pick the mapped profile or group.If there is no mapped profile or group then the default that is provided in the ADE section is picked.
- The ADE devices page lists the profile/group attached with the device.The Enrollment Method shown here does not apply for iOS and Mac devices

- The Download Report option can be used to download all devices that are in enrolled state.
- At this point, you are ready to start your device. Depending upon the state of your device, either of the following needs to be done,
- For a new iOS or Mac device, Unbox it and start the device. Choose the language and configure a Wifi. The device should show you a Remote Management screen post the initial setup screens.
- For an existing iOS device, go to Settings > General > Reset > Reset All Content & Settings. This will reset the device and post the screens where you choose the language and configure a Wifi, the device should show you a Remote Management screen.
- For an existing macOS device, please reinstall the macOS using Recovery options (CMD + R) to re-enroll using DEP method.
- Once you see the Remote Management screen, you would have to click Next, and the device will be enrolled onto the Scalefusion Dashboard.
- User Authenticated Enrollment: If you have chosen an Enrollment configuration where the Enrollment Type is User Authenticated enrollment, after Remote Management, you will get the screen to enter your email ID and OTP for user authentication.
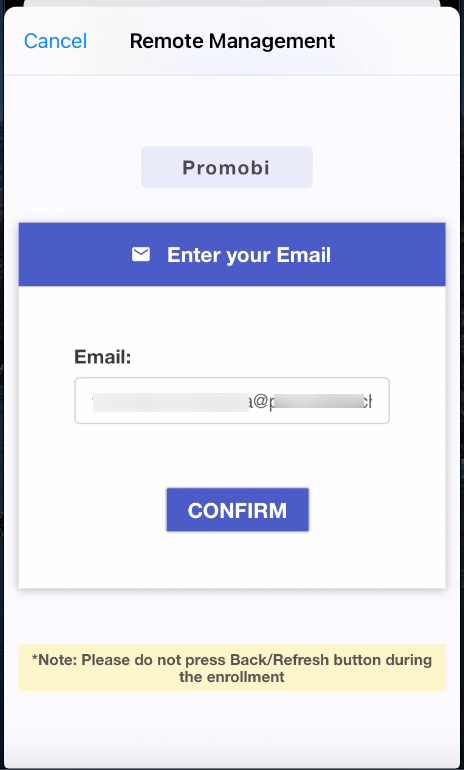
- Enter the email id, OTP and accept Terms of Service.
- Follow the next steps to install configuration profile and enroll the device.
- User Authenticated Enrollment: If you have chosen an Enrollment configuration where the Enrollment Type is User Authenticated enrollment, after Remote Management, you will get the screen to enter your email ID and OTP for user authentication.
- You can see the status of the newly enrolled device in the Scalefusion Dashboard under the Devices section.
Delete ADE
ADE can be deleted any time. Devices already enrolled will stay enrolled. However on next Factory Reset, they will not be enrolled to Scalefusion. To delete,
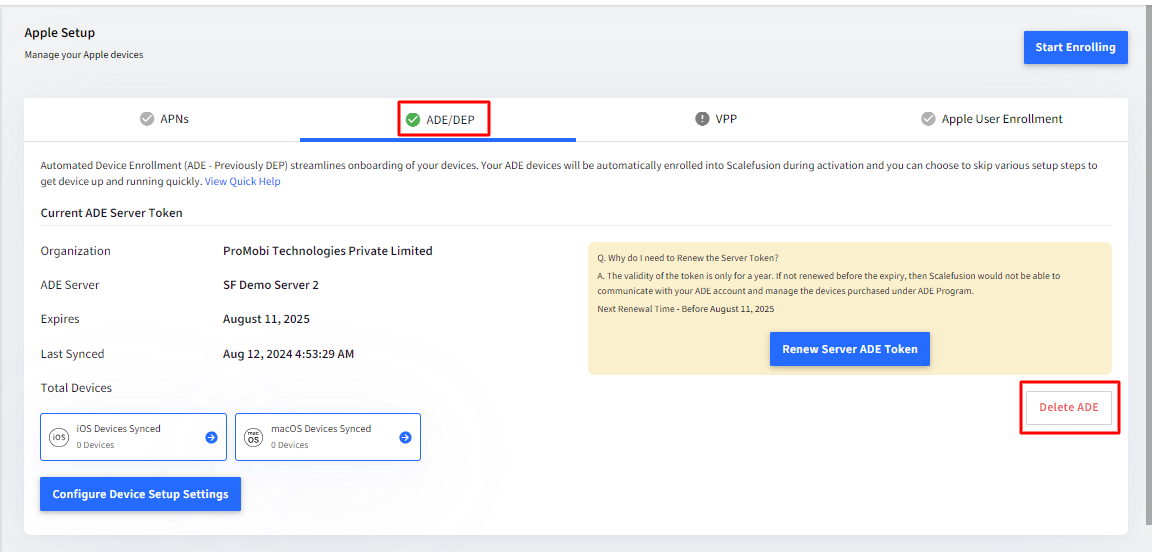
- Navigate to Getting Started > Apple Setup > ADE/DEP page and click on Delete ADE
- You will get a confirmation box. Click Yes to confirm. ADE will be deleted.
Managing ADE Supervisioning Settings
For all your ADE devices you can set a group of Supervisioning settings that are applied when the device enrolls to the Dashboard on the first unboxing or after hard reset. To access and change these settings please follow the below steps,
- Login to Scalefusion Dashboard.
- Navigate to Getting Started > Apple Setup > ADE/DEP.
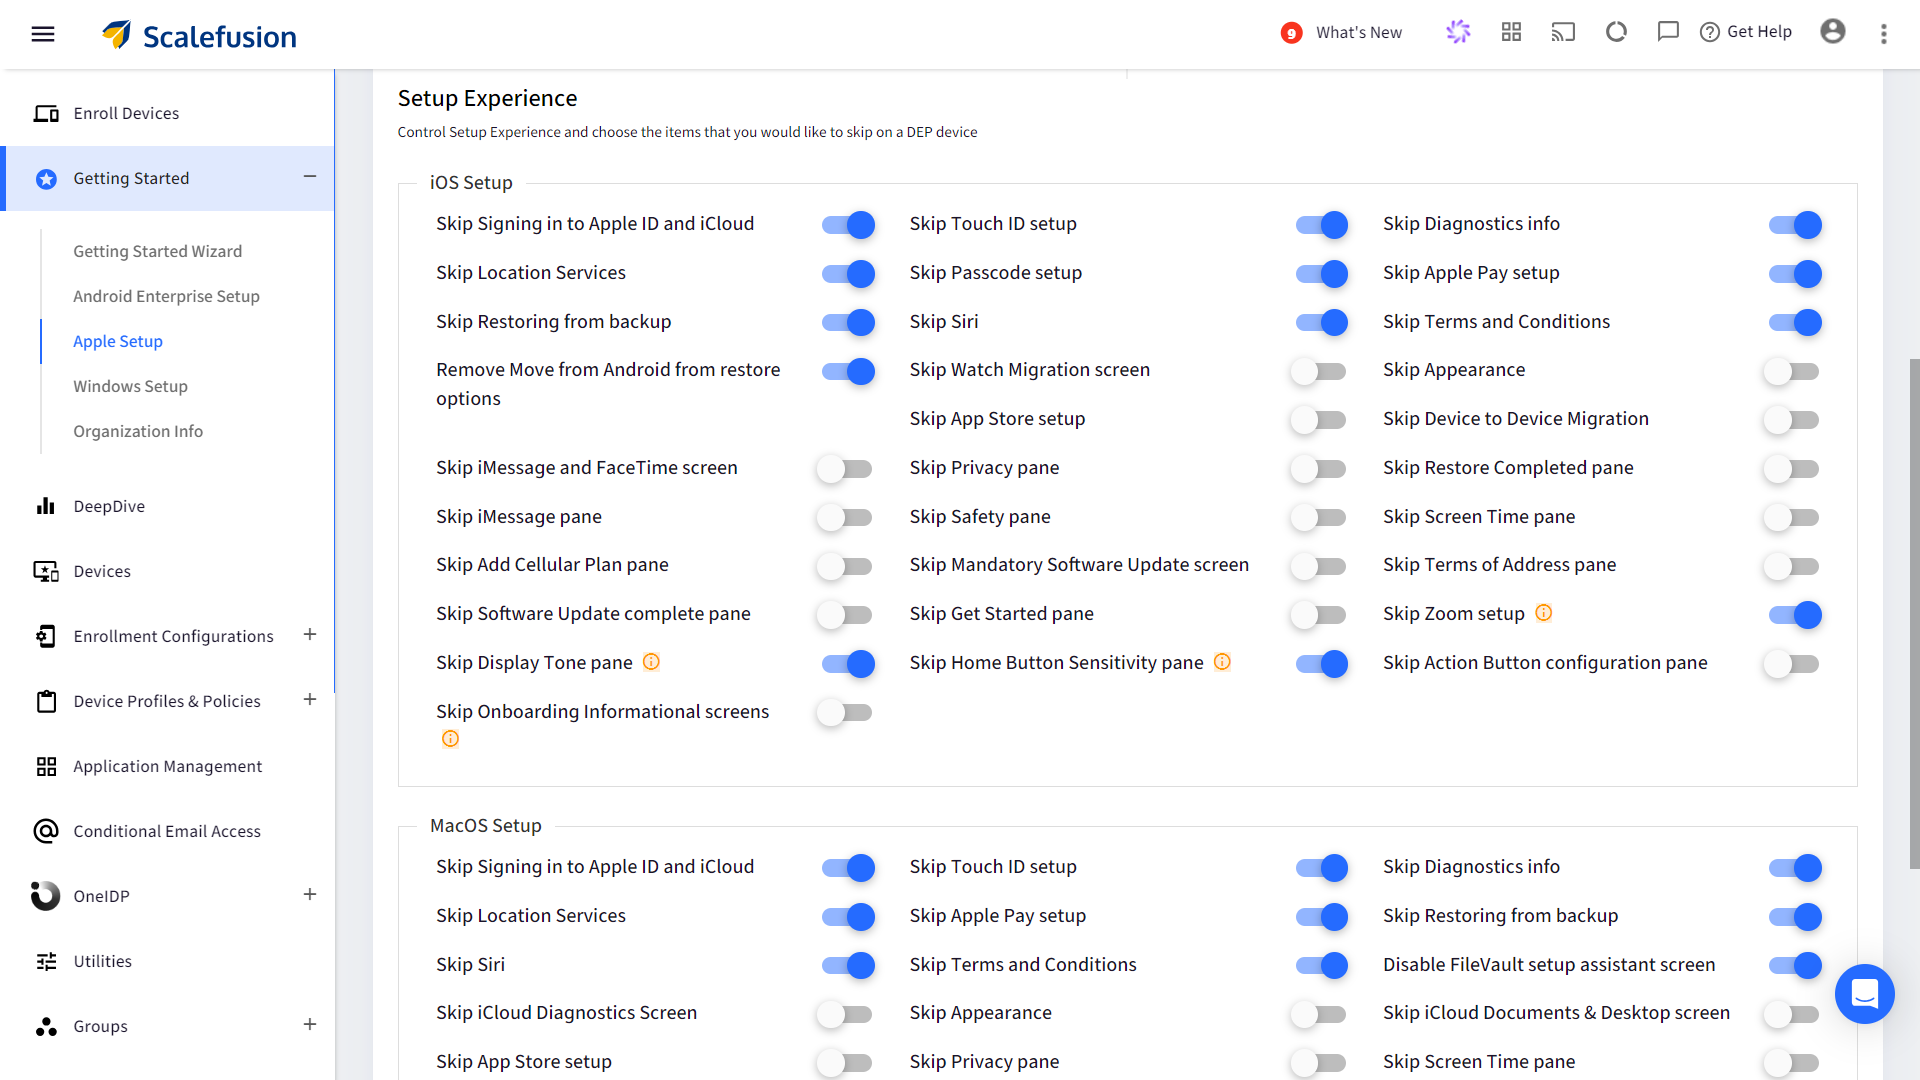
- Click on CONFIGURE DEVICE SETUP SETTINGS.
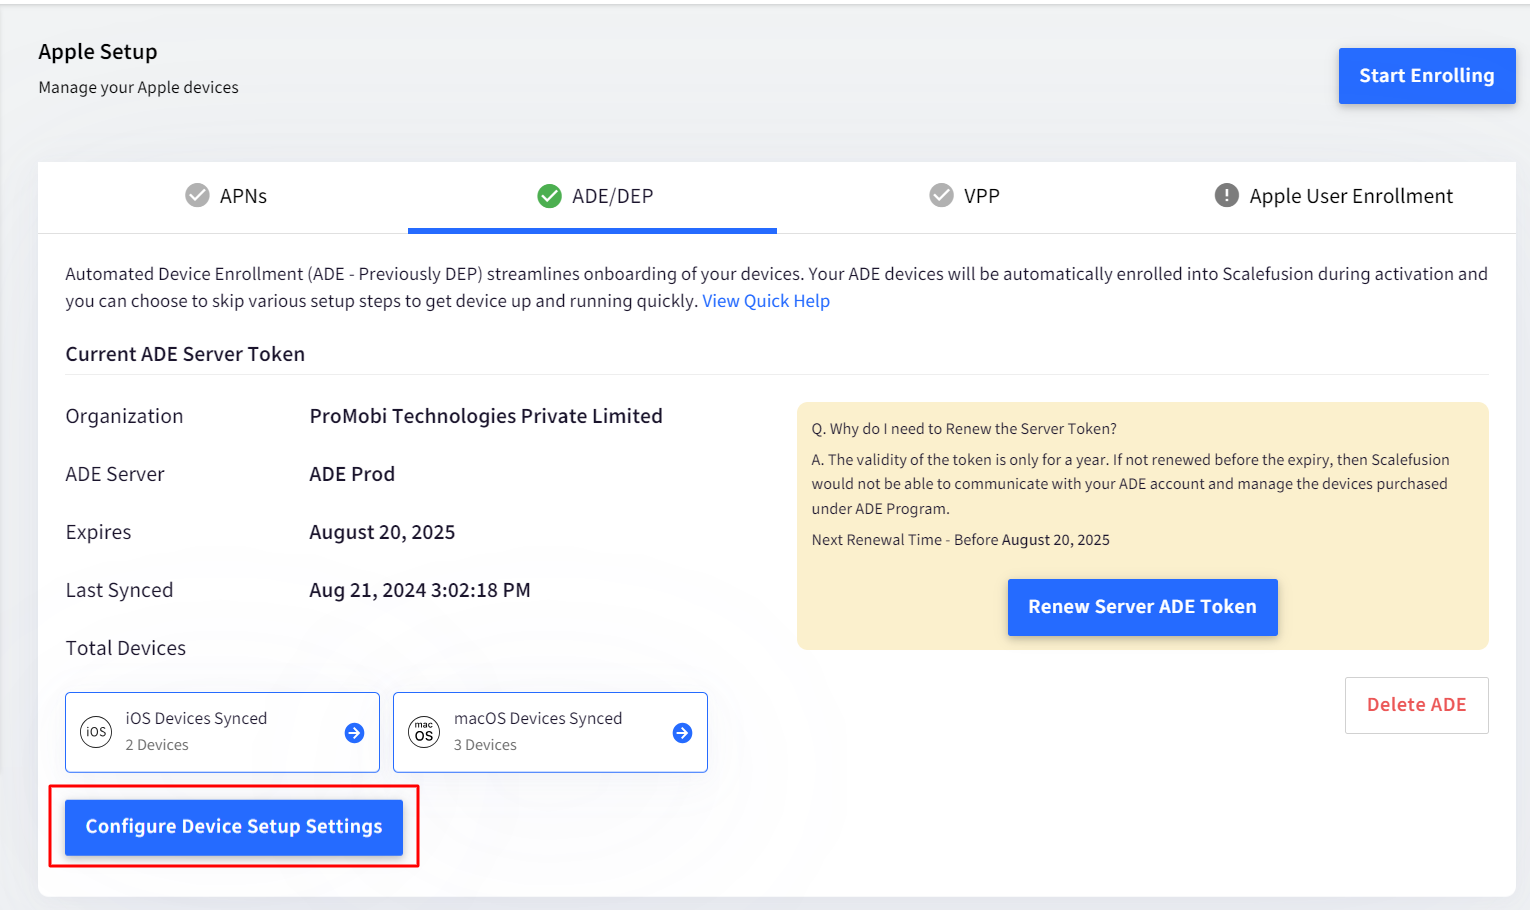
- Here you can choose the setup options for a new ADE device.
- Please note these settings are ONLY applied when the device is unboxed for the first time or is starting for the first time after a hard reset.
macOS Prestage Setup
On macOS devices, the account creation process while unboxing the device can also be configured right from Scalefusion Dashboard during the initial ADE setup. With this, the Primary account creation that takes place during enrollment, can be skipped. At the same time, admin account can be auto-created. This gives more controls to the IT Admins where many Admins may not prefer having the Primary User account as an Admin user. Click here to learn more.


