Just-In-Time Admin Access on macOS Devices
- 24 Jul 2024
- 6 読む分
- 印刷する
- PDF
Just-In-Time Admin Access on macOS Devices
- 更新日 24 Jul 2024
- 6 読む分
- 印刷する
- PDF
The content is currently unavailable in Ja - 日本語. You are viewing the default English version.
記事の要約
この要約は役に立ちましたか?
ご意見ありがとうございます
Administrator accounts are prime targets for hackers, as compromising a device grants them full control over all Admin actions. This includes tasks like managing users, accessing files, installing apps, and more. In a school environment, users typically require Admin privileges on their Macs for less than 5 minutes per month. However, to accommodate these brief needs, such as removing an app, users are granted Admin privileges for hundreds of hours each month, posing a significant security risk.
Hence comes the need for just-in-time admin access which ensures that users operate with Standard privileges, offering a secure way to access temporary Admin privileges only when absolutely necessary.
The Just-In-Time Admin feature enables standard users to request a temporary upgrade to Admin status. This feature grants users access to accounts and resources for a limited time when they need them. Thus, it reduces the risks associated with giving users more privileges than they require by providing this access only when required.
Through Scalefusion Dashboard, IT Admins can create configurations that control how and when users can request admin access and also monitor the usage of the privilege. Let us understand what configurations we offer and how they can be implemented, with the help of this article.
Pre-Requisites
- Devices should be enrolled with Scalefusion
- Latest version of Scalefusion MDM client should be installed on macOS devices
- Just-In Time feature should be enabled for your account.
Step 1: Create Configuration
- On Scalefusion Dashboard, navigate to OneIdP > Just-In-Time Admin and click on Create Configuration.
- This will bring up the Create Just-In Time Config window.
- Enter the Configuration name on the top
- The left side menu will show the following:
- JIT Admin Configuration
- Logs & Activities
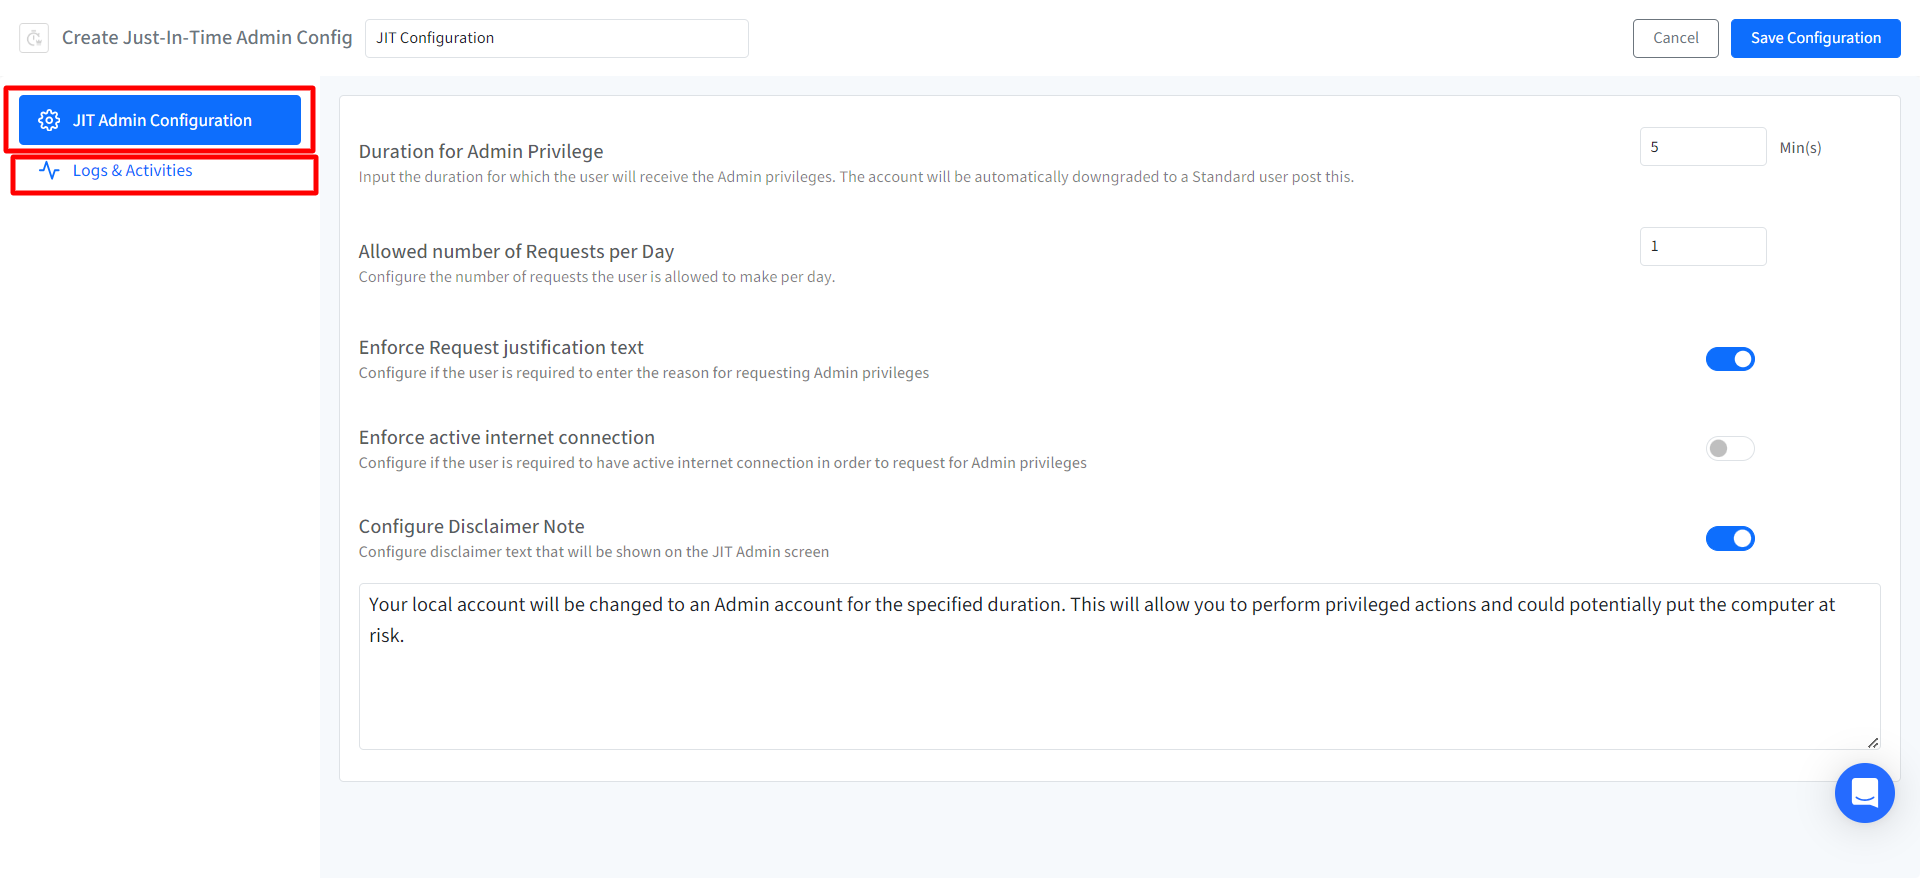
- JIT Admin Configuration: From this section, configure the following settings

| Setting | Description |
| Duration of Admin Privilege | Specify the duration (in minutes) during which the user will have Admin privileges. The account will be automatically reverted to a Standard user afterwards. Duration can be from 5 to 60 minutes. |
| Allowed number of Requests per Day | Configure the number of requests (for admin privileges), the user is allowed to make per day. It can be from 1 to 10. |
| Enforce Request justification text | By toggling on this setting, user will be required to enter the reason for requesting Admin privileges. |
| Enforce active internet connection | On enabling this setting, the user is required to have active internet connection in order to request for Admin privileges |
| Configure Disclaimer Note | Configure disclaimer text that will be shown on the JIT Admin screen. Enter the note in the text area. A default note is provided which can be updated. |
Logs & Activities: After configuring JIT Admin configuration, move to the next section from the left menu Logs & Activities. Configure the following from here:
- Collect logs of critical operations performed while having Admin Privileges:Configure if logs of critical operations performed with Admin privileges should be captured and synced to the dashboard.Logs are captured only during the timeframe when a Standard user is elevated to an Admin user.
- Terminate Applications on User downgrade: Configure the applications that need to be terminated when an Admin user is downgraded to a Standard user. Select from where the applications should be terminated. Following are the options:
- Terminal
- System Settings
- After configuring the above, click on Save Configuration on top.
The configuration will be created and displayed under JIT Admin Configurations tab.
Step 2: Publish JIT Admin Configuration
The next step is to publish the configuration on devices. To do so,
- Click on Publish icon in front of the JIT admin config.
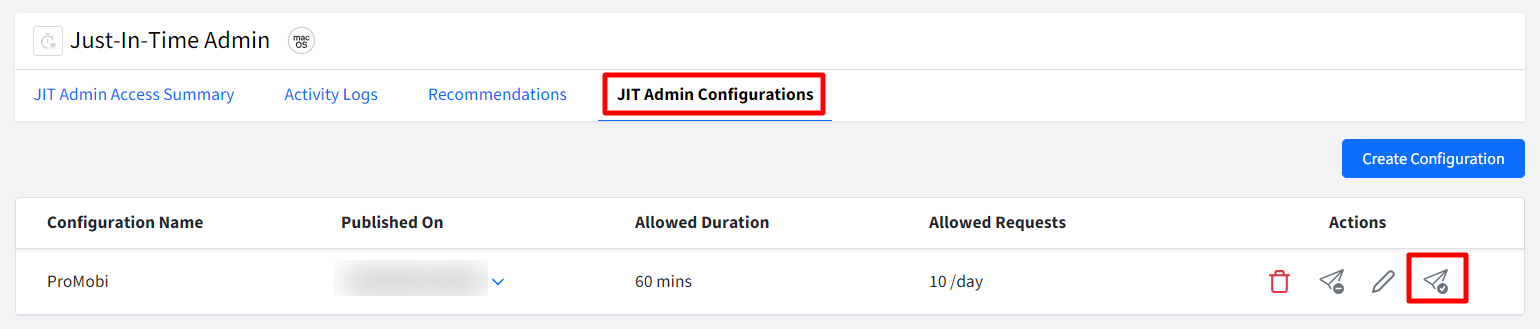
- This will bring up the Publish dialog. Select the device profiles on which you want to allow the JIT admin access, and click Publish
- The configuration will be pushed to devices.

Additional Actions
Following are the additional actions that can be taken on a JIT Admin Configuration from Scalefusion Dashboard:
- Edit: Allows you to make changes in the existing configuration. On clicking edit, you will get the Edit Just-In-Time config info
- Unpublish: This will unpublish the configuration from the profile(s) on which you have already published it.
- Delete: Deleting the configuration will unpublish the settings from the applied profile(s). All the data related to the configuration will also get deleted.
JIT Admin Access on Device
Once configuration is pushed to devices,
- Open the Scalefusion MDM Client (agent app for macOS) on the macOS device.
- On the left side menu, navigate to JIT Admin.
- In the text area, provide a justification as to why you are requesting admin privileges and click on the button Elevate as Admin.
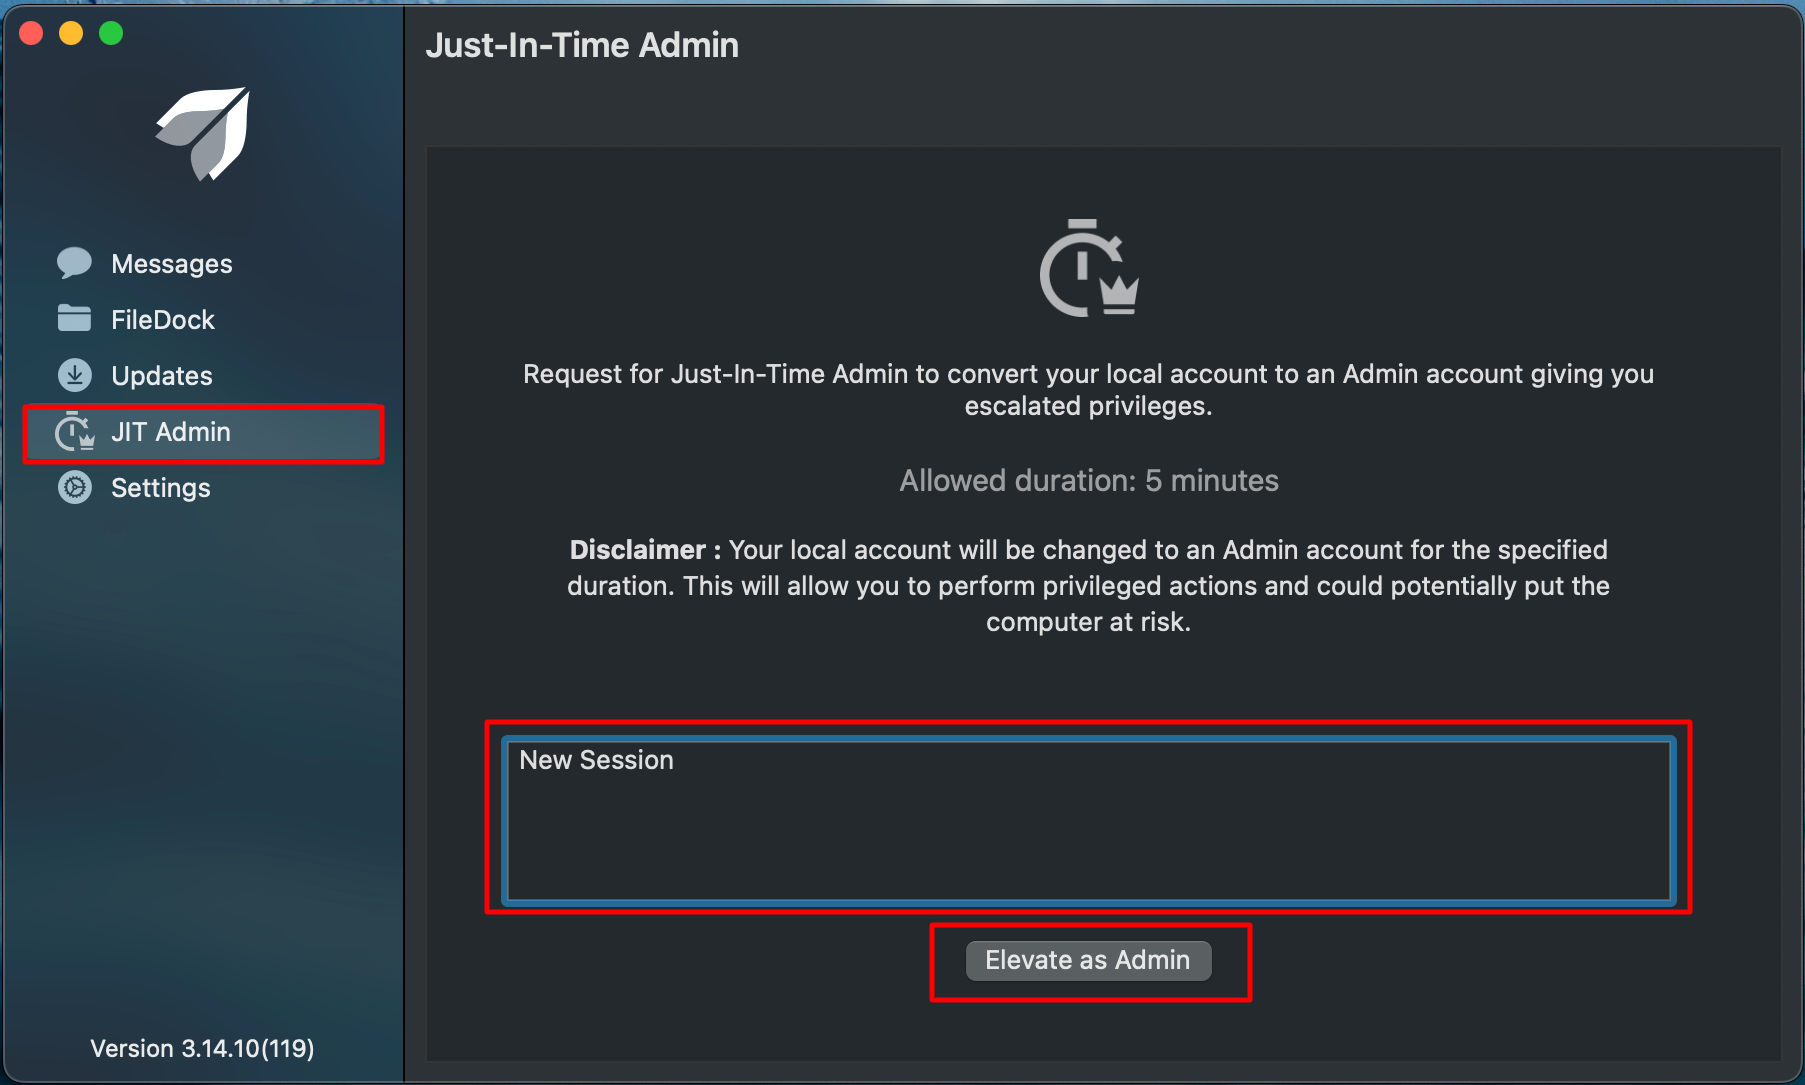
- You will receive a success message.
- Once the account is elevated to admin, a confirmation message will flash on the top right side of device.


You can also confirm this by going to Users section on device and see the standard user will get elevated to admin
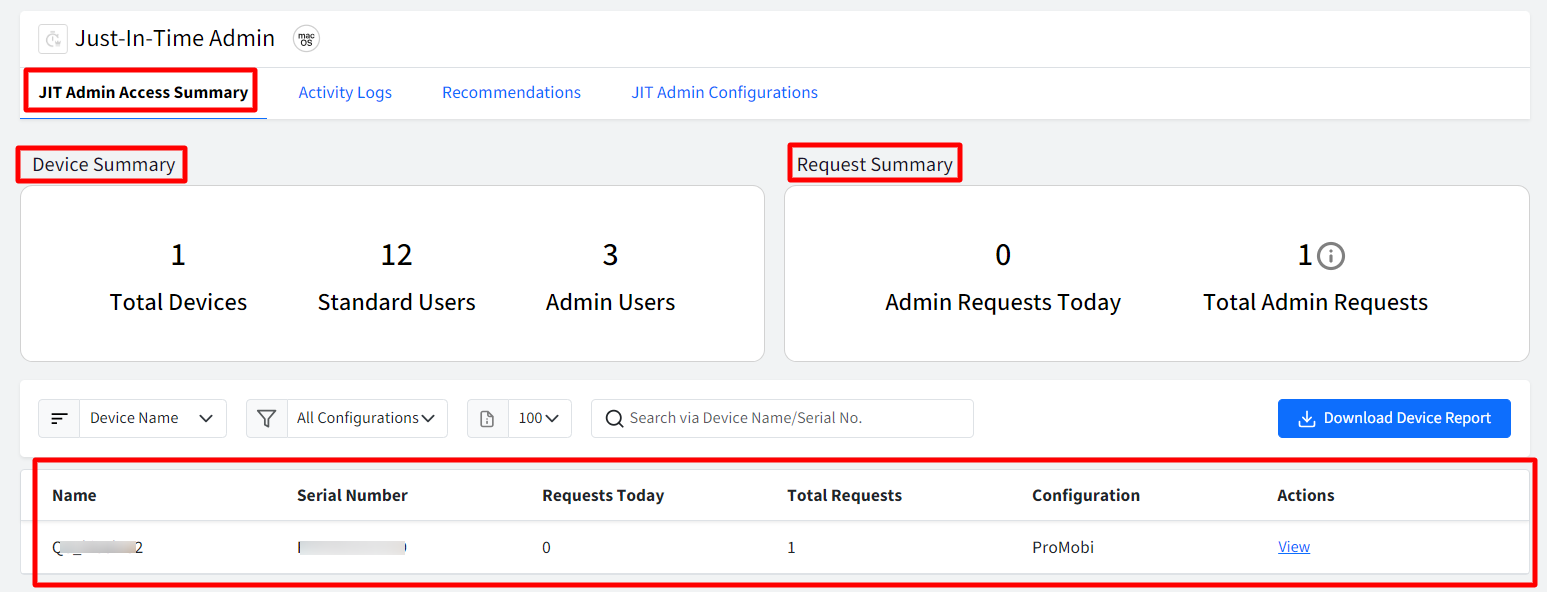
JIT Admin Access Summary
On Scalefusion Dashboard, you can get a summarized view of JIT Admin access on devices and other details from JIT Admin access summary section. Following information is available:
- Device Summary: Gives a summarized view with following details:
- Total Devices: Total number of devices that have JIT Admin configuration applied.
- Standard Users: Total number of standard users that are available on these devices.
- Admin Users: Total number of admin users that are available on these devices.
- Request Summary: Gives a summarized view of requests with following details:
- Admin Requests Today: No. of Admin requests made during the day. This is calculated based on the timezone of the dashboard
- Total Admin Requests: Total number of Admin requests made during last 60 days.
- Devices Overview: Here, you can get a consolidated tabular view with list of the devices where the configuration has been applied.
- Name: Displays the Device name.
- Serial Number: Displays the Device Serial number.
- Requests Today: Number of Requests received from the Device today.
- Total Requests: Total number of admin Requests received from the Device.
- Configuration: The name of the configuration applied on the device.
- Actions: Clicking on View will take you to the Activity Logs tab with the details of the selected Device.
- You can also apply filters to get results at a granular level, such as:
- Sort By: The results will be sorted based on:
- Device Name
- Requests Today
- Total Requests
- Configuration
- Select Configurations: Select all or any particular JIT admin configuration
- Pages: Select no. of results on a single page
- Download Device Report: Clicking on this will download the report in csv format containing following information:
- Name
- Serial Number
- Requests Today
- Total Request
- Configuration

- Sort By: The results will be sorted based on:


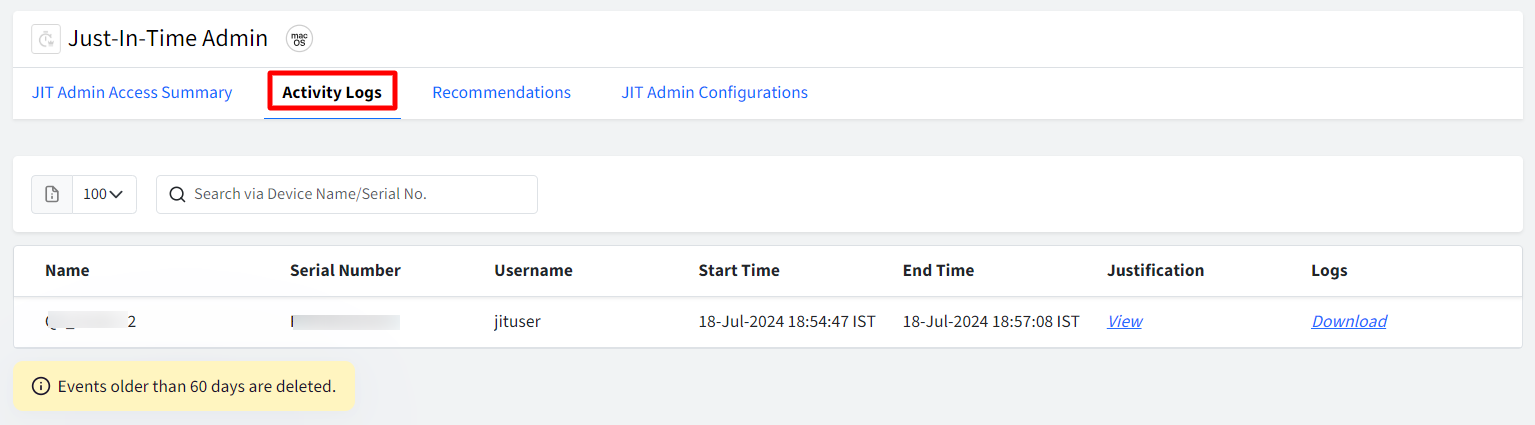
Activity Logs
From this section you can view and download the logs of activities undertaken by users on the device, during their elevation from standard to admin user. The admin sessions are listed with the following information:
Events for last 60 days are available in this section
- Name: Displays the Device name
- Serial Number: Displays the Serial number
- Username: Name of the User who requested for the JIT Admin feature.
- Start Time: Start time of the JIT Admin Activity, i.e, when the user is elevated to Admin. This will be shown based on the time zone selected in the settings.
- End Time: End time of the JIT Admin Activity, i.e, when the user is downgraded back as Standard user. This will be shown based on the time zone selected in the settings.
- Justification: Clicking on View will display the a popup with Justification text entered.
- Logs: Click on Download to download the log file of activities during admin session.

Recommendations
This section provides a summarized view of the Admin Accounts available on the devices. Following details are available:
- Name: Displays the Device name.
- Serial Number: Displays the Device Serial number.
- Total Users: Displays the total number of users on the device.
- Total Admins: Displays the total number of Admins on the device.
- Managed Admins: Displays the number of managed Admins, i.e, Global admins. Currently we do not have Global admins in macOS so it will be 0 for now.
- JIT Configuration: Displays the name of the JIT Admin configuration applied on the device. If no configuration is applied, it will display NA
- Actions:
- Publish: From here you can select and publish the JIT configuration on the device. This will be enabled only for devices where a JIT configuration is not applied. On clicking Publish, a dialog box will be displayed:
- Show Configurations: Clicking this will navigate the Admin to the JIT Admin Configuration section.
- Downgrade Admins: Select Admin users to downgrade as Standard user. Clicking this will display the following dialog with list of admin users to be downgraded. Select the users (to be downgraded) by selecting the checkbox and proceed.To downgrade all users in one go, simply select the checkbox in front of each row and click on the button Downgrade All Users
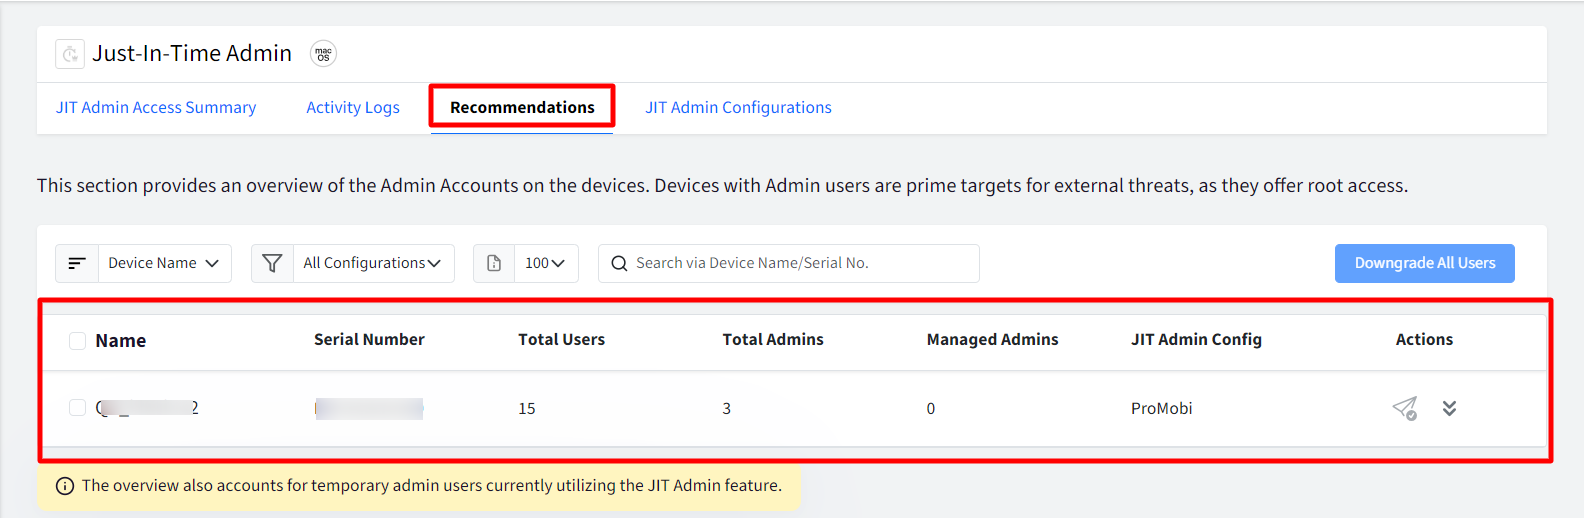
- Publish: From here you can select and publish the JIT configuration on the device. This will be enabled only for devices where a JIT configuration is not applied. On clicking Publish, a dialog box will be displayed:

この記事は役に立ちましたか?