Device Level actions on Android Devices
- 12 Dec 2024
- 6 読む分
- 印刷する
- PDF
Device Level actions on Android Devices
- 更新日 12 Dec 2024
- 6 読む分
- 印刷する
- PDF
The content is currently unavailable in Ja - 日本語. You are viewing the default English version.
記事の要約
この要約は役に立ちましたか?
ご意見ありがとうございます
Scalefusion's Devices section gives you a complete view of your device inventory across operating systems, including Android. As and when a new device successfully enrolls in Scalefusion, the device will start appearing in Scalefusion Dashboard. This guide focuses on familiarizing you with the Scalefusion Device inventory view and the various actions you can perform on enrolled Android devices from the Scalefusion Dashboard.
Before You Begin
- Have a valid Scalefusion Dashboard account
- Android Devices should be enrolled with Scalefusion
Device Details & Actions
From the Devices section, click on the View Details link over the Android Device..png)
This opens a new page displaying other details related to the device. This page has been divided into the following sections,
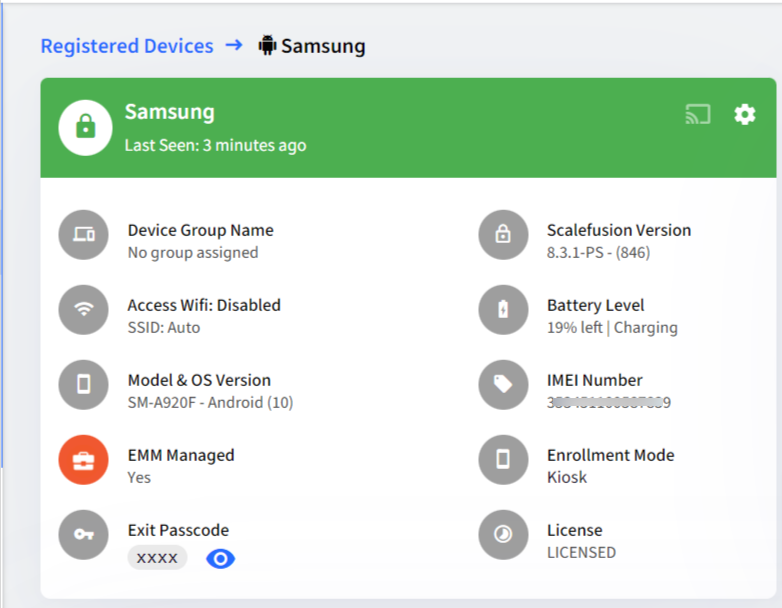
- Device Information Card: Gives a quick snapshot of the device information:
- Device Group Name: The device group name to which the device belongs
- Scalefusion Version: Scalefusion's version installed on the device
- Access Wifi: The status of Wifi access, whether it's disabled or enabled. If you have assigned a specific SSID, it will be displayed.
- Battery Level: The current battery level of the device
- Model & OS Version: Device's Model and Operating System
- IMEI Number: IMEI number of device
- EMM Managed: Whether the device is EMM Managed or not
- Enrollment Mode: The enrollment mode of the device (Kiosk or BYOD)
- Exit Passcode: The device's exit passcode which brings the device out of Scalefusion. Click on the eye icon to see the passcode.
- License: Whether you are using the licensed or trial version of Scalefusion
- Settings/Gear icon: Clicking on the Settings/Gear icon on the device information card lets you perform the following device-level actions:
.png)
- Change Device Name: This allows you to change the device name that is used to identify the device on the Scalefusion Dashboard.
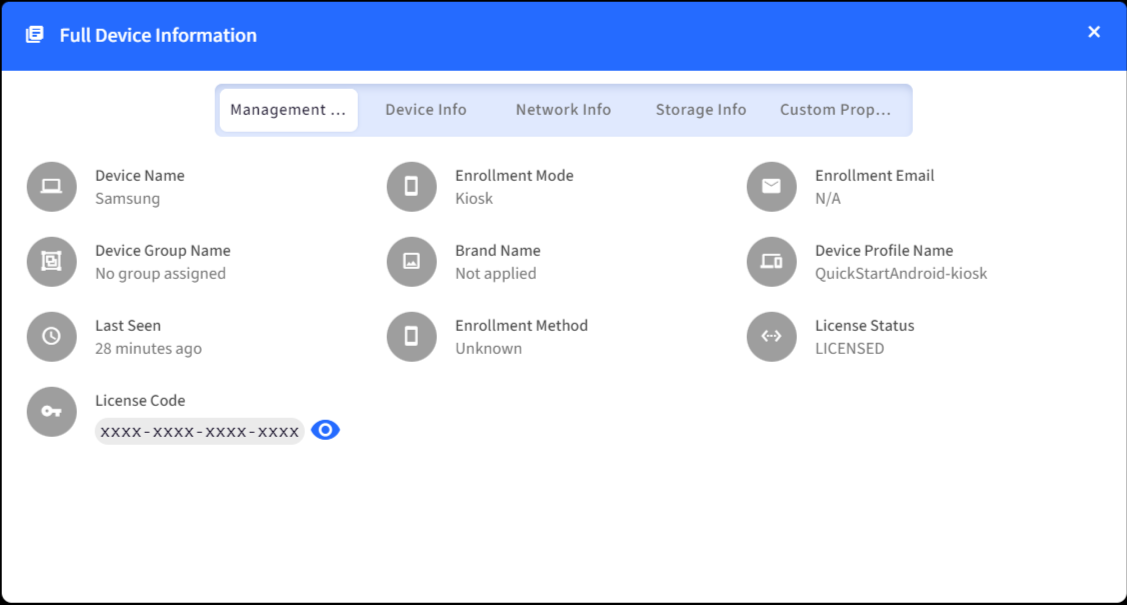
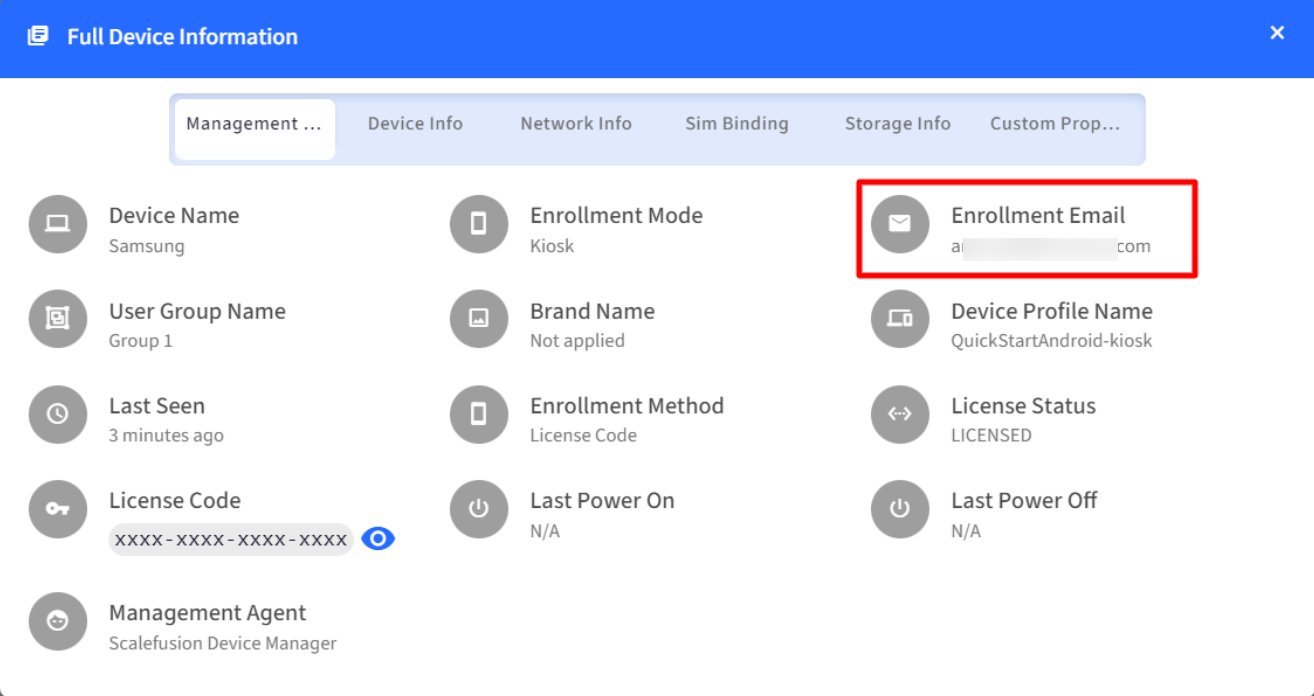
- Full Device Information: Displays additional granular device information retrieved from the device. For example, it shows Public IP based on the last request made by device.
- Unlock Device: Unlocks the device and brings it out of Scalefusion
- Refresh Device: Force attempts a Sync with the device and pushes the latest policies. Note that this option works only if the device is connected to the internet.
- Clear Scalefusion Browser Cache: This will clear the Browser Cache for Scalefusion Android Browser.
- Add Notes: This allows you to add custom notes/additional information to this device.
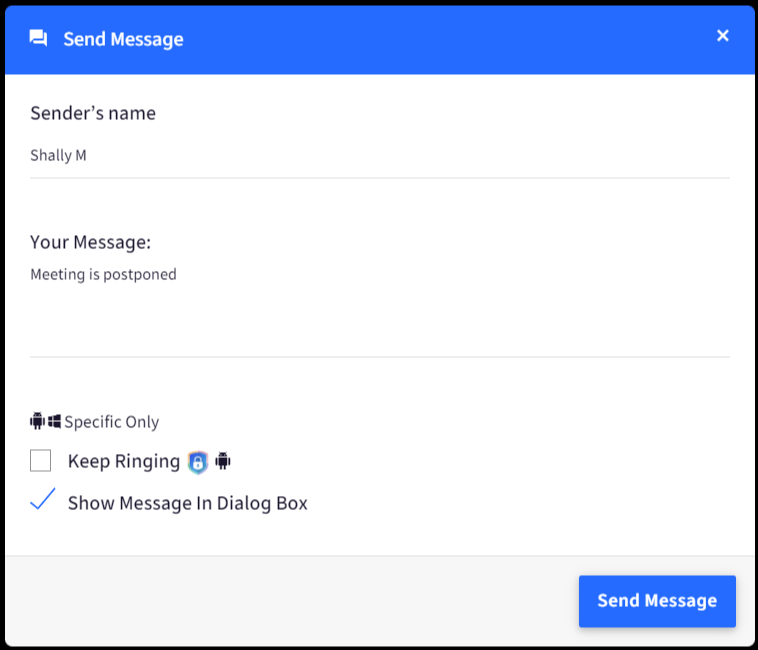
- Send Message: Compose and send a message on the device as a broadcast message. A dialog box comes up where you can compose the message and send it to the device.
- Add to Device Group: Add or Remove the device from a Device Group.
- Assign User: Assign a user to Company Owned Android devices using this option. This enables IT Admins to pre-enroll and distribute devices to users/employees and assign a user for internal tracking. It also makes it easier to identify device ownership in cases where a large number of devices are distributed among employees. A few pre-requisites to assign a user:
- User(s) should be added/imported in the User Enrollment section.
- The device should be enrolled in user agnostic method (Userless Enrollment).
- The user should belong to a user group with a company-owned Android Device Profile applied to the User Group.
To assign a user,- If all prerequisites are fulfilled, clicking on Assign User will bring up the Assign User to device dialog box listing all the users of the user group of which the Android device is part.
- Select a user and click on Save.
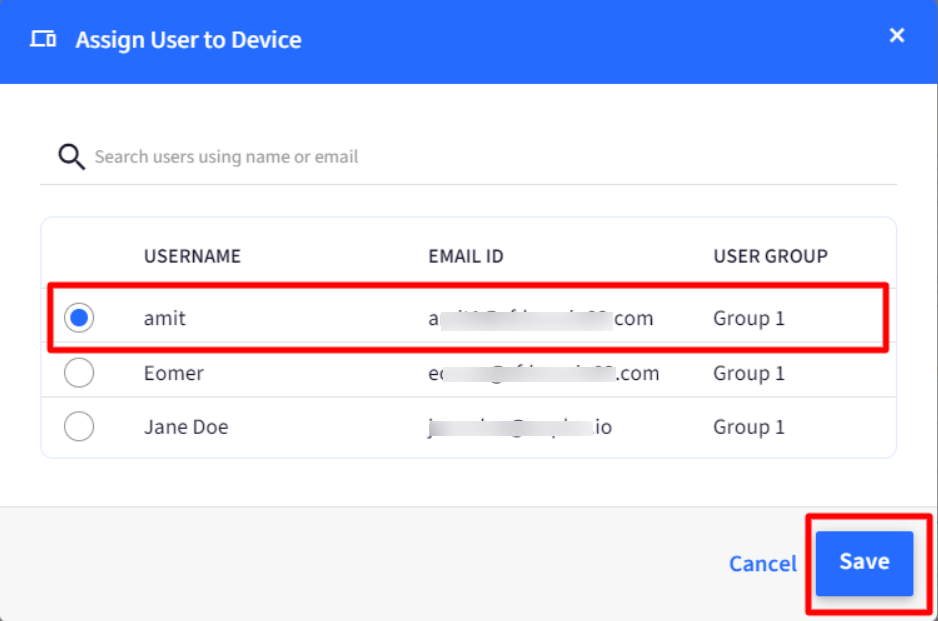
- Note that in Device Details, the Full Device Information will reflect the user's email id whom you have assigned the device.
- The Add to Group option will not be shown under the gear icon once the device is assigned to a user.
- Set custom properties: Set the values for the custom properties that you may have defined. Refer to our custom properties guide to understand how to use them.
- Lock Device: This sends a command to lock the device screen. This feature works only on EMM-managed devices
- Reboot Device: Sends a reboot command to the device, and the device is rebooted if it is online.On Legacy devices, Reboot command will work only if they are Wingman or Knox supported.
- Shutdown: Shut down the device. This command works on Wingman-enabled and Lenovo devices.
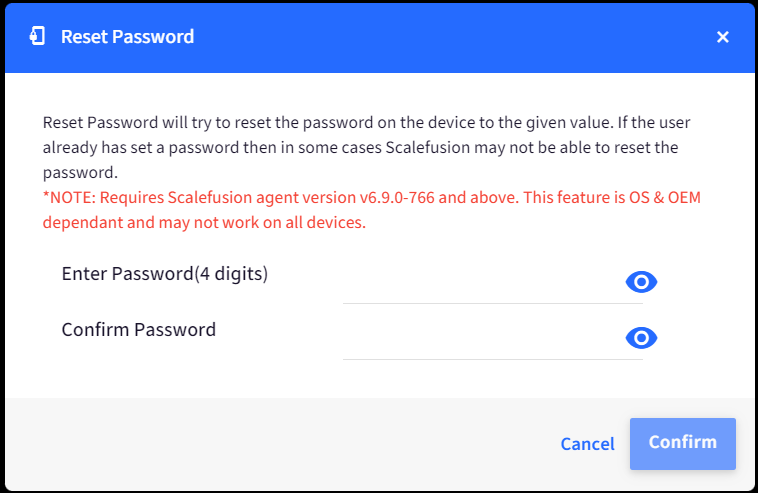
- Reset Password: Reset Password will try to reset the password on the device to the given value. A reset password dialog box will appear where you can enter the new password. This feature may not work on all devices.
- Remove CA certs: This will remove all user-installed CA certificates on EMM Managed devices.
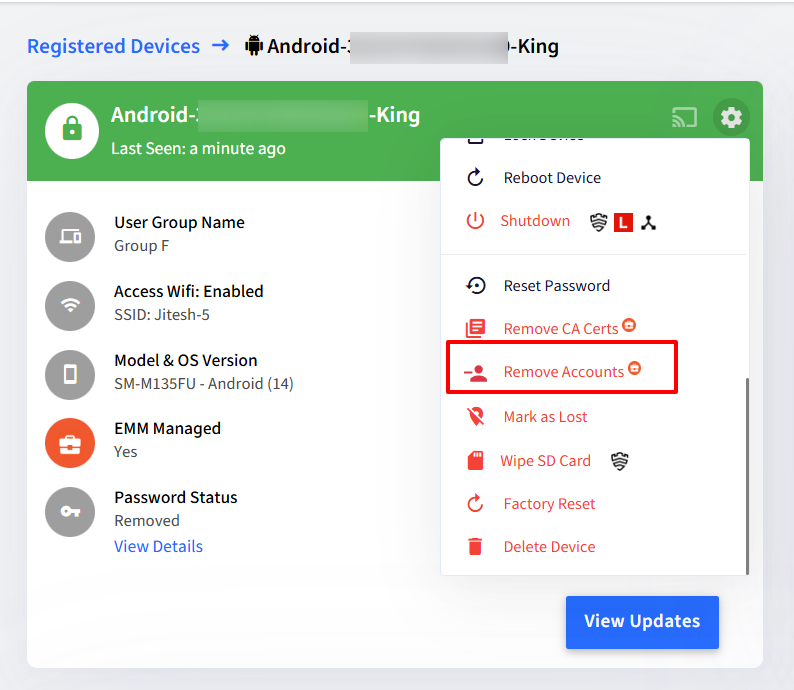
- Remove Accounts: This option will remotely remove all personal email accounts on the device without end-user intervention. Please note that this is supported only on EMM-managed device(s), Company-owned, Bring your own (BYO), and COPE devices.Note:PMTech and Managed Google Account will not be removed using this option.
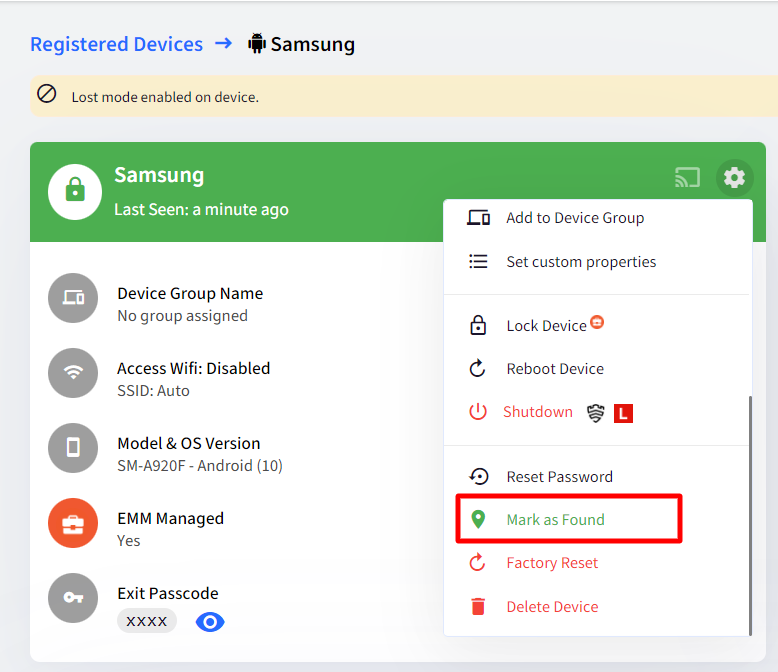
- Mark as Lost: You can mark the device as Lost. Clicking on the Mark as Lost option shows the following dialog. Here, you can compose a Message and enter Phone number to be displayed on the Lost Mode screen to the end user. Custom properties like $device. or $user. are also supported here for defining custom message.
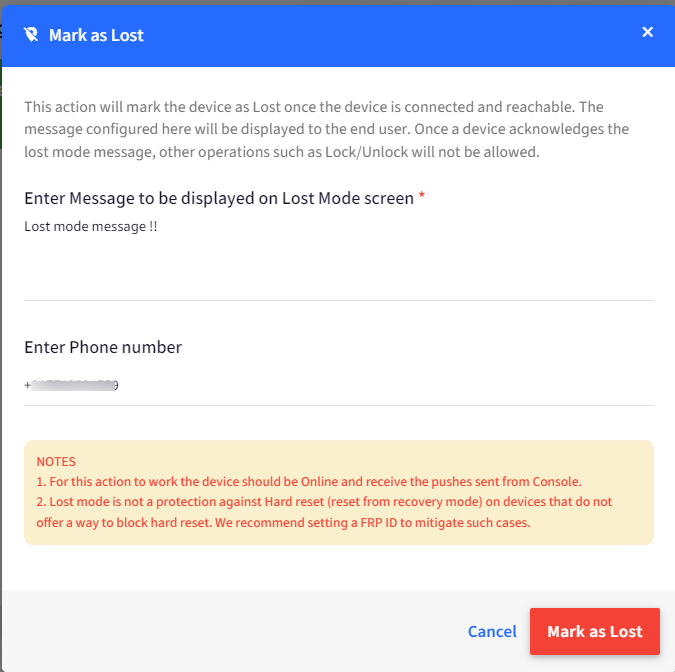
Important Points:- This feature requires Scalefusion agent version 8.3.6 and above to work.
- The device should be EMM Managed
- The device should be online
- Once a device is marked as lost, device-level actions such as Lock/Unlock will not be allowed. Notice the Unlock Device feature is disabled.
- The lost mode feature can also be disabled. After marking the device as lost, notice that there is an option marked as found. Click on it, and the device will be in a locked state again.
- Wipe SD card: This option is visible only for Knox supported devices. You can choose to remove the data stored on an SD card (if there is any) on the device. Selecting this option will remove the data from the SD card. A confirmation box will be displayed when you select this option. Confirming the action asks the admins to enter their password/PIN. On validating, the SD card data will be removed.If SD card usage is disabled in Device Profile (Restrictions > Secure Settings > Storage Device Management), the SD Card will get wiped only after the access to SD Card is restored.
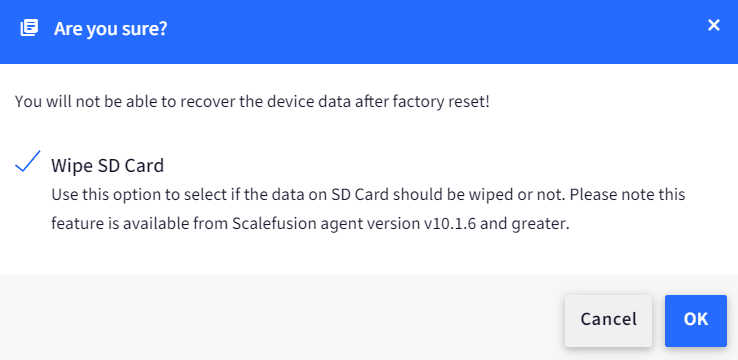
- Factory Reset: Use this option to initiate a factory reset on the device.
- Wipe SD card: On factory resetting, you can choose to remove or retain the data stored on an SD card (if there is any) on the device. Selecting this option will remove the data from the SD card as well, and if you uncheck this option, SD card data will be retained. This feature requires the latest version of Scalefusion MDM agent for Android.
 On OS 14 and above, Factory Reset works only if the Android devices are EMM Managed. This applies for both Company Owned and COPE devices.Reset Password and Factory Reset are also supported for direct boot actions and can be initiated when the device is restarted and is on the lock screen.
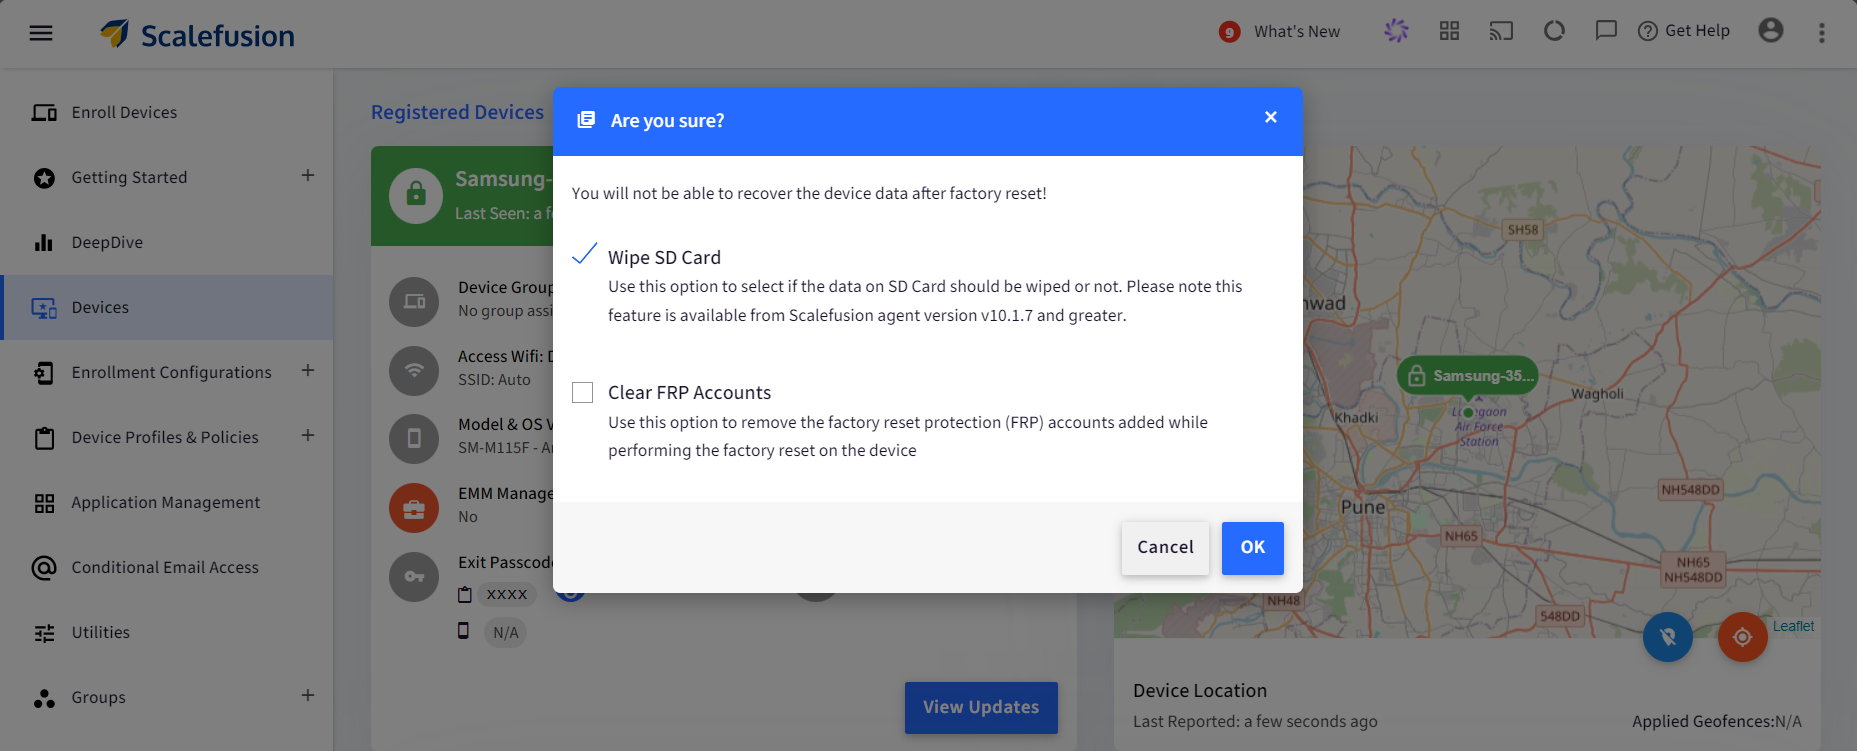
 - Clear FRP accounts: Use this option to remove the Factory Reset Protection (FRP) accounts added while performing the factory reset on the device.
- Wipe SD card: On factory resetting, you can choose to remove or retain the data stored on an SD card (if there is any) on the device. Selecting this option will remove the data from the SD card as well, and if you uncheck this option, SD card data will be retained. This feature requires the latest version of Scalefusion MDM agent for Android.
- Delete Device: Use this option to un-enroll/un-manage the device and delete it from the Scalefusion Dashboard. Note that this action is irreversible.
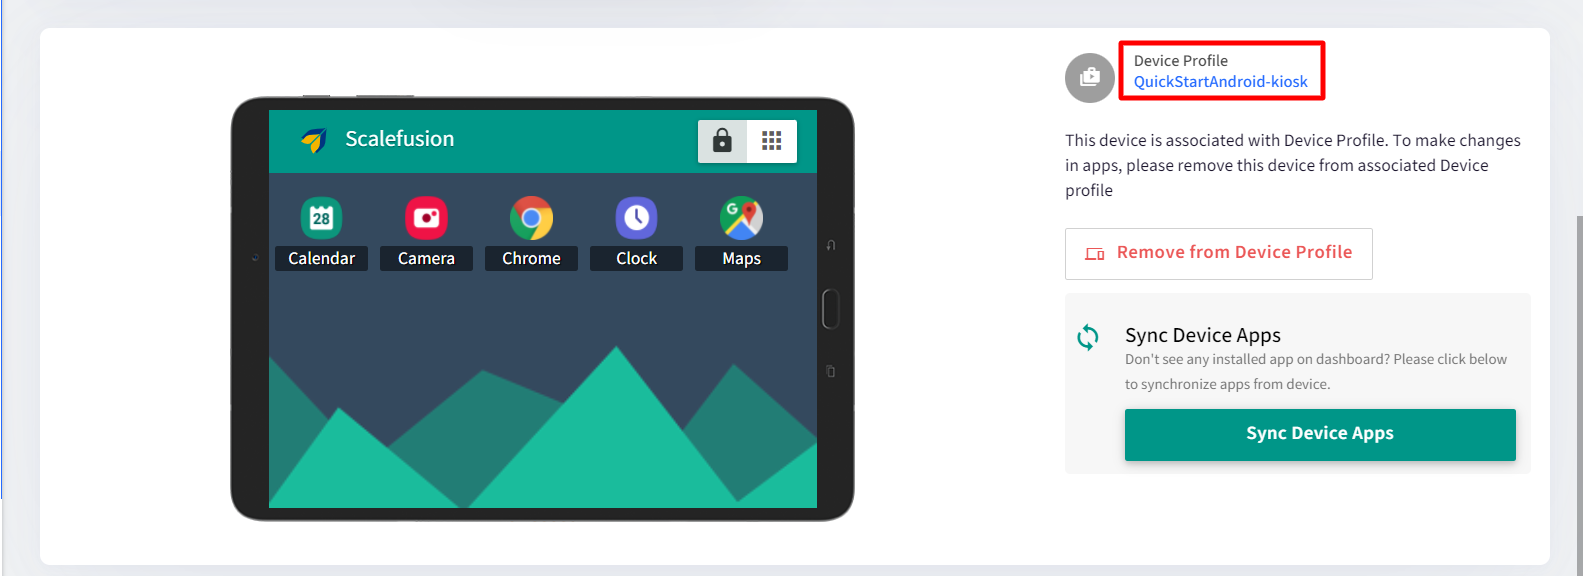
- Device State View: This displays the current application policy applied on the device in a device frame and provides you with information about the Device Profile and the Device Group to which this device belongs.
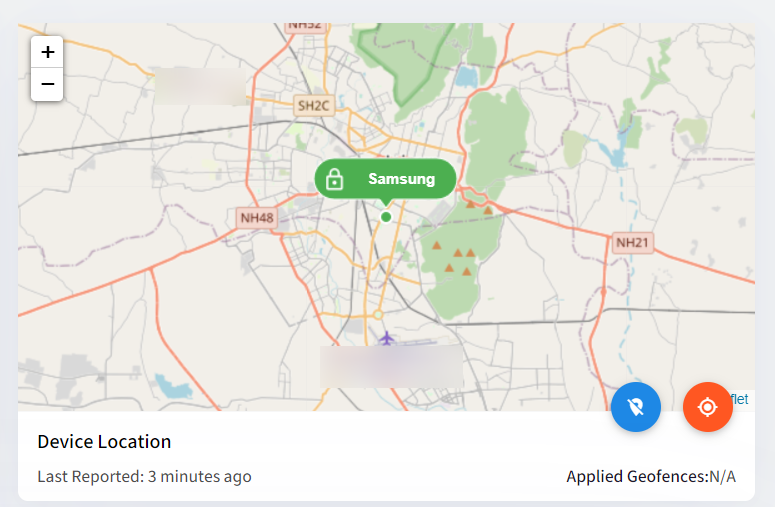
- Location View: Placed next to the Device Information Card, the Location view gives a quick view of the last reported IP-based location. Also, you can quickly see the complete location history of the device or turn ON/OFF the location collection for this device.

.png)


この記事は役に立ちましたか?