Certificate (CA Servers) Integration for macOS with Scalefusion
- 14 Oct 2024
- 5 読む分
- 印刷する
- PDF
Certificate (CA Servers) Integration for macOS with Scalefusion
- 更新日 14 Oct 2024
- 5 読む分
- 印刷する
- PDF
The content is currently unavailable in Ja - 日本語. You are viewing the default English version.
記事の要約
この要約は役に立ちましたか?
ご意見ありがとうございます
The standard method requiring admins to upload a certificate for each user and manually deploy it to devices may not be feasible for organizations with a large user base, leading IT admins to prefer automated certificate distribution. Scalefusion now provides a solution with which IT admins can automate certificate deployment on macOS devices by integrating their SCEP based CA server.
A certificate authority server (CA server) offers a secure and user-friendly solution for creating and storing asymmetric key pairs used in public-key infrastructure (PKI), decryption, signing, and validation. This article explains the methodology for automatic generation of certificates with CA Server Integration from Scalefusion Dashboard and ultimately deploying on Scalefusion managed devices.
How it Works?
This is enabled with SCEP (Simple Certificate Enrollment Protocol), a protocol that allows devices to easily enroll for a certificate by using a URL and a shared secret key to communicate with a PKI. In other words, it is a protocol that generates certificates from a template. In a nutshell, following are the steps involved:
- Step 1: Create CA Server configuration
- Step 2: Add Template(s) or the blueprints to generate a certificate
- Step 3: Enable Template(s) from Device Profile
These are explained in detail in below sections.
Pre-requisites
- macOS Device Profile should be created on Scalefusion Dashboard
Step 1: Configure Certificate Server (CA Server)
To configure a Certificate server for automatic deployment of certificates:
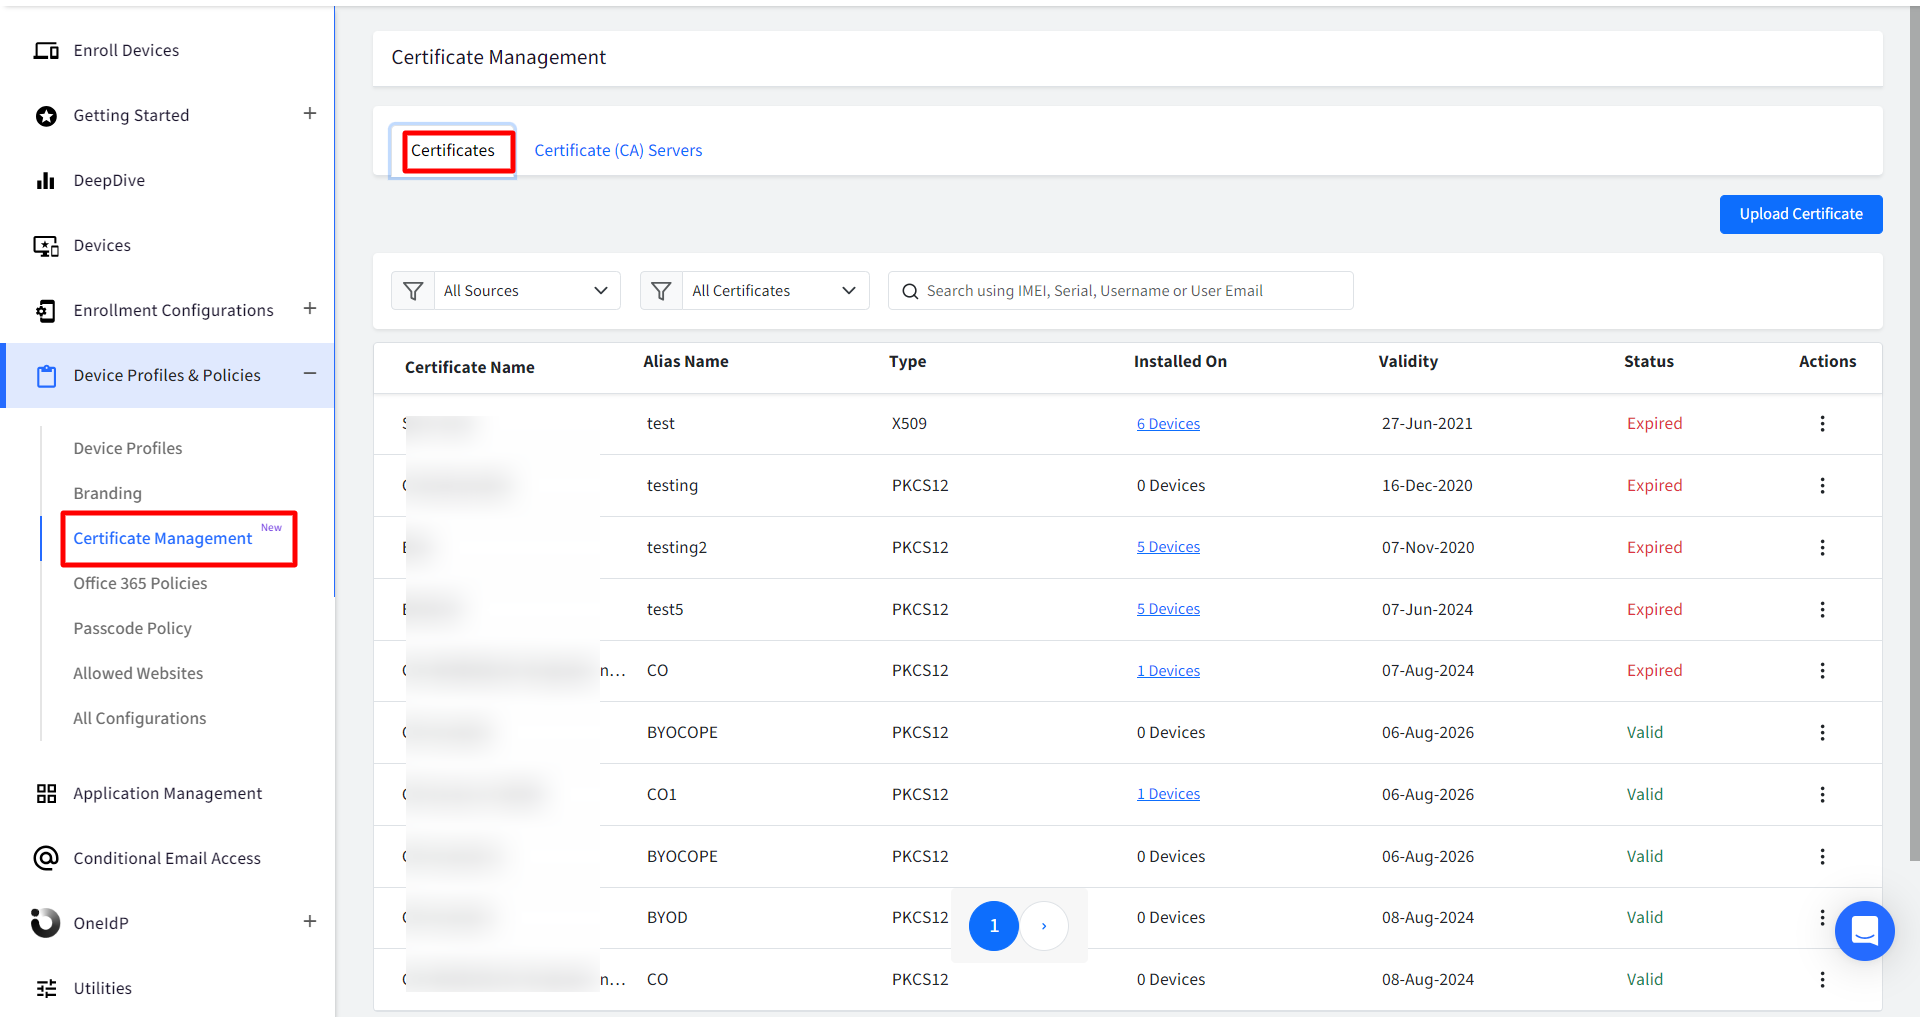
- On Scalefusion Dashboard, navigate to Device Profiles & Policies > Certificate Management
- Under Certificate (CA) Servers tab, click on Add CA Server
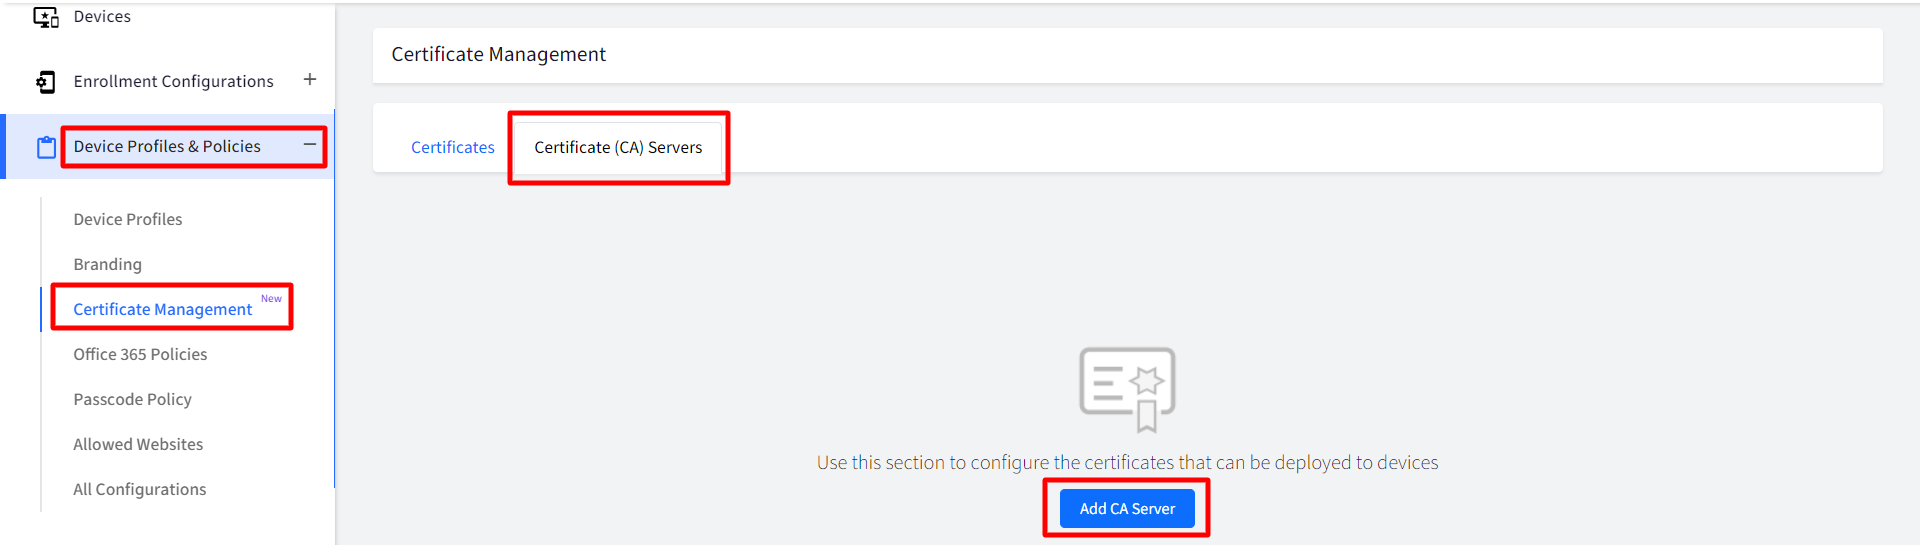
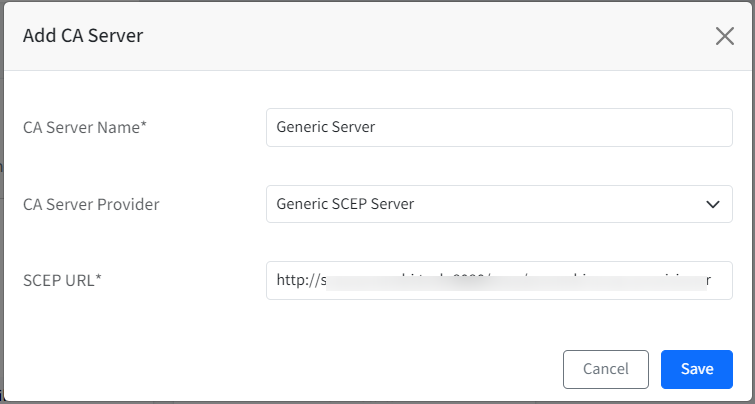
- This will open the Add CA Server window. Enter the following:
- CA Server Name: Enter a name for CA Server
- CA Server Provider: Choose the CA server provider from the following by clicking on the drop-down:
- Generic SCEP Server
- SCEPMan
- Smallstep CA Server
- SCEP URL: Provide SCEP URL. It is the URL to reach the Certificate Authority (CA) Server and its shared secret key
- Click Save
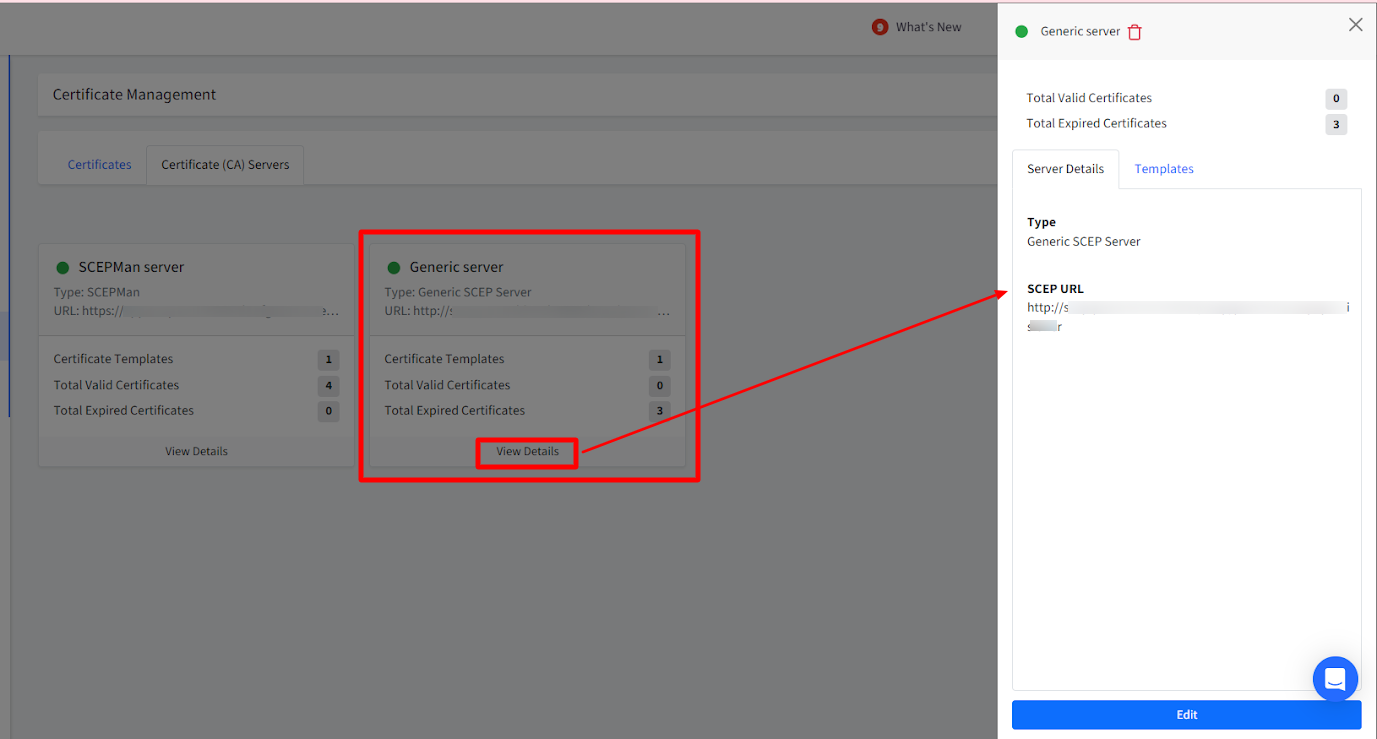
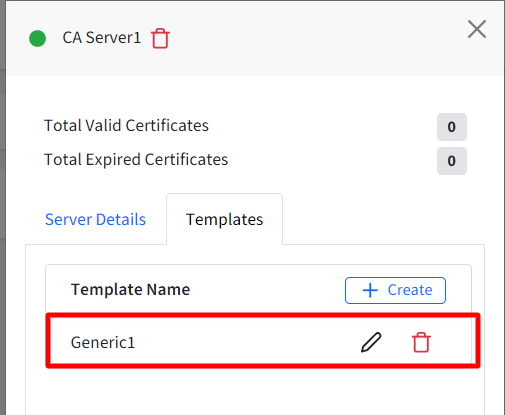
- The CA server (you have added) will display as a card on Dashboard under Certificate (CA) Servers tab with details like active/expired certificates, certificate templates etc.
- Clicking on View Details will show the server details in the side card


Step 2: Add Template
Add Template to start generating certificates using the CA server. To do so, follow these steps:
- On the side card, click on Create under Templates tab.
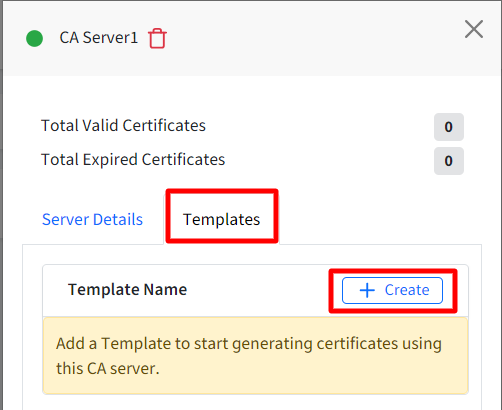
- This opens the Add Template window having three sections:
- Subject
- Subject Alternative Name
- Certificate Type
Points to Note:- Subject and Subject Alternative Name are a part of these details that need to be provided in the request.
- The Subject is the name of the end entity for whom the certificate is being generated.
- The certificate's Subject info is expected to be in a specific format called LDAP DN format. It works similar to a key values format where each key means something. For Eg. CN=$user.email,OU=Engineering,O=Example Corp,C=US. ere, CN stands for Common Name, C is Country, O is Organization etc.
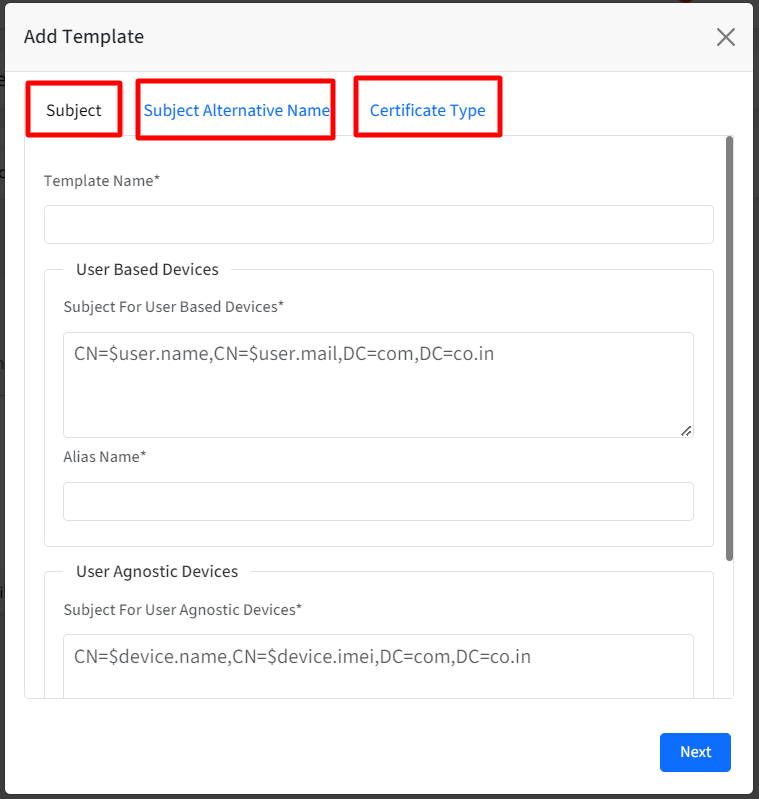
- Subject: This section allows admins to define a subject for their user based devices and user agnostic devices. Enter the following details:
- Template Name: Provide a name for the template
- For User Based Devices, enter the following in User Based Devices section:
- Subject: The subject should be in a valid LDAP DN format. For example, CN=$user.name,CN=$user.mail,DC=com,DC=co.in. As these are user based certificates, therefore we need to allow only $user.
- Alias Name: Enter the alias name under which certificate should be installed.
- For User Agnostic Devices, enter the following in User Agnostic Devices section:
- Subject: The subject should be in a valid LDAP DN format. For example, CN=$device.name,CN=$device.imei,DC=com,DC=co.in. As these are user agnostic certificates, therefore we need to allow only $device.
- Alias Name: Enter the alias name under which certificate should be installed.It is mandatory to enter at least one subject name
- Subject Alternative Name
- Subject Alternative Name: By default it is set to None. Select one from the drop-down:
- DNS Name
- RFC 822 Name
- Uniform Resource Identifier
- Subject Alternative Name Value: Provide Subject Alternate Name Value. For example, $user.name for user based devices and $device.name for User Agnostic Devices.
- NT Principal Name
Subject Alternative Name Value and NT Principal Name will be enabled if any one of the following conditions are met: - If Alternate name is not set to None
- If values for user based devices and user agnostic devices are configured in Subject
- Subject Alternative Name: By default it is set to None. Select one from the drop-down:
- Certificate Type: From this section, admins can define the properties of the certificate
- Challenge / Secret Key: Select Static from the drop-down and enter the certificate Enrollment challenge in the text box
- Key Size: Select the size of key (in bits) from the following:
- 1024
- 2048
- 4096
- Certificate Usage: Select from the following (Both can be selected):
- Digital Signature
- Key Encipherment
- Auto-Renew Certificate: Select whether you want the certificate to be auto-renewed whenever it expires
- Renew before (days): If you have selected to auto-renew the certificate, specify the no. of days in which the certificate should be renewed.
- Click Save
- The template gets created and is listed under Templates


Step 3: Enable certificate template from Device Profile
Next step is to associate templates with Device Profiles. Once the profile is saved, a certificate is generated for the devices in the profile. Follow these steps:
- Navigate to Device Profiles & Policies > Device Profiles and edit an existing macOS Device Profile.
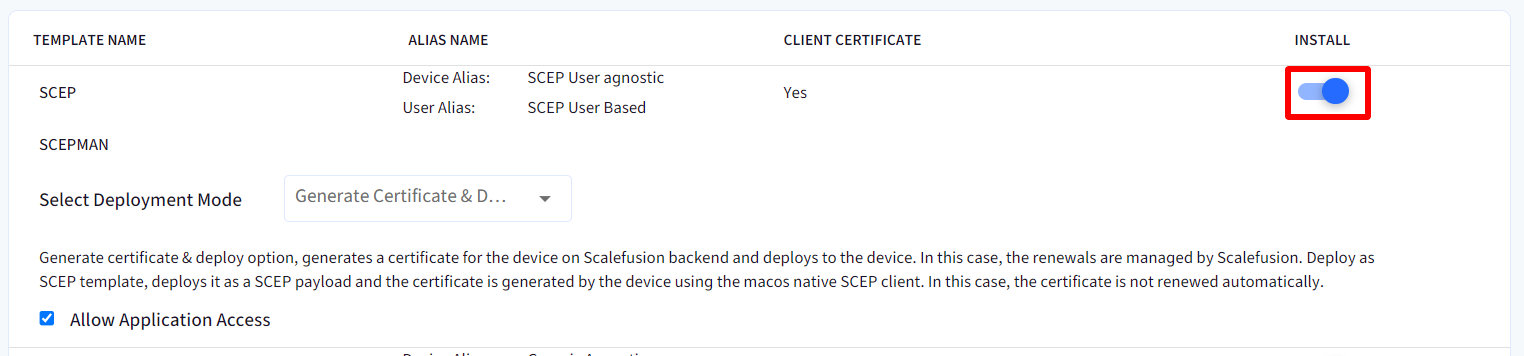
- Navigate to Certificate Settings
- On the template which you want to grant access, enable the Install toggle. On enabling, the row will become expandable downwards.
- Select Deployment Mode by choosing one of the options from the drop-down:
- Generate Certificate & Deploy: Generates a certificate for the device on Scalefusion backend and deploys to the device. In this case, the renewals are managed by Scalefusion.
- Deploy as SCEP Template: Deploys it as a SCEP payload and the certificate is generated by the device using the macOS native SCEP client. In this case, the certificate is not renewed automatically.
- Allow Application Access: If selected, access is granted to all the apps published on the profile.
- Select Deployment Mode by choosing one of the options from the drop-down:
- Once you have provided necessary grants, click on Update Profile
- On the devices associated with the profile, certificates will be generated and the apps will now be granted certificate.
- Notice the CA server certificates that are generated will be listed under Certificate ManagementOnly the certificates with deployment mode as Generate Certificate & Deploy will be displayed under Certificate Management


For devices enrolled as User Authenticated Enrollment or BYOD, user based certificates will be generated
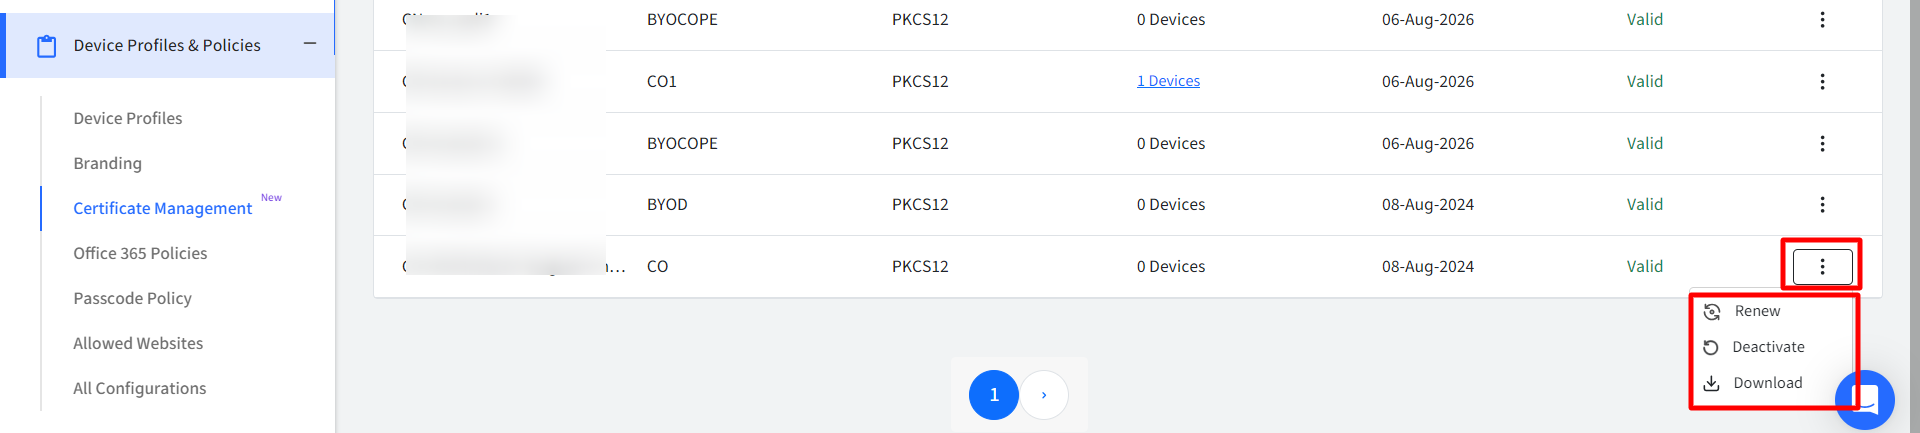
Actions on CA Certificates
Following actions can be taken on CA certificates:
- Renew: Renews the certificate on an immediate basis
- Deactivate / Activate: The certificate can be deactivated or activated. If you deactivate, it will be uninstalled from the device on which it is installed.
- Download: Downloads the certificate in zip format.

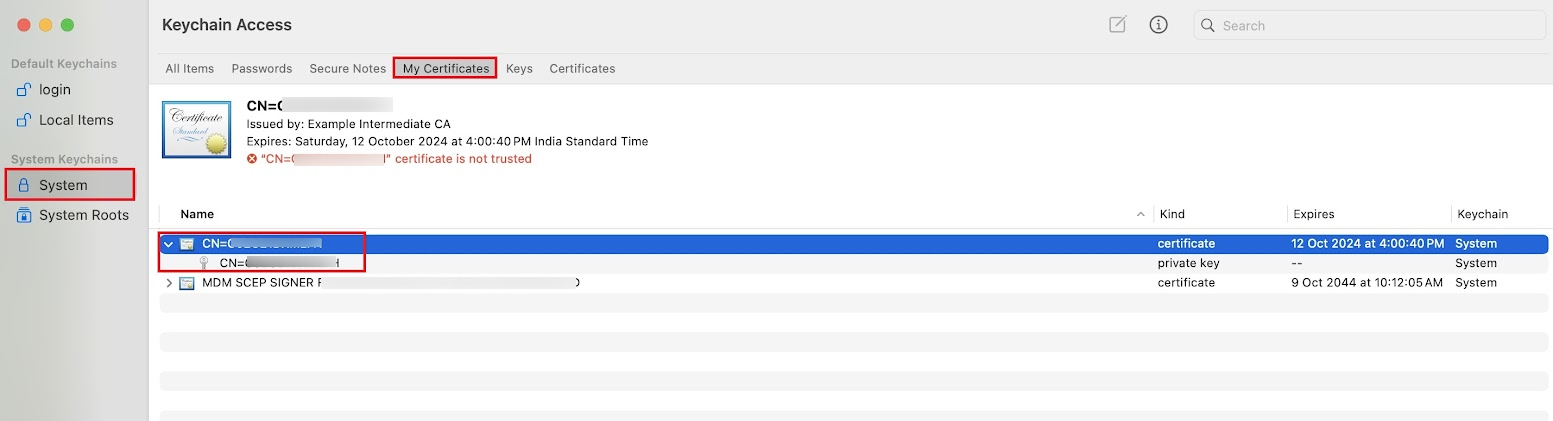
CA Certificates on device
- On macOS devices, certificates are stored in Keychain Access

この記事は役に立ちましたか?