Controlling access to external devices is a vital component of endpoint security. I/O Device Access Control (IODAC) enables IT administrators to define strict policies for managing peripheral connections on organizational devices, thereby preventing unauthorized data transfers and safeguarding sensitive information.
With Veltar’s I/O Device Access Control feature integrated into the Scalefusion Dashboard, administrators can configure granular policies across Windows, macOS, and Linux platforms to allow, restrict, or block specific device types ranging from USB storage and Bluetooth peripherals to keyboards, mice, and network adapters.
This document provides a step-by-step guide to configuring and managing IODAC policies on supported platforms to help you effectively control I/O device access within your organization.
Platforms Supported: macOS, Linux, Windows
Pre-Requisites
Minimum Agent versions:
macOS: Scalefusion MDM Client’s (agent app for macOS) v4.1.1 or above should be installed on device
Windows: Scalefusion MDM agent (agent app for Windows) v16.3.1 or above should be installed on device
Linux: v3.0.0 or above
Ubuntu: 0.0.0~20250619095657-0_amd64.deb
Redhat: 0.0.0~20250619100654-0.el8.x86_64.rpm
Device Profiles for macOS, Linux, Windows should be created on Scalefusion Dashboard
Your account should have access to I/O Device Access Control feature
Supported OS:
macOS: OS 10.15 or above
Linux: Debian and Redhat family
Windows: Win 10,11 Pro and Home, and Server 2022, 2025
Enrollment mode on Windows: Agent based enrollment, Modern Management, BYOD, User Authenticated enrollment, Serial number based enrollment
How it Works
Configure Access Policy: Set the default access level for storage devices.
Define Access Rules: Create rules specifying the devices to deny or allow based on the chosen criteria.
Enforcement: Scalefusion Veltar will monitor external devices connected and enforce the defined rules.
Logging: Detailed logs are recorded for devices’ access, providing valuable insights into device usage.
Steps
Step 1: Create Configuration
On Scalefusion Dashboard, navigate to Veltar > I/O Device Access Control and click on Create Configuration
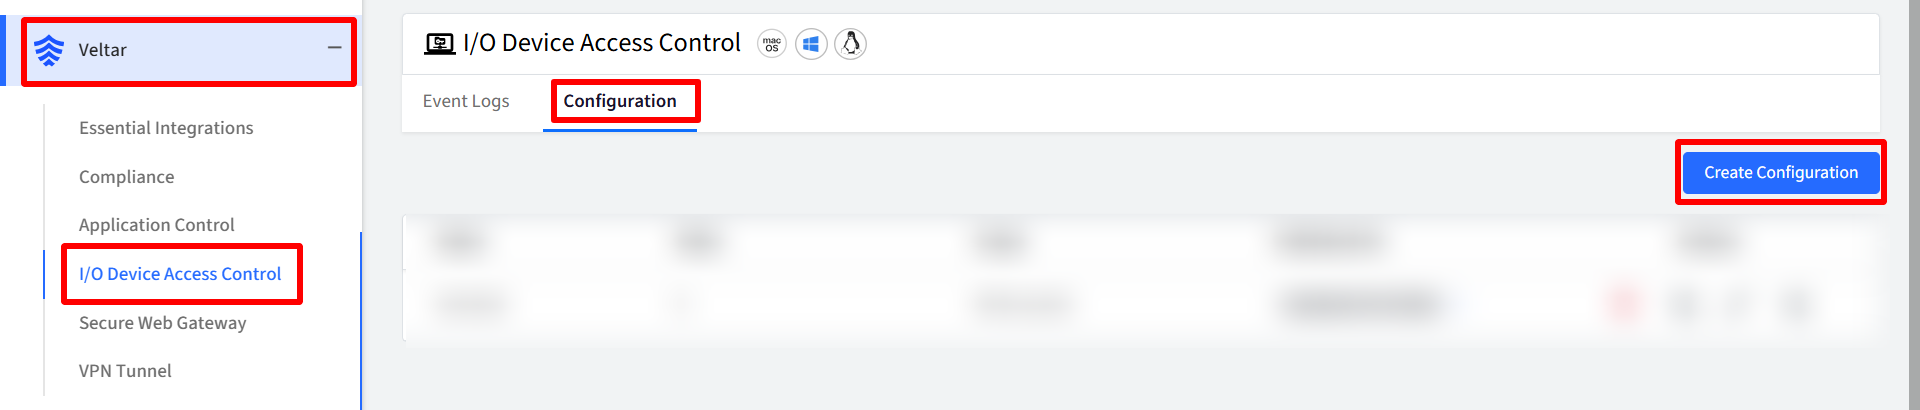
In the new window, enter Configuration Name
On the left you will find the configurable settings under these heads. Navigate to each link:
Once you have configured all the above, click on Create button on top right.
The configuration will get created and displayed under Configuration tab with other related details.
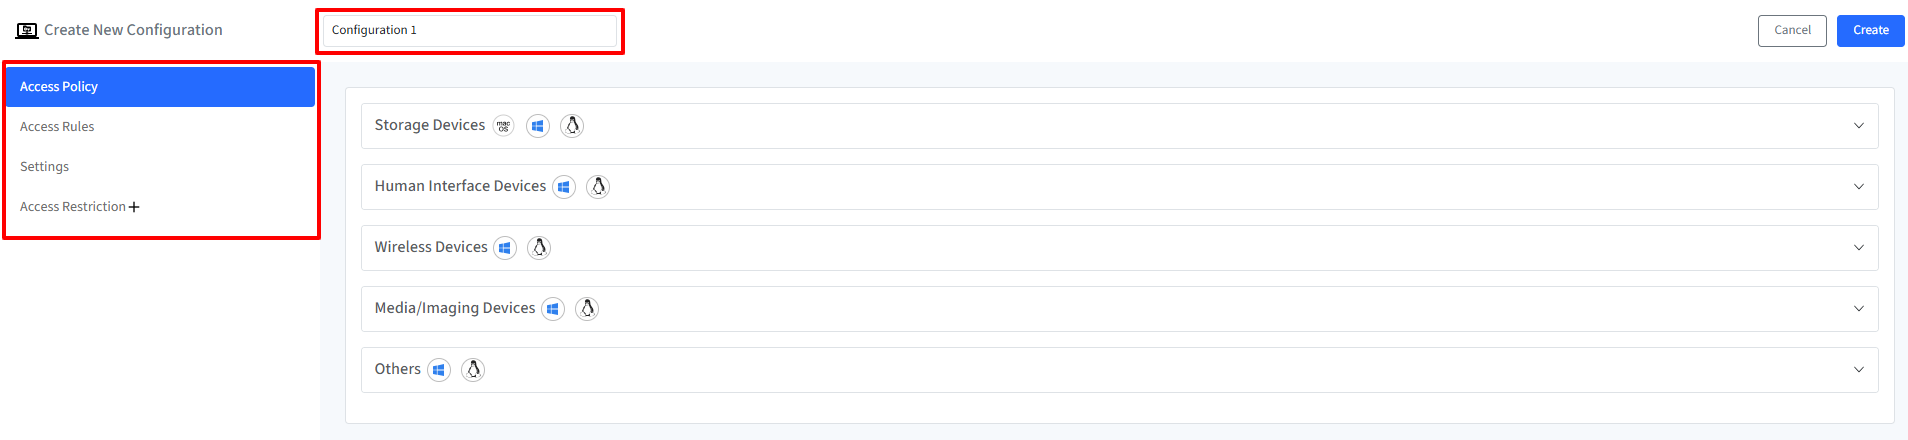
Access Policy
By configuring these settings, you can control the access level for various types of devices and enforce encryption requirements. Configuration Options:
Policy | Description | Platform Supported | Device Types Supported |
|---|---|---|---|
Storage Devices | |||
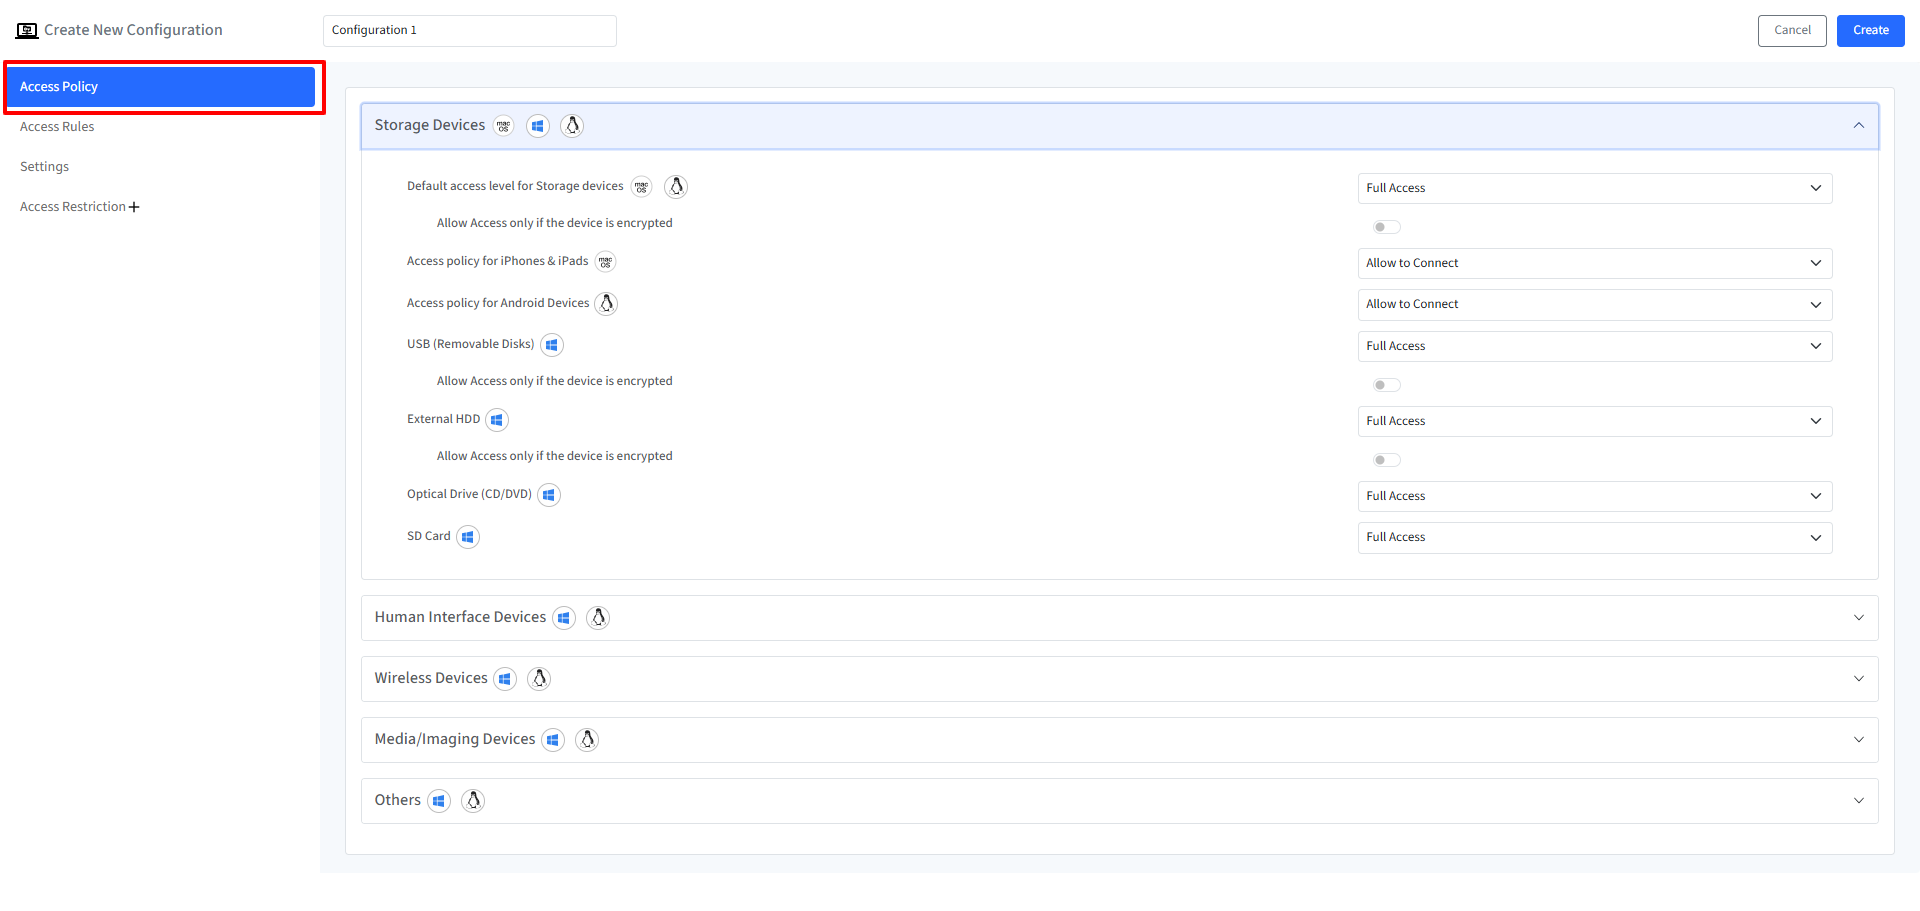
Default Access Level for Storage Devices | Set the default access level for storage devices.
| macOS, Linux | For macOS: PenDrive, Hard Disk Drive, SD Card For Linux: PenDrive, Hard Disk Drive (HDD), Solid State Drive (SSD) |
Allow Access Only if the Device is Encrypted | Enables or disables access to storage devices unless they are encrypted. This option is configurable when the default access level is set to Full Access or Read Only. | macOS, Linux | |
Access Policy for iPhones & iPads | Configure the access policy for iPhone and iPad connections to the device by choosing one of the following:
| macOS | |
Access Policy for Android Devices | Configure the access policy for connecting Android devices to Linux device by choosing one of the following:
| Linux | |
USB (Removable Disks) | Set the access level for USB devices:
| Windows | Pendrives (Encrypted & Non-Encrypted) |
Allow Access Only if the Device is Encrypted | Enables or disables access to USB devices unless they are encrypted. This option is configurable when the default access level is set to Full Access or Read Only. | Windows | |
External HDD | Set the access level for External Hard Disk Drives:
| Windows | External Hard Disk |
Optical Drive (CD/DVD) | Set the access level for Optical Drives:
| Windows | CD Drive |
SD Card | Set the access level for SD Card:
| Windows |
Points to Note for SD Card Detection Behavior:
|
Human Interface Devices | |||
Keyboard | Set the access level for Keyboard:
| Windows, Linux | For Windows:
Important Point to Note:
|
Mouse | Set the access level for Mouse:
| Windows, Linux | For Windows:
Important Points to Note:
|
Wireless Devices | |||
Bluetooth | Set the access level for Bluetooth:
| Windows |
|
External WiFi Adapter | Set the access level for External WiFi Adapter:
| Windows, Linux | For Windows: External USB Wifi Nano Adapter Important Point to Note:
|
Infrared | Set the access level for Infrared:
| Windows | |
Media/Imaging Devices | |||
Cameras, Webcams | Set the access level for Cameras, Webcams:
| Windows, Linux | For Windows:
|
Scanners | Set the access level for Scanners:
| Windows | Scanner (USB) |
Others | |||
Printers | Set the access level for Printers:
| Windows, Linux | Printers (Wired) |
USB Headphones | Set the access level for USB Headphones:
| Windows, Linux | USB Headphones |
Windows Portable Devices (WPD) | Set the access level for Windows Portable Devices:
| Windows | WPD using mobile |
External Network Adapters | Set the access level for External Network Adapters:
| Windows | USB Modem |
Access Rules
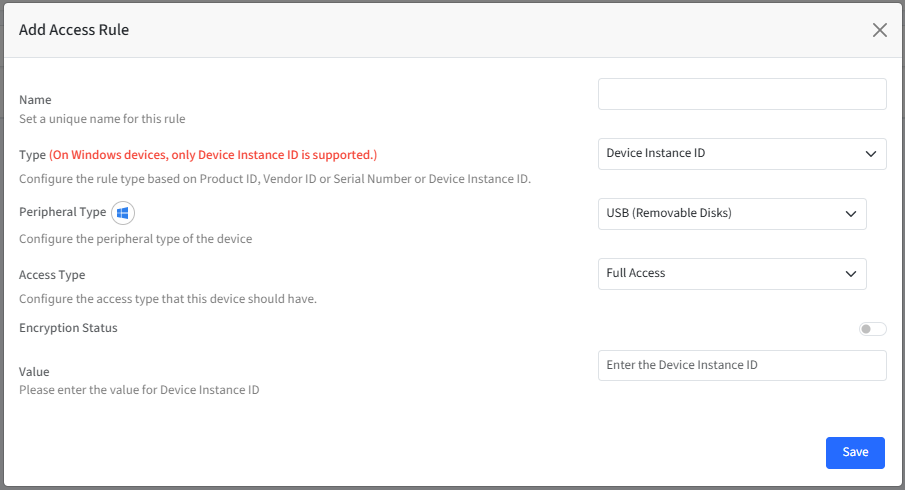
Device Level Access Rules: Configure specific rules for individual storage devices which will allow you to define exceptions to the default policy. To do so,
Go to Access Rules tab on the left panel and click on Add Access Rule

This will open the Add Access Rule wizard. Enter the following details:
Name: Set a unique name for the rule.
Type: Select the rule type which act as unique identifiers for the device. It can be based on any of the following:
Product ID
Vendor ID
Serial Number
Device Instance ID (only for Windows)
On Linux and macOS devices, Device Instance ID is not supported.
Peripheral Type (only for Windows): Lists all peripheral types. Select the peripheral type for which you want to configure access rule.
Note: Bluetooth is not supported as a peripheral type for configuring Access Rules.
Access Type: Configure the access type for the device. The drop-down options might differ based on the peripheral type you have selected
Full Access
Read Only
Deny Access
Encryption Status: With this, you can allow or deny the access to the storage device only if the device is encrypted.
In Windows, the encryption status can be configured only when the Peripheral Type is set to either USB (Removable Disks) or External HDD.
Value: Enter the value for the selected rule type. For example, if you have selected Product ID as the Type then provide the Product ID of the storage device for which you are creating access rule.
How to fetch values from macOS devices
Values can be fetched from the managed device by navigating to Settings > General > About > System Report
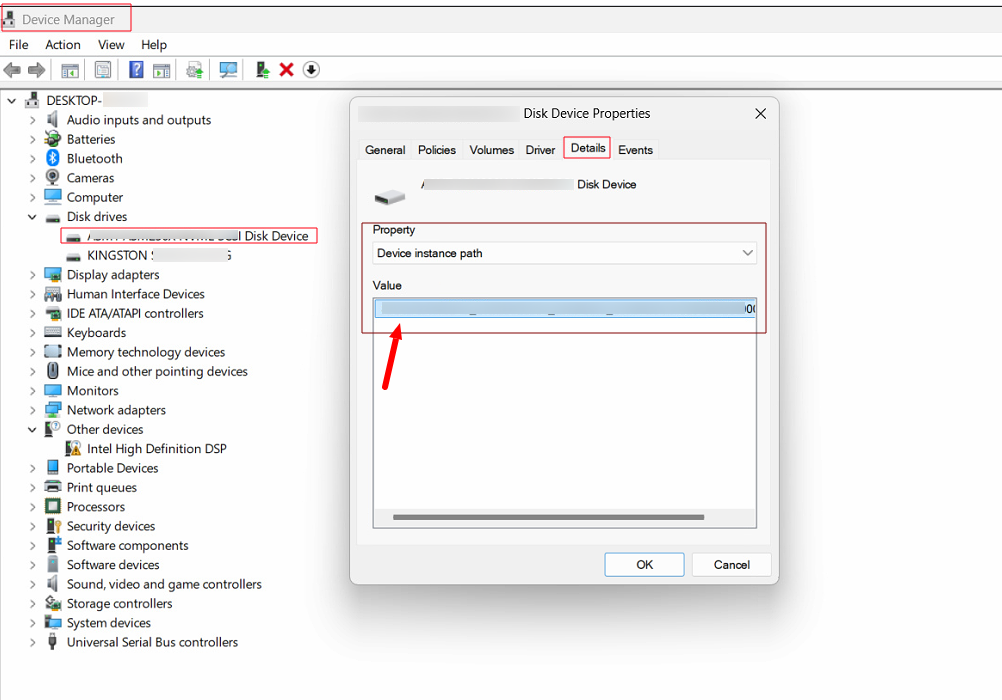
How to fetch Device Instance ID from Windows Devices
To fetch device instance id, in target windows machine, connect the I/O device:
Open Device Manager
Press
Win + X→ Select Device Manager
Locate the Device
Expand the relevant category (e.g., Universal Serial Bus controllers, Disk drives, or Portable Devices)
Open Device Properties
Right-click the device → Select Properties
Find the Device Instance ID
Go to the Details tab
In the Property drop-down, select Device Instance Path (or Device Instance ID in older versions)
The value displayed is the Device Instance ID
Click Save
The rule will be created and displayed.
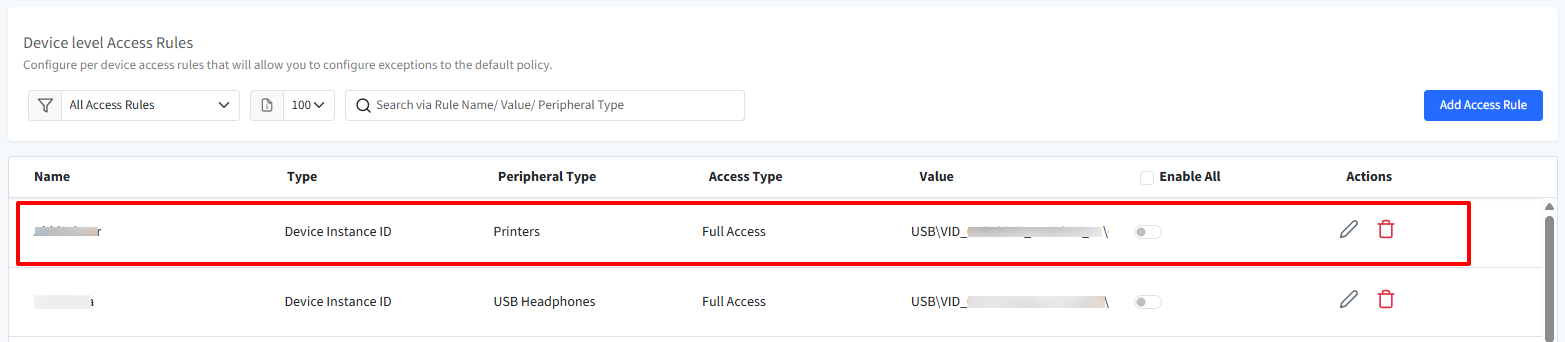
To apply a rule, you need to enable the toggle under Enable All
Settings
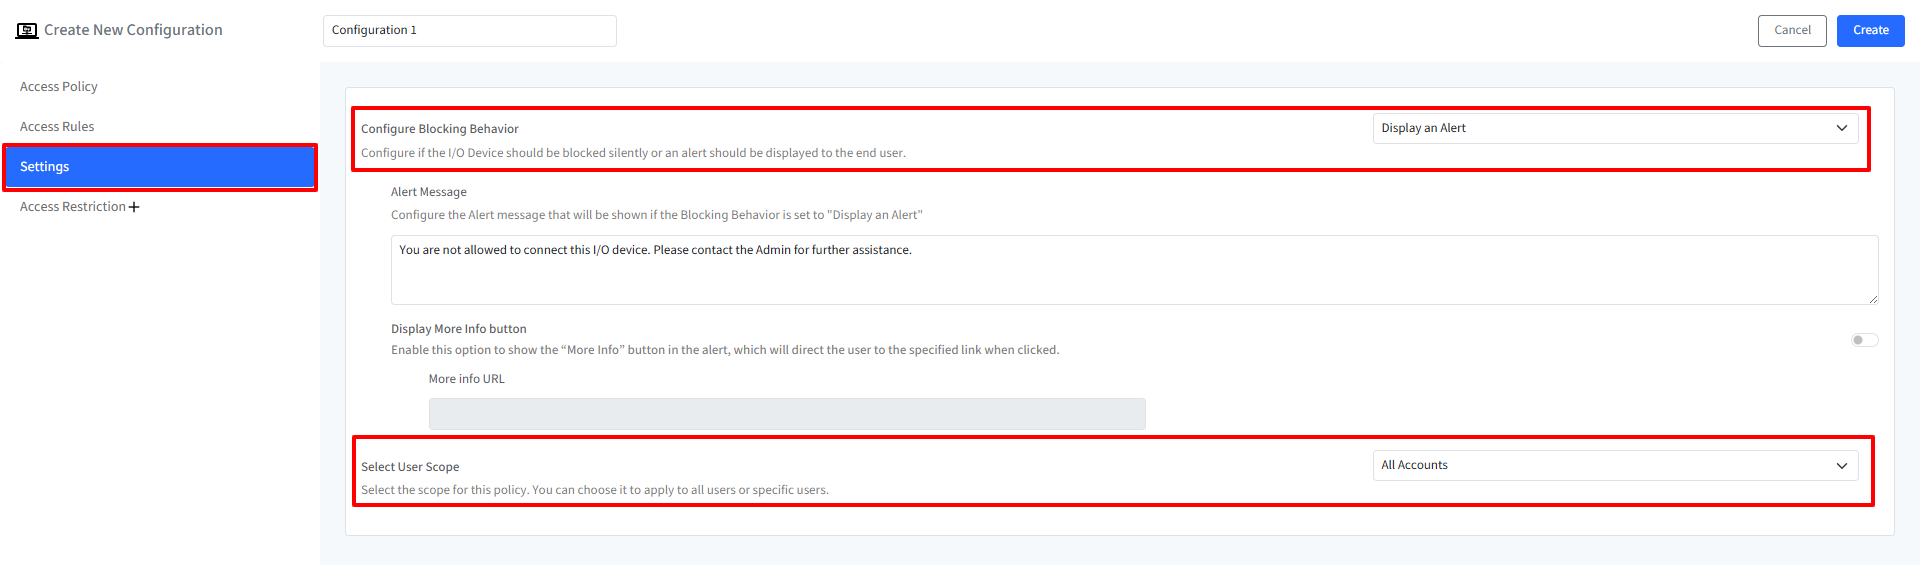
Configure I/O Devices’ blocking behavior through these settings:
Configure Blocking Behavior: Select whether to block I/O device silently or display an alert to the end user.
Alert Message (Enabled if Blocking Behavior is set to Display an Alert): Configure the alert message that will be shown to the user when a blocked storage device is accessed.
Display More Info Button: Enables or disables the More Info button in the alert. When enabled, clicking the button will direct the user to the specified URL.
More Info URL: Enter the URL that will be displayed when the More Info button is clicked.
The alert message and Display More Info button become configurable only if the blocking behavior is set to Display an alert
Select User Scope: Select the scope for the blocking policy by choosing one of the following:
Enrolled User
All Accounts
Administrator Accounts
Standard Accounts
Specific User Accounts: On selecting this option, a text field will be displayed where you need to enter Local user short names which are present on the device. You can search for a particular user which will populate list of users created. To add more than one user, click on New User link.
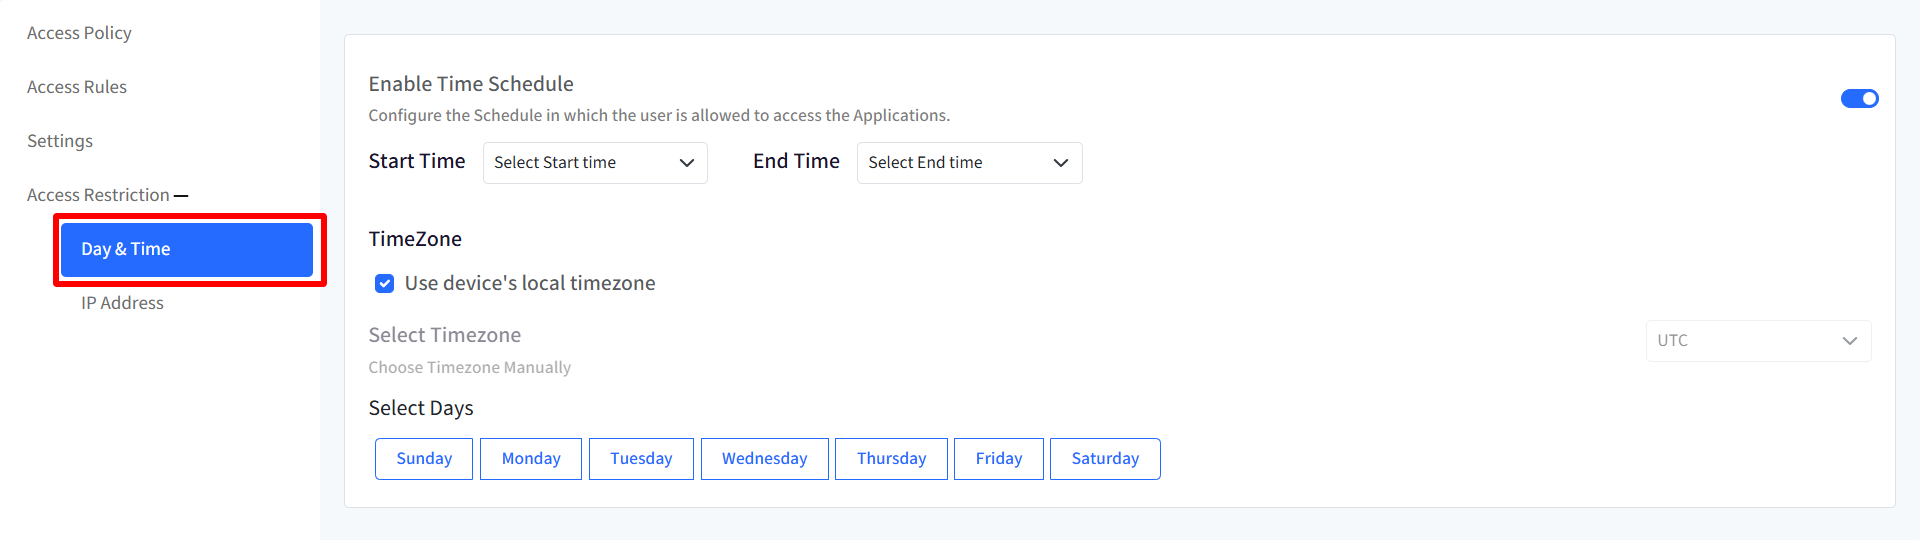
Access Restriction
IT admins can configure specific conditions from the Scalefusion Dashboard which determine the users' ability to access the I/O device. To conditionally access, following parameters can be enforced:
Day & Time: Configure the Time schedule in which user account is allowed to access the I/O device. Select the following:
Start Time & End Time
Timezone: You can either choose to use device's local timezone or select it manually from the drop-down.
Select Days: Select particular day(s) from Sunday to Saturday
IP Address: Enter the IP ranges and the user(s) will be allowed to access the I/O device within those specified ranges. To give range, click on Add Range link. This will add a new row below. Here, select Type from IPv4 and IPv6, give the IP address. The IT admins can click on the delete icon under Actions if any particular IP range has to be removed. Click on Add range to configure multiple IP ranges.
Note: The IP addresses should be valid.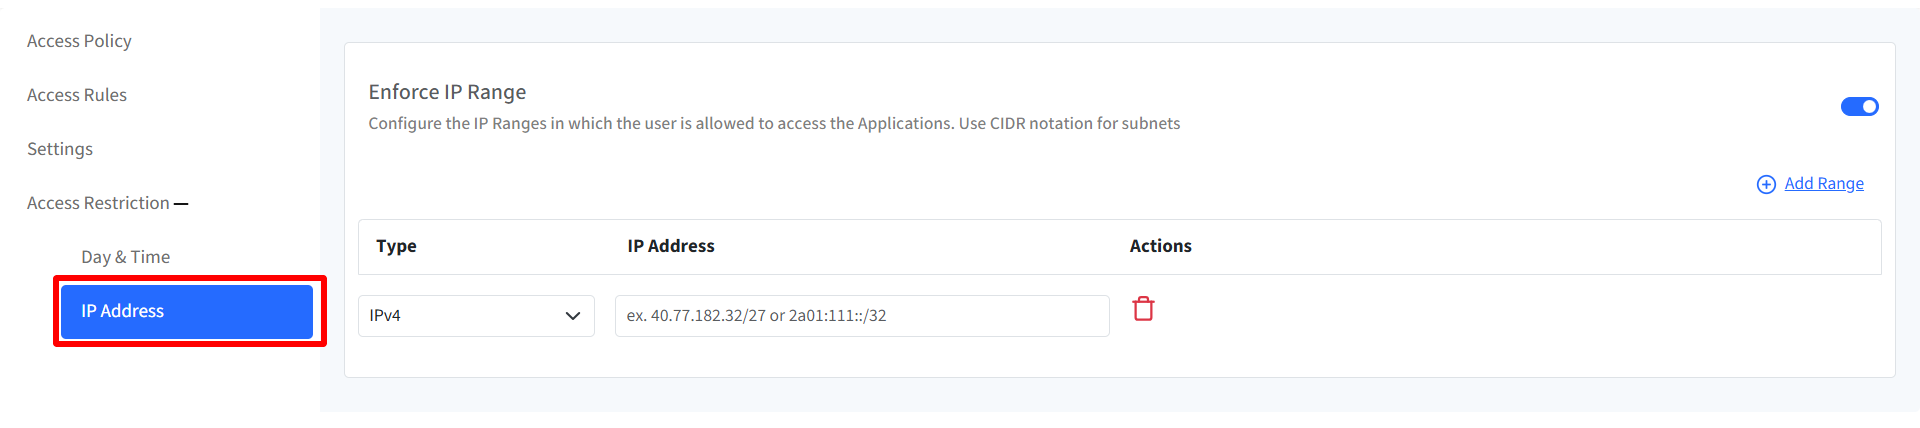
On Windows devices, a 10-minute timer runs to check whether the device falls within the specified IP range or day and time range.
Once you have configured all the above, click on Create button on top right. The configuration will get created and displayed under Configuration tab with other related details.

Step 2: Publish Configuration
To Publish,
Click on publish icon in front of the configuration
In the new window, select the device profile(s) on which you want to publish the configuration.
Click Publish
On Linux, an I/O device must be disconnected and reconnected for policy changes to take effect, whereas on Windows, a disconnect/reconnect may be required depending on the device type and policy.

User Experience on Device
On publishing the configuration,
Notice Veltar icon on the top bar. Clicking on it will reflect I/O Device Access Control Policy as Configured

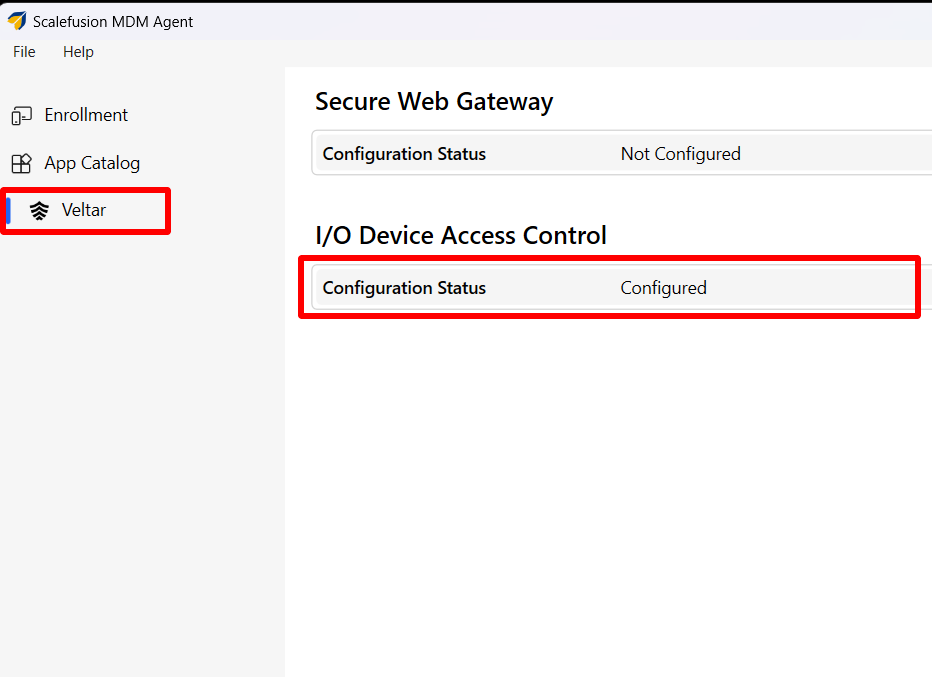
If you open Scalefusion MDM Client, it will reflect I/O Device Access Control Policy as Configured, under Settings

If you try to access an external storage device (for which you have created a rule in the configuration) it will show up the alert message you have configured. Below screenshot is an example when user tries to access Crucial X6 on macOS device, a portable solid-state drive (SSD) which has I/O Device Access Control policy applied to it and the user is denied from using the storage device.

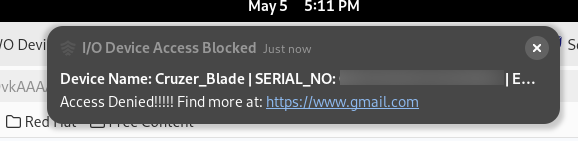
When user tries to access Cruzer Blade on Linux device, which has I/O Device Access Control policy applied to it and the user is denied from using the storage device.
On publishing the configuration,
If you open Scalefusion MDM Agent , it will reflect I/O Device Access Control Policy as Configured, under Veltar
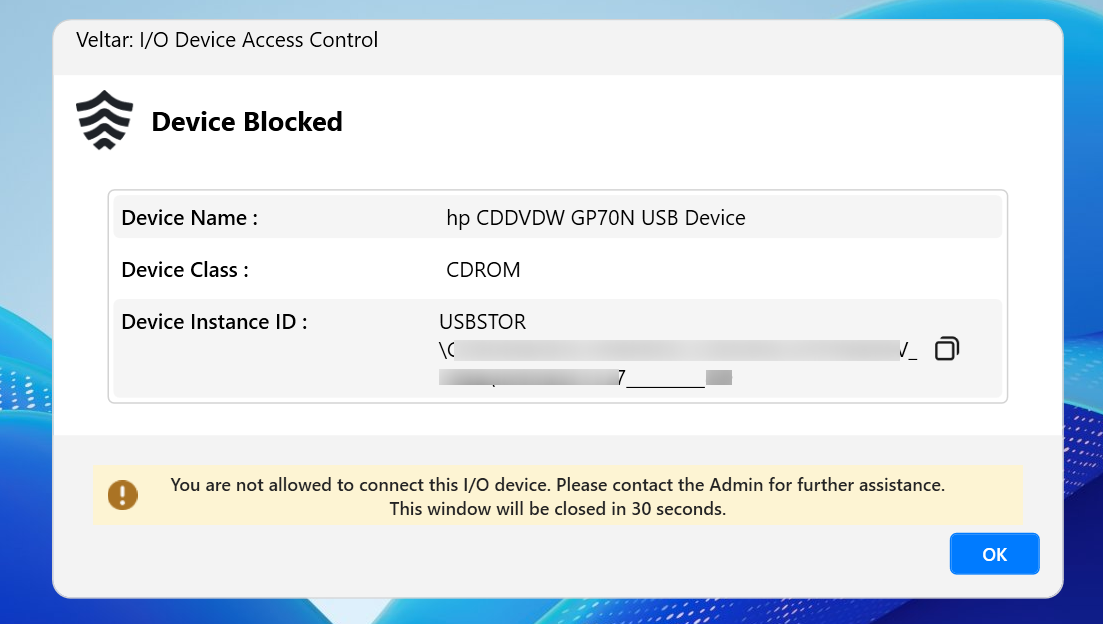
If you try to access a device (for which you have created a rule in the configuration) it will show up the alert message you have configured. Below screenshot is an example when user tries to access HP USB device on Windows, of type CDROM which has I/O Device Access Control policy applied to it and the user is denied from using the device.
On Windows, Bluetooth connection or access events are not captured by the system, so block pop-up notifications are not displayed. However, Bluetooth peripheral devices are still blocked as expected.
Event Logs
From this section you can get detailed logs which are recorded for I/O device access, providing valuable insights into device usage. Click on Event Logs tab under I/O Device Access Control
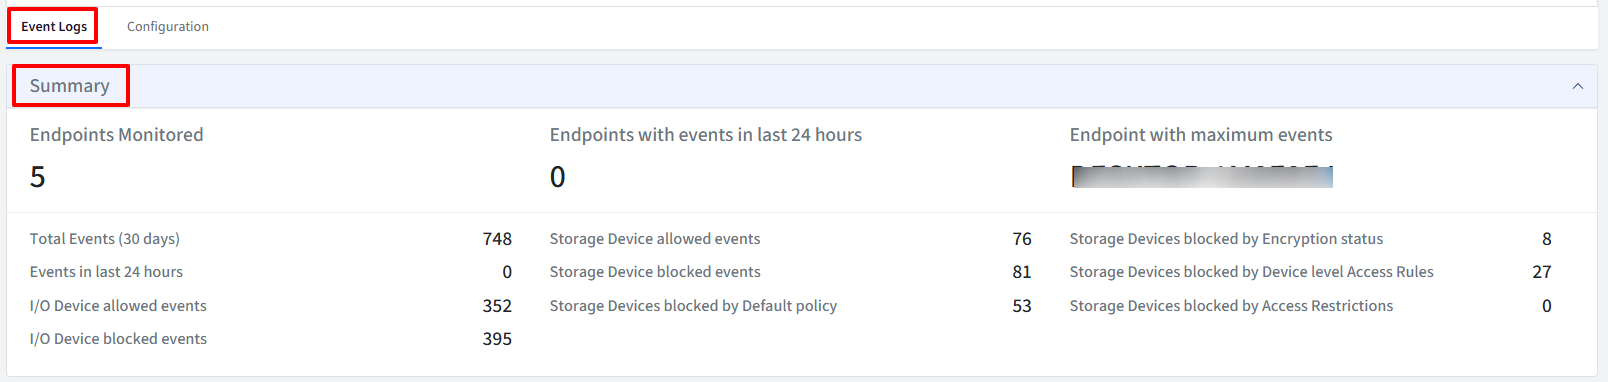
Summary
The Summary view provides an overview of I/O Device Access Control activity and status. The information can be viewed under following heads:
Endpoints Monitored
Endpoints with events in last 24 hours
Endpoint with maximum events
Total Events (30 days)
Storage Device allowed events
Storage Devices blocked by Encryption status
Events in last 24 hours
Storage Device blocked events
Storage Devices blocked by Device level Access Rules
I/O Device allowed events
Storage Devices blocked by Default policy
Storage Devices blocked by Access Restrictions
I/O Device blocked events
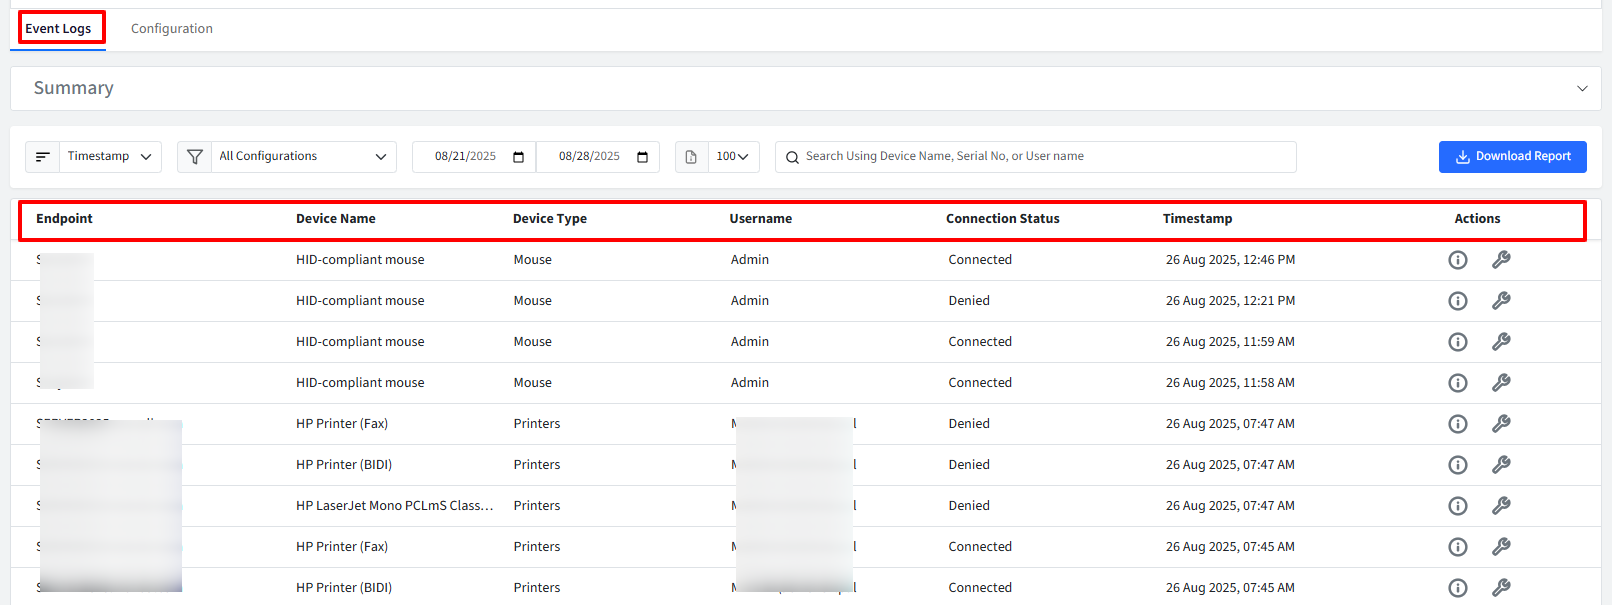
Events Info
This section shows detailed information on the events, under following heads
Endpoint: The name assigned to the device.
Device Name: The name of the device.
Device Type: The type of device (External Storage or USB)
Username: The name of the user account that accessed the device.
Connection Status: Connected- Read & Write, Connected - Read Only, Denied, Connected
Timestamp: Indicates when the I/O device was accessed by the user.
Actions:
View App Information: Clicking this option displays a pop-up with detailed information about the I/O device. This information helps administrators understand the context of device’s access and identify the specific reasons for the blocks:
Name
Product ID
Product Name
Vendor ID
Serial Number
Manufacturer
BSD Name
Bsd Path
Mount Point
File System
Is Encrypted
Is Read Only
Total Size
Available Size
Connection Status
Connection Reason
Edit Configuration: With this, you can update the configuration
Additional Features
Filters
There are filtering options available for viewing activity logs. You can filter them by:
Timestamp:
Timestamp
Device Name
Username
Configurations:
All Configurations
List of available configurations. Choose a specific configuration
Date Picker:
Start Date: It can be from Current Date to 7 days. You cannot select a date more than 30 days in the past.
End Date
Note: Logs older than 30 days get automatically deleted.
Page Size: Select the number of records to be displayed on one page
Search Using Device Name, Serial No, or Name

Download Report
Clicking the button downloads a CSV report containing the filtered activity data. Please note the report can be downloaded for a duration of 7 days at the maximum.