Managing applications is a key part of macOS device management. While App Store apps can be distributed through Apple’s VPP, organizations often need to deploy enterprise and third-party applications using DMG (Disk Image) or ZIP (compressed archive) files.
Scalefusion’s Enterprise Store makes it easy for IT administrators to upload, configure, publish, and manage these applications on managed macOS devices. This guide covers the complete deployment process, from uploading the application package to configuring installation settings and monitoring its status.
Pre-requisites
Scalefusion-managed macOS device.
Suitable Scalefusion Plan that supports Enterprise Store. To know more about this, please visit here.
DMG / .zip file of the app to be installed
Scalefusion MDM Client’s (agent app for macOS) latest version v6.5.6 (626) or above should be installed on devices
Step 1: Uploading a DMG / ZIP file
Once you have the app information, the next steps are very easy, and if you are familiar with the Scalefusion Enterprise store for other platforms, then they are pretty much the same. Follow the steps below,
Sign In to Scalefusion Dashboard. Navigate to Application Management > Enterprise Store
Click on Upload New App > Upload macOS App
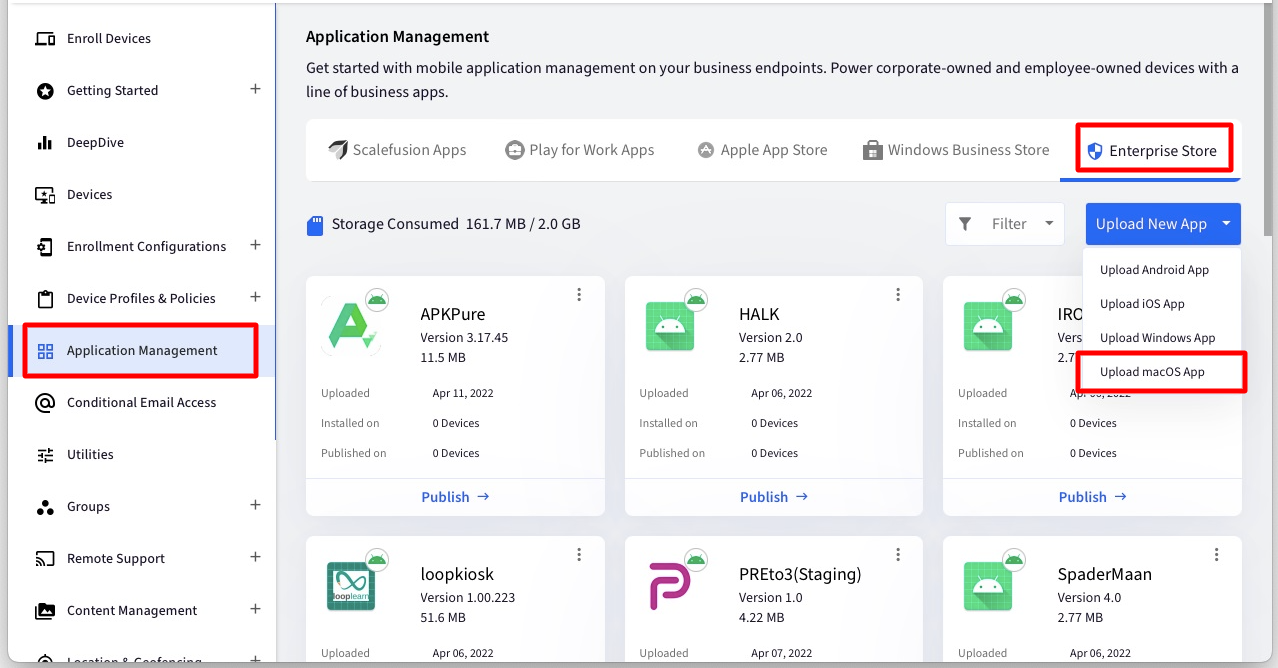
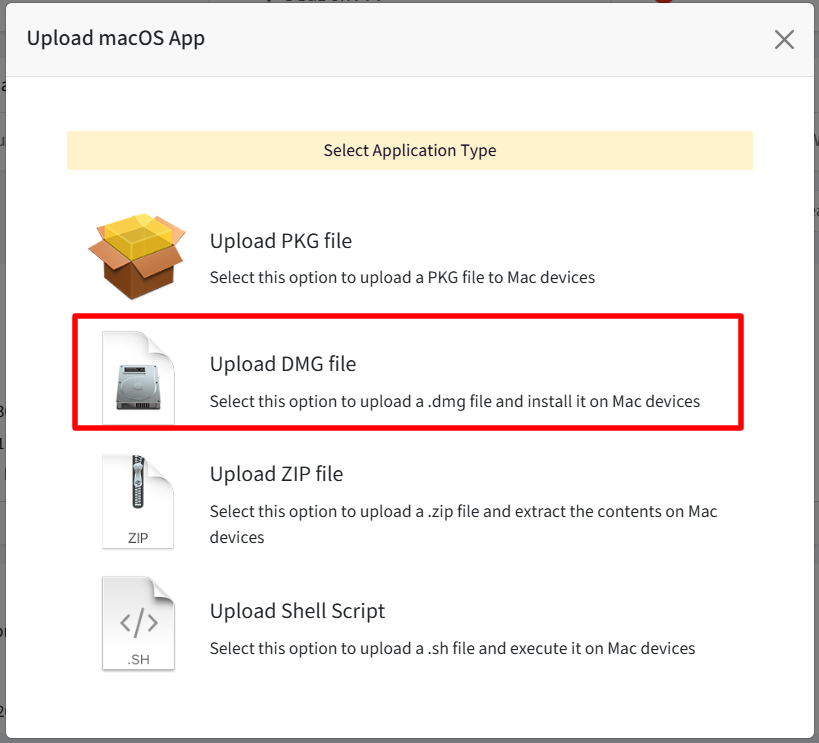
In the Upload macOS app window,
Choose Upload DMG file to upload the dmg file.
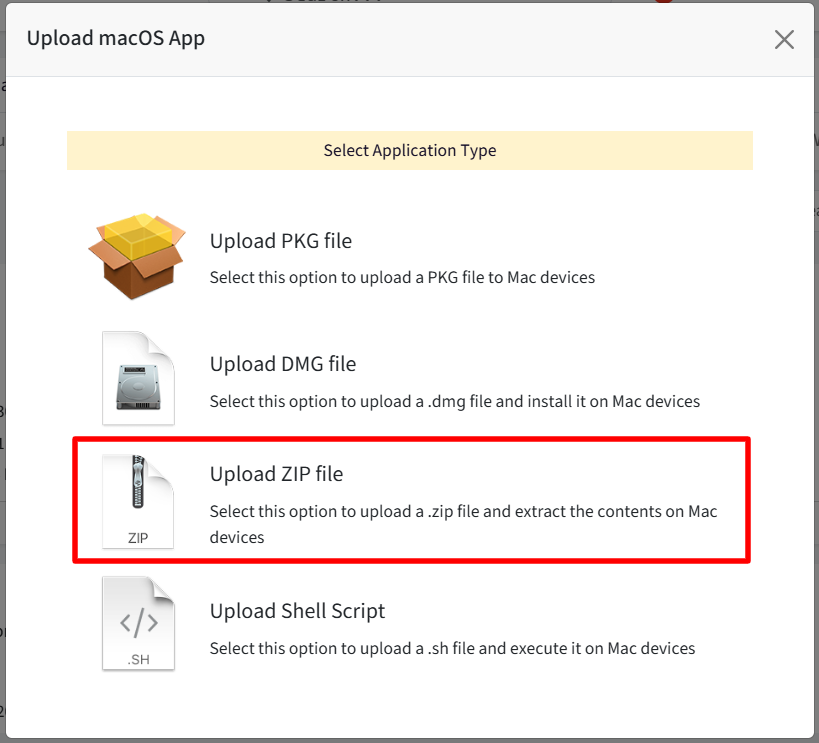
Choose Upload ZIP file to upload .zip file
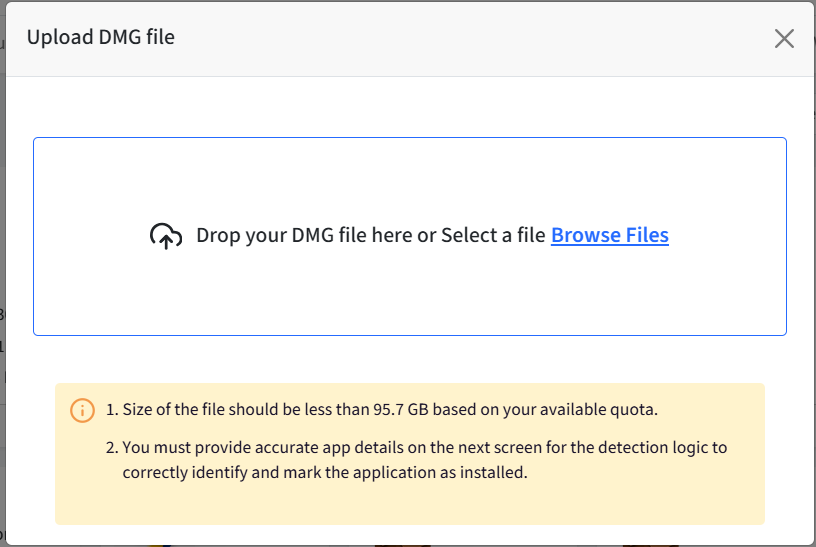
In the Upload wizard, upload a dmg/.zip file from your computer. Click Next once done, which would upload and parse the file for its validity.
You will get the following dialog. Provide the app details (App Name, Bundle Id, App Version etc.) and click SAVE.
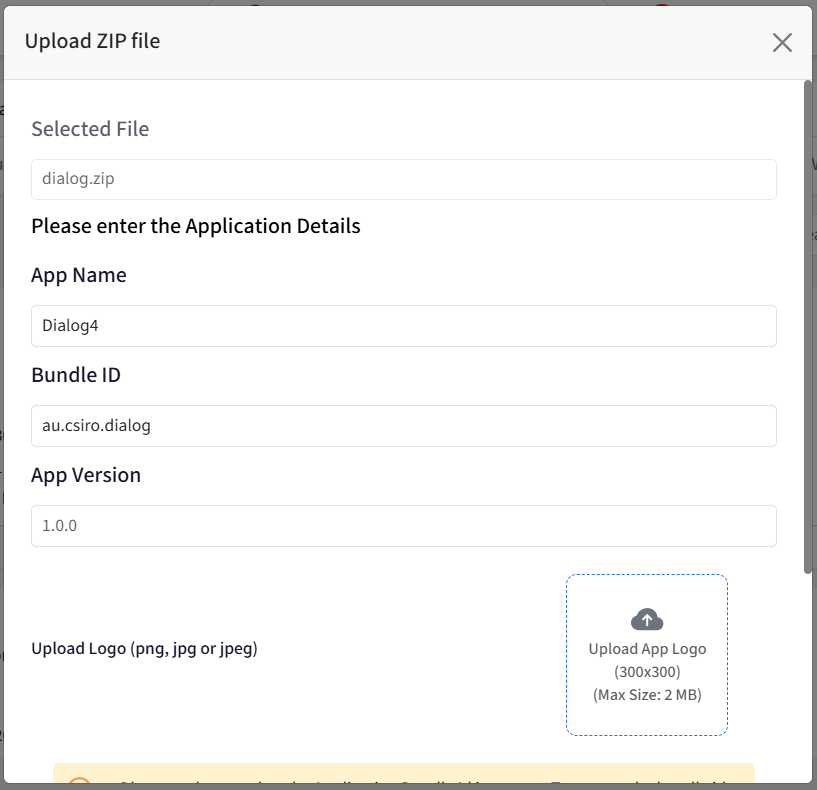
Make sure to update the App Name, Bundle ID, and App Version, If they are not correct, then the Installation will succeed, but the installed status will not be updated on the Scalefusion Dashboard.
The logo is an optional item and for your reference on the Dashboard only. It has NO IMPACT on installation.
Once the app is uploaded, you will get the publish window. Click on Cancel if you do not want to publish at this point. The uploaded app will appear in the list of applications.
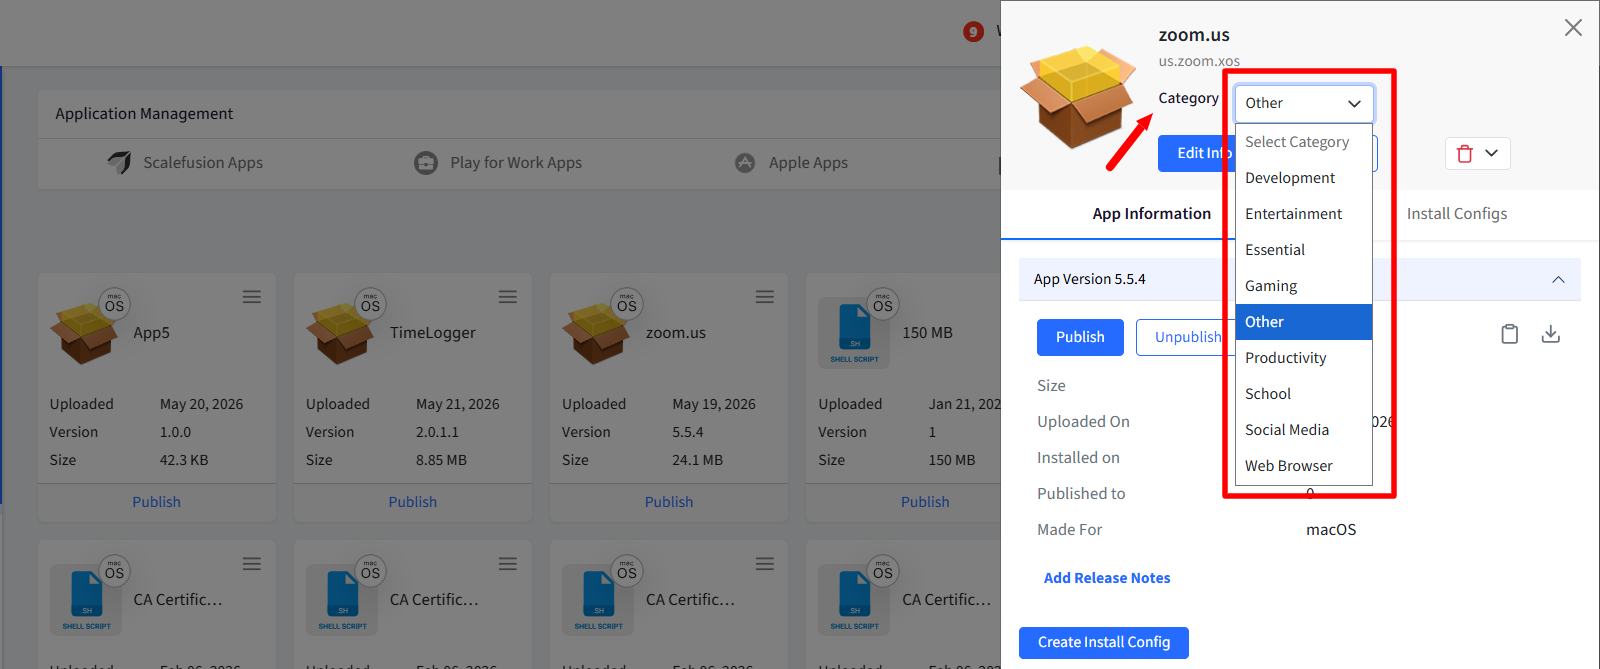
You can choose category for the app by selecting the category from drop-down below app title, on the right panel.
Step 2: Create Install Configurations
Now when apps are added, next step is to create install configurations for the app. To do so,
Click on View Details link below the app card, for which you want to create app configurations. This brings up the app panel on the right.
Here, you will see two tabs, viz.,
App Information: Contains a brief description of the app and a link to Create Install Configuration
Install Configs: If any configurations are created, they are listed here. It also contains CREATE link to create Install Configuration.
You can either click on Create Install Config button on App Information or CREATE button under Install Configurations. Both open the Configure app window wherein you specify details to create App Install configurations.
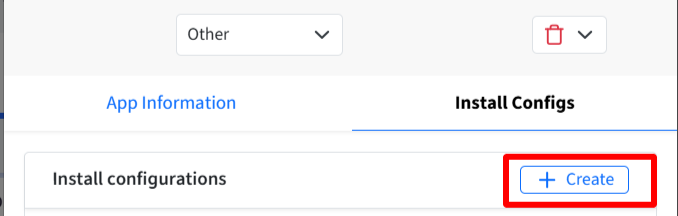
Configurations: Clicking on create brings up the Create New Install Config window. Following are the settings you need to configure for the app. Click Save after configuring the settings.
Install Settings
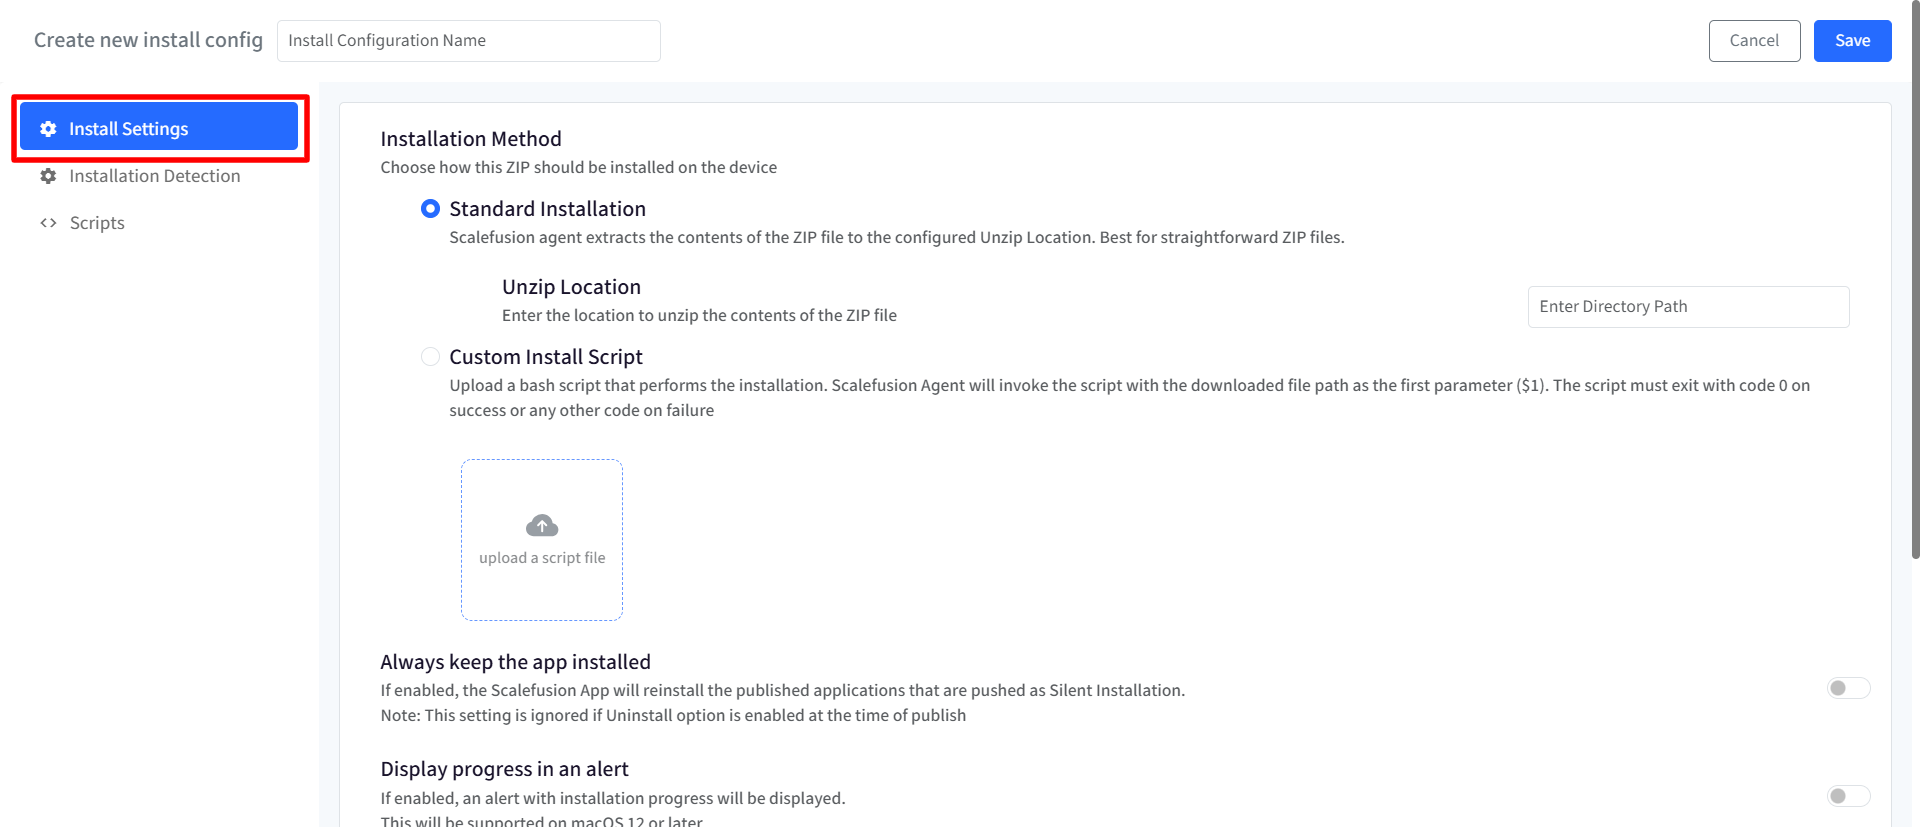
Install Configuration Name: Provide a name with which this configuration can be identified.
Installation Method: Choose how this package should be installed on the device
Standard Installation (Default): Agent installs the downloaded DMG / ZIP file. Best for straightforward packages
If it’s a zip file, you can also specify the location to unzip the contents of the ZIP file
Custom Install Script Upload a bash script that performs the installation. Agent will invoke the script with the downloaded file path as the first parameter ($1). The script must exit with code 0 on success or any other code on failure
Custom Script Upload Requirements
Accepted File Types:
.shValidation Rule: Must not be empty. Displays error message: "Install Script is required when Custom Install Script is selected"
Always keep the app installed: If enabled, the app will reinstall any published applications that were deployed using the Silently Install method.
If uninstall is enabled at the time of publishing, this setting will be ignored.
Display progress in an alert: If enabled, an alert displaying the installation progress will be shown to the user. Note: This is supported on macOS 12 and above
Overwrite existing installation: If enabled, apps previously installed will be overwritten by the deployed version. If disabled, installed apps will not be overwritten.
The published version and installed version must match for this setting to be applied.
Ignore DND apps: If enabled, application installation proceeds if any of the target apps have Do Not Disturb (DND) or Display Assertion set (e.g., Zoom during a call, PowerPoint during a presentation).
Show alert before beginning silent installation: If enabled, an alert message will be displayed to the user before a silent installation begins.
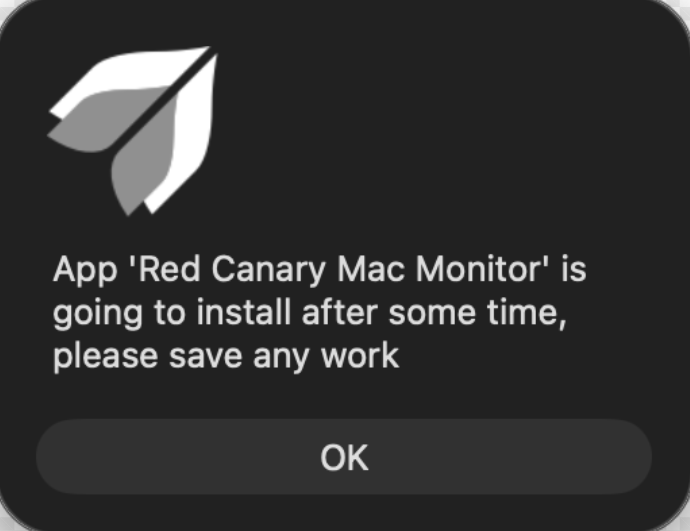
Allow users to defer the installation: If enabled, users will be allowed to postpone the installation for 24 hours. Deferred apps can be viewed in the Application Catalog (inside agent app for macOS).
Note: This option can only be enabled if Show alert before beginning silent installation is also enabled.
Installation Detection
Custom Installation Detection allows the agent to identify applications that cannot be reliably detected using a standard macOS Bundle ID. This is useful for command-line tools, frameworks, binaries, or applications installed in non-standard locations. By default, the agent detects applications using the Bundle ID configured for the app. Enable Custom Installation Detection only when the application does not use a standard .app bundle or requires a custom verification method.
When Custom Installation Detection is disabled, all settings in this section remain unavailable.
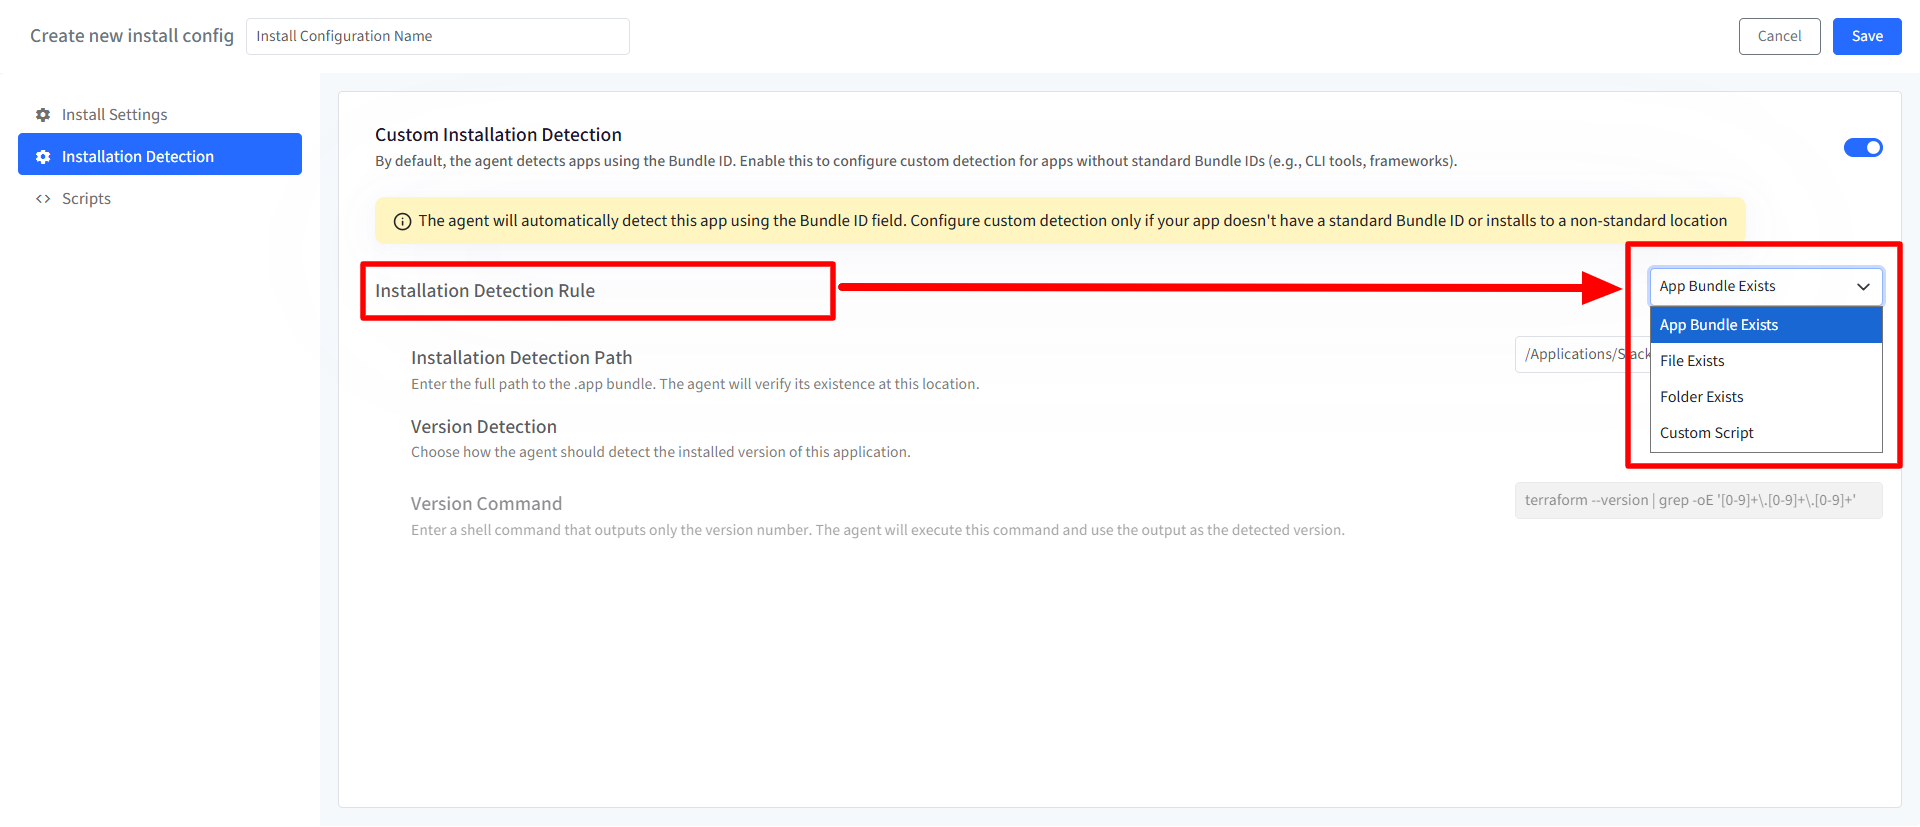
Installation Detection Rule
The Installation Detection Rule determines how the agent checks whether an application is installed on a device. Available detection methods include:
App Bundle Exists: Use this option to detect standard macOS applications packaged as
.appbundles. The agent verifies that the specified application bundle exists at the configured path.File Exists: Use this option to detect applications or tools installed as individual files or executables. The agent checks whether the specified file exists on the device.
Folder Exists: Use this option to detect software installed as a directory or framework. The agent checks whether the specified folder exists on the device.
Custom Script: Use this option when installation status must be determined through custom logic. The agent executes an uploaded bash script to determine whether the application is installed. The script:
Exits with code
0if the application is installedExits with code
1if the application is not installedInstallation Detection Script: Upload a
.shbash script containing the custom detection logic.
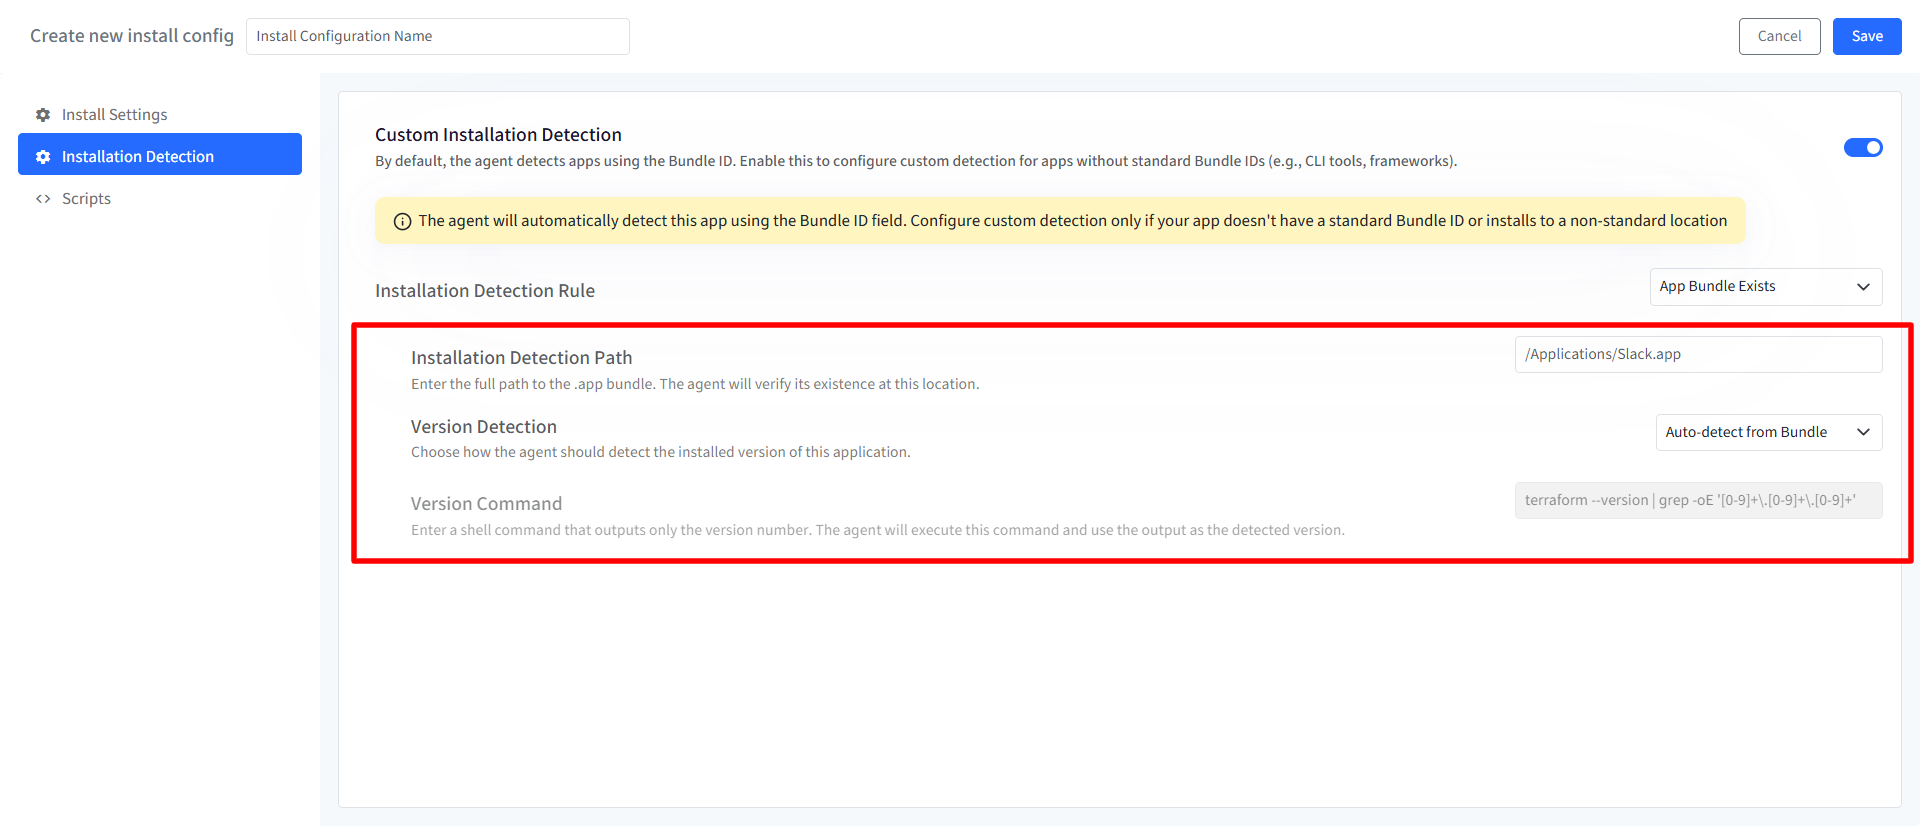
Installation Detection Path: The Installation Detection Path specifies the file system location the agent uses to verify installation status. Provide the full path to the
.appbundle / file / folder.Version Detection: Version Detection controls how the agent determines the installed version of the application.
Auto-detect from Bundle (only for app bundle): Automatically reads the application version from the app bundle’s
Info.plistusingCFBundleShortVersionString.Run command: Runs a custom shell command to retrieve the installed version. When selected, a Version Command field becomes available.
Not required: Skips version detection. Applications configured with this option display the version as
N/Ain device status views.
Version Command: The Version Command defines the shell command the agent runs to retrieve the installed application version. Example:
terraform --version | grep -oE '[0-9]+\.[0-9]+\.[0-9]+'This is required only when Run command is selected under Version Detection.
Scripts
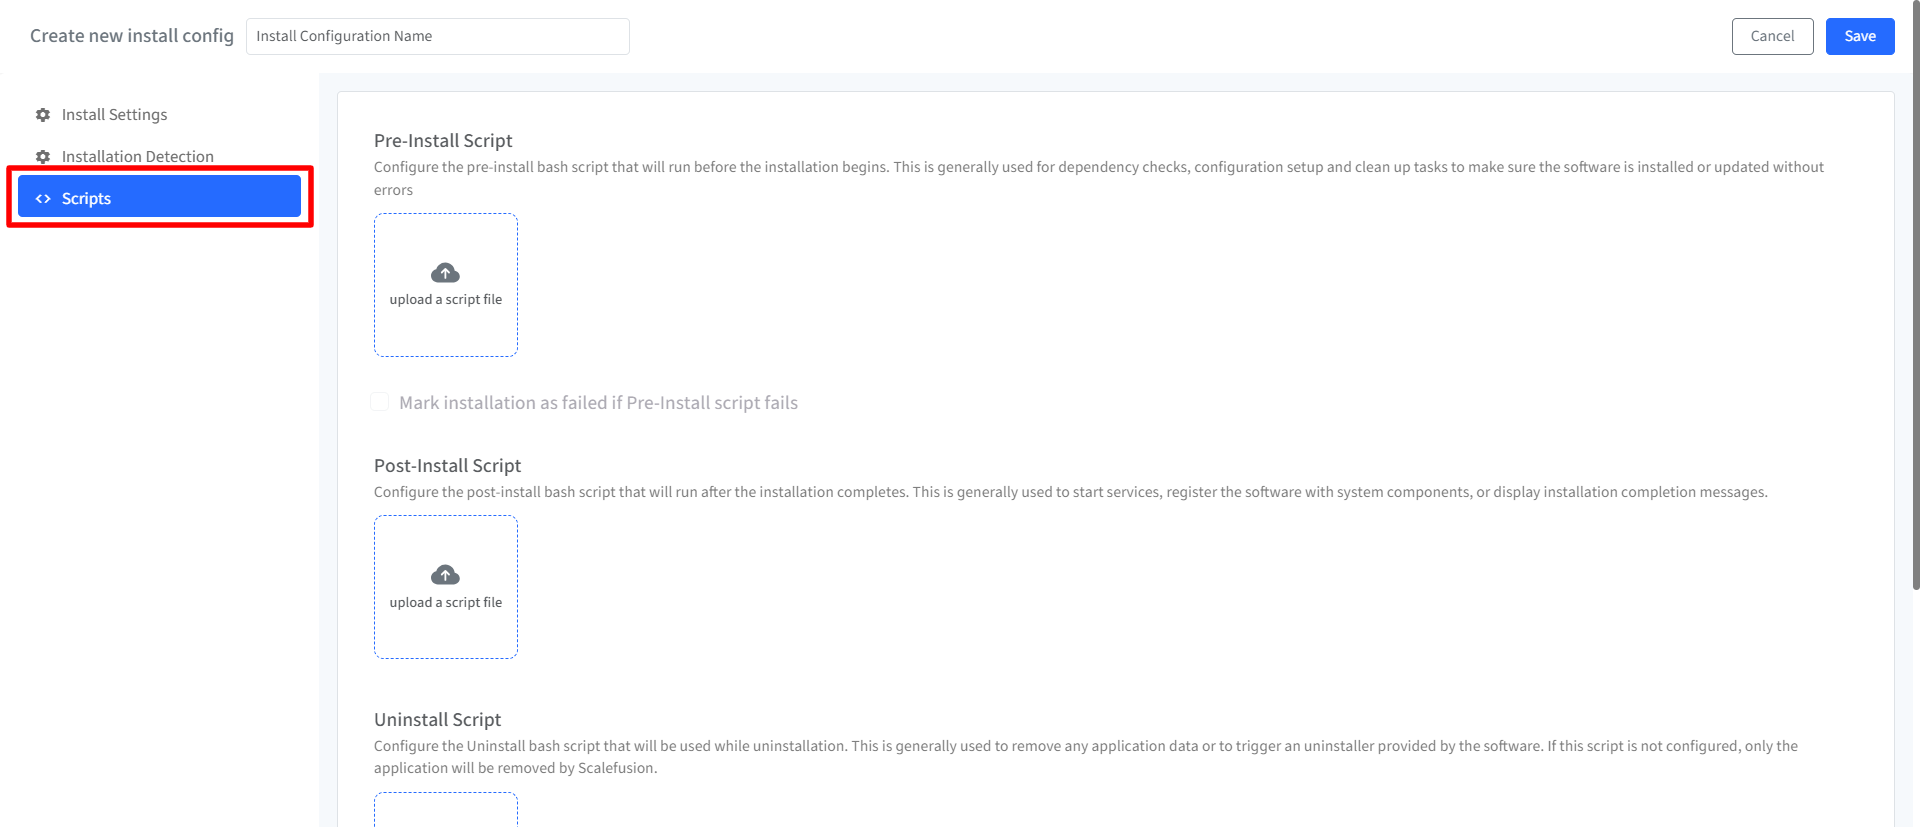
From this section you can manage scripts related to DMG/ZIP applications.
Pre-Install Script: Upload a pre-installation Bash script (.sh file extension) which will run before the application installation begins. Pre-install scripts are typically used for dependency checks, configuration setup, or cleanup tasks to ensure a smooth installation or update process. Click Browse to upload a script file.
Mark installation as failed if Pre-Install script fails: If checked, it will halt the installation process if the pre-install script encounters errors.
Post-Install Script: Upload a post-installation Bash script (.sh file extension) which will run after the application installation is complete. Post-install scripts are commonly used to start services, register the software with system components, or display completion messages.
Uninstall Script: Upload a Bash script (.sh file extension) which will run during the application uninstallation process. Uninstall scripts are typically used to remove application data or trigger the software's built-in uninstaller. If no uninstall script is provided, Scalefusion will only remove the application itself.
Important Notes on Scripting:
Verify Script Before Upload: Please review your script thoroughly before uploading it.
Script Size Limit: The maximum script file size is 5.0 MB.
Custom Property Expansion: You can leverage custom properties within your scripts. These properties will be dynamically replaced with corresponding device or user-specific values at runtime (enclosed by "%" symbols).
Step 3: Publishing the App & Viewing Status
Once the app is uploaded, it will appear in the list of applications and clicking on it will allow you to Publish the app.
The Publish window includes the following tabs:
Installation Targets
Installation & Management Options
Installation Targets
The Installation Targets allows you to select and review the Profiles, Groups, and Devices where the pkg will be published. When you select Device Profiles, you will get following options:
Show Selected: Enabling this displays only the device profiles that were selected during the app publishing process.
Show Published: When you enable Show Published, the list displays all profiles, including those where the app has already been published.
If the app is already published to a profile and you need to change the installation mode, go to Show Published, select the profile where the app is published, choose the new installation mode, and republish the app.
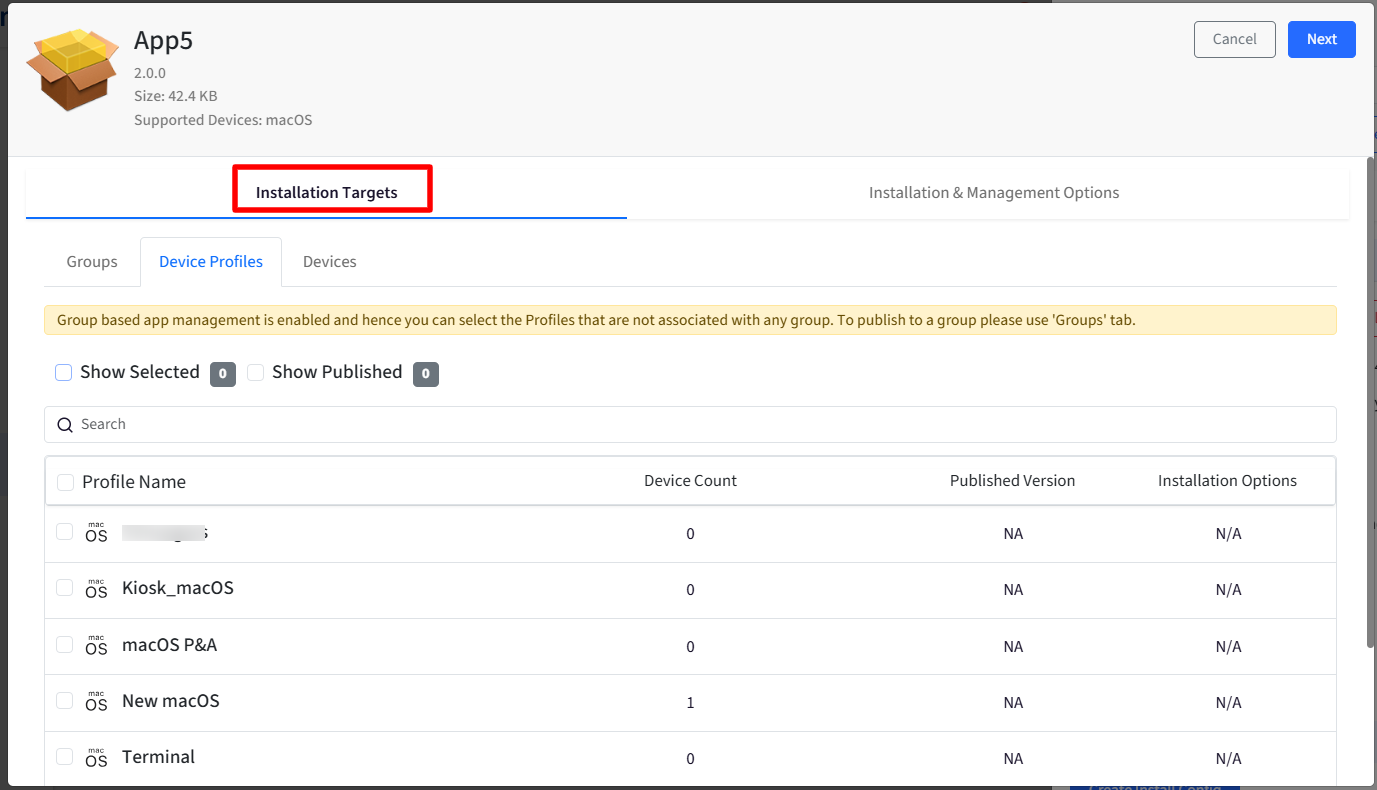
Installation & Management Options
The Installation & Management Options section controls how a DMG / ZIP application is deployed, installed, and managed on devices.
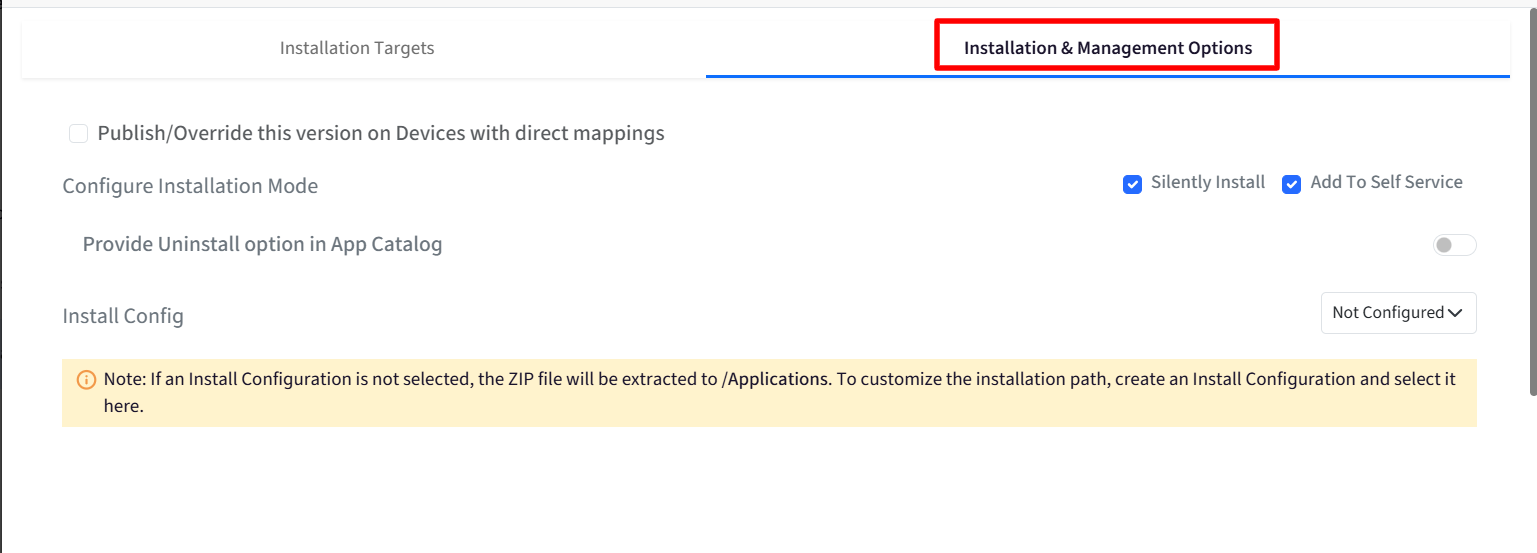
Publish/Override this version on Devices with direct mappings: Enable this option to publish the selected application version even on devices that already have direct app mappings configured. When enabled, device-specific mappings are ignored and the selected version is published to all targeted devices using the standard publishing workflow. When disabled, existing direct device mappings continue to take precedence.
Configure Installation Mode: This setting determines how the application is made available to users and devices. At least one installation mode must be selected.
Silently Install: Installs the application automatically on target devices without requiring user interaction. Use this mode when applications should be deployed automatically in the background.
Add to Catalog: Makes the application available in the App Catalog for users to install manually. When enabled, users can browse and install the application from the app catalog available inside the macOS agent app on device.
Select at least one installation mode. You may also select both.
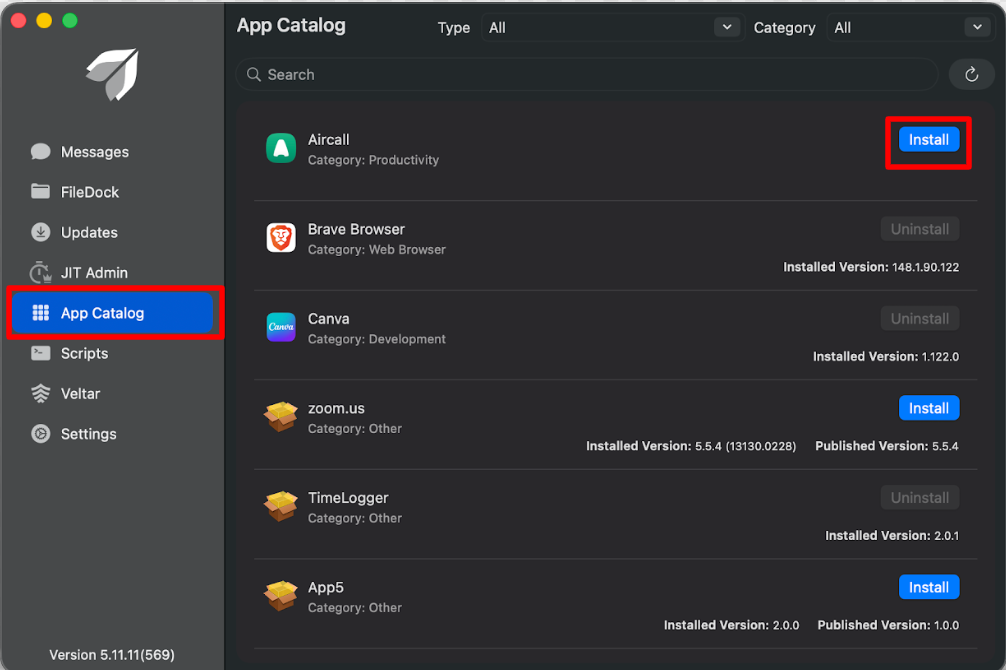
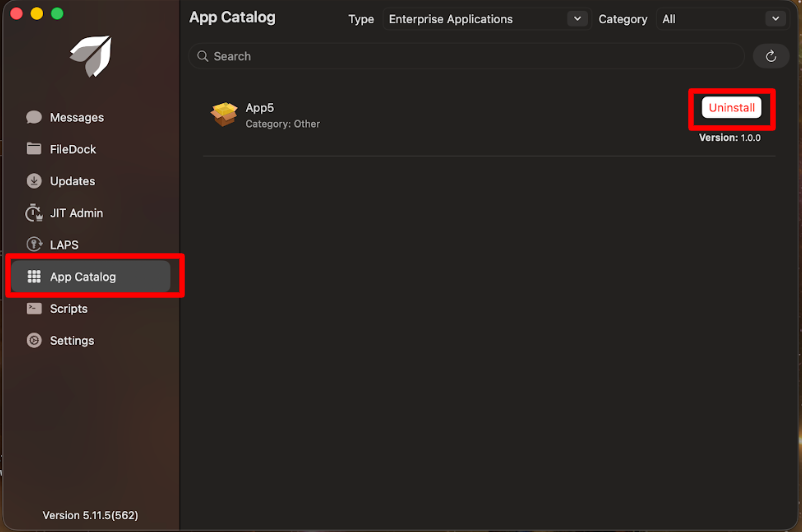
Provide Uninstall option in App Catalog: This setting controls whether users can uninstall the application directly from the App Catalog. The option is available only when Add to Catalog is enabled. When enabled, users will see an uninstall action for the application in the catalog.
Install Config: This setting allows you to apply a predefined installation configuration to the application. Available configurations include all install configurations created for the selected application.
Not Configured: No additional installation behavior or scripting is applied during installation.
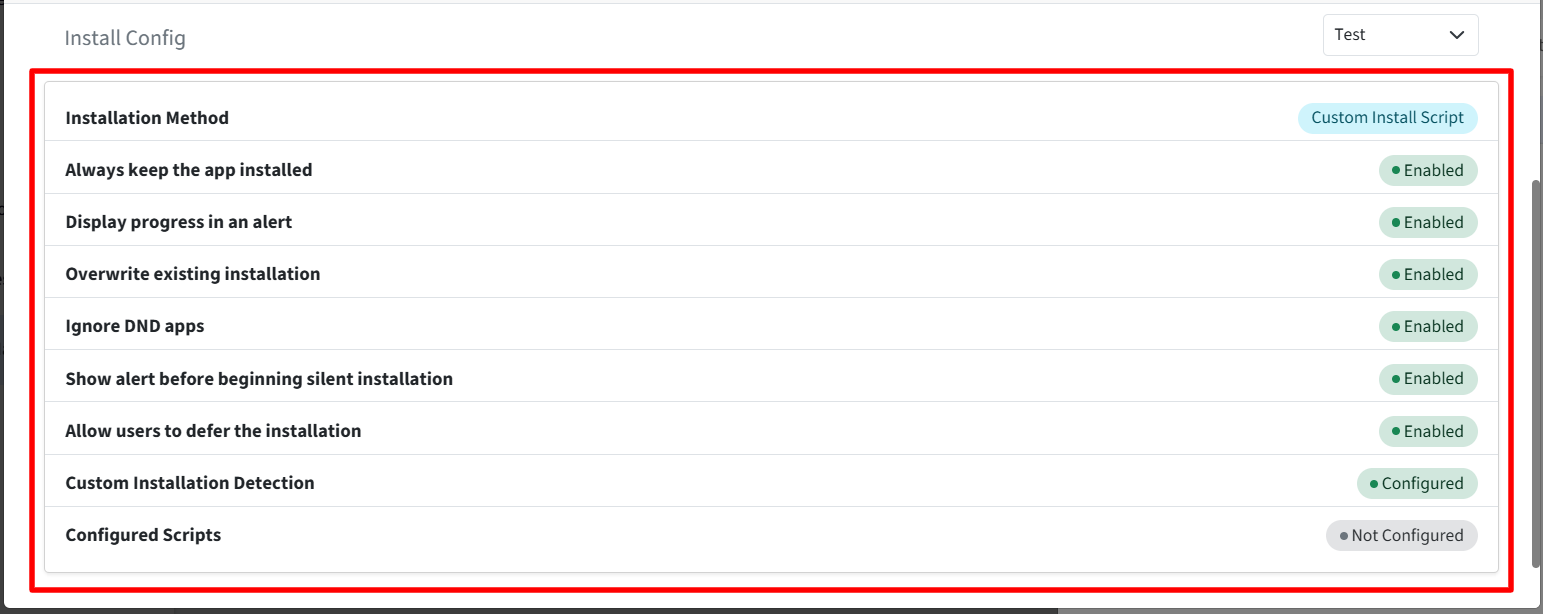
Configured Install Profiles: When an install configuration is selected, the following settings are displayed as a summary of the configuration:
Always keep the app installed: Indicates whether the agent continuously ensures the application remains installed on the device.
Display progress in an alert: Indicates whether installation progress notifications are shown to the user.
Overwrite Appstore Apps: Indicates whether App Store versions of the application can be replaced by this deployment.
Ignore DND Apps: Indicates whether the installation can proceed even when Do Not Disturb-related restrictions are present.
Allow users to defer installation: Indicates whether users can postpone the installation.
Show alert before beginning silent installation: Indicates whether users receive a notification before a silent installation begins.
Custom Installation Detection: Indicates whether the install configuration uses custom logic to detect application installation status.
Configured Scripts: Displays the scripts configured as part of the installation workflow. Examples include:
Pre-Install
Post-Install
Uninstall
Multiple configured scripts are displayed as a comma-separated list. Example:
Pre-Install, Post-Install
If all required settings are valid, the platform applies the updated configuration and sends the relevant settings updates to targeted devices.
View Installation Status
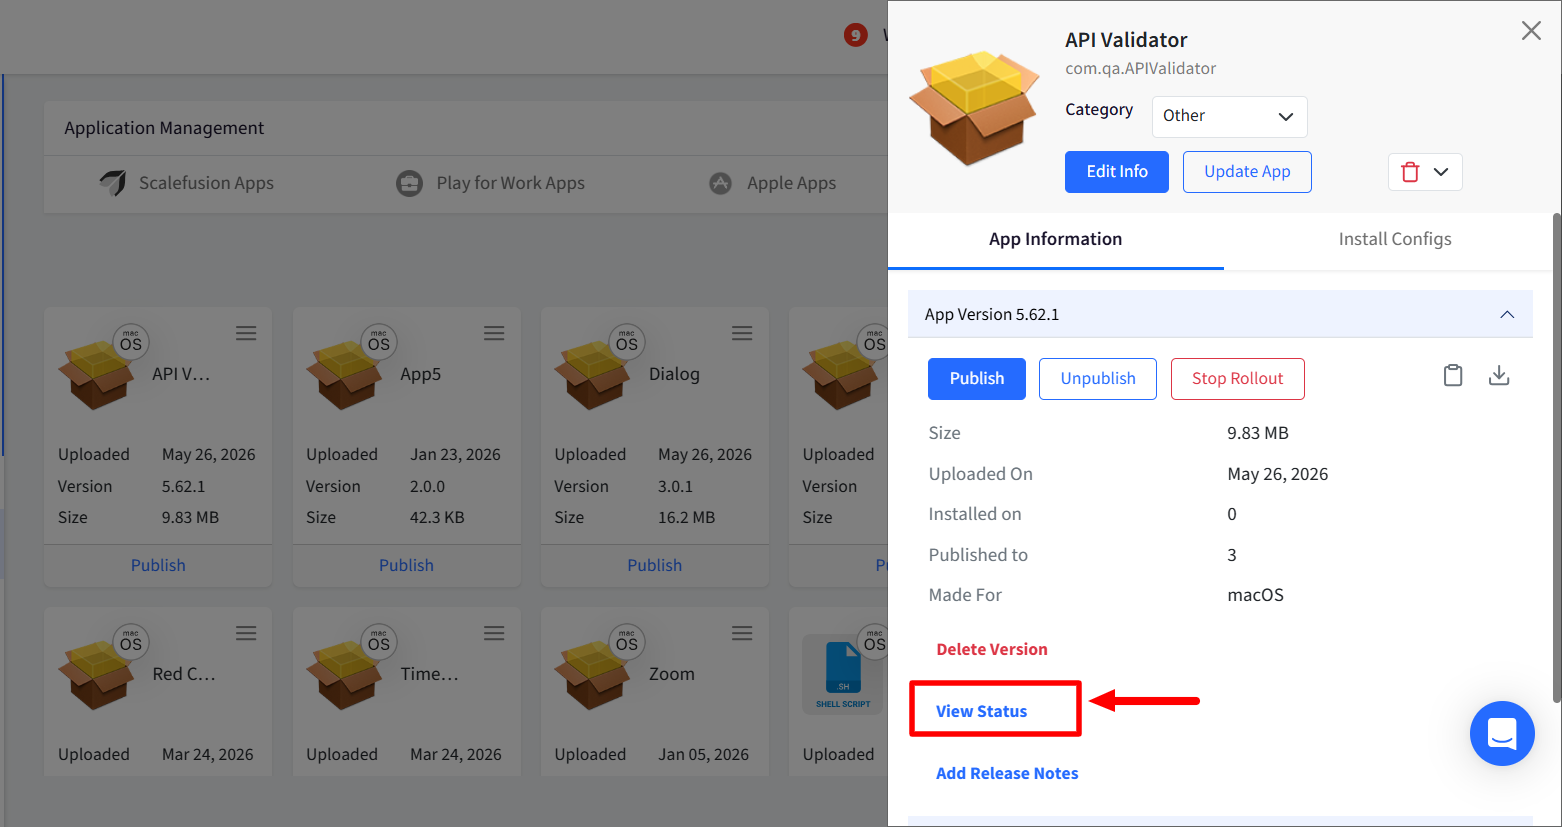
With View Status, you can view the installation status and other info for the selected application. To do so,
Click on View Status in the side bar
This will open the Installed App Info dialog
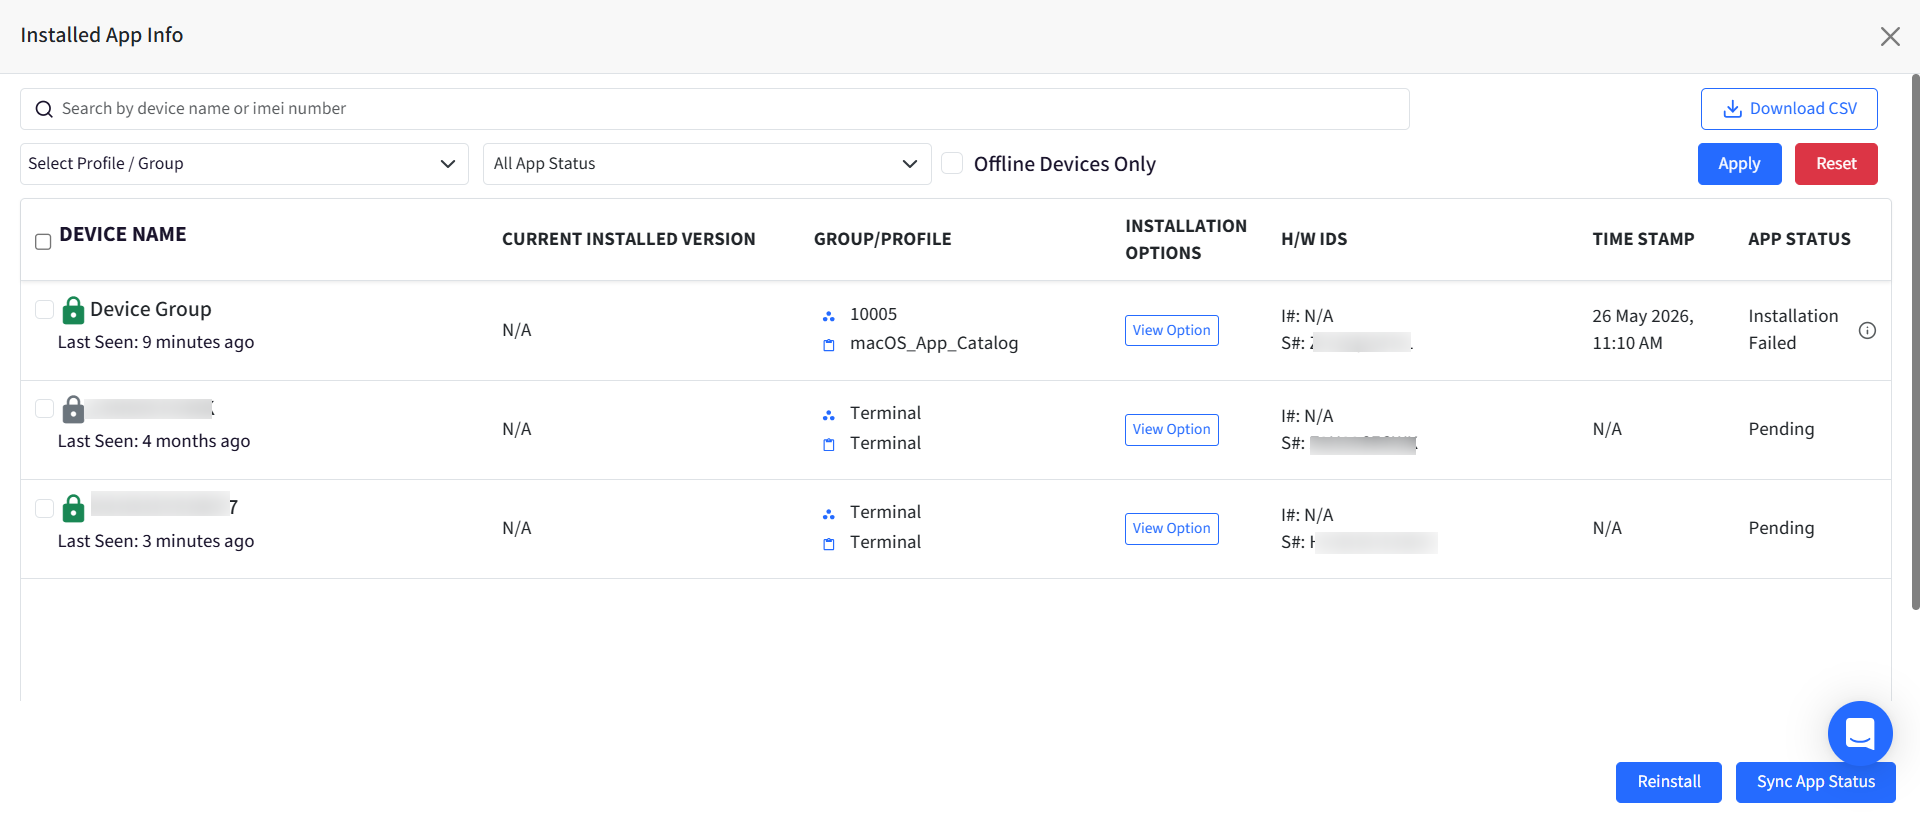
Here,
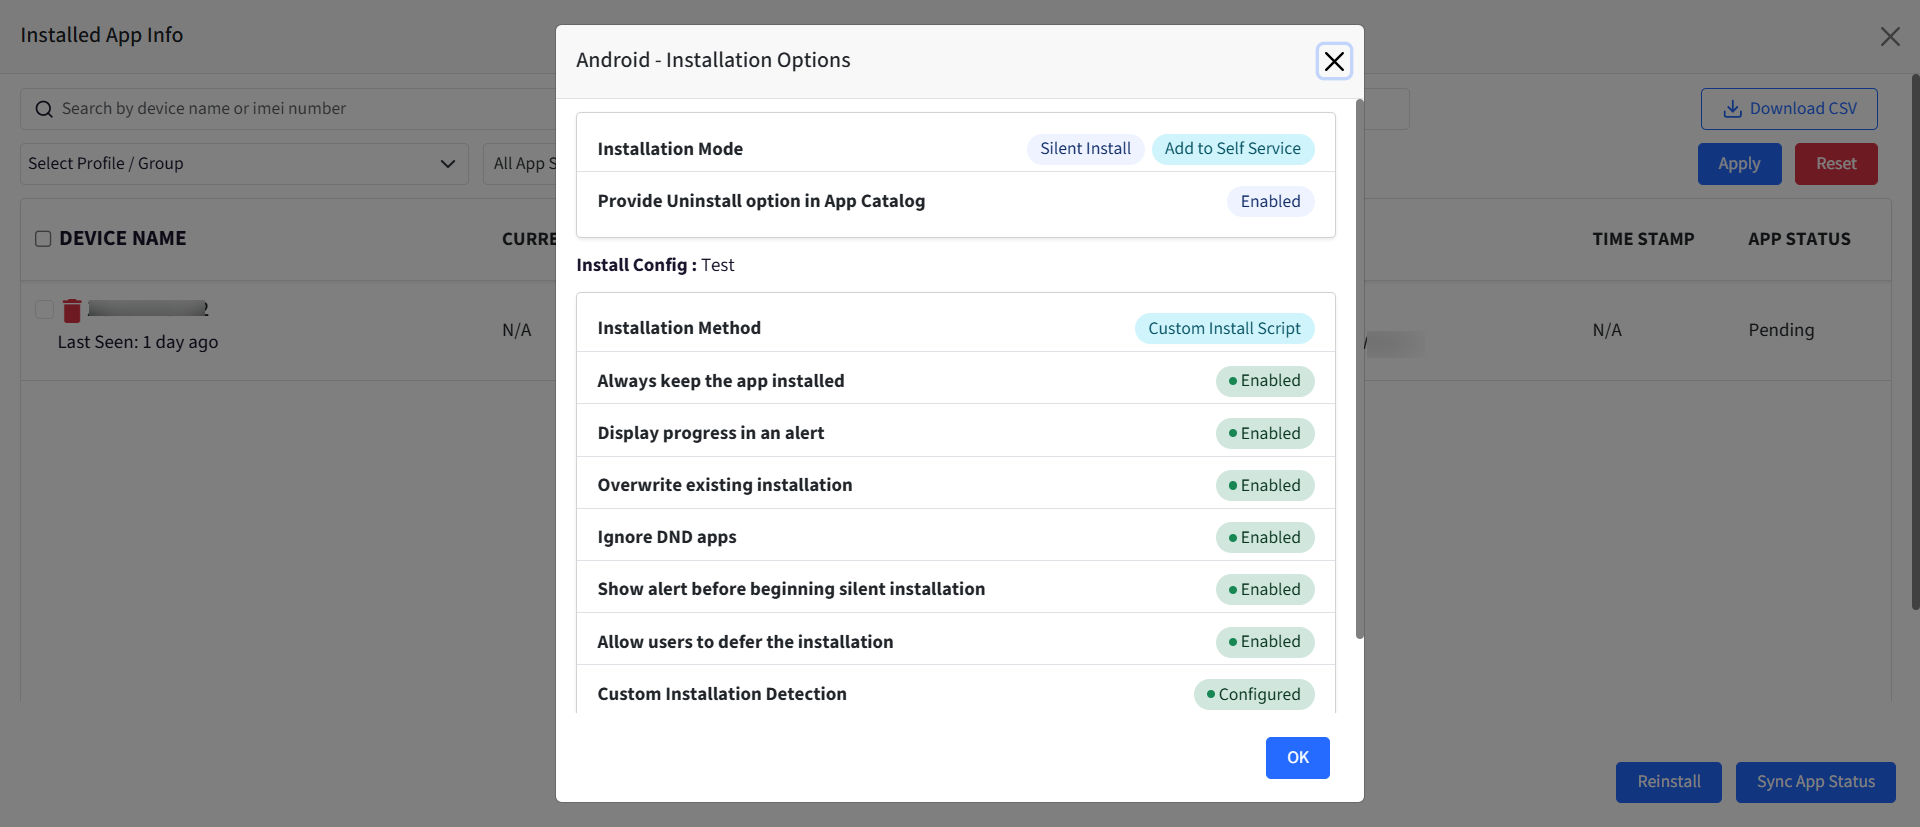
Installation Options: Clicking on View Options under this opens another window displaying the installation options associated with a Device Profile / Group / Device
App Status: This column shows the current installation status of the application. It can be Installation Failed, Pending, Installed, Uninstalled
Reinstall: The Reinstall action retries application installation on selected devices.
Sync App Status: The Sync App Status action refreshes the installation status of the application on selected devices.