Scalefusion offers an easy way to Search and Add applications from the iTunes Store, which you can Install, Uninstall or Update from the Dashboard to your iOS devices.
Video Guide:
Please watch the video below to get a visual walkthrough.
Search & Add iTunes Applications
- Log In to Scalefusion Dashboard.
- Navigate to Application Management > Apple App Store.

- Click on Add from the App Store.

- In the search field, enter the app name. The search will happen automatically, and you will be shown the list of matching applications.

- Click on the Application, and you can view the details of the application on the right-hand side panel. Click on ADD
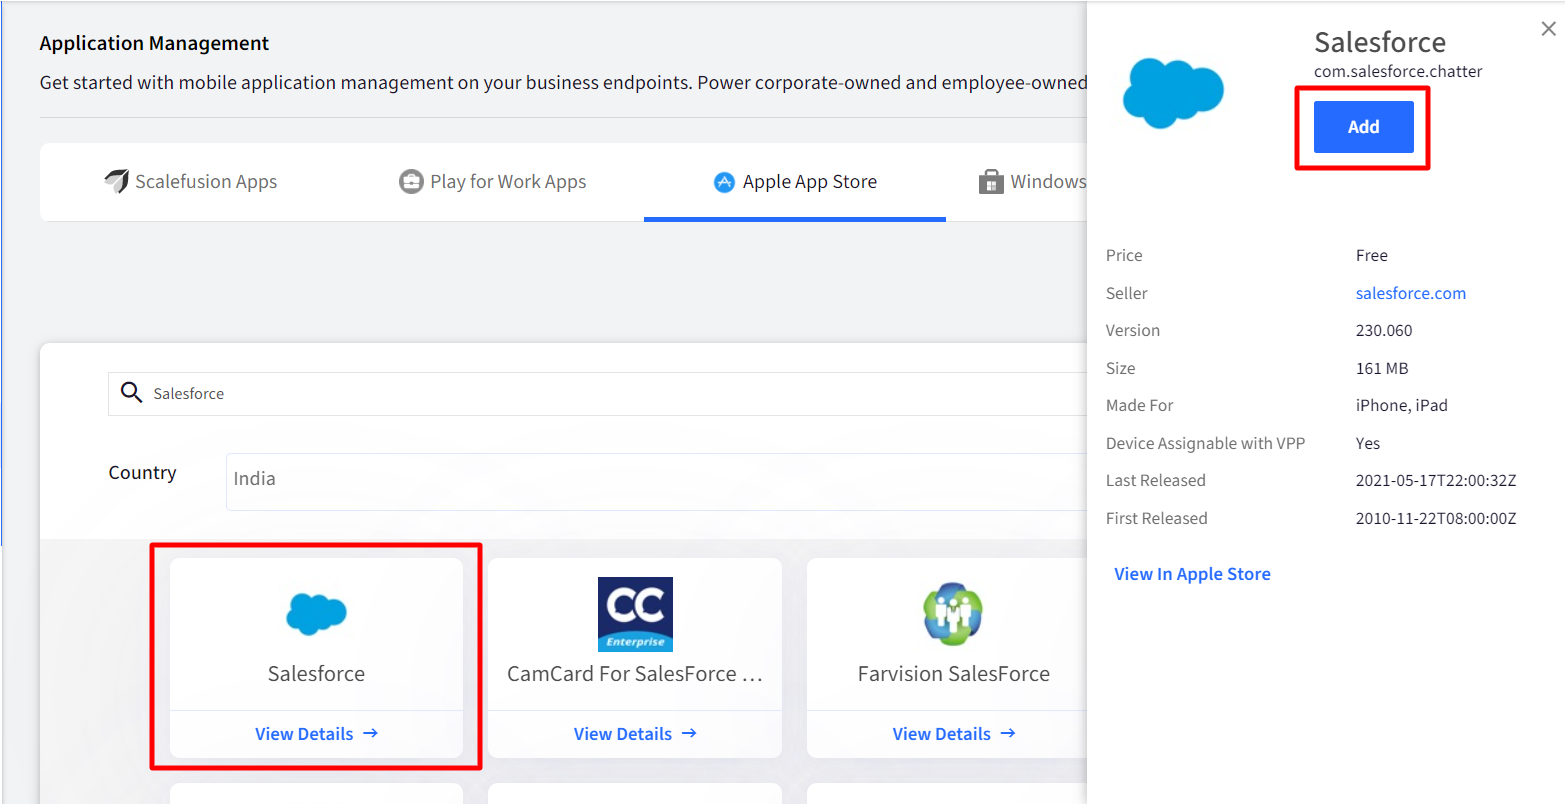
- Now this application will start appearing in your Dashboard under Application Management > Apple App Store.
Publishing the Application to Device profiles
On the Scalefusion Dashboard
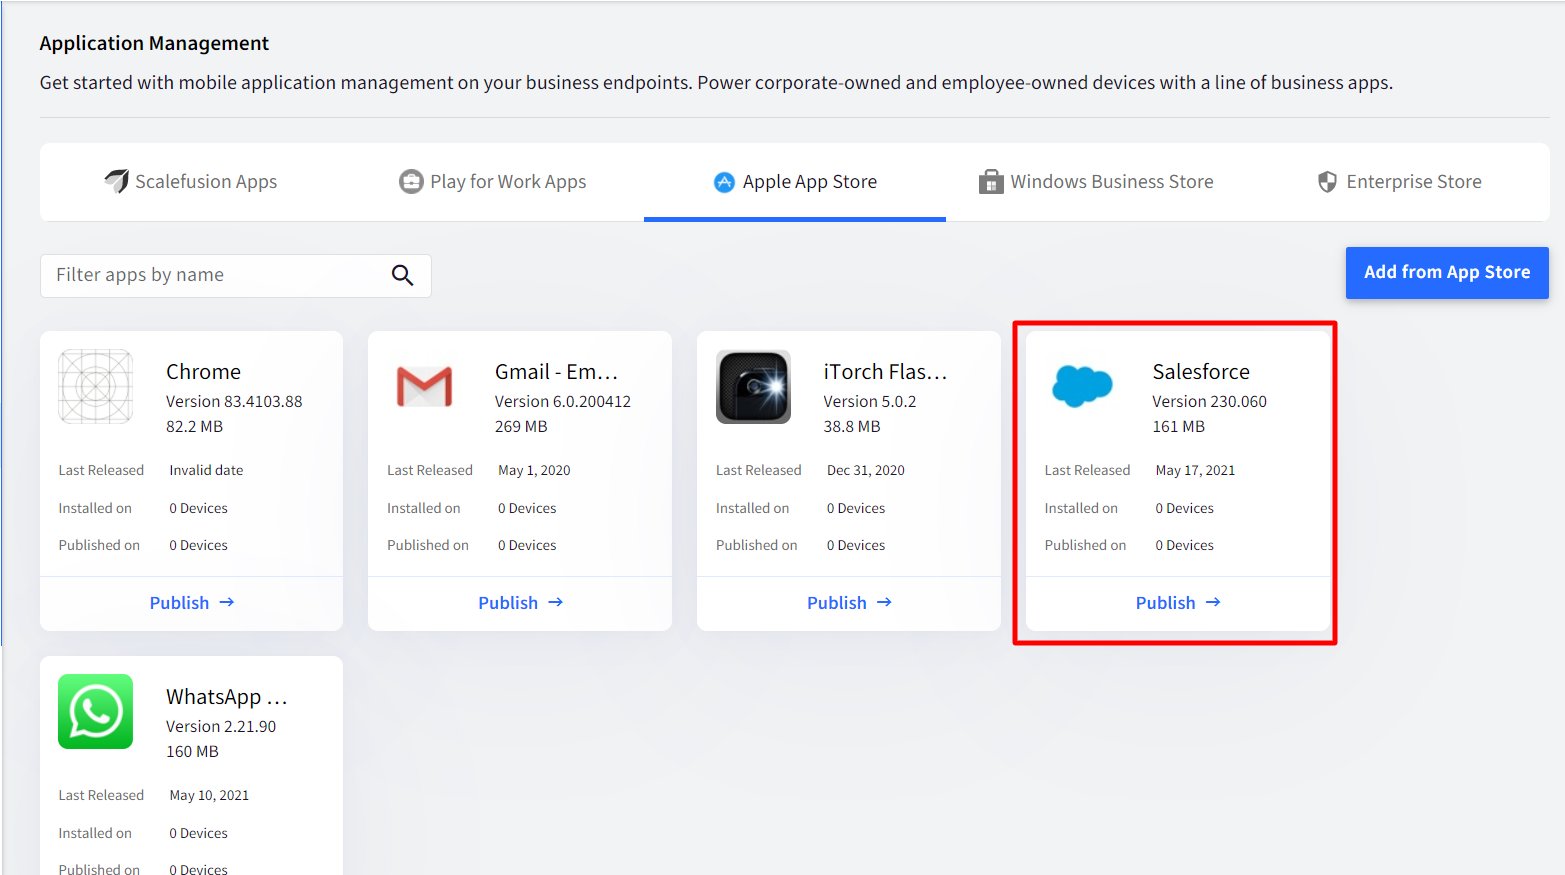
- Navigate to Application Management > Apple App Store. Click on the application that you have added. This will open up a panel from the right-hand side with the following information & options.
- View Options
- App Information.
- View the Status of Installations on devices.
- Action Commands
- PUBLISH
- UNINSTALL
- REFRESH
- DELETE | DELETE & UNINSTALL

- View Options
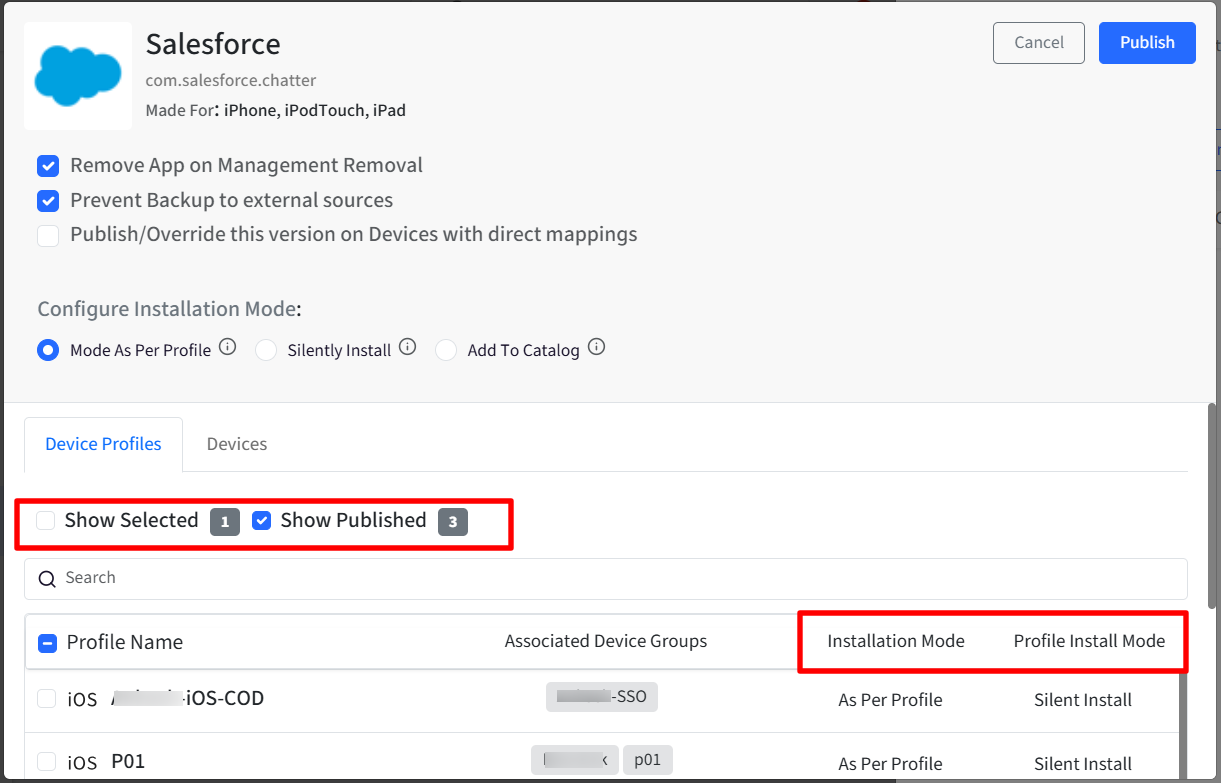
- Click on the PUBLISH button. This will open a dialog that will show you all the Device Profiles that you have created. Along with this, the following additional settings can be configured:
- Remove App on Management Removal: Users can control whether they want the published app to be removed from the device after device management removal.
- Prevent Backup to external sources: With this flag user can control whether the app's data has to be backed up when the device data is backed up to iCloud, using the iTunes ID on the device if available.
- Publish/Override this version on Devices with direct mappings: This flag will be visible when the setting Enable Applications to be published to Devices in a Group or profile is toggled on from Utilities > Global Settings > General Settings. If enabled, all direct mappings of this App from devices selected in Devices tab (older versions or newer versions), are removed and the currently mapped version is being pushed to the devices.
- Configure Installation mode: To override the installation mode selected at the profile level (Restrictions > App Management Settings), the admin can configure how an app has to be published at the per-app level. Following are the three options to choose from:
- Mode as per Profile: The application would be silently installed or added to the app catalog as per profile settings
- Silently Install: This would attempt a silent installation of the application on the device. Silent installation works for Supervised devices.
- Add to Catalog: Add this app to the catalog for user-initiated installation. If the App catalog is not enabled at the profile level, then the app will be silently installed.
- Select the Device Profile(s) where you want to install this application and click PUBLISH on the dialog. Here,
- Installation Mode: Displays the installation mode selected at the time of publishing the app, such as Silently Install or Add to Catalog. This allows you to associate different device profiles with different installation modes. The selected configurations will be reflected under Show Published.
- Profile Install Mode: Indicates the installation mode configured within the iOS Device Profile > App Management Settings.
- Show Selected: Enabling this displays only the device profiles that were selected during the app publishing process.
- Show Published: When you enable Show Published, the list displays all profiles, including those where the app has already been published.
If the app is already published to a profile and you need to change the installation mode, go to Show Published, select the profile where the app is published, choose the new installation mode, and republish the app.
 You can click the View Status link to see how many devices it is installed.
Irrespective of what version you have searched and added when the application is installed on the device, it will always be the version of the application available on iTunes at that point in time. iOS does not offer a way to enforce a particular version to be installed from iTunes.
To publish VPP applications, please read our VPP guides on How to Setup VPP & How to Install VPP Applications.
On the iOS Device
- On the iOS device, you would be shown a dialog to set up an iTunes account if it is not already set up.
- On an Unsupervised device, users would see a dialog asking them to confirm the installation.
- On a Supervised device, the installations should ideally be silent. However, if in the iTunes Account settings, you had enabled Require Password for Free Downloads, then a password will be asked every time an application is pushed. Please read How to Install Apps Silently on how to do this.
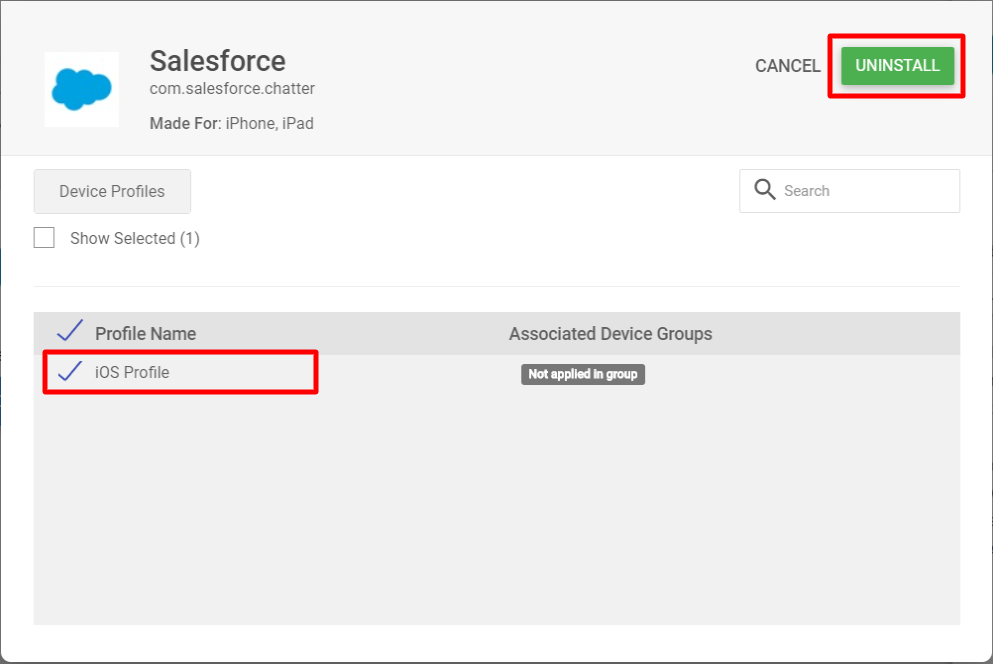
Uninstalling an Application
- Log in to Scalefusion Dashboard.
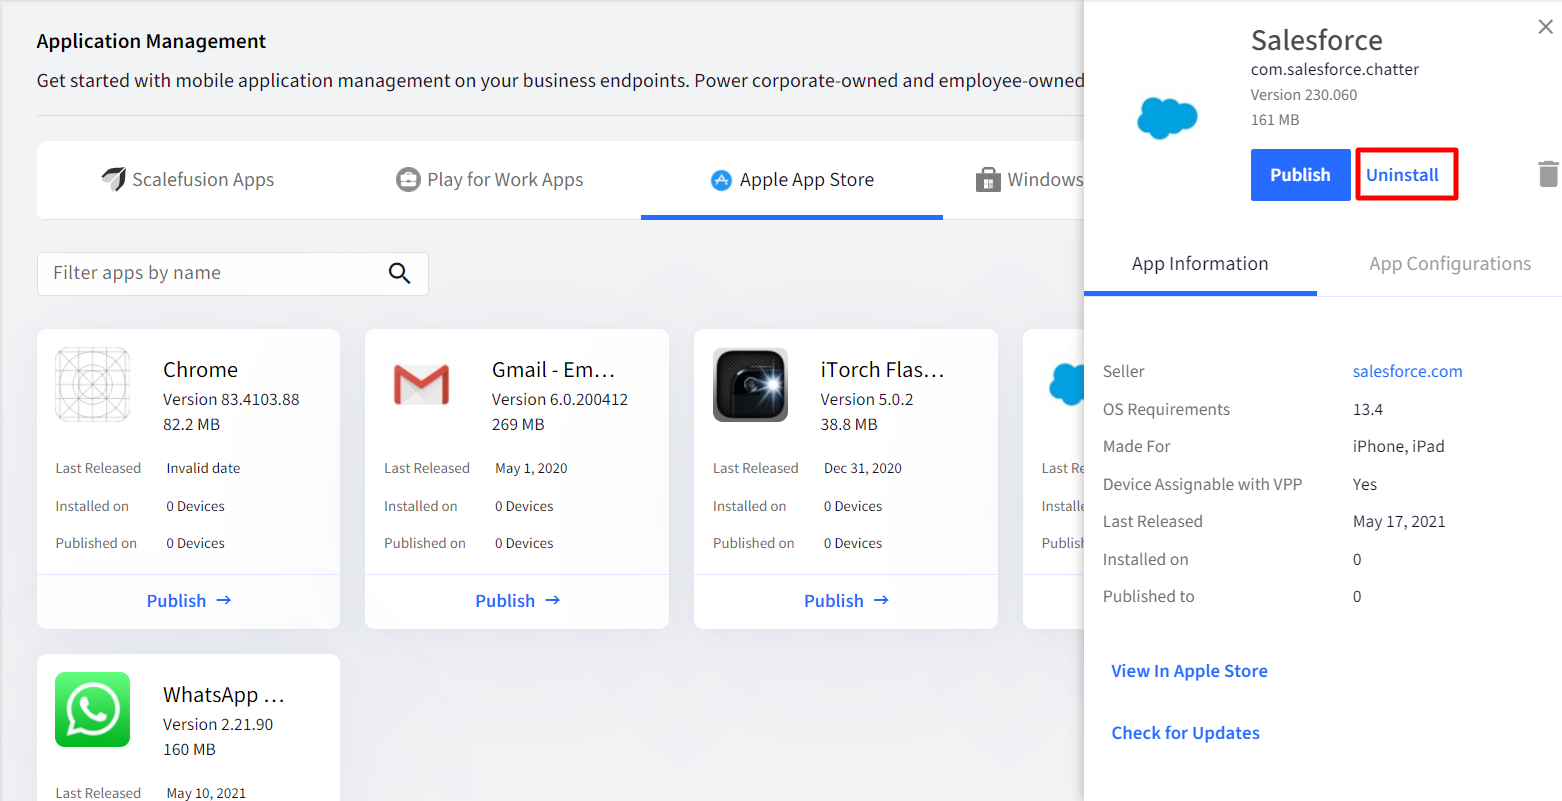
- Navigate to Application Management > Apple App Store. Click on the application that you have added.
- On the right-hand side panel, click on UNINSTALL. This will open a dialog that shows only the Device Profiles where you have installed this.
- Select the Device Profiles where you want to Uninstall this application and click on UNINSTALL.
Updating an Application from Dashboard
There are two ways an application can be updated from Dashboard:
Check for Updates
- Log in to Scalefusion Dashboard.
- Navigate to Application Management > Apple App Store. Click on the application that you have added.
- In the right side panel, click on the Check for Updates link at the bottom.
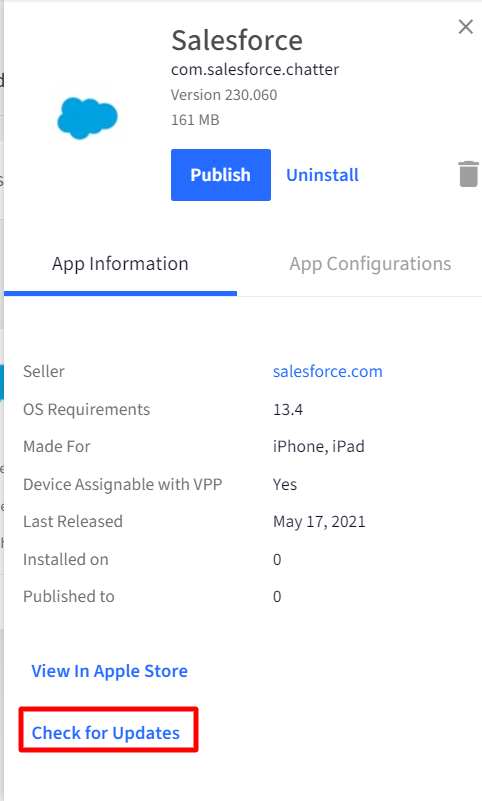
- Click on this link to check if there is an update available. If there is an Update available, then an alert will be displayed to you with two options
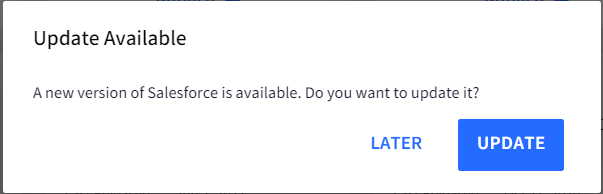
- UPDATE: This will update the application information on the dashboard. In addition, a dialog box will come up where you can select the Device Profiles on which you want to push the updated version of the app. Select/deselect the device profiles and click on the Publish button. Once done, the updated app will be installed on those selected device profiles.Any new device that enrolls to a profile/group where the new version is not published, will still get the most updated version. This is because Apple does not allow us to push a version of the app. Whenever we push an app, it only installs the latest version.
- LATER: Click on this to push the update later.
- UPDATE: This will update the application information on the dashboard. In addition, a dialog box will come up where you can select the Device Profiles on which you want to push the updated version of the app. Select/deselect the device profiles and click on the Publish button. Once done, the updated app will be installed on those selected device profiles.
Schedule App Updates
If you want an app update to be pushed on the device at a later date, you can also schedule it from the dashboard. To do so,
- Navigate to Application Management > Apple App Store. Click on the application for which you want to schedule updates.
- In the right side panel, click on the Schedule Updates tab and click on Create.
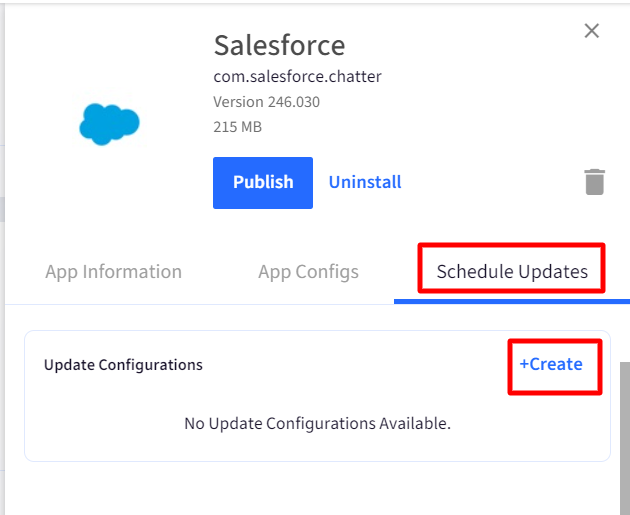
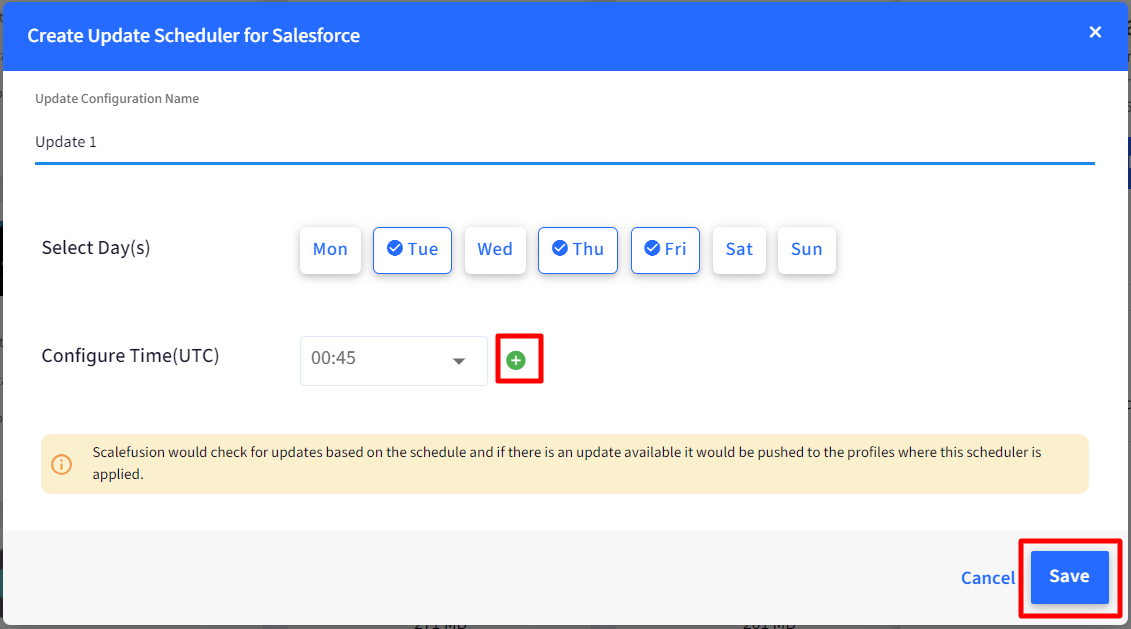
- This will open the Create Update Scheduler dialog. Enter the following:
- Update Configuration Name: Enter a name for the update scheduler
- Select Day(s): Select the day on which the app update should be pushed
- Configure Time: Select the time at which the update should be applied on the device. The time will be in UTC. You can add multiple times by clicking on the + icon.
- After entering all the above, click Save
- The configuration will appear under Schedule Updates tab.
- Now, publish this configuration by clicking on three dots next to configuration and selecting Publish
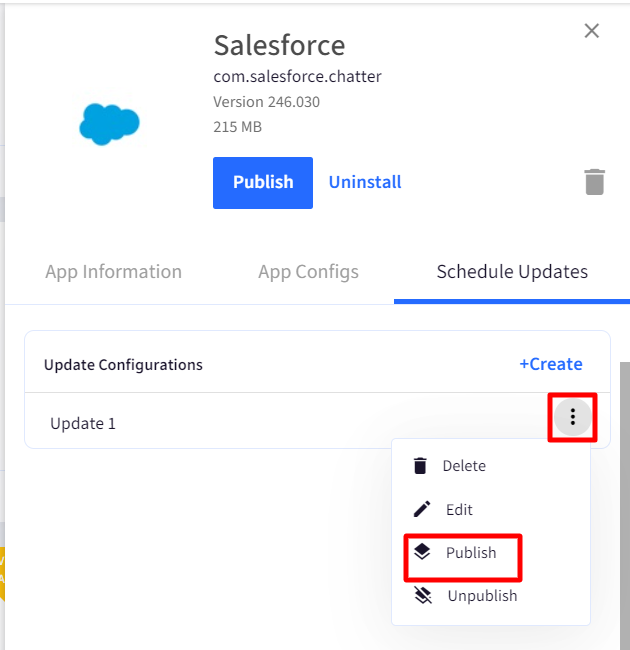
- In the publish dialog box select the device profiles on which you want to apply the updates and click on Publish.
- Based on the schedule, Scalefusion would check for updates and if there is an update available it would be pushed to the profiles on which this scheduler is applied.You can also check the status in the Account Activity Report whether the updates on the app were applied as per schedule.
Deleting an Application from the Dashboard
- Log in to Scalefusion Dashboard.
- Navigate to Application Management > Apple App Store. Click on the application that you have added.
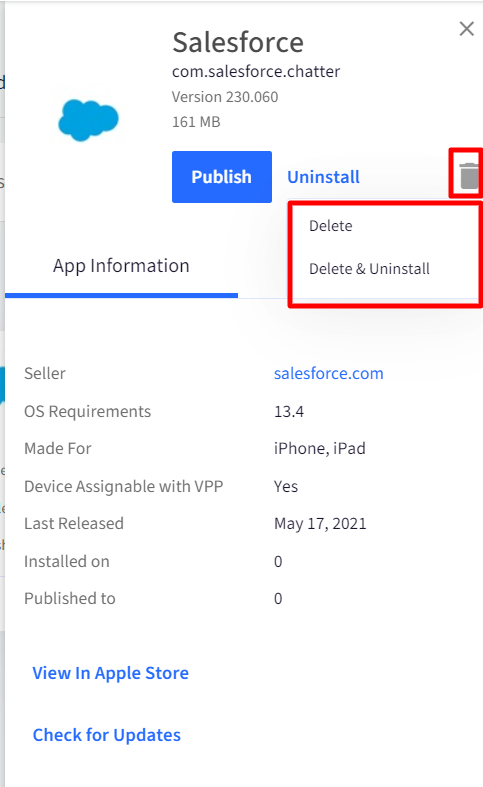
- On the right-hand side panel that opens up, you will see a Bin icon. Clicking on the Bin icon will show you 2 options,
- Delete - Choose this to only delete this application from your Dashboard. It will still be installed and managed on the device.
- Delete & Uninstall - Choose this to delete this application from your Dashboard and Uninstall from all the devices where it is installed.
Head over to our Application Configuration guide to learn how to configure iOS applications from Dashboard.