To start using the On-Premise Connector, the first step is to configure it. Configuring it requires the flow to be started from the Scalefusion Dashboard and continued on-premise with required information exchanged between the two, that is, the Scalefusion Dashboard and the On-Premise Connector instance.
Prerequisites
Scalefusion Account with Enterprise License (Legacy, Modern or Trial)
The administrator should have owner or co-account owner privileges to complete the setup.
Any other administrator (Group Admin, Device Admin or in a custom role) who has write access can also do the setup.
Overview of Setup
In a nutshell, the following is the process for OPC Setup:
Download the .msi file from Scalefusion Dashboard and install it to create an OPC Instance
Login to the OPC Instance and choose an appropriate Network Configuration scheme
Configure On-Premise Connector Details on Scalefusion Dashboard
Check Connection to validate the connection between Scalefusion Dashboard and OPC Instance
Set-Up On-Premise Connector Certificates. To do so:
Generate CSR from the OPC Instance
Upload .csr file on Scalefusion Dashboard to generate a signed identity certificate
Download the signed identity certificate from the Scalefusion Dashboard
Upload the signed identity certificate to the OPC Instance
Download the trust certificate from Scalefusion Dashboard
Upload the trust certificate to the OPC Instance
Directory (LDAP) Configuration on OPC Instance
Complete Setup on Scalefusion Dashboard
The steps are explained in detail below.
Setting up On-Premise Connector (OPC) on Scalefusion Dashboard
Step 1: Download and Install On-Premise Connector .msi file
Download
On the Scalefusion Dashboard, navigate to Integrations > On-Premise Connector
Click Configure
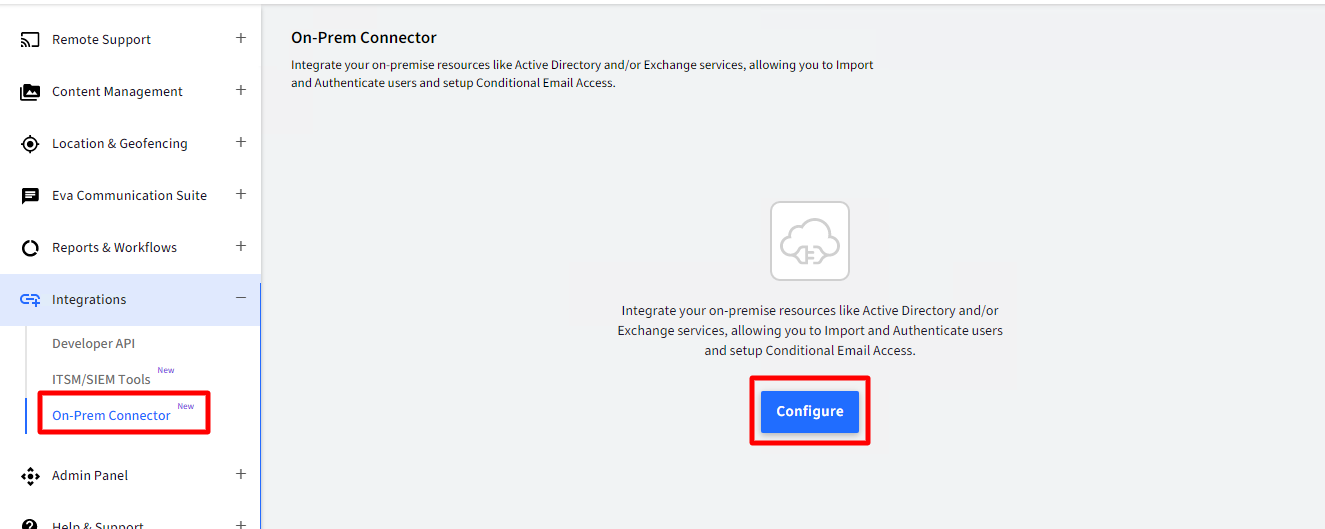
The On-Premise Connector configuration page opens. Click on the Download button to download the On-Premise Connector file
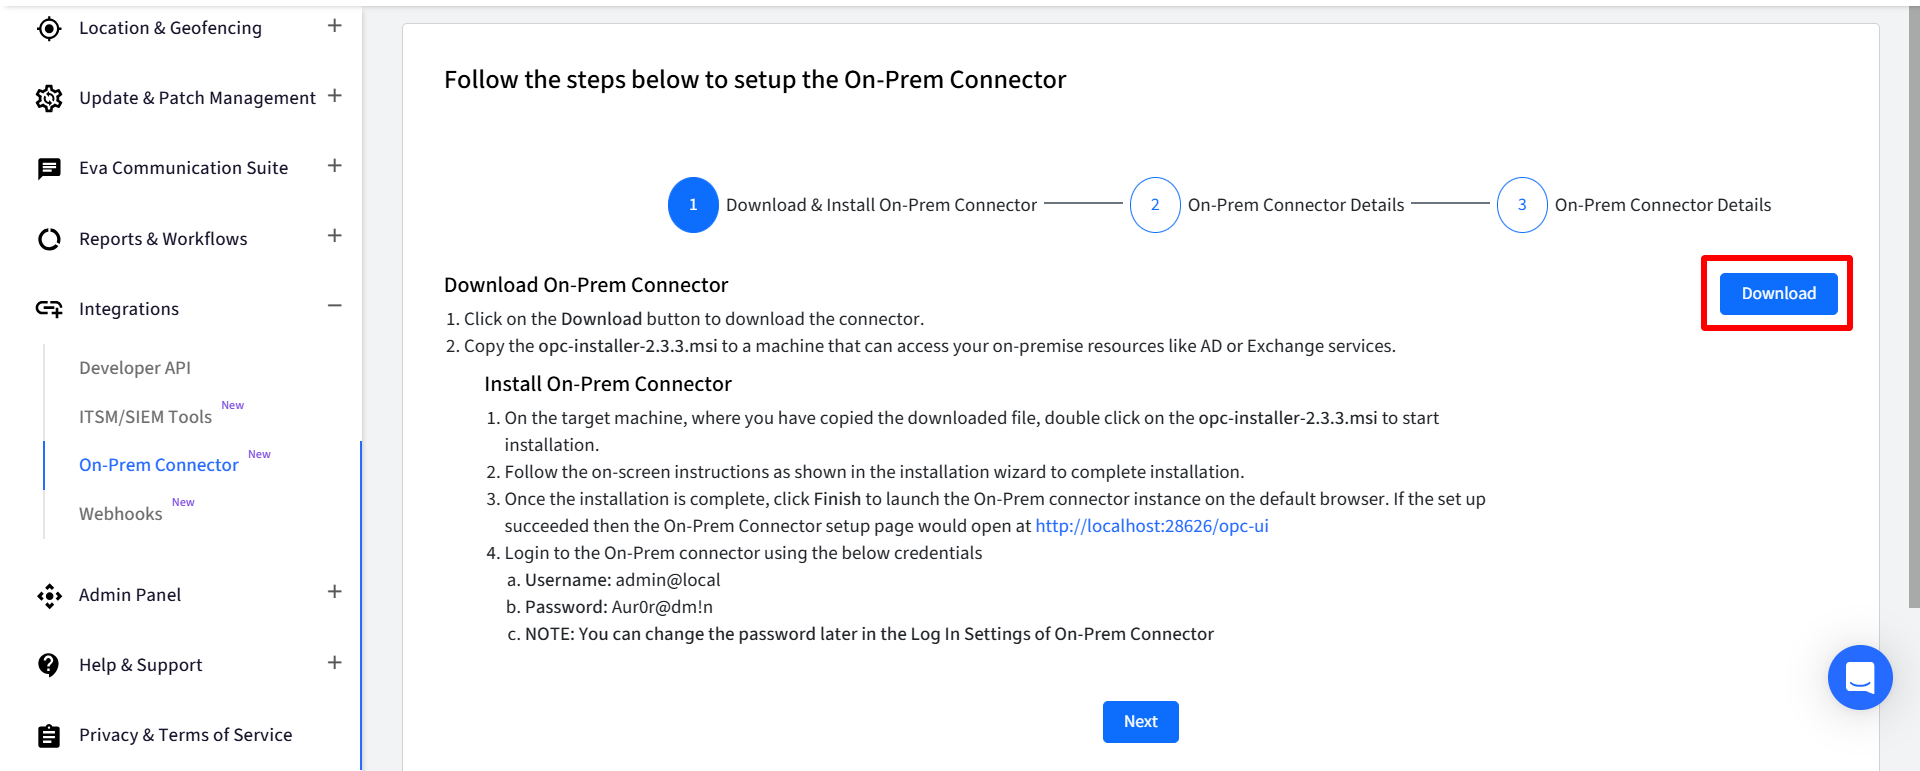
Once the download is complete, copy the opc-installer-<version>.msi file to a server within your premises that can access your on-premise resources like Microsoft Active Directory, Microsoft Exchange, etc.
Install On-Premise Connector file
On the target machine where you have copied the downloaded file, double-click on the opc-installer-<version>.msi file to begin installation.
Follow the on-screen instructions as shown in the installation wizard to complete the installation.

Once the installation is complete, click Finish to launch the On-Premise Connector Instance's Admin UI on the default browser. If the setup is successful, then the On-Premise Connector Instance's Admin UI will open with the URL http://localhost:28626/opc-ui
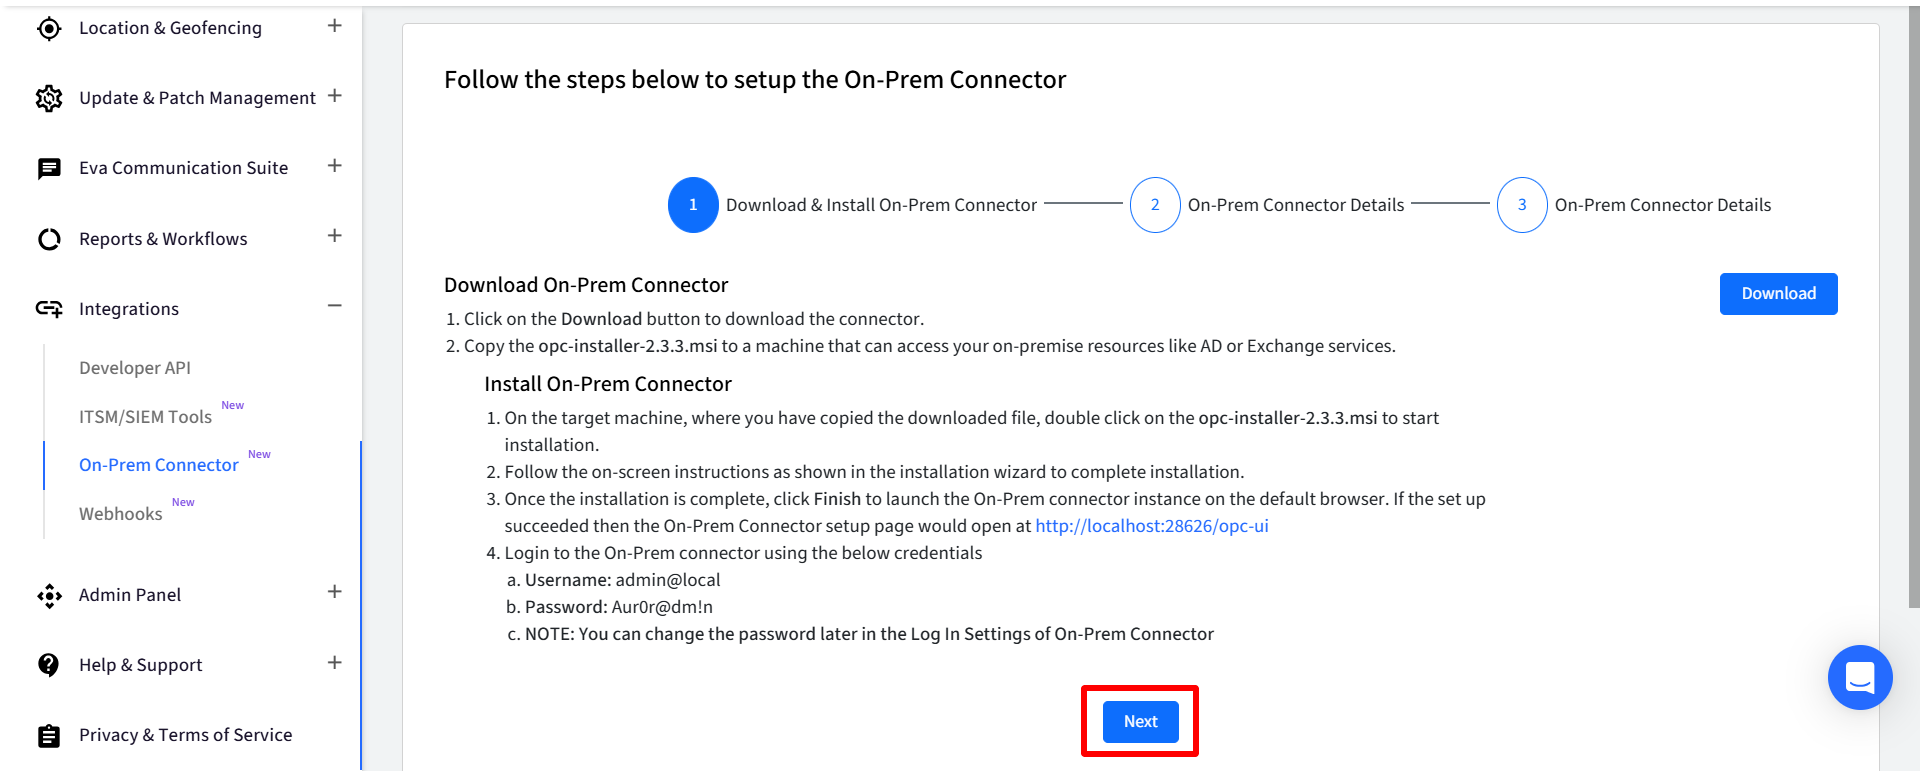
On the Scalefusion Dashboard, click Next
Step 2: Configure the On-Premise Connector Instance
The On-Premise Connector Instance can be configured once you have made the necessary network configurations to allow reachability of the On-Premise Connector Instance from Scalefusion Dashboard either via the Reverse Proxy scheme or directly. You may refer to this document for further details. Kindly ensure such network configuration is in place before proceeding ahead.
On the host machine where the OPC Instance is created, follow these steps:
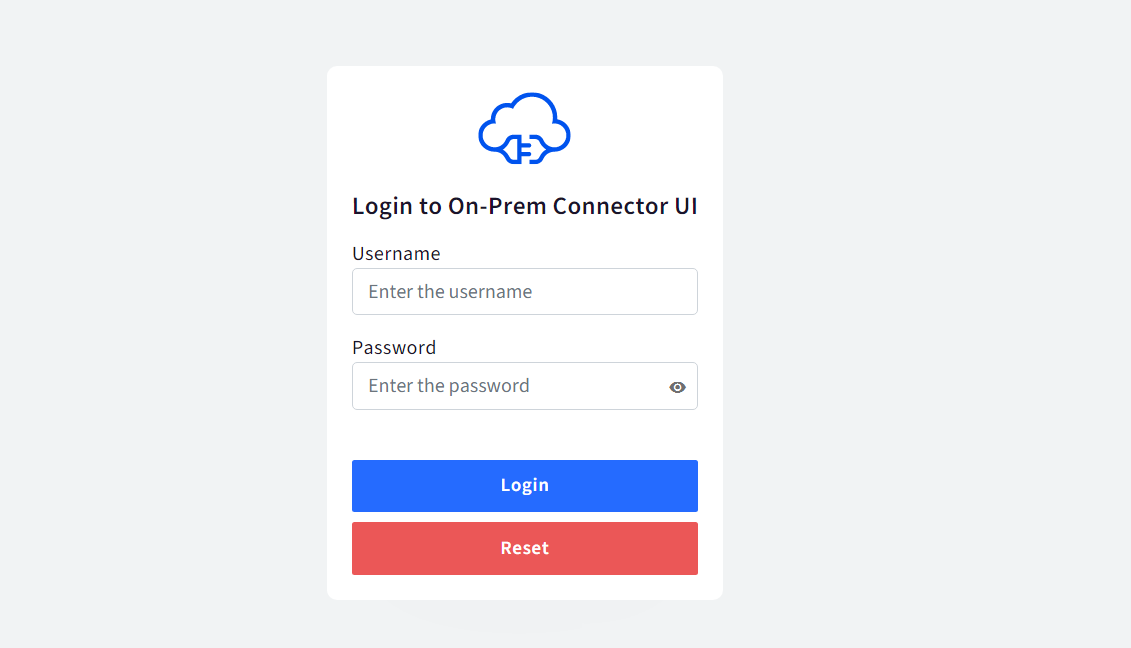
Login to the OPC instance using the credentials
Username:
If you are using On-Prem Connector version 2.3.10 or less,
admin@local
If you are using On-Prem Connector version 2.3.11 or higher,
sf-admin@local
Password: Aur0r@dm!n
NOTE: You can change the password later in the Log-In Settings of the On-Premise Connector.png)
Under Network Configuration, Choose one connection method from the following:
Web-Server or Reverse proxy (e.g.: IIS): Selected by default
Static Public IP
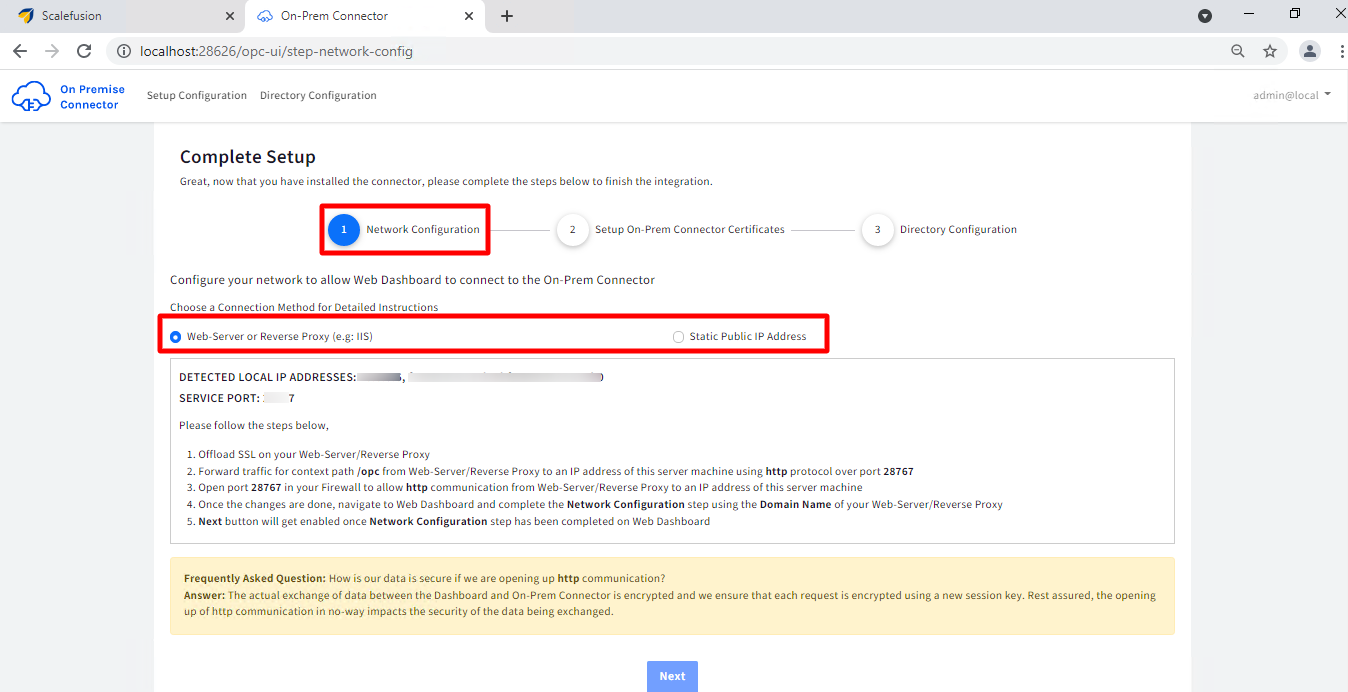
The next button will get enabled once you configure On-Premise Connector Details on the Scalefusion Dashboard
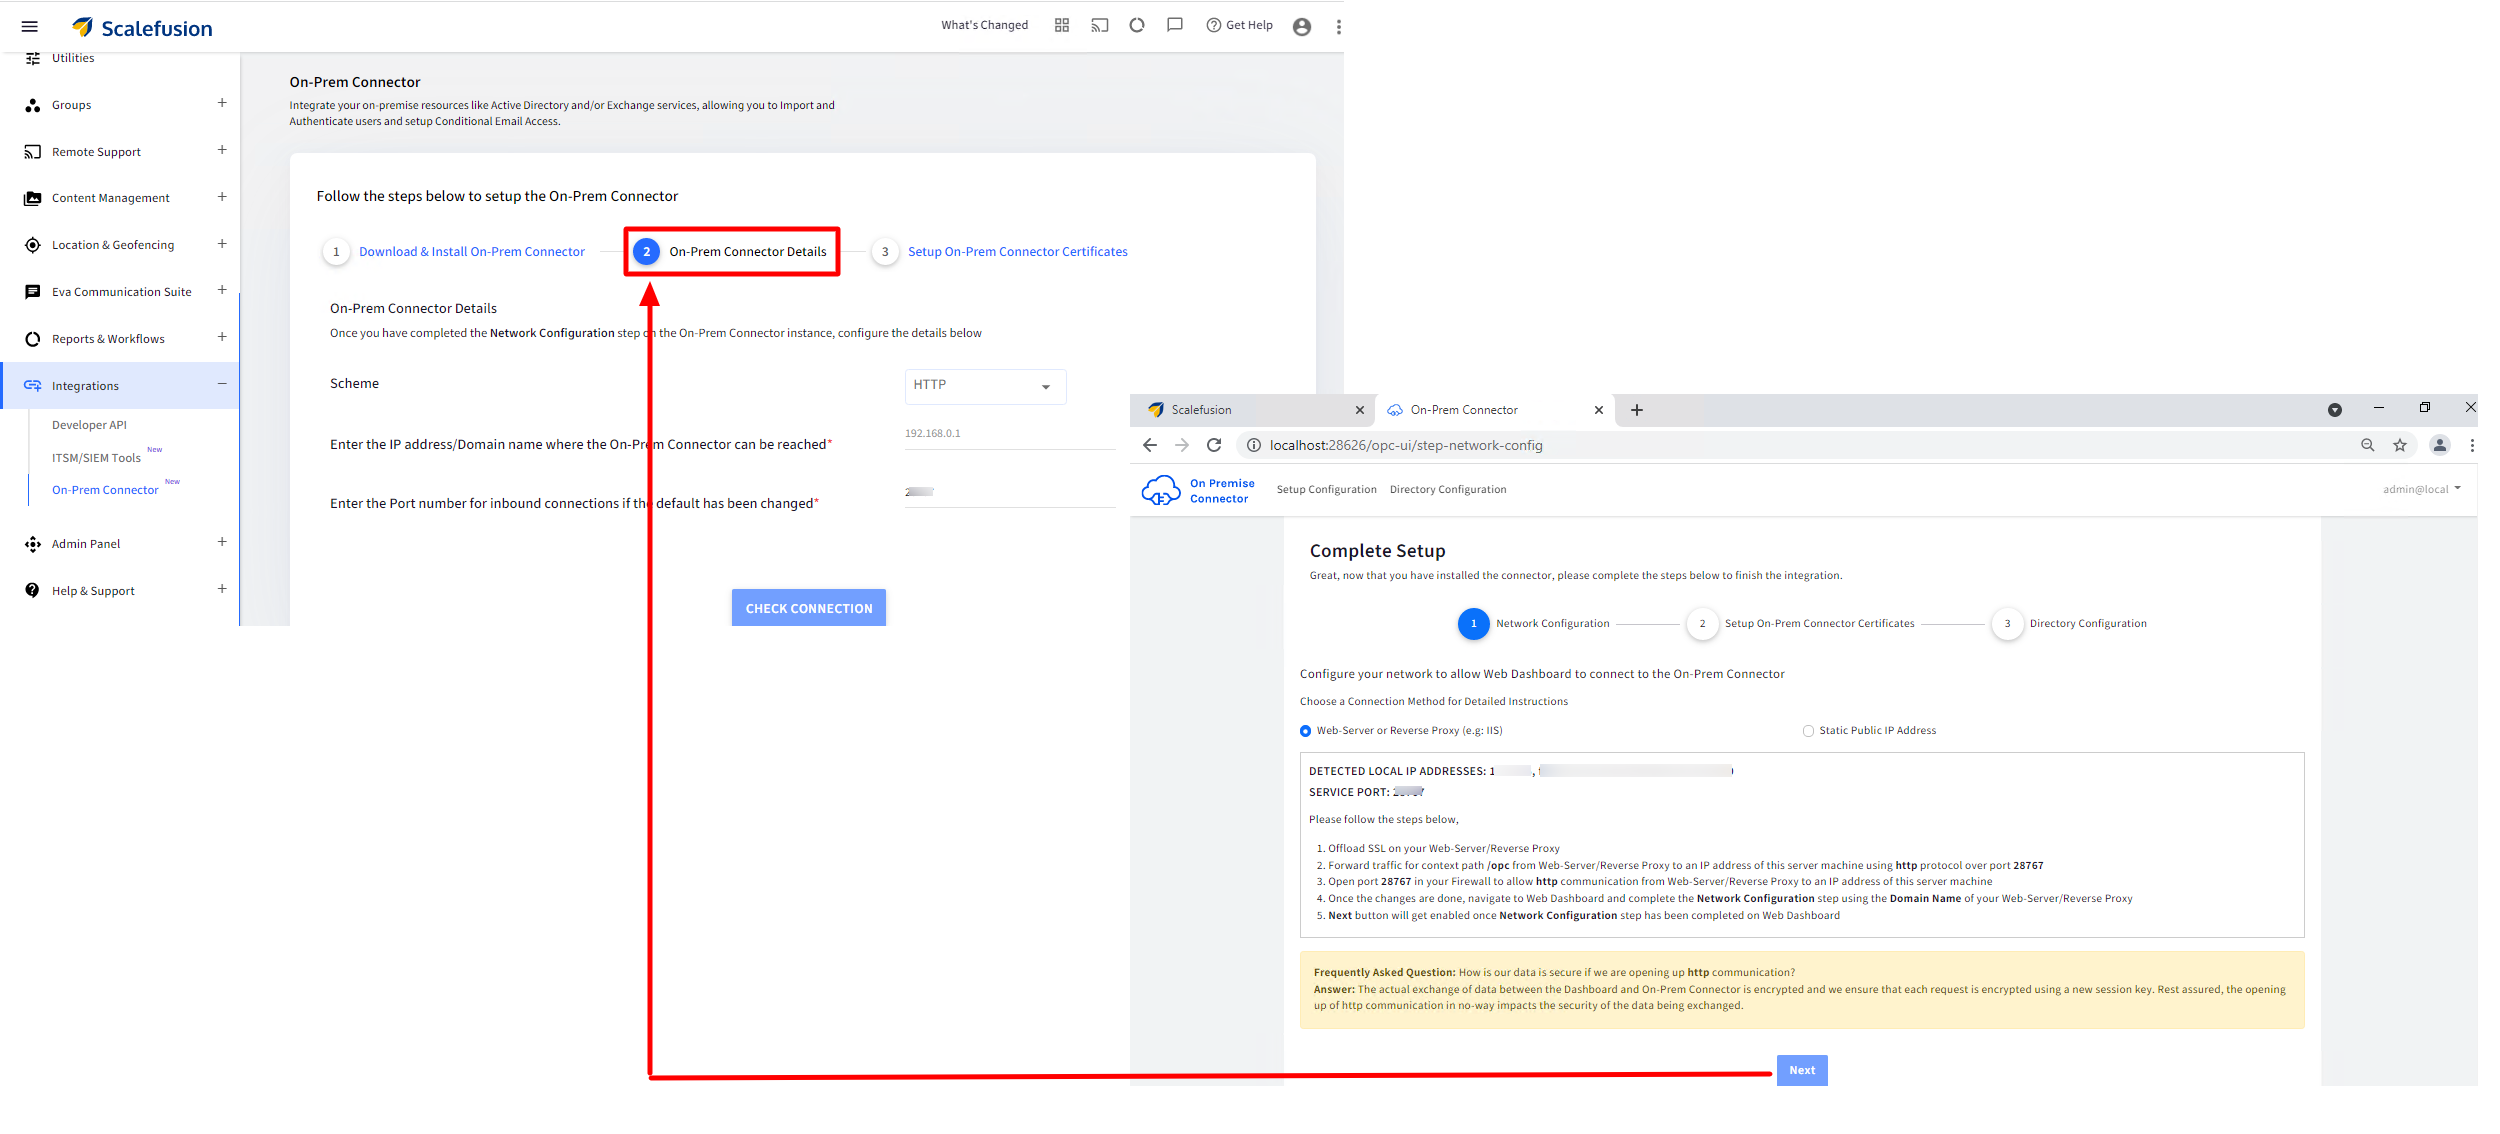
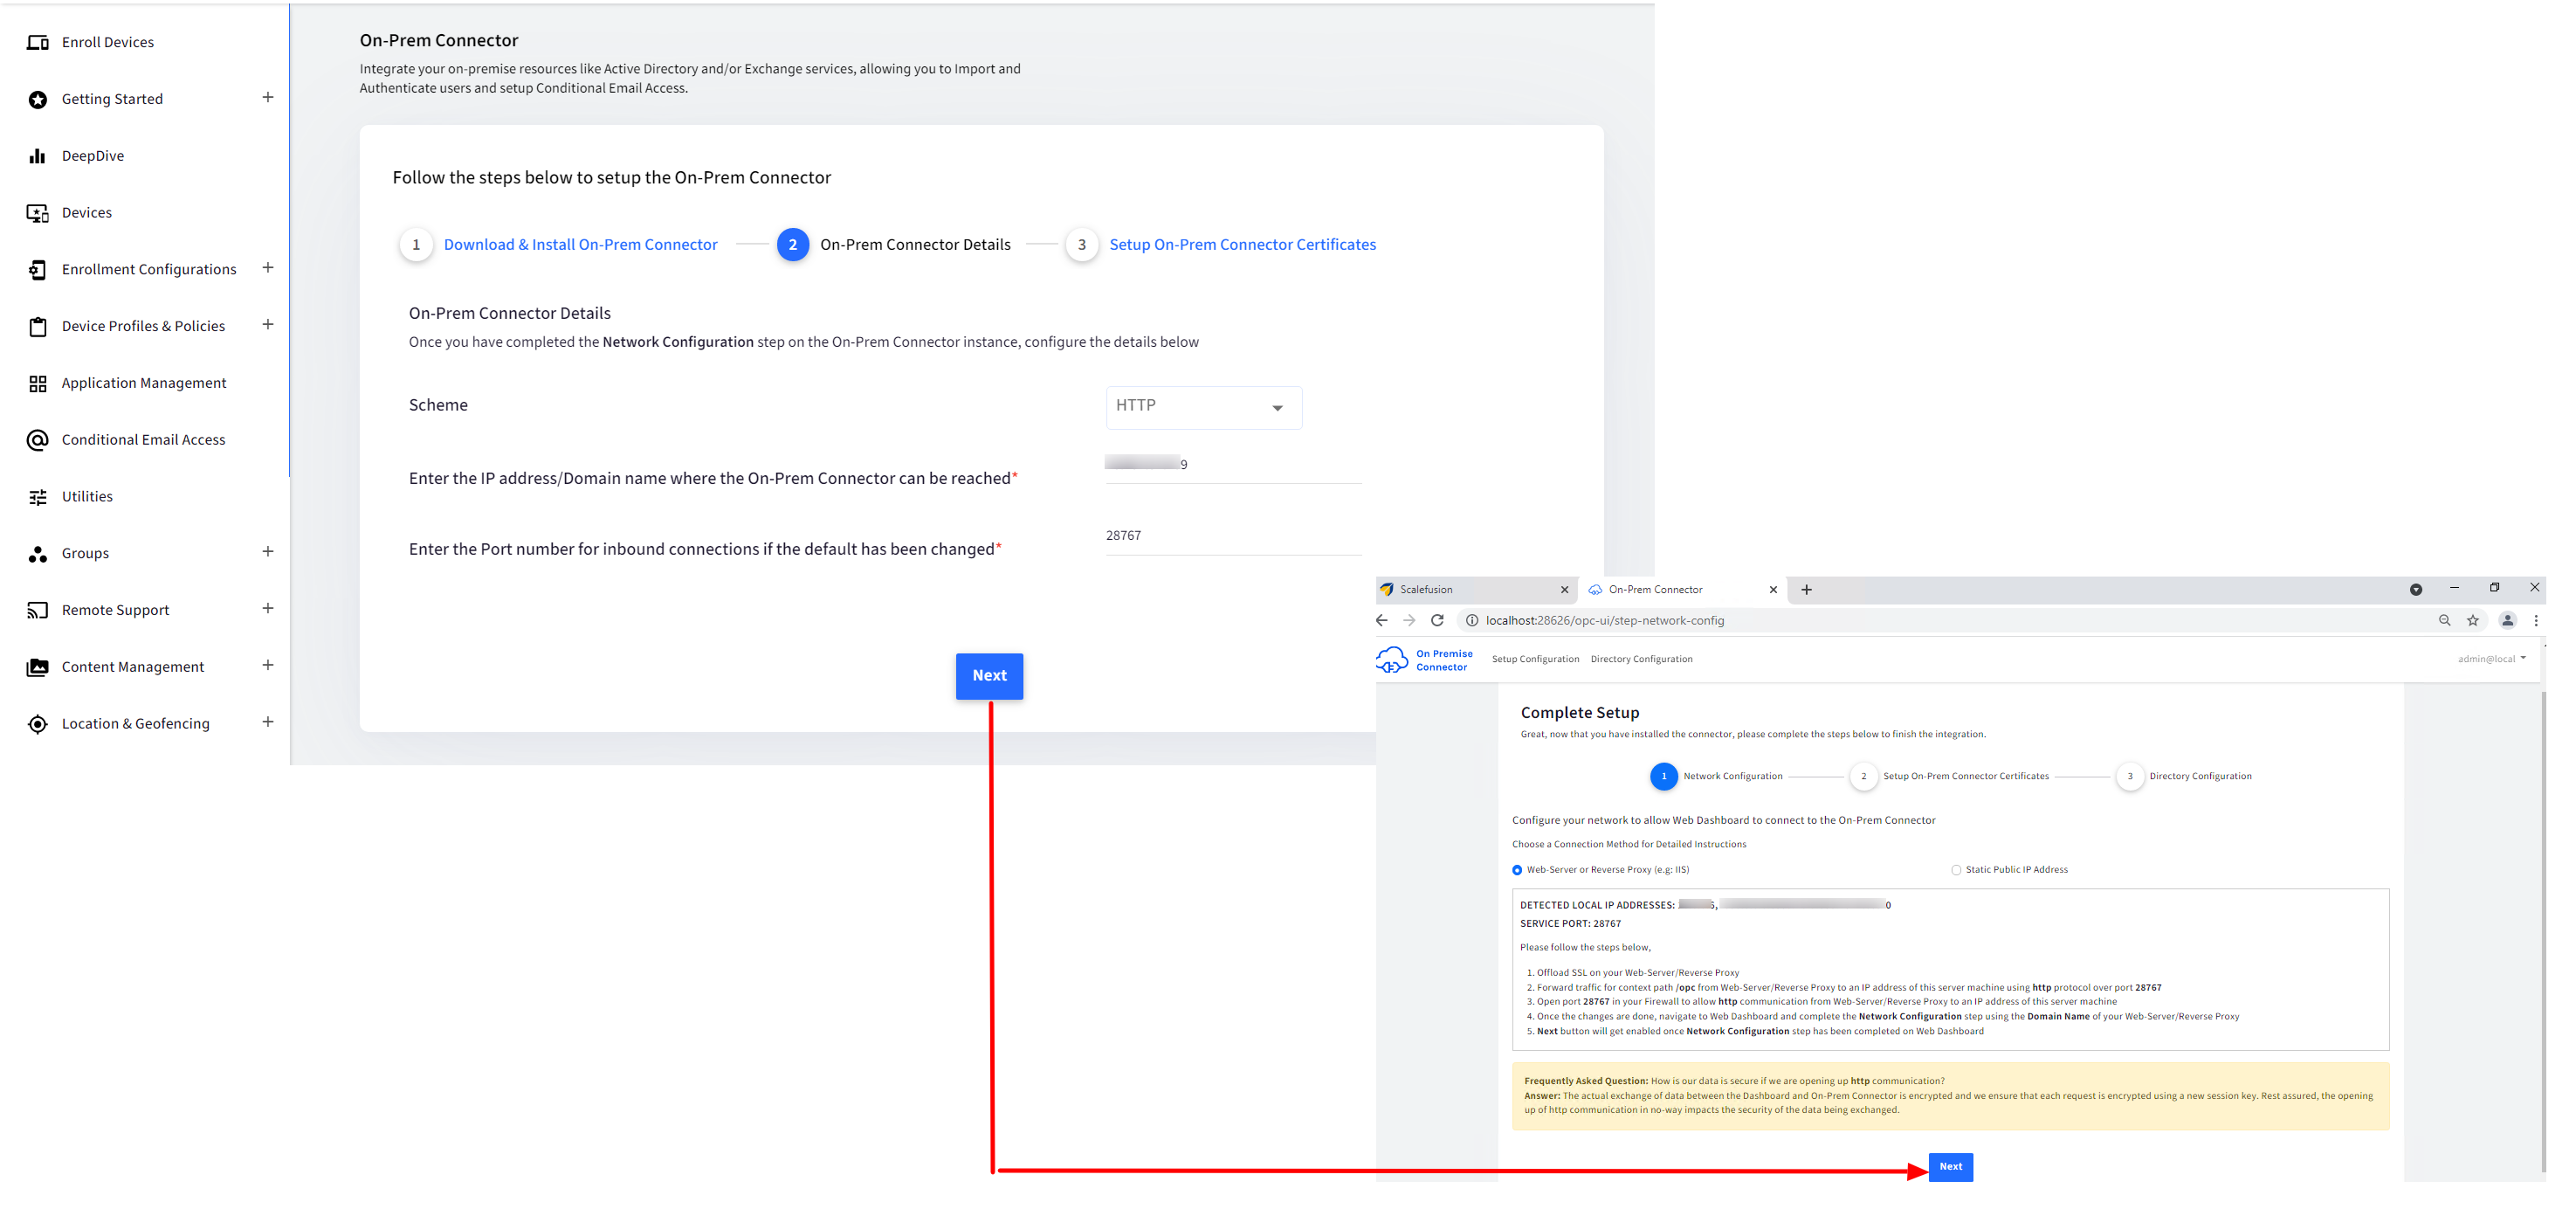
Switch to Scalefusion Dashboard and enter the following details:
Field
Description
Scheme
Choose one from among the following:
HTTP (Selected by default)
HTTPS
Enter the IP Address / Domain Name where the On-Premise Connector can be reached
The public IP address of the server where the OPC Instance is created if the HTTP scheme is selected.
The public DNS name if the HTTPS scheme is selected.
Enter the Port number for inbound connections if the default has been changed
This is set to 28767 by default if the HTTP scheme is selected. Unless instructed specifically, you should not change this port.
This is set to 443 by default if the HTTPS scheme is selected.

The check Connection button will be enabled after entering the required details. Click on Check Connection which would trigger a connectivity check with OPC Instance using the details provided
Once the connection between Scalefusion Dashboard and OPCInstance is validated, the following will reflect:
On the Scalefusion Dashboard, the button changes from Check Connection to Next
The next button on OPC Instance > Network Configuration (mentioned in Step #1.c above) will also be enabled.
Step 3: Set Up On-Premise Connector Certificates
You need to set up On-Premise Connector certificates to enable encrypted communications for secure data exchange between Scalefusion Dashboard and OPC Instance. Follow these steps:
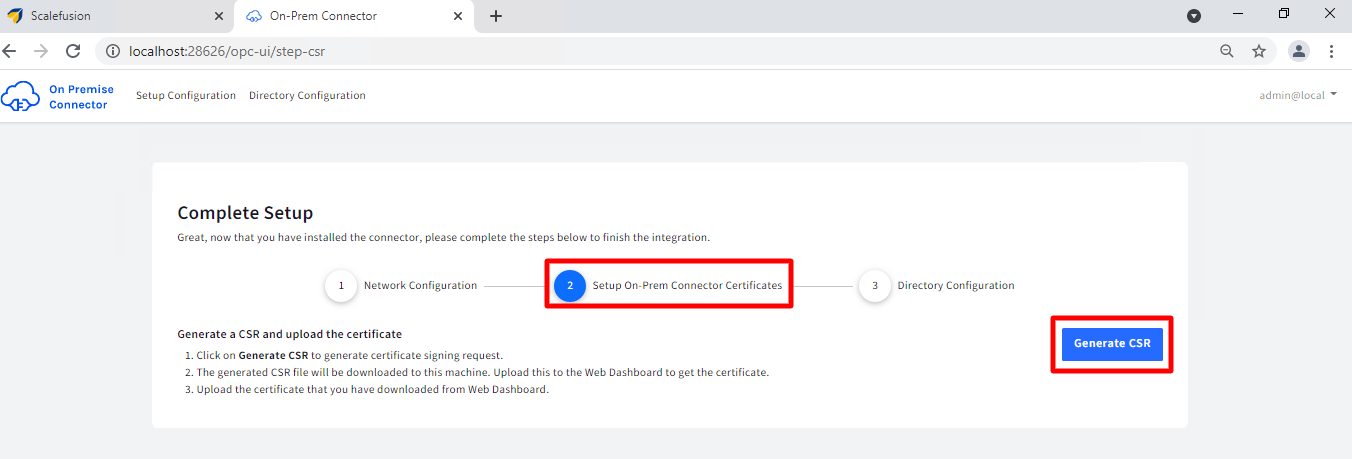
- In the On-Premise Connector Instance, click Next at the Network Configuration step, which takes you to Step 2, that is, Set Up On-Premise Connector Certificates
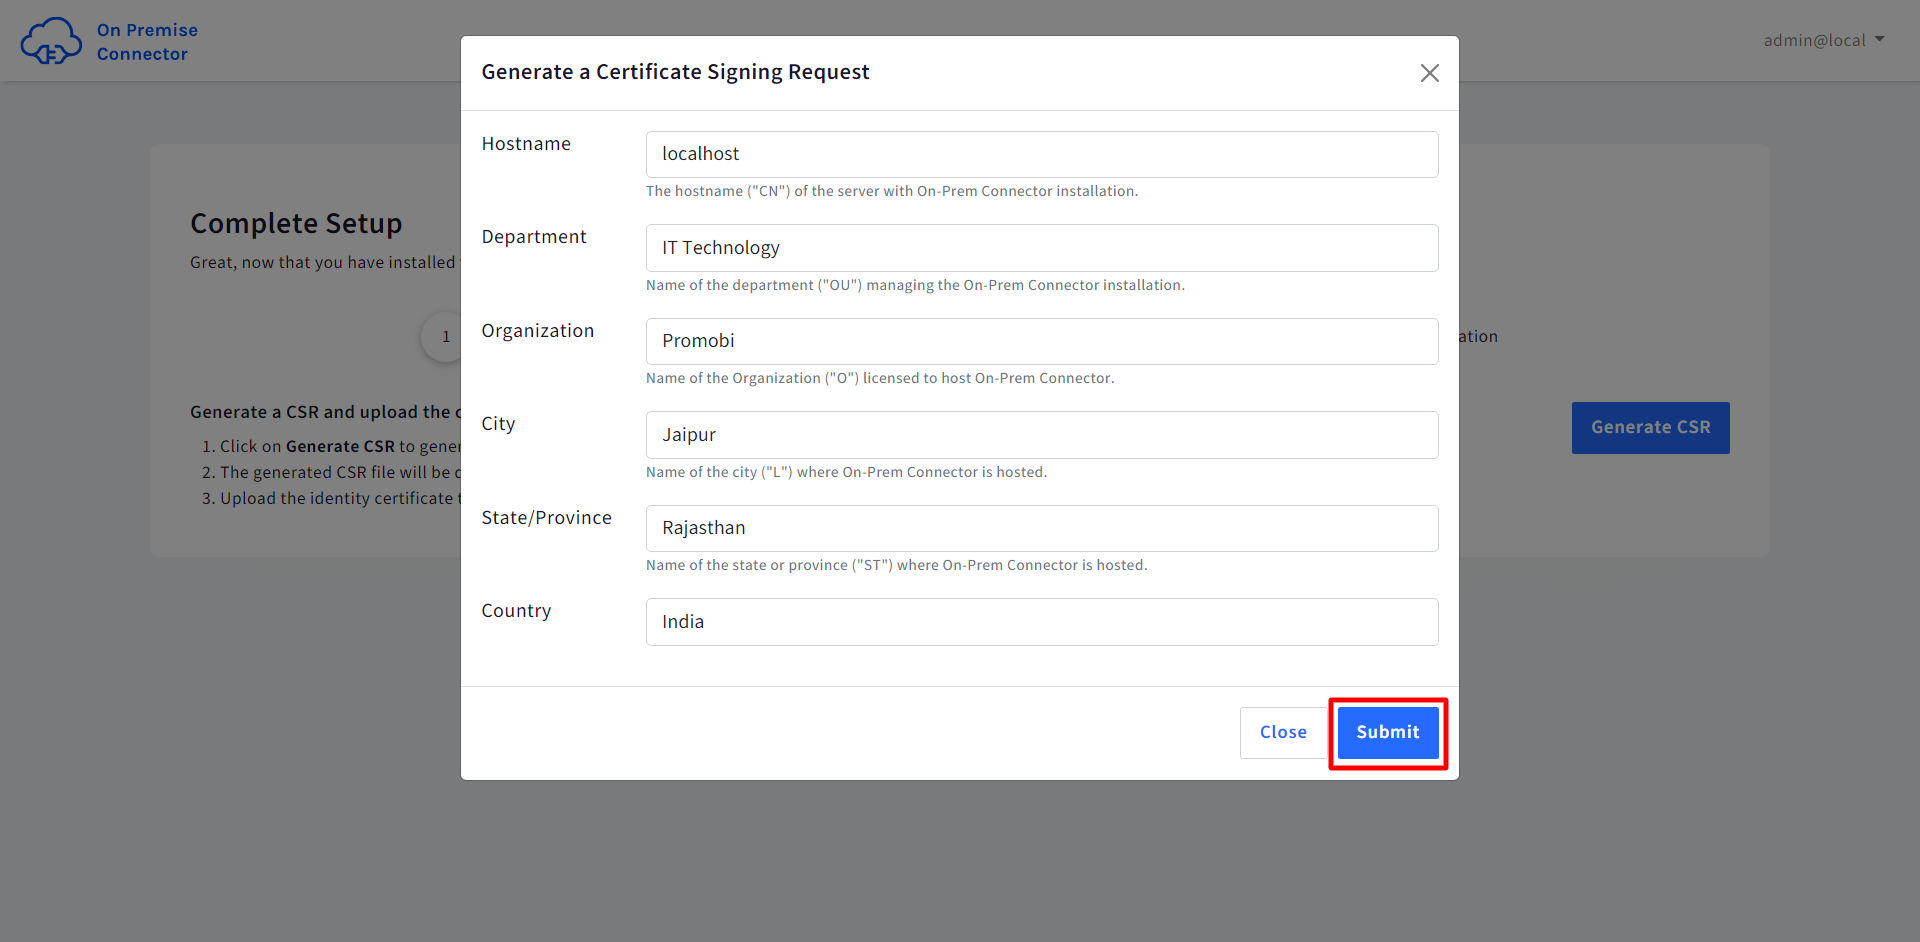
- Here click on the Generate CSR button to generate a Certificate Signing Request (CSR) file
- This opens up a dialog where you need to enter server/host information where the OPC Instance is hosted.
- Hostname: The IP address or hostname of the server where the OPC Instance is created
- Department: The department "OU" that is managing the OPC Instance
- Organization: Name of the Organization "O" licensed to host OPC Instance
- City: City "L" where the OPC Instance is hosted
- State/Province: Name of the State "ST" where the OPC Instance is hosted
- Country: Name of the Country where the OPC Instance is hosted
- Click Submit
- This will generate and download the CSR file on your local machine (with extension .csr).
- Here click on the Generate CSR button to generate a Certificate Signing Request (CSR) file
- On the Scalefusion Dashboard, upload the same CSR file (downloaded on your local machine) either by dropping the CSR file here or by Selecting Browse Files. This will generate a signed certificate.

- Notice that the Download button will get activated under both sub-sections viz. On-Premise Connector Certificate and Trust Store Certificate.
- Click on the Download button under the On-Premise Connector Certificate sub-section to download the Identity Certificate.
- Click on the Download button under the Download Trust Store Certificates sub-section to download the Trust Certificate

- On the OPC Instance, first, upload the Identity Certificate.

- Next, upload the Trust Certificate.

Step 4: Directory Configuration on OPC instance
After uploading the certificates, the next step is to configure directory settings in OPC Instance. This enables Scalefusion Dashboard to read the users' and groups' information.
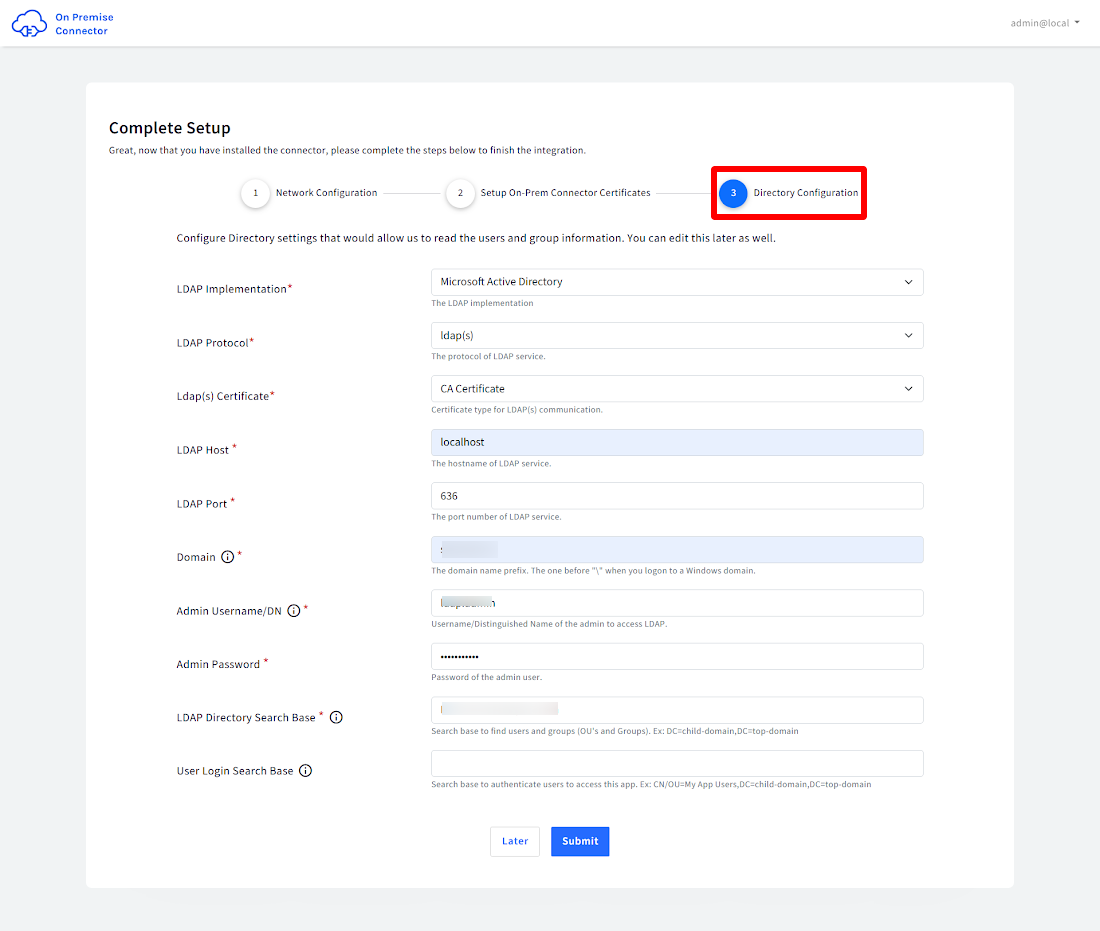
Enter the following under Directory Configuration
Directory Configuration
Some fields are pre-filled as hints for understanding. These should be replaced with actual data. Click Submit after entering details.Field
Description
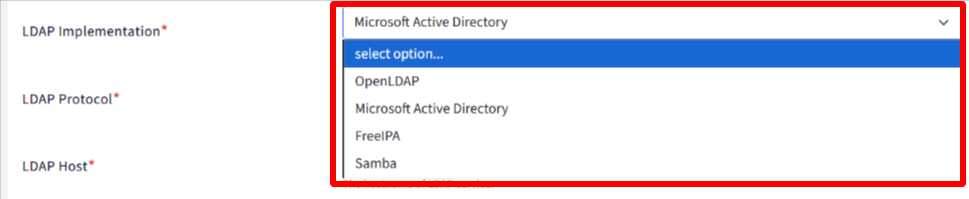
LDAP Implementation
Select the directory to be implemented from one of the following
LDAP Protocol
Choose which protocols you want to enable, from the following:
ldap: By default, the port for LDAP(standard protocol) is 389.
ldap(s): Stands for secure LDAP. It is typically used in environments where IT administrators restrict access to only the LDAP(s) port, even within the firewall, to interact with or read from the Active Directory. By default, the port for LDAPs is 636.

LDAP(s) Certificate
For LDAP(s) connections, administrators can also provide a certificate. Certificate can be one of the following:
CA Certificate
Self Signed Certificate: Certificate needs to be uploaded here

LDAP Hostname
The hostname/IP address where the Active Directory service is hosted
LDAP Port
Port number of Active Directory service listening for LDAP connections
Domain
Active Directory Domain Name Prefix (the one that is provided when logging on to Windows workstations.)
LDAP Admin Username
Active Directory Admin's username for LDAP binding
LDAP Admin Password
Active Directory Admin's password for LDAP binding
LDAP Directory search base
Define the scope of users and groups i.e. the Organization Units (OU's) that Scalefusion will be able to read.
User Login search base
Specify a Security Group that contains users who can access to OPC Instance's Admin UI. The access can be controlled via the User Management section from the 3 dots menu in the OPC Profile.
Configurable Attributes: This section allows administrators to customize user property mappings. This addresses cases where Email, Username, First Name, and Last Name are mapped to Active Directory attributes.
Note:
Default attributes are preconfigured (as shown in the “Complete set up” image for Directory Configuration). However, administrators may customize these attribute mappings to align with their specific Active Directory (AD) configuration. For example,
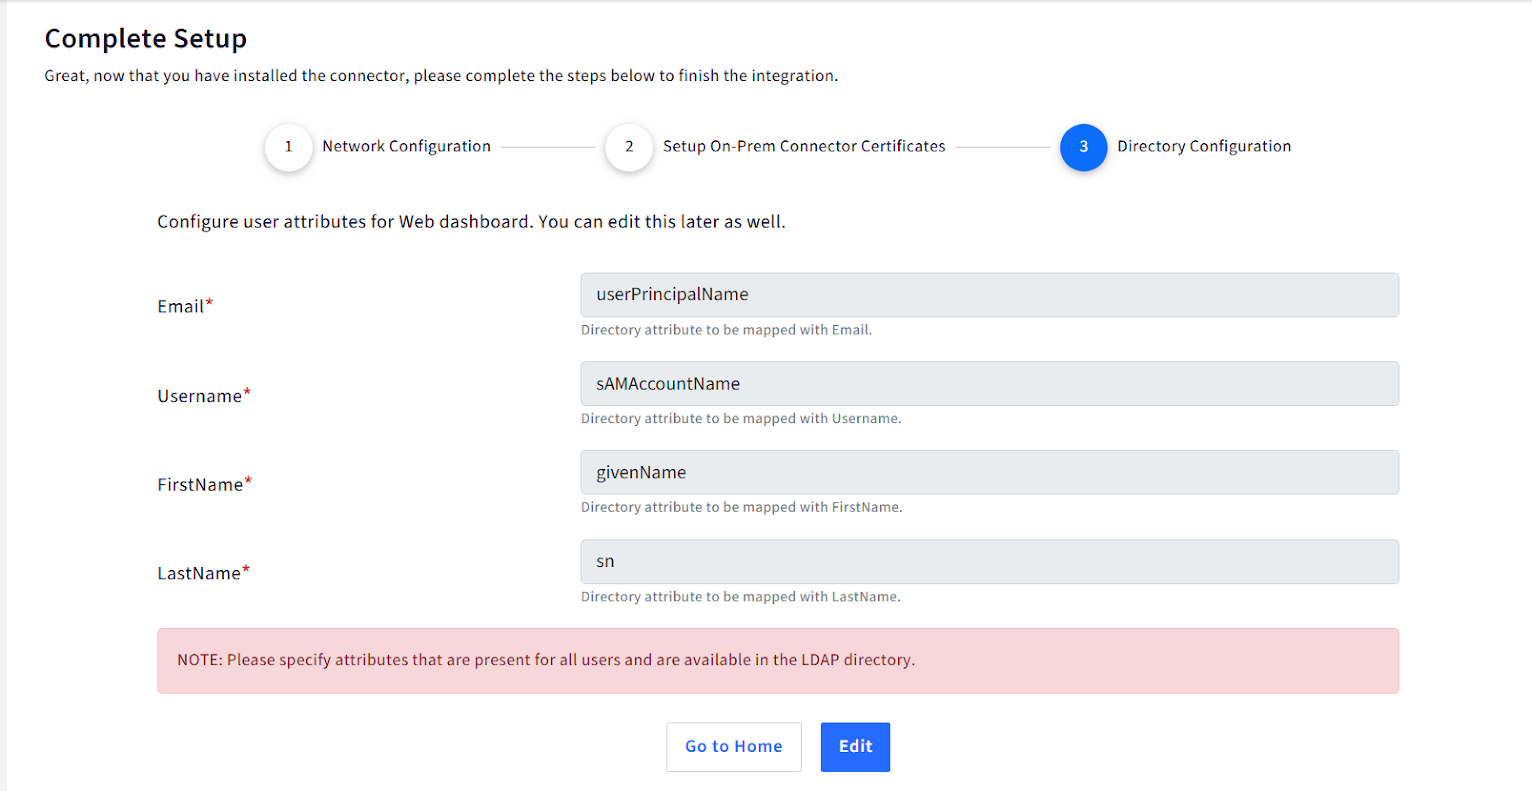
After entering configurable attributes, click on Go to Home
If LDAP information is not available during setup, the admin can click on the Later button and come back later to complete the setup.
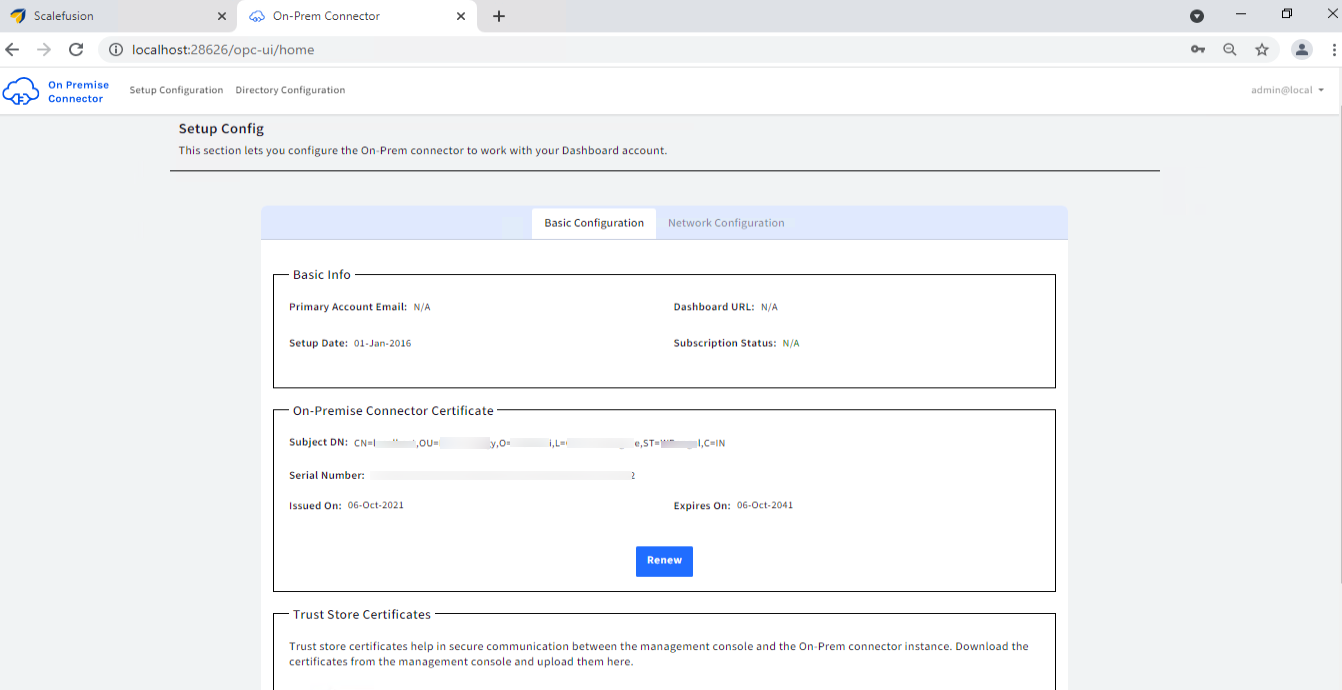
You will land on the Basic Configuration page, which indicates that the integration with OPC is complete. The Basic Configuration page displays basic details like primary email, setup date, certificate details etc.
Step 5: Complete Setup on SF Dashboard
On Scalefusion Dashboard, click Complete Setup.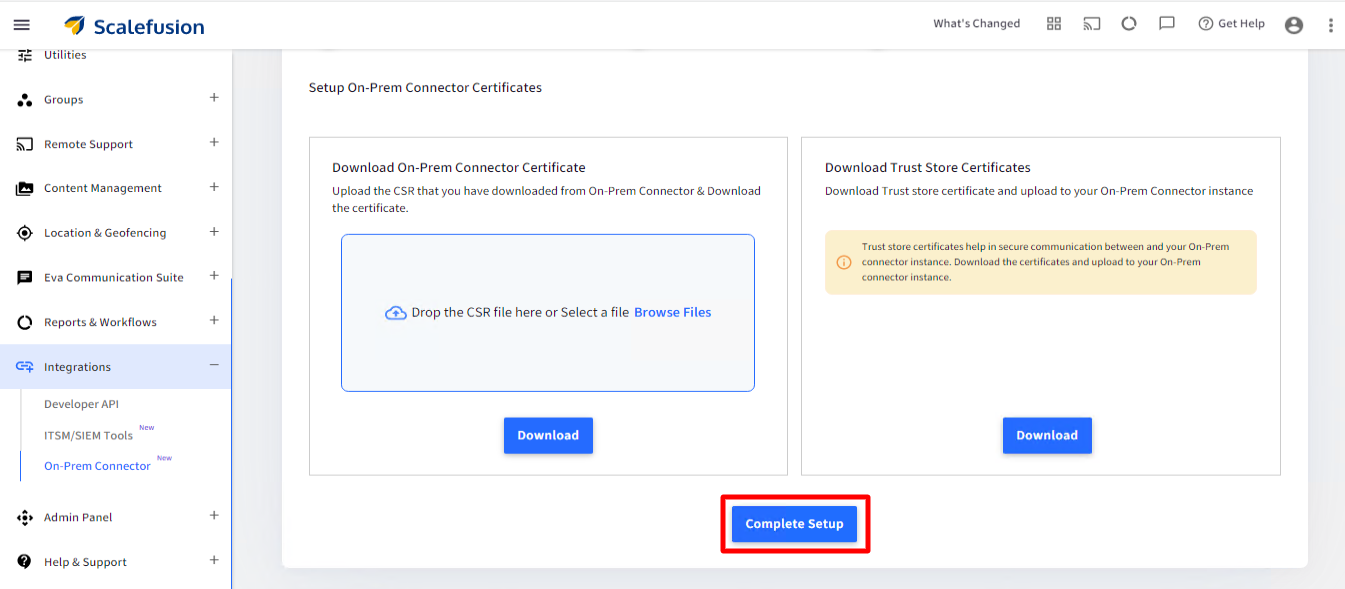
This completes the setup and displays the OPC configuration details in a single view:
Connector IP, Port, Version
Configuration Date
Configured by
Status
Configuration Info: The directory configuration that has been set in OPC Instance.
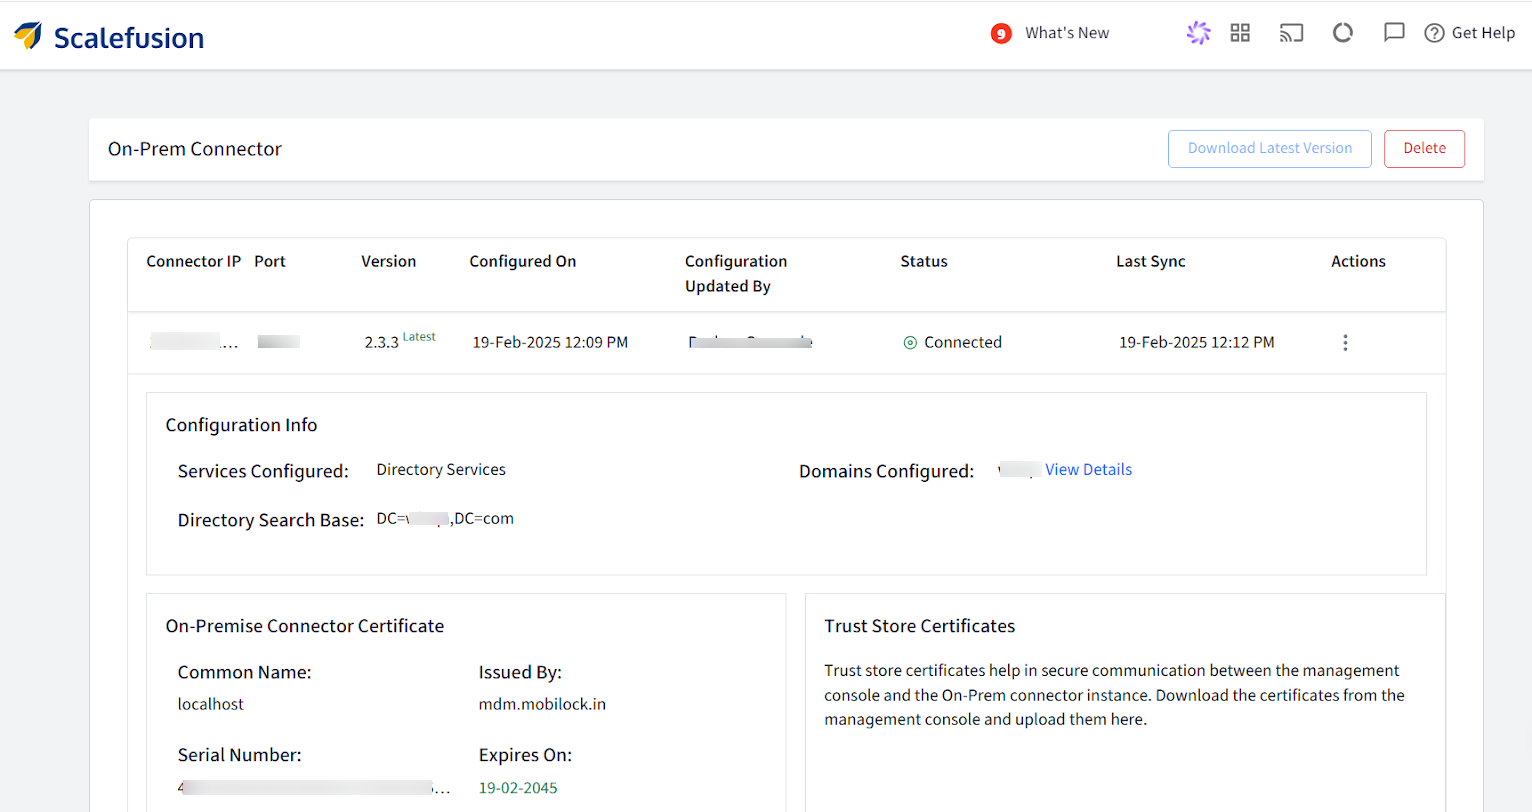
Clicking on View Detailsto show the Organizational Units and Security Groups
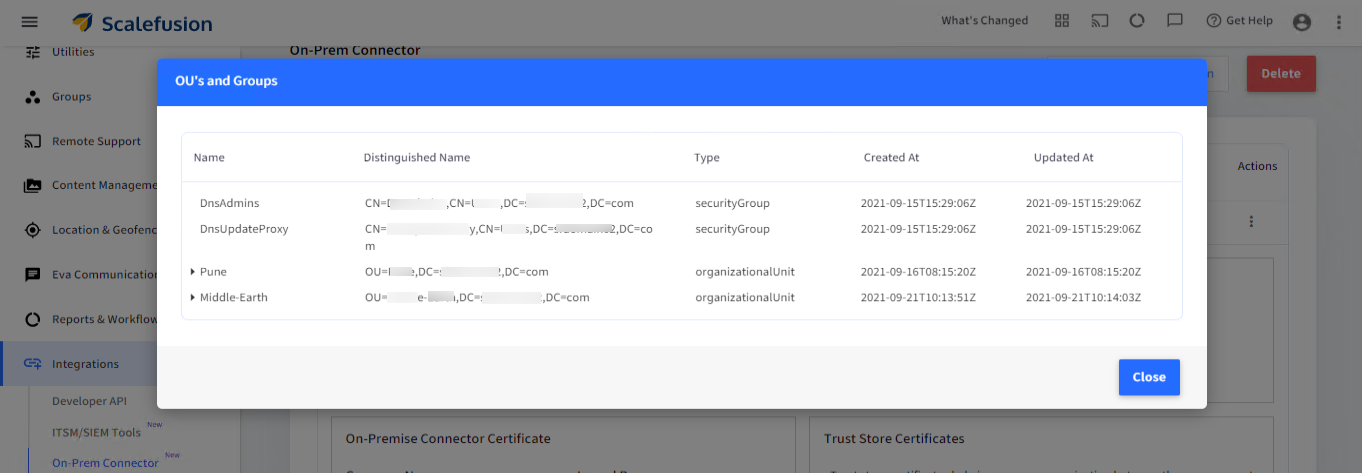
Actions on Configurations
The following actions can be performed over configuration:
Sync: If you want to do a manual sync with OPC Instance, click on Sync
Edit Config: Allows you to edit the scheme, port or IP
Renew Certificate: There will be an option to renew certificates if they have expired. Click on Renew and follow the same Steps to update the certificates.
Delete: Deletes the complete OPC configuration. When you click Delete, a confirmation box will appear. Click Confirm.
Custom Properties: Allows administrators to sync Active Directory (AD) attribute values to the Scalefusion Dashboard by mapping AD attributes with Scalefusion custom properties. This helps centrally manage user and device information such as employee ID, department, designation, and location, with automatic updates based on AD changes. For more details, please visit the Custom Properties section below.
Management of On-Premise Connector Instance
OPC Instance consists of the following sections when you log in after the initial setup is complete
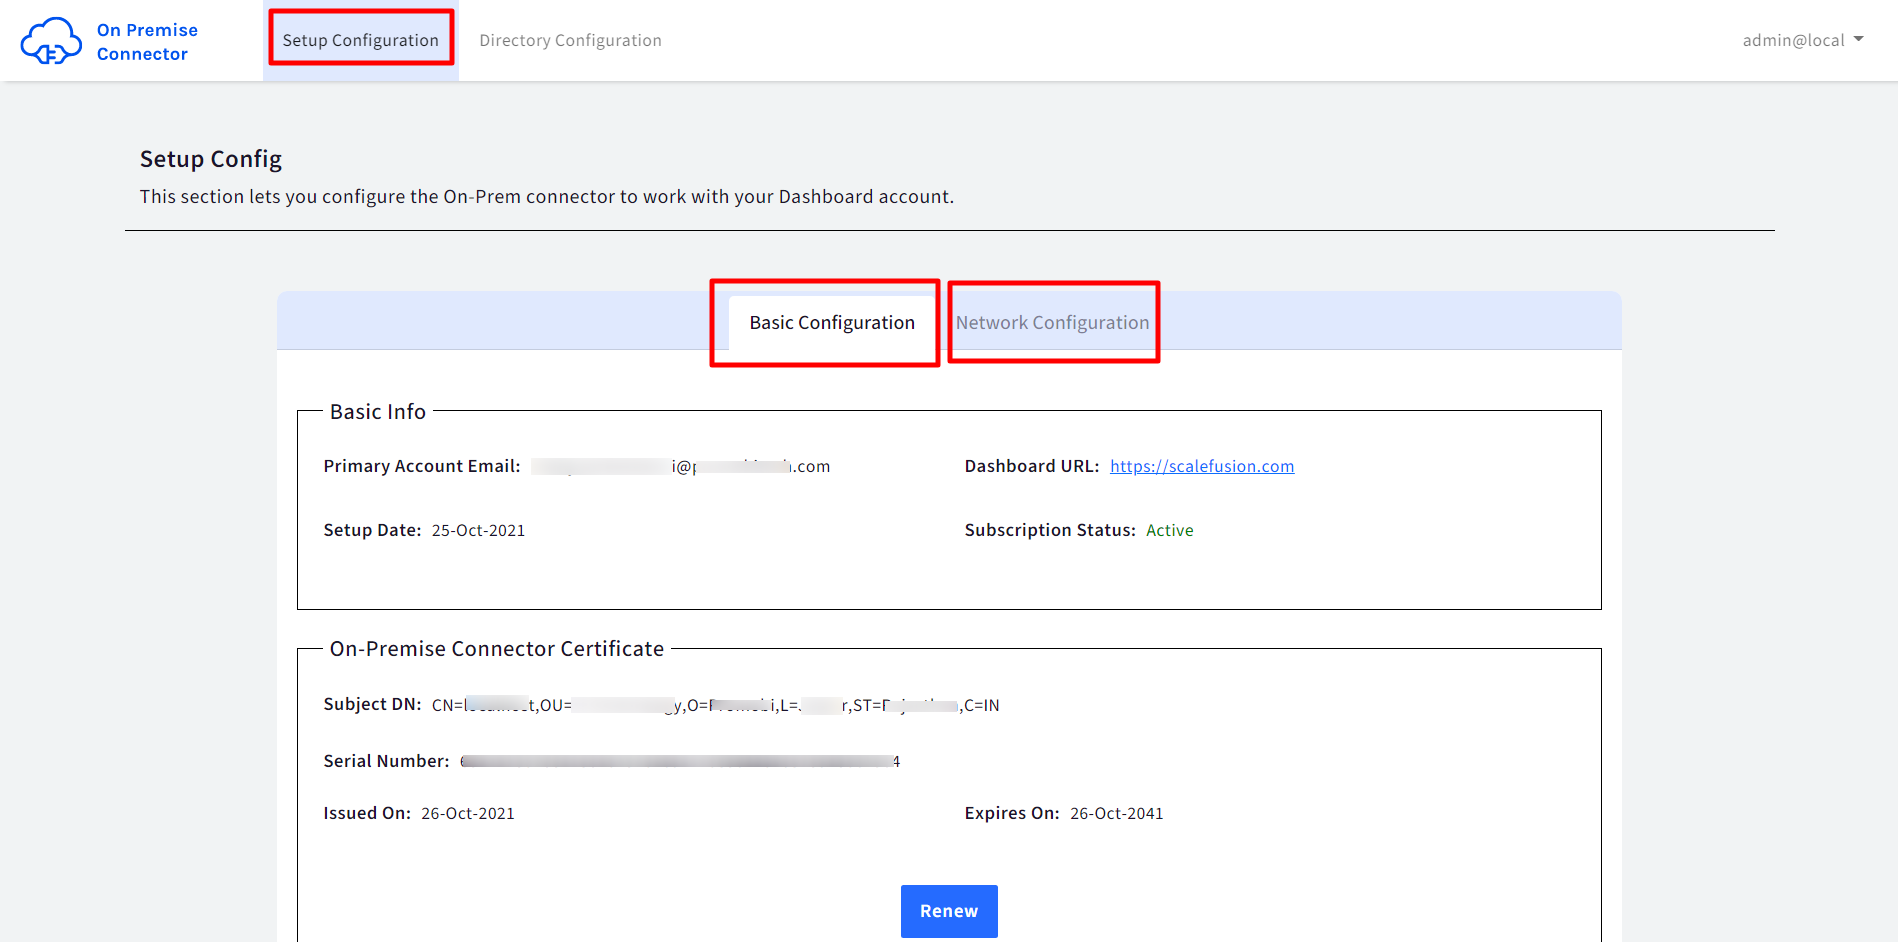
Setup Configuration: This consists of two sections
Basic Configuration - Displays all basic configurations that have been done in sync with Scalefusion Dashboard
Network Configuration - View the network configuration options to establish the connection between the Scalefusion Dashboard and OPC Instance.
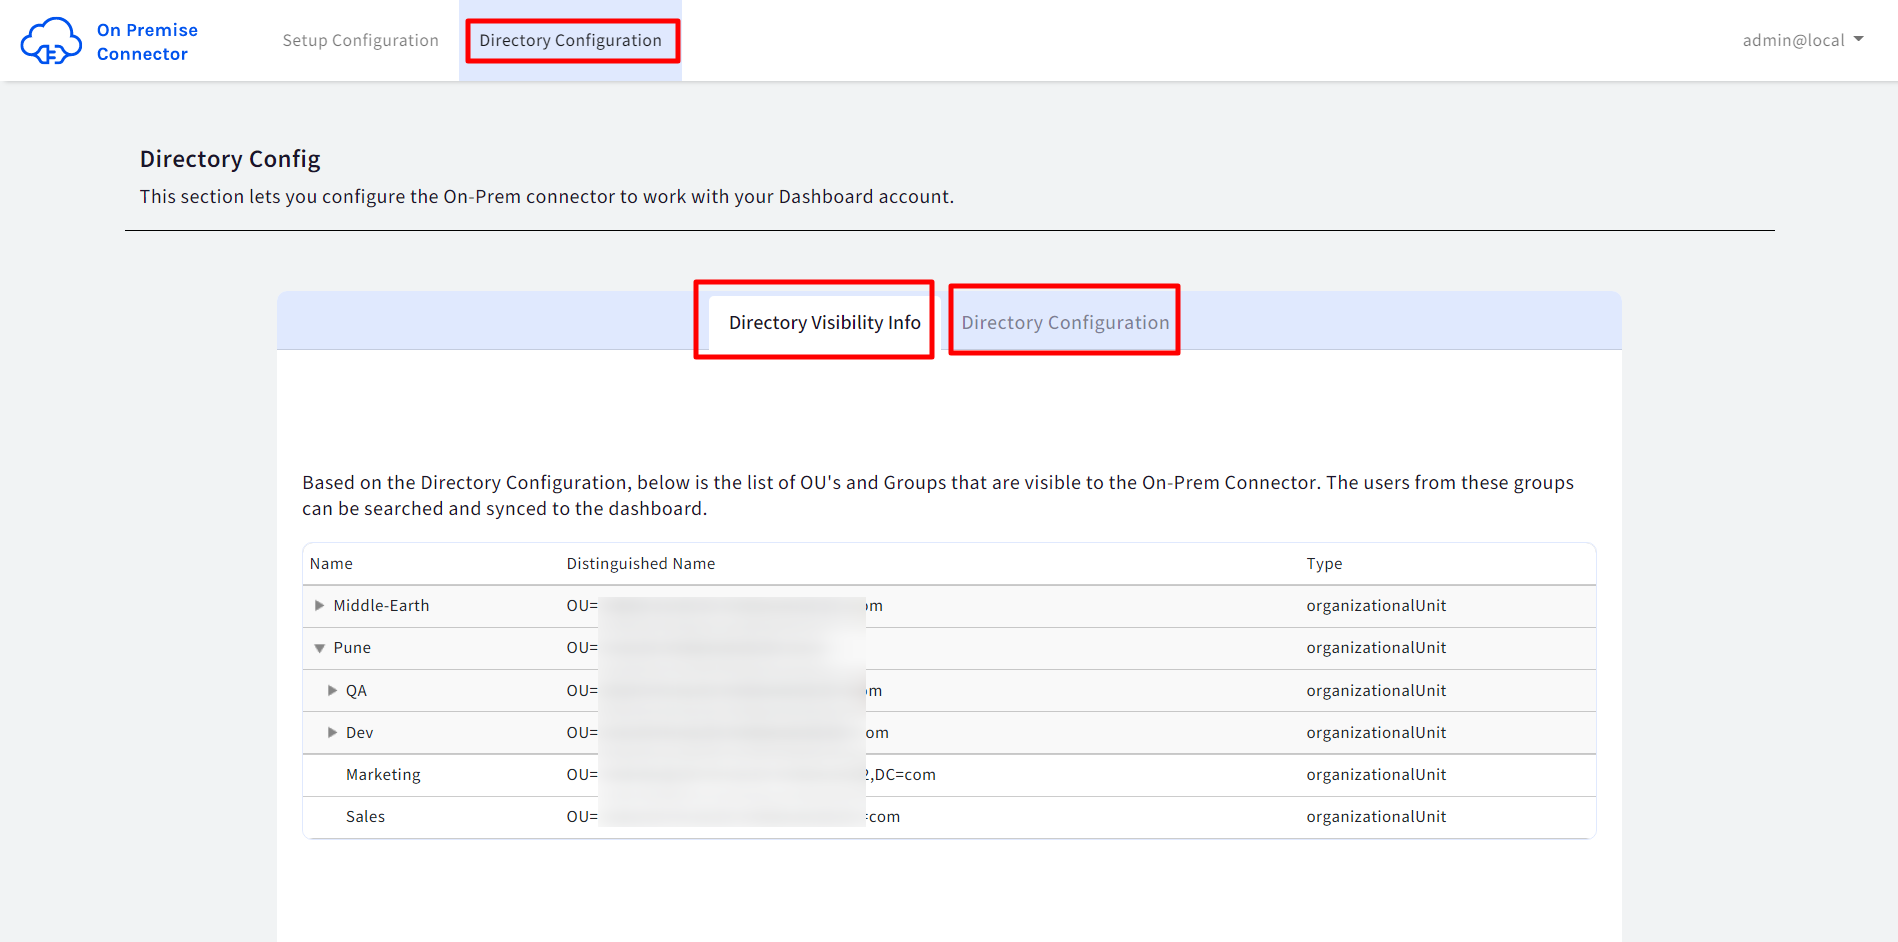
Directory Configuration
Directory Visibility Info - Shows the list of OU's and Security Groups that would be visible to the On-Premise Connector, based on Directory Configuration. The users from these groups can be searched and synced with Scalefusion Dashboard.
Directory Configuration - The directory settings that have been configured. These can be edited.
Manage Users - Manage the users who are allowed to access OPC UI. Users can be Read+Write (Admin) or Read-Only (User). The User Login Search Base in the Directory Configuration must be defined.
Custom Properties
Custom Properties allow administrators to synchronize additional Active Directory (AD) attribute values to the Scalefusion Dashboard for centralized user management.
Pre-requisites
Custom Fields must be configured in the Scalefusion Dashboard under User Enrollment > Set Custom Fields.
The Custom Properties feature is available only with OPC build version 2.4.10 or later.
Configure Custom Properties
To add custom properties:
Navigate to Integration > On Prem Connector.
Click the three-dot menu and select Custom Properties.
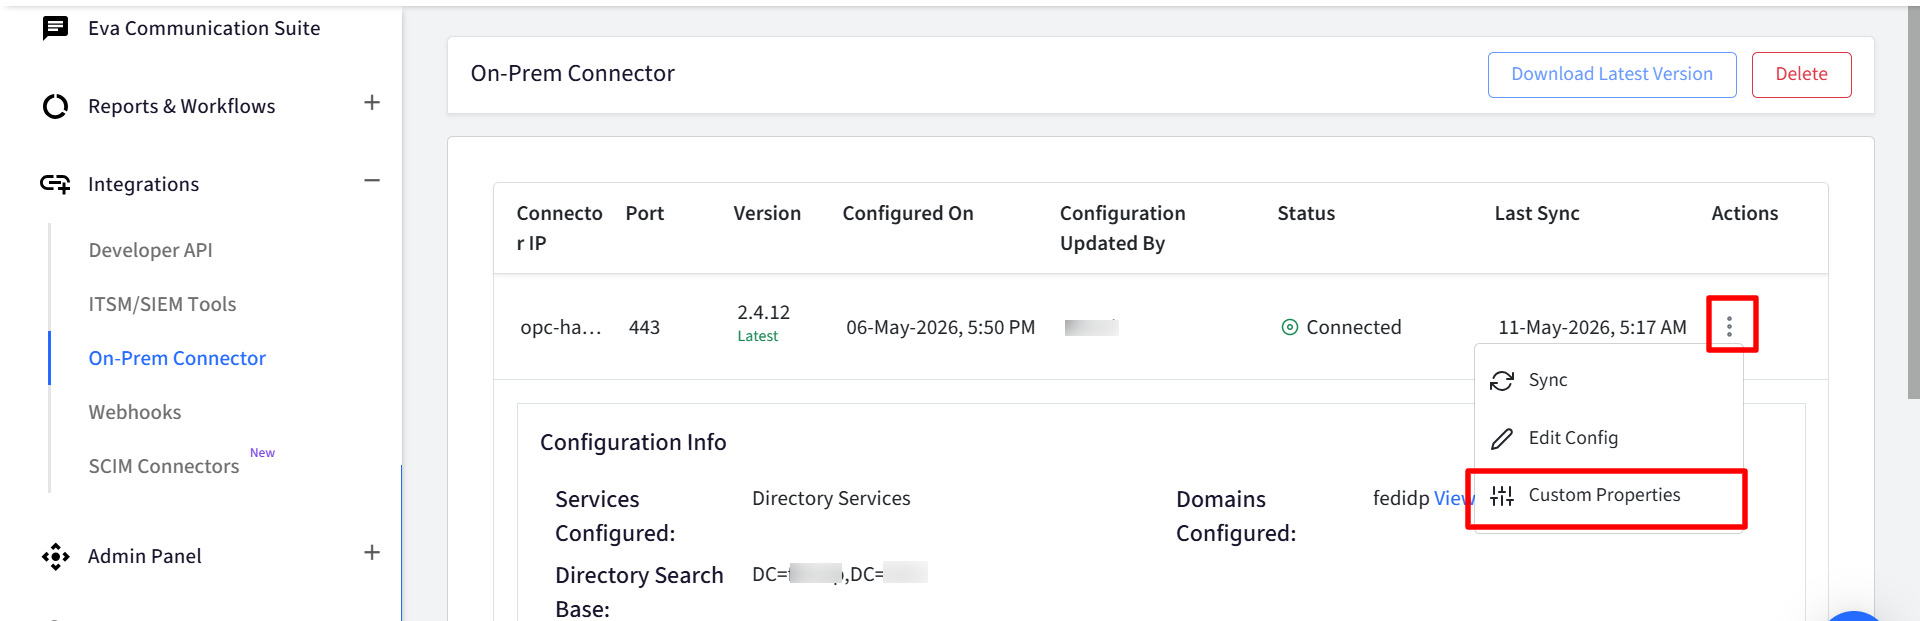
In the Custom Properties dialog, manually add the required Active Directory attribute names.
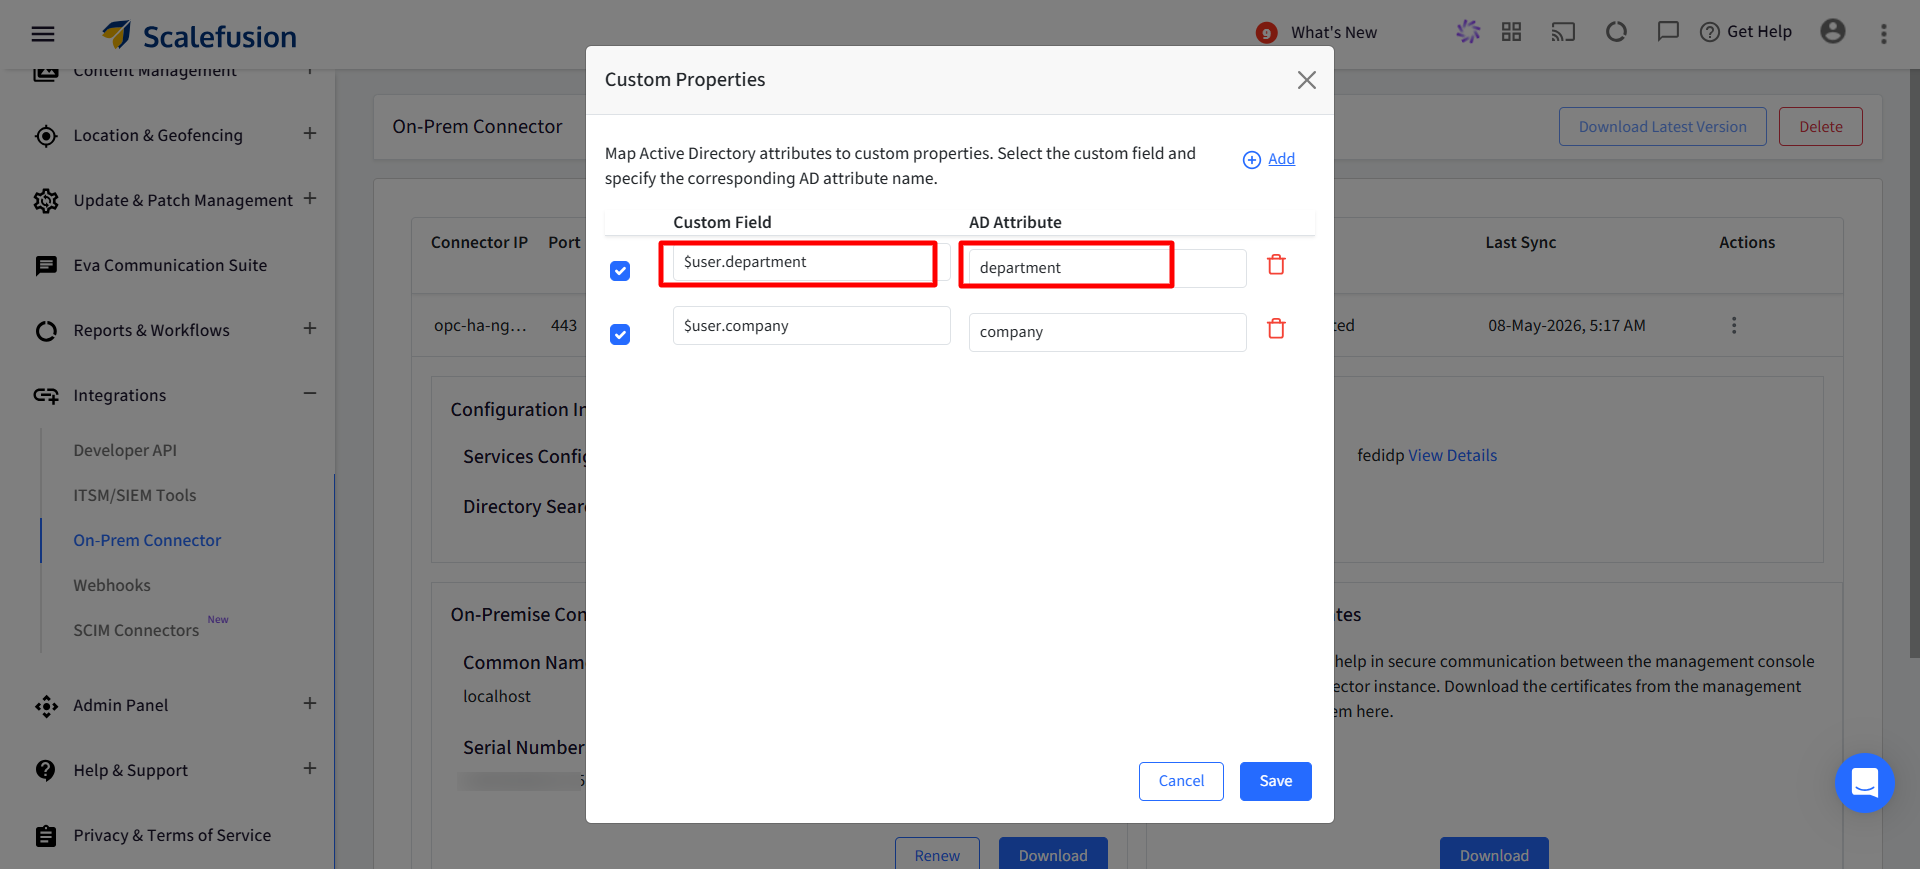
The configured attributes will be synchronized from Active Directory to the Scalefusion Dashboard during the sync process.
Important Points to Note
The Active Directory attribute names entered in Custom Properties must exactly match the attribute names configured in Active Directory.
If the attribute names do not match, the values will not be synchronized to the Scalefusion Dashboard.
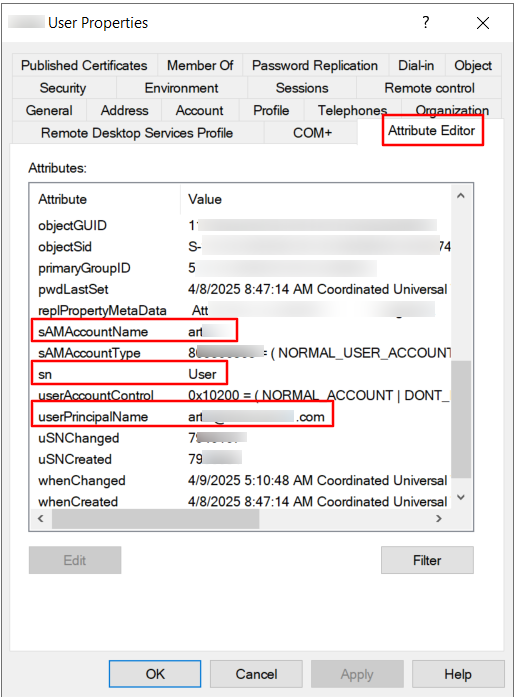
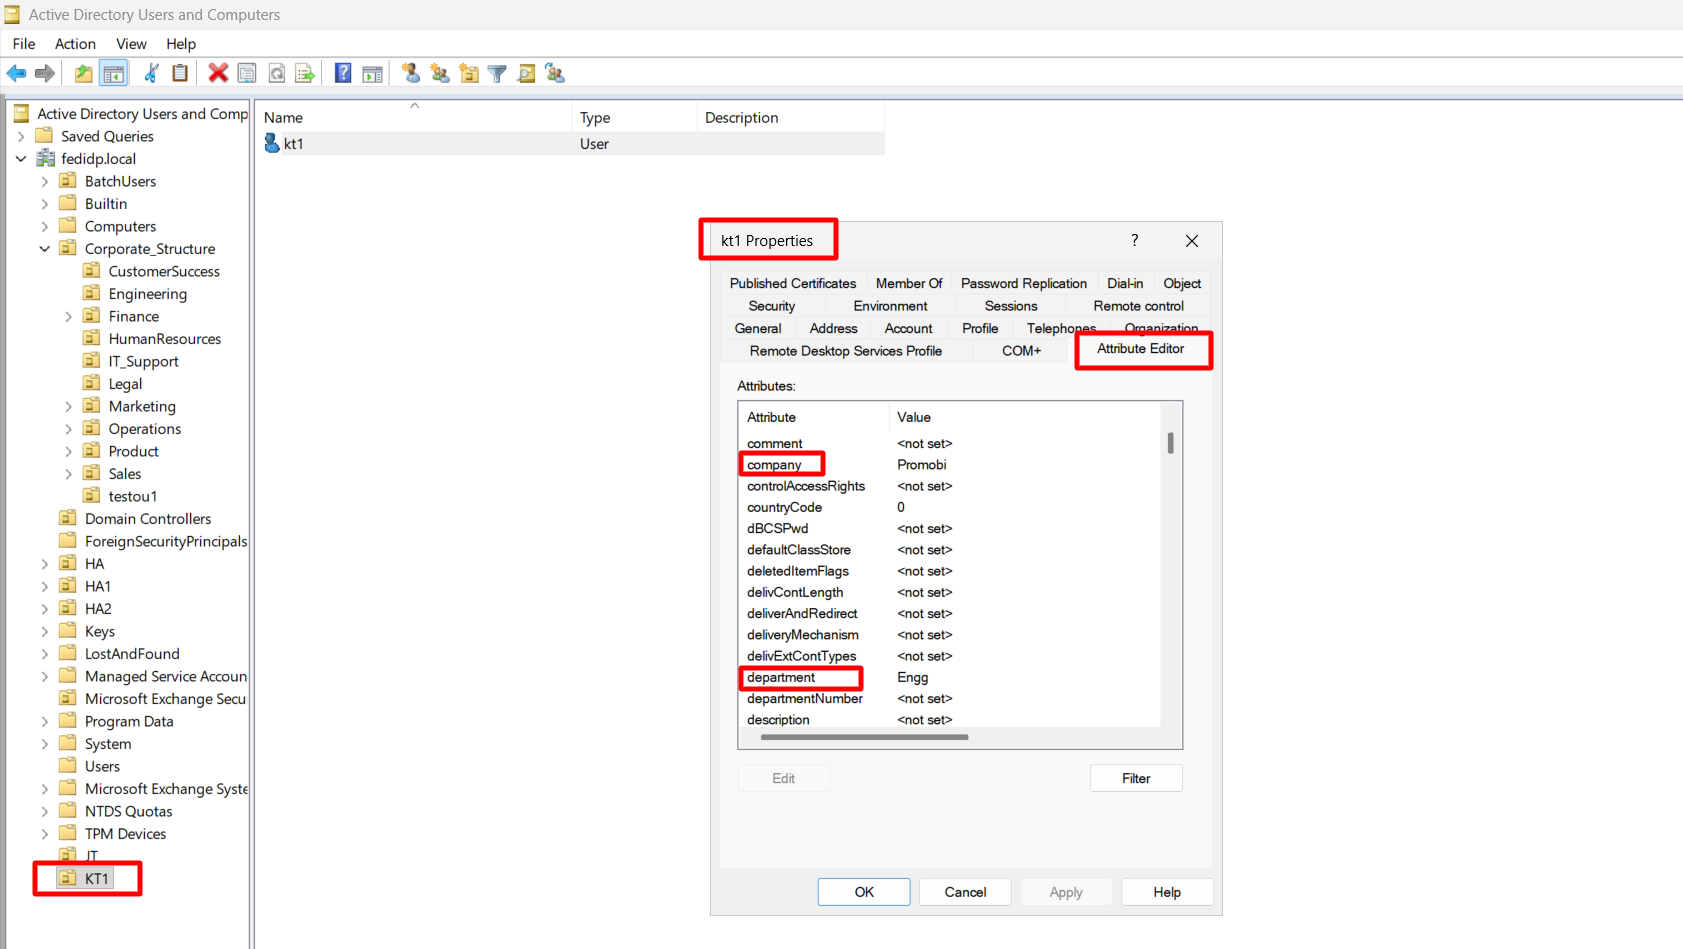
Finding Active Directory Attribute Names
To find the exact Active Directory attribute name and its value for a user:
Open the user in Active Directory.
Navigate to Properties > Attribute Editor.
Search for the required attribute and use the exact attribute name while configuring Custom Properties in OPC.
Once a user is imported into the Scalefusion Dashboard using any supported import method, the configured attribute values are automatically synchronized from Active Directory to the Scalefusion Dashboard during the next sync cycle.