This document explains how to set up and configure an HAProxy-based load balancer environment with multiple application servers. It covers host configuration, HAProxy installation and setup, monitoring configuration, and Cloudflare Tunnel integration to securely expose services over the internet. The setup helps improve application availability, reliability, and traffic distribution across backend servers.
Note: This document is intended as a general setup guide and covers only the specific configuration steps. Steps may vary depending on software versions, environment settings, or future updates. Scalefusion does not provide technical support for third-party software or infrastructure configurations referenced in this document.
Any tools or software mentioned are shared for guidance purposes only, and customers should choose the approach best suited to their environment.
What is HAProxy?
HAProxy (High Availability Proxy) is a free, open-source load balancer and proxy server for TCP and HTTP-based applications.
It distributes incoming requests across multiple backend servers to improve availability, reliability, and performance.
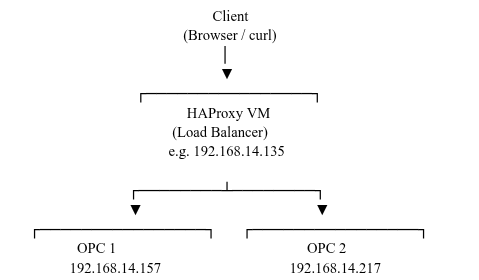
Role | Hostname | IP |
|---|---|---|
Load Balancer | ubuntu | 192.168.14.135 |
OPC Server 1 | opc-1 | 192.168.14.157 |
OPC Server 2 | opc-2 | 192.168.14.217 |
Hosts entry setup on both App servers
1] App server 1 configuration
1) Configure hosts file
1. Open Notepad as Administrator
Click Start
Search for Notepad
Right-click → Run as administrator
This step is important without admin rights, you won’t be able to save changes.
2. Open the Hosts File
In Notepad:
Click File → Open
Navigate to:
C:\Windows\System32\drivers\etc\In the bottom-right, change file type from:
Text Documents (*.txt) to All Files (*.*)
Select the file named: hosts, Click Open
3. Add Your Host Entry
At the bottom of the file, add a new line like this:
192.168.14.135 ubuntuFormat:
<IP Address> <Domain Name>Example:
127.0.0.1   localhost-test.com
192.168.14.135   myapp.internal
4. Save the File
Click File → Save
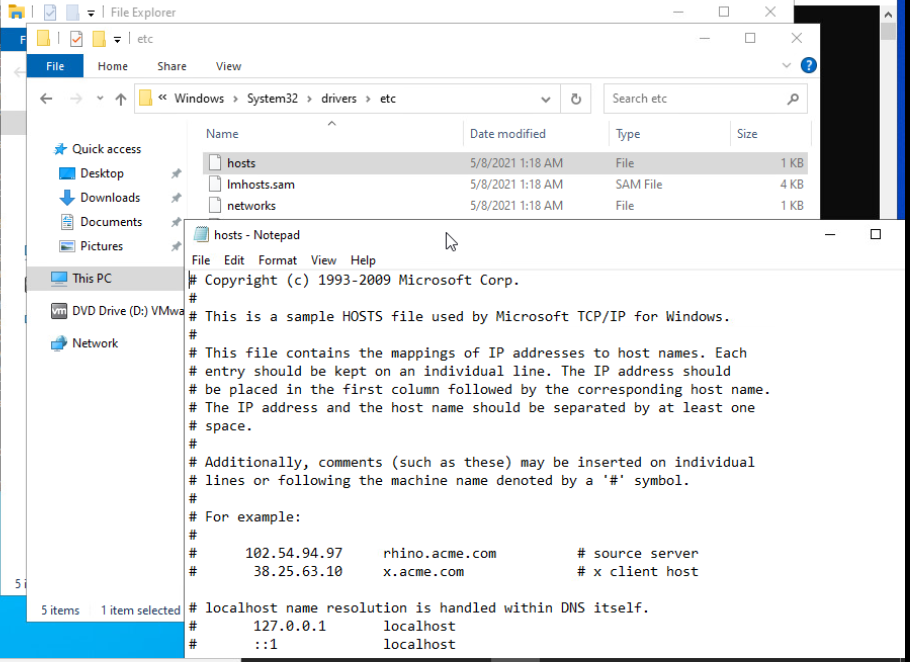
If it fails, double-check you opened Notepad as Administrator.
5. Flush DNS Cache (Important)
Open Command Prompt as Administrator and run:
ipconfig /flushdnsThis ensures Windows uses the updated entry.
6. Test Your Entry
You can test using:
ping 'ip-address'or open it in a browser:
http://ip-addressCommon Issues
“Access denied” → Not running Notepad as admin
Changes not working → Forgot to flush DNS
Wrong file → Make sure it’s hosts (no extension)
2] App server 2 configuration
1) Configure hosts file
Perform the same steps as mentioned above in App server 1 configuration.
3] Setting up HAproxy load balancer-Frontend server
On the HAproxy server (192.168.14.135), perform the below steps to setup load balancer
1) configure hosts file
Edit the /etc/hosts file using the below command in terminal:
sudo vi /etc/hostsAdd the following hostname entries for both web servers along with it’s own hostname:
192.168.14.135 ubuntu
192.168.14.157 OPC-1
192.168.14.217 OPC-2
4]Installing the HAproxy load balancer
sudo apt-get update
sudo apt-get upgrade
sudo apt install haproxy
haproxy
5] Configuring HAproxy as a load balancer
We will configure HAproxy as a load balancer. To do so edit the /etc/haproxy/haproxy.cfg file:
sudo vi /etc/haproxy/haproxy.cfgAdd following lines to config file:
6] Configuring HAproxy Monitoring
With HAproxy monitoring, we can view lot of information including server status, data transferred, uptime, session rate, etc. To configure HAproxy monitoring, append the following lines in the configuration file located at
sudo vi /etc/haproxy/haproxy.cfgAdd following lines in the config file:
global
    log /dev/log    local0
    log /dev/log    local1 notice
    chroot /var/lib/haproxy
    stats socket /run/haproxy/admin.sock mode 660 level admin
    stats timeout 30s
    user haproxy
    group haproxy
    daemon
    # Default SSL material locations
    ca-base /etc/ssl/certs
    crt-base /etc/ssl/private
    # See: https://ssl-config.mozilla.org/#server=haproxy&server-version=2.0.3&config=intermediate
        ssl-default-bind-ciphers ECDHE-ECDSA-AES128-GCM-SHA256:ECDHE-RSA-AES128-GCM-SHA256:ECDHE-ECDSA-AES256-GCM-SHA384:ECDHE-RSA-AES256-GCM-SHA384:ECDHE-ECDSA-CHACHA20-POLY1305:ECDHE-RSA-CHACHA20-POLY1305:DHE-RSA-AES128-GCM-SHA256:DHE-RSA-AES256-GCM-SHA384
        ssl-default-bind-ciphersuites TLS_AES_128_GCM_SHA256:TLS_AES_256_GCM_SHA384:TLS_CHACHA20_POLY1305_SHA256
        ssl-default-bind-options ssl-min-ver TLSv1.2 no-tls-tickets
defaults
    log    global
    mode    http
    option    httplog
    option    dontlognull
        timeout connect 5000
        timeout client  50000
        timeout server  50000
    errorfile 400 /etc/haproxy/errors/400.http
    errorfile 403 /etc/haproxy/errors/403.http
    errorfile 408 /etc/haproxy/errors/408.http
    errorfile 500 /etc/haproxy/errors/500.http
    errorfile 502 /etc/haproxy/errors/502.http
    errorfile 503 /etc/haproxy/errors/503.http
    errorfile 504 /etc/haproxy/errors/504.http
frontend opc_frontend
    bind *:80
    default_backend opc_backend
backend opc_backend
    balance roundrobin
    server opc1 192.168.14.157:28767 check inter 5s fall 3 rise 2
   #server hb1 192.168.14.157:28626 check inter 5s fall 3 rise 2
   #server opc1 192.168.14.217:28767 check inter 5s fall 3 rise 2
   #server hb1 192.168.14.217:28626 check inter 5s fall 3 rise 2
listen stats
    bind 192.168.14.135:8080
    mode http
    stats enable
    stats uri /stats
    stats realm Haproxy\ Statistics
    stats auth opc:opc
Note: Above config can be change based on requirement.
Save and restart the service.
Haproxy -c -f /etc/haproxy/haproxy.cfg
sudo systemctl daemon-reload
sudo systemctl start haproxy.service
sudo systemctl enable haproxy.service
sudo systemctl status haproxy.service
sudo systemctl restart haproxy.service
sudo systemctl stop haproxy.service
Note: And access on http://<haproxy-server>:8080/stats
7] Testing HAproxy server
CloudFlare tunnel Setup
1) Add Cloudflare's package signing key:
sudo mkdir -p --mode=0755 /usr/share/keyrings
curl -fsSL https://pkg.cloudflare.com/cloudflare-main.gpg | sudo tee /usr/share/keyrings/cloudflare-main.gpg >/dev/null
2) Add Cloudflare's apt repo to your apt repositories
echo "deb [signed-by=/usr/share/keyrings/cloudflare-main.gpg] https://pkg.cloudflare.com/cloudflared any main" | sudo tee /etc/apt/sources.list.d/cloudflared.list3) Update repositories and install cloudflared
sudo cloudflared service install ‘Replace with your token’Note: Edit /etc/cloudflared/config.yml file (if present or else create) and replace with below configuration.
In your .cloudflared directory, create a config.yml file using any text editor. This file will configure the tunnel to route traffic from a given origin to the hostname of your choice.
tunnel: 'Replace with your token'
ingress:
  - hostname: opc-ha.xxxxx.com
    service: http://192.168.14.135:80
    originRequest:
     noTLSVerify: true
     httpHostHeader: opc-ha.xxxxxx.com
  - service: http_status:404
4) Run as service
Note: replace with your token
Replace below config in file /etc/systemd/system/cloudflared.service
[Unit]
Description=cloudflared
After=network-online.target
Wants=network-online.target
[Service]
TimeoutStartSec=15
Type=notify
ExecStart=/usr/bin/cloudflared --no-autoupdate tunnel run --token 'Replace with your token'
Restart=on-failure
RestartSec=5s
[Install]
WantedBy=multi-user.target
Save and Start service
sudo systemctl daemon-reload
sudo systemctl start cloudflared.service
sudo systemctl enable cloudflared.service
sudo systemctl status cloudflared.service
sudo systemctl restart cloudflared.service
If you don’t have token then follow below steps:
Authenticate cloudflared
cloudflared tunnel loginRunning this command will:
Open a browser window and prompt you to log in to your Cloudflare account. After logging in to your account, select your hostname.
Generate an account certificate, the cert.pem file, in the default cloudflared directory.
Create a tunnel and give it a name
cloudflared tunnel create <NAME>Running this command will:
Create a tunnel by establishing a persistent relationship between the name you provide and a UUID for your tunnel. At this point, no connection is active within the tunnel yet.
Generate a tunnel credentials file in the default cloudflared directory.
Create a subdomain of .yourdomain.com.
From the output of the command, take note of the tunnel's UUID and the path to your tunnel's credentials file.
Confirm that the tunnel has been successfully created by running:
cloudflared tunnel listCreate a configuration file
In your .cloudflared directory, create a config.yml file using any text editor. This file will configure the tunnel to route traffic from a given origin to the hostname of your choice.
tunnel: 'Replace with your token'
ingress:
  - hostname: opc-ha.xxxxxx.com
    service: http://192.168.14.135:80
    originRequest:
     noTLSVerify: true
     httpHostHeader: opc-ha.xxxxxx.com
  - service: http_status:404
4. Create DNS route
To route a published application through the tunnel:
cloudflared tunnel route dns mytunnel app.yourdomain.comThis command will create a CNAME record pointing to <UUID>.yourdomain.com.
If you are connecting a private network, route a private IP address or CIDR through the tunnel:
cloudflared tunnel route ip add <IP/CIDR> <UUID or NAME>Confirm that the route has been successfully established:
cloudflared tunnel route ip showRun as service
Note: replace with your token
Replace below config in file /etc/systemd/system/cloudflared.service
[Unit]
Description=cloudflared
After=network-online.target
Wants=network-online.target
[Service]
TimeoutStartSec=15
Type=notify
ExecStart=/usr/bin/cloudflared --no-autoupdate tunnel run --token 'Replace with your token'
Restart=on-failure
RestartSec=5s
[Install]
WantedBy=multi-user.target
Save and Start service
sudo systemctl daemon-reload
sudo systemctl start cloudflared.service
sudo systemctl enable cloudflared.service
sudo systemctl status cloudflared.service
sudo systemctl restart cloudflared.service