Although there are quite a lot of applications on Google Play Store, there are some Enterprise apps that are designed to be used internally within an organization and, therefore, not hosted on Google Play.
Scalefusion offers a provision that is a simple and easy way to upload and distribute your Android Enterprise applications to all the devices or devices in selected Device Profiles.
This tutorial guides you through the process of uploading your enterprise applications on Android devices.
Before You Begin
- Make sure Enterprise Store has been enabled for your account.
- Your account has been allocated the space required for your enterprise Application. To learn more about space allocation, please visit here.
Overview
Scalefusion allows you to upload your enterprise applications in the following two ways,
- Upload the APK file to Scalefusion Dashboard.
- Manifest path: Provide the link to the location where the APK file resides.
Uploading an APK File
Using this method, you can upload the APK file(s) of the application(s) to the Scalefusion dashboard.
- Login to Scalefusion Dashboard.
- Navigate to Application Management > Enterprise Store section.
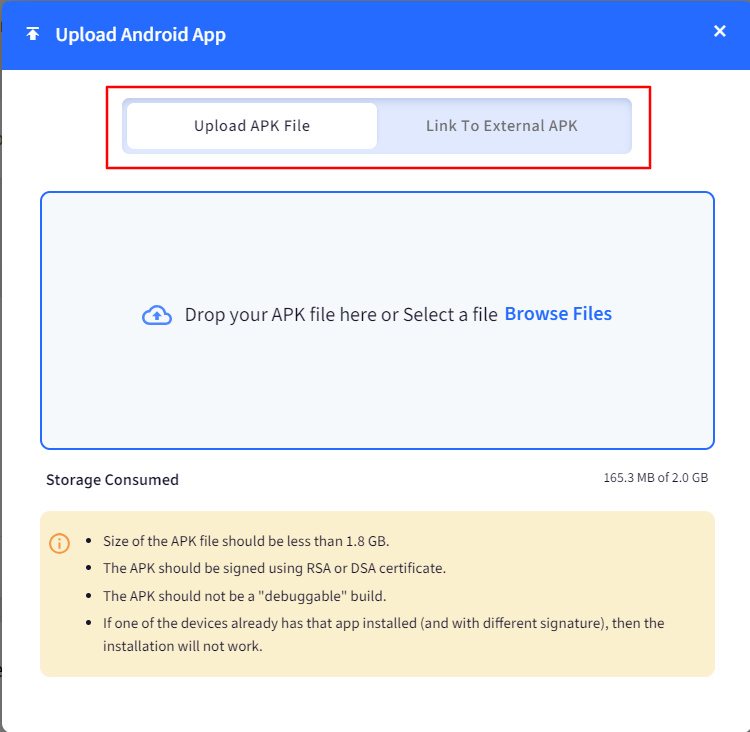
- Click on Upload New App > Upload Android App.
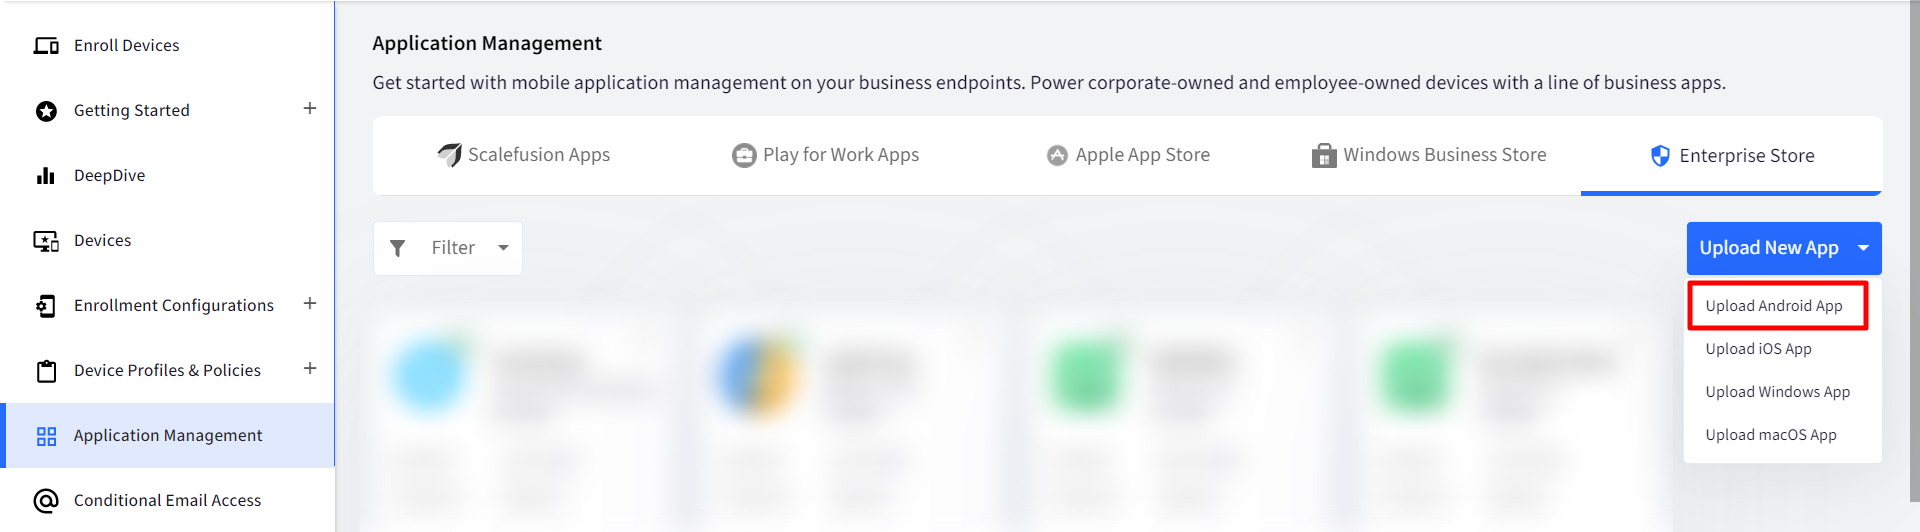
- You will be shown a dialog with two buttons:
- Upload the APK file.
- Link to External APK.
- Select Upload APK File.Google Drive link is not supported. Any other File Server that is public is supported
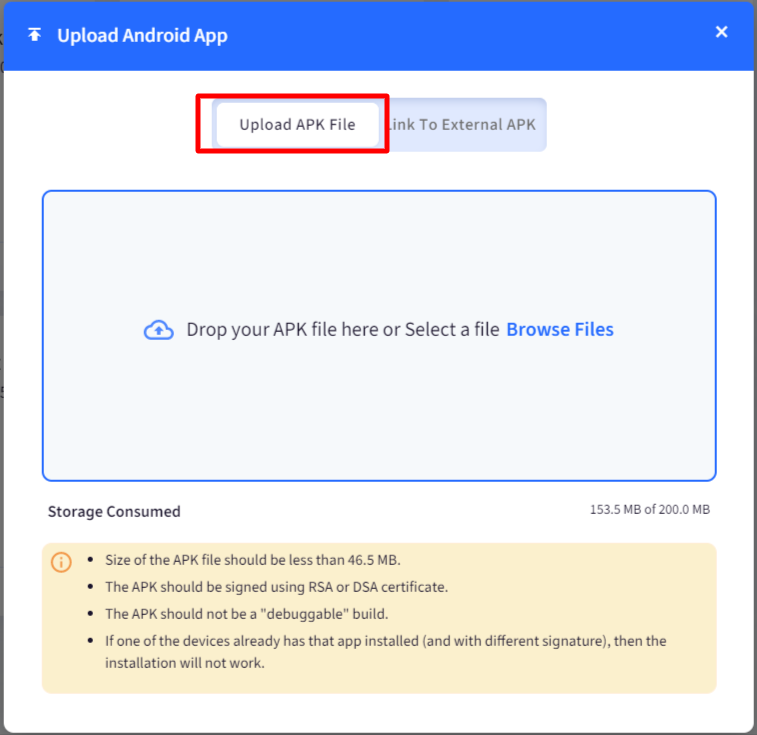
- Either Drag and drop the APK file or Click on Browse Files and browse the file on your machine.
- Once you upload the file, Scalefusion checks the validity of the APK file to make sure that it is an Enterprise application. This process will take around 3-5 minutes of time depending upon the size of the application being uploaded.If the apk file is unsigned, you get a different dialog box through which you need to custom-sign the apk first. To learn more about unsigned APKs, please visit here.

- If the application verification succeeds, then you will be shown a dialog with the App Information, with the list of Device Groups / Device Profiles / Device(s) where it can be published.
- If you want to Publish this application now, select the Device Groups / Device Profiles / Device(s) where you want to publish this and click PUBLISH.
- If you want to Publish the app later, just close the dialog.
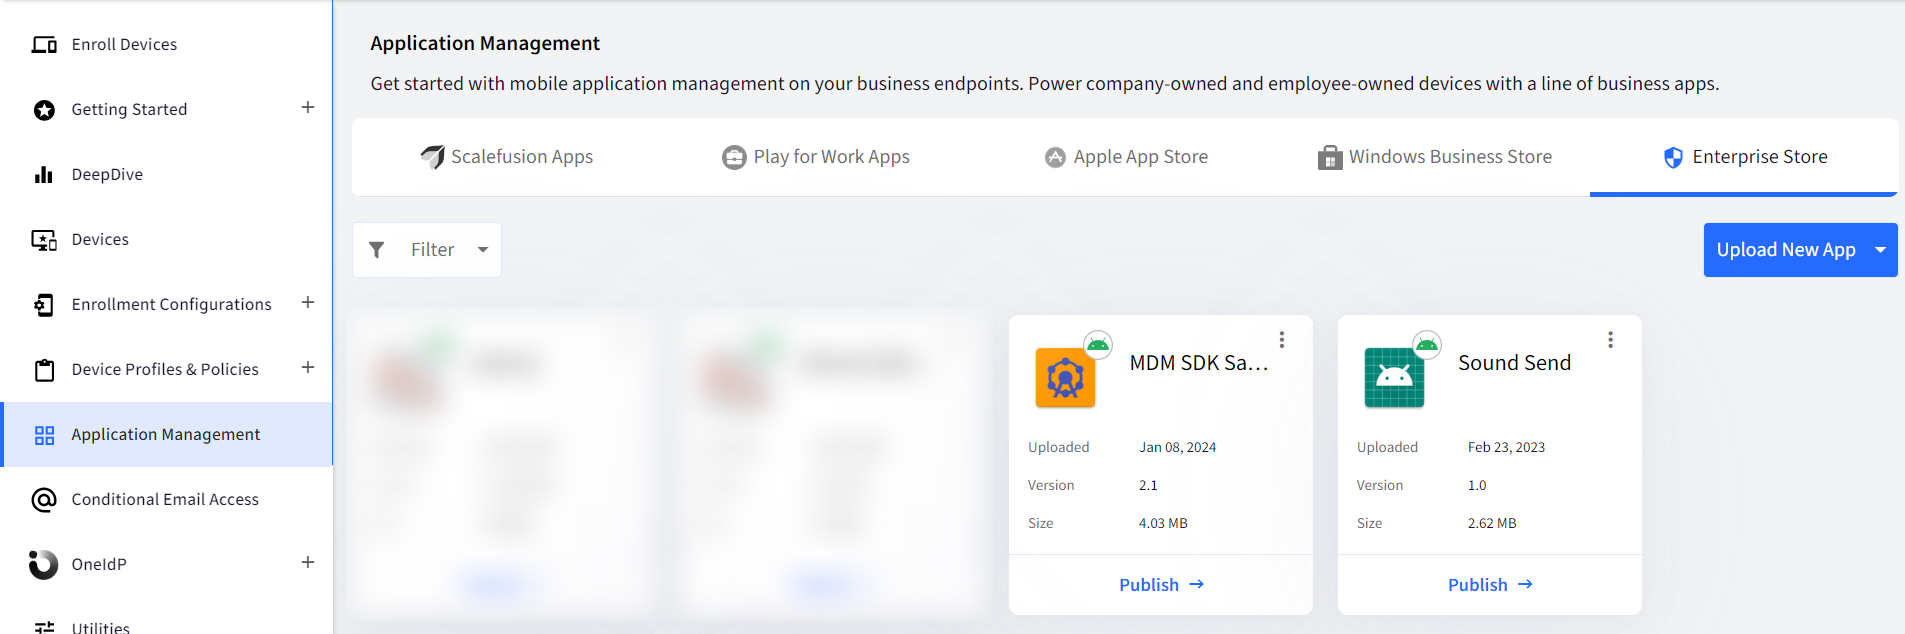
- The application will start appearing on the Enterprise Store page.
Upload using the APK link
- Login to Scalefusion Dashboard.
- Navigate to Application Management > Enterprise Store section.
- Click on Upload New App > Upload Android App.
- You will be shown a dialog with two buttons:
- Upload the APK file.
- Link to External APK.
- Select the Link to External APK.
- Here you will see a text box to enter the link of your apkfile. Please copy/paste the link to your manifest file here.Google Drive link is not supported. Any other File Server that is public is supported
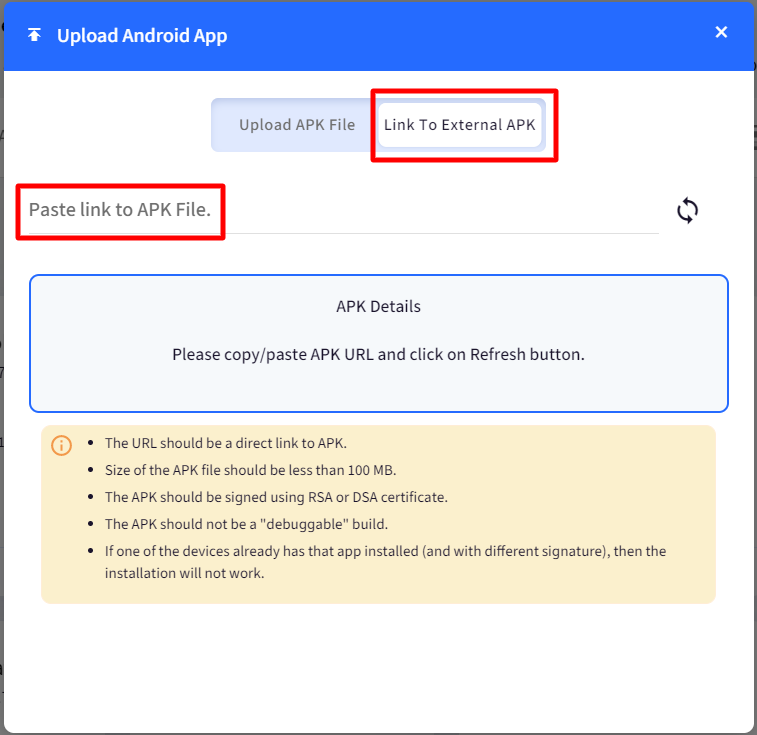
- Scalefusion will now start reading the apk file and validate the file and other entries.
- If the application verification succeeds, then you will be shown a dialog with the App Information, with the list of Device Groups / Device Profiles / Devices where it can be published.
- If you want to Publish this application now, select the Device Groups / Device Profiles / Devices where you want to publish this and click PUBLISH.
Note: You can even upload the lower or the same version of apps. While doing so, you will get a confirmation message before uploading information that you already have an updated version of the app. Click Continue Anyway if you want to upload a lower or the same version of the app.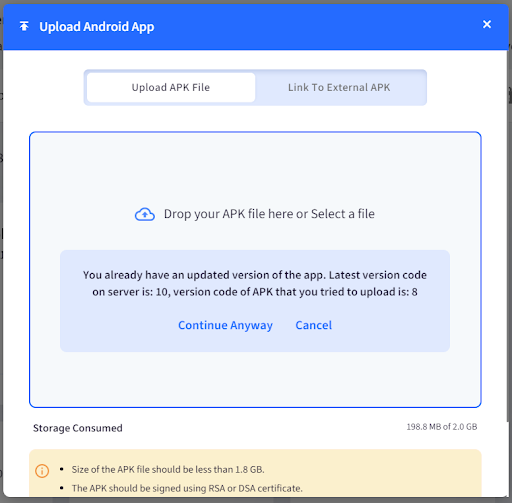
Publishing an Enterprise Application to a device
To publish/install the Enterprise Application on the device, follow these steps:
- In the Enterprise Store, click on the app name. A panel from the right-hand side will be opened.
- Click on Publish
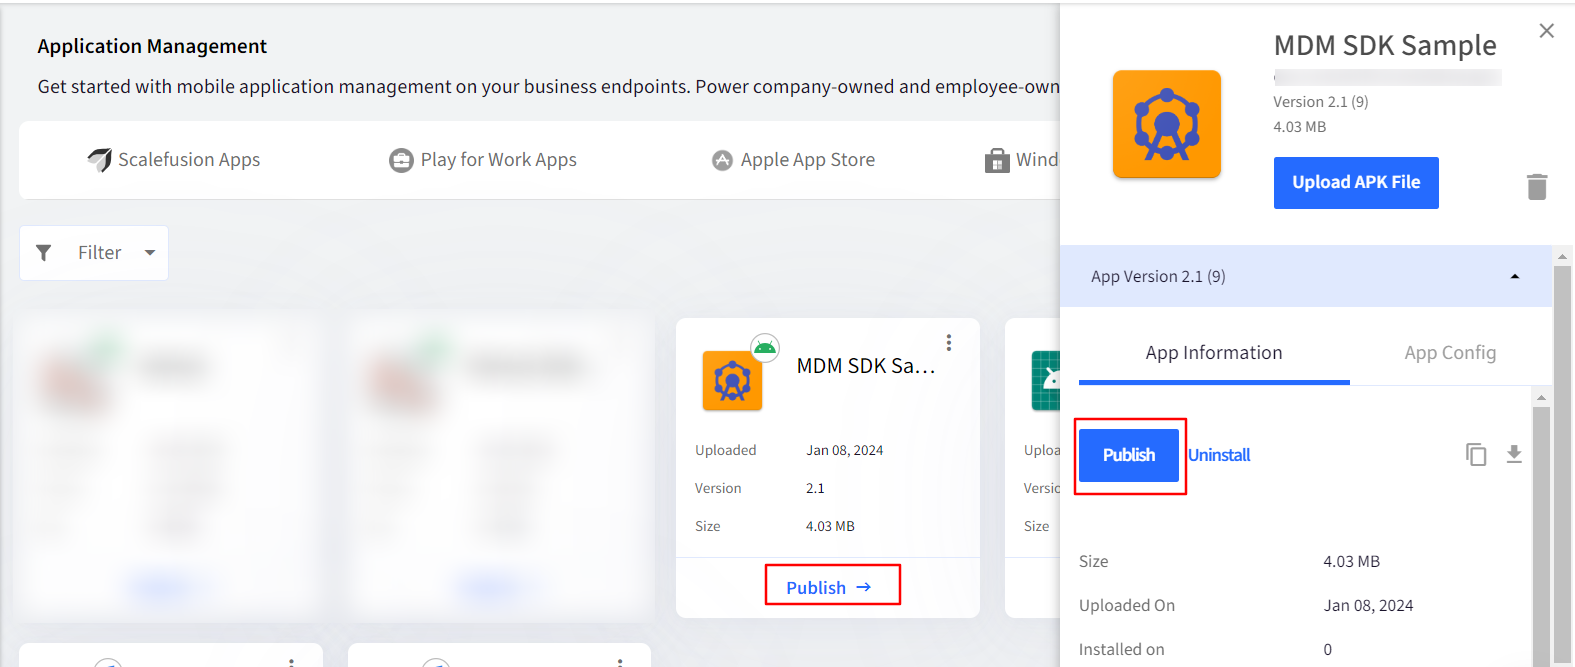
- You will be shown a dialog with the App Information and the list of Device Groups / Device Profiles / Device(s) where it can be published. This is mainly divided into following sections:
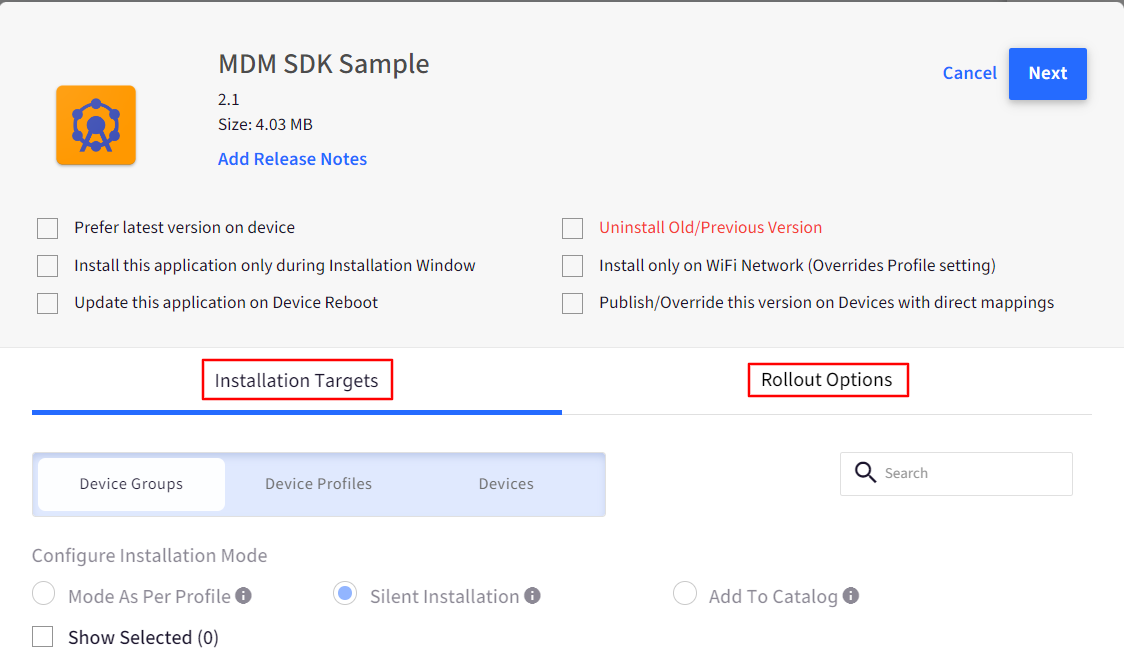
- Installation Targets: Allows you to select the groups/profiles/devices on which app has to be installed, configure installation mode, additional settings before installing.
- Rollout Options: If you want the app to be rolled out in stages instead of installing on all devices in one go, you can configure from this section. To configure staged rollout, make sure you have selected groups or device Profile(s) under Installation Targets.
- In the Publish dialog box, the following flags are present:
- Prefer the latest version on the device: The latest version of the application will get installed on the device
- Install this application only during Installation Window: The application will get installed right at the time of installation.
- Update this Application on Device Reboot: If enabled, it pushes an application update on the device whenever the updated version is uploaded into the Enterprise store. Thus, whenever the next device reboot happens, the updated version will get automatically installed on the device.
- Install only on Wifi Network: The enterprise app will get downloaded and installed only if the device is connected to Wifi network. If this is checked, the setting at profile level under App Management settings, will get overridden.
- Publish/Override this version on Devices with direct mappings: This flag will be visible when the setting Enable Applications to be published to Devices in a Group or profile is toggled on from Utilities > Global Settings > General Settings. If enabled, all direct mappings of this App from devices selected in Devices tab (older versions or newer versions), are removed and the currently mapped version is being pushed to the devices.If you are publishing downgraded version of an app to devices, one of the following conditions should be fulfilled:
- Prefer latest version is set to Off
- Uninstall Old/Previous Version is set to On
These flags are unchecked by default and can be associated with each app version.
- Configure Installation Mode
For per-app control at the time of publishing the app, admins can choose to follow the profile setting or override it for this app by silently installing it or adding it to the Catalog. Hence, there are three options to choose from:
Silent Installation: This would attempt a silent installation of the application and also make it available in the App Catalog for users to install it.
Add to Catalog: This would make the application available in the App Catalog and enabled when a user installs it.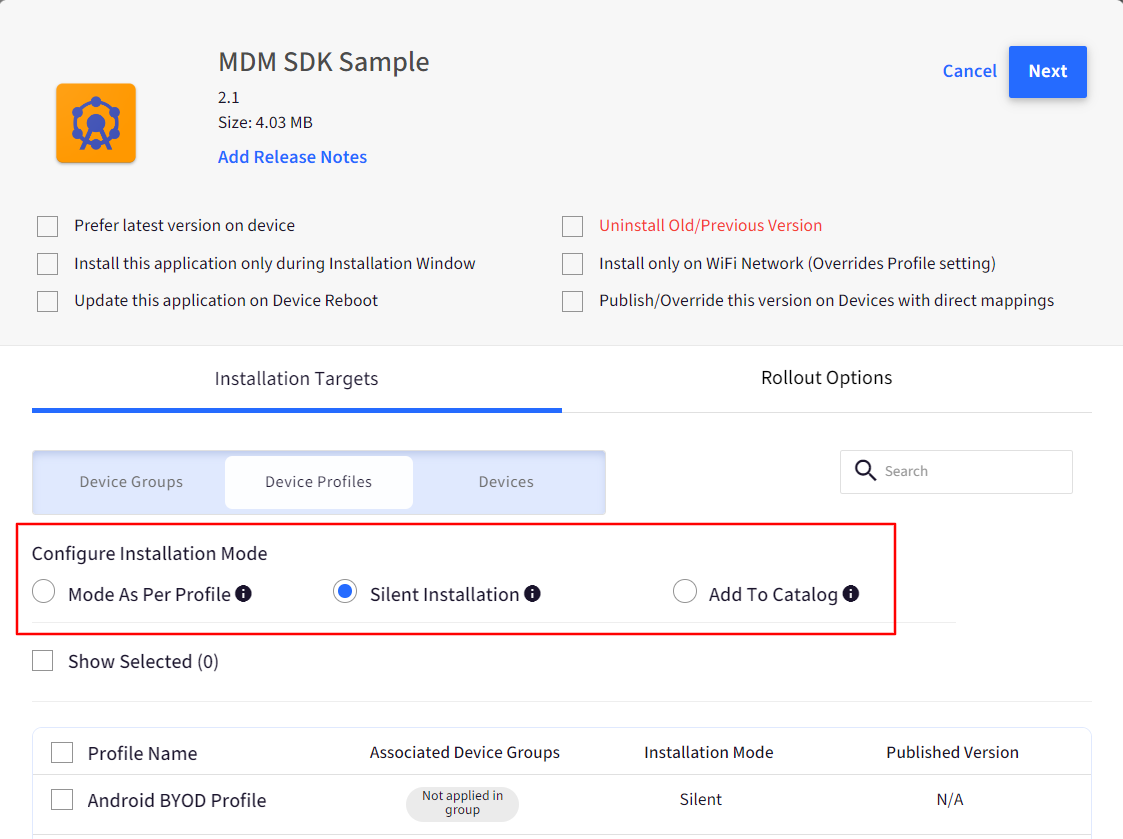
- Select the Device Groups / Device Profiles / Device(s) where you want to publish the app and click PUBLISH.
- After publishing, you can also view the status of the installation:
- On the Scalefusion Dashboard in the Enterprise Store, click on the app that you have published on your device. This will open a panel on the right side.
- Here, click on View Status.
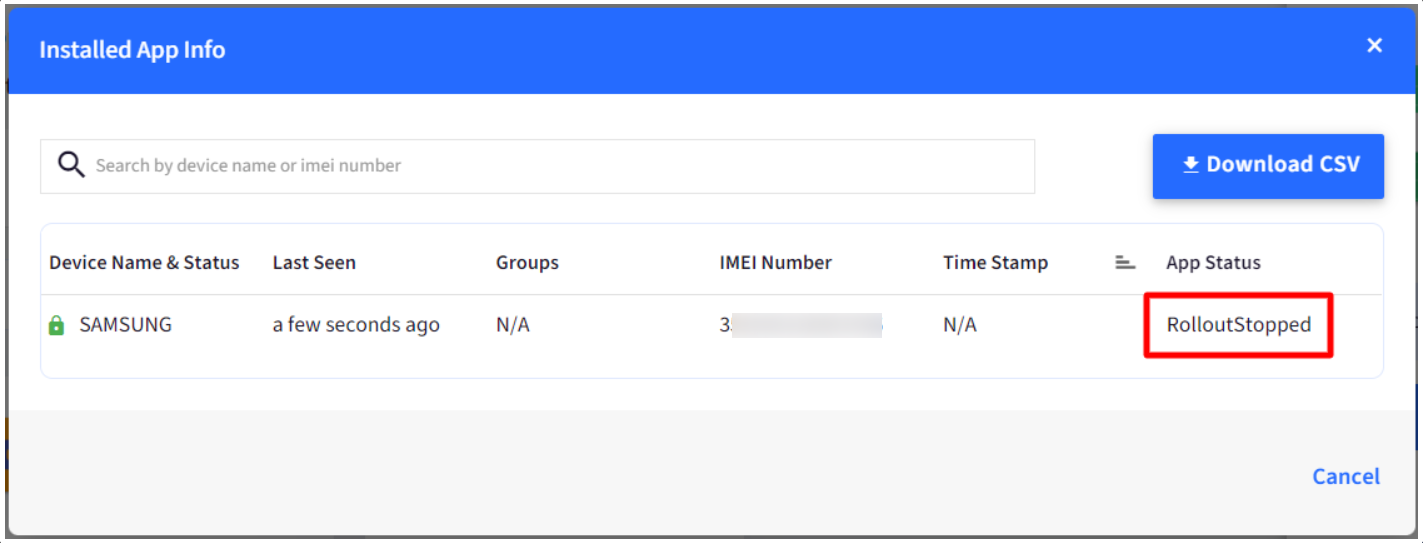
- A new window will open where the APP STATUS column reflects the status of installation along with other details of the device. If you have configured Staged Rollout, the status can be seen under Staged Rollout Status tab.
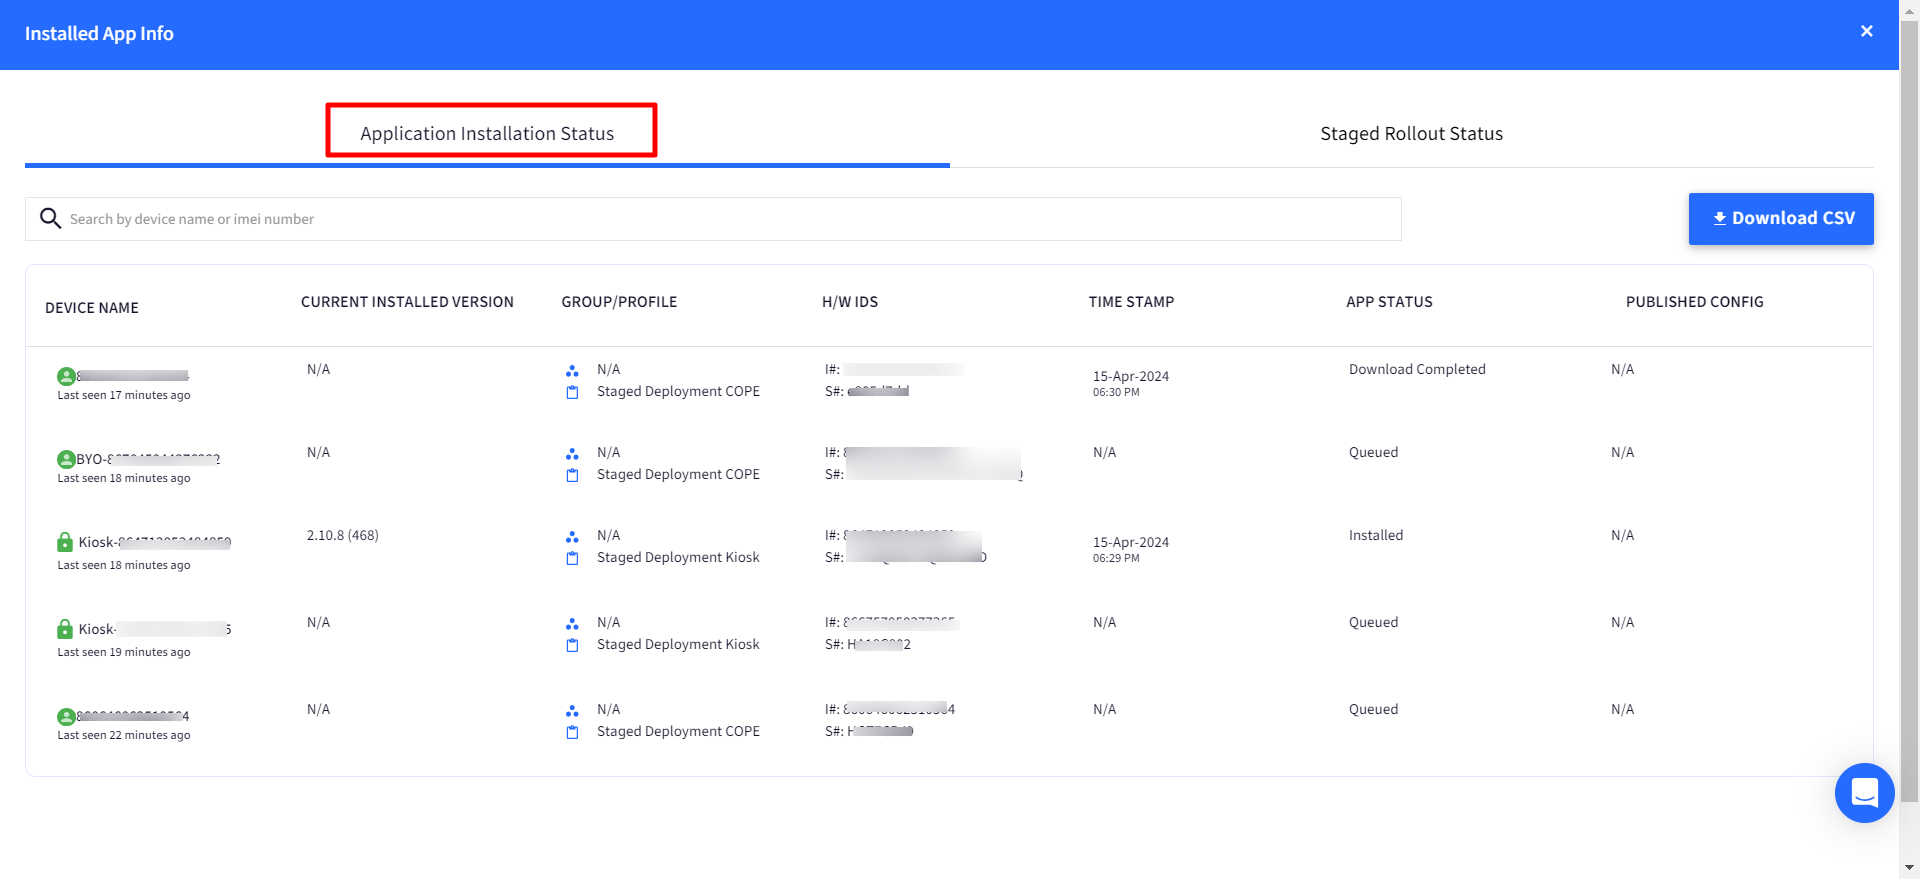
- When the App Status shows as installed, the app will reflect on the device.
Updating an Enterprise Application
If you want to update your Enterprise application, please follow the steps below,
- Login to Scalefusion Dashboard.
- Navigate to Application Management > Enterprise Store section.
- On the app that you want to update, click on the three dots over the app. This opens a menu. Choose Update.
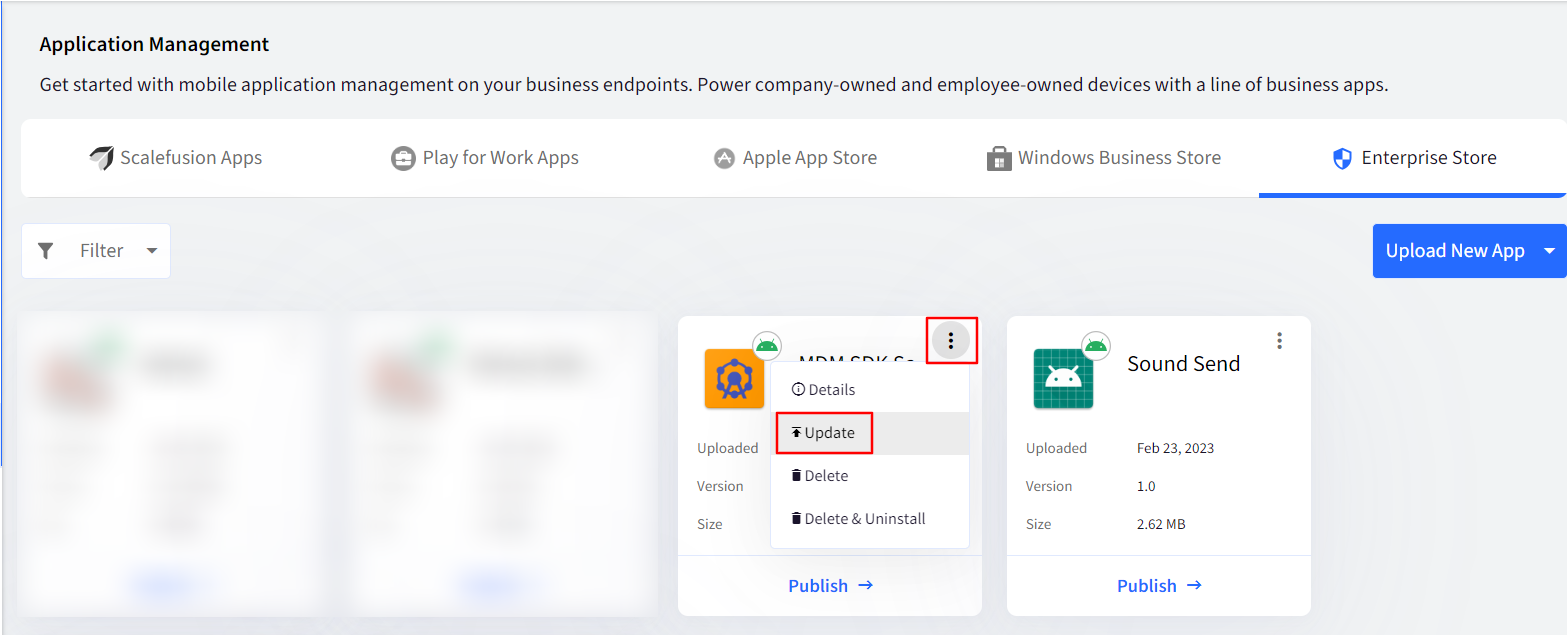
- You will be shown a dialog to Upload the new APK or Update the Link to the external APK.
- If you are uploading the APK file, choose Upload APK file.
- If you are using a link, then use Link to External APK.
- You can copy/paste if the URL has changed Or just click on the Refresh icon.
- After this step, Scalefusion verifies the new APK file, and if the application verification succeeds, then you will be shown a dialog with the App Information, with the list of Device Groups / Device Profiles / Device(s) where it can be published.
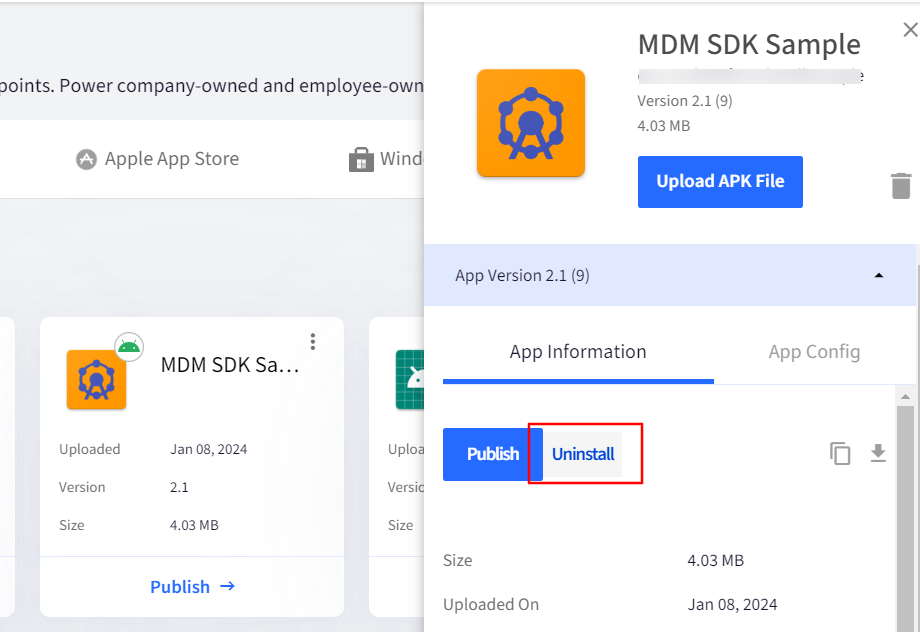
Uninstalling an Enterprise Application
To Uninstall an Enterprise Application, follow the steps below,
- Login to Scalefusion Dashboard.
- Navigate to Application Management > Enterprise Store section.
- Click on the App that you want to uninstall. A panel from the right-hand side will be opened.
- On the right-hand side panel, click on the UNINSTALL button.
- Select the Device Profiles where you want to uninstall and click the UNINSTALL button.
- Note that if this app had been set as Single App Mode, then the App will be uninstalled, and the devices will be out of Single App Mode. However, the last profile settings will still be applied.
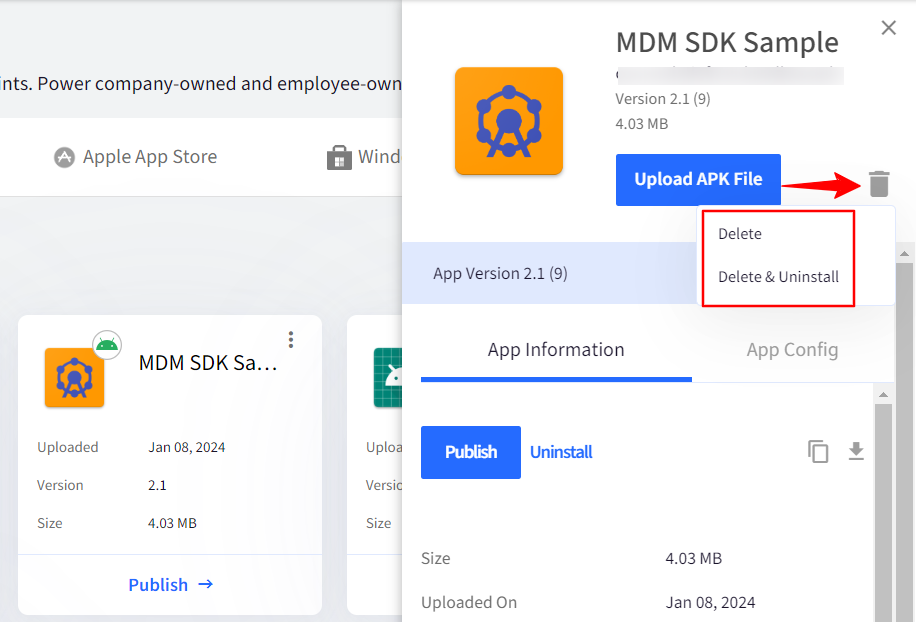
Deleting an Enterprise Application
You can either choose to Delete the application or Delete and uninstall the application. Follow the steps below to do the same,
- Login to Scalefusion Dashboard.
- Navigate to Application Management > Enterprise Store section.
- Click on the App that you want to delete. A panel from the right-hand side will be opened.
- On the right-hand side panel, click on Uninstall button.
- Or you can click on the Bin icon. From here you can choose from either of the two options:
- Delete: It would delete the APK file from the Dashboard.
- Delete & Uninstall: It would delete the APK file from the Dashboard and also Uninstall the app from the device.
Head over to our Application Configuration guide to learn how to configure Android applications from Dashboard.
Stop the Rollout of an Enterprise Application
Sometimes you may want to stop the rollout of Enterprise applications that have been published to groups or profiles, for example, if a wrong version is being pushed. You can stop the rollout of such apps, which only unpublishes the app from selected Groups, Profiles or Devices.
To stop the rollout,
- Select the Enterprise app and click on Stop Rollout in the right side panel.Stop rollout appears if the app version has been published on at least one device group/profile/device.
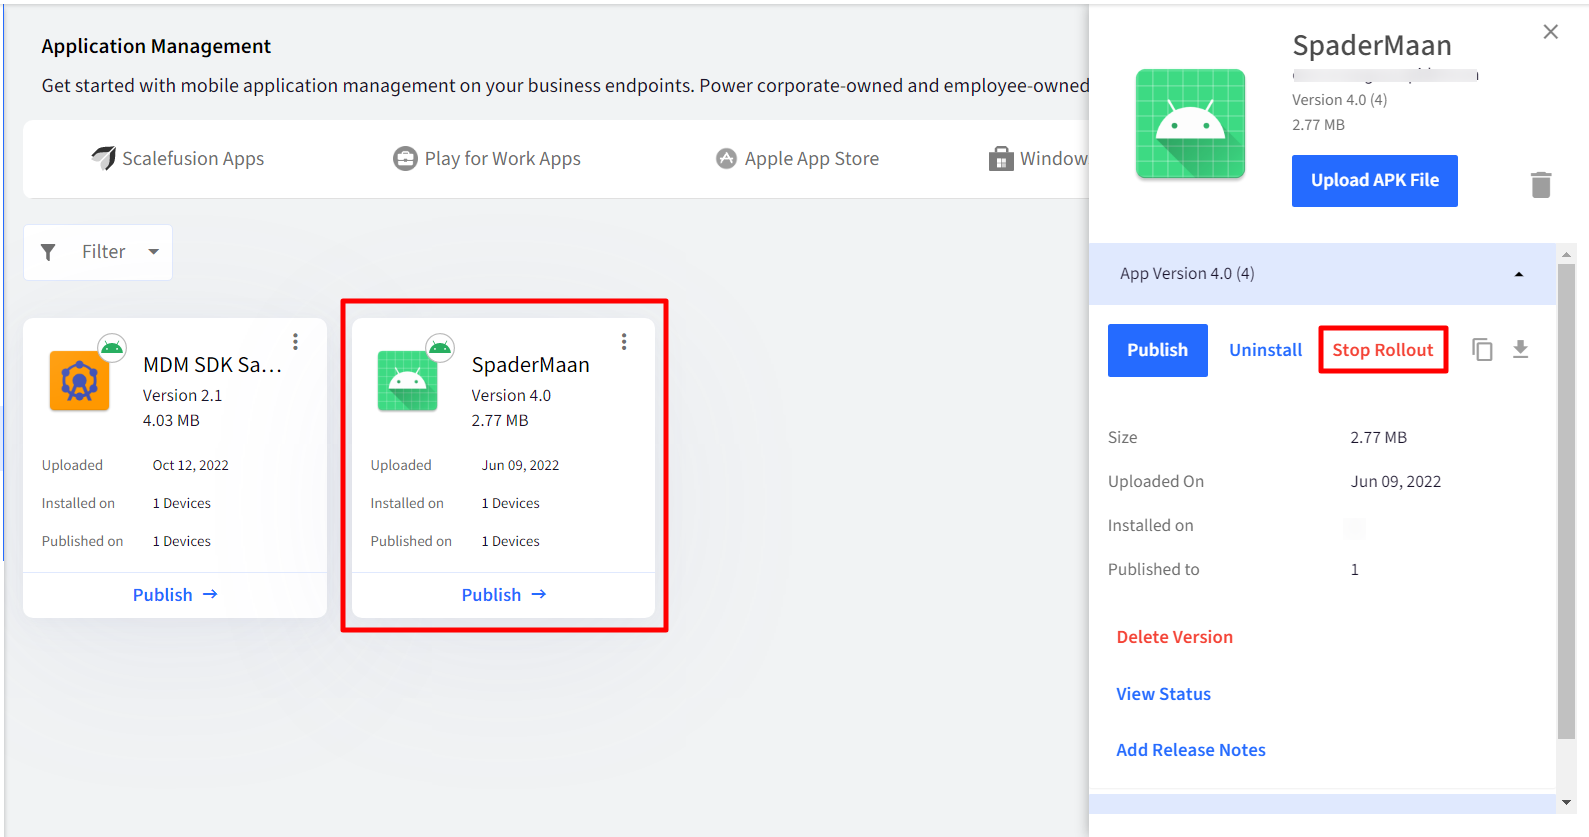
- This opens the following dialog box. Choose the Group, Profile or Devices on which you want to stop the app's rollout. Only the entities where the app has been published will be displayed here.
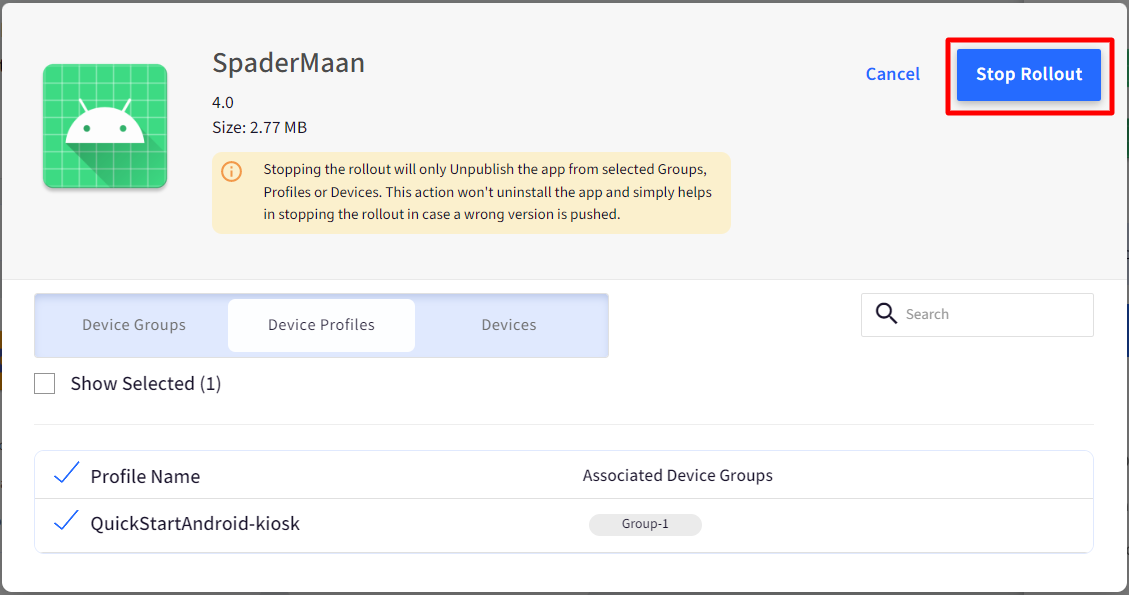
- After selecting, click on the button Stop rollout
- When executed,
- The application will be unpublished, and it will not be installed on devices where it is not installed yet.
- The Stop rollout button will no longer be visible in the right-side panel
Important Points on Stop Rollout's Execution
- You cannot stop the rollout of an app that is already installed on the device.
- On devices where downloading of the app has not started, the app will not be installed.
- On devices newly enrolled or moved to a device profile, the app will not be installed after the stop rollout.
- On such apps, View Status shows the App Status as Rollout Stopped.
Permissions on Enterprise Applications
IT Admins can also control and set runtime permissions for Enterprise Apps.
Important Points to note
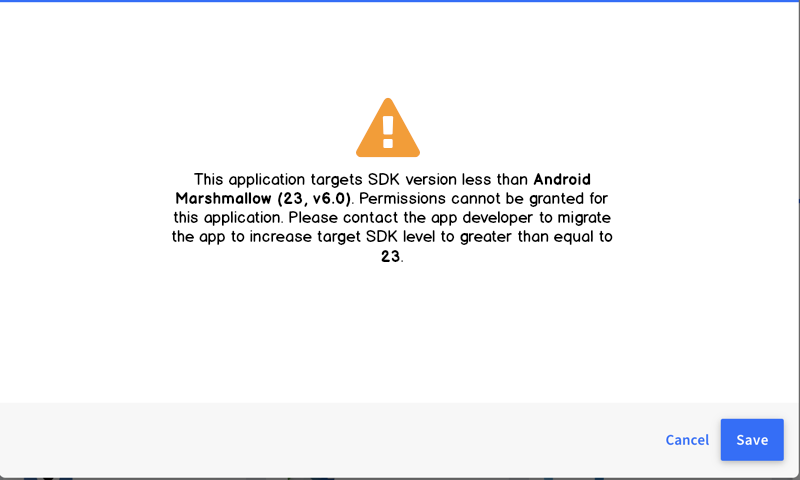
- Permissions can only be granted on apps targetting Android Marshmallow (23, v6.0) and above and not below. The target SDK level should be greater than equal to 23
- Permissions are applicable only on devices where Scalefusion is set as Device Owner or Samsung Knox has been activated, or Wingman App is available.
- Static Permissions like WRITE_SETTINGS, SYSTEM_ALERT_WINDOW, REQUEST_INSTALL_PACKAGES, PACKAGE_USAGE_STATS & BIND_NOTIFICATION_LISTENER_SERVICE can only be granted. These cannot be revoked.
- Static permissions require Android version 8.1.0 and above.
Steps to Configure Permission Settings
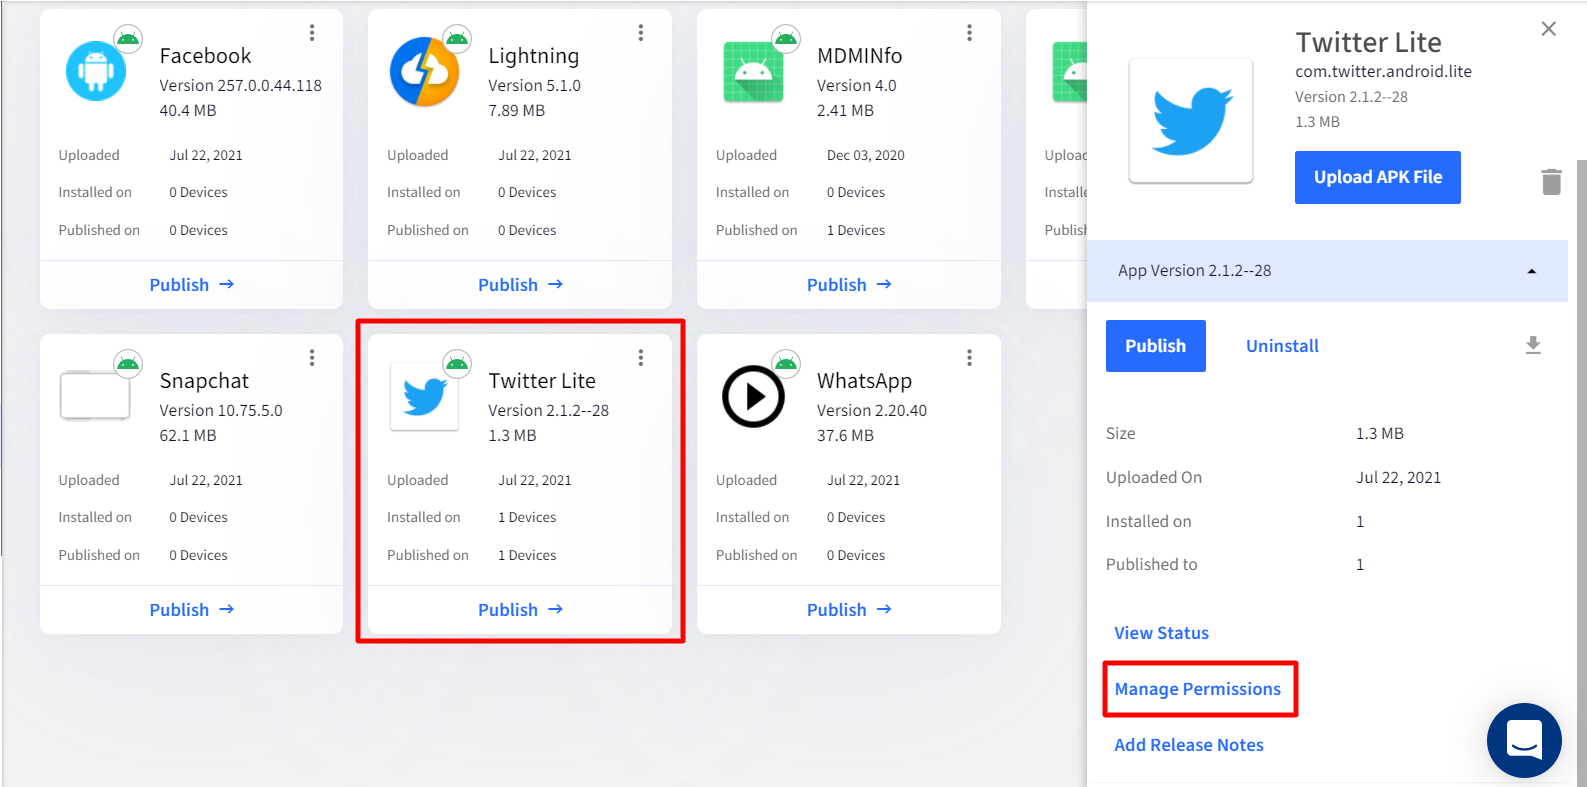
- In Application Management > Enterprise Store, click on the app name. This opens the right-side panel
- Click on Manage Permissions
- If the API's target SDK is less than 23, then the following message is displayed
- Else, a dialog box opens up in which you can configure permission settings for the app
- There are three options. Select one as per requirement:
Ask Always: The user can view a prompt. By default, this option is selected.
Grant: Permissions are granted by default.
Deny: Permissions are denied.For existing apps, none of the options would be selected.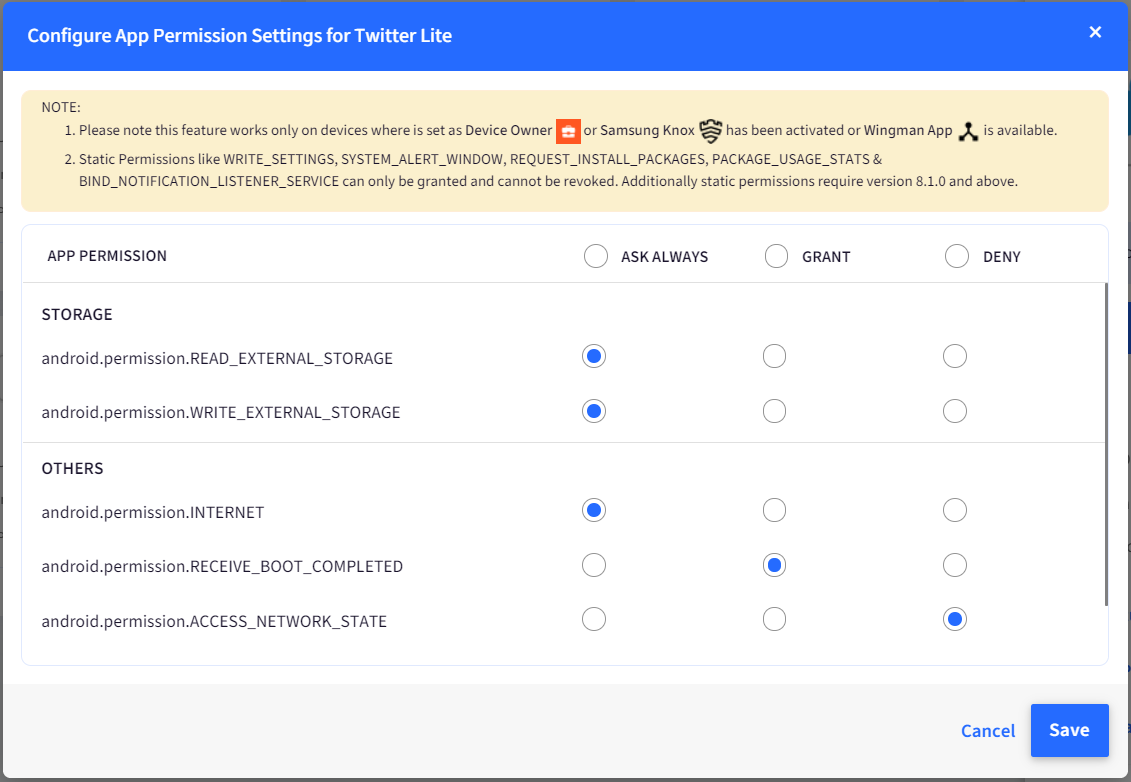
- Click SaveThe configured permissions on the app will be implemented only when you click Save
- The permissions will be applied on the device when the app is published.
FAQs
Q: How does app configuration publishing work when both DBAP (Enable Applications to be published to Devices in a Group or profile) and GBAP (Enable Enterprise apps to be published to Groups with a profile) are enabled, and a Play for Work (PFW) or Enterprise App is published?
A: When both DBAP and GBAP are enabled, and a PFW or Enterprise App is published with any of the methods, the following applies to app configuration:
If the app is published directly to a device/device group (by selecting specific devices/device groups in the publishing dialog), the associated app configuration should also be published in the same manner, that is, by choosing either device or device group. This ensures consistency in how the app and its configuration are mapped and delivered.
Q. How can I determine whether an Enterprise App was published to a device using Device-Based App Publishing (DBAP) or Group-Based App Publishing (GBAP)?
A. To identify the publishing method, follow these steps:
- Click Uninstall for the app
- In the Uninstall dialog, check the Devices tab
- If the device is listed here, the app was published using DBAP
- If the device is not listed under Devices tab, check the Device Groups and Device Profiles tabs.
- If the device is listed under Device Groups, the app was published using GBAP.
- If the device is listed under Device Profiles, the app was published at profile level
Q. I have published an App Config, but it's not visible on the device. What should I do?
A. Kindly ensure that the app config is published using the same method that was opted while publishing the associated app.