Although there are quite a lot of applications in the iTunes Store, some organizations choose to have dedicated Enterprise iOS applications that are distributed only to the device in the organization.
Scalefusion offers you a simple and easy way to upload and distribute your Enterprise iOS applications to all the devices or devices in selected Device Profiles.
This tutorial guides you through the process of uploading your enterprise applications.
Before You Begin
- Make sure Enterprise Store has been enabled for your account.
- Your account has been allocated the space required for your enterprise Application. To learn more about space allocation, please visit here.
Video Guide:
Please watch the video below to get a visual walkthrough.
Overview
Types of files
There are two types of files you can upload on iOS devices via Scalefusion's Enterprise Store, viz:
- IPA files: Allows you to upload IPA files on iOS devices
- eBook or pdf files: Allows you to publish e-books in the form of ePub and PDFs
Ways to Upload
Scalefusion allows you to upload your enterprise applications in the following ways,
- Upload the IPA file or EPUB/PDF file to the Scalefusion Dashboard.
- Upload the manifest.plist file if the IPA file is self-hosted on your servers.
- Provide direct URL of the epub file if it is hosted on external servers
How to Upload
- Login to Scalefusion Dashboard.
- Navigate to Application Management > Enterprise Store section.
- Click on Upload New App > Upload iOS App.
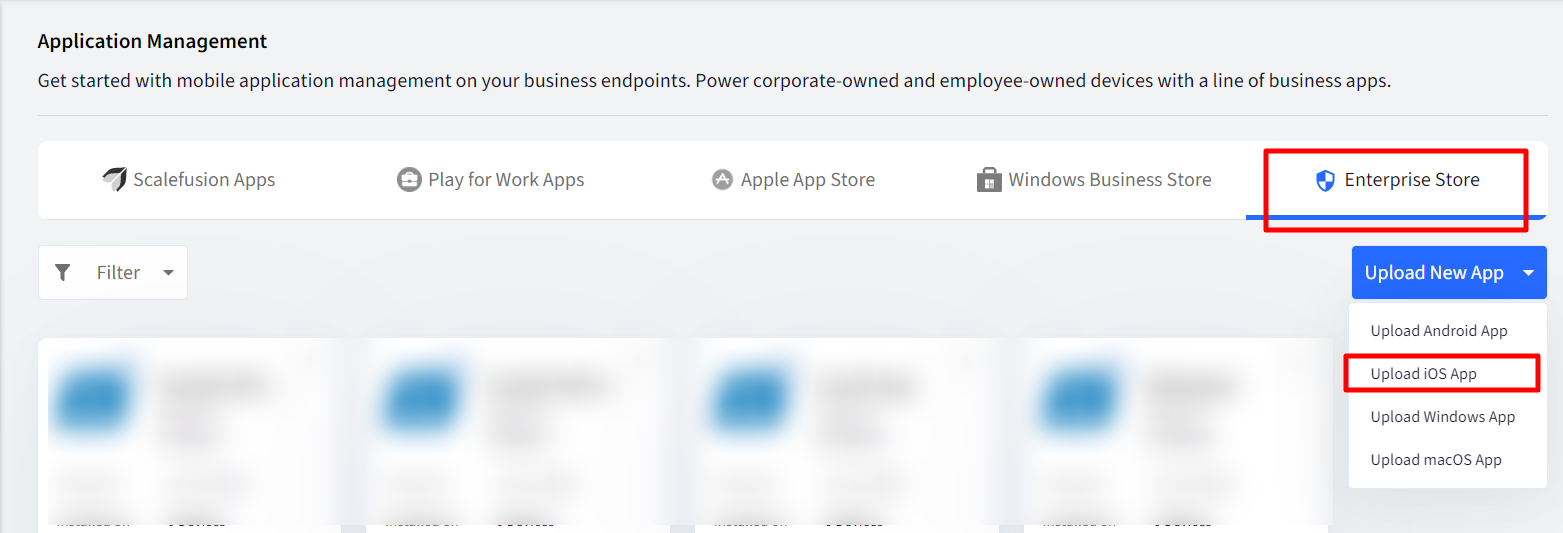
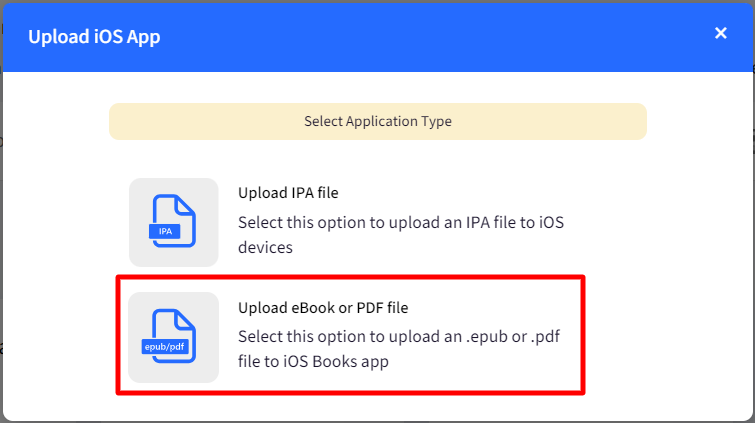
- The following dialog box will come up
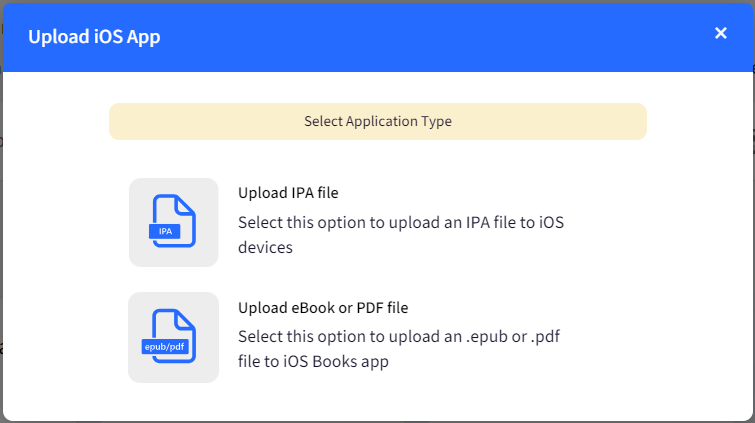
- The next sections describe
Uploading an IPA File
Upload using an IPA file
This option is useful where you have the IPA file, but it is not hosted on any of your servers. Using this method, you can upload the IPA files to the Scalefusion dashboard.
- Under Select Application Type, Click on Upload IPA file
- You will be shown a dialog with 2 buttons-
- Upload using an IPA file.
- Upload using the Plist link.
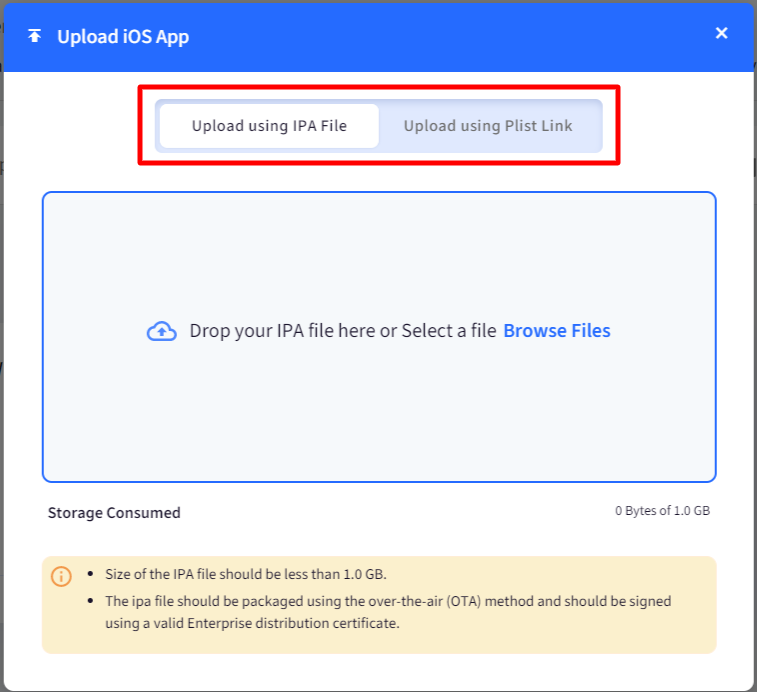
- Select Upload using the IPA file.
- Either Drag and drop the IPA file or Click on Browse Files and browse the file on your machine.
- Once you upload the file, Scalefusion checks the validity of the IPA file to make sure that it is an Enterprise application. This process will take around 3-5 minutes of time depending upon the size of the application being uploaded.
- If the application verification succeeds, then you will be shown a dialog with the App Information, with the list of Device Profiles where it can be published.
- If you want to Publish this application now, select the Device Profiles where you want to publish this and click PUBLISH.
- If you want to Publish it later, just close the dialog.
Upload using the Plist link
This option is quite handy if you have self-hosted the IPA file on your servers and/or do not want to upload the IPA file to an external server. Follow the below steps to upload a plist file to the Scalefusion dashboard,
- Login to Scalefusion Dashboard.
- Navigate to Application Management > Enterprise Store section.
- Click on Upload New App > Upload iOS App.
- You will be shown a dialog with 2 buttons-
- Upload using an IPA file.
- Upload using the Plist link.
- Select Upload using the Plist link.
- Here you will see a text box to enter the link of your manifest .plist file. Please copy/paste the link to your manifest file here.
- Scalefusion will now start reading the plist file and validate the IPA file and other entries. Note we do not store the IPA file; just download it temporarily to validate it.
- If the application verification succeeds, then you will be shown a dialog with the App Information, with the list of Device Profiles where it can be published.
- If you want to Publish this application now, select the Device Profiles where you want to publish this and click PUBLISH.
Uploading EPUB/PDF files
Upload Local EPUB/PDF file
- Under Select Application Type, click on Upload eBook or pdf file
- You will be shown a dialog with 2 buttons:
- Upload local EPUB/PDF file.
- Link to external EPUB/PDF file.
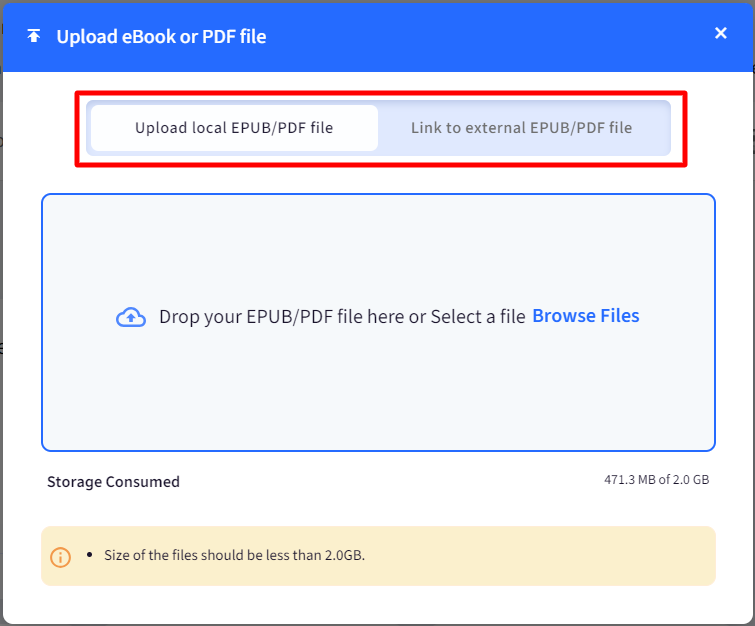
- Select Upload local EPUB/PDF file.
- Either Drag and drop the file or Click on Browse Files and browse the file on your machine.
- Once you upload the file, Scalefusion checks the validity of the file to make sure that it is an epub/pdf or media file. This process will take around 3-5 minutes of time depending upon the size of the epub/pdf or media file being uploaded.
- If the epub/pdf or media file verification succeeds, then you will be shown a dialog with the file information and the list of Device Profiles where it can be published.
- If you want to Publish this epub/pdf or media file now, select the Device Profiles where you want to publish this and click PUBLISH.
- If you want to Publish it later, just close the dialog.
Upload with external link
Follow the below steps to upload a link to the Scalefusion dashboard,
- In the Upload eBook or pdf file dialog, click on Link to External EPUB/PDF file.

- Here you will see a text box to enter the link of your .epub file. Please copy/paste the link to your manifest file here and click on Refresh icon. The URL should be a direct link to EPUB file.
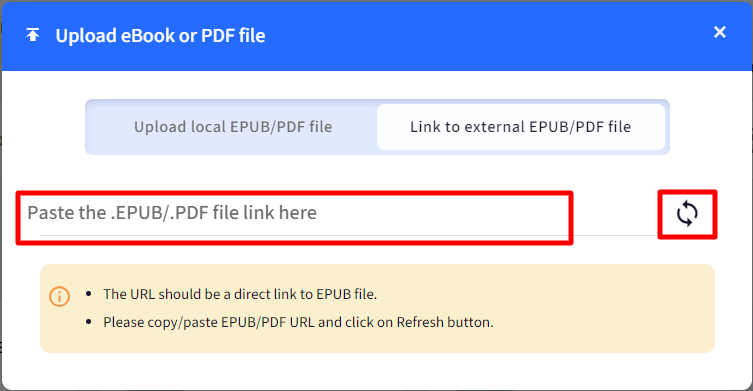
- Scalefusion will now start reading the file and validate the file and other entries. Note we do not store the file; just download it temporarily to validate it.
- If the application verification succeeds, then you will be shown a dialog with the App Information, with the list of Device Profiles where it can be published.
- If you want to Publish this application now, select the Device Profiles where you want to publish this and click PUBLISH.
Publishing the Application to Device profiles
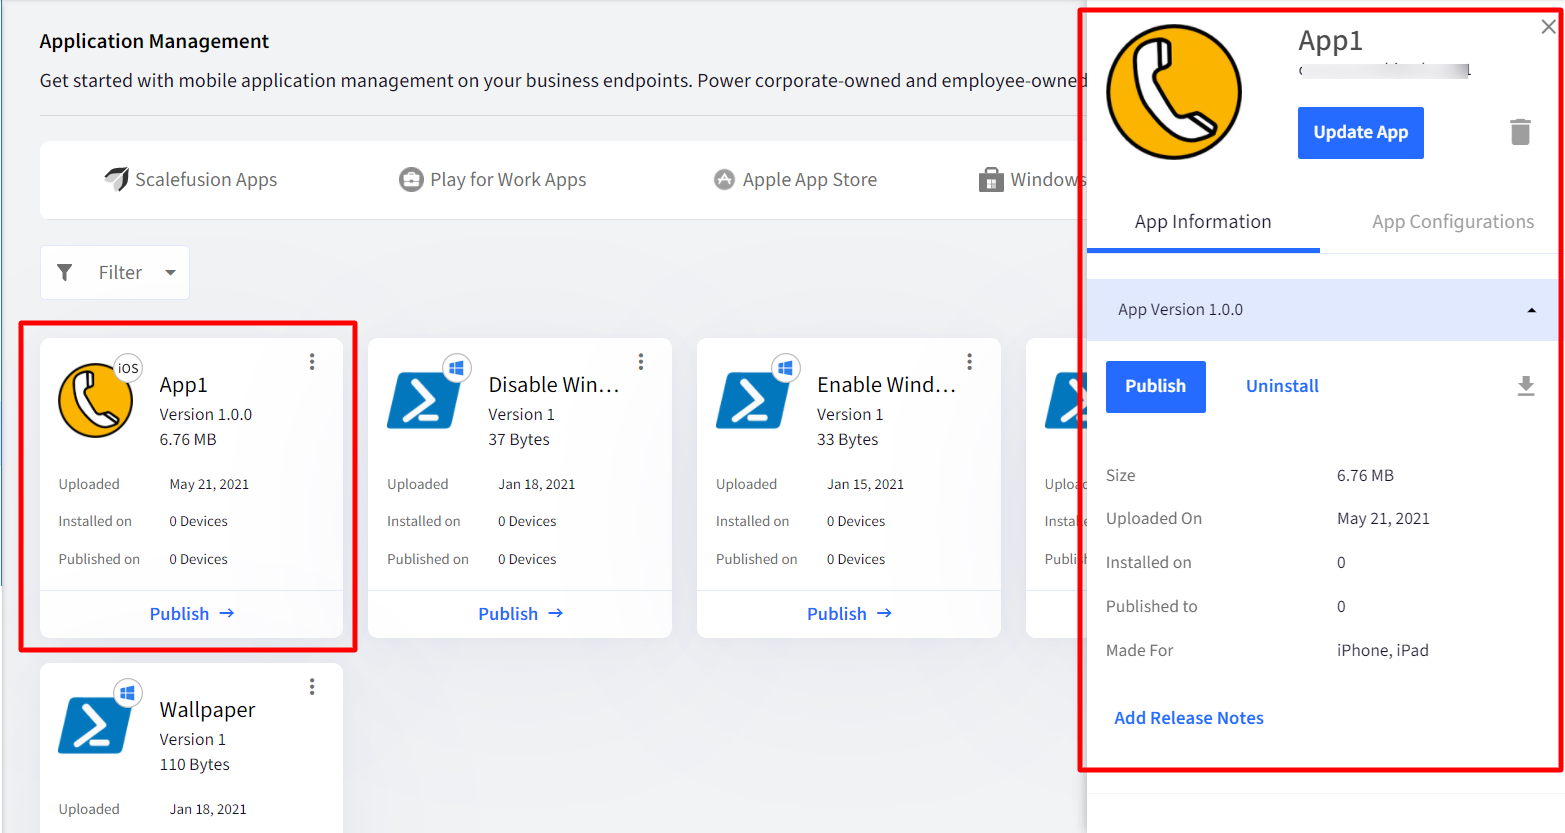
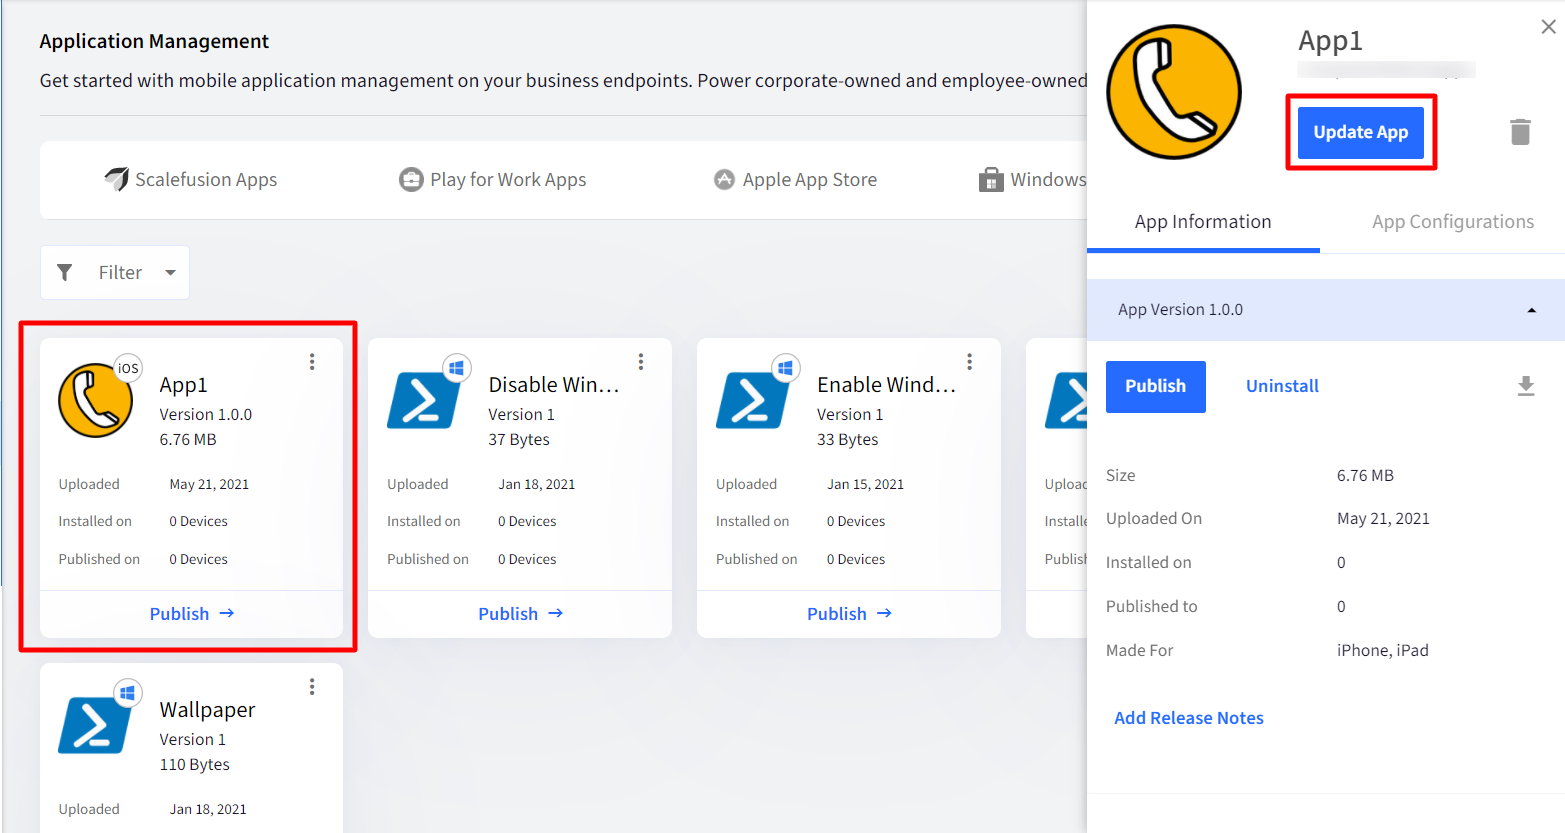
- Navigate to Application Management > Enterprise Store. Click on the application that you have added. This will open up a panel from the right-hand side with the following information & options.
- View Options
- App Information.
- View the Status of Installations on devices.
- Action Commands
- PUBLISH
- UNINSTALL
- REFRESH
- DELETE | DELETE & UNINSTALL
- View Options
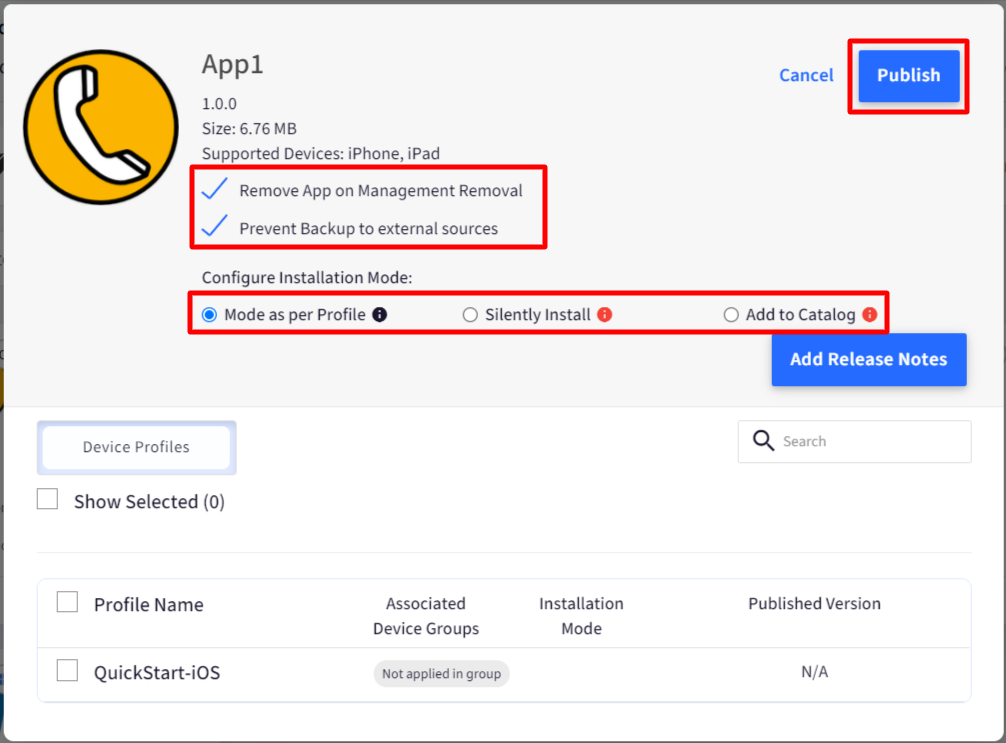
- Click on the PUBLISH button. This will open a dialog that will show you all the Device Profiles that you have created. Along with this, the following additional settings can be configured:
- Remove App on Management Removal: Users can control whether they want the published app to be removed from the device after device management removal.
- Prevent Backup to external sources: With this flag user can control whether the app's data has to be backed up when the device data is backed up to iCloud, using the iTunes ID on the device if available.
- Publish/Override this version on Devices with direct mappings: This flag will be visible when the setting Enable Applications to be published to Devices in a Group or profile is toggled on from Utilities > Global Settings > General Settings. If enabled, all direct mappings of this App from devices selected in Devices tab (older versions or newer versions), are removed and the currently mapped version is being pushed to the devices.
- Configure Installation mode: To override the installation mode selected at the profile level (Restrictions > App Management Settings), the admin can configure how an app has to be published at the per-app level. Following are the three options to choose from:
- Mode as per Profile: The application would be silently installed or added to the app catalog as per profile settings
- Silently Install: This would attempt a silent installation of the application on the device. Silent installation works for Supervised devices.
- Add to Catalog: Add this app to the catalog for user-initiated installation. If the App catalog is not enabled at the profile level, then the app will be silently installed.
- Select the Device Profile(s) where you want to install this application and click PUBLISH on the dialog.
You can click the View Status link to see how many devices it is installed.
Updating an Enterprise Application
If you want to update your Enterprise application, please follow the steps below,
- Login to Scalefusion Dashboard.
- Navigate to Application Management > Enterprise Store section.
- Click on the App that you want to update. A panel from the right-hand side will be opened.
- On the right-hand side panel, click on the UPDATE App button.
- You will be shown a dialog to Upload the New IPA or Update the Plist file.
- If you are uploading the IPA file, choose Upload using the IPA file.
- If you are using a self-hosted file, then use Upload using the Plist link.
- You can copy/paste if the URL has changed Or just click on the Refresh icon.
- After this step, Scalefusion verifies the new IPA file, and if the application verification succeeds, then you will be shown a dialog with the App Information, with the list of Device Profiles where it can be published.
Uninstalling an Enterprise Application
To Uninstall an Enterprise Application, follow the steps below,
- Login to Scalefusion Dashboard.
- Navigate to Application Management > Enterprise Store section.
- Click on the App that you want to uninstall. A panel from the right-hand side will be opened.
- On the right-hand side panel, click on the UNINSTALL button.
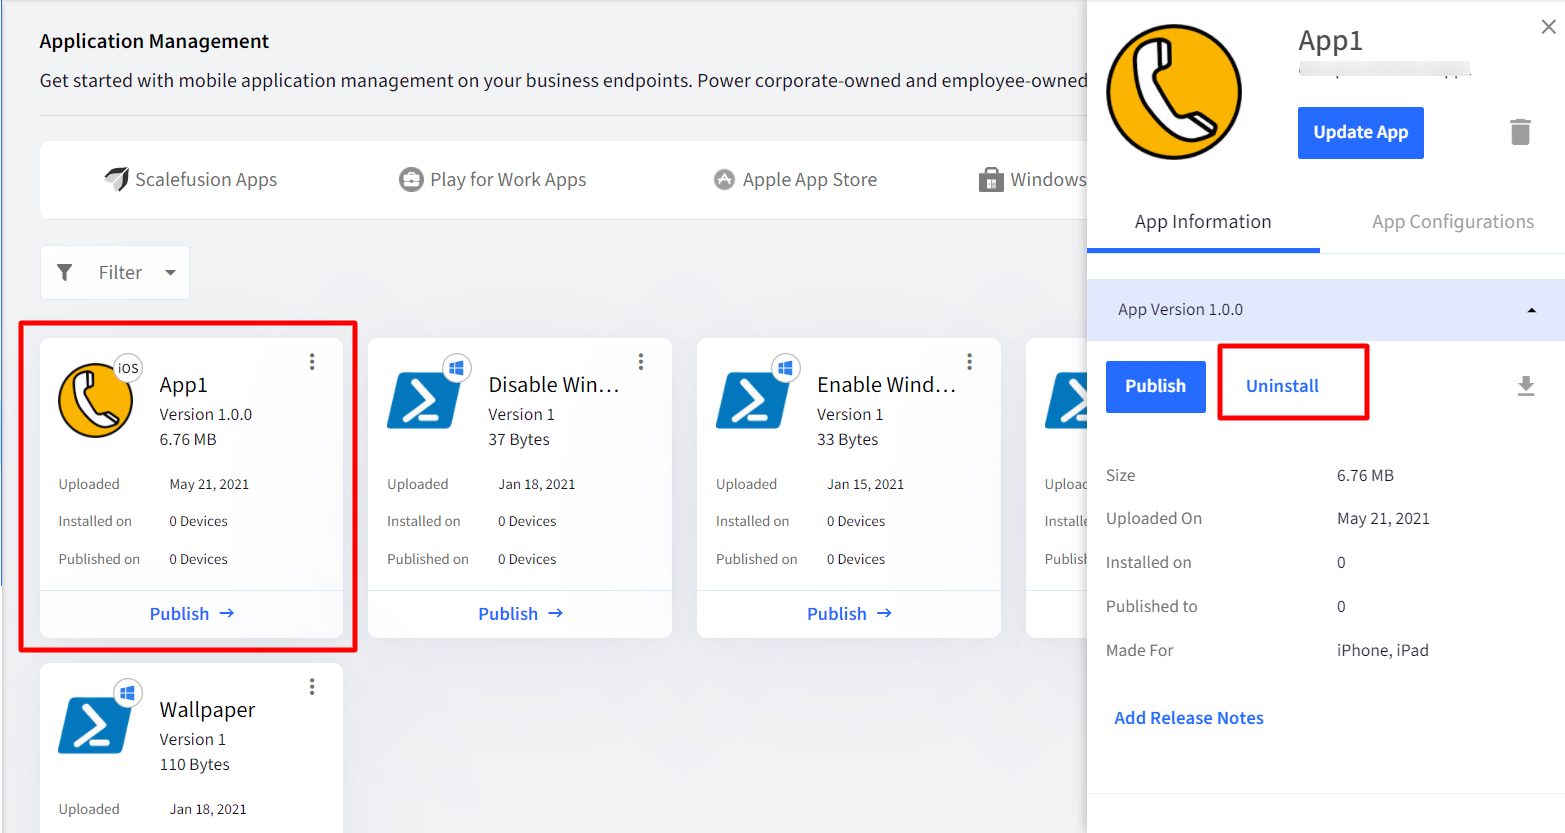
- Select the Device Profiles where you want to uninstall and click the UNINSTALL button.
- Note that if this app had been set as Single App Mode, then the App will be uninstalled, and the devices will be out of Single App Mode. However, the last profile settings will still be applied.
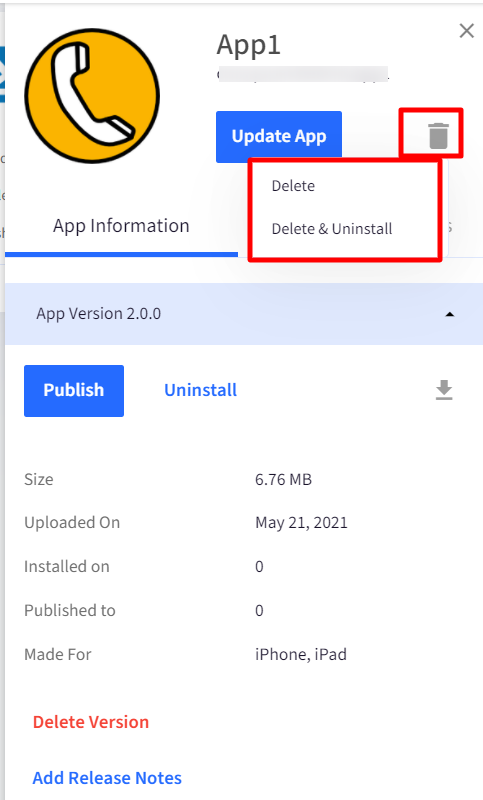
Deleting an Enterprise Application
You can either choose to Delete the application or Delete and uninstall the application. Follow the steps below to do the same,
- Login to Scalefusion Dashboard.
- Navigate to Application Management > Enterprise Store section.
- Click on the App that you want to delete. A panel from the right-hand side will be opened.
- On the right-hand side panel, click on the Bin icon below the package name.
- Here you can choose from either of the 2 options,
- Delete - It would delete the IPA file from the Dashboard.
- Delete & Uninstall - It would delete the IPA file from the Dashboard and also Uninstall the app from the device.
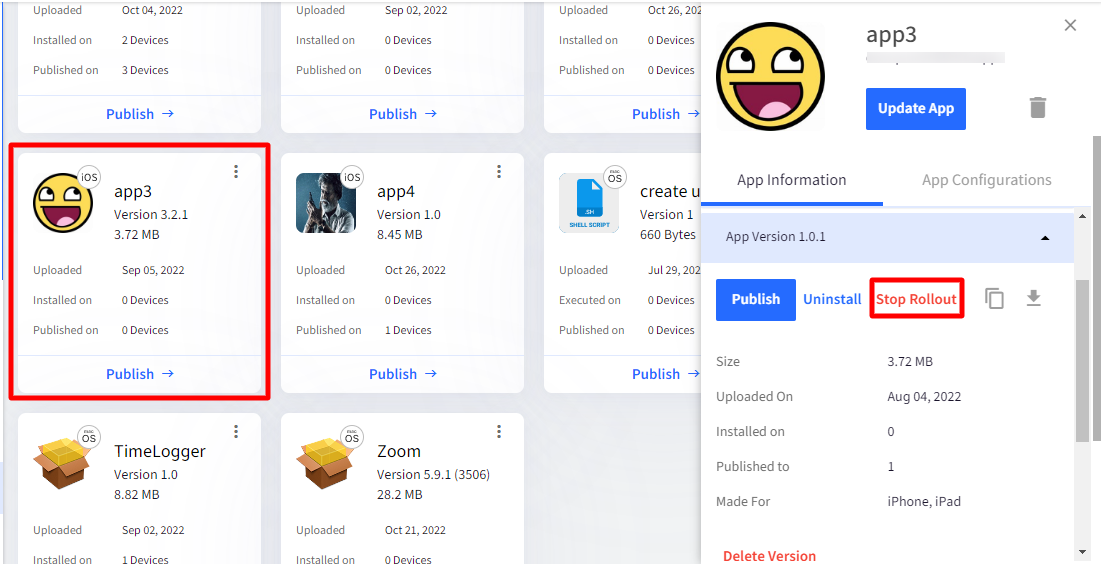
Stop the Rollout of an Enterprise Application
Sometimes you may want to stop the rollout of Enterprise applications that have been published to groups or profiles, for example, if a wrong version is being pushed. You can stop the rollout of such apps, which only unpublishes the app from selected Groups or Profiles.
To stop the rollout:
- Select the Enterprise app and click on Stop Rollout in the right side panel.
- This opens the following dialog box. Choose the Group or Profile on which you want to stop the app's rollout. Only the entities where the app has been published will be displayed here.
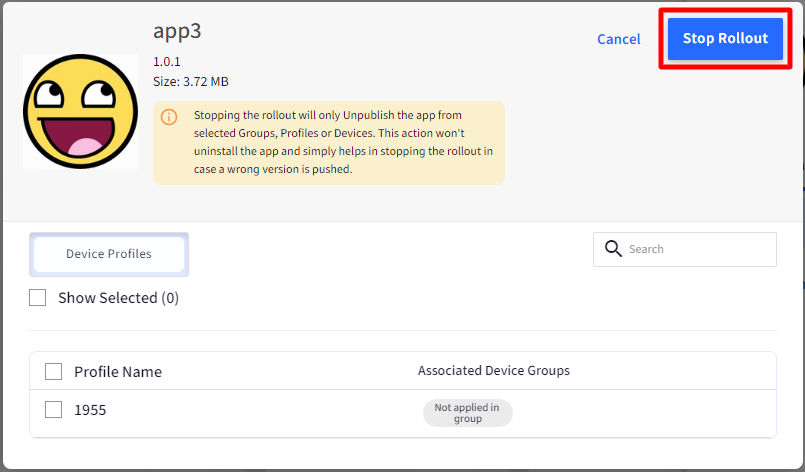
- After selecting, click on the button Stop rollout
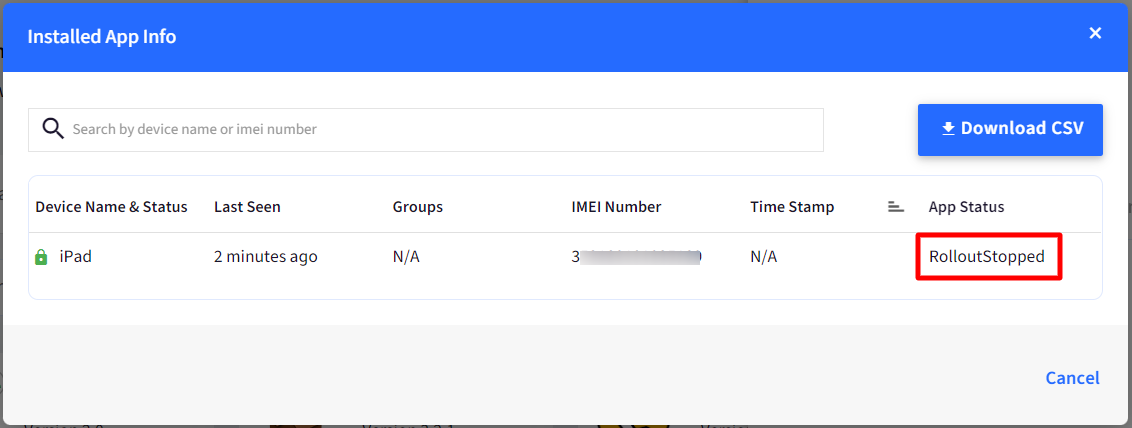
- When executed,
- The application will be unpublished, and it will not be installed on devices where it is not installed yet.
- The Stop rollout button will no longer be visible in the right-side panel
Important Points on Stop Rollout's Execution
- You cannot stop the rollout of an app that is already installed on the device.
- On devices where downloading of the app has not started, the app will not be installed.
- On devices newly enrolled or moved to a device profile, the app will not be installed after the stop rollout.
- In-App Catalog, the app will be removed as it is no longer published.
- On such apps, View Status shows the App Status as Rollout Stopped.
Head over to our Application Configuration guide to learn how to configure iOS applications from Dashboard.
FAQs
Q: How does app configuration publishing work when both DBAP (Enable Applications to be published to Devices in a Group or profile) and GBAP (Enable Enterprise apps to be published to Groups with a profile) are enabled, and Enterprise App is published?
A: When both DBAP and GBAP are enabled, and a PFW or Enterprise App is published with any of the methods, the following applies to app configuration:
If the app is published directly to a device/device group (by selecting specific devices/device groups in the publishing dialog), the associated app configuration should also be published in the same manner, that is, by choosing either device or device group. This ensures consistency in how the app and its configuration are mapped and delivered.
Q. How can I determine whether an Enterprise App was published to a device using Device-Based App Publishing (DBAP) or Group-Based App Publishing (GBAP)?
A. To identify the publishing method, follow these steps:
- Click Uninstall for the app
- In the Uninstall dialog, check the Devices tab
- If the device is listed here, the app was published using DBAP
- If the device is not listed under Devices tab, check the Device Groups and Device Profiles tabs.
- If the device is listed under Device Groups, the app was published using GBAP.
- If the device is listed under Device Profiles, the app was published at profile level
Q. I have published an App Config, but it's not visible on the device. What should I do?
A. Kindly ensure that the app config is published using the same method that was opted while publishing the associated app.