Apple User Enrollment offers a streamlined way for employees to enroll their employee-owned/personally owned iOS devices using managed Apple IDs via the Sign in to Work or School option in Settings. This approach simplifies the onboarding process and supports a BYOD strategy by keeping work data logically separated from personal content.
Traditionally, configuring Apple User Enrollment required IT admins to host the com.apple.remotemanagement file in the .well-known directory of their domain—a task that often involved coordination with DevOps teams, leading to unnecessary delays. To simplify this process, Apple has introduced a new way to configure the discovery URL via MDM and ABM/ASM tokens, available starting with iOS 18.2 and iPadOS 18.2.
This document outlines the steps required to enable Apple User Enrollment using the Sign in to Work or School option, making it easier for IT teams to manage iOS devices with Scalefusion.
Pre-requisites
You should have managed Apple IDs. These are the IDs provided by Apple when you have a Business Manager or School Manager account.
The managed Apple IDs should be imported on the Scalefusion Dashboard under User Enrollment
Minimum Supported OS: iOS 18.2 and iPadOS 18.2
Apple User Enrollment Profile is created
Users should be assigned a User Group with an Apple User Enrollment Profile.
Your domain name should be verified in Apple Business Manager or Apple School Manager
To enroll devices using this approach, proceed with the following steps:
Step 1: Configure Apple User Enrollment Settings
APNS should be configured on the dashboard before configuring these settings
On the Scalefusion Dashboard, navigate to Getting Started > Apple Setup > Apple User Enrollment
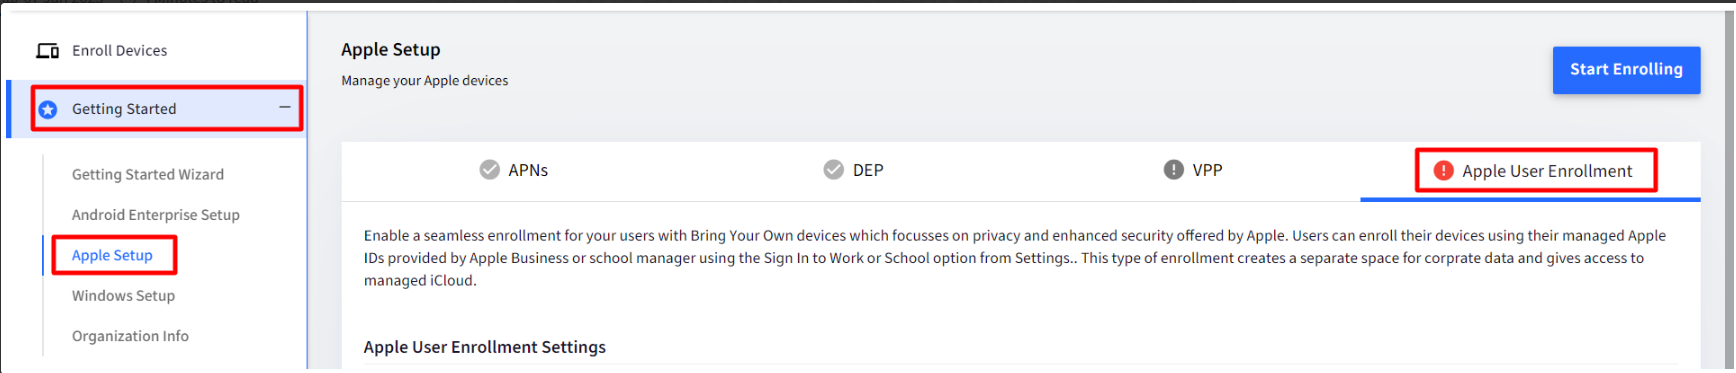
There are two tabs under Apple User Enrollment Settings, viz.
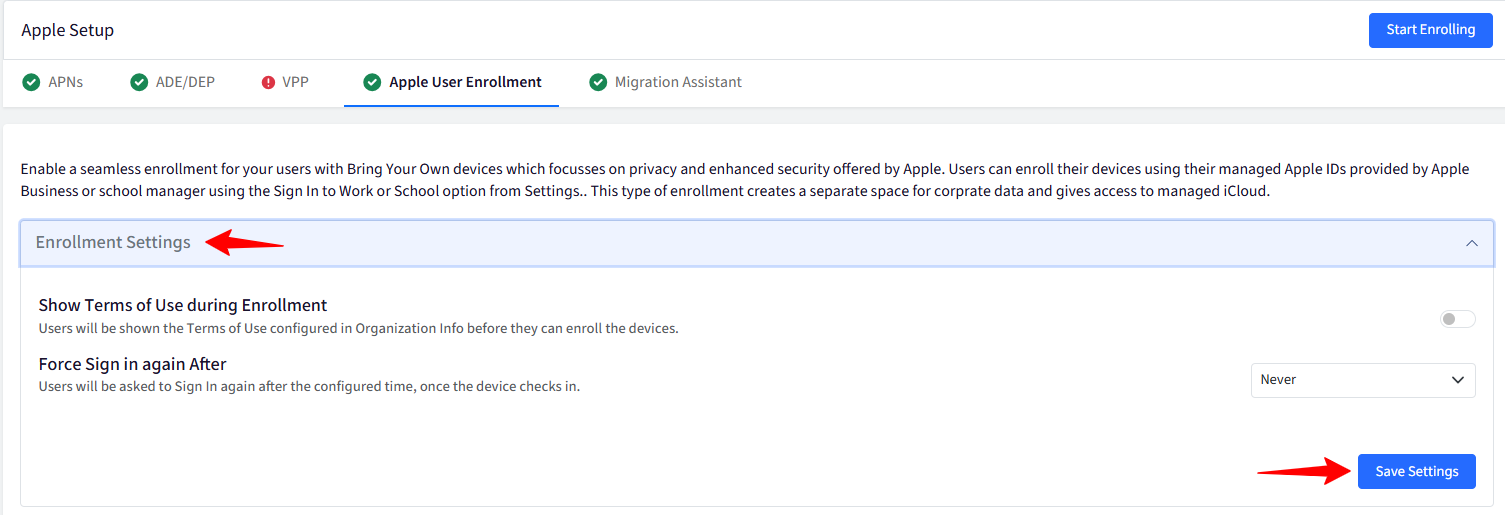
Enrollment Settings: Allows you to configure basic enrollment settings. They are:
Show Terms of Use during Enrollment: If enabled, Users will be shown the Terms of Use configured in Organization Info before they enroll the devices.
Force Sign In again After: Users will be asked to sign in to Work or school again after the configured time. Select time from the drop-down:
Never
8 hours
12 hours
24 hours
36 hours
48 hours
72 hours
After configuring, click Save Settings.
A. Domain Configuration
Should you choose to host the JSON file within your verified domain, the next step involves downloading the file. To proceed:
Click Download JSON to download the file.

Please rename the downloaded file to com.apple.remotemanagement
Now host it on your domain. For example, if your domain name is 'onplex.com', then download the JSON file and host it at https://*onplex*/.well-known/com.apple.remotemanagement
Note:
Please ensure and confirm the content type for this file is set to application/json. This may also be known as MIME type in some server softwares
How to host a JSON file
After downloading the JSON file (from Domain Configuration) and renaming it to com.apple.remotemanagement (ensure there is no file extension), follow these steps:
Move the File to Your Domain / Website Directory
Log into the server where your website is hosted.
Navigate to the root directory of your website (e.g., /var/www/domain.com).
Create the .well-known Directory
Inside the root directory, create a new directory named .well-known (This is a standard directory used for specific purposes, such as hosting files like this one)
Place the Renamed File in the .well-knownDirectory
Move the renamed com.apple.remotemanagement file into the .well-known directory.
Set the Correct Permissions
Ensure that the .well-known directory and the com.apple.remotemanagement file have the appropriate permissions to be accessed publicly.
Set the Correct MIME Type
To ensure the file is served with the correct content type, you need to configure your web server to set the MIME type for the file to application/json.
This can typically be done by modifying the web server's configuration (for example, Nginx or Apache) to explicitly set the MIME type for .well-known/com.apple.remotemanagement to application/json.
Verify the File is Accessible
Once the file is placed and the MIME type is set, check if the file is accessible through the browser at: https://yourdomain.com/.well-known/com.apple.remotemanagement
You should see the JSON content if everything is set up correctly.
After hosting the file, go to Domain Configuration, click Add Domain, type the domain name, and save the changes.
If the file is successfully hosted, you will see the green tick mark next to the added domain(s).
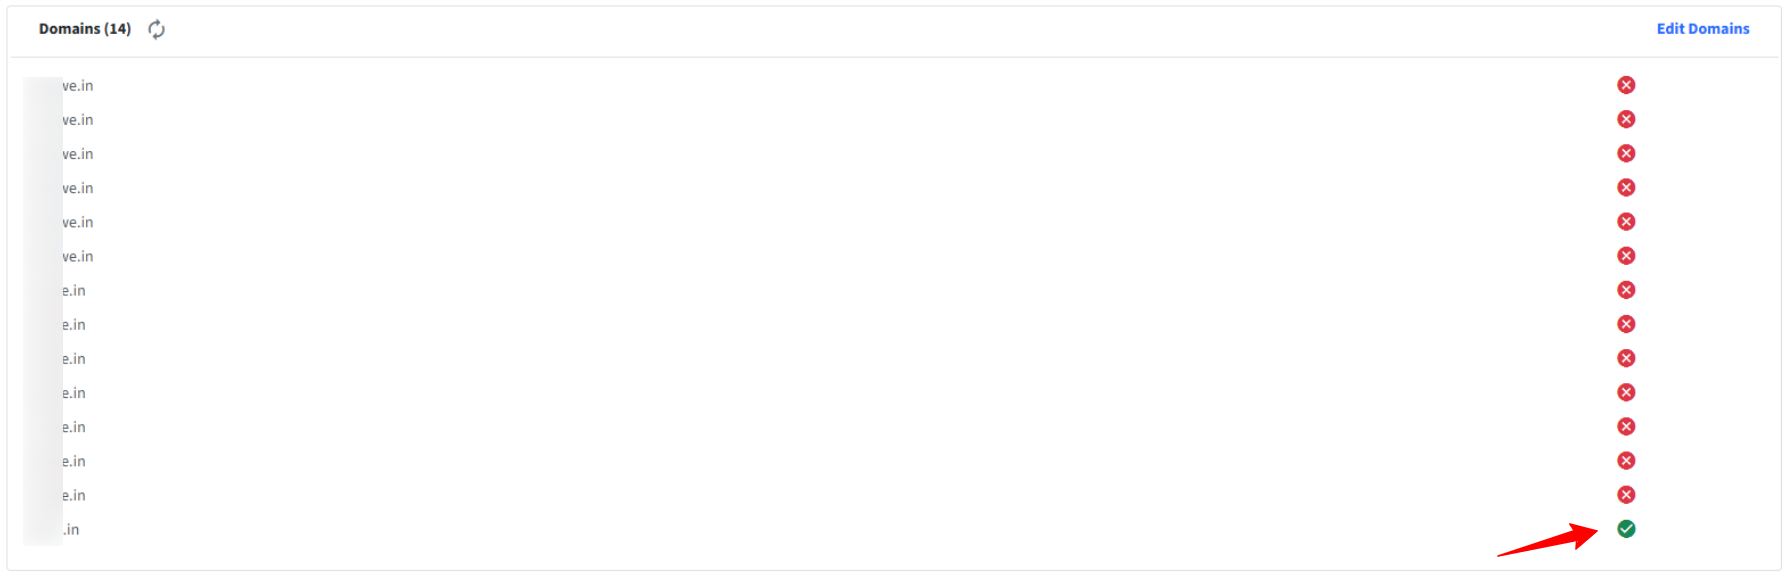
You can add up to 25 Domains.
Note:
Even if you've already completed the Domain Configuration, you can still add your domain here to check its status. This allows you to verify whether the JSON file has been successfully hosted.
B. Alternate Discovery via ABM/ASM
If you opt to configure the server tokens for which the Discovery URL should be set, proceed with the following steps:
Please make sure that you have completed the ADE/DEP setup.
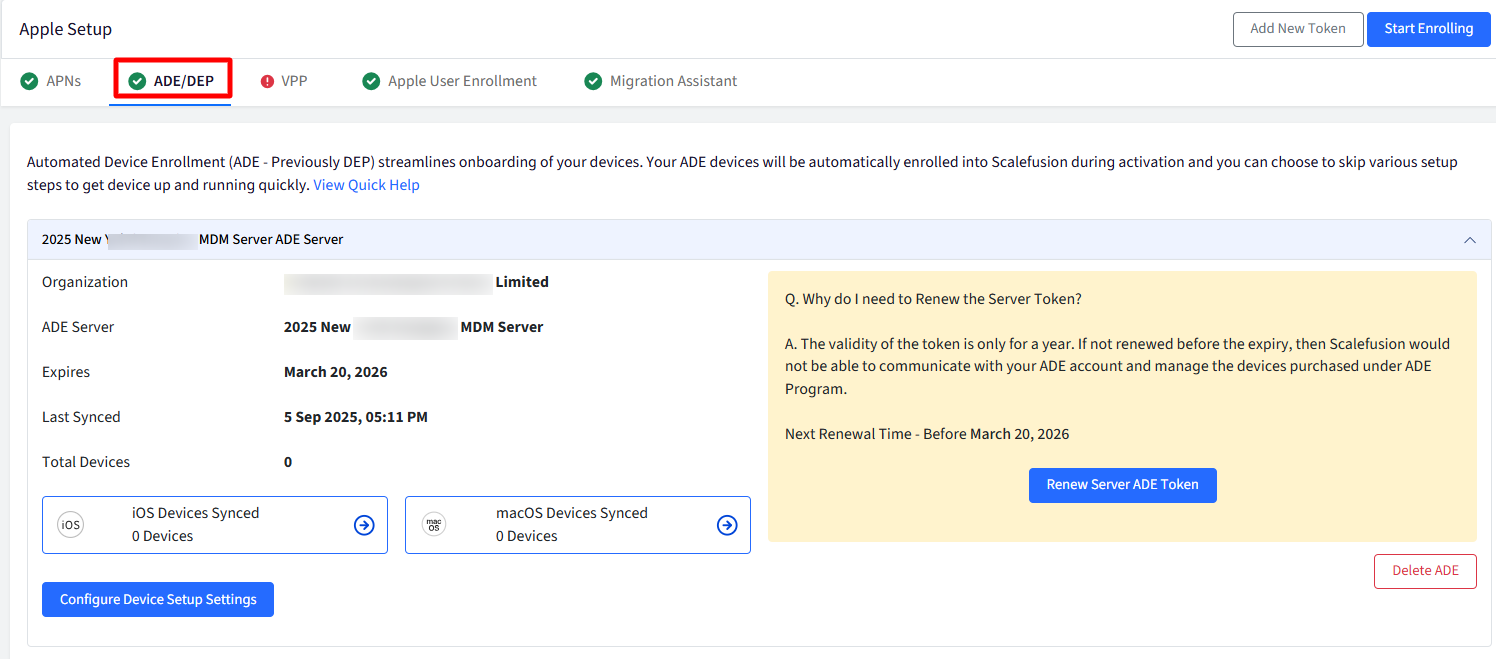
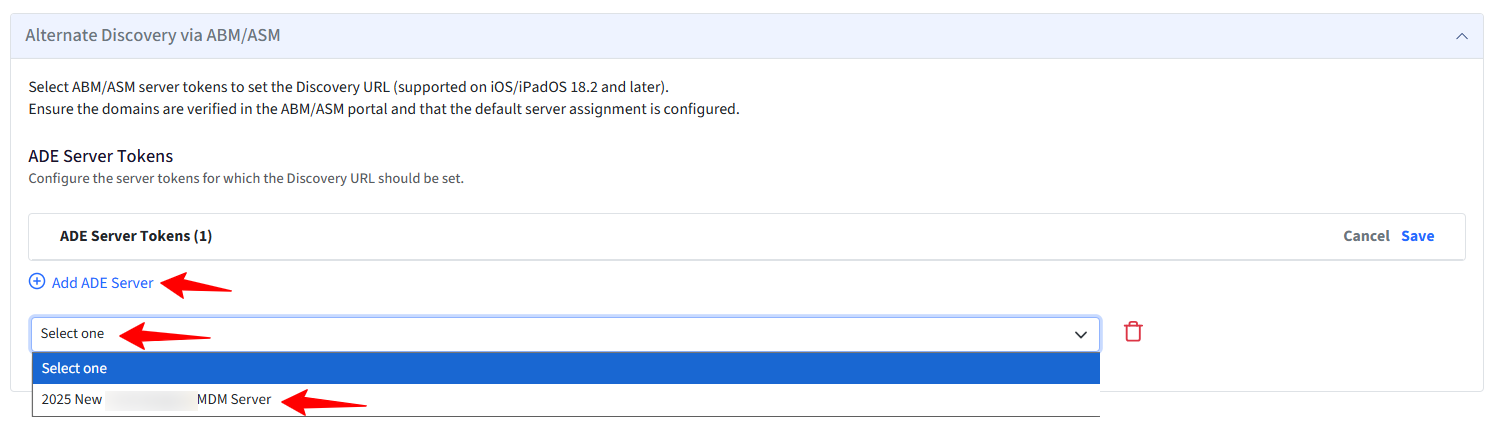
Click Add ADE Server to add the server token.
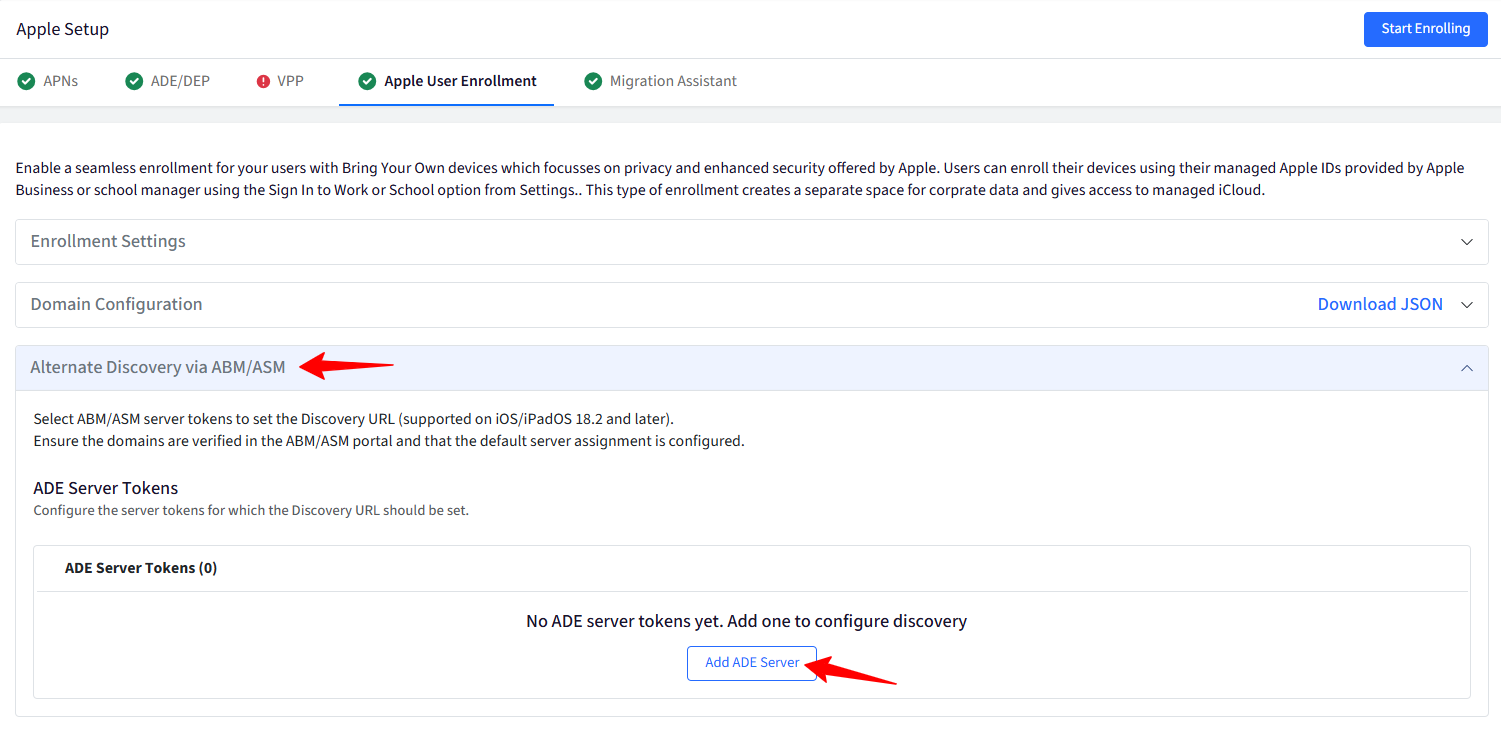
You will be able to see all the ADE/DEP servers that you have added and select them. Click Save. You can add up to 25 servers.
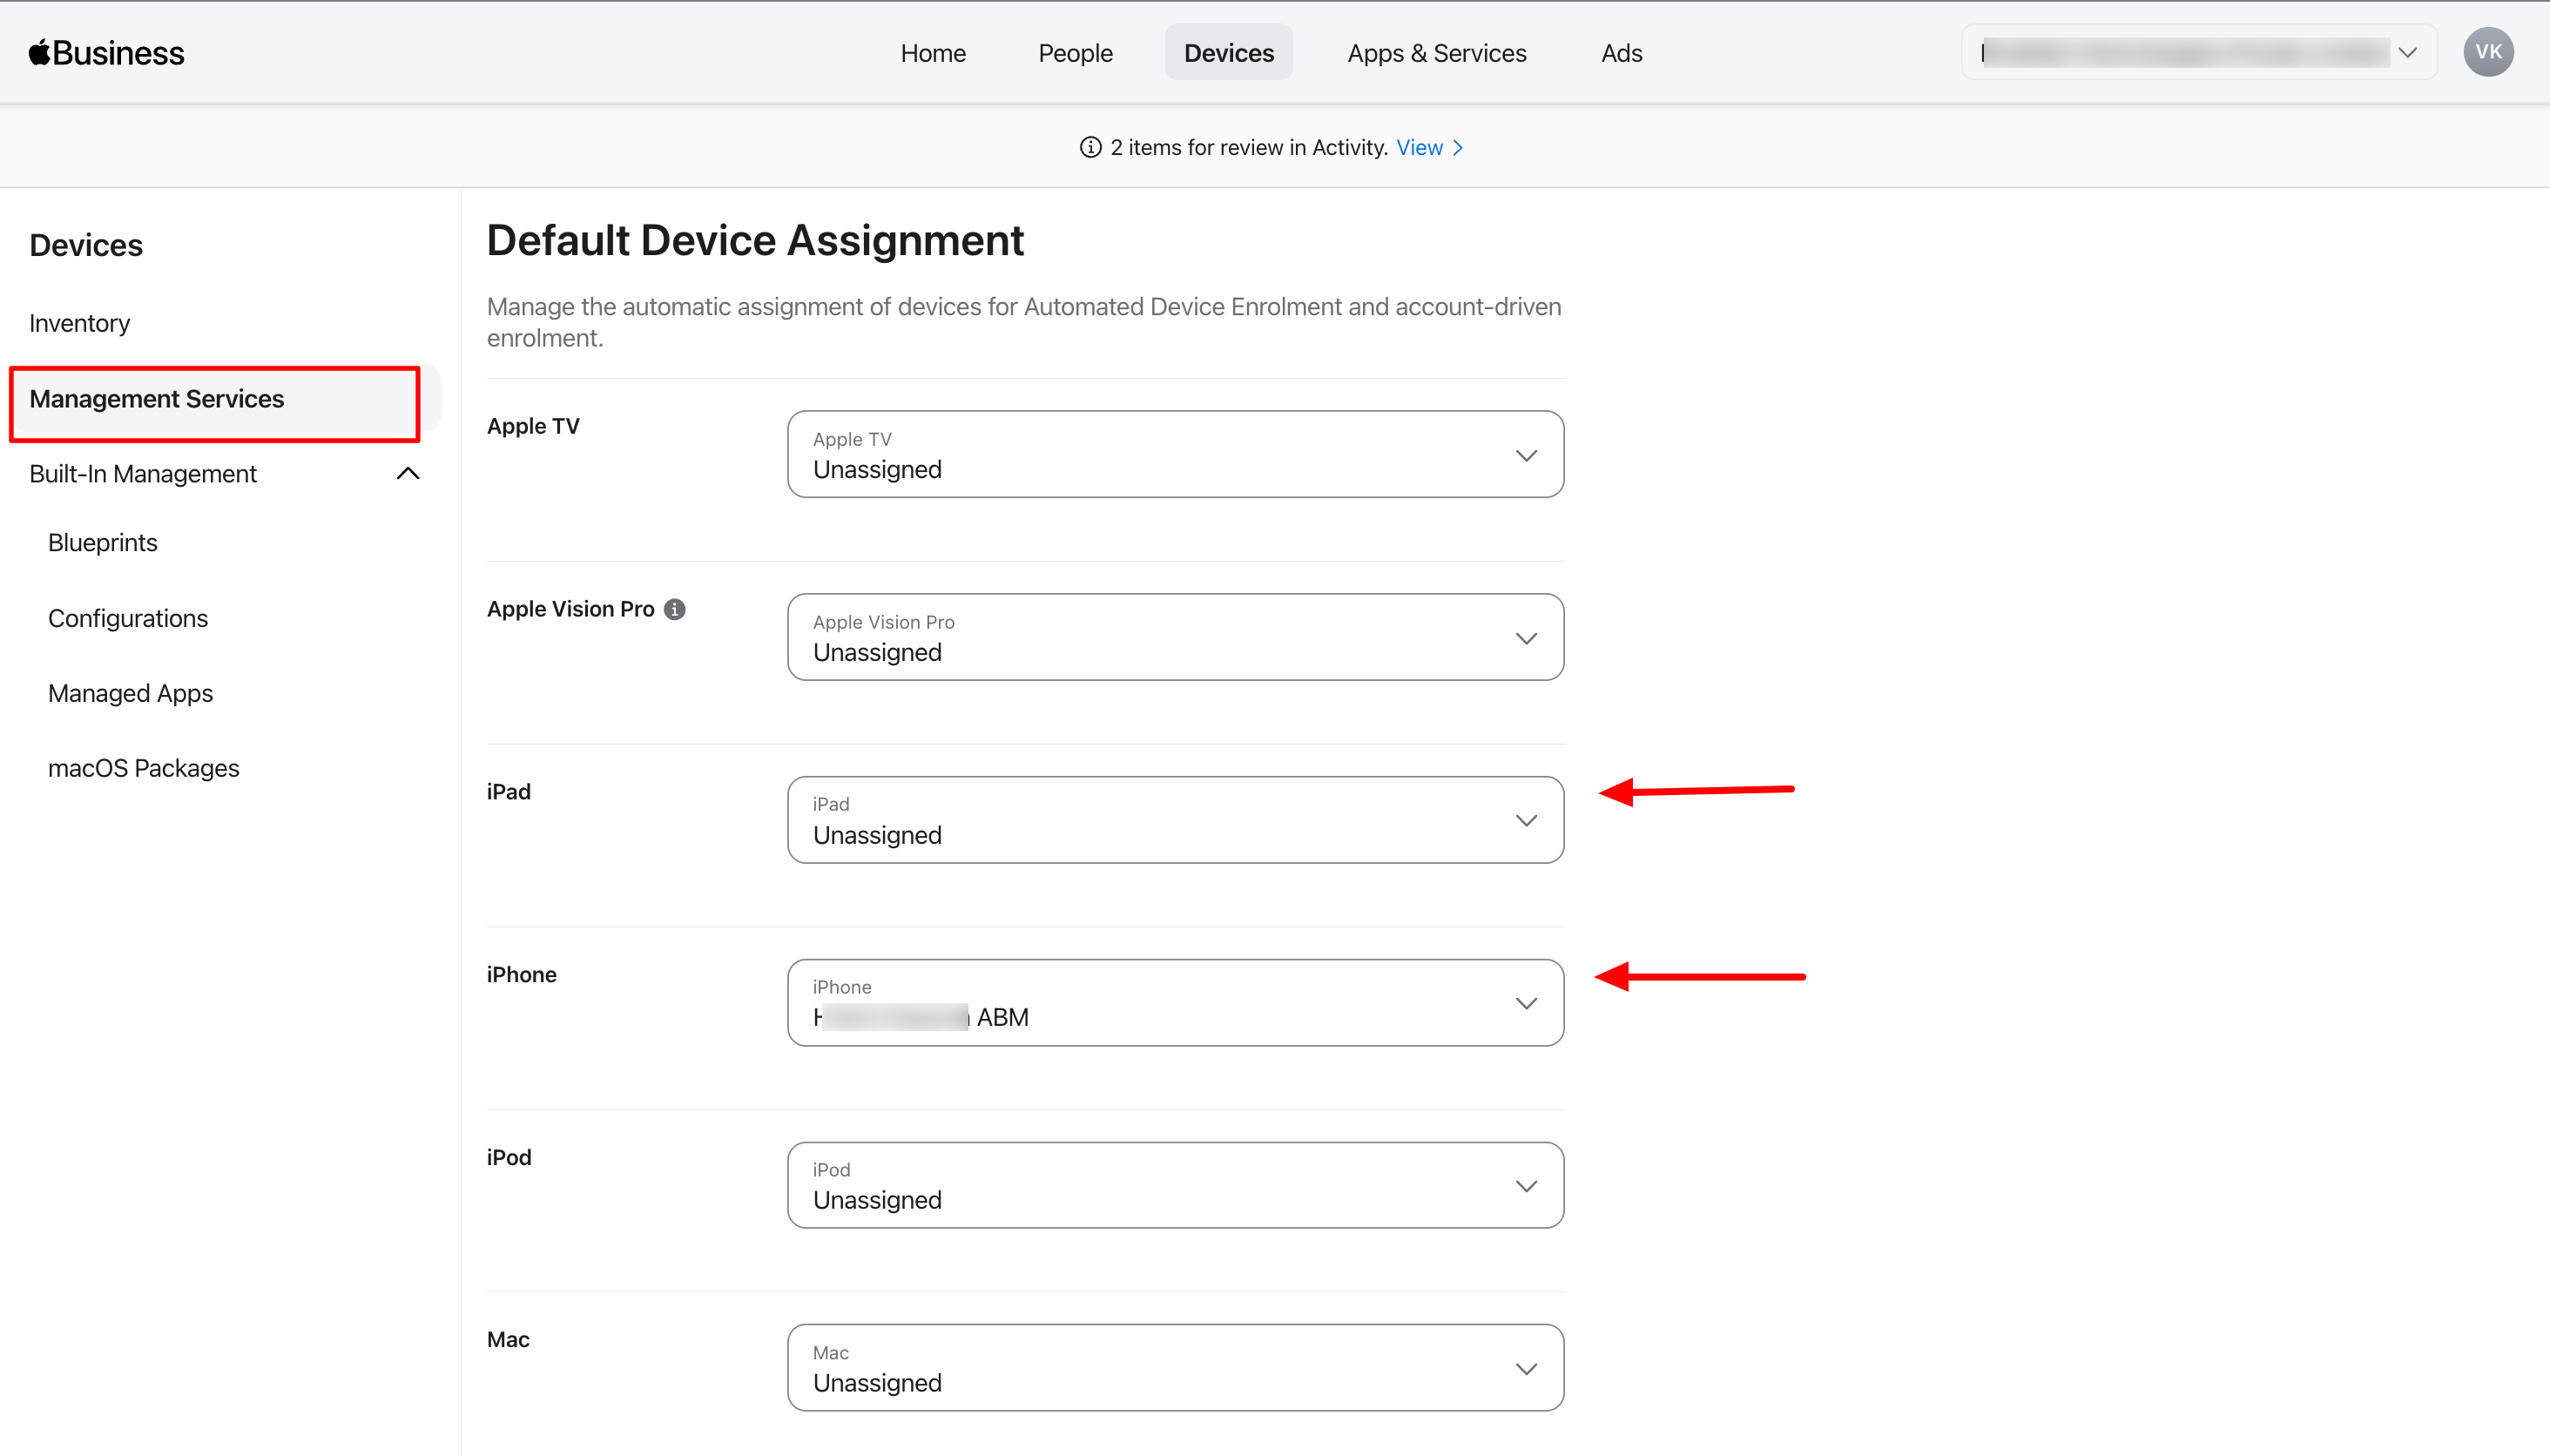
Next, navigate to your ABM account to assign MDM servers to iOS and iPad devices.
Go to Devices and open Management Services. Here, select Default Device Assignment.

Change the default assignment for iPad and iPhone to the MDM server selected in the Scalefusion dashboard.
Step 2: Enrolling an iOS device
After configuring Apple User Enrollment settings, follow these steps on your iOS device to enroll it with Scalefusion:
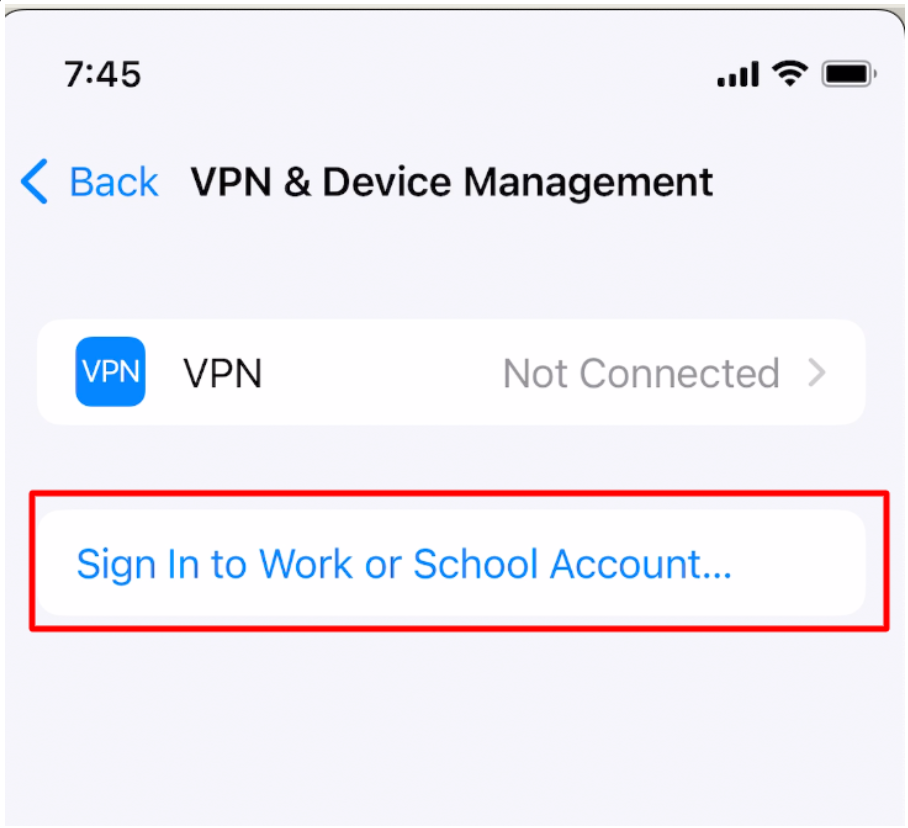
Navigate to the Settings app on the device and go to VPN & Device Management
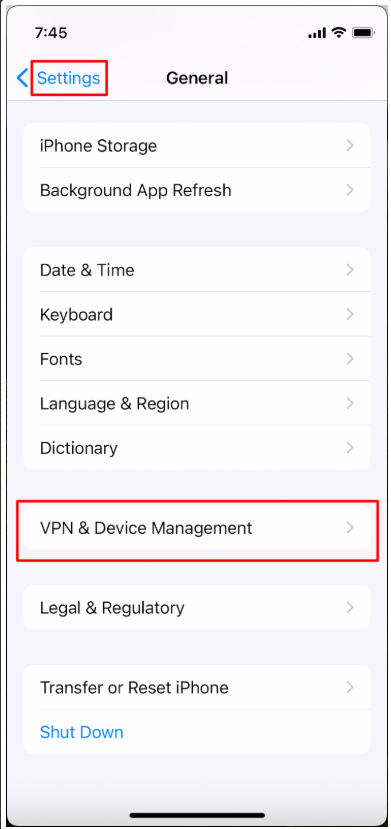
Click on Sign in to Work or School account, under VPN & Device Management
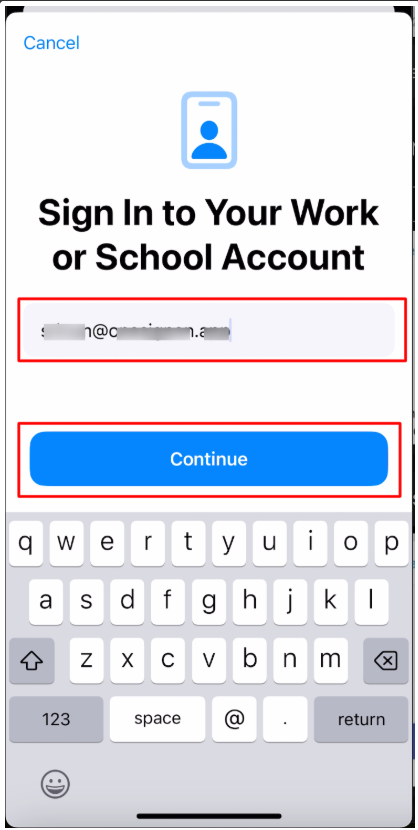
Here, enter your managed Apple ID and click Continue
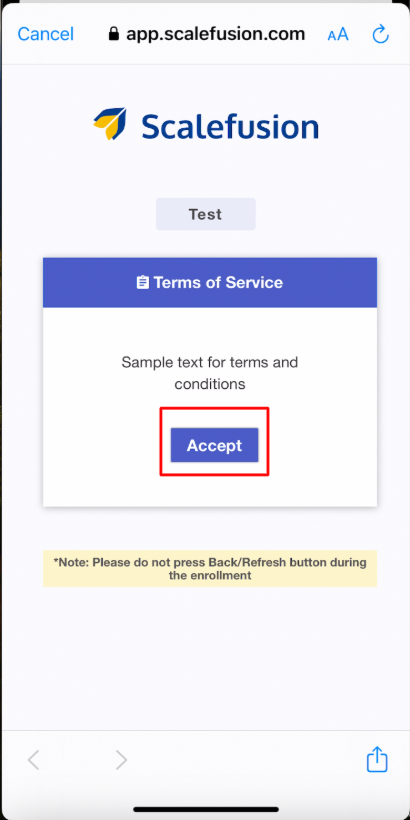
You will be directed to the Terms of Service page. Review the terms and click Accept
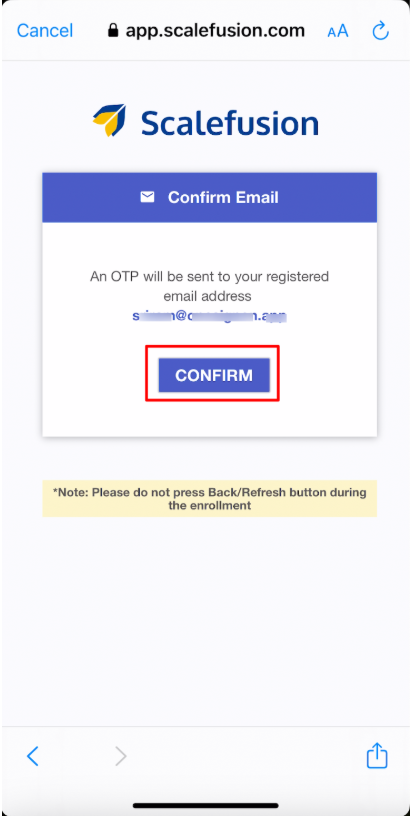
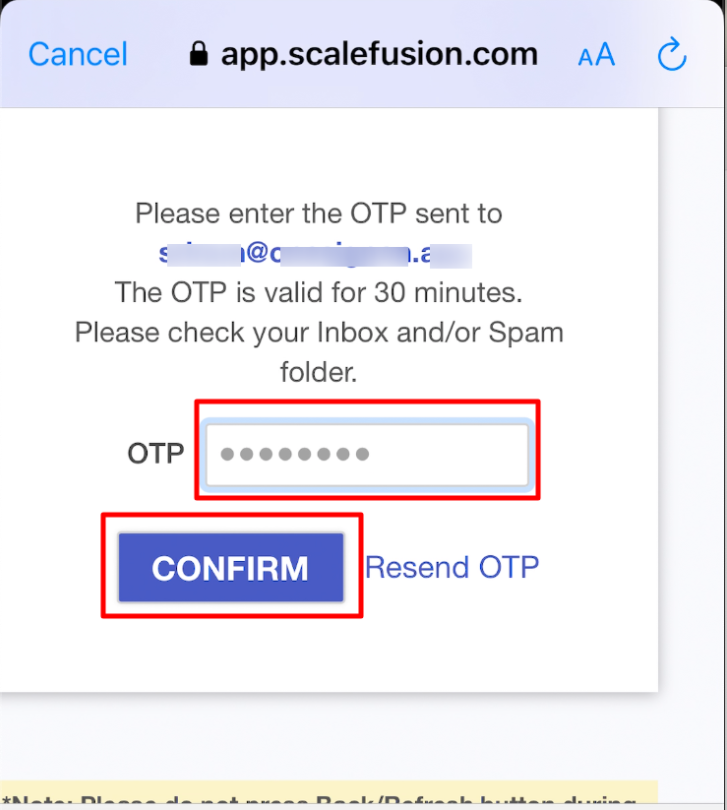
Now, click Confirm on this screen. An OTP will be sent to your registered email ID.
On the next screen, enter the OTP (you have received on the email ID) and click Confirm
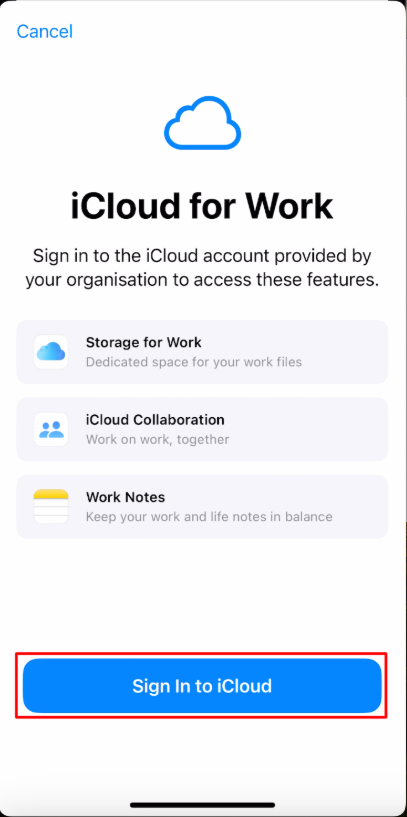
On the next screen, click on Sign In to iCloud
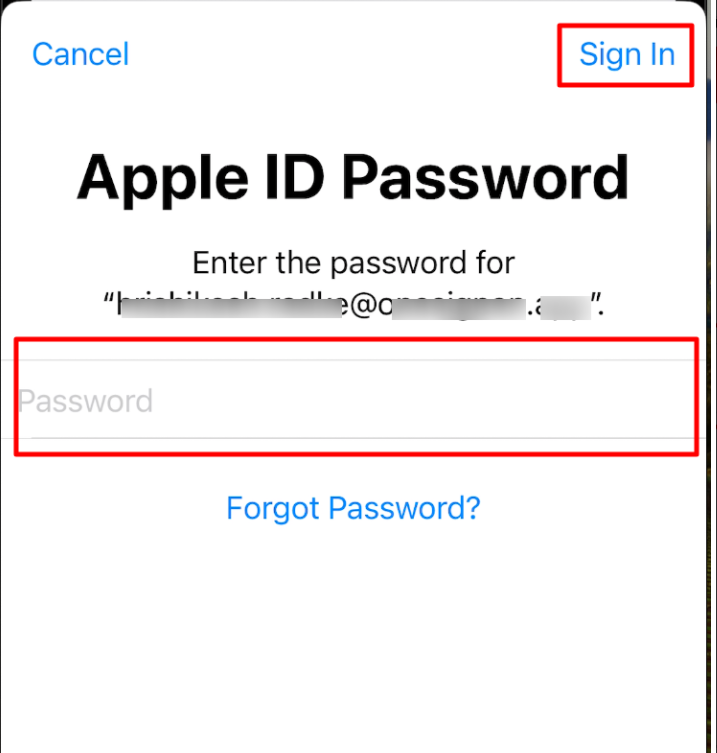
Now, enter the password for your managed Apple ID and click Sign In
On the next screen, click on Allow Remote Management
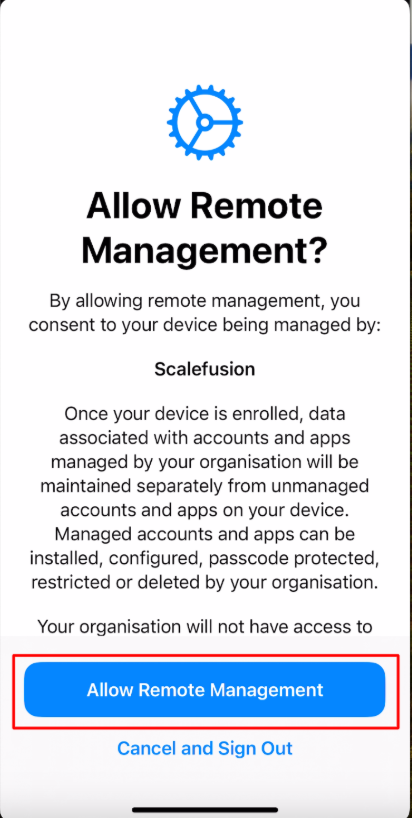
It may take a few minutes to configure. You will get the screen to wait.
Once done, you will see the following screen showing the managed Apple ID under Managed Account. This confirms that the enrollment process is complete, and your device is now managed. The applications and policies pushed by your IT Admin will start getting installed.

Frequently Asked Questions
Question: While enrolling an iOS device via Apple User Enrollment, the users get an error Sign-In Failed. What can be the reason?
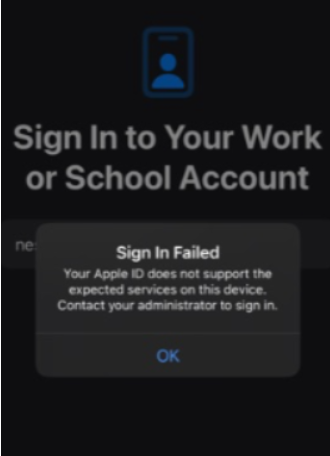
Answer: It appears the server is not configured to correctly identify the file type. Please ensure and confirm the content type is set to application/json. This may also be known as MIME type in some server softwares.
Question: Will the process of enrollment be same if I have a GSuite/O365 account?
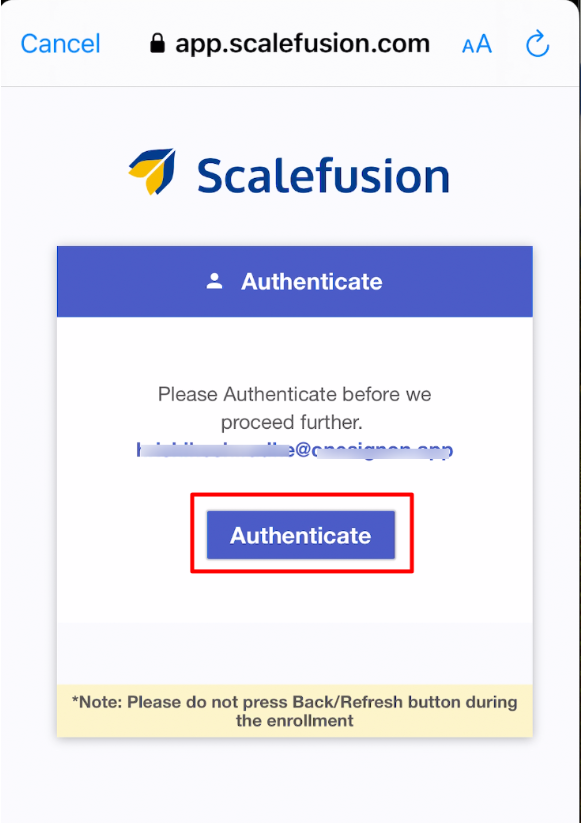
Answer: If you have a GSuite/O365 account federated, the process is slightly different. On the device, you will be asked to authenticate with the respective provider after accepting Terms & Conditions. Hence,
After Step #4 (mentioned above) you will get the following screen. Click on Authenticate.
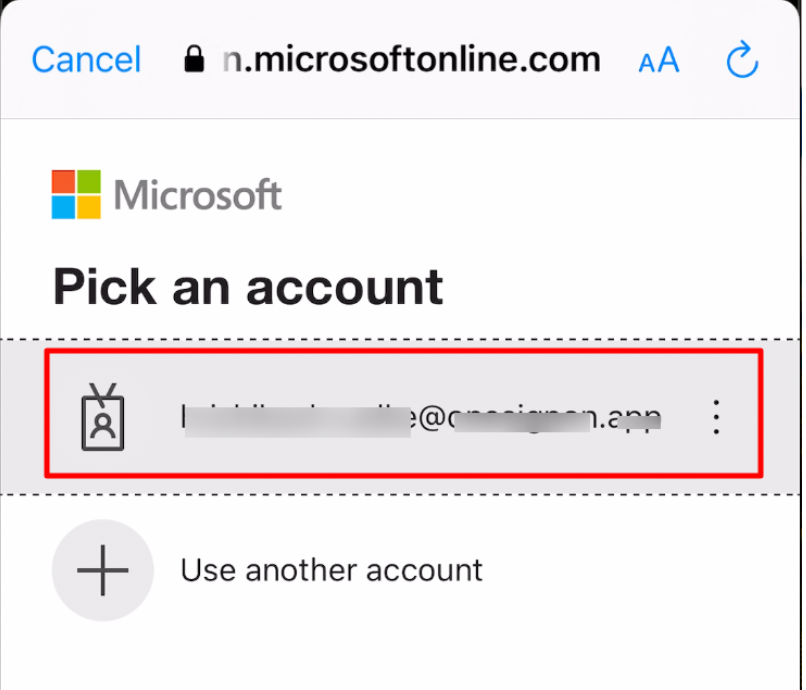
This will take you to the Microsoft authentication screen (this is for an O365 account). Select your Apple ID
Enter the password and click on Sign In to authenticate.
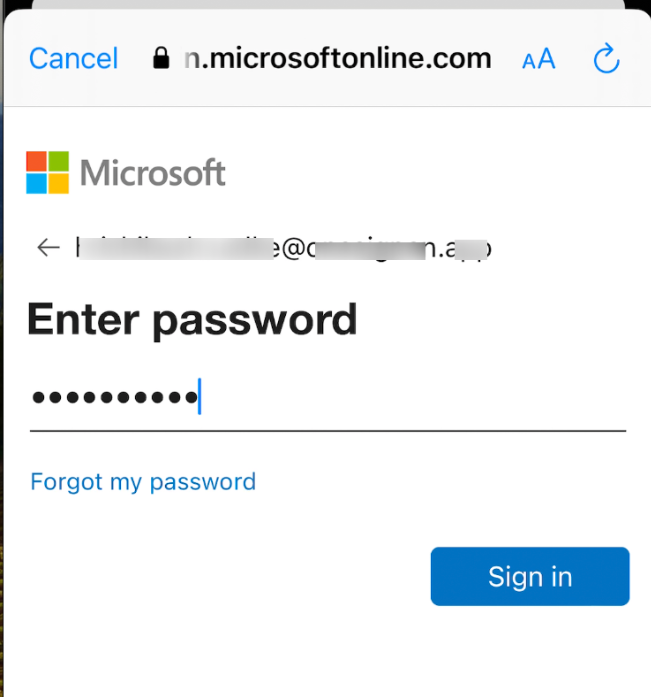
Once authenticated, you will get the screen to Sign In to iCloud (Step #7 above). After that, the steps will be the same as above for enrolling the device.