Enrolling Apple devices by using the QR Code helps to simplify the process of onboarding the device. This enrollment avoids manual error with time-saving steps and efficient provisioning of iOS devices.
This enrollment method lets you enroll the devices in Company Owned Device Management mode. If you are looking to let your employees enroll their personal devices, please refer to our How to Enroll a User/Employee-Owned device.
Before you Start
- Make sure you completed the APNs upload part as per Setting Up APNs guide.
- Make sure you have at least one Device Profile as per Create an Apple Device Profile guide.
- Make sure you have at least one QR Code configuration as per Create a QR Code Configuration guide.
- Make sure you have one iOS Device - Preferably a Supervised device.
Steps on iOS Devices
Video Guide:
Please go through the video to see how to enroll an iOS device.
iOS 12.1 and Below Devices: If you are using a device running 12.1 and below, please use the video below.
iOS 12.2 and Above Devices: If you are using a device running 12.2 and above, please use the video below.
Steps
Based on the iOS version on your device, please refer to either For iOS 12.1 and Below Devices or For iOS 12.2 and Above Devices section below.
For iOS 12.1 and Below Devices
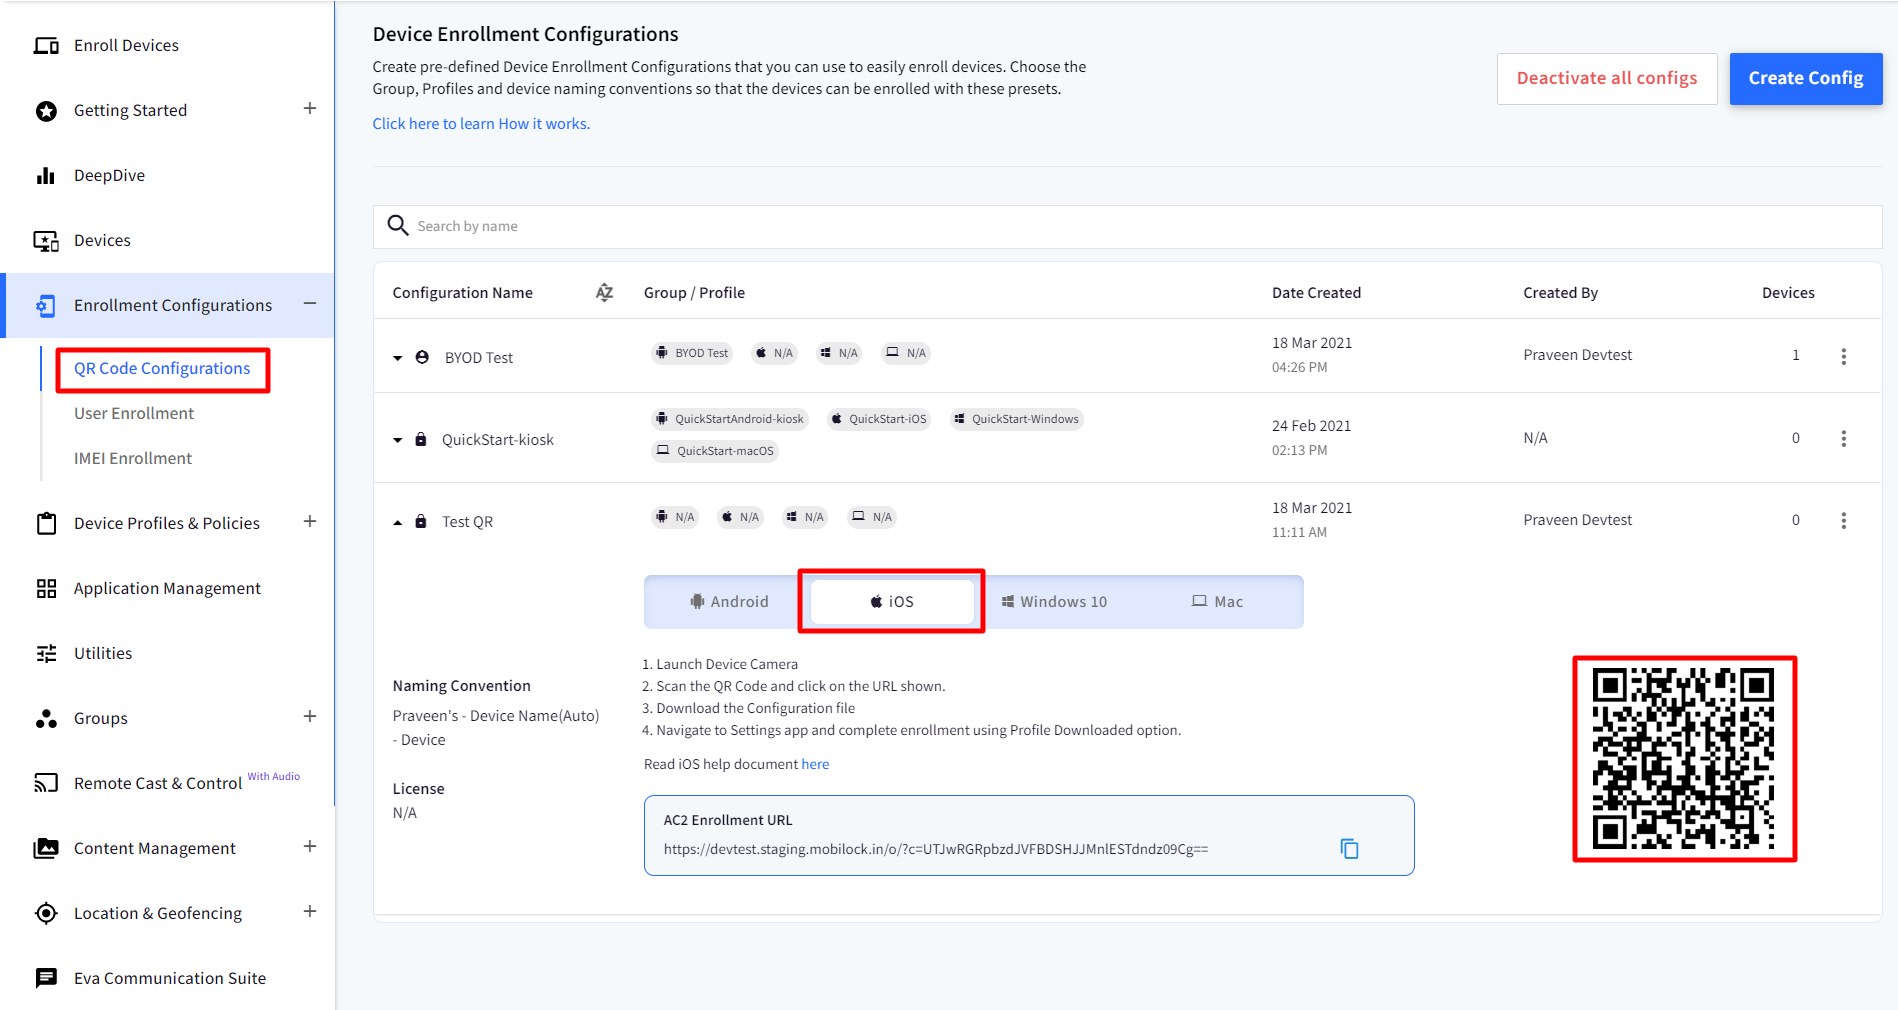
- Start by logging into the Dashboard and navigate to Enrollment Configurations > QR Code Configurations
- Expand the Configuration that you want to use, and click on iOS to scan the QR Code.
.png)
- On the iOS Device, launch the Camera app.
- Scan the QR Code using the Camera app.
- You would see a Notification asking you to open Safari. Please click on the notification.
- Once Safari opens up, it will show you a dialog informing you that the Settings app will be opened. Click on Allow.
- You will be shown a screen with the option to Install. Click on Install.
- The device will ask for a confirmation by asking you to click on install again. Click on Install.
- This will start enrolling the device, and if the initial checks pass, then you will be shown a warning page informing you that Scalefusion will be remotely managing the device. Click on Install again.
- A dialog will be shown to confirm if you Trust this server. Click on Trust.
- This will start signing into the Scalefusion, and once completed, you will see a screen with the Done option.
- Clicking on Done will complete the flow, and you should see the set of policies and applications that you had allowed in the Device Profile have been applied to the device.
For iOS 12.2 and Above Devices
- Start by logging into the Dashboard and navigate to Enrollment Configurations > QR Code Configurations
- Expand the Configuration that you want to use, and click on iOS so that you can see the QR Code.
.png)
- On the iOS Device, launch the Camera app.
- Scan the QR Code using the Camera app.
- You would see a Notification asking you to open Safari. Please click on the notification.
- Once Safari opens up, it will show you a dialog informing you that the Settings app will be opened. Click on Allow.
- At this point, the MDM Profile will be downloaded, and you will see an alert asking you to navigate to Settings to complete setup. Click on Close.
- Press the Home key on the device and launch the Settings app.
- In the Settings app, find and click on the Profile Downloaded option. This is normally located below the Apple ID menu item in Settings.
- On the next screen, click on Install on the top right.
- This will start enrolling the device, and if the initial checks pass, then you will be shown a warning page informing you that Scalefusion will be remotely managing the device. Click on Install again.
- A dialog will be shown to confirm if you Trust this server. Click on Trust.
- This will start signing into the Scalefusion, and once completed, you will see a screen with the Done option.
- Clicking on Done will complete the flow, and you should see the set of policies and applications that you had allowed in the Device Profile have been applied to the device.
Video Guide:
Please go through the video to see how to enroll an iOS device.
Details
- Start by logging into Dashboard and navigate to Enrollment Configurations > QR Code Configurations.
- Expand the Configuration that you want to use, and click on iOS so that you can see the QR Code.
- On the iOS Device, launch the Camera app.
- Scan the QR Code using the Camera app.
- You would see a Notification asking you to open Safari. Please click on the notification.
- Once Safari opens up, it will show you a dialog informing you that the Settings app will be opened. Click on Allow.
- You will be shown a screen with the option to Install. Click on Install.
- The device will ask for a confirmation by asking you to click on install again. Click on Install.
- This will start enrolling the device, and if the initial checks pass, then you will be shown a warning page informing you that Scalefusion will be remotely managing the device. Click on Install again.
- A dialog will be shown to confirm if you Trust this server. Click on Trust.
- This will start signing into the Scalefusion, and once completed, you will see a screen with the Done option.
- Clicking on Done will complete the flow, and you should see the set of policies and applications that you had allowed in the Device Profile have been applied to the device.