- 05 Apr 2024
- 7 Minutes to read
- Print
- PDF
Configure BitLocker on Windows 10 and above Devices.
- Updated on 05 Apr 2024
- 7 Minutes to read
- Print
- PDF
BitLocker is Microsoft’s built-in full volume encryption feature which is designed to protect data by providing encryption for the hard disk volumes. BitLocker integrates with the operating system and addresses the threats of data theft or exposure from lost, stolen, or inappropriately decommissioned computers.
BitLocker works best when used on computers with Trusted Platform Module (TPM) version 1.2 or later. The TPM is a hardware component installed in many newer computers by the computer manufacturers. It works with BitLocker to help protect user data and to ensure that a computer has not been tampered with while the system was offline.
On computers that do not have a TPM version 1.2 or later, you can still use BitLocker to encrypt the Windows operating system drive. However, this implementation will require the user to insert a USB startup key to start the computer or resume from hibernation.
Scalefusion lets IT Admins configure BitLocker settings and apply these settings to the Windows 10 and above managed devices. Further on Azure AD joined devices the BitLocker encryption can be enforced and automated.
Prerequisites
BitLocker requires Windows 10 v1809+and above works on Windows Pro, Enterprise and Education Editions.
Not Supported on Windows Home (10 & 11).
The following document guides you on how to setup BitLocker and push the configuration on devices. We also cover the user experience once BitLocker policy is pushed to devices.
The settings offered by BitLocker may cause some conflicts if not configured properly. Please make sure to go through our Conflicting Scenarios section to understand the settings to avoid.
Setting up BitLocker in Windows Profile
The first step is to configure a BitLocker policy that can be then pushed to devices. Follow the steps below to configure a BitLocker policy:
Sign In to Scalefusion Dashboard.
Navigate to Device Management > Device Profiles. Click on a Windows Device profile and edit or create a new Windows Device profile.
Once in the Device Profile wizard, navigate to Settings > Security Settings. Go to BitLocker section to configure BitLocker settings,
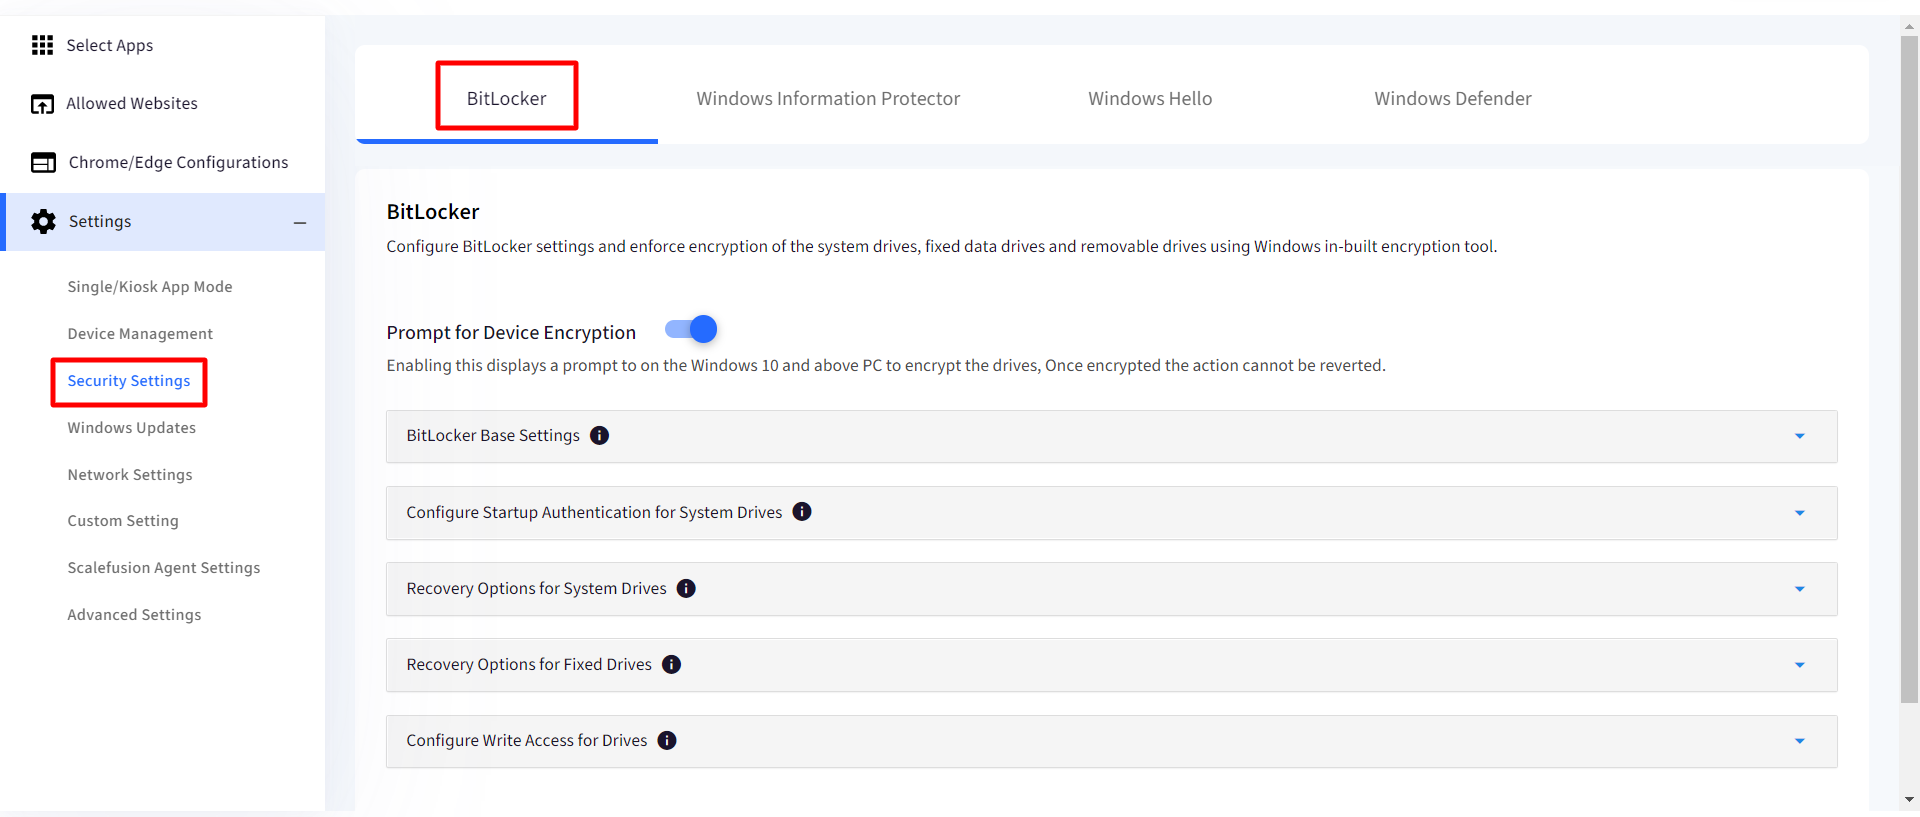
To configure BitLocker by enabling Prompt for Device Encryption. This allows you to start configuring various settings and this will show a notification to the end users that they need to configure BitLocker.

BITLOCKER BASE SETTINGS The first section controls the basic encryption settings.
Choose Encryption Method: Choose an encryption algorithm for the various disk drives.
Operating System Drives: Defaults to XTS-AES 256-bit
Fixed Data Drives: Defaults to AES-CBC 128-bit
Removable Data Drives: Defaults to AES-CBC 128-bit
Changing the Encryption method has no effect on already encrypted drives.
Settings for Azure AD joined Devices: These settings are applicable only for devices enrolled using AD join method.
Allow Warning for Other Disk Encryption: Enable this to show a warning for AD joined devices. Disabling this silently applies the BitLocker settings.
Allow Standard User Encryption: Enable this to encrypt all the disk drives for a standard user account.

CONFIGURE STARTUP AUTHENTICATION FOR SYSTEM DRIVES Use this section to configure additional authentication methods when the computer starts and configure settings for computers without TPM chip.
Enforce Additional Authentication at Startup: Enable this setting to configure additional authentication mechanisms.
Allow BitLocker on PCs without a Trusted Platform Module(TPM): Configure BitLocker for computers without a TPM chip.
Requires the user to insert a USB startup key to start the computer or resume from hibernation.
Select Authentication method for PCs with a Trusted Platform Module: Select the authentication method. Users will see only the selected options while configuring BitLocker.
Set Minimum Length for Startup PIN: Enforce a minimum PIN length that needs to be configured.
This setting works only if authentication method includes PIN.

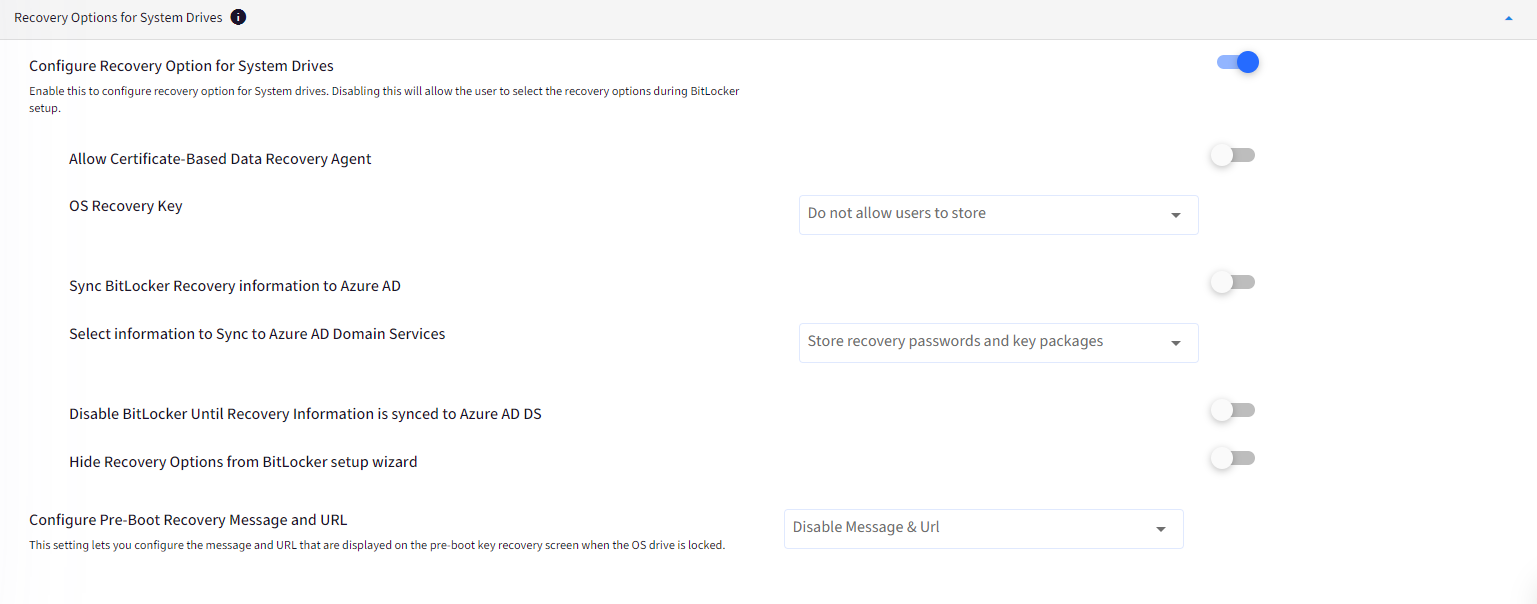
RECOVERY OPTIONS FOR SYSTEM DRIVES If you have configured the startup authentication, then this method allows you to configure the recovery mechanisms for System drives (the drive that hosts the OS).
Configure Recovery Option for System Drives: Enable this to configure the recovery options.
Allow Certificate Based Data Recovery Agent: Specify whether a data recovery agent can be used with BitLocker-protected operating system drives. Before a data recovery agent can be used it must be added from the Public Key Policies item in either the Group Policy Management Console or the Local Group Policy Editor.
OS Recovery Key: Configure if users are allowed, required, or not allowed to generate a 48-digit recovery password or a 256-bit recovery key.
Sync BitLocker Recovery Information to Azure AD: Enable this to Sync the BitLocker recovery/escrow keys to Azure AD. This setting works only if the device is Azure AD joined.
Select information to Sync to Azure AD Domain Services: Choose what information related to BitLocker recovery should be used to sync with Azure AD.
Disable BitLocker Until Recovery Information is synced to Azure AD DS: Prevent users from configuring BitLocker until they join their devices to Azure AD.
Hide Recovery Options from BitLocker setup wizard: Prevent users from specifying recovery options when they turn on BitLocker on a drive. This means that you will not be able to specify which recovery option to use when you turn on BitLocker, instead BitLocker recovery options for the drive are determined by the policy setting.
Configure Pre-boot Recovery Message and URL: Override the default pre-boot recovery message and URL that is displayed when computer starts.
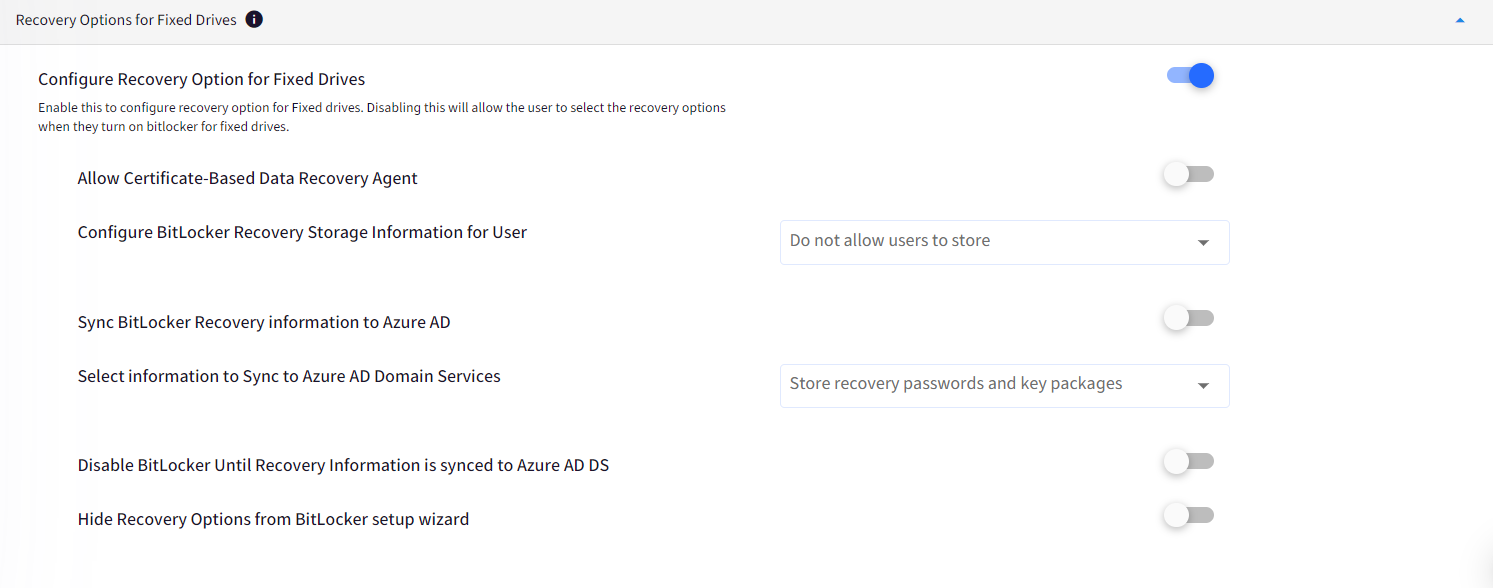
RECOVERY OPTION FOR FIXED DRIVES Configure recovery options for your fixed drives. These options are similar to the recovery options for System drives, except that these are set for the non-System or other fixed drive partitions.
CONFIGURE WRITE ACCESS FOR DRIVES Configure if users are allowed to write data or create files on the fixed drives and removable media without BitLocker encryption.
The existing data stored on these drives can be read always.
Block Write Access to Fixed Device until encrypted: If enabled blocks write access to fixed drives until they are encrypted.
Block Write Access to Removable Devices until encrypted: If enabled blocks write access to removable drives.

Once you have configured your BitLocker settings, click on Update Profile to save these settings. The changes will be automatically pushed to the devices where this profile is applied.
Possible Conflicting Scenarios
Due to the wide variety of options available for BitLocker and some of them being interdependent, there is a chance that some of these settings may cause conflict and may not work on actual device even though the policy gets successfully applied. In case of a conflict when users try to configure BitLocker on their device, they see an error. Here we cover some of the settings that may cause possible conflicts.
Devices without a TPM Chip: For devices without a TPM chip, BitLocker cannot encrypt System/OS drives until "Allow BitLocker on PCs without Trusted Platform Module (TPM)" is enabled,

Startup Authentication Methods: Startup authentication mechanisms are mutually exclusive at this point of time, that is both PIN & Recovery key cannot be used. Although we have given this option for future support. The setting below is an invalid option.

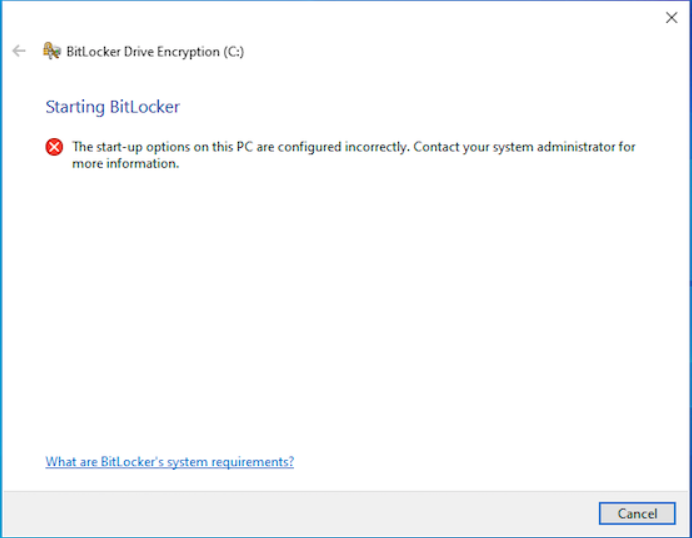
Error on Device
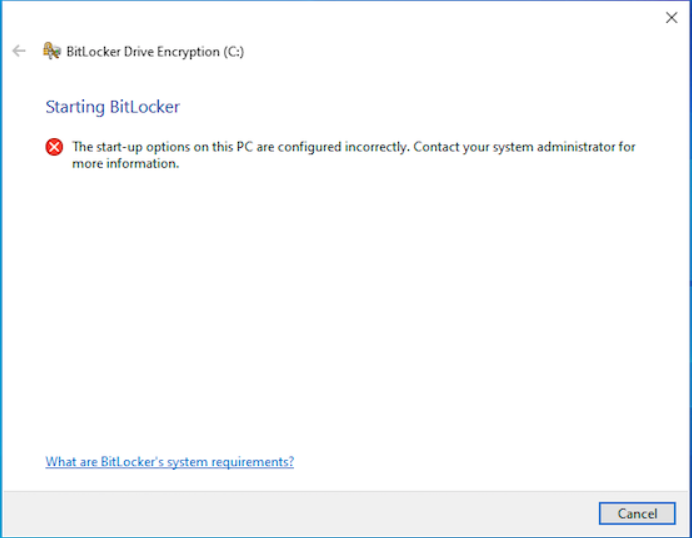
Recovery Options for System Drive: If the recovery options are not configured properly then you may see the following error on Device.
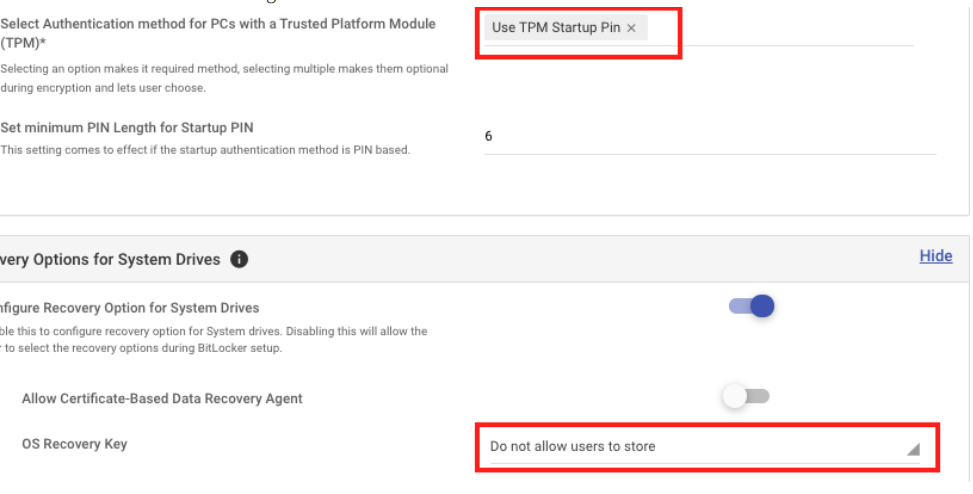
Conflict 1: If Startup Authentication mechanism is Use TPM Startup PIN then the OS Recovery Key cannot be set to Do not allow users to store. The setting below is an invalid combination.
Conflict 2: If Startup Authentication mechanism is Use TPM Startup Key then OS Recovery Key cannot be set to Allow users to generate the recovery password OR Enforce users to generate Recovery Password
If the Write access to Fixed Drives is Blocked then the the OS Recovery Key cannot be set to Allow users to generate Recovery Key or Enforce users to generate Recovery Key.
For the above settings to work on Windows 11 devices, a Microsoft account should be present on the target device(s). In case there is no Microsoft account available, you can silently enable Bitlocker encryption using the PowerShell script (please refer our guide on the same).
User Experience for BitLocker Setup on Device
Now that you have configured a BitLocker policy, let us have a look at the user experience while they configure BitLocker. The actual flow may be different and is dependent on your BitLocker policy.
For Azure AD joined devices, BitLocker encryption will happen automatically if Allow Warning for Disk Encryption is disabled.
Once a BitLocker policy is configured, the end users will see a notification in the system tray, prompting them to configure BitLocker.
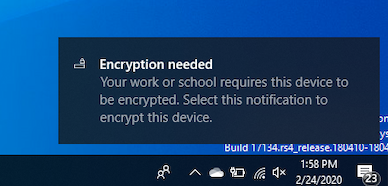
Clicking on the notification, starts the encryption process. Select Yes to start encryption.
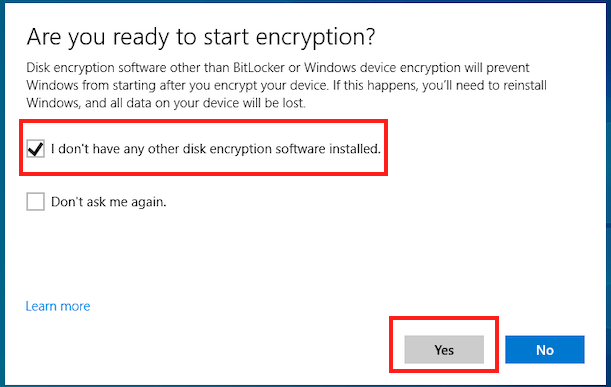
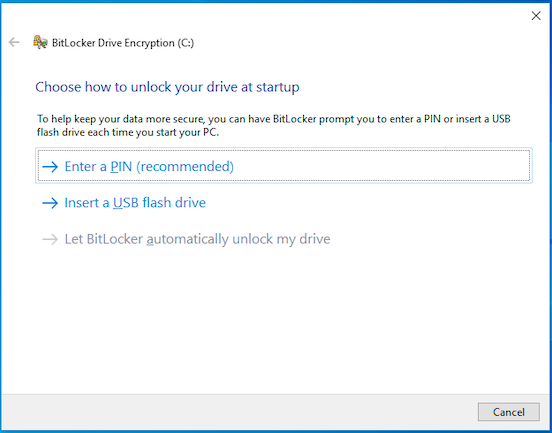
Windows verifies if BitLocker can be configured and if supported then it shows the Start up authentication configuration screen basing on the policy. Here the user has an option to create a PIN or a recovery key using USB drive
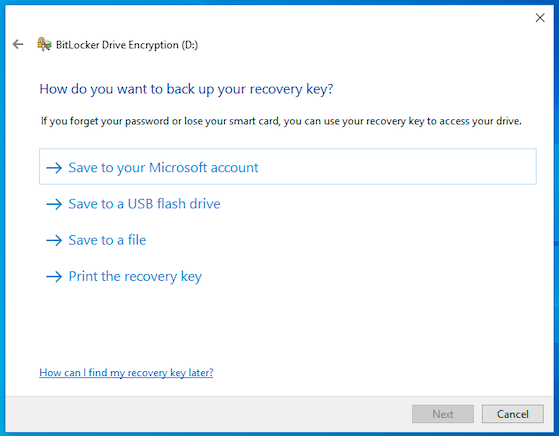
Next, they are shown the recovery options for System drive basing on the policy. Here they can select how to back up the recovery key. Select an option to back up and click Next
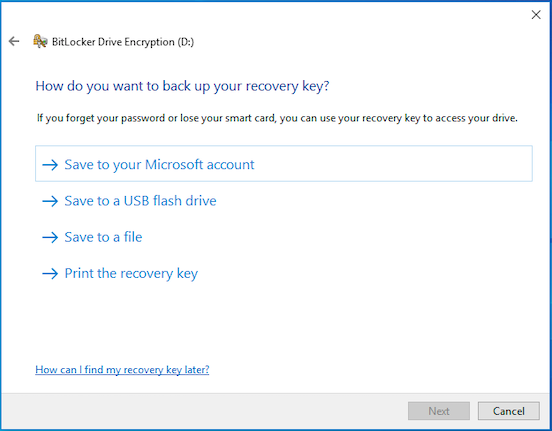
Next, they get an option to back up the recovery key for fixed drives if configured in the policy. Select an option to back up and click Next
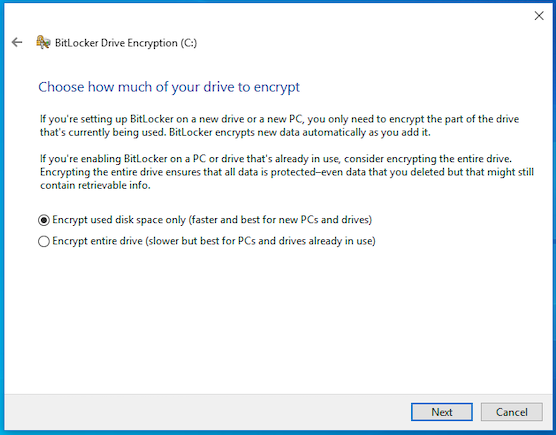
Next select how to encrypt the drives where they can choose to Encrypt used space or Encrypt the complete drive. Click Next
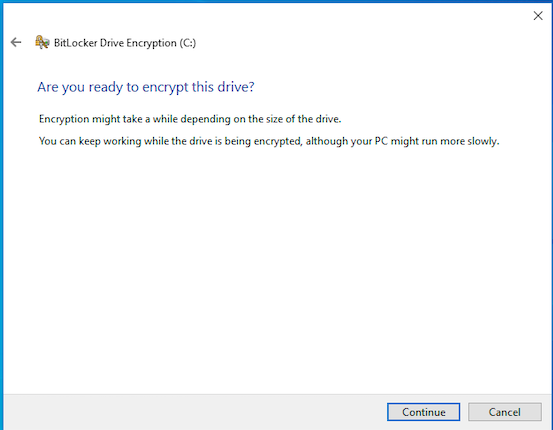
The final step is to confirm the process and start the encryption. Click Continue to start the encryption.
