- 07 Nov 2024
- 7 Minutes to read
- Print
- PDF
Application Control
- Updated on 07 Nov 2024
- 7 Minutes to read
- Print
- PDF
Scalefusion Veltar's Application Control for macOS leverages Apple's Endpoint Security framework to provide granular control over application access on your managed devices. IT administrators can block or allow applications based on various criteria, ensuring compliance and security.
Application Control empowers IT administrators to precisely manage application access on their managed macOS devices. By blocking or allowing applications based on Team ID, Bundle ID, Signing Certificate, or Version Hash, you can effectively control which applications are permitted to run. Additionally, you can configure blocking behavior (silent or with a message), restrict access to specific users or devices, and implement conditional blocking based on time and IP address. Detailed logging provides valuable insights into blocked app access, enabling you to monitor and analyze application usage.
The document explains what configurations you need to do on Scalefusion Dashboard to enable allowing or blocking of applications on managed macOS devices.
Platforms Supported: macOS
Pre-Requisites
Scalefusion MDM Client’s (agent app for macOS) v4.1.1 or above should be installed on device
macOS Device Profile should be created on Scalefusion Dashboard
Your account should have access to Application Control feature
Supported OS: OS 10.15 or above
How it Works
Define Rules: Create rules specifying which applications to block or allow based on the chosen criteria.
Enforcement: Scalefusion Veltar will monitor application launches and enforce the defined rules.
Logging: Detailed logs are recorded for blocked app access, providing valuable insights into device usage.
Steps
Step 1: Create Configuration
On Scalefusion Dashboard, navigate to Veltar > Application Control and click on Create Configuration

In the new window, enter Configuration Name
On the left you will find the configurable settings under these heads. Navigate to each link:
Application Policy
Settings
Access Restrictions

Once you have configured all the above, click on Create button on top right.
The configuration will get created and displayed under Configuration tab with other related details
Application Policy
From this section, you can define the rules to determine the applications that will be allowed/blocked. To do so, Choose one of the following:
Note: Apple System Apps and Scalefusion apps cannot be blocked with this policy
Configure Allowlist: Select this if you want to define the rules that determine which applications will be allowed
Configure Blocklist: Select this if you want to define the rules that determine which applications will be blocked

Next, click on the button Add New Rule

This will open the Add New Rule wizard. Enter the following details:
Name: Give a unique name for the rule
Type: The application can be allowed/blocked based on the following identifiers. Select any one and provide its value in the next field:
Bundle ID
Team Identifier
Certificate
Version Hash
Value: Provide value for the type you have selected. For example, if you have select Bundle ID as the Type then provide the Bundle ID of the app for which you are creating a rule.
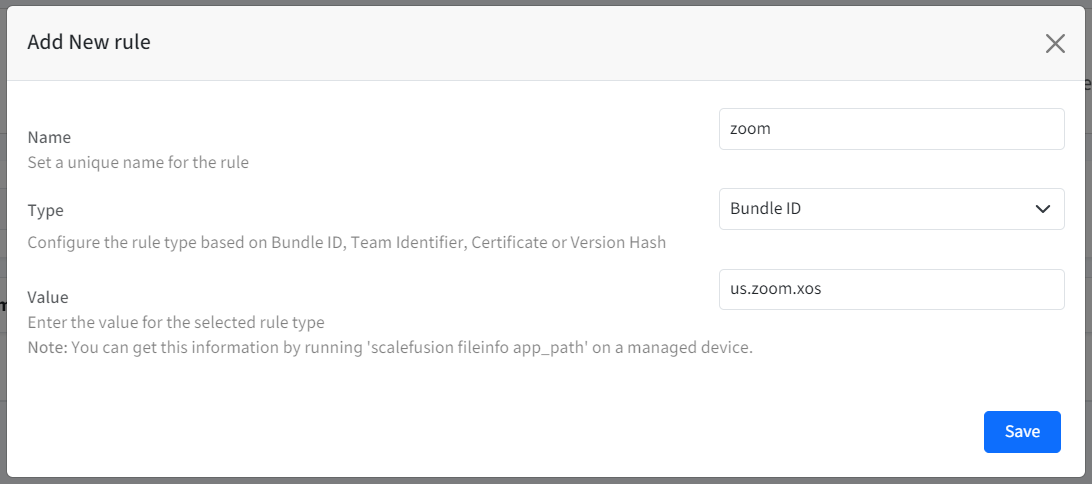
Note: You can fetch the values by running scalefusion -fileinfo <app_path> on a managed device. To do so, open the terminal window on the device and run the above command with the app name. Notice the information like Bundle Id, Team Id, Certificate etc. for the app being displayed.

Click Save
The rule will be created and displayed.
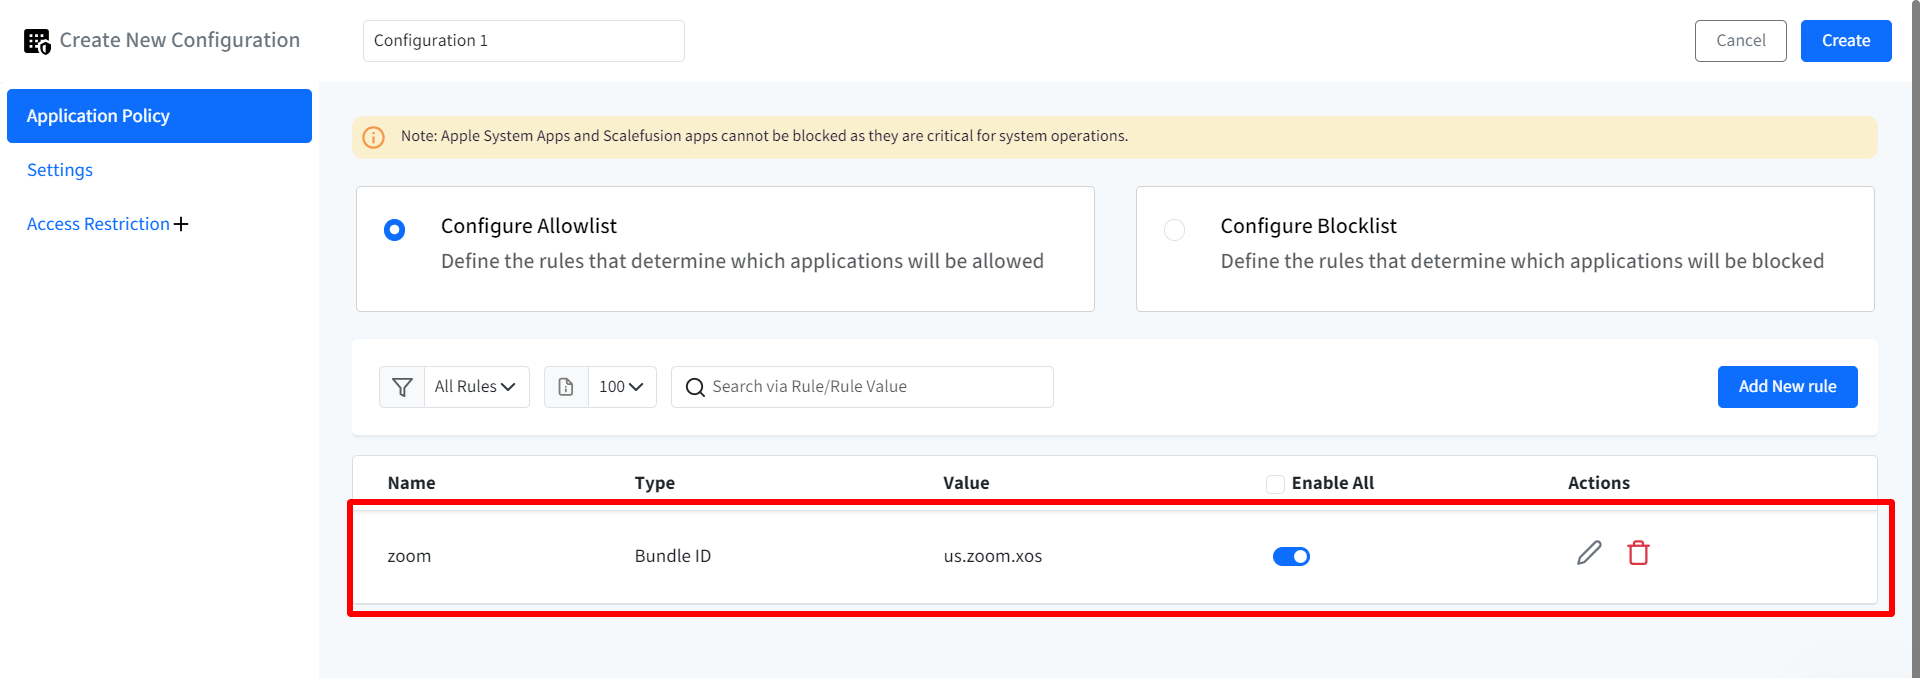
To apply a rule, you need to enable the toggle under Enable All
Settings
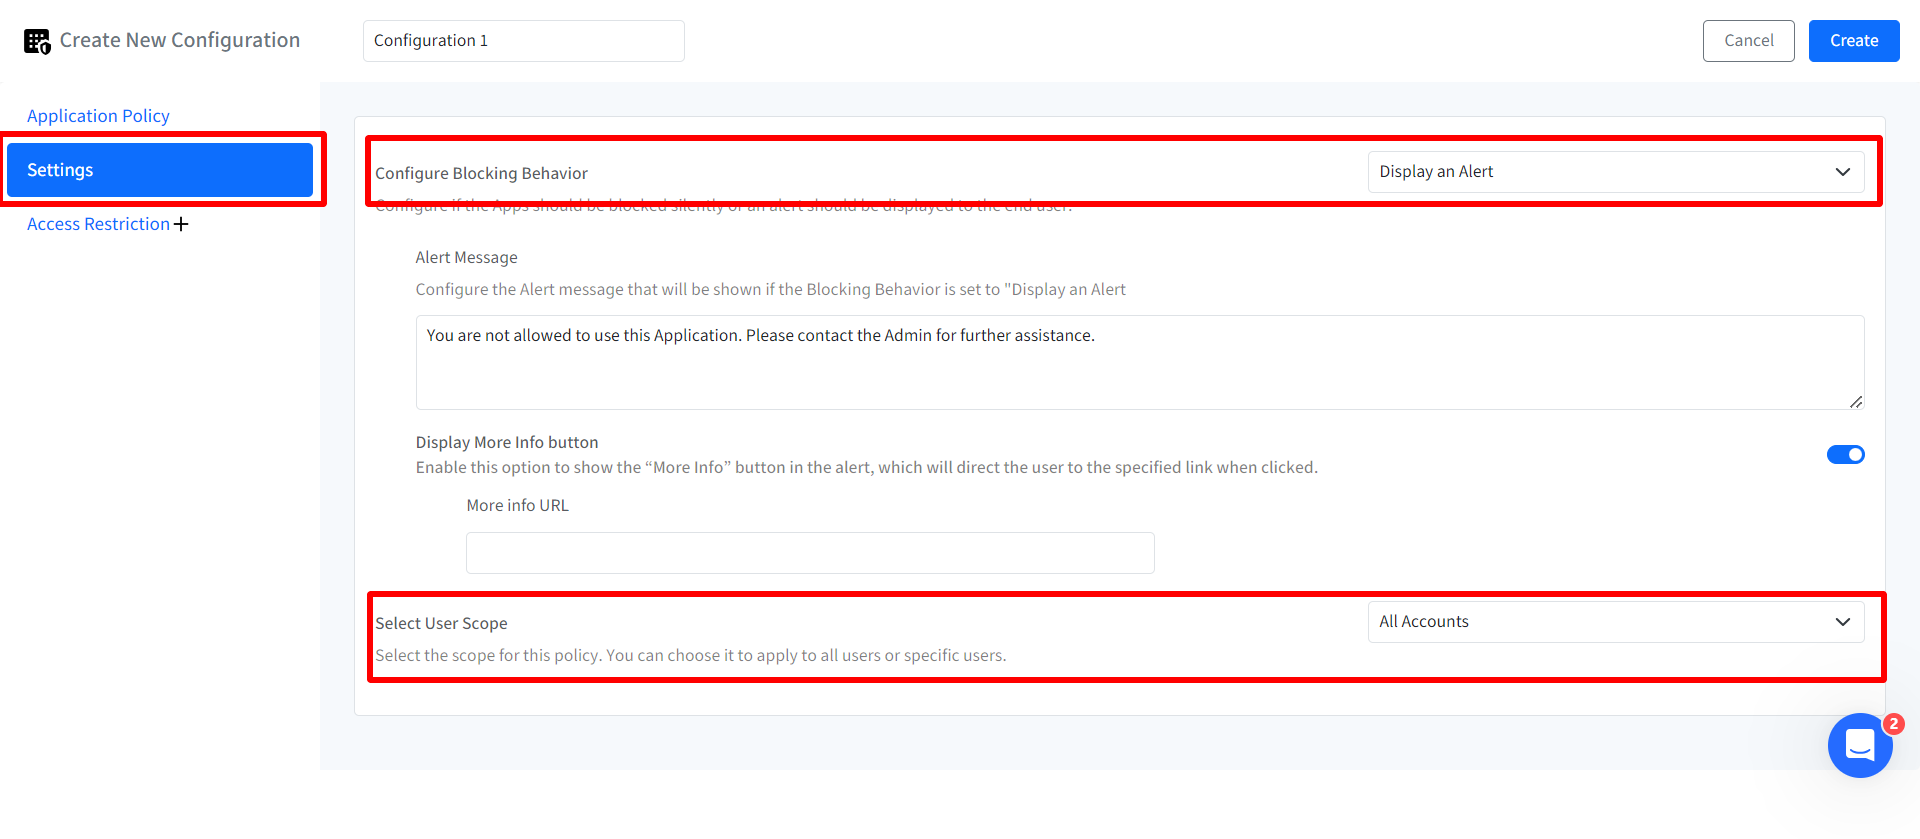
Configure app blocking behavior through these settings:
Configure Blocking Behavior: Select whether to block applications silently or display an alert to the end user.
Alert Message (Enabled if Blocking Behavior is set to Display an Alert): Configure the alert message that will be shown to the user when a blocked application is accessed.
Display More Info Button: Enables or disables the More Info button in the alert. When enabled, clicking the button will direct the user to the specified URL.
More Info URL: Enter the URL that will be displayed when the "More Info" button is clicked.
The alert message and Display More Info button become configurable only if the blocking behavior is set to Display an alert
Select User Scope: Select the scope for the blocking policy by choosing one of the following:
Enrolled User
All Accounts
Administrator Accounts
Standard Accounts
Specific User Accounts: On selecting this option, a text field will be displayed where you need to enter Local user short names which are present on the device. You can search for a particular user which will populate list of users created. To add more than one user, click on New User link.
Access Restrictions
IT admins can configure specific conditions from the Scalefusion Dashboard which determine the users' ability to access the applications on the device. To conditionally access, following parameters can be enforced:
Day & Time: Configure the Time schedule in which user account is allowed to access the applications. Select the following:
Start Time & End Time
Timezone: You can either choose to use device's local timezone or select it manually from the drop-down.
Select Days: Select particular day(s) from Sunday to Saturday

IP Address: Enter the IP ranges and the user(s) will be allowed to access the applications within those specified ranges. To give range, click on Add Range link. This will add a new row below. Here, select Type from IPv4 and IPv6, give start and End IP address. The IT admins can click on the delete icon under Actions if any particular IP range has to be removed. Click on Add range to configure multiple IP ranges. Note: The IP addresses should be valid.

Once you have configured all the above, click on Create button on top right. The configuration will get created and displayed under Configuration tab with other related details.

Step 2: Publish Configuration
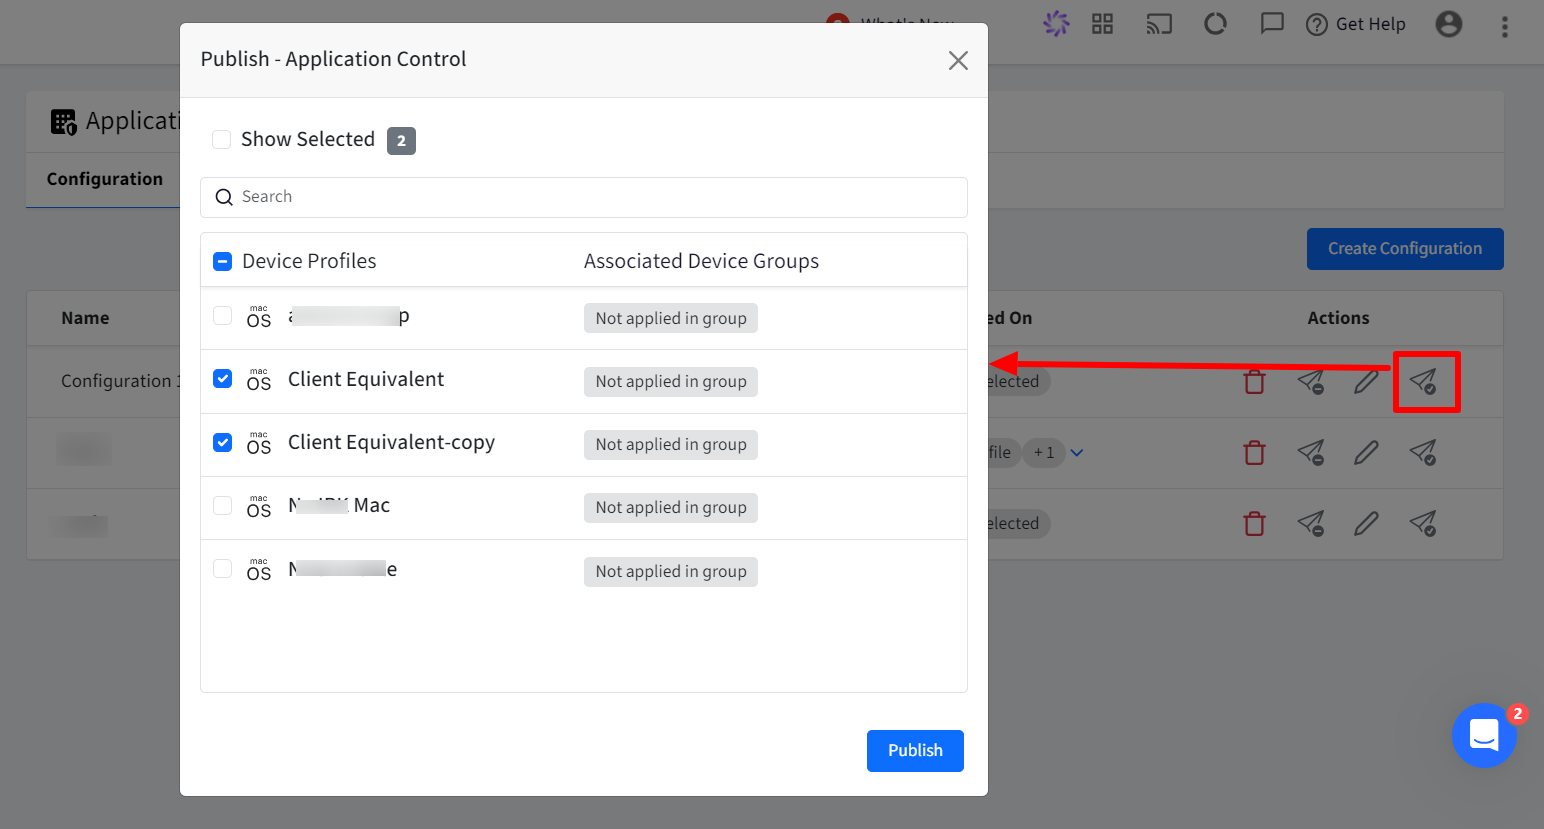
To Publish,
Click on publish icon in front of the configuration
In the new window, select the device profile(s) on which you want to publish the configuration.
Click Publish
User Experience on Device
On publishing the configuration,
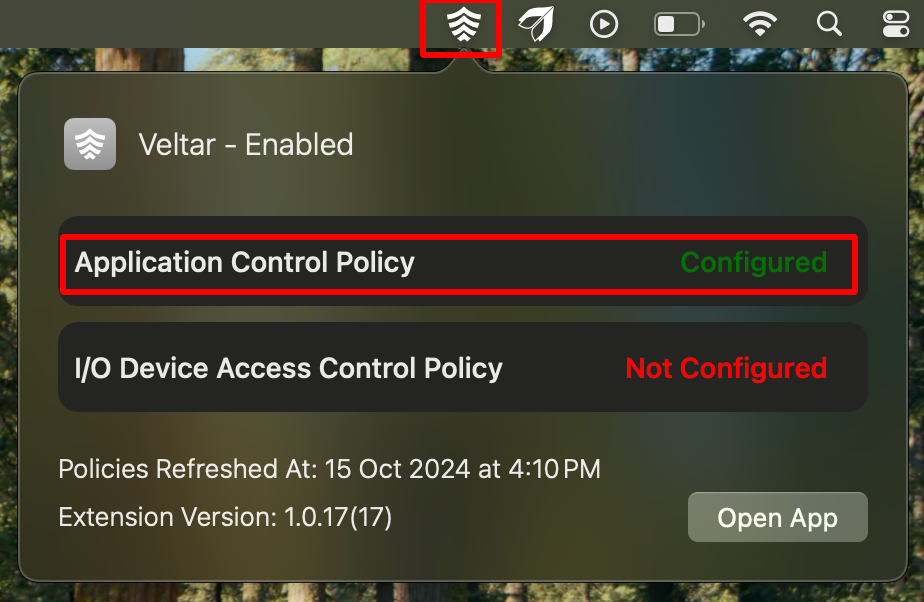
Notice Veltar icon on the top bar. Clicking on it will reflect Application Control Policy as Configured
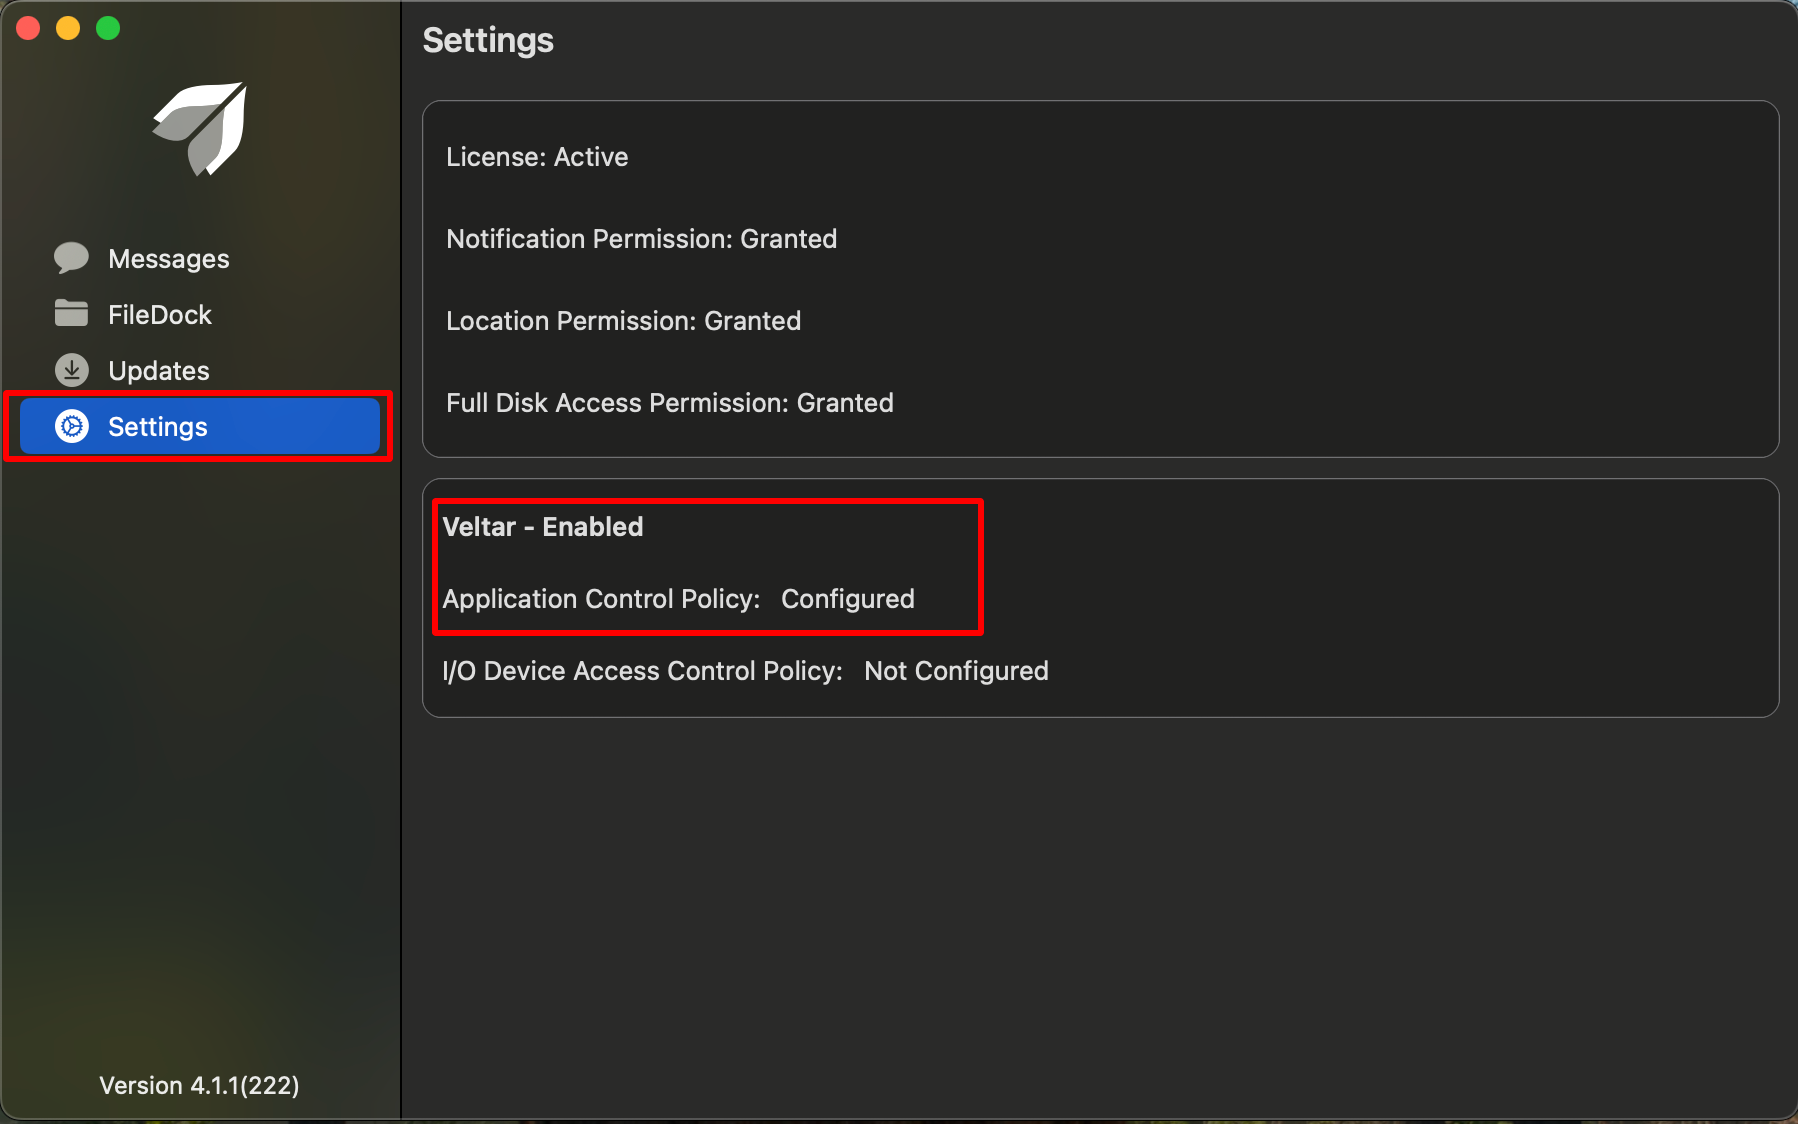
If you open Scalefusion MDM Client, it will reflect Application Control Policy as Configured, under Settings
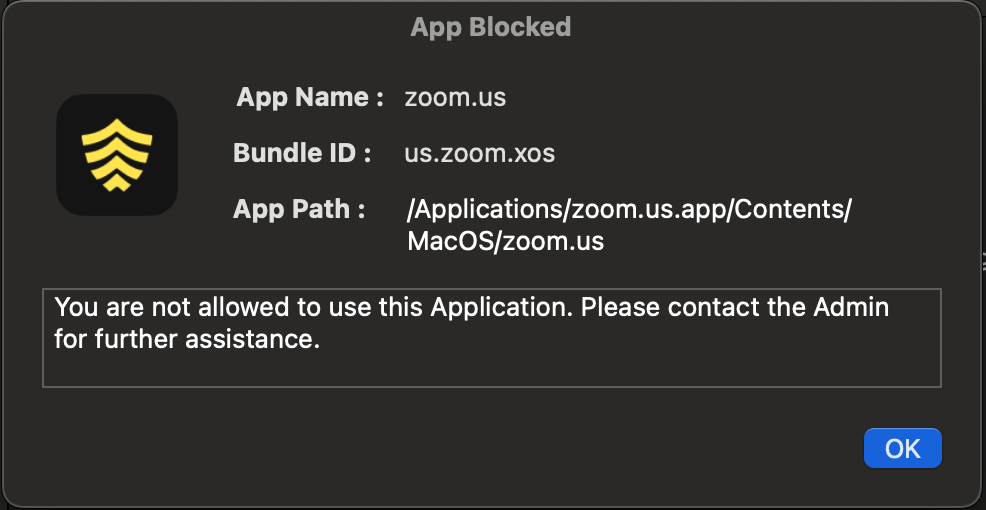
If you try to access an app (for which you have created a rule in the configuration) it will show up the alert message you have configured. Below screenshot is an example when user tries to access zoom app which has app block policy applied to it and the user is not allowed to use the application.
Event Logs
From this section you can get detailed logs which are recorded for blocked app access, providing valuable insights into device usage. Click on Event Logs tab under Application Control
Summary View
This section displays a summary of blocked instances within the Scalefusion platform. This provides a quick overview of the blocked instances and their distribution across different criteria, allowing administrators to easily identify and address potential issues.
Blocked Instances: Shows the total number of blocked events / instances on all the devices and a bifurcation further:
By Bundle ID: Displays the number of blocked instances due to violations of the Bundle ID rule.
By Team ID: Displays the number of blocked instances due to violations of the Team ID rule.
By Version Hash: Displays the number of blocked instances due to violations of the Version Hash rule.
By Certificate: Displays the number of blocked instances due to violations of the Certificate rule.
By Whitelist Policy: Displays the number of blocked instances that are not included in the whitelist rules.

Events Info
This section shows detailed information on the events, under following heads
Endpoint: The name assigned to the device.
Serial Number: The unique serial number of the device.
Username: The name of the user account that accessed the blocked application.
App Name: The name of the blocked application.
Timestamp: Indicates when the blocked application was accessed by the user.
Actions:
View App Information: Clicking this option displays a pop-up with detailed information about the blocked application. This information helps administrators understand the context of blocked application access and identify the specific reasons for the blocks.:
Bundle ID: The unique identifier for the application.
Version: The version of the application.
Build: The build number of the application.
Team ID: The team ID associated with the application.
Path: The path of the application on the device.
Certificate: The certificate used to sign the application.
Version Hash: The hash value of the application's version.
Blocking Reason: The reason why the application was blocked (e.g., violated a rule).
Edit Configuration: With this, you can update the configuration

Additional Features
Filters
There are filtering options available for viewing activity logs. You can filter them by:
Timestamp:
Timestamp
App Name
Username
Configurations:
All Configurations
List of available configurations. Choose a specific configuration
Date Picker:
Start Date: It can be from Current Date to 7 days. You cannot select a date more than 30 days in the past.
End Date
Note: Logs older than 30 days get automatically deleted.
Page Size: Select the number of records to be displayed on one page
Search Using Device Name, Serial No, or App Name

Download Report
Clicking the button downloads a CSV report containing the filtered activity data. Please note the report can be downloaded for a duration of 7 days at the maximum.


