This document provides an overview of the OneIdP Directory Settings within the Scalefusion Dashboard. These settings allow you to configure various aspects of user authentication and management for domains associated with your OneIdP instance.
Pre-Requisite
Directory (OneIdP) should be configured on Scalefusion Dashboard.
Access Settings
To access Settings,
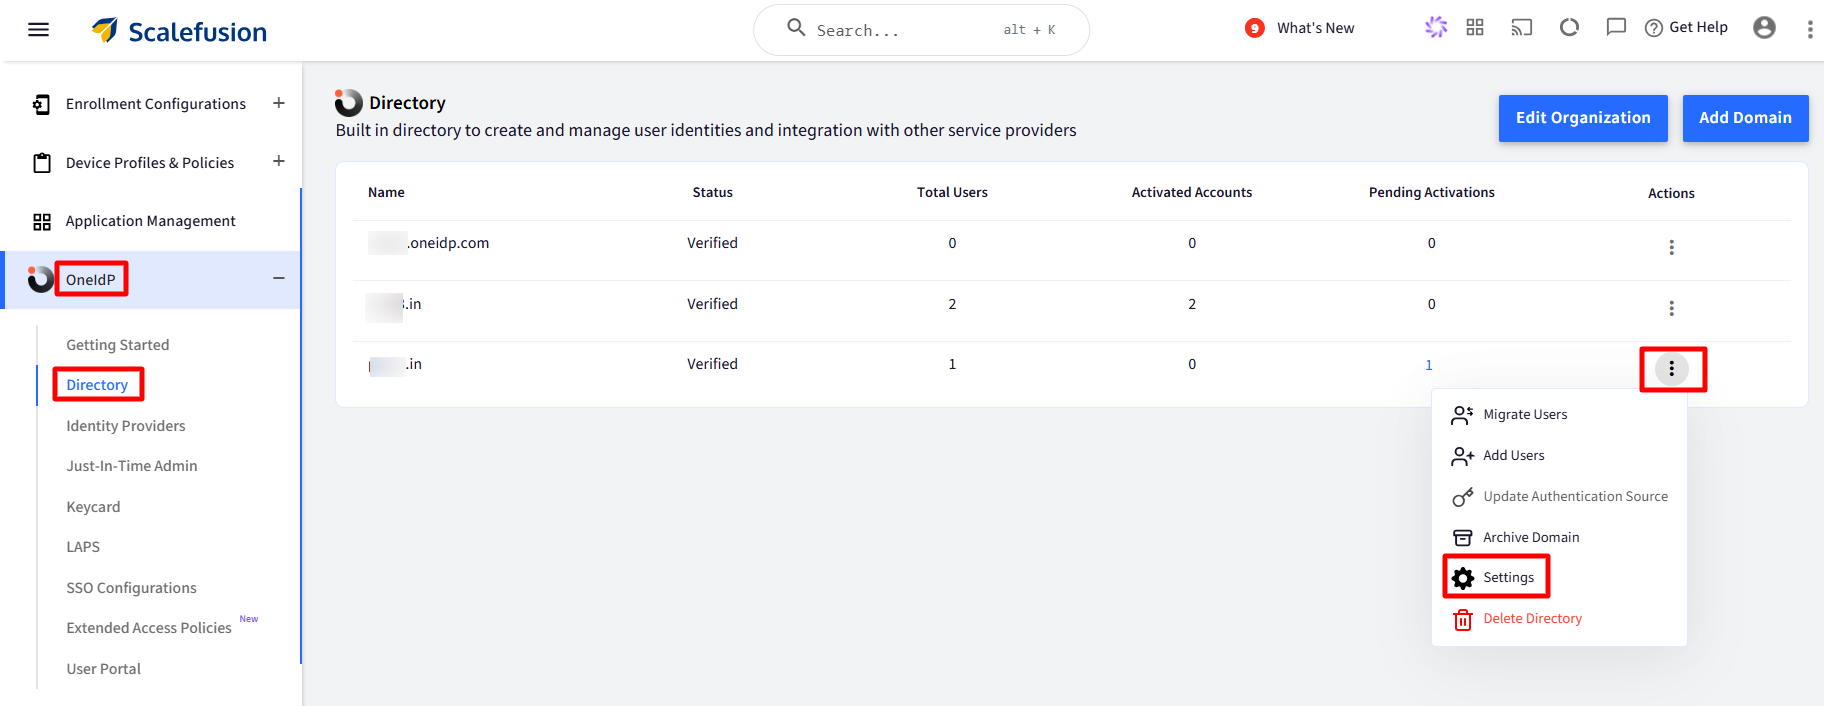
On Scalefusion Dashboard, navigate to OneIdP > Directory
Click on three dots under Actions, for the domain over which you have to configure Settings
Click on Settings
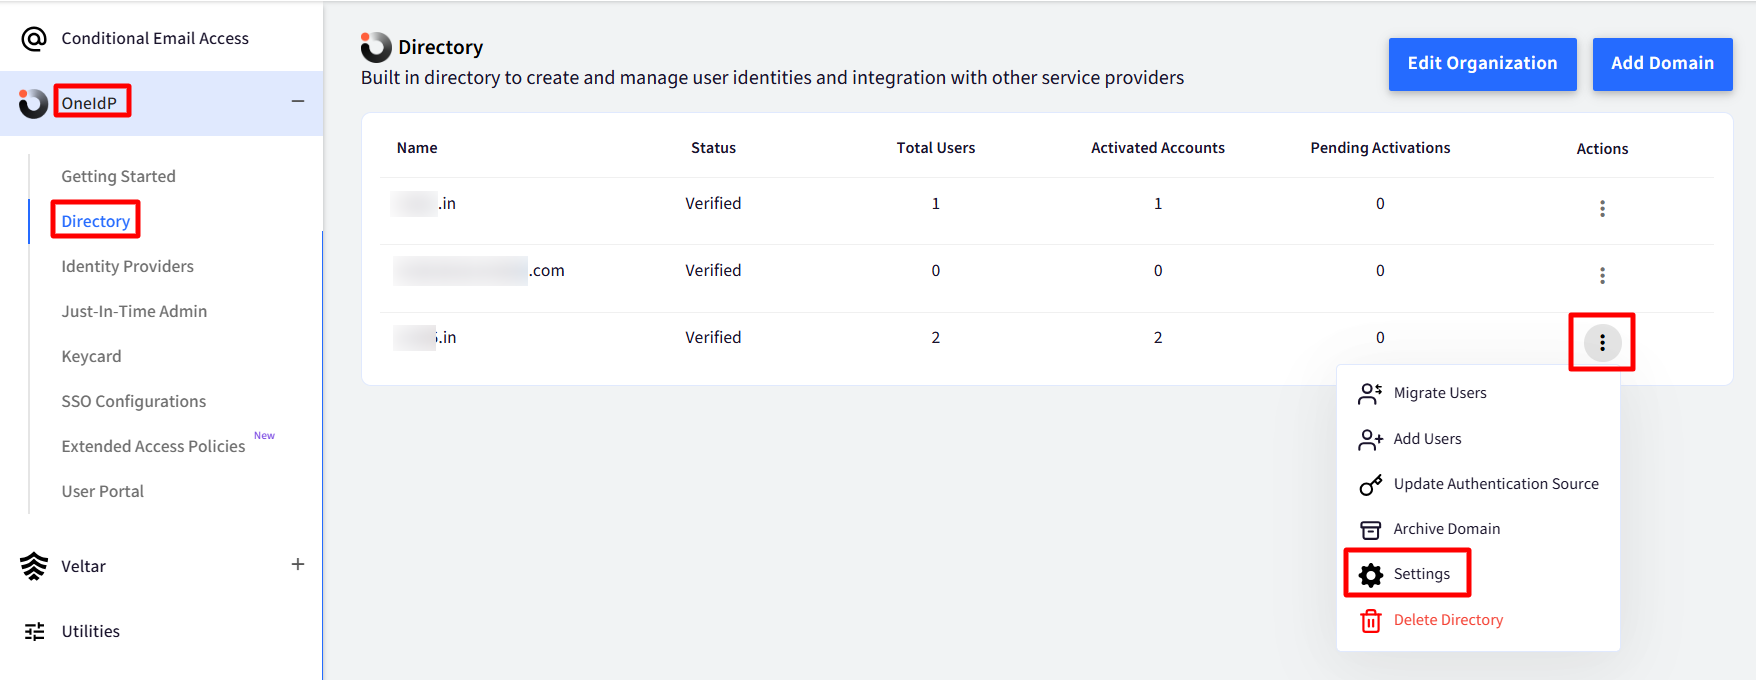
This will open a new dialog box.
The following are the settings you can configure:
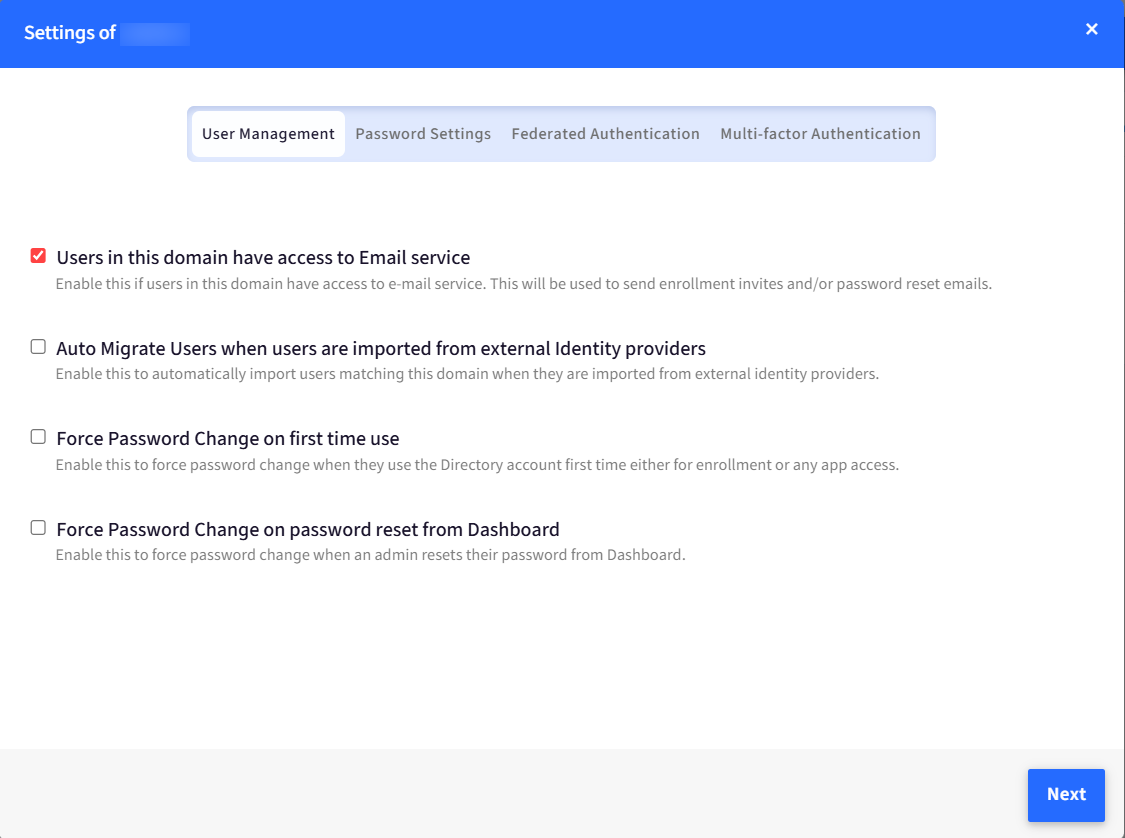
A. User Management
Users in this domain have access to Email service: Enable this if users in this domain have access to e-mail service. This will be used to send enrollment invites and/or password reset emails.
Auto Migrate Users when users are imported from external Identity providers: Enable this to automatically import users matching this domain when they are imported from external identity providers.
Force Password Change on first time use: Enable this to force password change when they use the Directory account first time either for enrollment or any app access.
Force Password Change on password reset from Dashboard: Enable this to force password change when an admin resets their password from Dashboard.
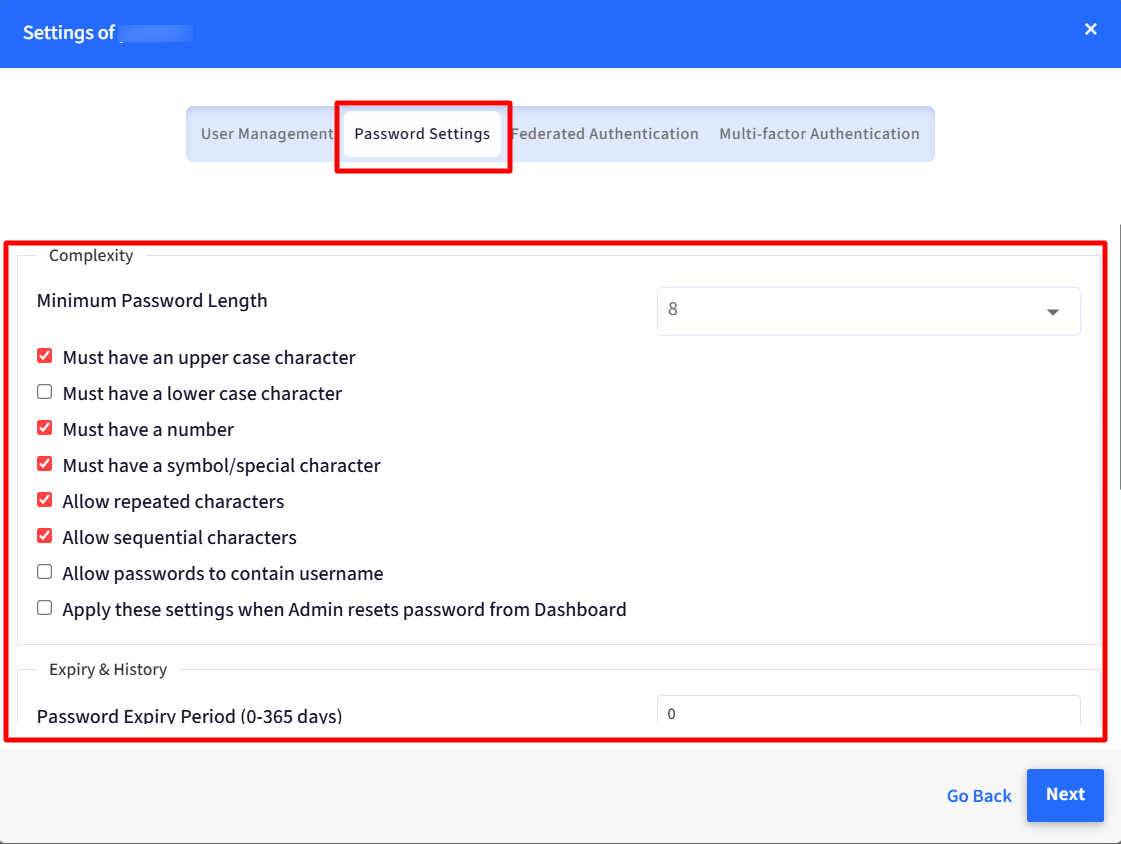
B. Password Settings
Password management is one of the policies that comes along with user management. The goal is to let admins define a password complexity rules for each domain that they have added in Directory
It has the following sections:
Complexity: Here you can define how complex the password should be. You can choose a number, upper, lower-case character, special character, etc. The minimum password length is 8 and maximum is 16.
Please note that is the option “Apply these settings when Admin resets password from Dashboard” is selected then the password complexity will be applied in following cases:
When an Admin resets the password from the Scalefusion dashboard.
When Admin is adding a new user from the dashboard.
Allow sequential characters: If it is not selected, the user will not be able to use sequential characters for example, Pqr, or 345, etc.
Allow repeated characters: If it is not selected, the user will not be able to use same characters repeatedly, for example, 111 or aaa, will be allowed however 1111 or aaaa will not be allowed.
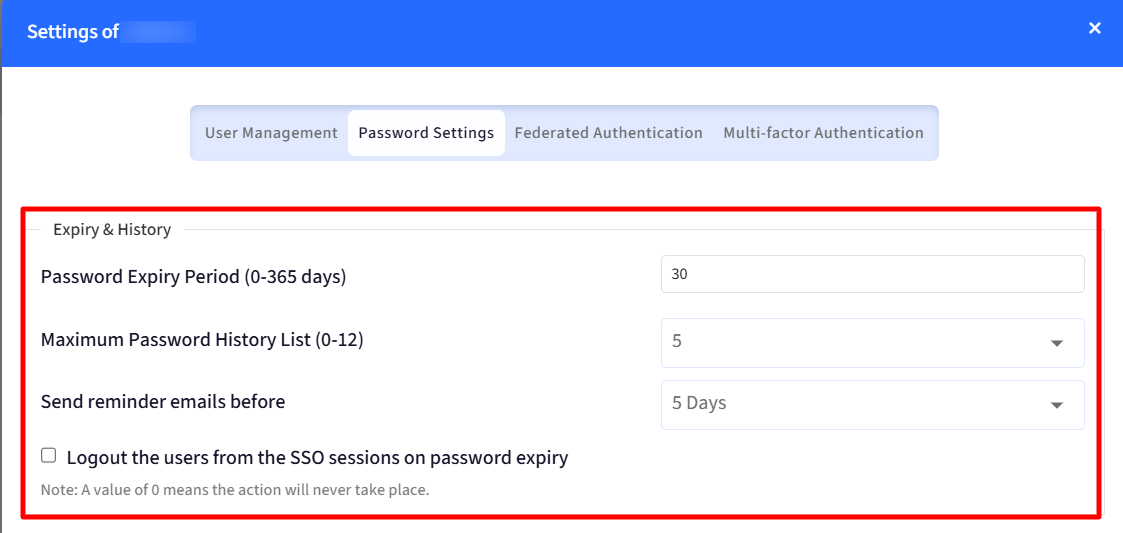
Expiry & History: In this section, you can configure:
Password Expiry Period: Set the number of days after which the password will expire. It should be between 0 and 365 days.
Maximum Password History List: This determines how many previous passwords are remembered and prevented from being reused when a user changes their password. It should be between 0 and 12.
Send reminder emails before: Select the number of days before which the password expiry email should go to the users.
Logout the users from the SSO session on password expiry: This will invalidate the login sessions of the users from their devices.
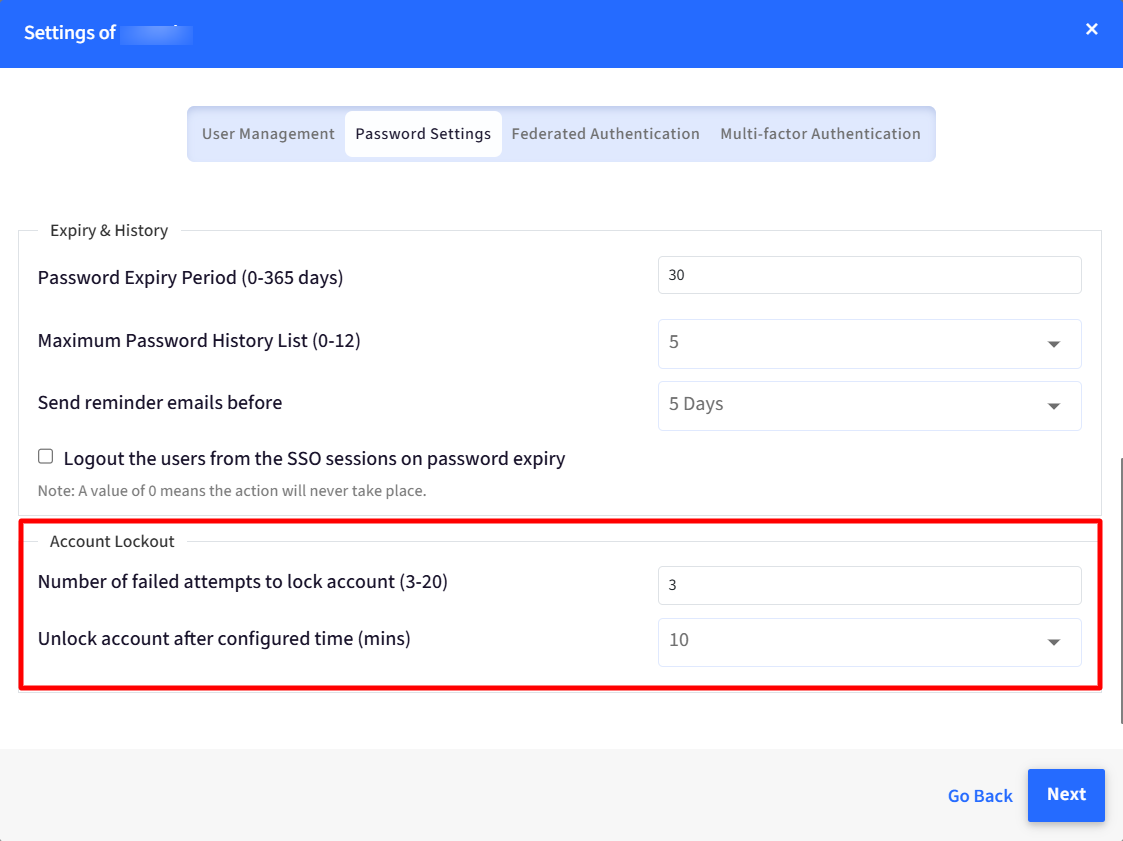
Account Lockout: In the section you can configure:
Number of failed attempts to lock account: Select the number of failed attempts after which the account will be locked.
Unlock account after configured time (mins): Specify the time period after which the account will be unlocked following a lockout due to failed login attempts. Minimum is 10 minutes and Maximum is 60 minutes.
Password Reset (Password Self-Service)
IT admins frequently receive requests to reset user passwords, and as the number of users grows, so does the volume of these requests, increasing the burden on IT. The goal, therefore, is to enable users to reset their own passwords when forgotten, while also implementing logging to monitor and track these changes.
Note:
Please note that this feature is supported only for SSO configurations set up with Microsoft Entra, Google Workspace, or Google LDAP.
Prerequisites:
Kindly ensure that the option to create and delete users is enabled under SSO Scope Management > Configure User Management in the SSO configuration.
Settings
Navigate to OneIdP > Directory > click the 3 dots under Action for the concerned domain.
Click Settings.
Go to the Password Settings tab and scroll down to the Password Reset section.
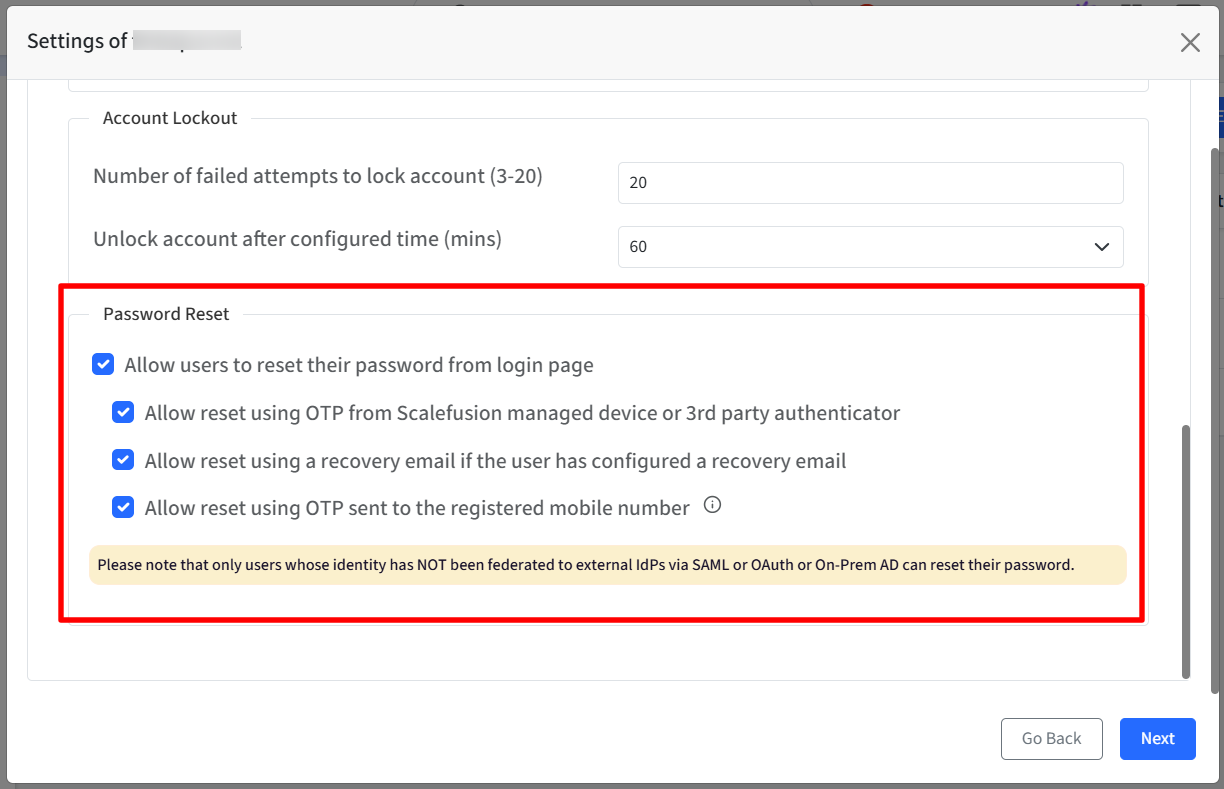
To allow user to reset their passwords from the login page, enable the following options:
Allow users to reset their password from login page
Allow reset using OTP from Scalefusion managed device or 3rd party authenticator: Selecting this option allows users to enter an OTP generated by the Scalefusion Authenticator app on a managed device. If they are using a third-party authenticator app, they can enter the OTP generated by that app instead, and go ahead and reset the password.
Allow reset using a recovery email if the user has configured a recovery email: If the user has configured a recovery email in the User Portal on their device, selecting this option will send an OTP to that email address, allowing the user to reset their password.
Allow reset using OTP sent to the registered mobile number: This option allows users to securely reset their password directly from the login page using a One-Time Password (OTP) sent to their registered mobile number. Please note SMS integration should be set up from Utilities > Global Settings section, for this feature.
Click on Next to save the settings on the dashboard.
Password reset events can be viewed under Reports > OneIdP Activity. To see these events, apply the 'User Events' filter.
Setting Recovery email in User Portal
The user will log in to the User portal using their email ID and password.
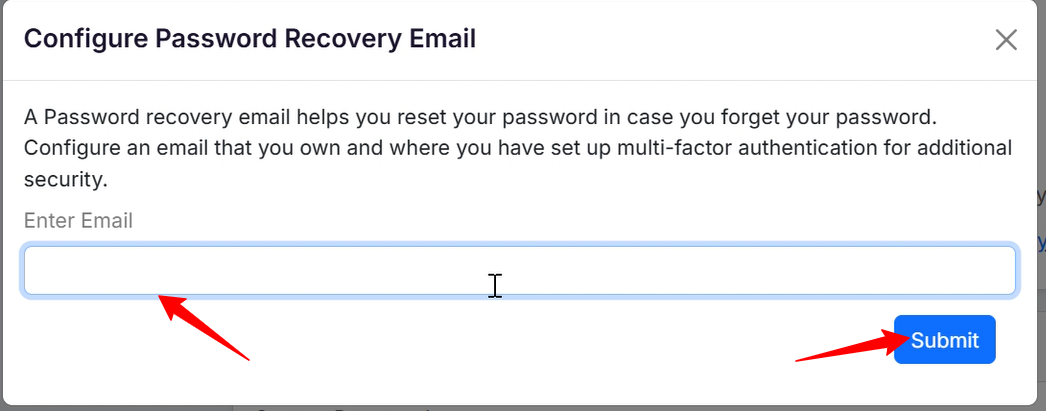
Select My Profile to open the Account Details page, then click the Configure Recovery Email option.
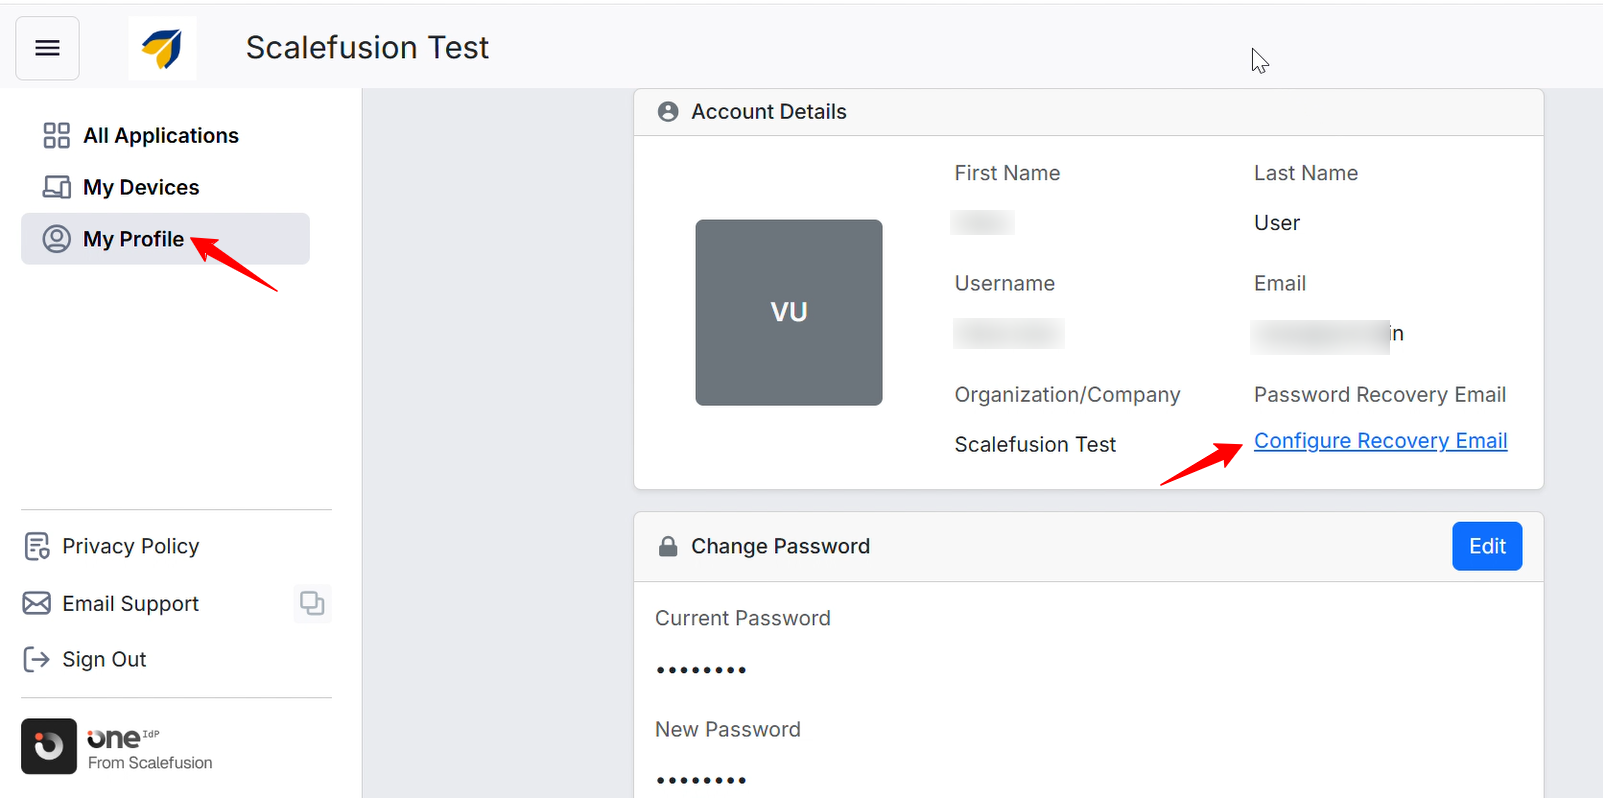
The user will be prompted to enter the email ID they wish to set as the recovery email. Click Submit.
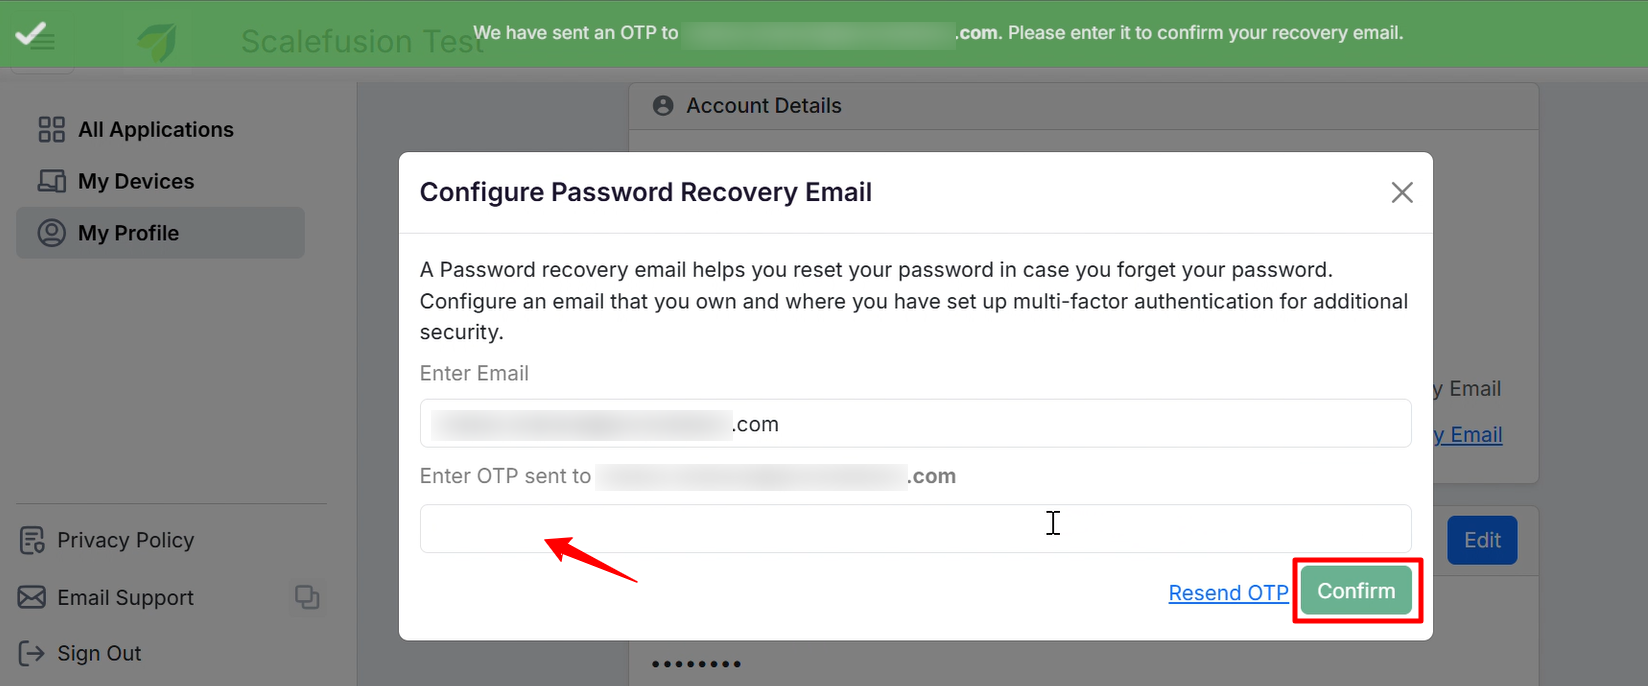
An OTP will be sent to the provided email ID, which the user must enter before clicking Confirm.
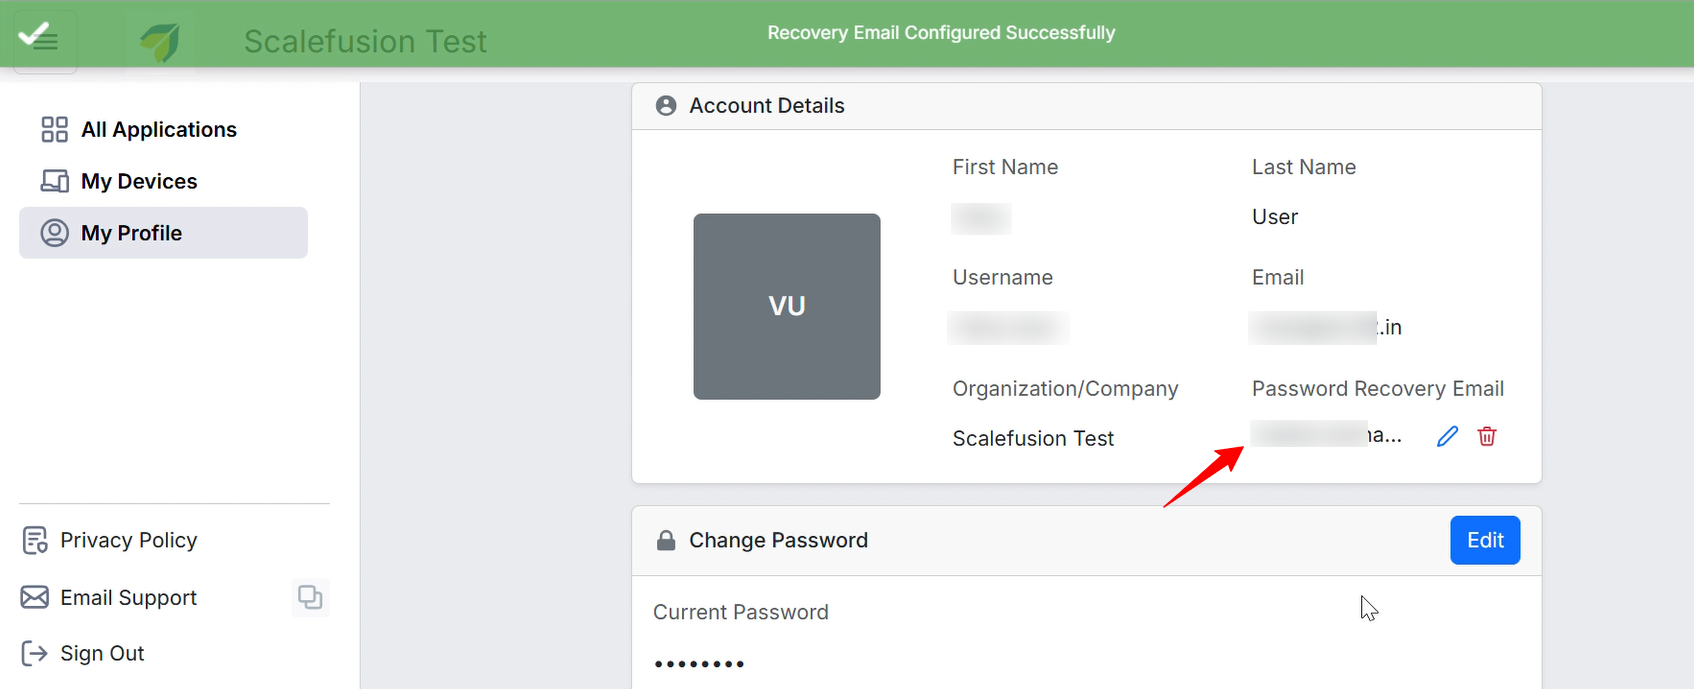
After completing this step, the recovery email will be displayed on the Account Details page in the User Portal.
User Experience
Allow reset using OTP from a Scalefusion-managed device or 3rd third-party authenticator.
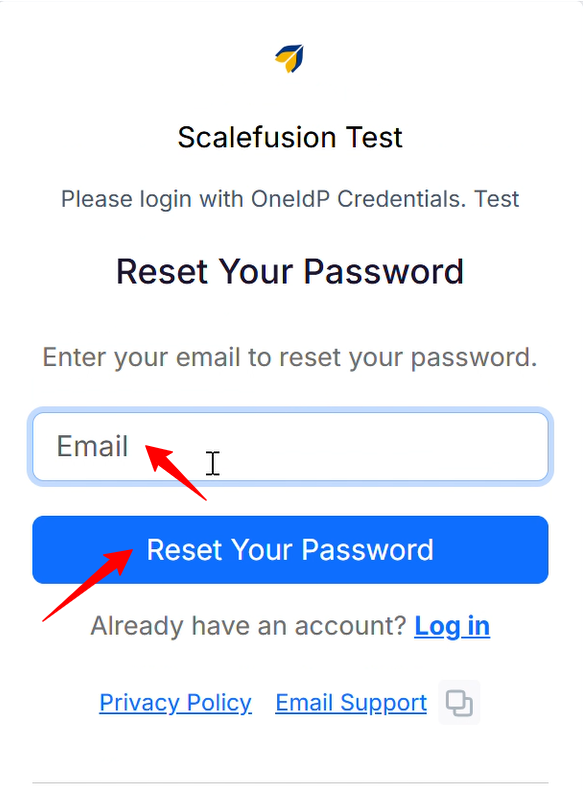
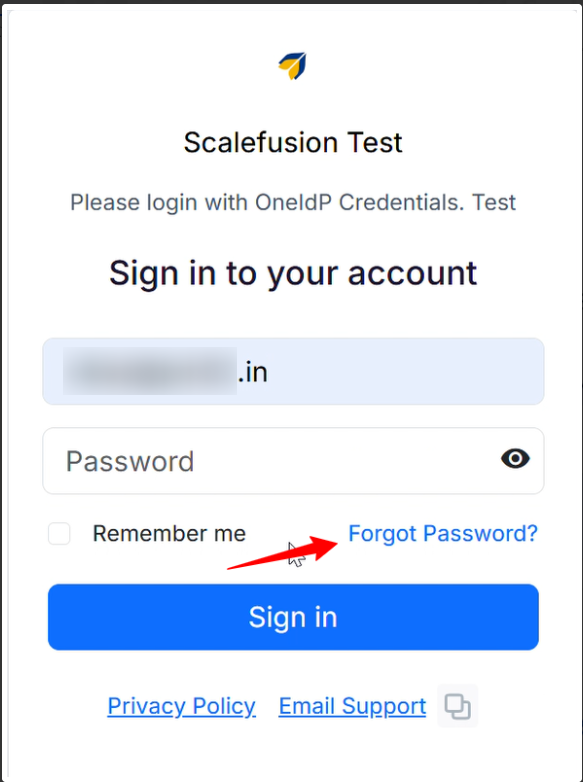
If the user has forgotten their password, they can click the Forgot Password option on the OneIdP login page.
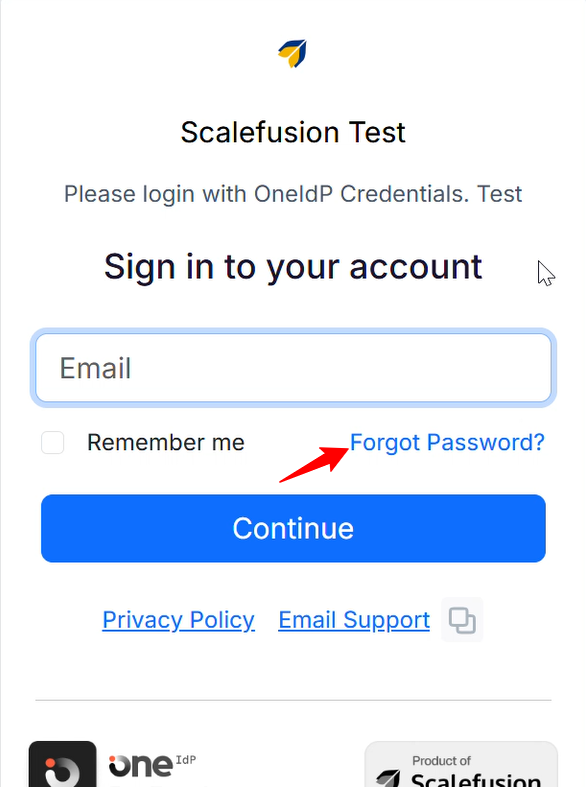
Next, they will have to enter their email ID and click Reset your password.
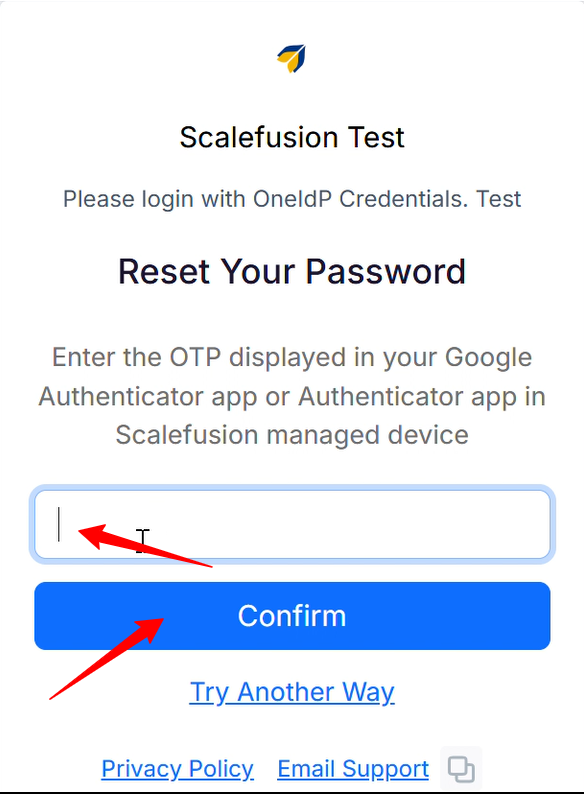
They will see a screen to enter the OTP displayed either from a Scalefusion-managed device or 3rd third-party authenticator. Click Confirm.
They will see a screen to Reset Password.
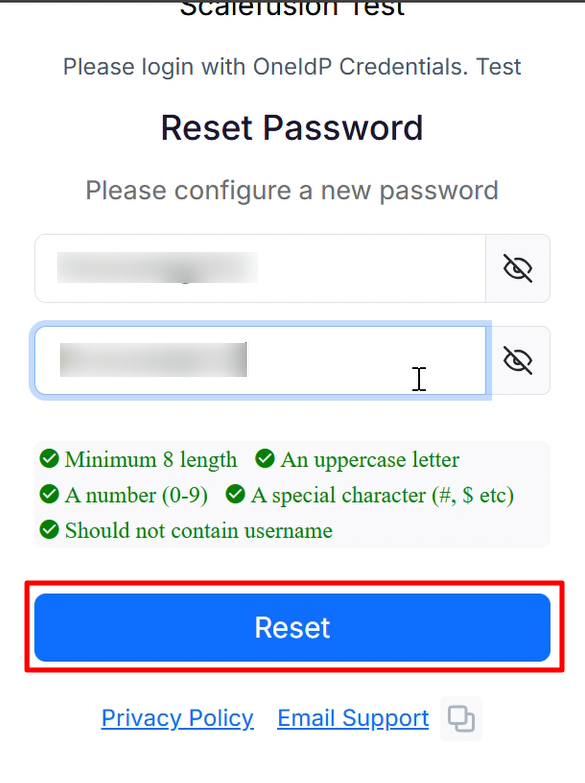
They will be redirected to the sign-in page to log in with the new password.

Note:
Please note that if the device is offline or not connected to a stable internet connection, the user should reset the password by entering the OTP from a third-party authenticator app.
Allow resetting using a recovery email if the user has configured one.
If the user has set a recovery email in the User Portal, they can use this option to reset the password.
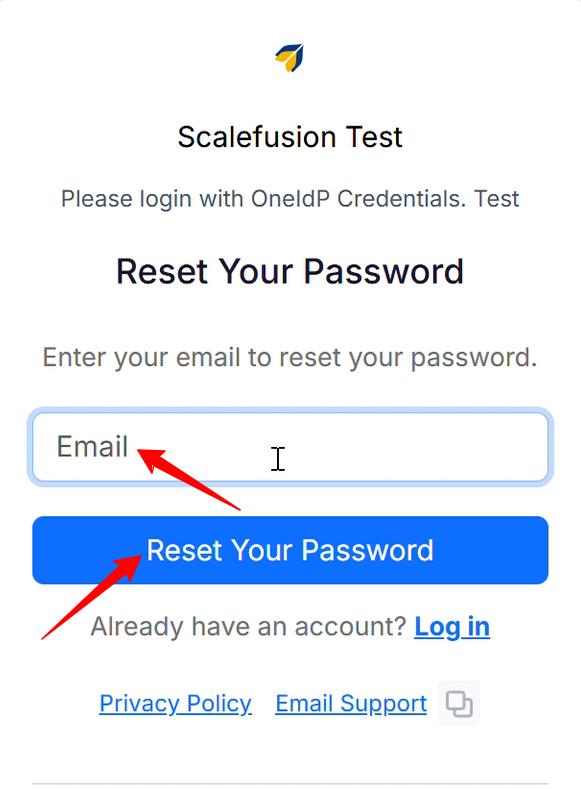
The user will enter their email ID on the OneIdP page and click Continue.
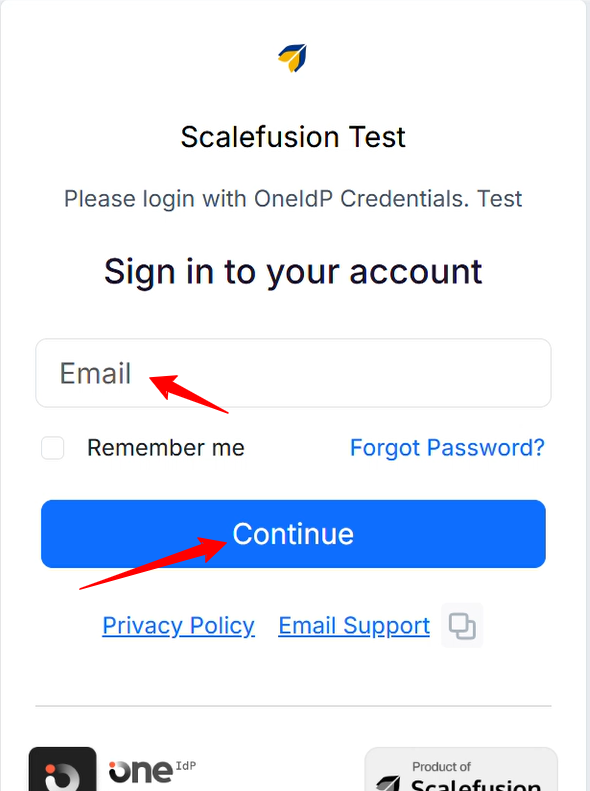
In the next screen, click on the Forgot Password option.
Enter your OneIdP email ID here again and click the Reset Your Password option.
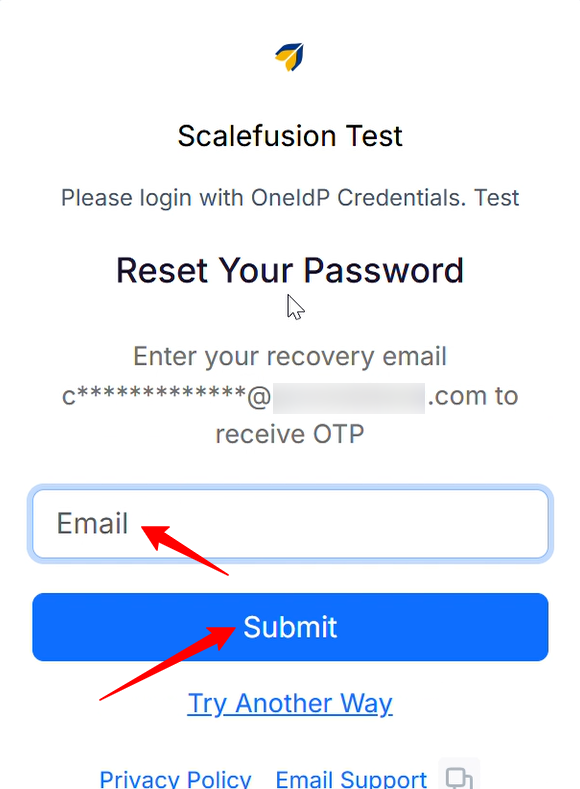
In the next screen, enter the recovery email and click Submit.
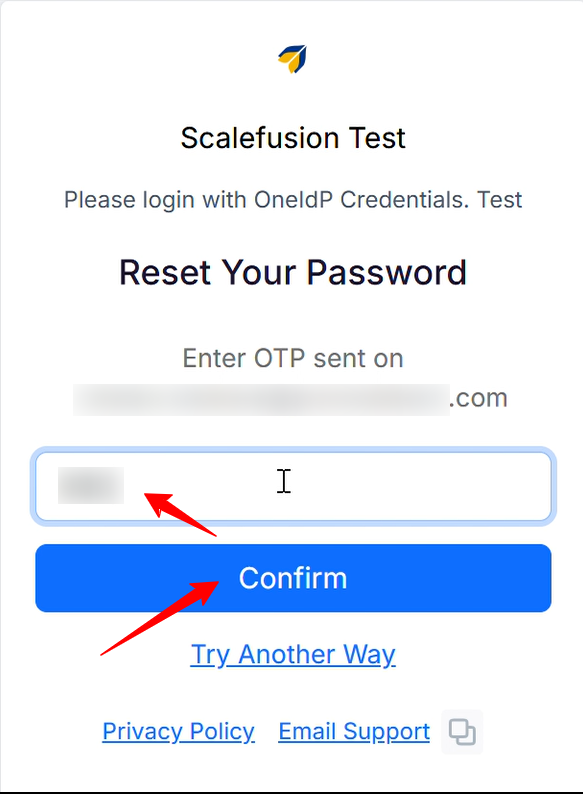
Next, enter the OTP that is sent to the recovery email ID and click Submit.
In the next screen, they can reset the password.
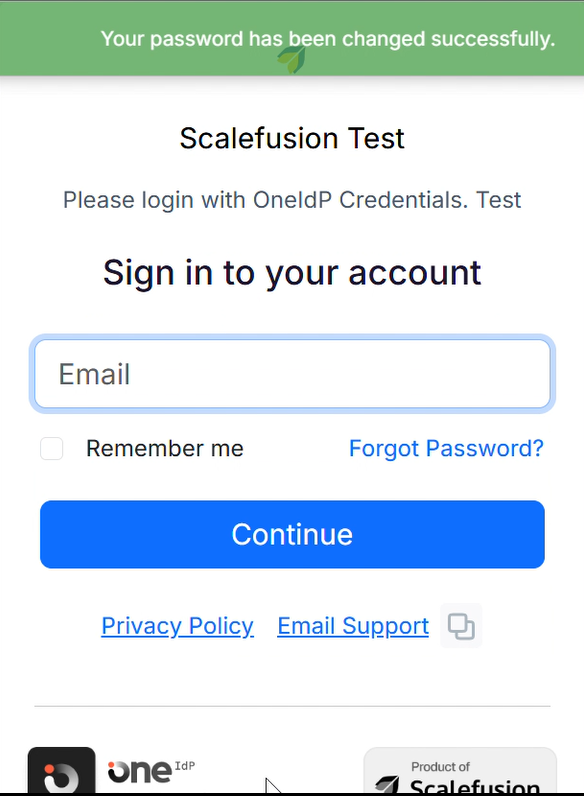
They will be redirected to the sign-in page to log in with the new password.
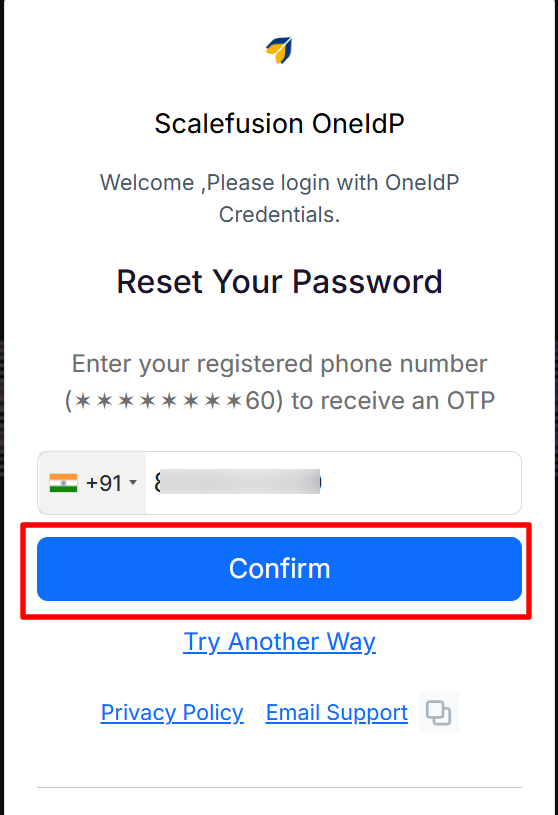
Allow reset using OTP sent to the registered mobile number
Click the Forgot Password option on the OneIdP login page.
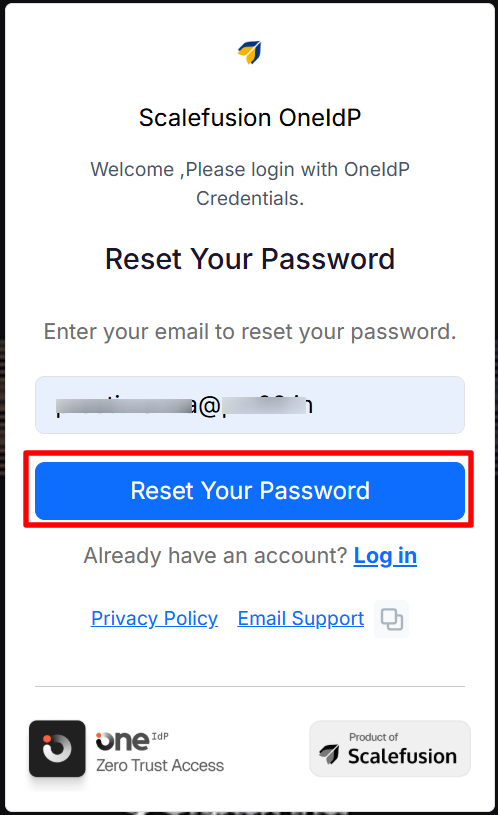
You will get Reset Your Password screen. Enter your email id and click Reset Your Password
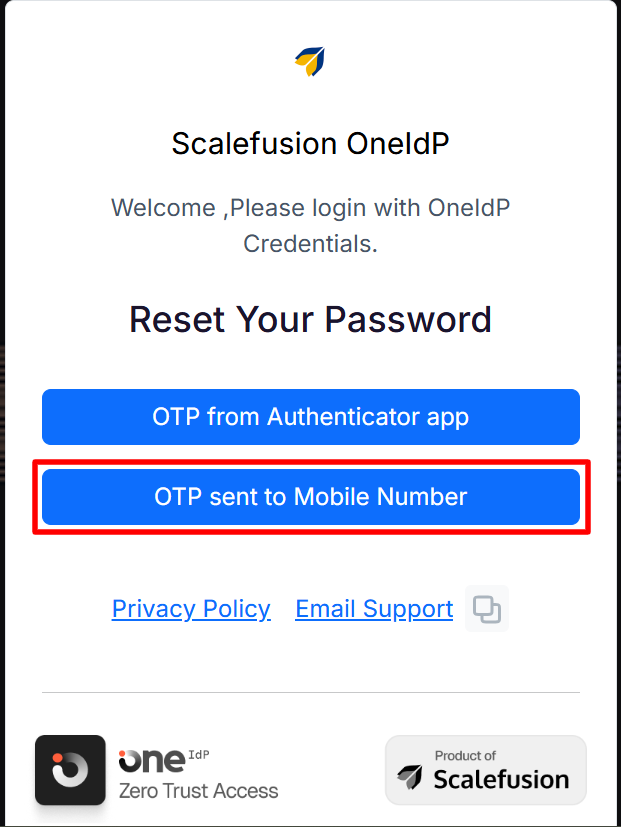
On the next screen select OTP sent to Mobile Number
Next, enter your registered mobile number (as given in User Management) and click Confirm
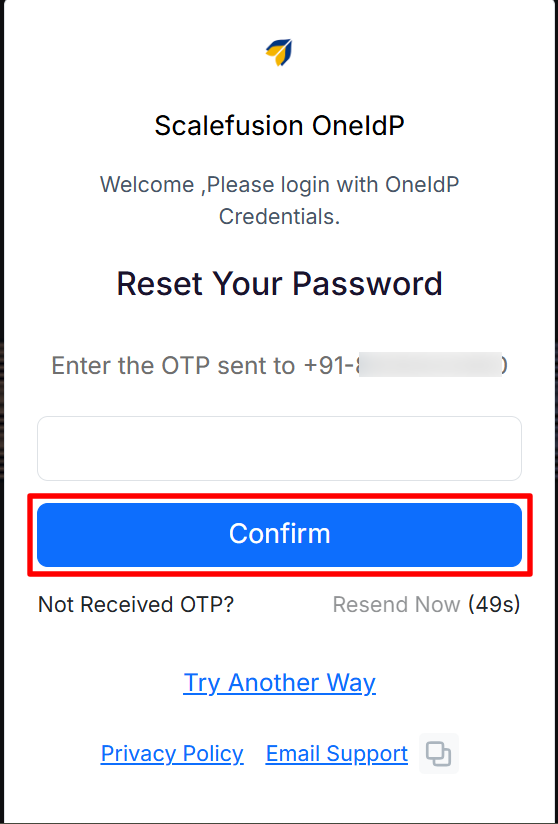
You will receive the OTP. Enter the OTP and click Confirm
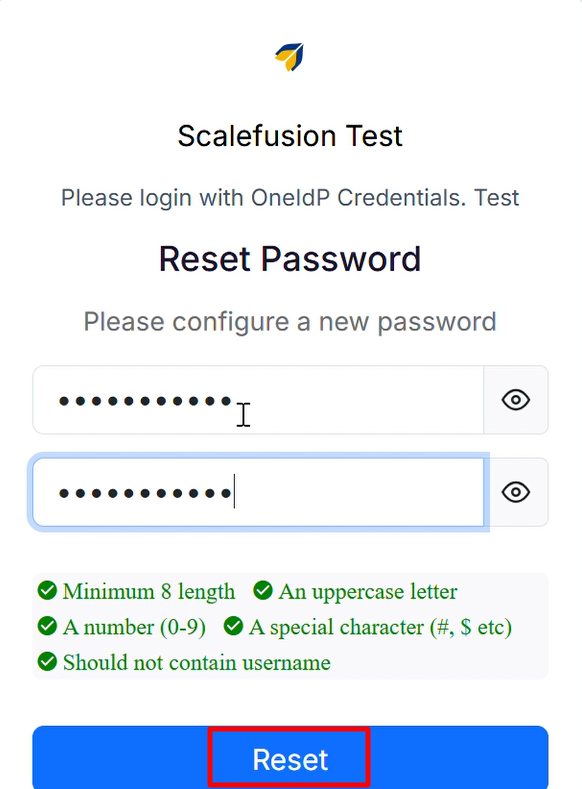
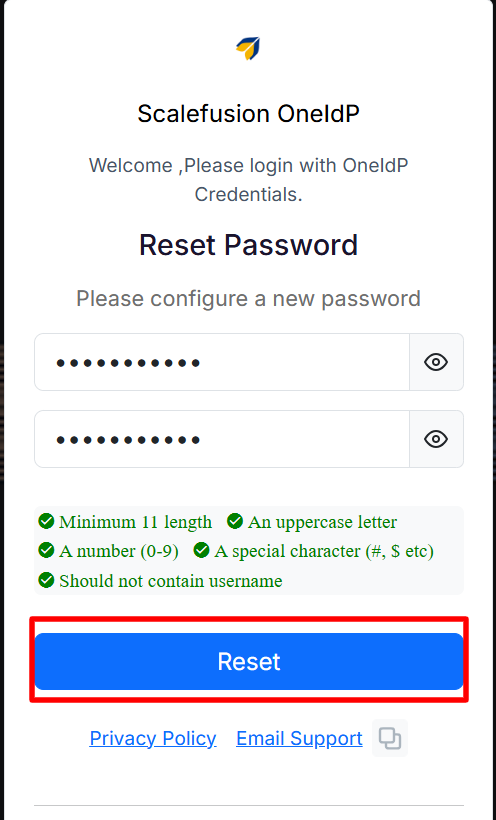
Now, configure a new password and click Reset
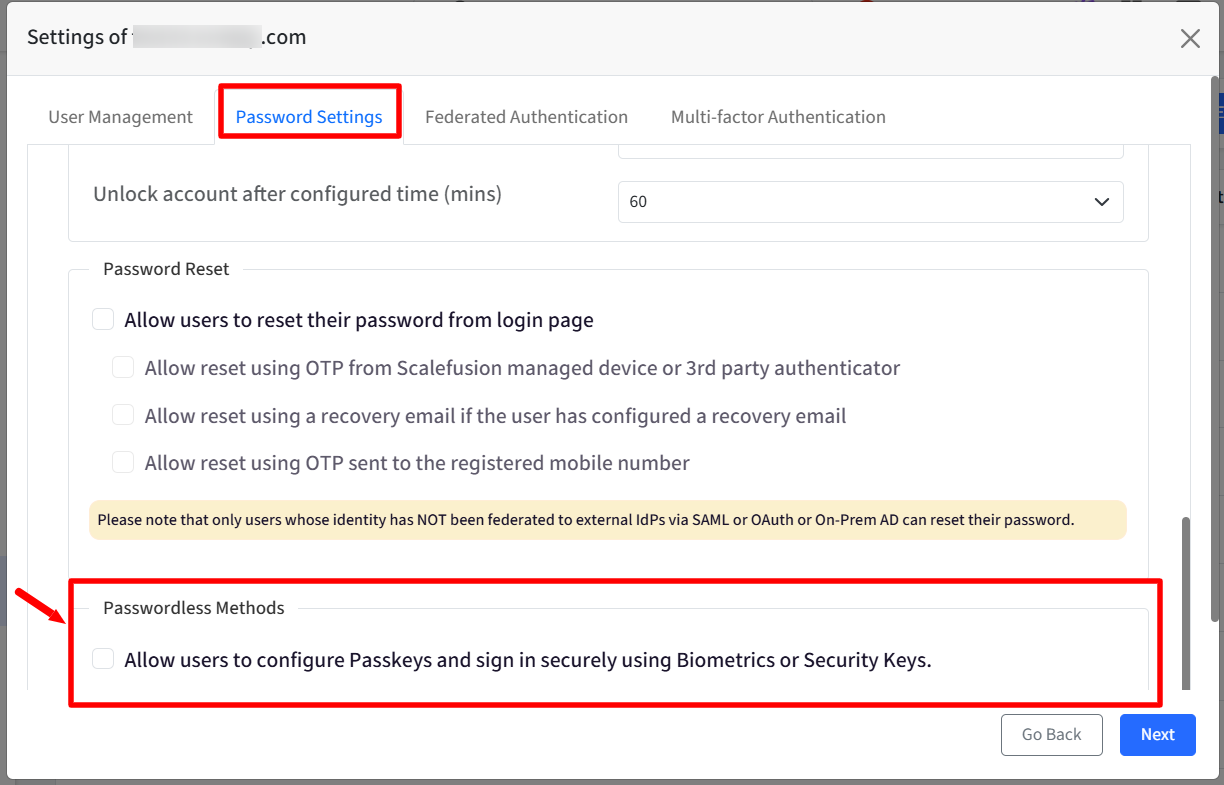
Passwordless Methods
Passwordless Authentication with Passkeys
Passkeys provide a passwordless sign-in experience, helping reduce login friction while improving protection against phishing and credential theft. When Passkeys are enabled, users accessing a flow that requires a password may be prompted to register a passkey. Once registered, the passkey can be used for future sign-ins instead of a password, resulting in a faster and more seamless login experience.
Note: Passkeys replace only the password step of authentication. Other configured SSO requirements, such as managed device verification, OTP validation, or third-party MFA, continue to be enforced as applicable.
To do so, enable the following setting from Directory > Settings > Password Settings:
Allow users to configure Passkeys and sign in securely using Biometrics or Security Keys
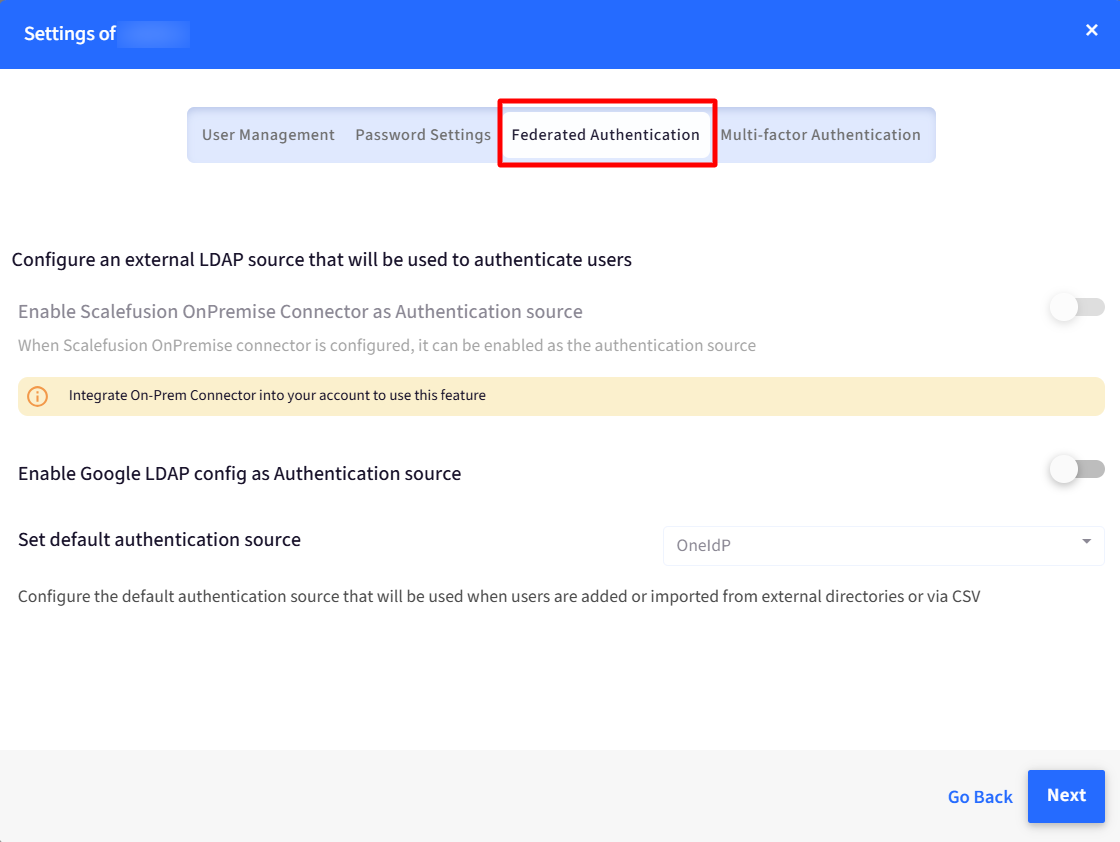
C. Federated Authentication
OPC (On-Premise Connector) allows Scalefusion to authenticate users against your on-premises Active Directory (AD) environment. This means that users can sign in to Scalefusion using their existing AD credentials. This is also extended to OneIdP users to provide a more seamless and unified sign-in experience. In essence, extending OPC to OneIdP users allows for a more centralized and convenient authentication method within your organization.
Important Points to Note:
Federated Authentication allows admins to select additional identity sources.
For Federated Authentication, OPC integration should be done into your Scalefusion account.
Federated Authentication settings are applicable only for custom domains
Configure an external LDAP source that will be used to authenticate users
Enable Scalefusion OnPremise Connector as Authentication source: Enabling this will make Scalefusion OnPremise Connector as the authentication source (when configured). When the Scalefusion On-Premise Connector is configured and enabled as the authentication source, Scalefusion will use your on-premises Active Directory (AD) environment to authenticate users. This allows users to sign in to Scalefusion using their existing AD credentials instead of creating separate Scalefusion accounts.
Set default authentication source: Set the default authentication source for users added or imported from external directories or CSV files. This will determine how these users will sign in to Scalefusion. Choose one from the drop-down:
OneIdP (default)
Scalefusion OnPremise Connector
D. Multi-factor Authentication
Multi-factor authentication policy allows you to secure access to your services when accessed from an unmanaged device. You can also enable MFA for Keycard based logins on managed devices. Any change in settings apply from the subsequent logins.
Note:
MFA with 3rd party authenticator app will not be enforced on managed device.
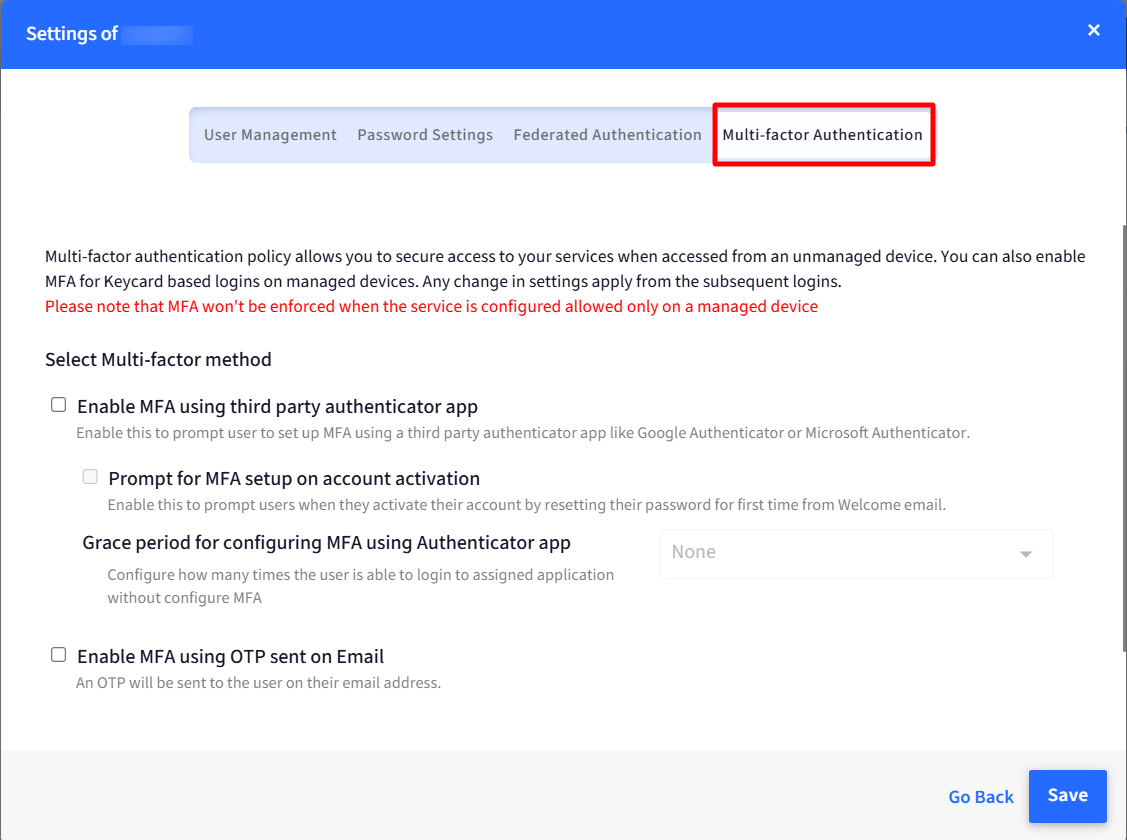
Select Multi-factor method
Enable MFA using third party authenticator app: Enable this to apply MFA and to prompt user to set up MFA using a third-party authenticator app like Google Authenticator or Microsoft Authenticator.

Prompt for MFA setup on account activation: Enable this to prompt users when they activate their account by resetting their password for first time from Welcome email.
Grace period for configuring MFA using Authenticator app: Configure how many times the user is able to login to assigned application without configure MFA with 3rd party authenticator. You can choose within the range 1-5 times. On the OneIdP login screen, user(s) can click on Skip for now to skip setting up the authenticator app.

Enable MFA using OTP sent on Email: An OTP will be sent to the user on their email address and they will see the field to enter the OTP. User(s) will also have the option to resend the OTP, if not received.
If both options “Enable MFA using third party authenticator app” and “Enable MFA using OTP sent on Email” are selected, then on the OneIdP login screen Users will have to click on Try Another Method button and they will see the field to enter the OTP. User(s) will also have the option to resend the OTP, if not received.


Points to note
If MFA is enabled in SSO config and you try to uncheck the options "Enable MFA using third party authenticator app" and "Enable MFA using OTP sent on Email" in Directory, you will see the following message.
