Introduction
To reduce the administrative overhead on IT teams, organizations aim to provide end users with the ability to manage their own devices via a self-service portal. This capability is intended to complement existing access to applications. While the use of features such as Single Sign-On (SSO) may vary across organizations, enabling basic device management for end users helps streamline support operations.
Introducing Device Management in the User Portal. The objective is to extend the existing user portal to include device management functionalities.
Prerequisites
The user(s) should be migrated to OneIdP.
The user(s) should be in the User Group on the Scalefusion dashboard.
The User Group must have a profile assigned to it on the Scalefusion dashboard.
Configure Device Management features
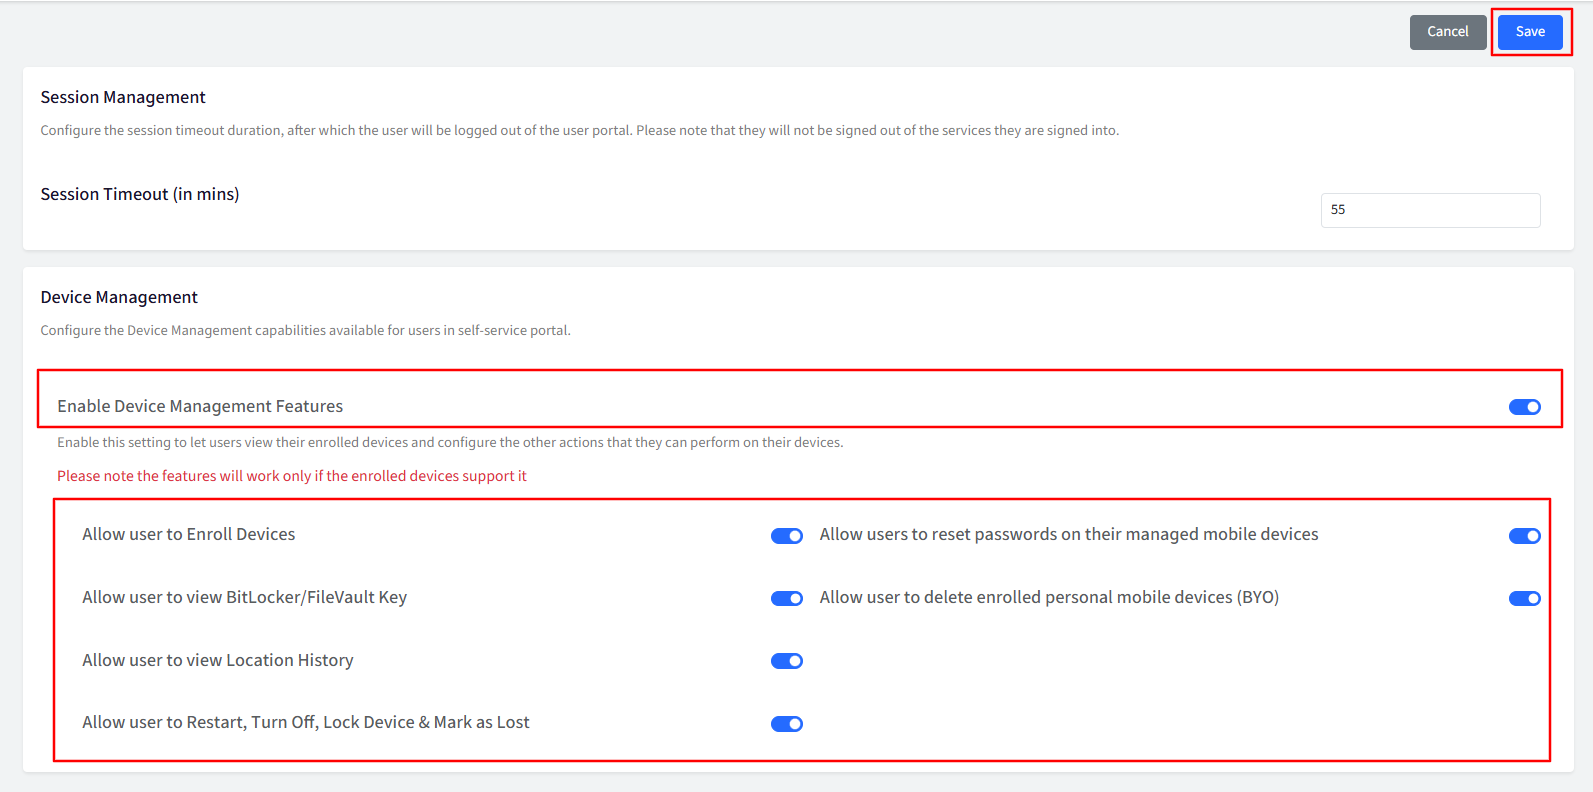
Enable Device Management Features: This setting allows users to view their enrolled devices and configure actions such as Refresh, Reboot, lock the device, and many more.
Navigate to OneIdP > User Portal > General Settings > Device Management.

Click the Edit button to configure the Device Management features.
Admins have control over what end users can view and which actions they can perform. A user can only see their device if the admin enables the feature, and can perform specific actions only if the corresponding settings (flags) are turned on.
Once configured, click Save.
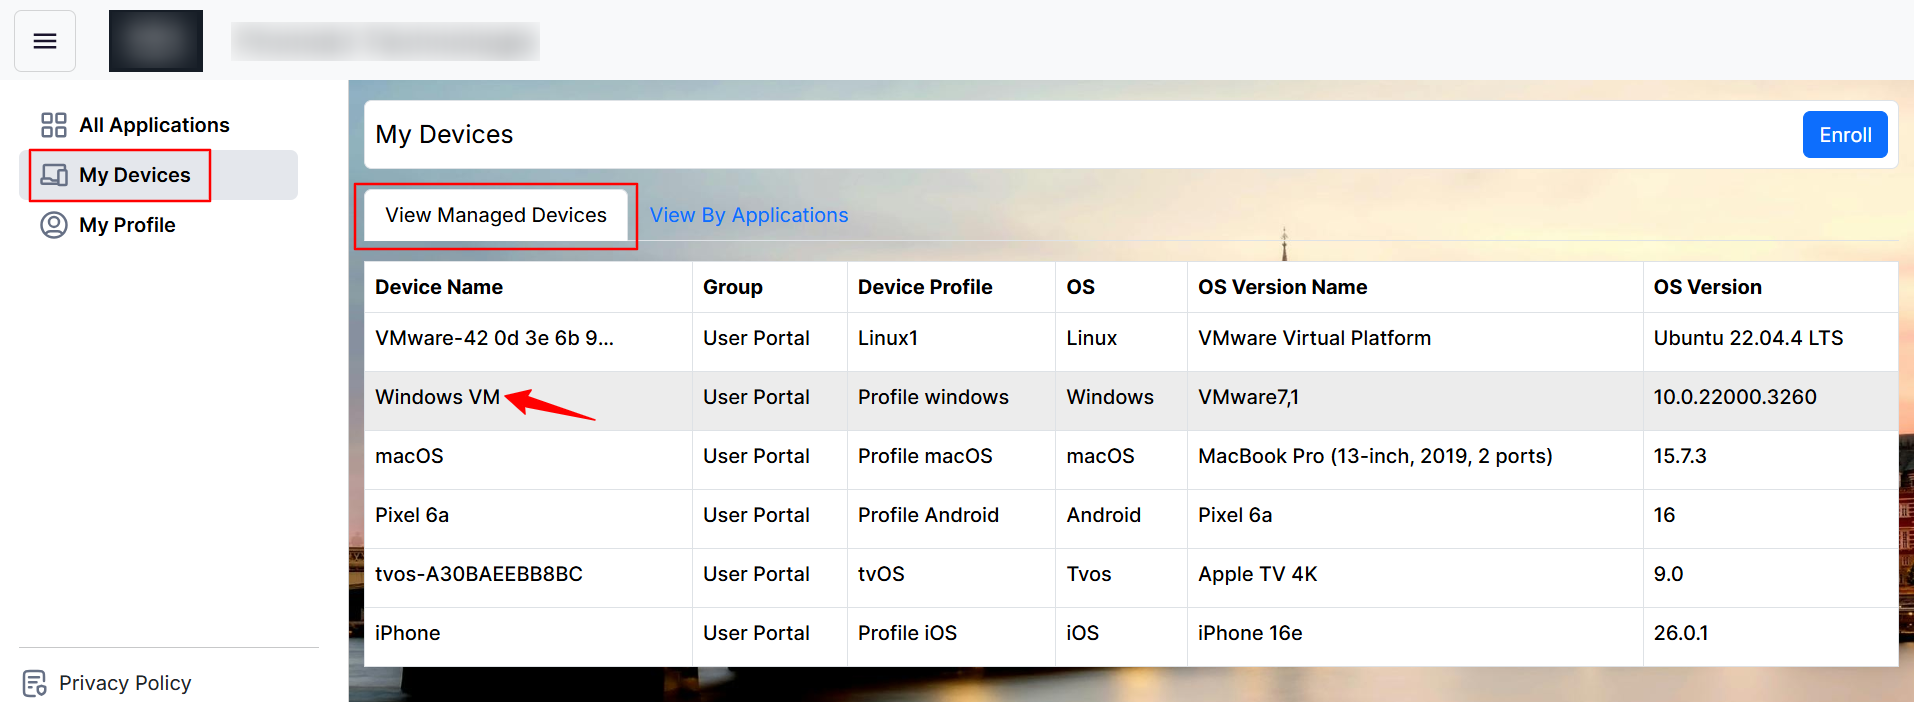
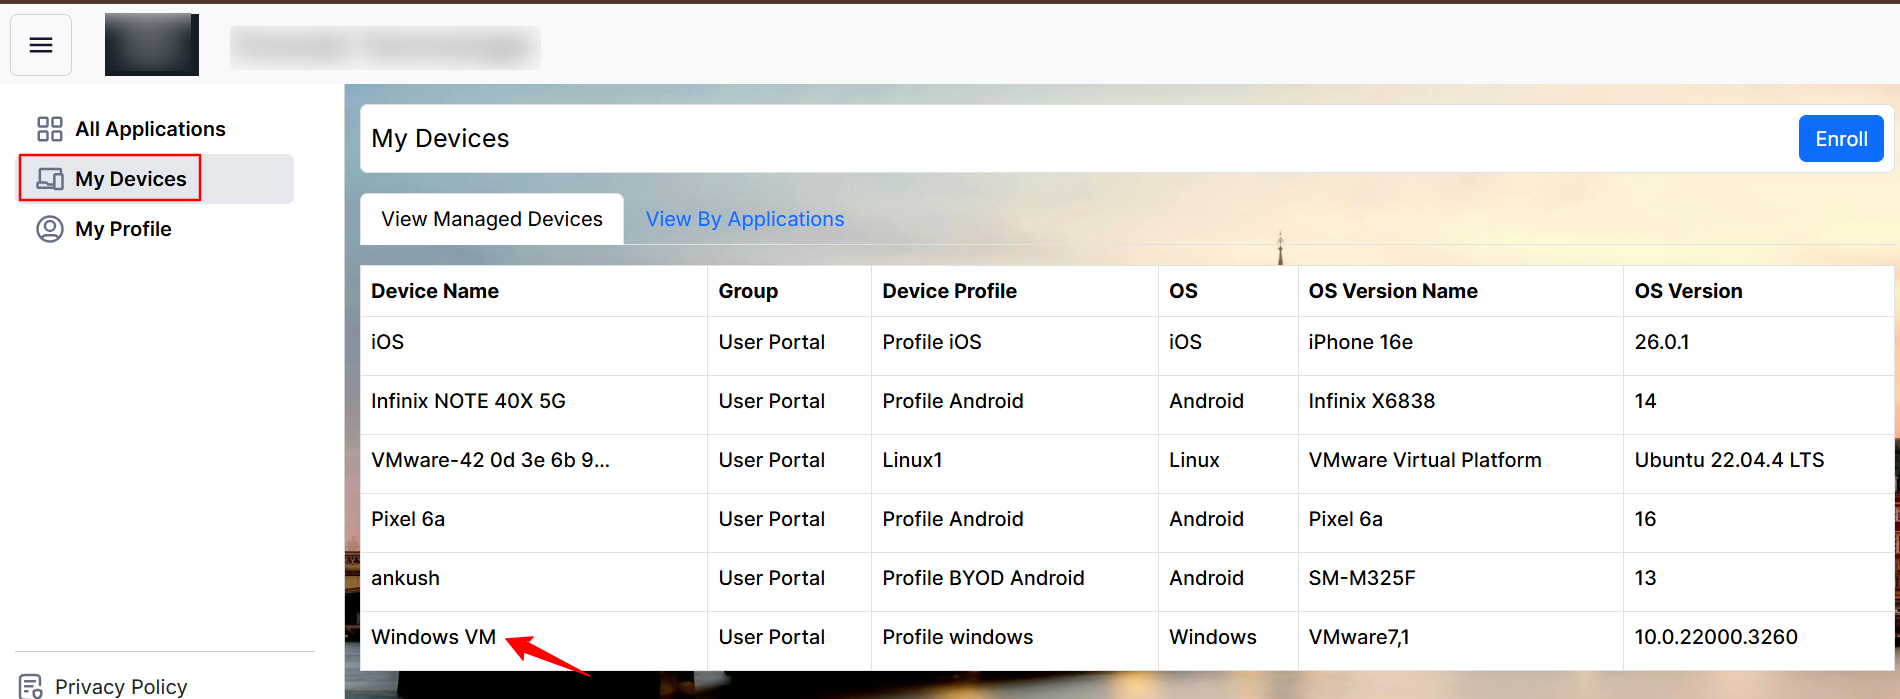
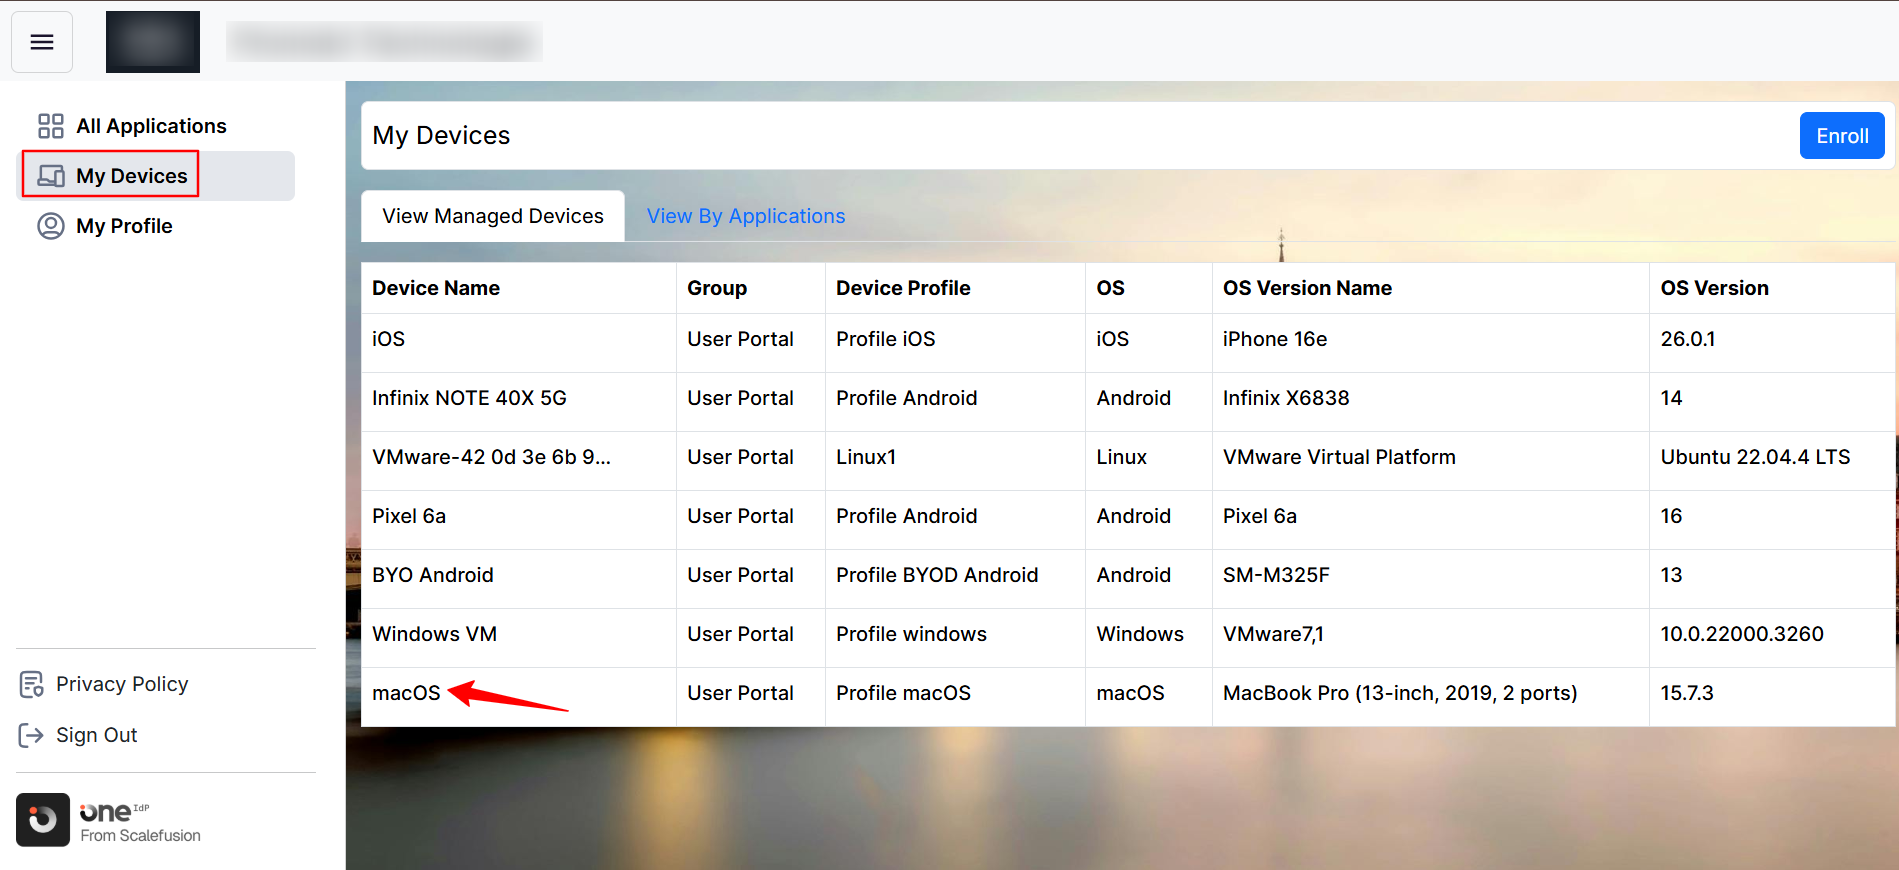
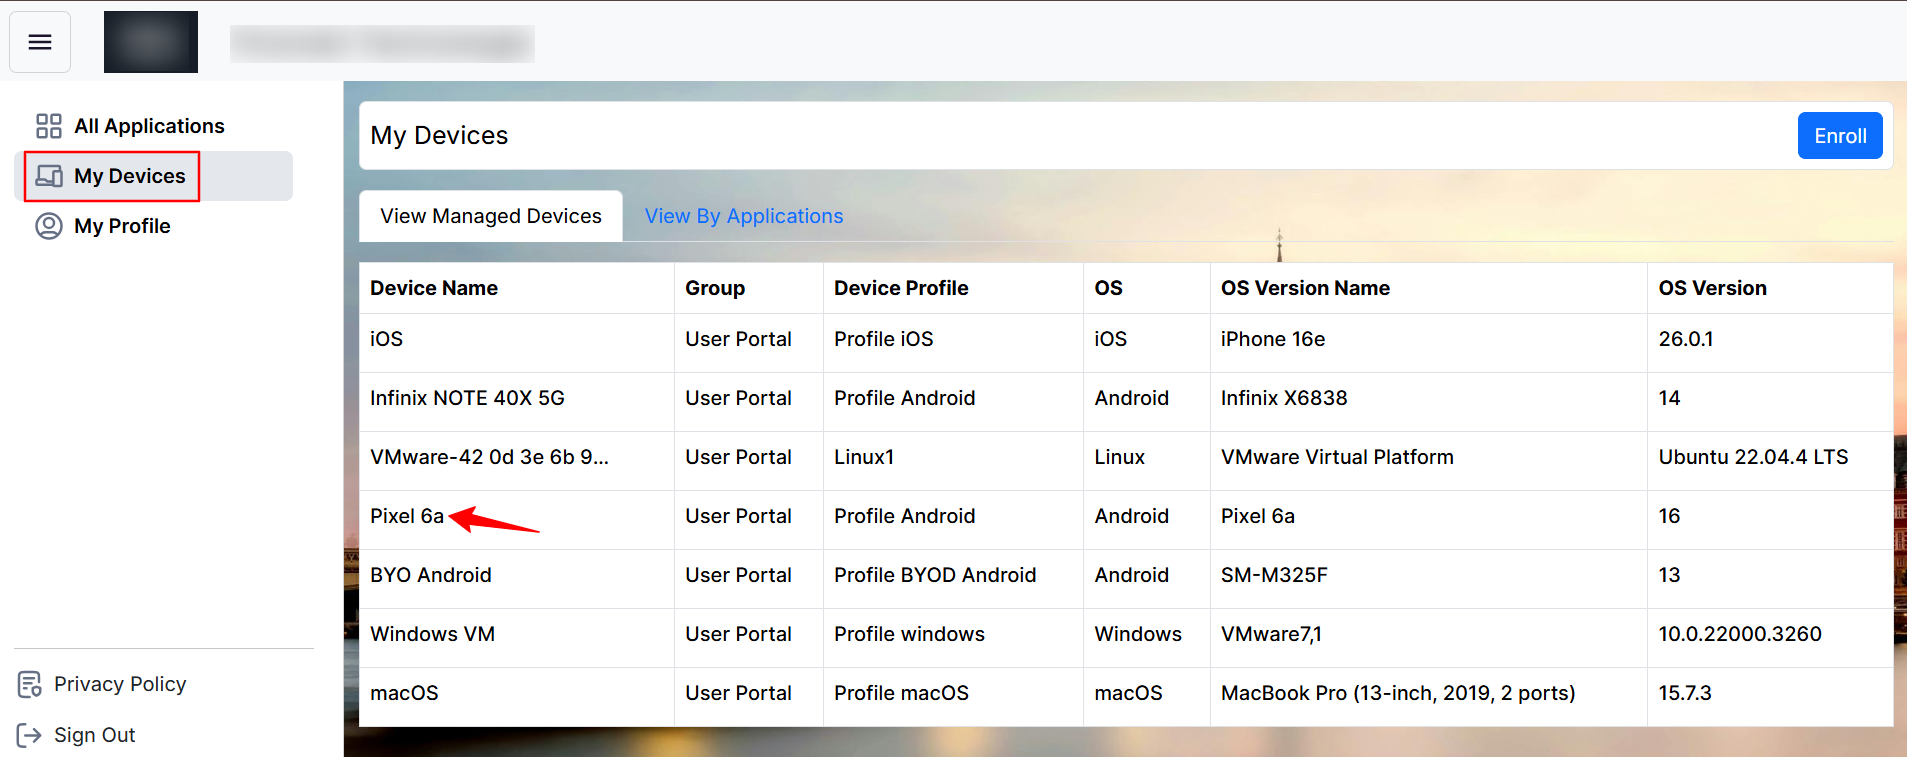
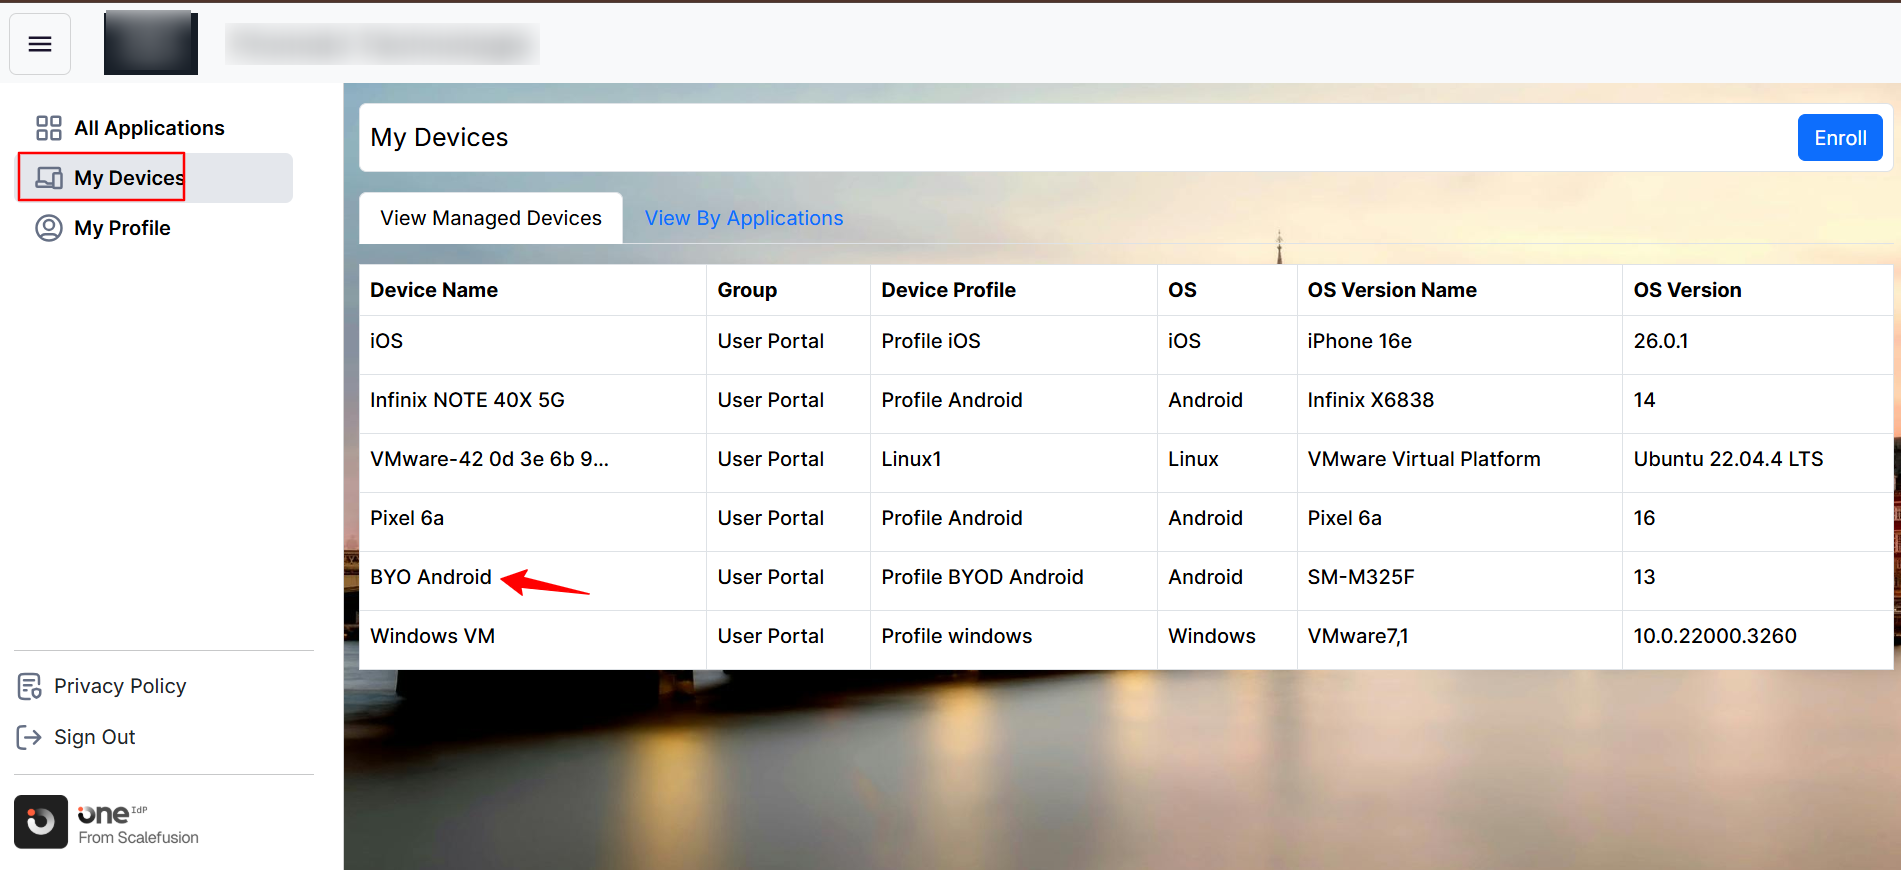
In the User Portal, users can view their device details by selecting the corresponding device name.
Users will be taken to a device preview page that displays key device information along with location details.

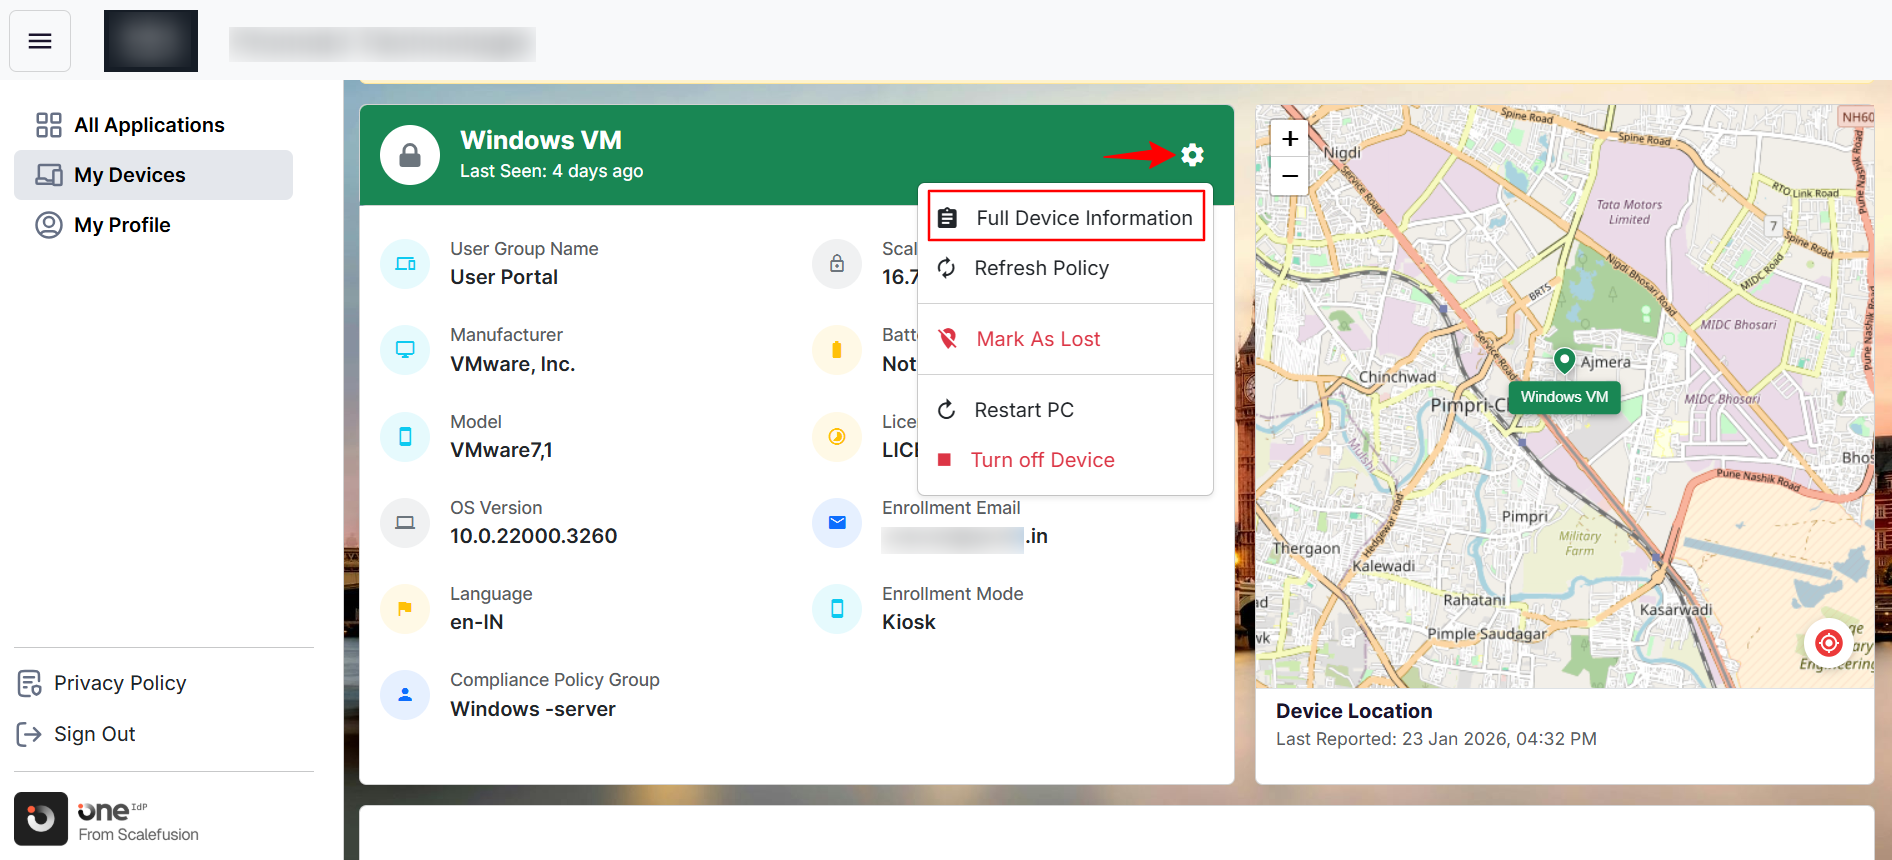
Selecting the gear icon reveals the actions available to the user, based on permissions granted by the administrator.
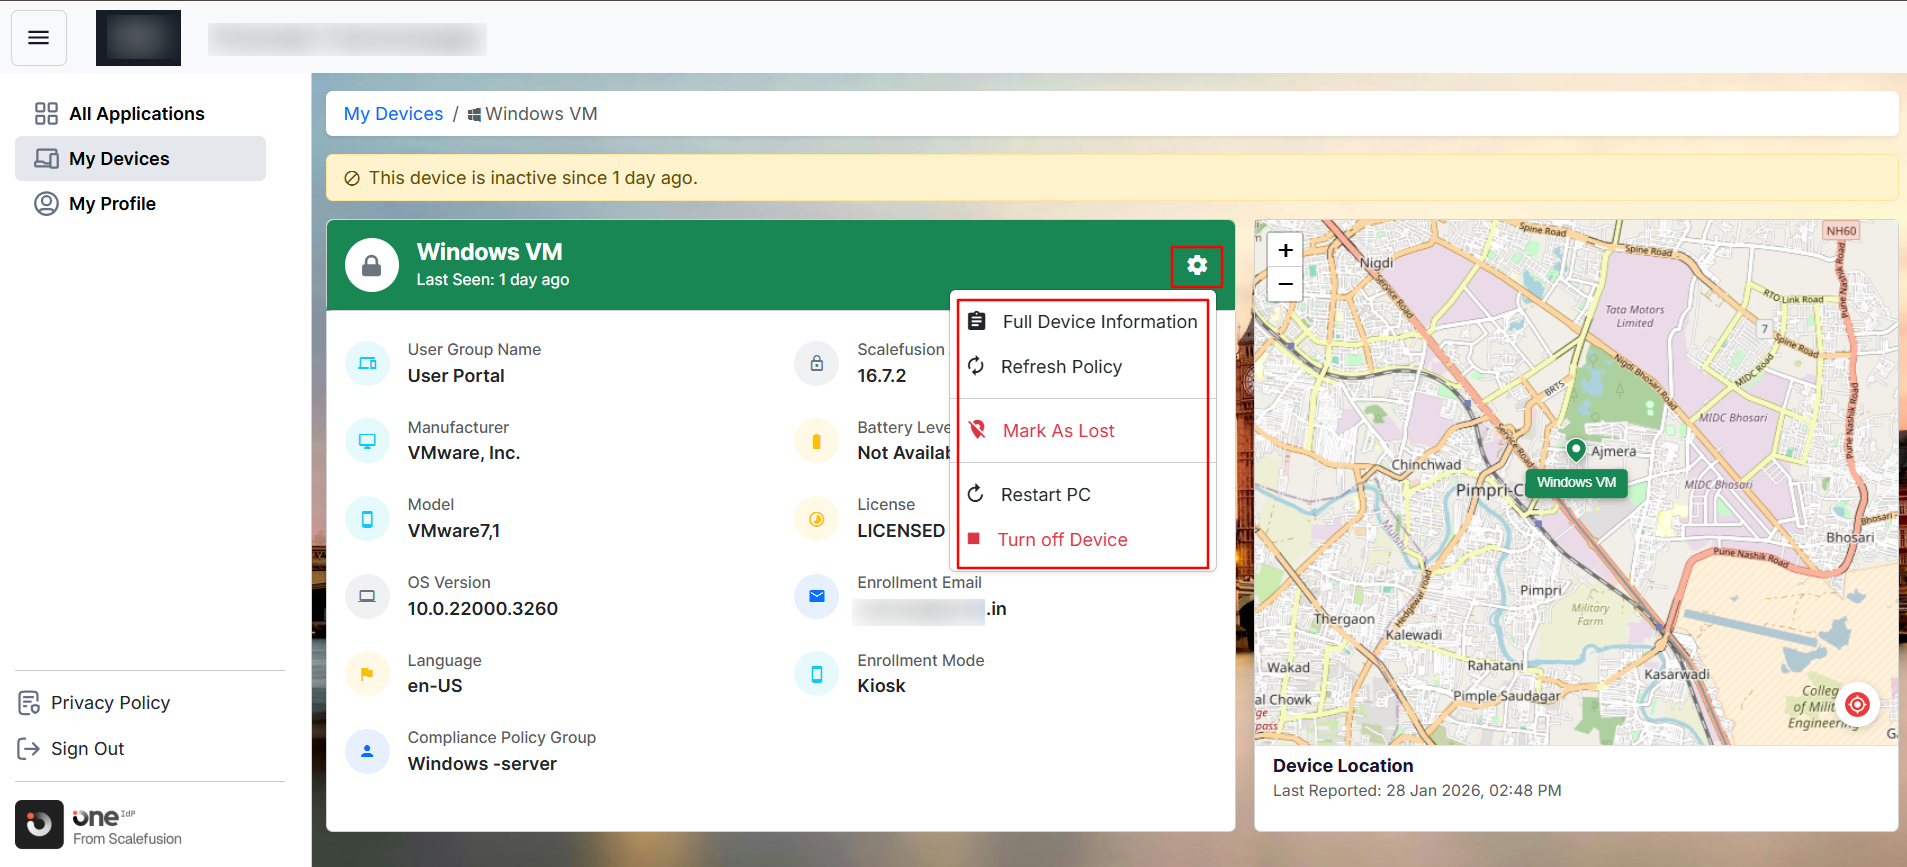
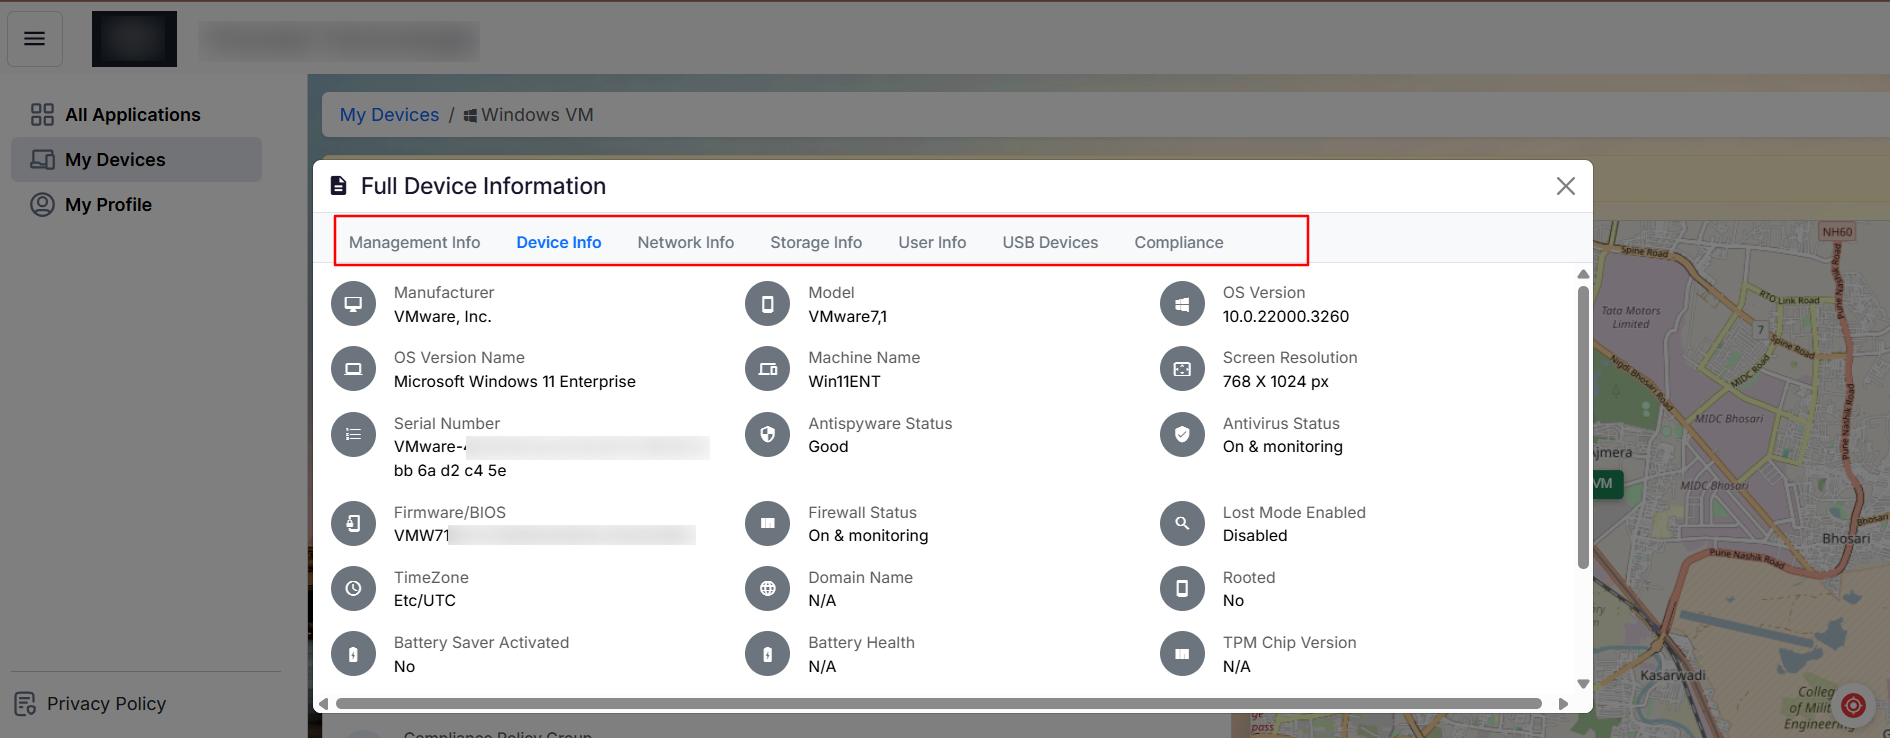
The Full Device Information section provides additional details, including device management information, device specifications, network and storage data, etc.
Note:
The Device Management features will work only if the enrolled device(s) support it.
Note:
Users will see all the devices that they have enrolled or have been assigned to them.
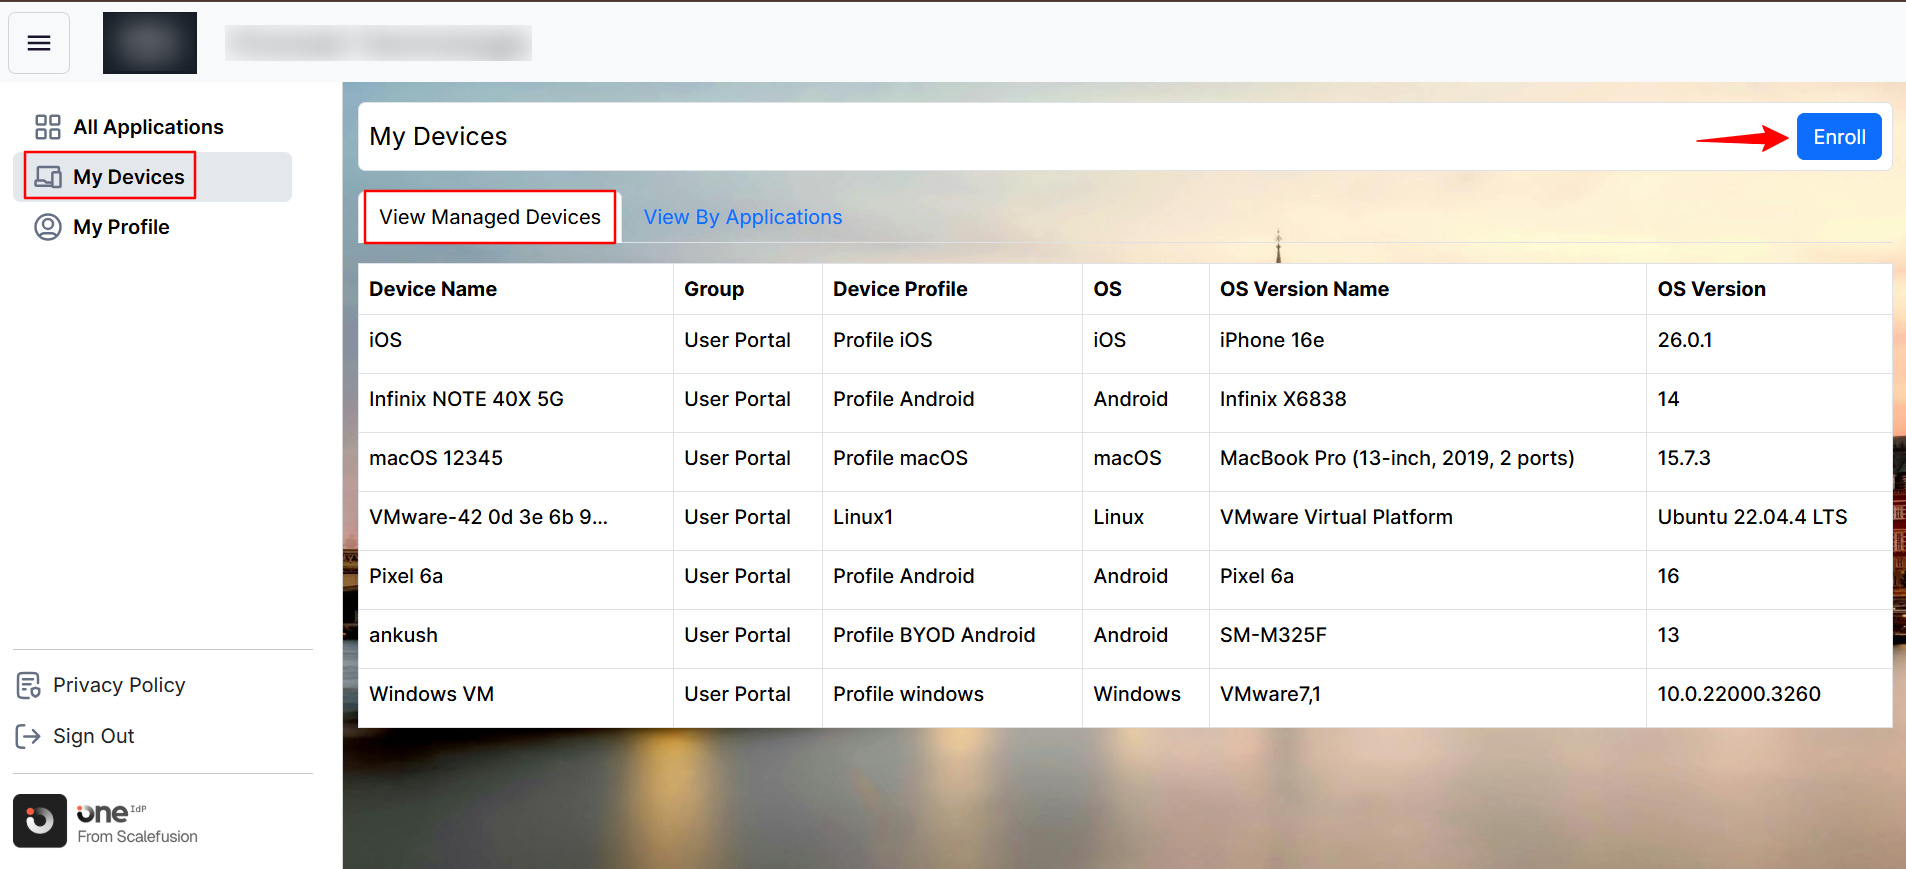
A. Allow Users to Enroll Devices
Enabling this option will allow users to enroll their devices.
In the Devices section in the User Portal, users will see an Enroll button.
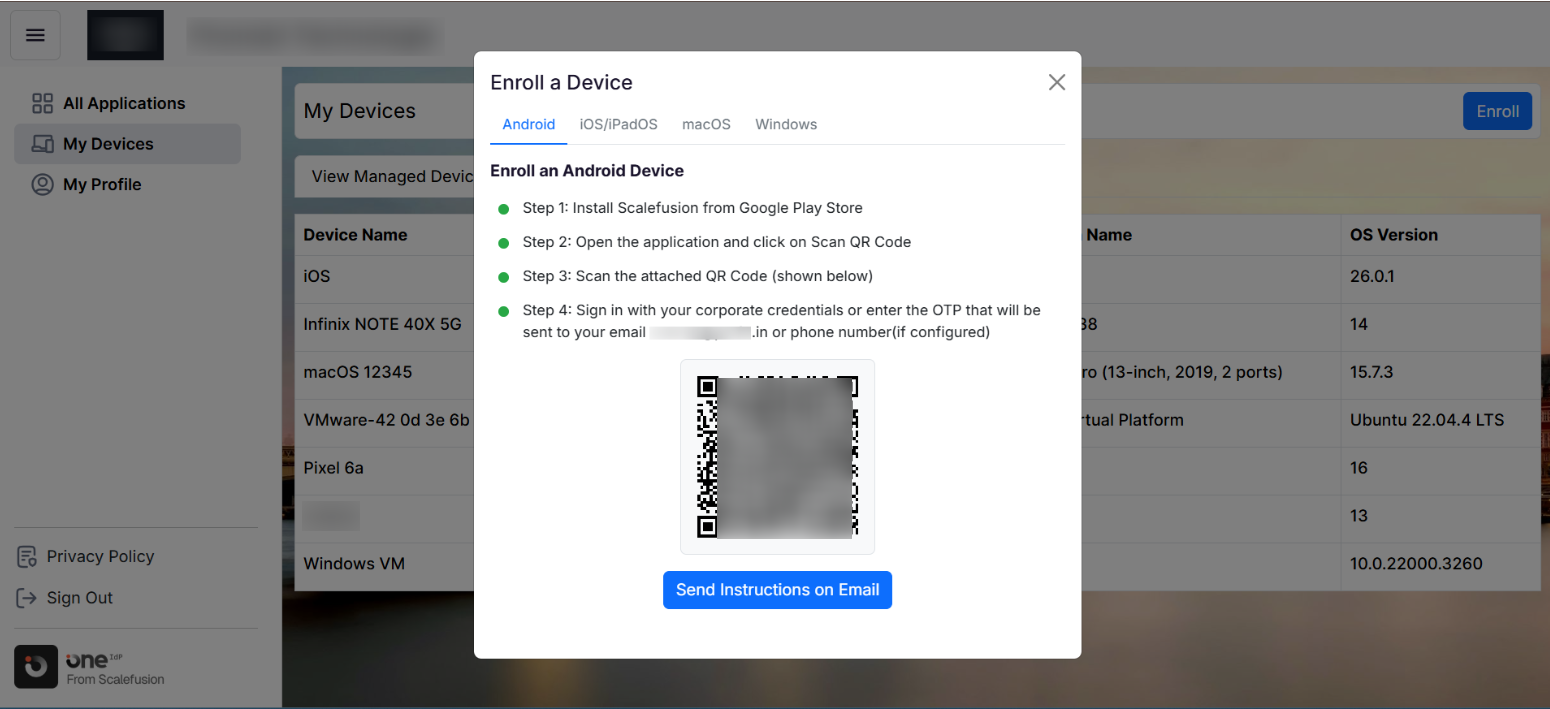
Clicking this button opens a pop-up window with enrollment instructions for Android, iOS/iPadOS, macOS, and Windows. From here, users can enroll their devices or send the enrollment instructions via email.
Note:
Users can easily enroll their personal Android and iOS devices (BYOD) through the User Portal. They can also enroll their company-provided Mac and Windows devices.
B. Allow user to view BitLocker / FileVault Key
Enabling this option will allow users to view the BitLocker / FileVault Key on their Windows/ Mac devices, respectively.
Navigate to the My Devices section in User Portal > click the device name for which you want to view the key.
You will be greeted with a device preview similar to what Admins see on the Scalefusion dashboard.
Click the gear icon > click Full Device Information.
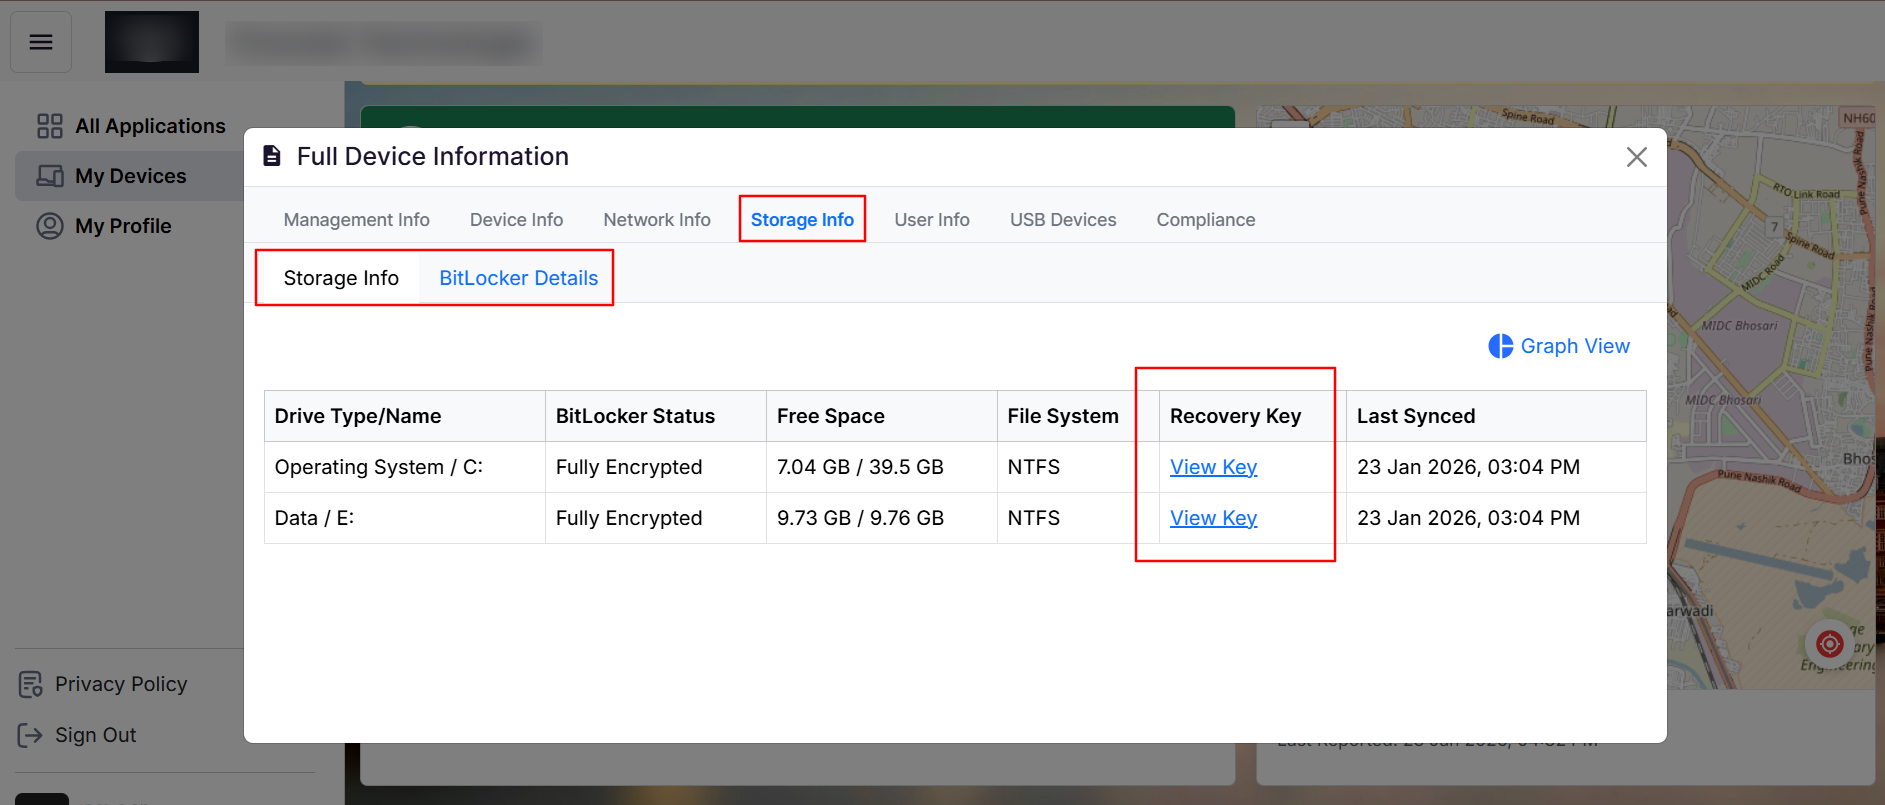
Go to the Storage Info tab to view the Recovery key and other details.
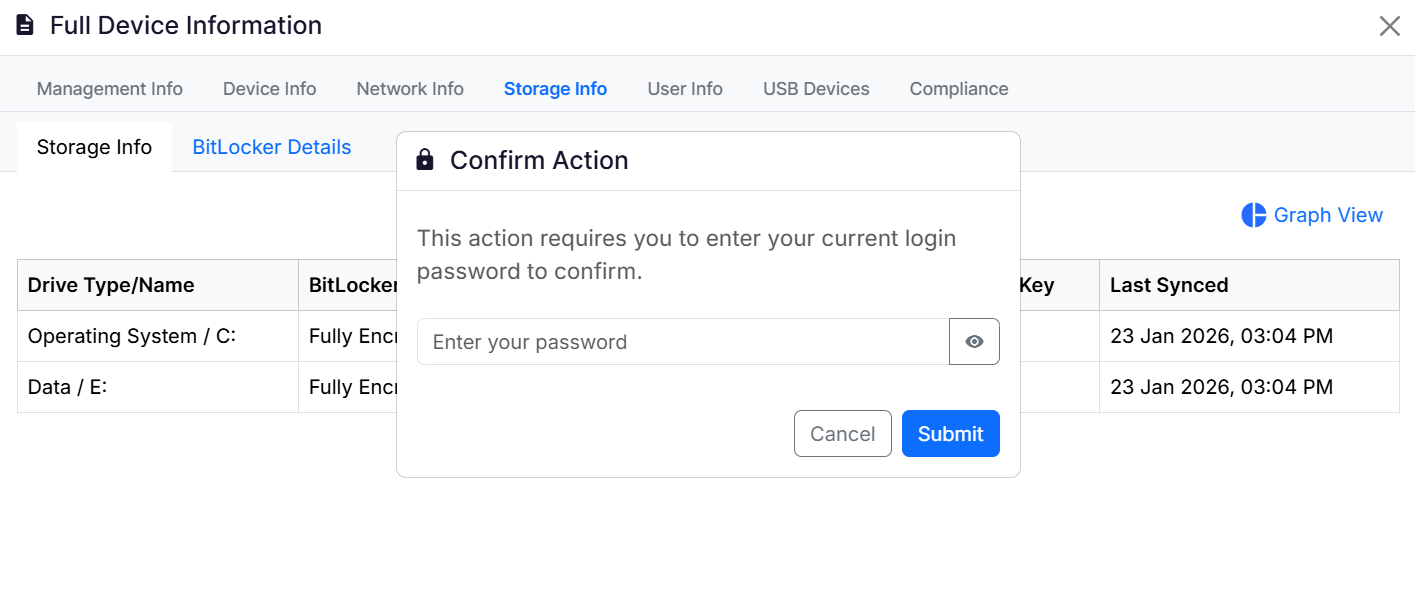
To view the key, users must enter their User Portal login password. If the user’s identity provider is anything other than OneIdP, OPC, or Google LDAP, they will not be prompted to enter a password.
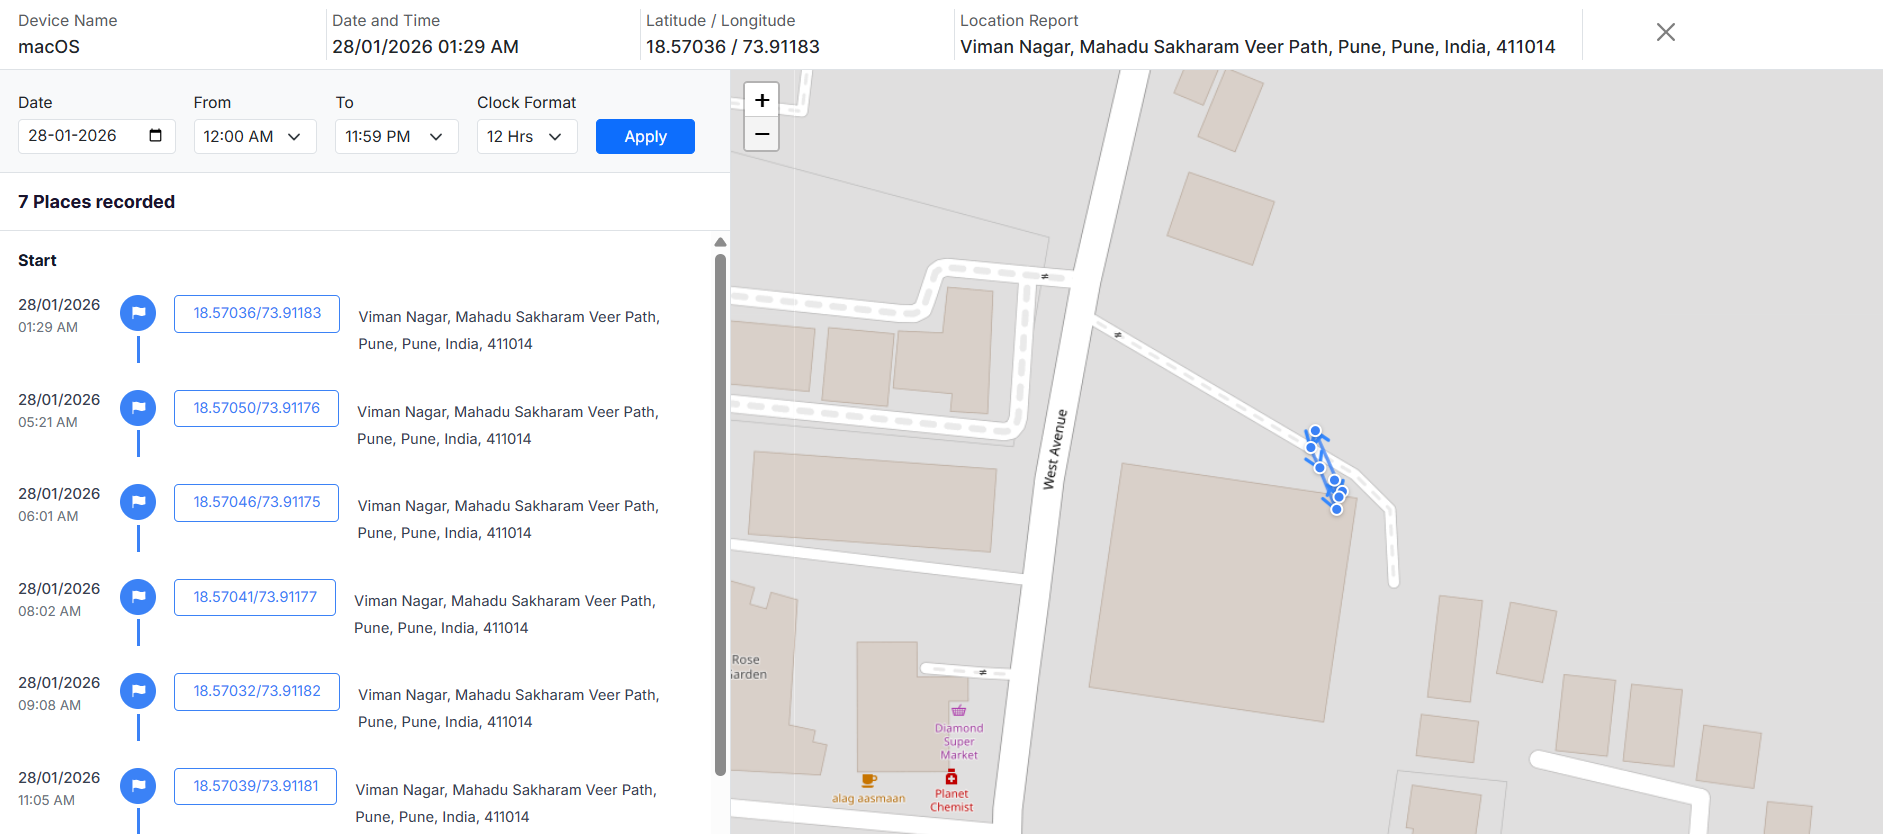
C. Allow users to view Location History
Enabling this option will allow users to view the location history of their devices.
Navigate to the My Devices section in User Portal > click the device name for which you want to view the location history.
You will be greeted with a device preview similar to what Admins see on the Scalefusion dashboard.
On this page, you will see the current device location.
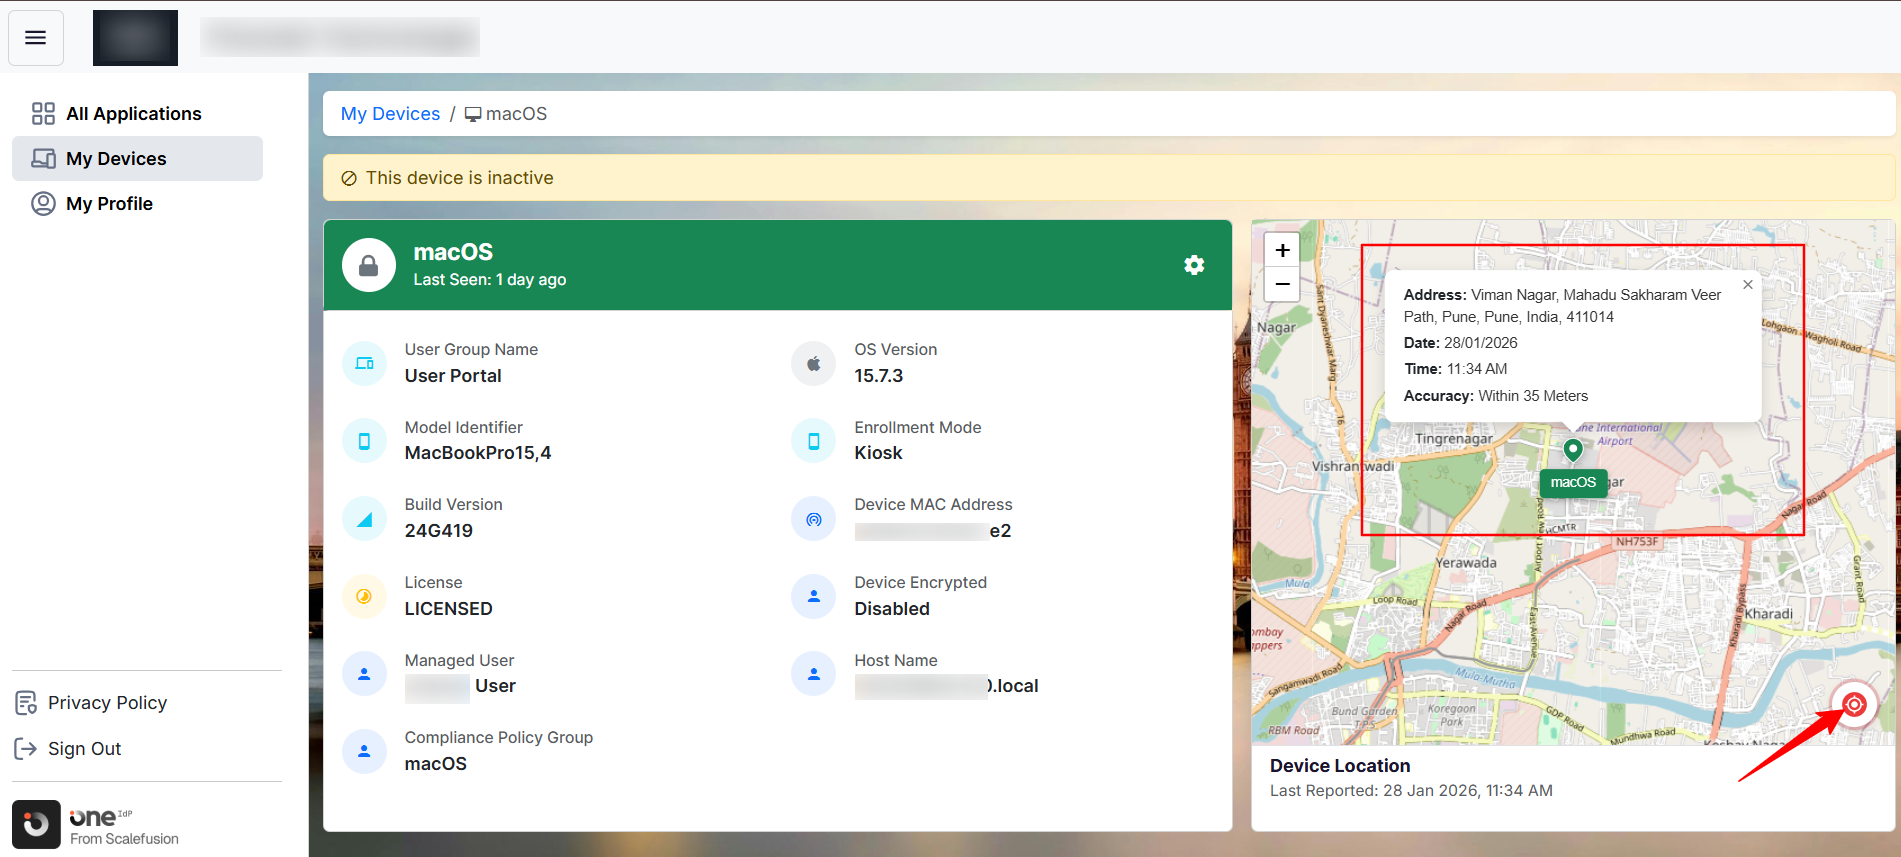
Clicking the red icon in the maps view will show a detailed location history on the device.
D. Allow user to Restart, Turn off, Lock Device & Mark as Lost
When enabled, this setting grants users visibility into the controls required to perform the specified actions.
Navigate to the My Devices section in User Portal > click the device name for which you want to view the different actions.

Click the gear icon to view the actions.
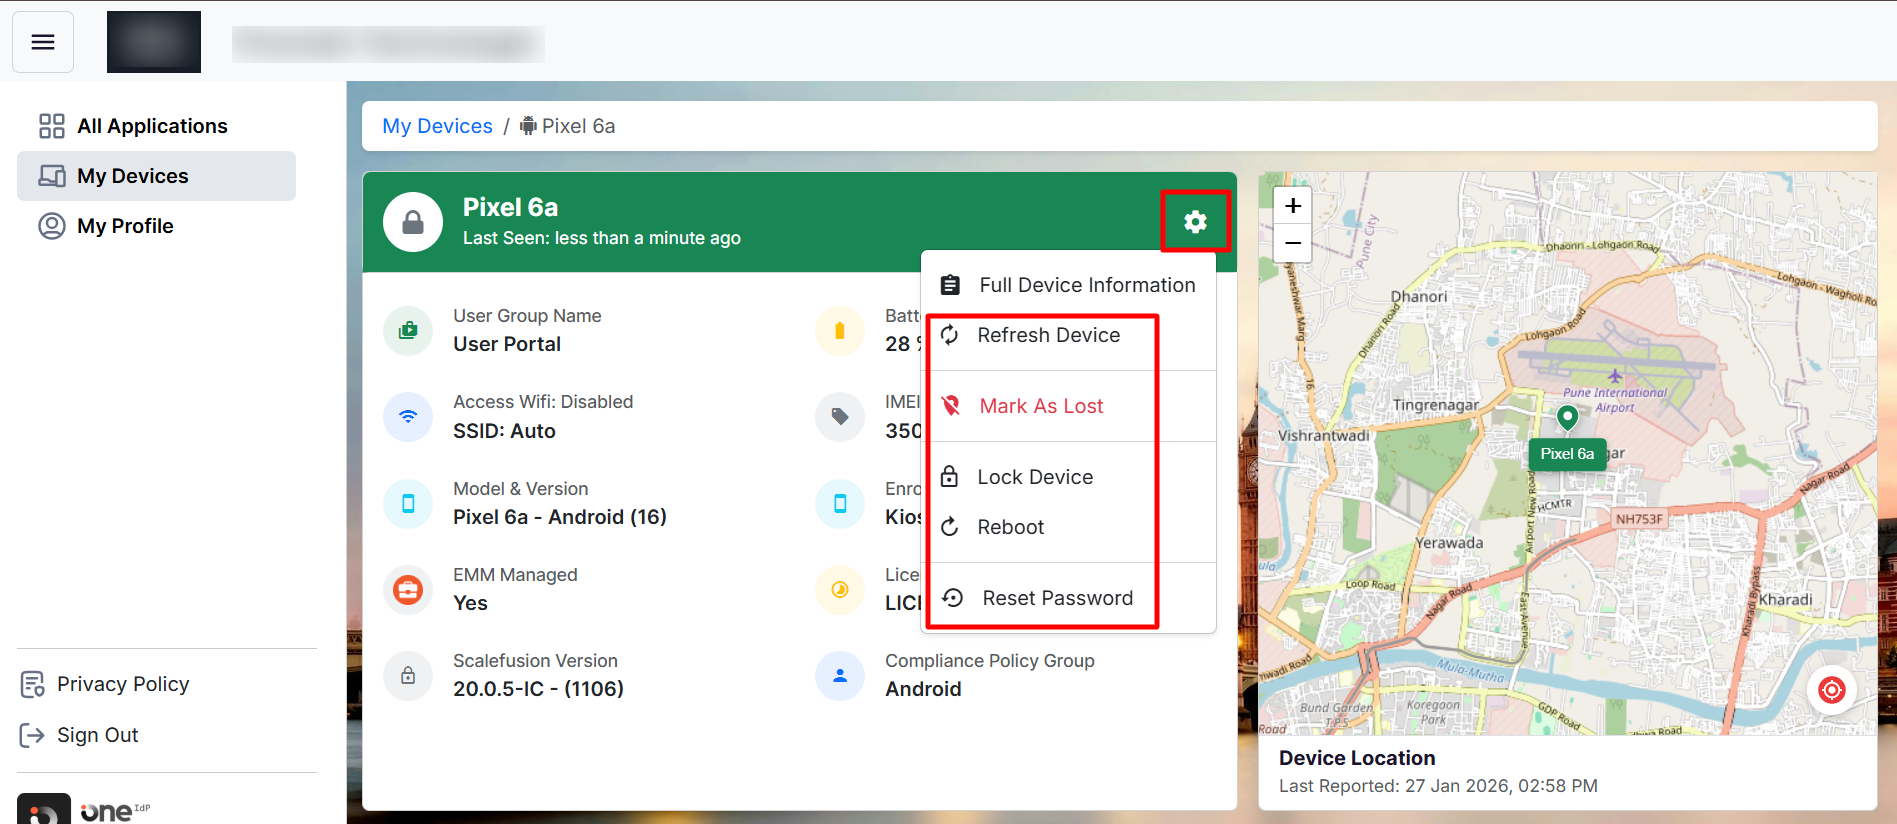
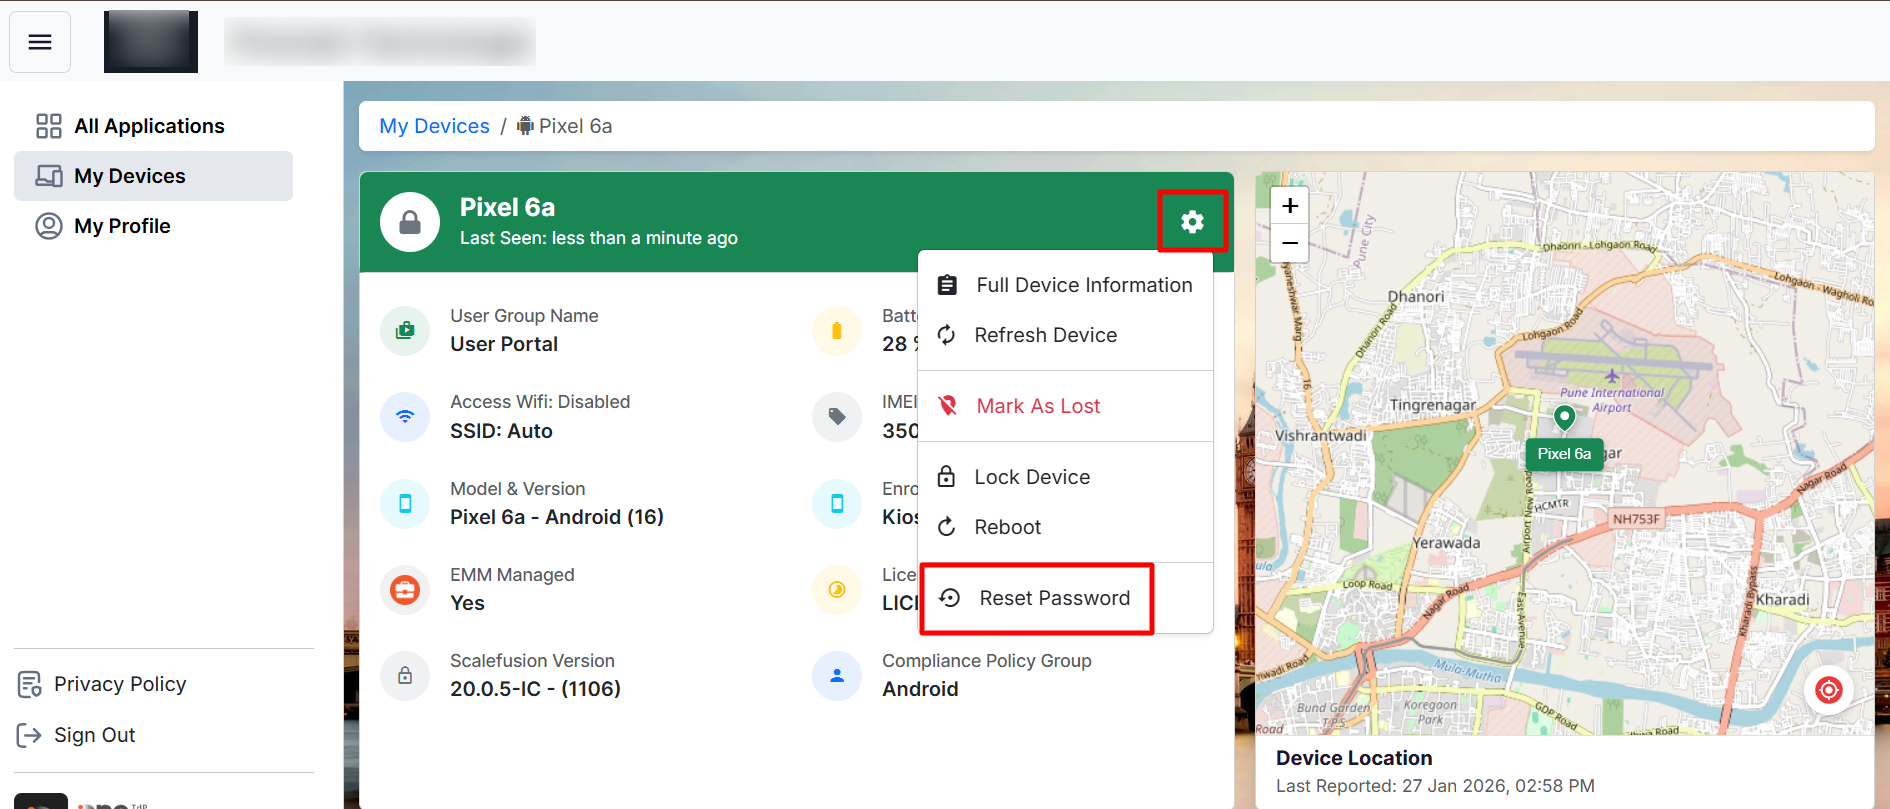
E. Allow users to reset passwords on their managed mobile devices
When enabled, this setting grants users visibility into the control required to perform the specified action.
Navigate to the My Devices section in User Portal > click the device name for which you want to reset the password.
Click the gear icon to view the action.
F. Allow user to delete enrolled personal mobile devices (BYO)
When enabled, this setting grants users visibility into the control required to perform the specified action.
Navigate to the My Devices section in User Portal > click the device name that you want to delete.
Click the gear icon to view the action.
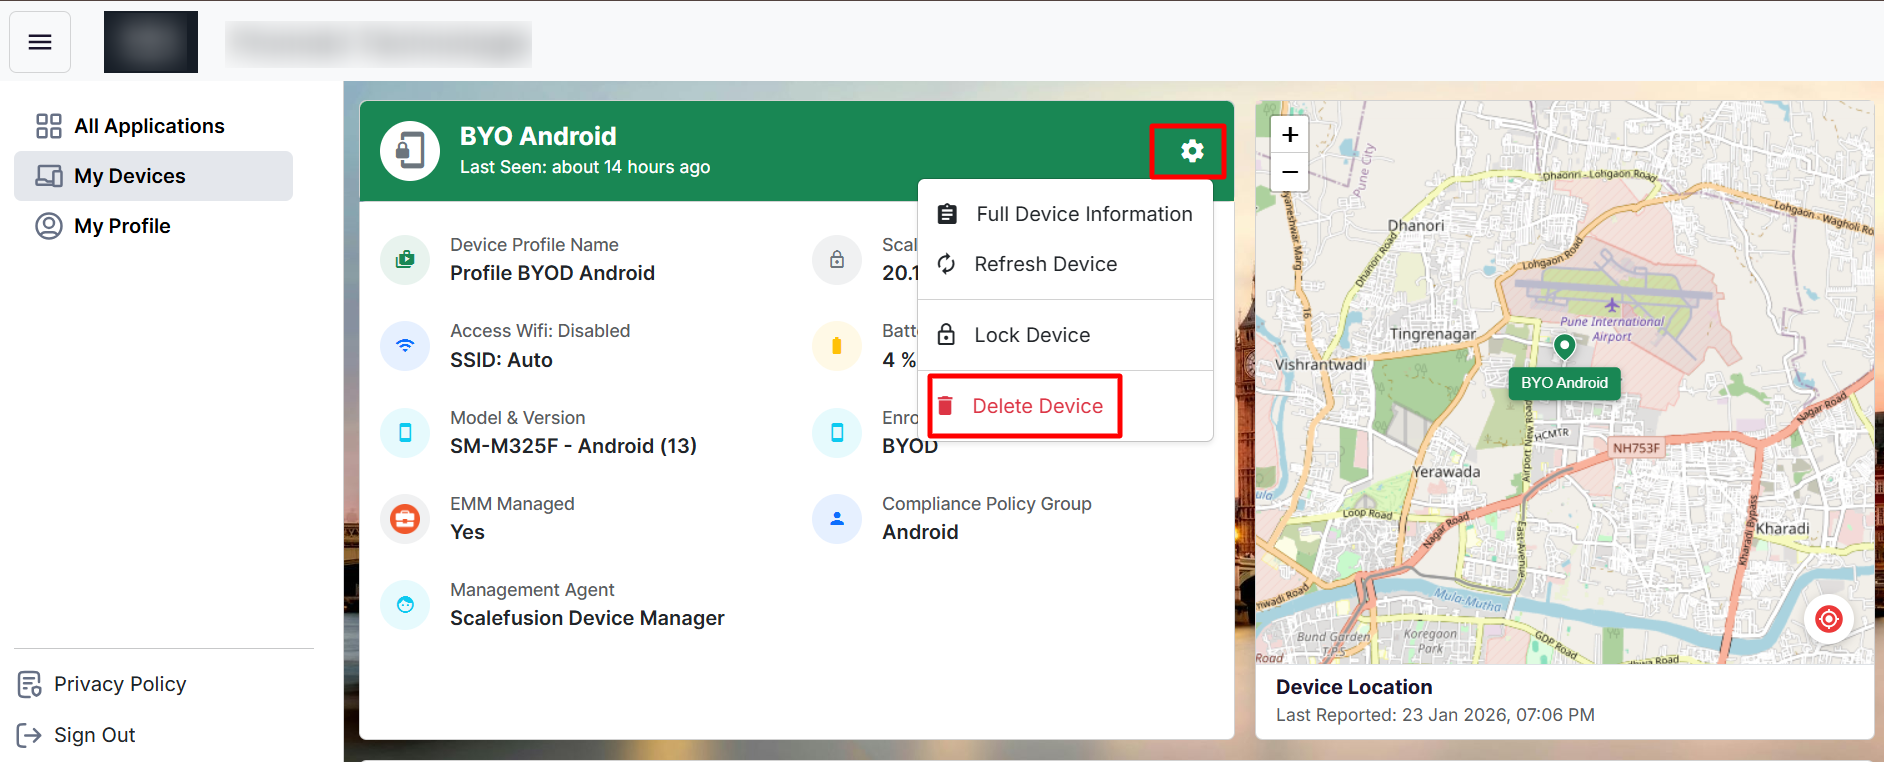
Note:
To delete the device, users must enter their User Portal login password. If the user’s identity provider is anything other than OneIdP, OPC, or Google LDAP, they will not be prompted to enter a password.
G. Allow Users to Manage Multi-Factor Authentication
Users can manage their MFA settings from Authenticators section with the following methods:
Authenticator App (TOTP)
Passkeys (Biometrics or Security Keys)
Note: The available authentication methods depend on your organization's security policies.
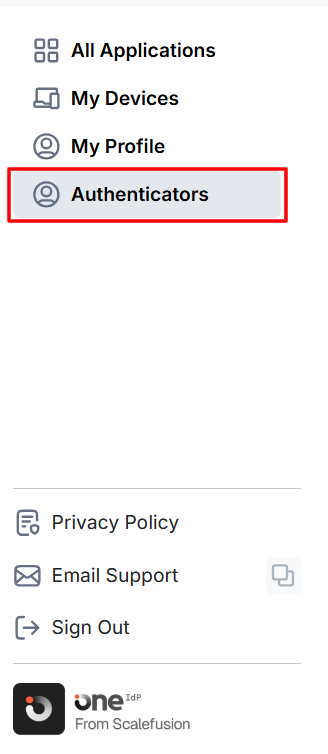
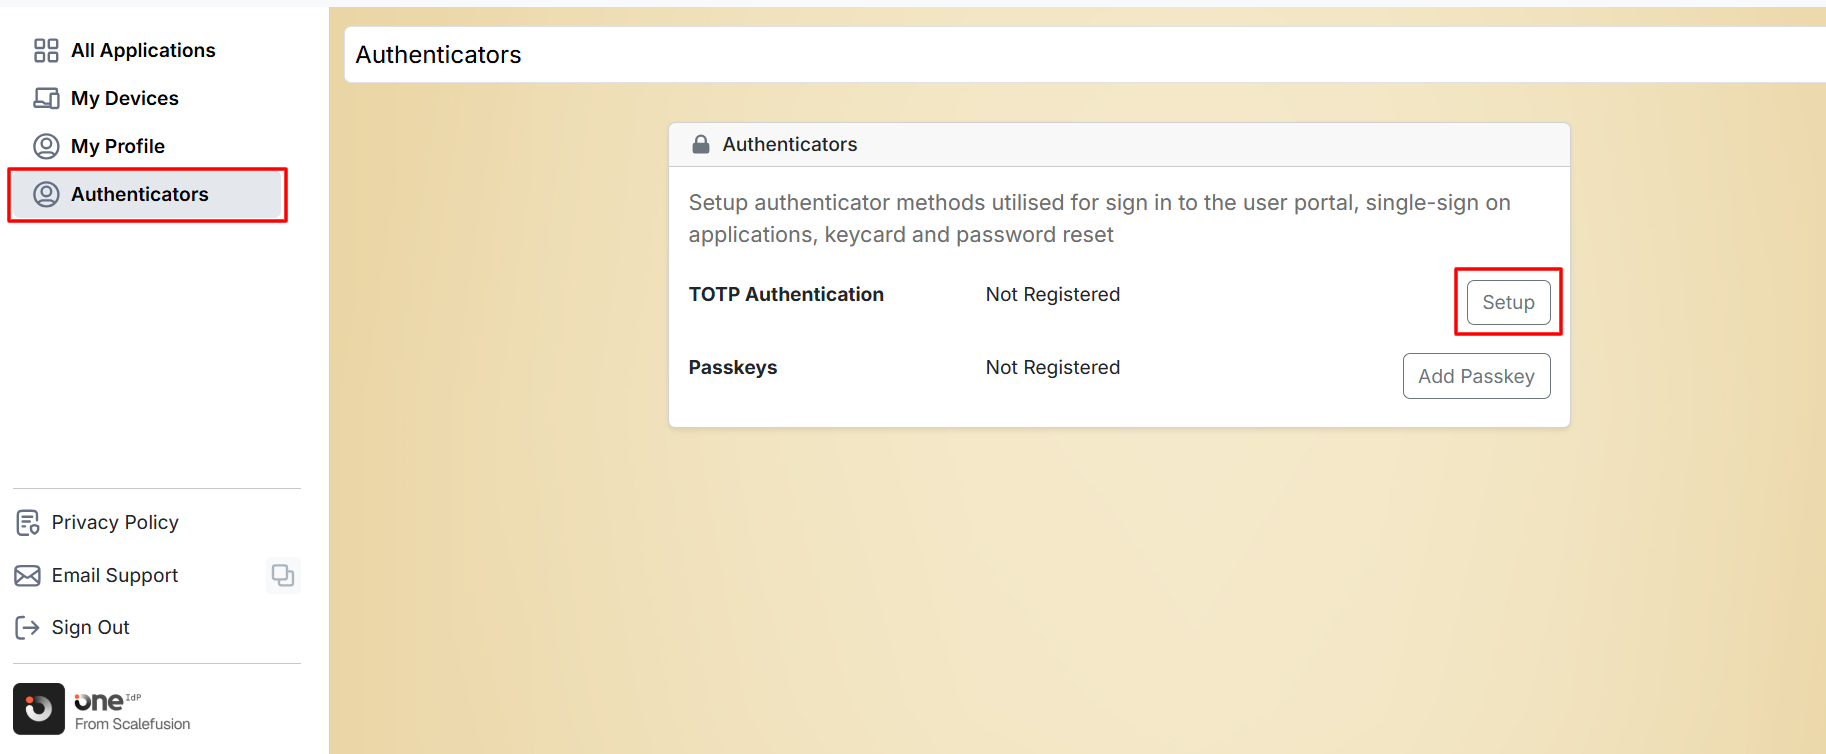
To access the Authenticators Page:
Sign in to the User Portal and navigate to Authenticators.
View the available authentication methods configured by your organization.
For each authentication method, you can:
Set up a new authenticator.
View device information.
View the last time the authenticator was used.
Remove and reconfigure an authenticator if needed.
Before You Begin
Your organization must have authenticator app-based MFA enabled.
Only one authenticator app can be registered at a time.
Set Up an Authenticator App (TOTP)
Use an authenticator application such as Google Authenticator, Microsoft Authenticator, or a compatible TOTP app. To do so,
On the Authenticators page, click on Setup in front of TOTP Authentication
A QR code and setup key will be displayed.
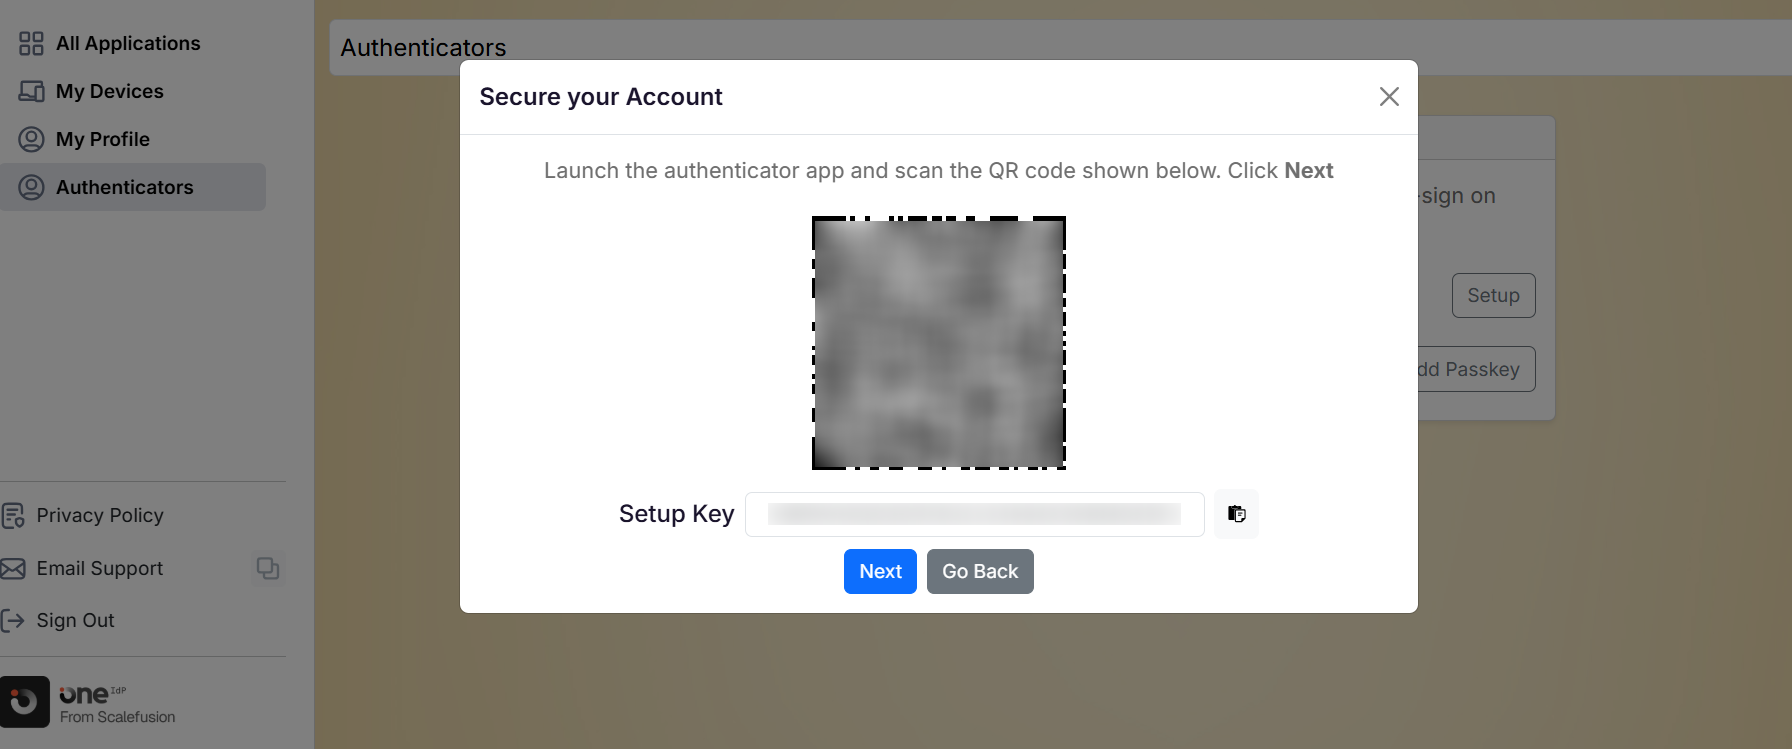
Open your authenticator application and scan the QR code.
Alternatively, manually enter the provided setup key in the authenticator app and click Next.
Enter the verification code generated by your authenticator app.
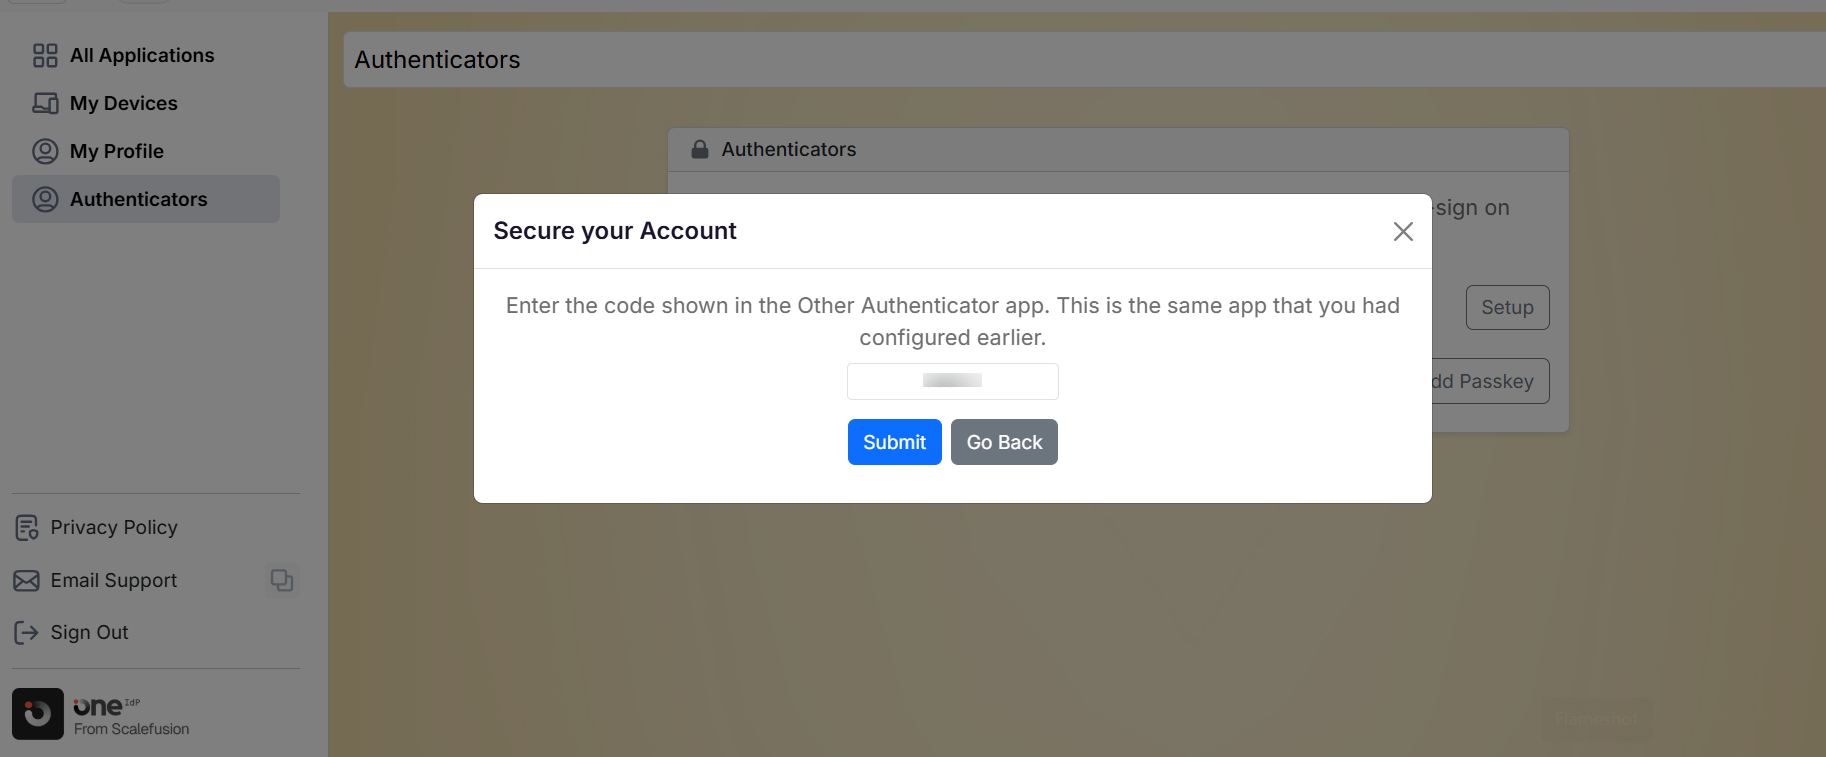
Complete the verification process.
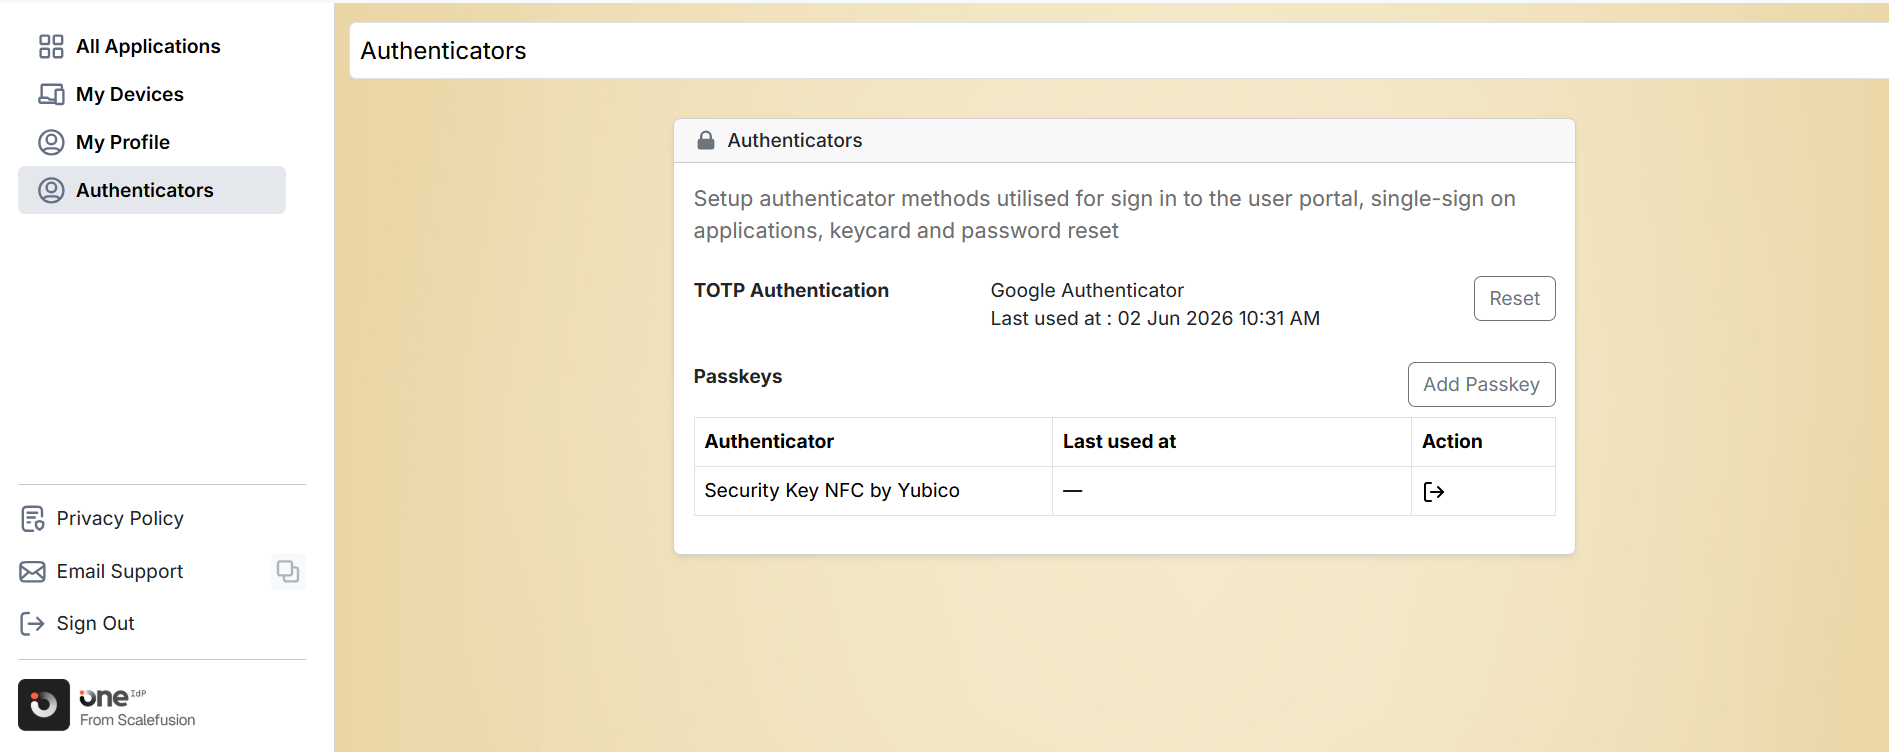
Once configured, the following information is displayed:
Application used for authentication
Last Used On date and time
Remove an Authenticator App (TOTP)
If you need to replace or reconfigure your authenticator app, you can remove the existing registration. To do so,
On the Authenticators page, locate your registered authenticator app and click Reset.
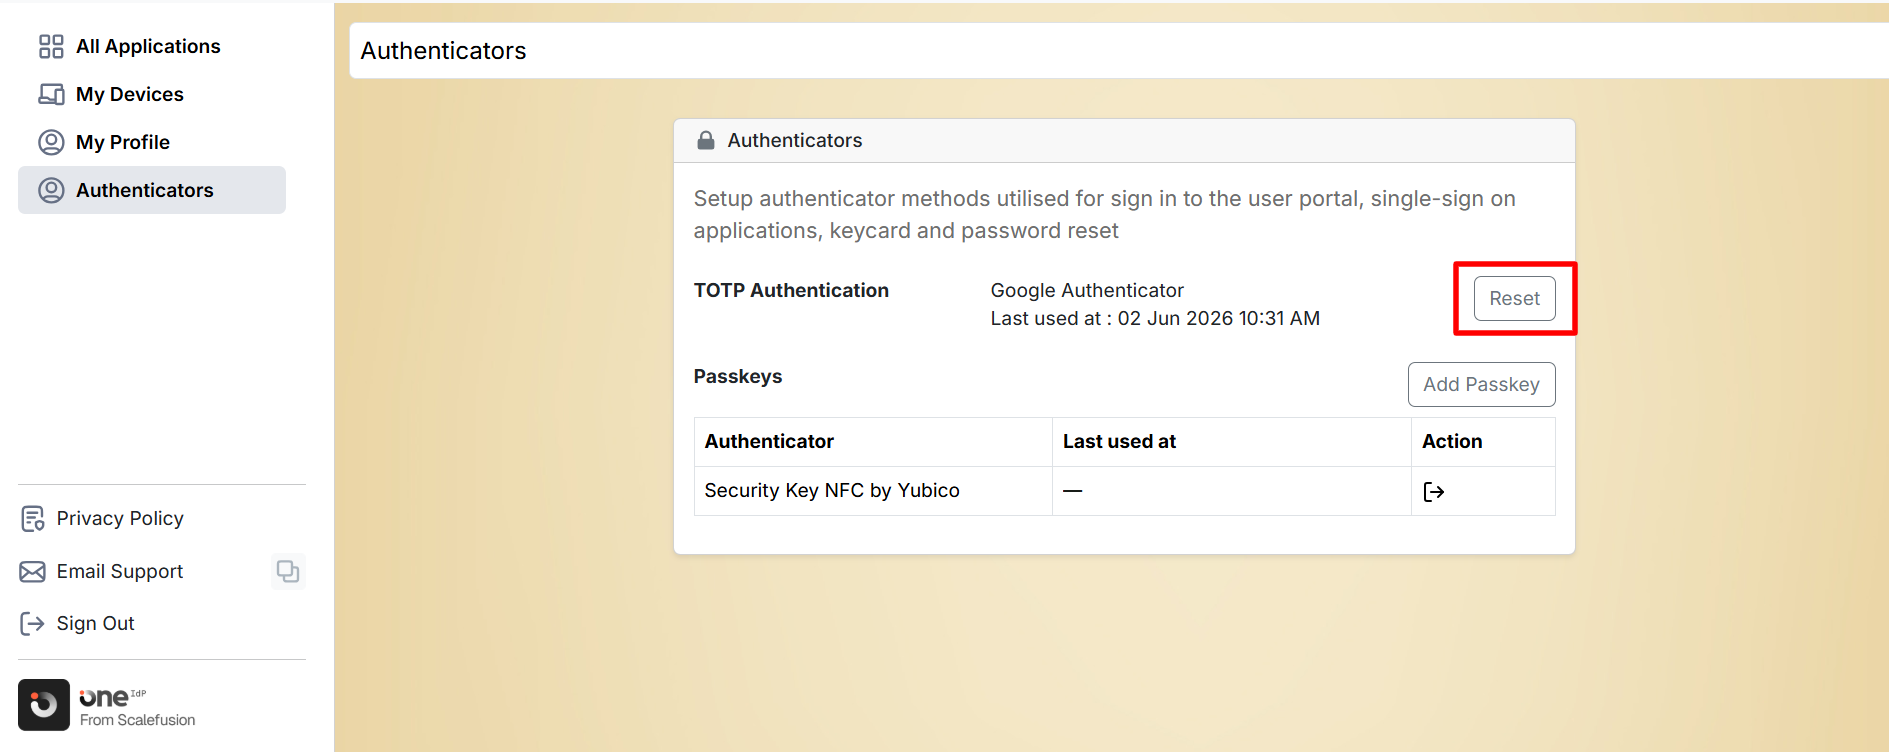
Review the confirmation message and click Confirm.
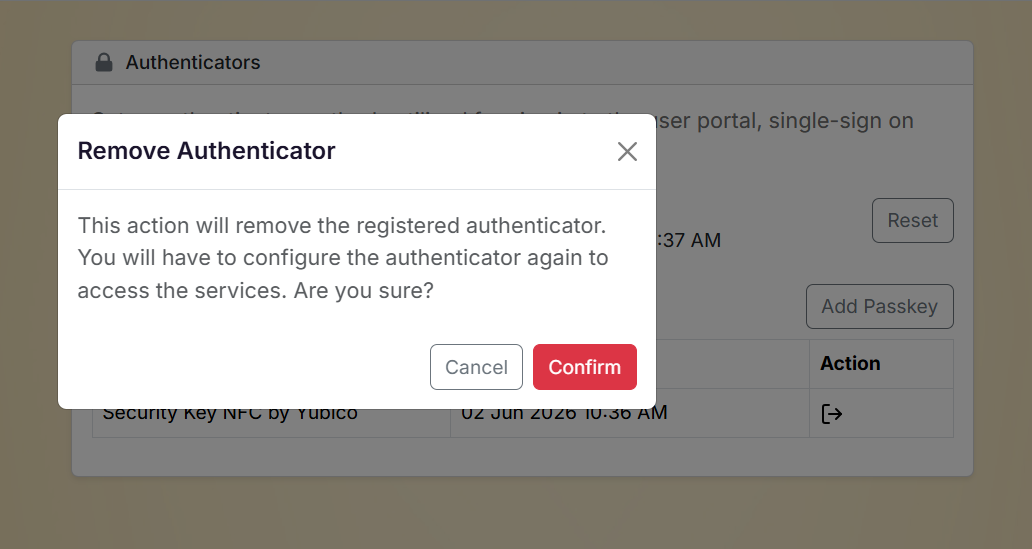
Enter the verification code from your current authenticator app.
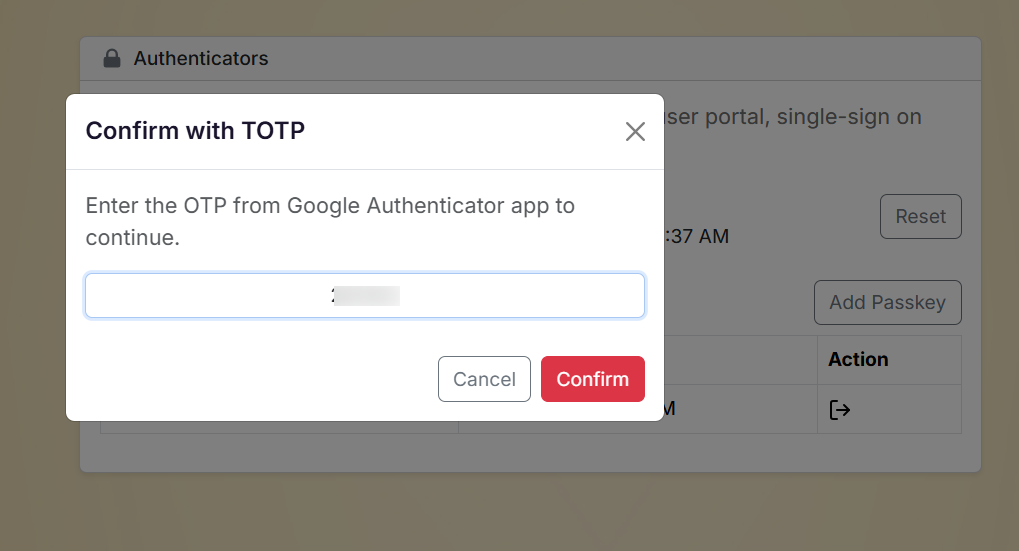
Complete the verification process.
The authenticator app will be removed and must be configured again before it can be used for sign-in.
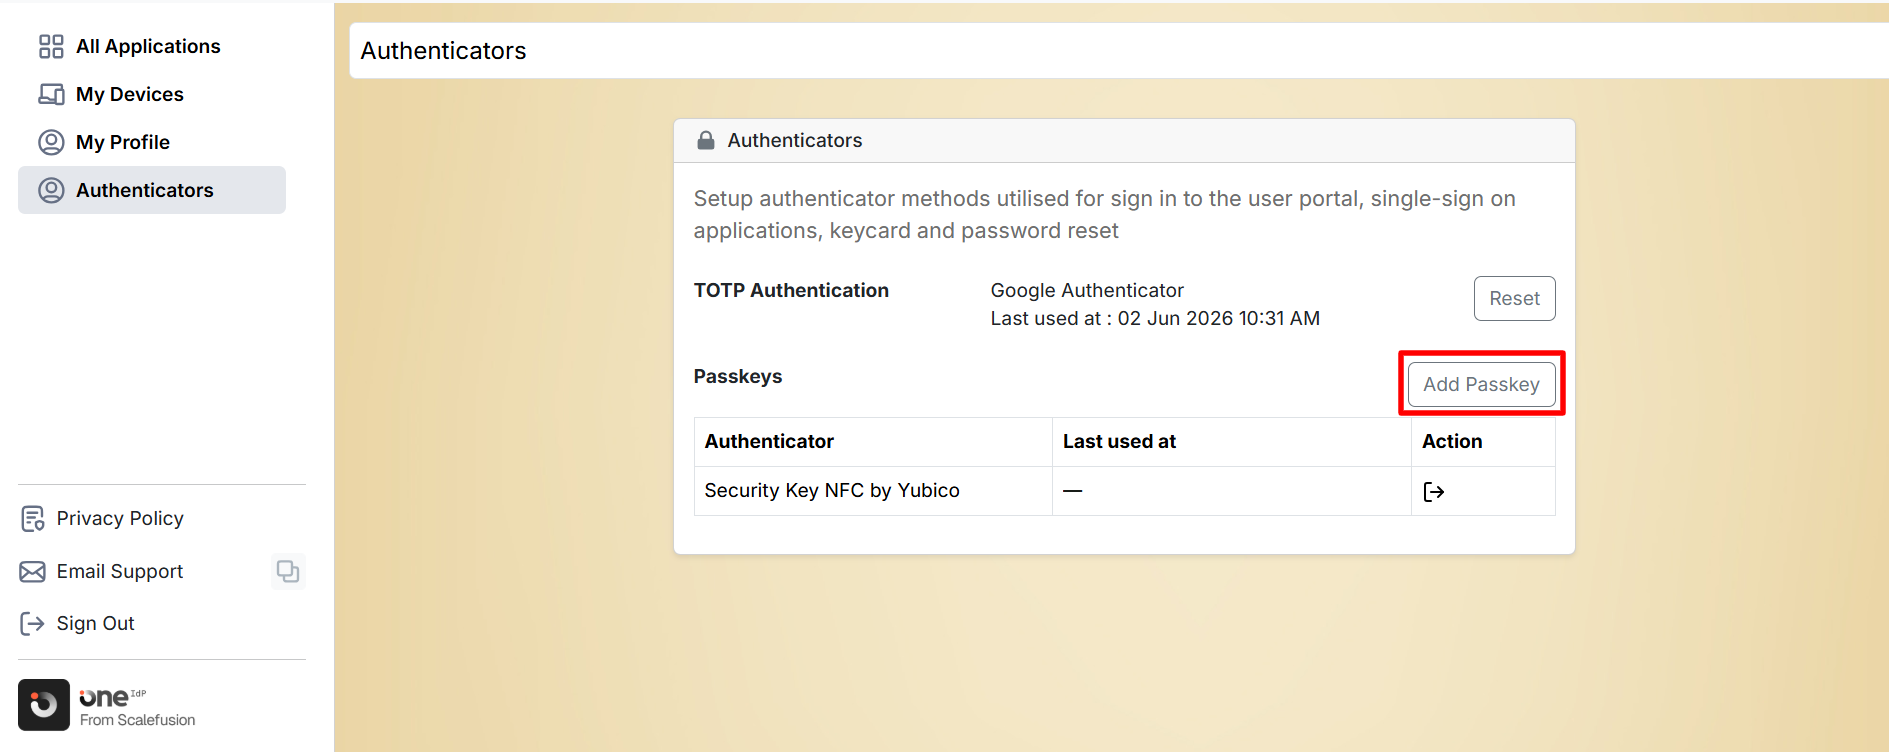
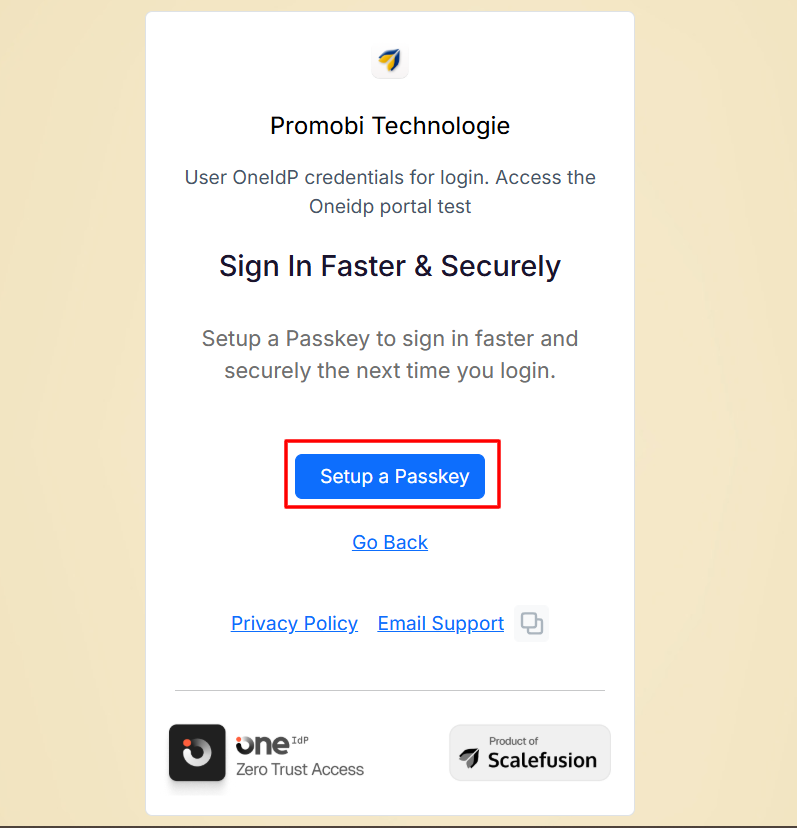
Set Up a Passkey
Passkeys allow secure sign-in using biometrics (such as fingerprint or face recognition) or hardware security keys. To do so,
Multiple passkeys can be setup with User Portal
On the Authenticators page, click on Add Passkey in front of Passkeys.
Wait while passkey registration is initiated.
Follow the prompts displayed by your browser or operating system.
Complete the registration using your preferred authentication method, such as:
Windows: A built-in authenticator such as fingerprint, face recognition, or device PIN
iPhone, iPad or Android: This option requires scanning a QR code with your phone or tablet. When prompted, tap Use passkey or use the QR scanner on your device. If you choose to save the passkey on your phone or tablet, Bluetooth pairing may be required to verify the device.
Security key: You will get a prompt to insert the key in the device and set up key
Password Manager: You can store your passkey in Google Password Manager or any other credential manager that supports syncing.
After successful registration, the following information is displayed:
Registered device type (for example, Windows Hello, Mac Touch ID, or a security key)
Last Used On date and time
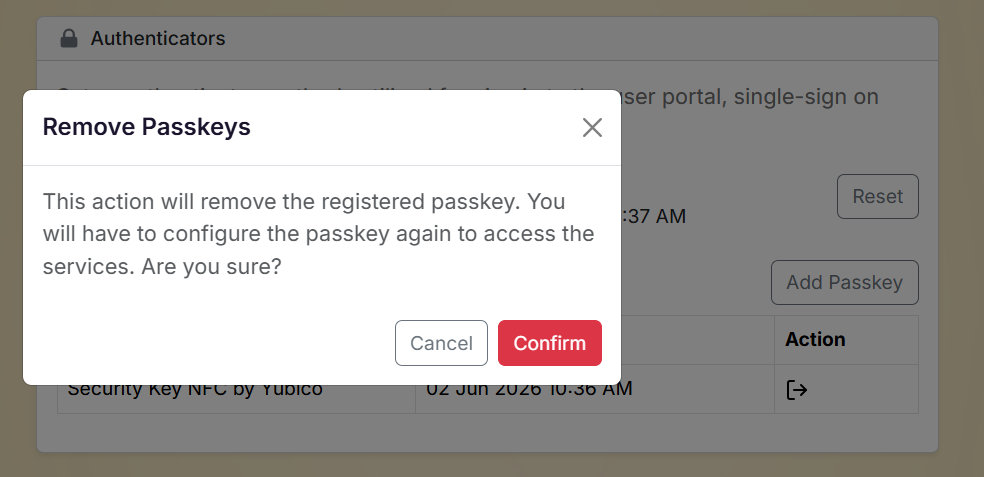
Remove a Passkey
You can remove a registered passkey and configure a new one if required. To do so,
On the Authenticators page, locate your registered passkey and click Reset.
Review the confirmation message and click Confirm.
Enter your account password to verify your identity.
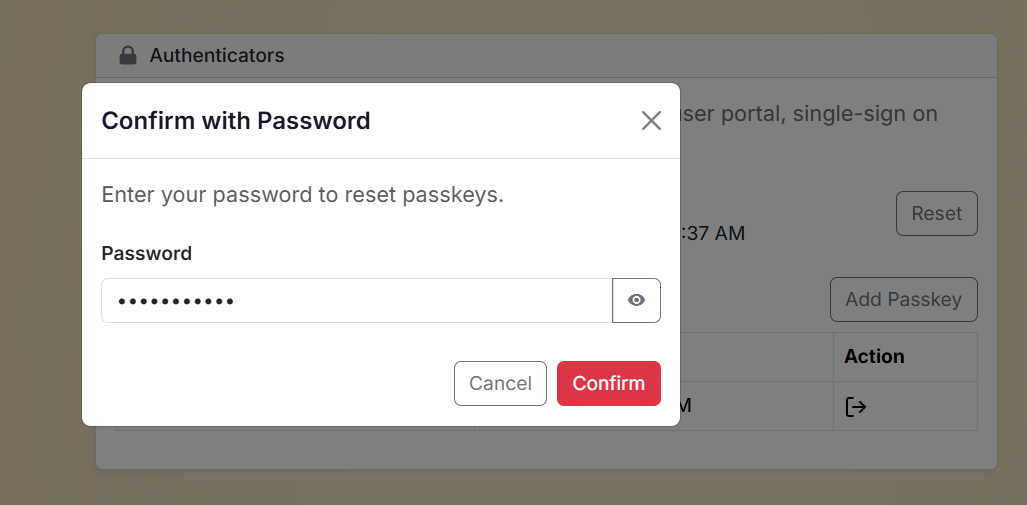
Complete the removal process.
The registered passkey is removed and must be configured again before it can be used for sign-in.
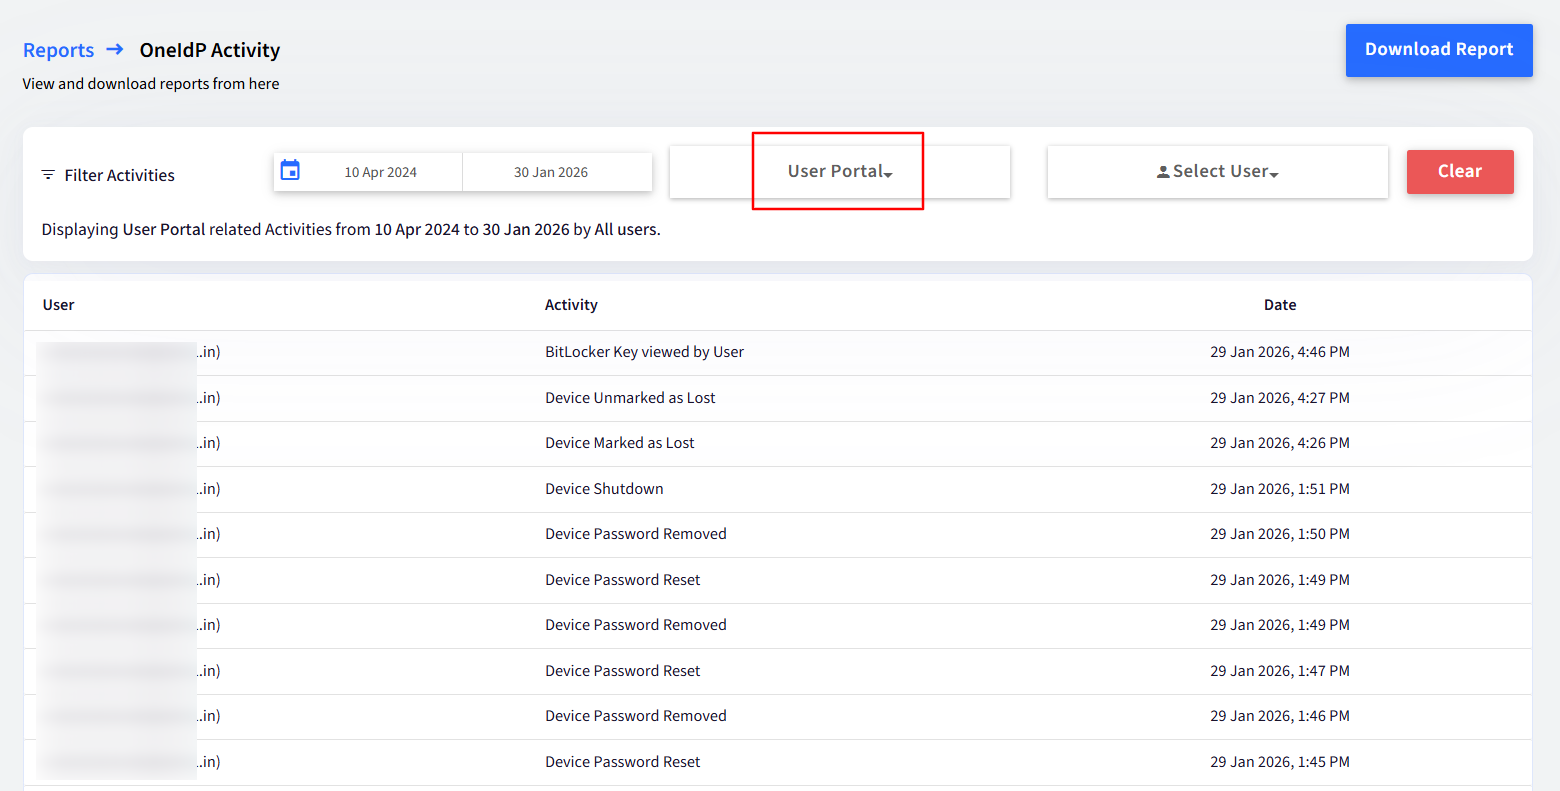
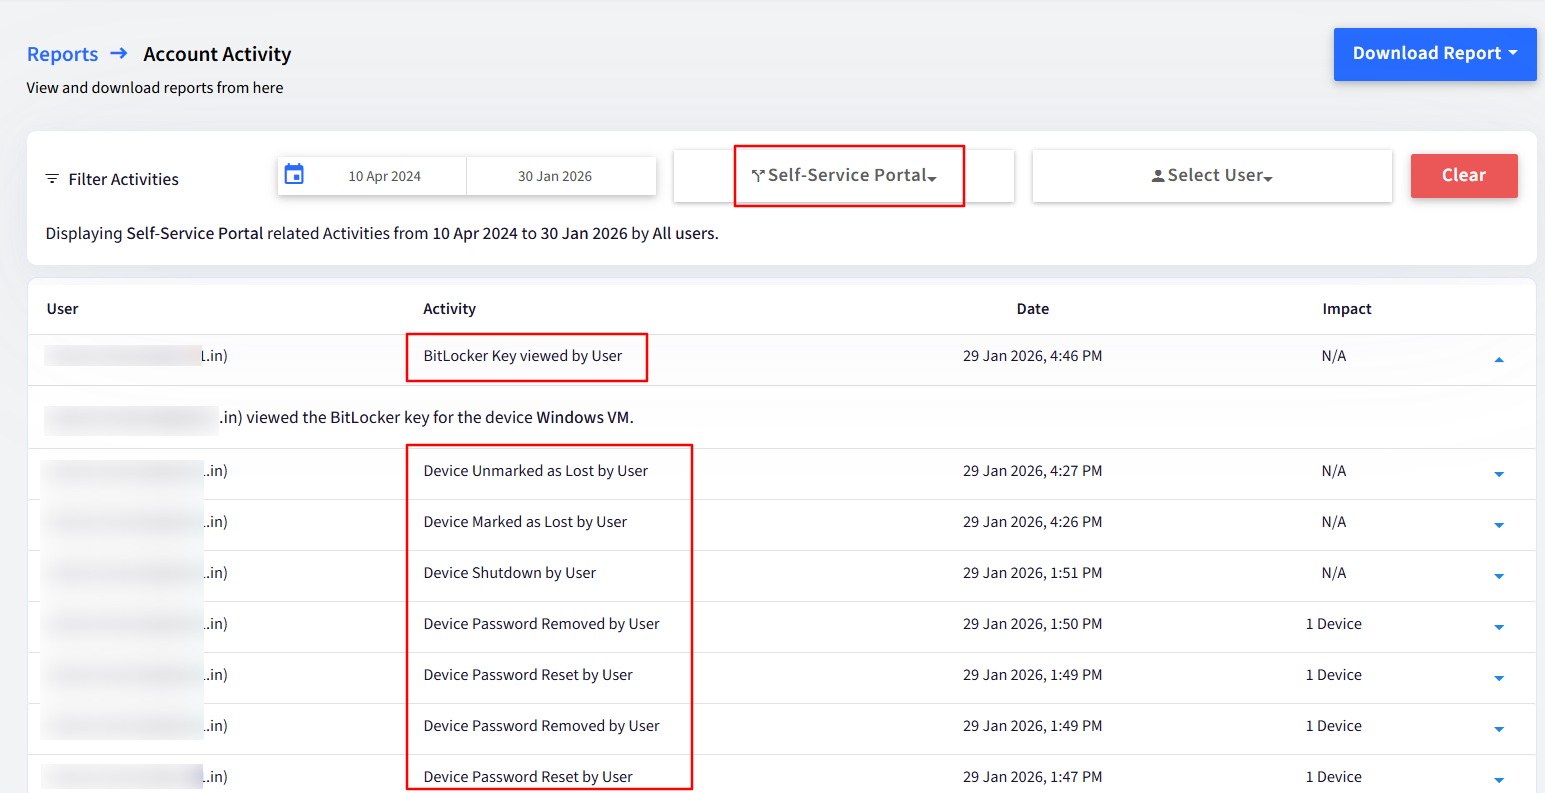
Reporting
Admins will have access to a detailed report that logs all actions performed by users within the User Portal, in the Reports section.
In the Account Activity Report, all relevant activities will be displayed under the 'Self-Service Portal' filter.
In the OneIdP Activity Report, all relevant activities will be displayed under the 'User Portal' filter.