The Scalefusion Devices section gives you a complete view of your device inventory across operating systems, including Printers. As and when a new printer device is configured in Scalefusion, it will start appearing in Scalefusion Dashboard. This guide focuses on familiarising you with the inventory of Printers configured on Scalefusion along with various actions that can be performed.
Pre-requisites
Printer Device Profile should be created and applied to device(s) from Scalefusion Dashboard.
Scalefusion Devices View
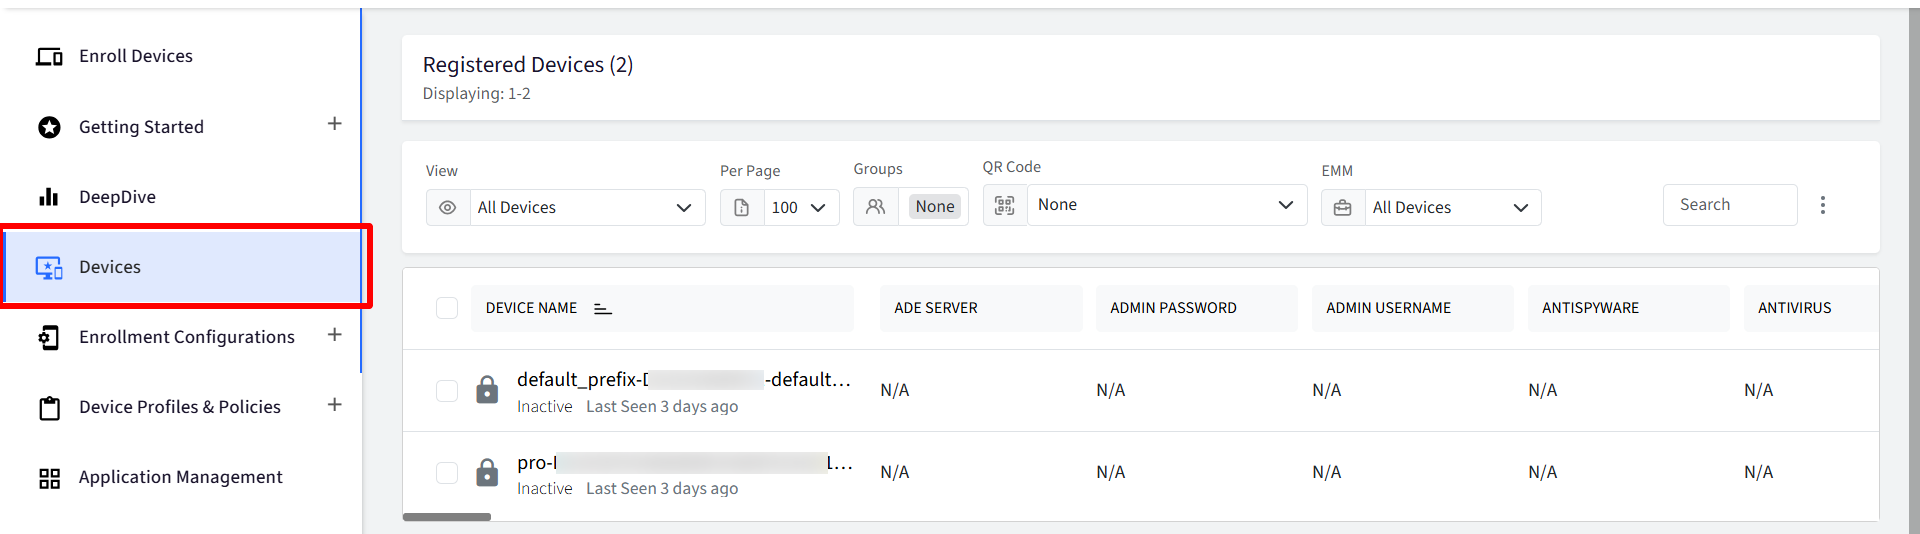
Once you log in to the Scalefusion dashboard, please click on the Devices tab to view the list of all devices. You can switch between the list view and grid view based on your preferences.
Printer devices can be filtered using Printers in View filter
By default, Scalefusion displays the basic information, but you can go ahead and customize the view using the 3 dots menu > Customize Table View option.
Device Status: Provides you with the current status of the device and the possible values,
Managed: Indicates that the profile policies are actively applied
Unmanaged: Indicates that the profile policies are relaxed, but the device is managed
Inactive: Indicates that the device is managed but has not connected to our backend servers
Device Name: The name of the device on the Dashboard, along with the OS version of the device.
Group: Displays the Group that this device belongs to.
Last Seen: Indicates the time when the device last connected to our servers.
The device makes a ping call to our servers every 30 minutes, which updates the last connected status.
Battery: The last reported Battery % and the charging status
Device Details View
Clicking on the Device Name field displays the device details. Each of the sections below provides you with device details categorized based on their group.
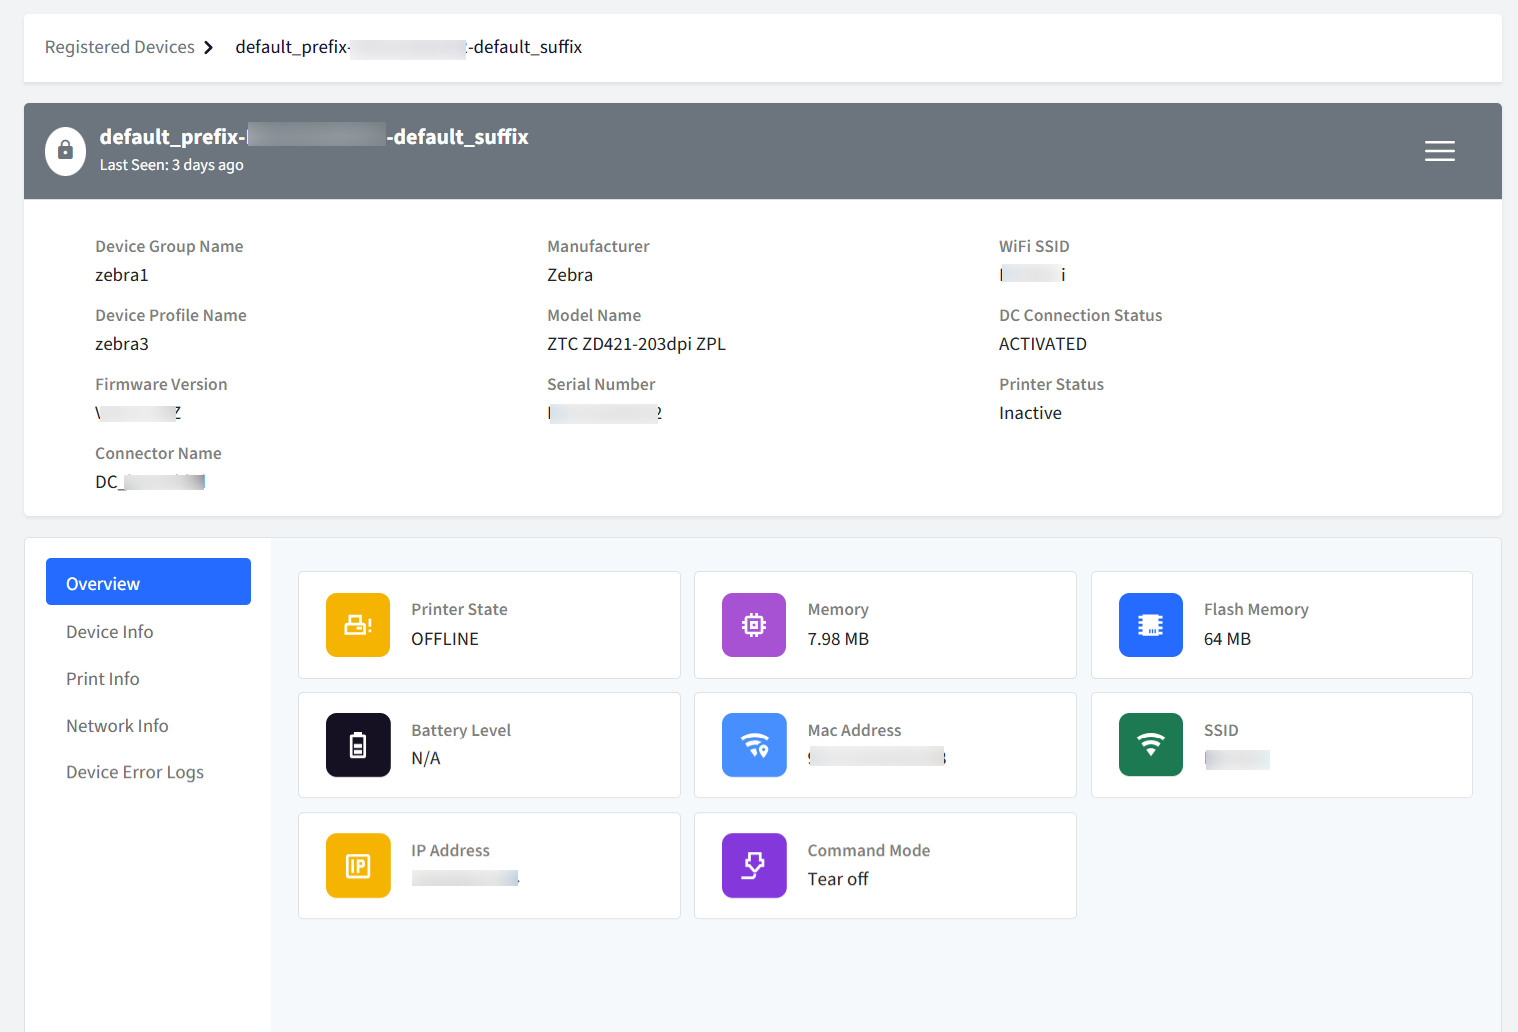
The device details page consists of the following main components:
Top Bar: The top bar uses color-coded indicators and a user icon to represent the printer's management state:
Grey Icon: Inactive printer.
Green Icon: Active and ready printer.
Red Icon: Active printer but in an error state or any state other than "Ready".
Card Views: Display detailed information in organized cards.
Action Menu: Contains actions that can be performed on the device.
Basic Details: This displays essential printer information:
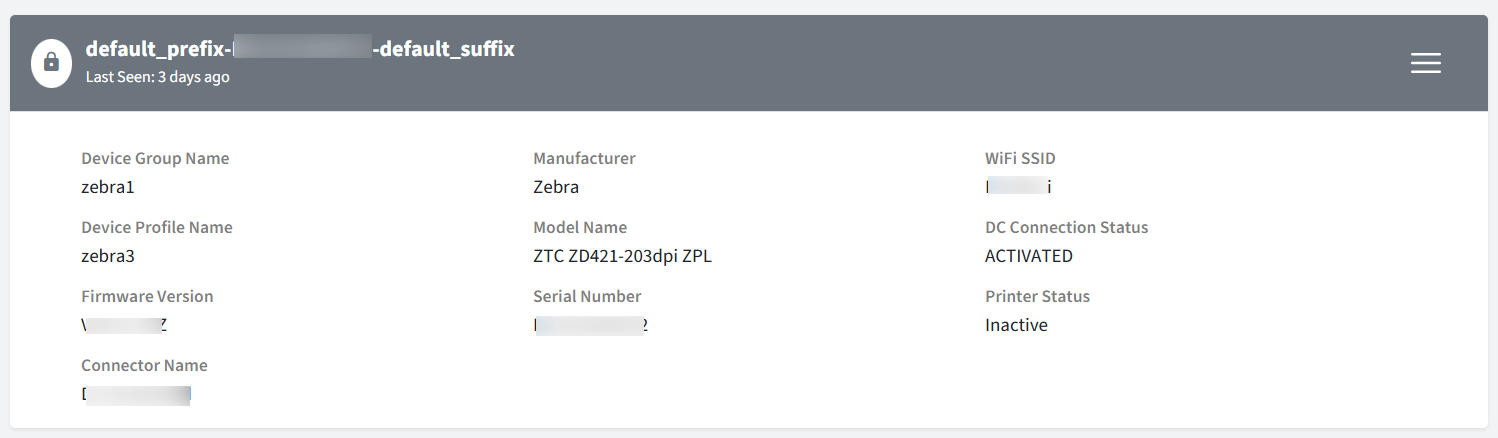
Printer Name
Last Seen
Device Group Name
Device Profile Name
Firmware Version
Connector Name
Manufacturer
Model
Serial Number
Wi-Fi SSID
DC Connection Status
Printer Status: Displays Active or Inactive
Overview: This provides a quick summary of key printer metrics:
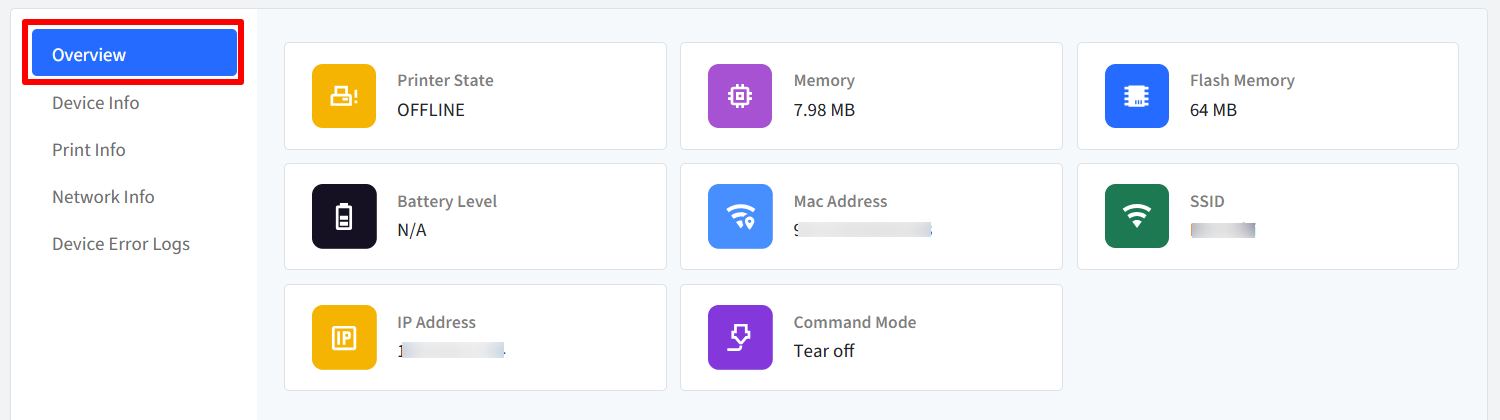
Printer State
The Printer State displayed depends on the device's online status:
Offline/Inactive: The Printer State will be Offline.
Online/Active (but not ready): The Printer State will display one of the following statuses: PRINTING, COOLING, COVER OPEN, ERROR, or BUSY.
Memory: The total RAM memory of device
Flash Memory: The total Flash memory of device, that is, non-volatile storage area built into the printer that retains data even when the printer is powered off.
Battery Level
MAC Address
SSID
IP Address
Command Mode
Device Info: This displays detailed device-specific information:
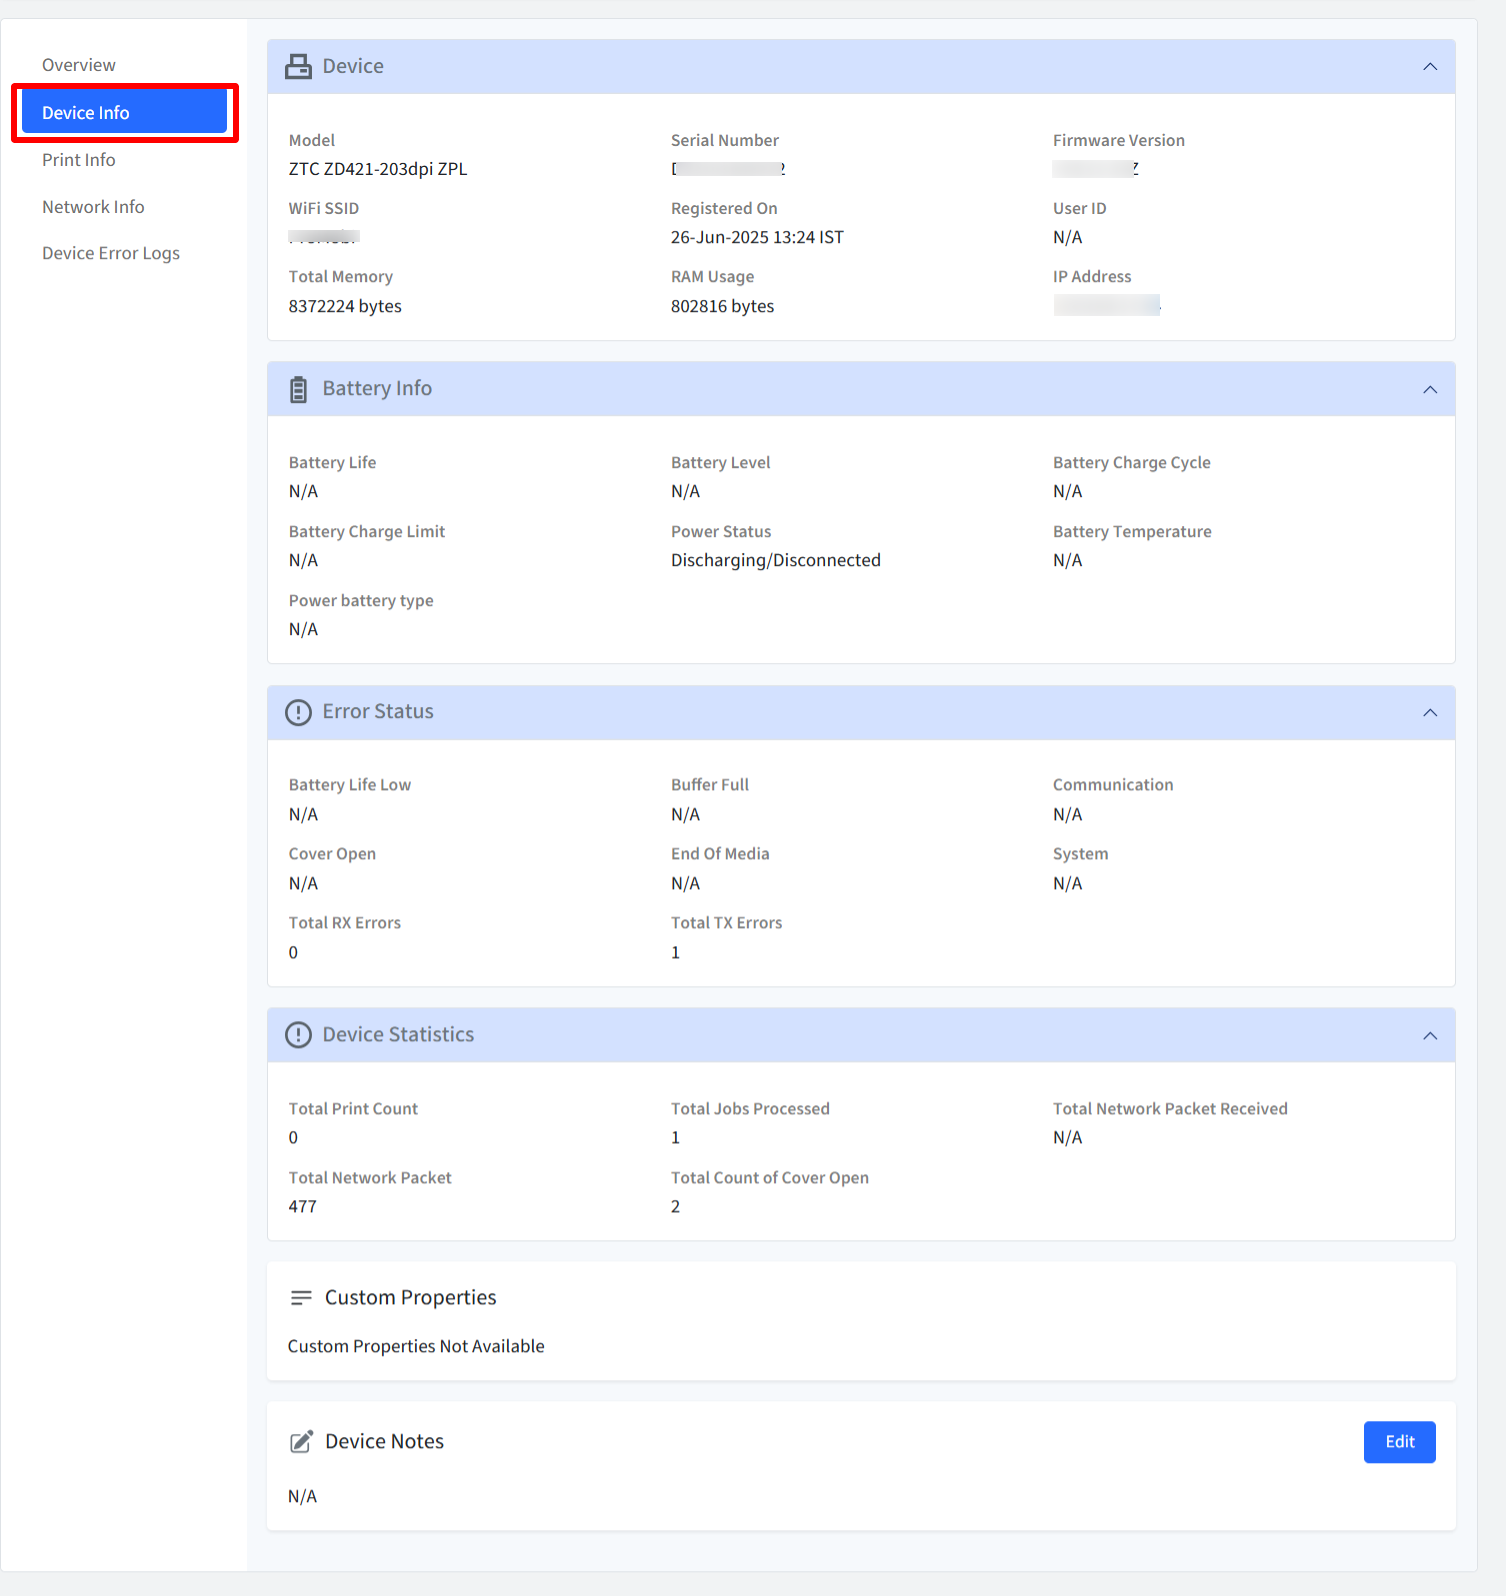
Device
Model
Serial Number
Firmware Version
SSID
Registered On
User ID
Total Memory
Memory Usage
IP Address
Battery Info:
Battery Life
Battery Level
Battery Charge Cycle
Battery Charge Limit
Power Status
Battery Temperature
Power Battery Type
Error Status (with icon and Yes/No value)
Battery Life Low
Buffer Full
Communication
Cover Open
End of Media
System
Device Statistics
Total Print Count
Total Jobs Processed
Total Network Packet Received
Total Network Packet Sent
Total Count of Cover Open
Custom Properties: Includes user-defined custom properties and the following:
Contact
Location
Device Notes: Notes added within the Scalefusion platform.
Print Info: This displays printer-specific settings:
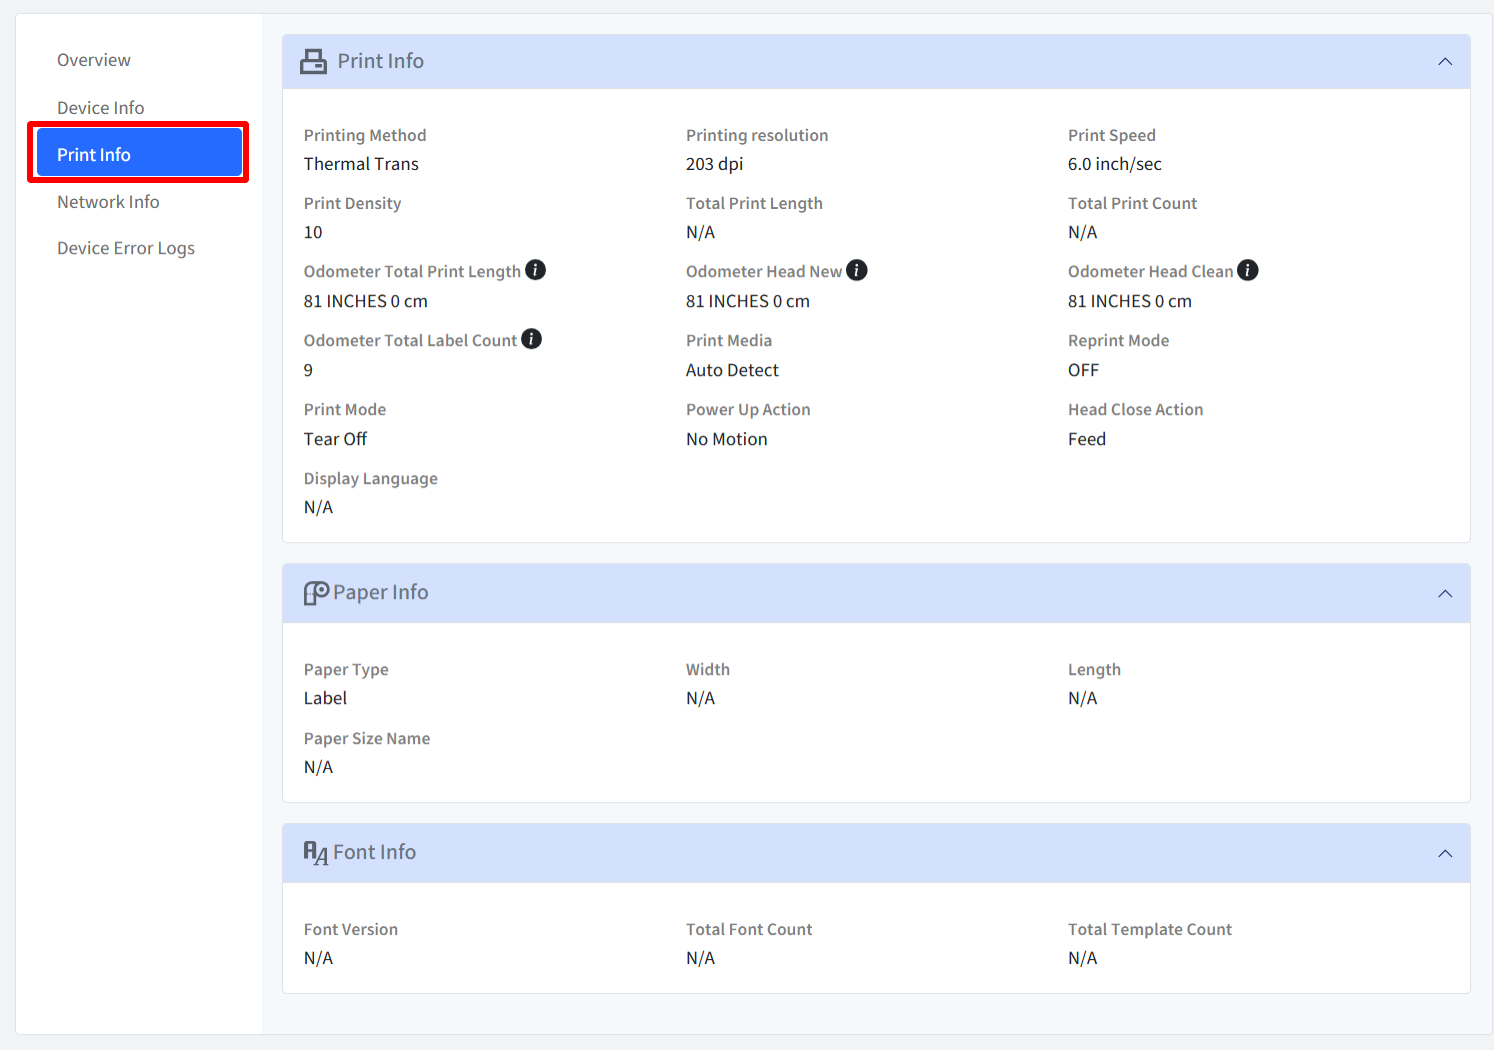
Print Info:
Printing Method
Printing Resolution
Print Speed
Print Density
Total Print Length
Total Print Count
Odometer Total Print Length: The cumulative length of media (usually in meters or inches) that has been printed by the printer over its lifetime.
Odometer Head New: The print length (or count) at the time when the printhead was last replaced. This helps track the lifespan of the current printhead.
Odometer Head Clean: The total print length or time since the last recorded printhead cleaning. It is used to monitor cleaning intervals and ensure maintenance routines are followed.
Odometer Total Label Count: The total number of labels printed by the printer. This count helps monitor printer usage and plan for supplies or maintenance.
Print Mode
Print Media
Reprint Mode
Display Language
Power Up Action
Head Close Action
Paper Info:
Paper Type
Width
Length
Paper Size Name
Font Info:
Font Version
Total Font Count
Total Template Count
Network Info: This provides detailed network connection information, divided into four sections:
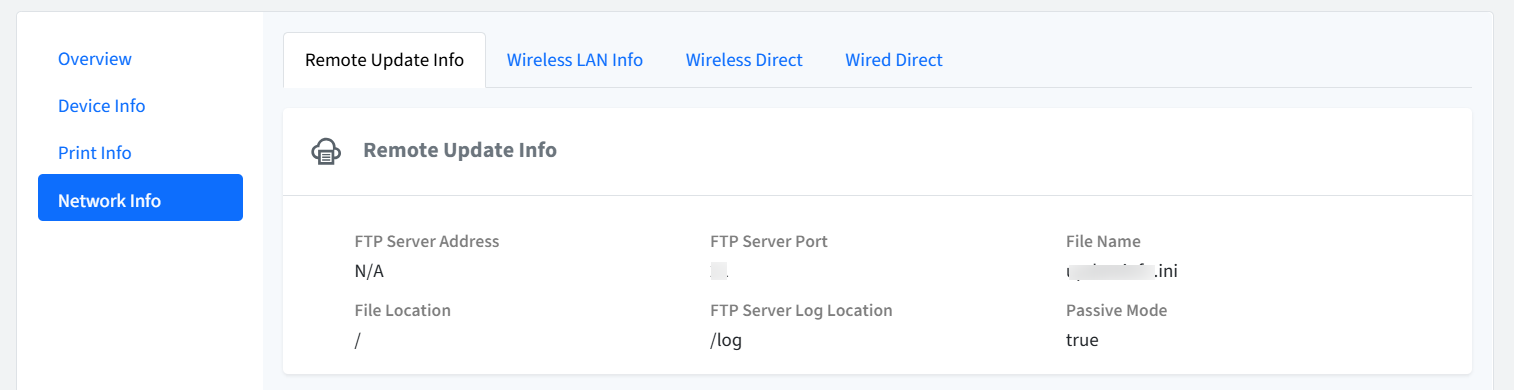
Remote Update Info:
FTP Server Address
FTP Server Port
File Name
File Location
FTP Server Log Location
Passive Mode
Wireless LAN Info:
Status
Signal Strength
Node Type
Node Name
MAC Address
Communication Mode
SSID
Channel
Authentication Method
Server Certificate Verification
Encryption Mode
Boot Method
IP Address
Subnet Mask
Gateway
DNS Server Method
Primary DNS Server IP Address
IPv6 Usage
Secondary DNS Server IP Address
IPv6 Static Address
IPv6 Enable Static Address
IPv6 Primary DNS Server IP Address
IPv6 Secondary DNS Server IP Address
IPv6 Address List
Wireless Direct:
Wireless Direct Usage
Wireless Direct Connection Info Generation
Wireless Direct SSID
Wireless Direct Channel
Wired LAN Info:
Status
Node Type
Node Name
MAC Address
Boot Method
IP Address
Subnet Mask
Gateway
DNS Server Method
Primary DNS Server IP Address
Secondary DNS Server IP Address
IPv6 Static Address
IPv6 Enable Static Address
IPv6 Primary DNS Server IP Address
IPv6 Secondary DNS Server IP Address
IPv6 Address List
Device Error Logs: This provides a detailed table view of all reported device errors.
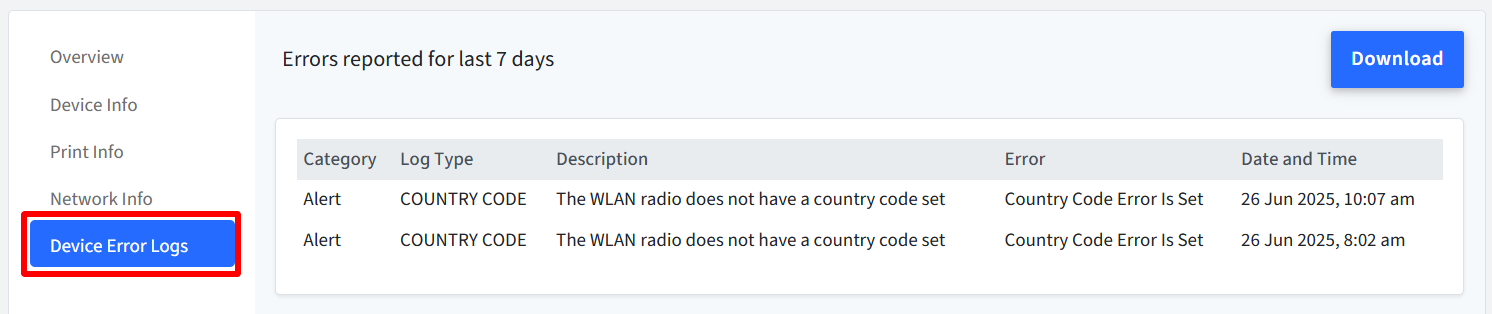
Column
Description
Category
Displays the category to which the error belongs.
Log Type
Indicates the type of error log (e.g., system, hardware, software).
Description
Provides a brief description of the error log.
Error
Shows the specific error message or relevant information.
Date and Time
Displays the date and time when the error was reported.
Download Logs
To download a report of the errors logged in the last 7 days, click the Download button.
A CSV file will be generated containing all the data displayed in the table.
File Name Format:
Device_Name_Error_Logs.csv
Device Actions
Click on the hamburger menu to see the list of actions that can be performed on the managed device.
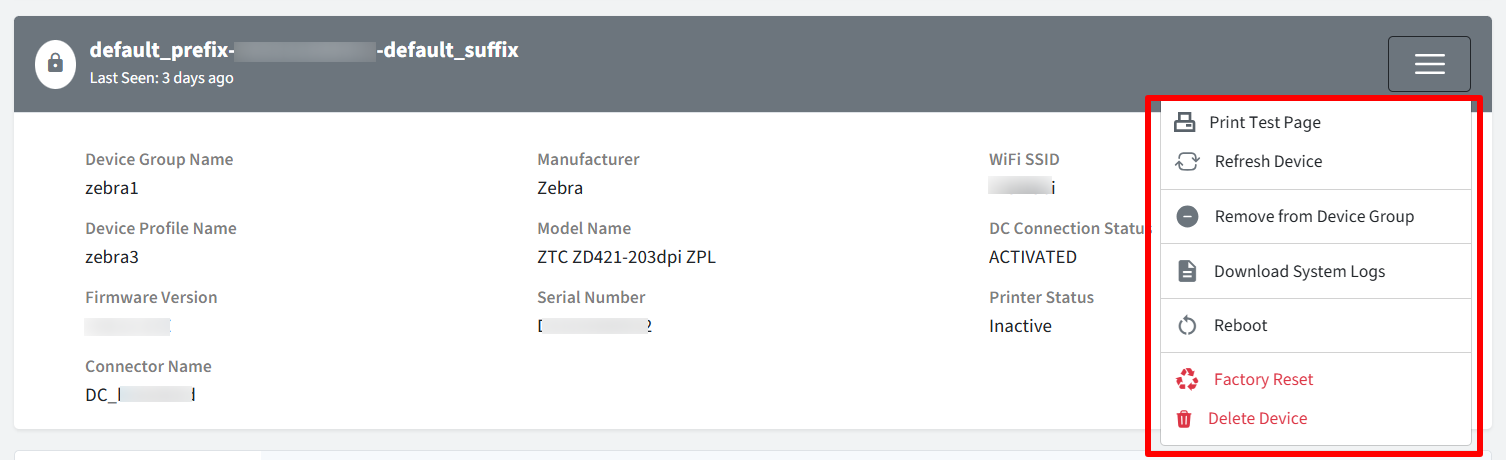
Print Test Page: This sends a command to the printer to print a test page. This is useful for verifying printer functionality, checking print quality, or troubleshooting printing issues.
Refresh Device: This forces the device to synchronize with the management server, retrieving the latest configurations, policies, and updates. This ensures the device is up-to-date and compliant with current settings.
Add to Device Group / Remove from Device Group: These allow administrators to manage device membership within device groups. Device groups are used to organize devices and apply policies or configurations to multiple devices simultaneously. Adding a device to a group applies the group's settings to that device, while removing a device from a group removes those settings.
Reboot: This action restarts the device. This can be useful for resolving software issues, applying updates that require a restart, or performing general maintenance.
Shutdown: This action powers off the device. This can be used to conserve energy, perform maintenance, or address certain software issues.
Factory Reset: This action restores the device to its original factory settings, erasing all user data, applications, and configurations. This is typically used when preparing a device for reassignment or when troubleshooting severe software problems.
Delete Device: This action removes the device from the management system. This typically does not erase the device itself but removes it from the management console, preventing further remote management. This is used when a device is retired, lost, or no longer needs to be managed.
Download System Logs: Helps you retrieve the logs of managed Zebra printer devices remotely and view activities. The logs are retained for 5 days.
Some actions may be specific to certain Zebra printer models.
Download System Logs
To pull system logs,
Click on Download System Logs from the gear icon menu. Click on the button Get System Logs on the right side panel.
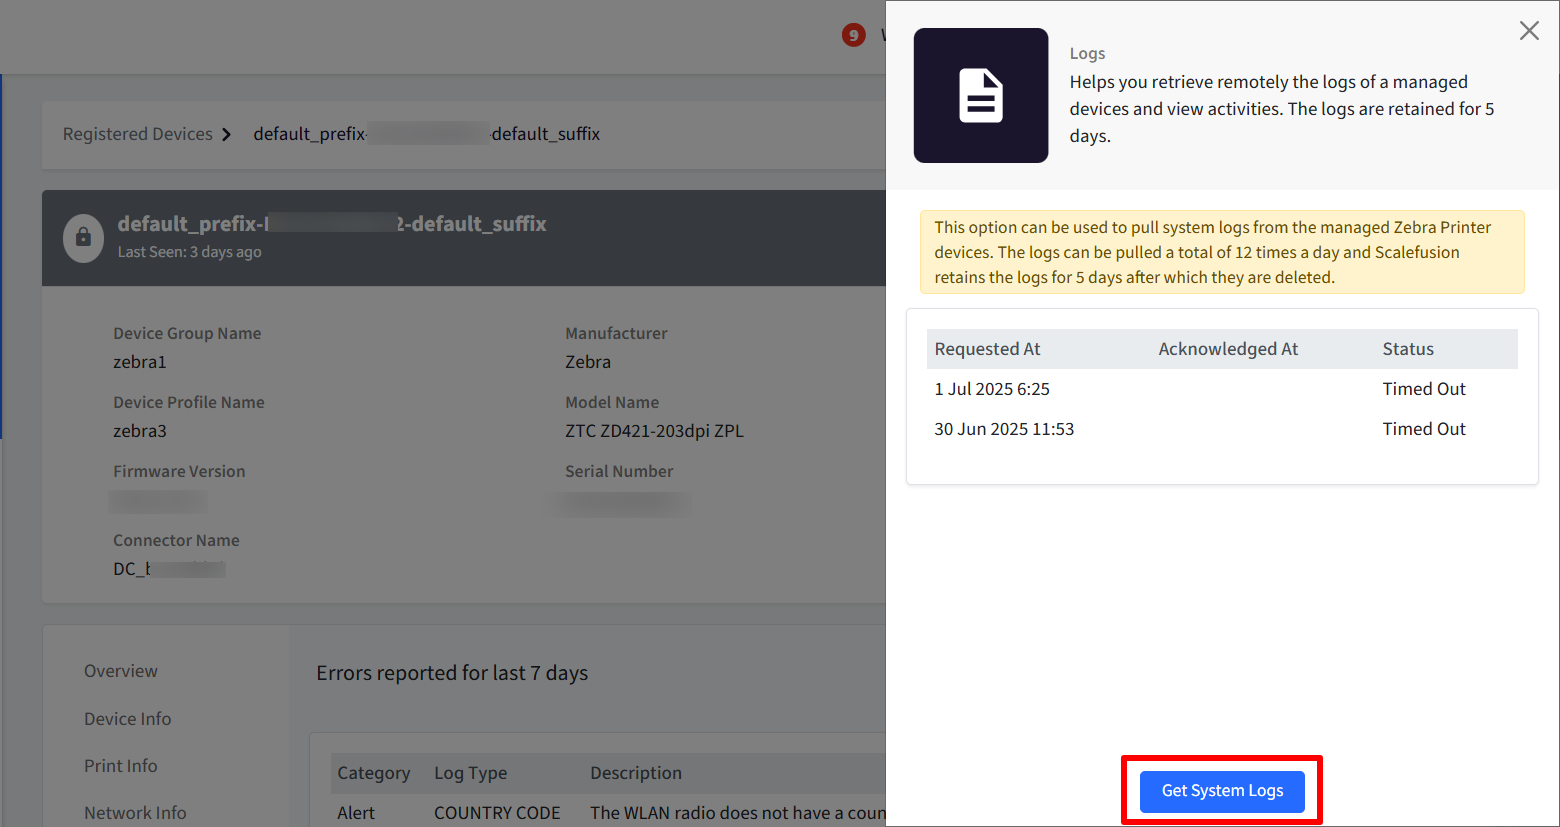
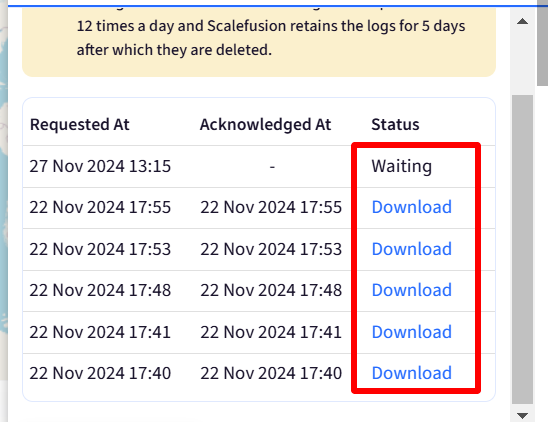
Logs will be fetched as per configurations, and listed on Dashboard with current Status as Waiting along with other details.
Refresh the page once to download the log file. Note that the status will change to Download
Log Fetching Status
Waiting: The initial state when a log fetch request is initiated.
Download: The log file has been successfully fetched and is ready to be downloaded.
Failed: The log fetch request failed due to various reasons, such as network issues, device inactivity, or user account issues.
Note: For failed log fetch requests, you can view detailed error logs in text format by clicking the Logs button next to the Failed status.
Timed Out: The log fetch request timed out before completion. This can occur if the device did not acknowledge the request within a specified timeframe.
Download Logs
Once logs are fetched successfully, you should see Download under Status with which the logs can also be downloaded. The logs are downloaded in zip format. You need to unzip them to get the log file which is in .evtx format.
Important Points
Logs can be pulled from devices a maximum of 12 times per day.
The logs are retained for 5 days on the Dashboard and automatically deleted after that.
Log fetch activities are also recorded in the Account Activity Report for additional visibility and auditing purposes.
Factory Reset
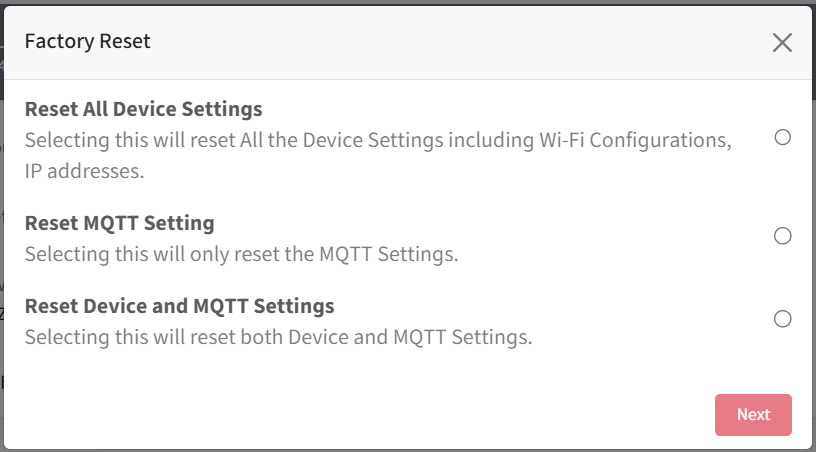
On clicking the gear icon menu > Factory Reset, you will be presented with three reset options. Select any one and click Next:
Reset All Device Settings: Resets all device settings including Wi-Fi configurations and IP addresses.
Reset MQTT Settings: Resets only the MQTT-related settings.
Reset Device and MQTT Settings: Resets both device and MQTT settings.
Important Notes
Ensure any necessary backups are taken before performing a reset.
Once initiated, some reset actions cannot be undone.
Reports
You can view Zebra printer-related reports in the following sections:
Policies and Actions Status: Monitor the status of applied policies and triggered actions for Zebra printers.
Device Inventory Reports: Access detailed inventory data, including Zebra printer models, configurations, and statuses.
Account Activity Reports: Review user and system activities related to Zebra printer management and interactions.