- 08 Aug 2024
- 7 Minutes to read
- Print
- PDF
Creating MDM Profiles for Samsung KME
- Updated on 08 Aug 2024
- 7 Minutes to read
- Print
- PDF
MDM Profiles in the Samsung KME portal are the enrollment configurations that can be used to enroll your Samsung devices. Creating a minimum of one MDM Profile is mandatory to manage Samsung devices.
Before you Begin
- Create a Samsung Knox account and get access to the Knox Mobile Enrollment Account.
- Complete the Android for Work step on the Scalefusion Dashboard.
- Create an Android Kiosk Device Profile.
- Create a QR Code configuration with the Android Kiosk device profile.
MDM Profiles for Company-Owned devices
Samsung offers two types of MDM Profiles to be created. These are,
- Android Enterprise Profile: For devices enrolled via this Profile, make sure that Scalefusion is set up as Device Owner and the device is set up as EMM managed. This gives you the advantage of using both the EMM and Knox features.
- Device Admin Profile: This is the legacy mode of setup where the Scalefusion app gets Knox privileges and can offer Knox features.
Irrespective of the Profile type, devices enrolled via KME ensure that if the end-user uninstalls the Scalefusion agent, then the user is forced to reinstall the application.
Steps
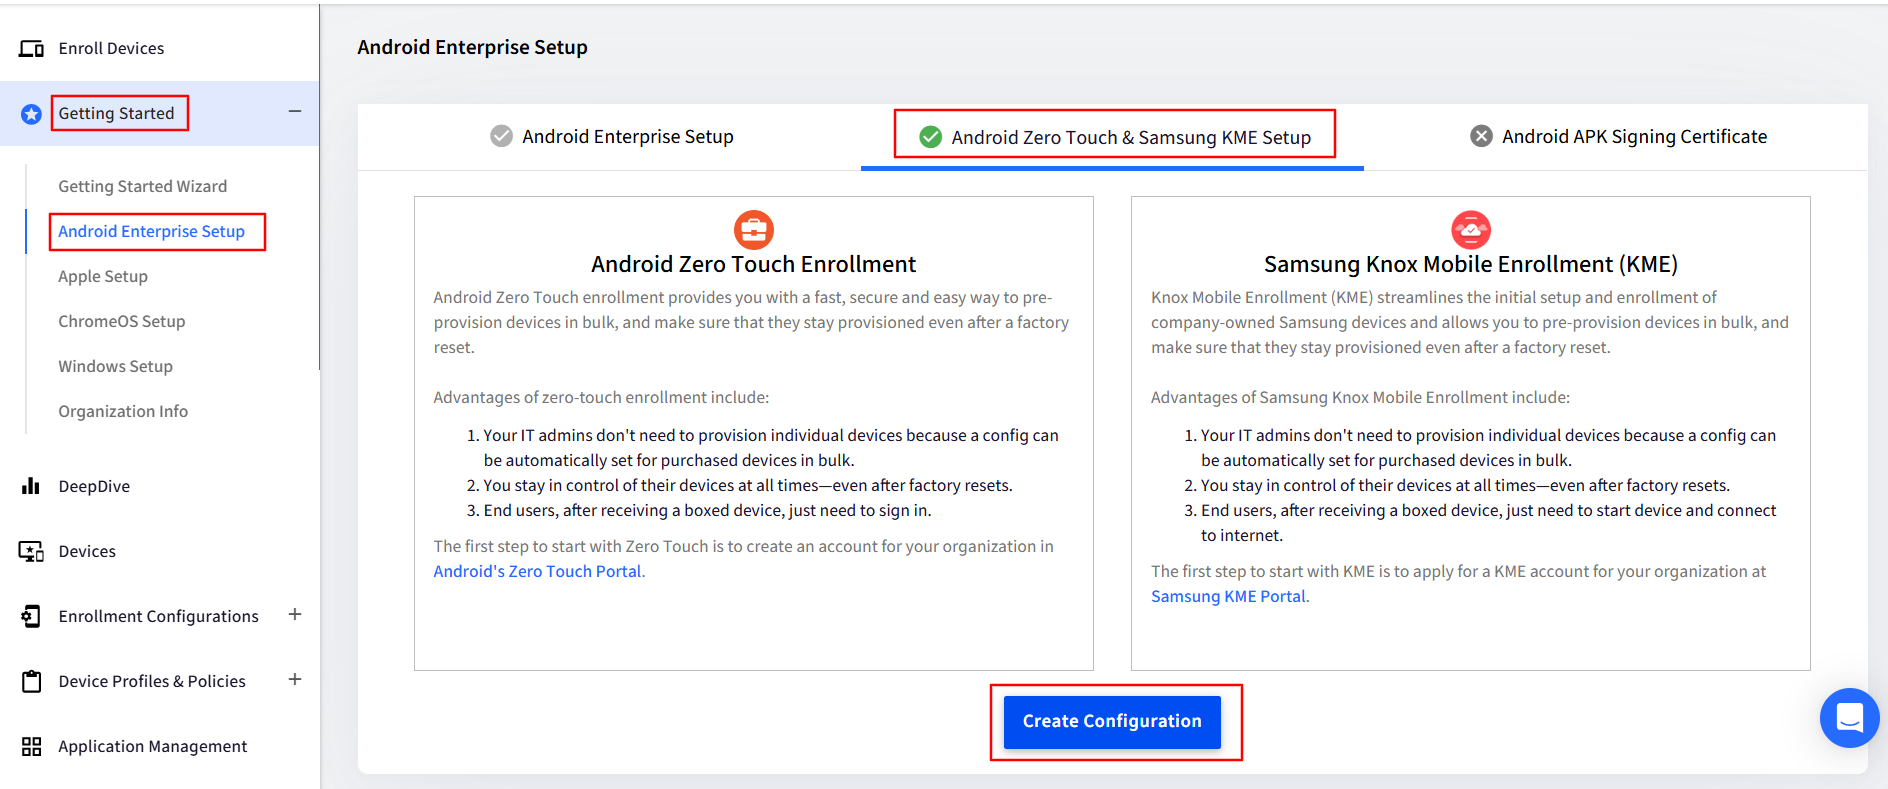
- Sign In to Scalefusion Dashboard. Assuming that you have performed the pre-requisites as mentioned above, navigate to Getting Started > Android Enterprise Setup
- Click on Android Zero Touch & Samsung KME Setup Tab.
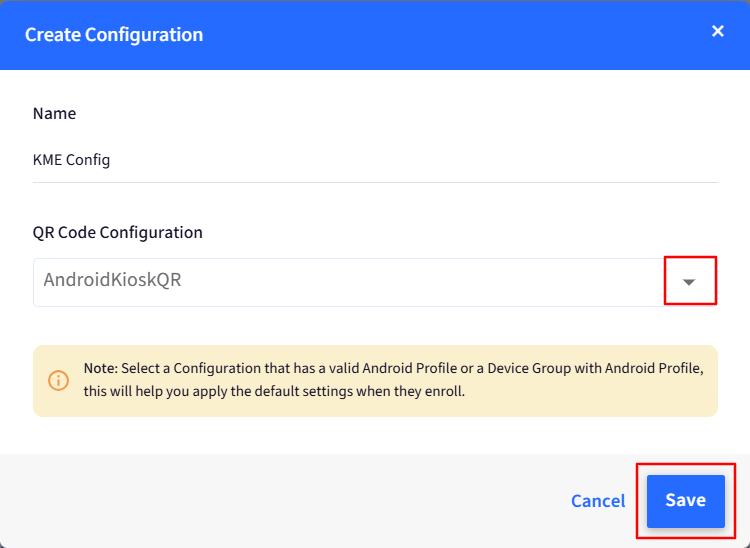
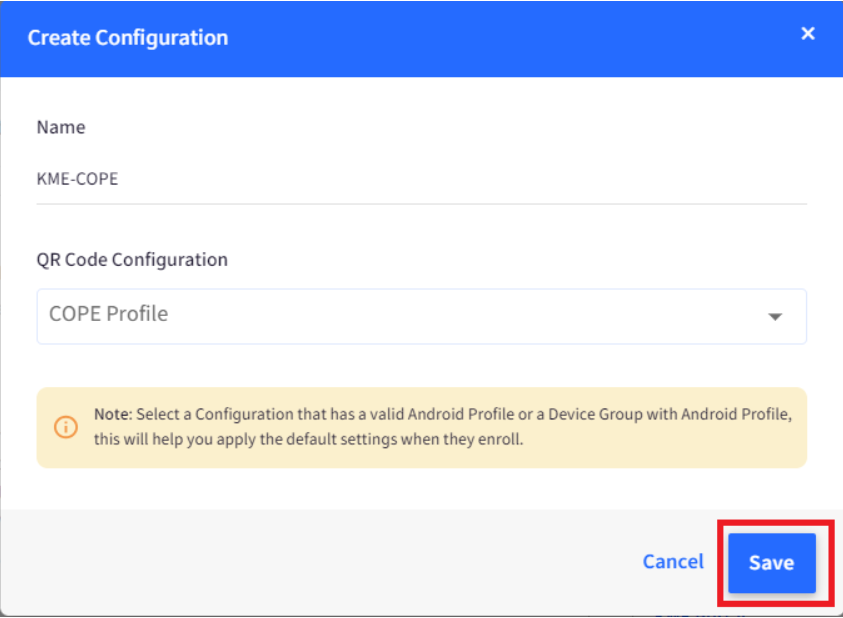
- Click on Create Configuration or New to launch the configuration creator wizard. In the configuration creator wizard,
- Provide a name for this configuration.
- From the dropdown, select the QR Code that you want to enroll your Samsung devices using KME.
- Click SAVE to save the configuration.
- Once a configuration is saved, it will appear in the list of configurations. Expand a saved configuration and select the Samsung KME tab to see the next steps.
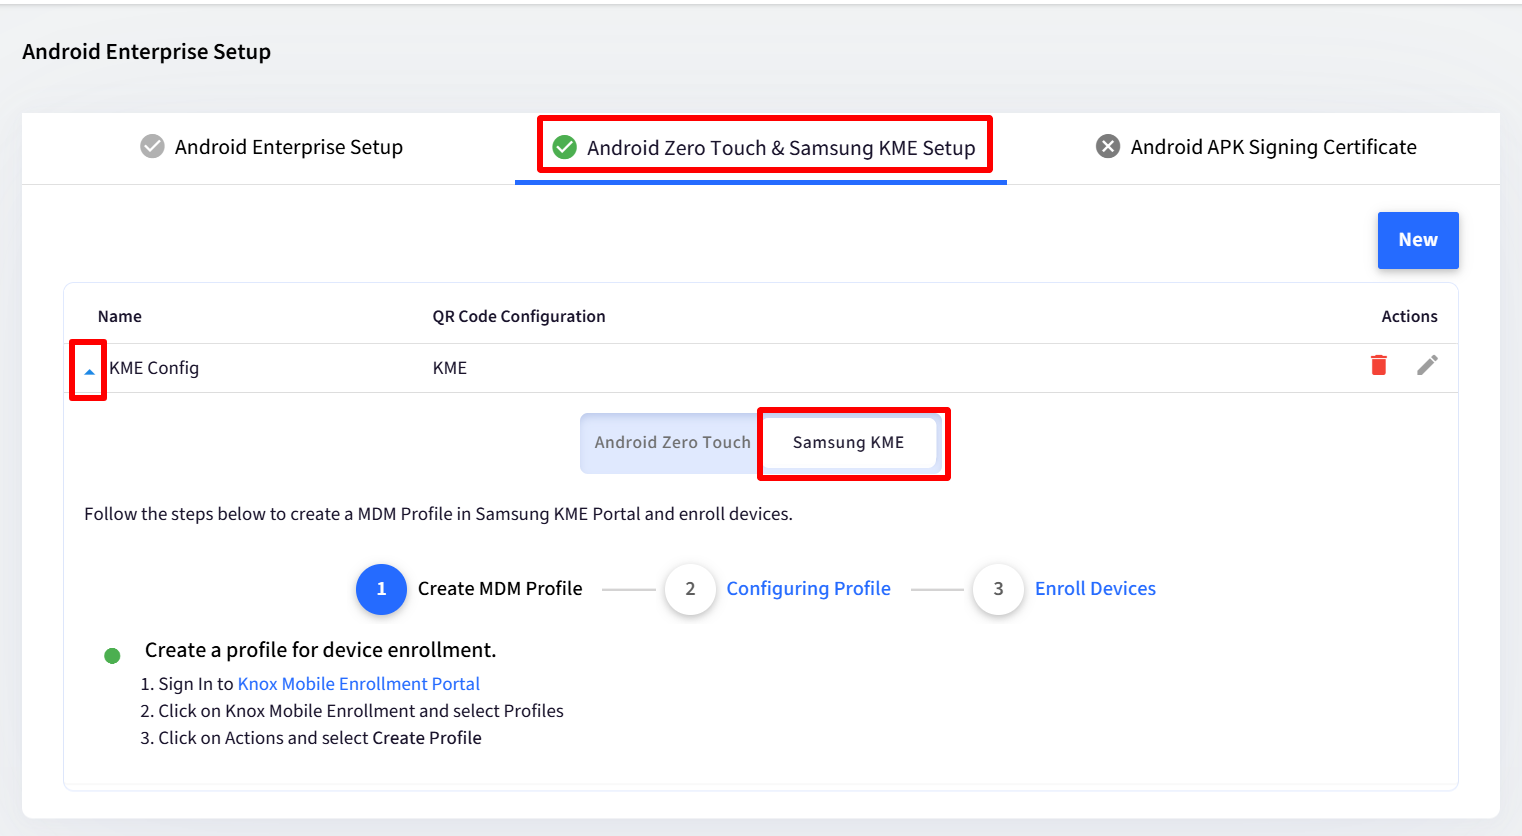
- At this point, the flow shifts to the Samsung KME Portal. Sign Into the Samsung Knox portal and Launch the KME Console
- Click on the Profiles option on the left-hand side and click on the CREATE PROFILE button on the top-right-hand side.
- Samsung allows you to create profiles of the below-mentioned types. Please follow the sections below to create an appropriate MDM Profile. 
Please note that KME no longer supports Device Admin on Android 11 and above. (A) Android Enterprise Profile:
In this type of Profile, the Scalefusion app will be set as the Device Owner app on the device. This profile allows you to leverage both the EMM Features (Android for Work) and Knox features offered by Scalefusion. We highly recommend this approach.
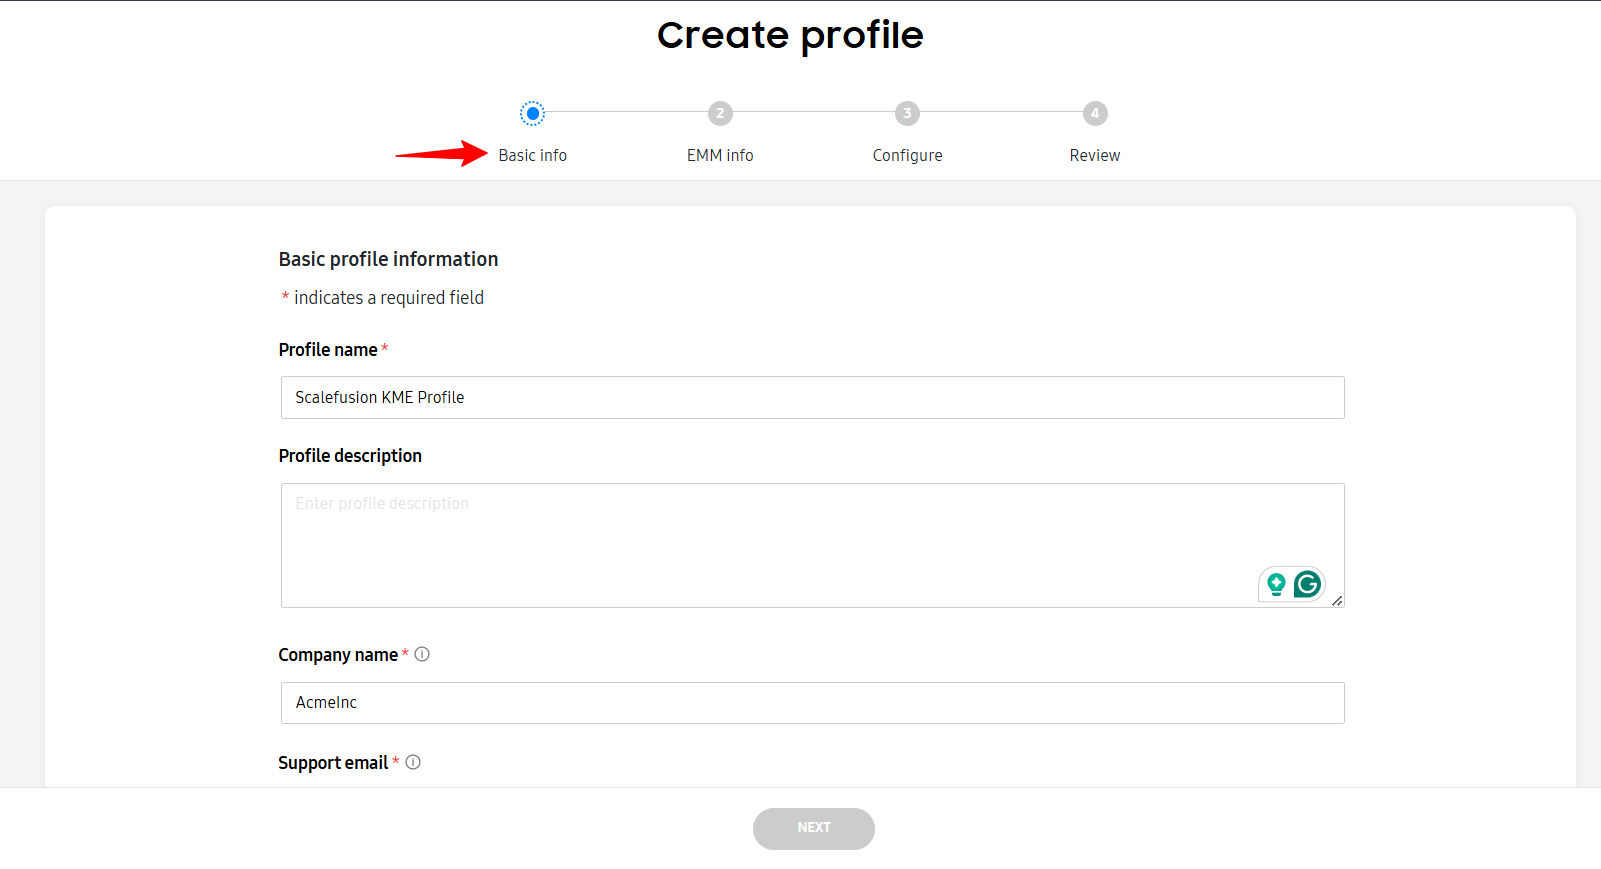
- Clicking on Android Enterprise will launch the profile creation wizard. The first screen of the create profile wizard is divided into two sections,
- BASIC INFO: This section allows you to provide the following details,
- Profile Name: Give this profile a name to identify it.
- Description: Provide a description for this profile.
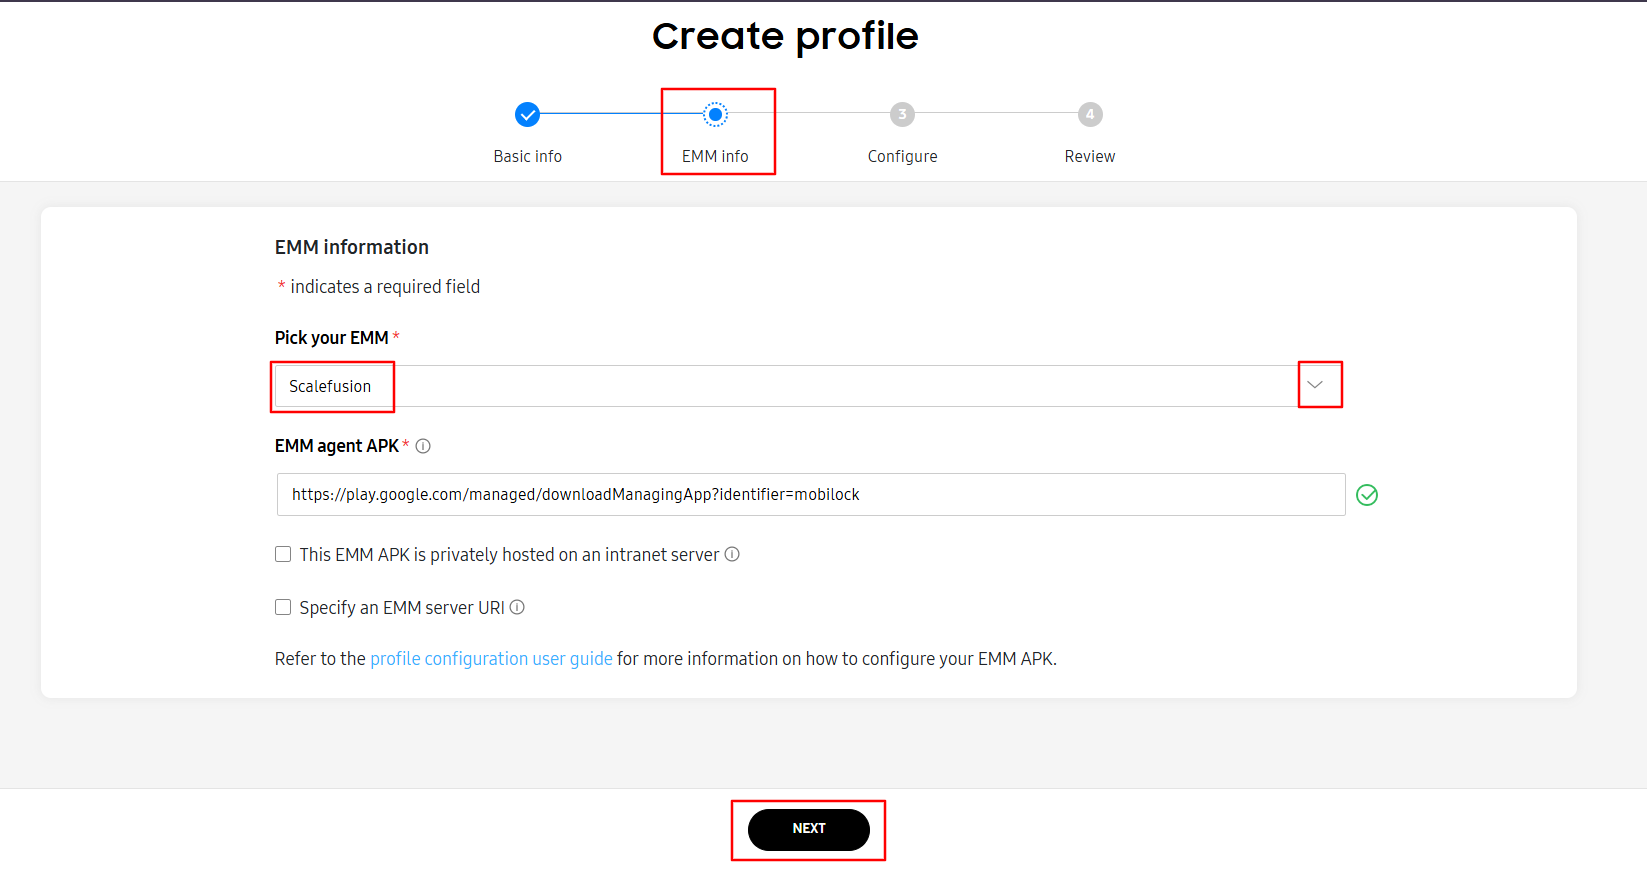
- MDM INFORMATION: This section allows you to provide the download information related to Scalefusion MDM Agent,
- Select Force Device Owner Enrollment
- Pick your MDM: From the dropdown, please select Scalefusion by Promobitech
- Copying the URL from Scalefusion Dashboard: At this point, navigate to Scalefusion Dashboard, select I want to Create a Device Owner Profile & Copy the MDM Agent URL
- Pasting the URL in KME Console: Paste the copied URL in the Profile creation wizard as shown below. Once you paste the URL and click outside of the URL field, the link to the APK will be verified. Once it is verified, the CONTINUE will be enabled.
- Click CONTINUE to go to the next section.
- BASIC INFO: This section allows you to provide the following details,
- The second section lets you provide the enrollment information & device settings. This section is further divided into the following sub-sections,
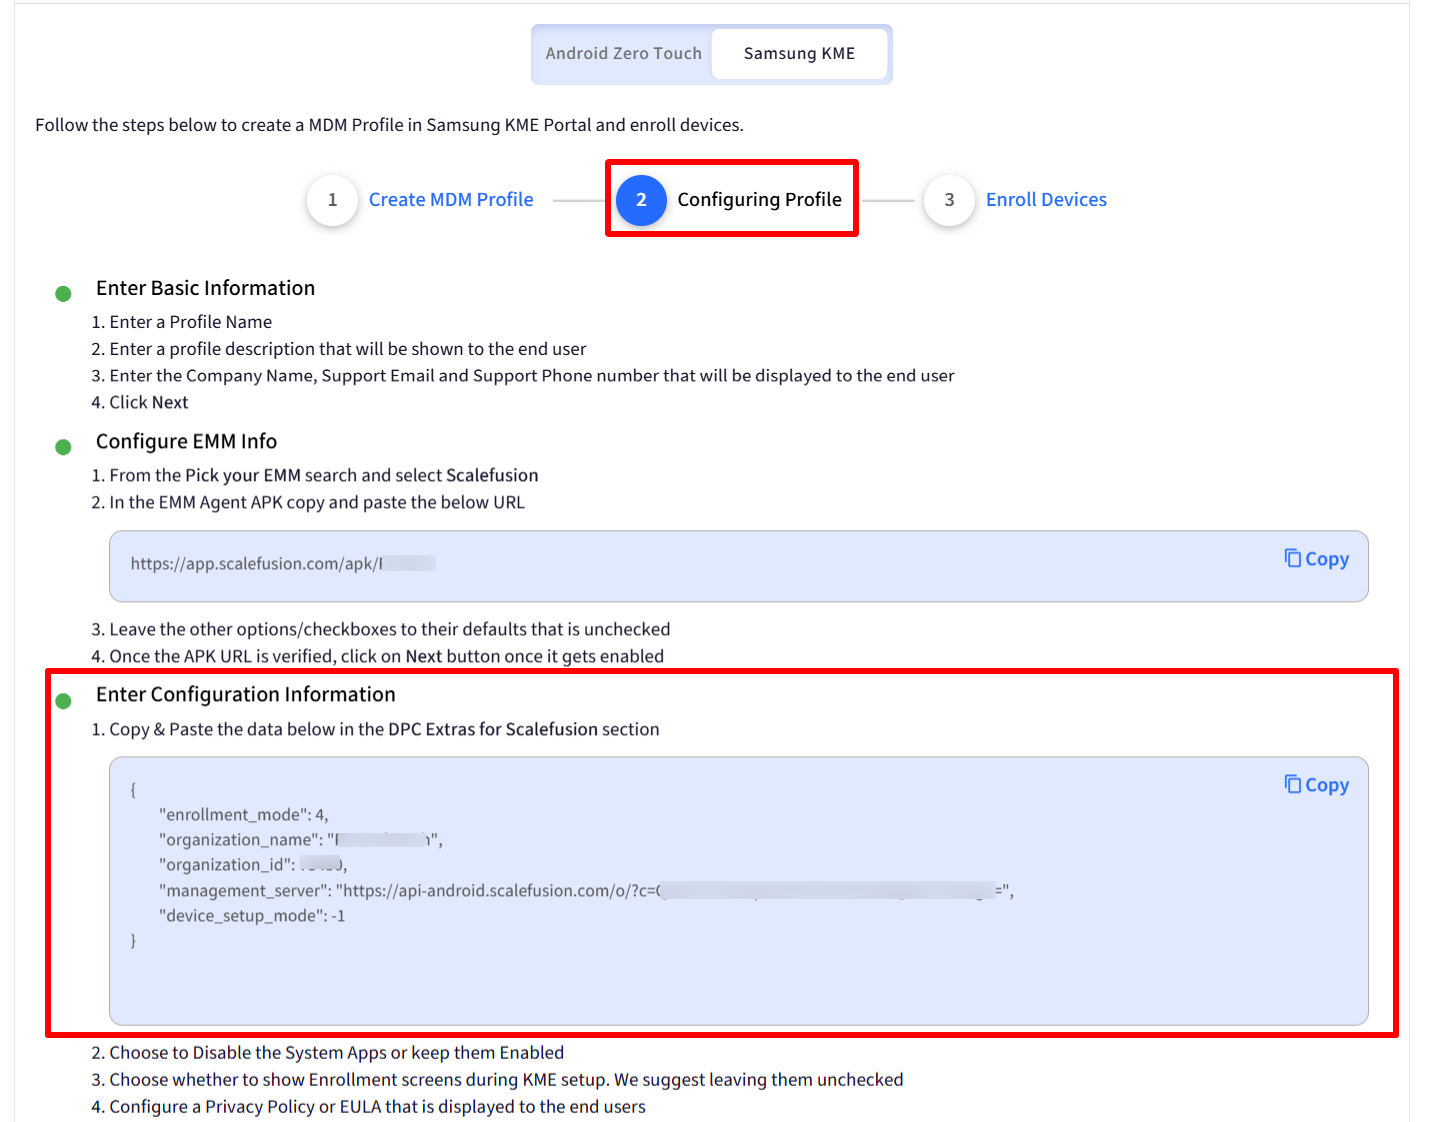
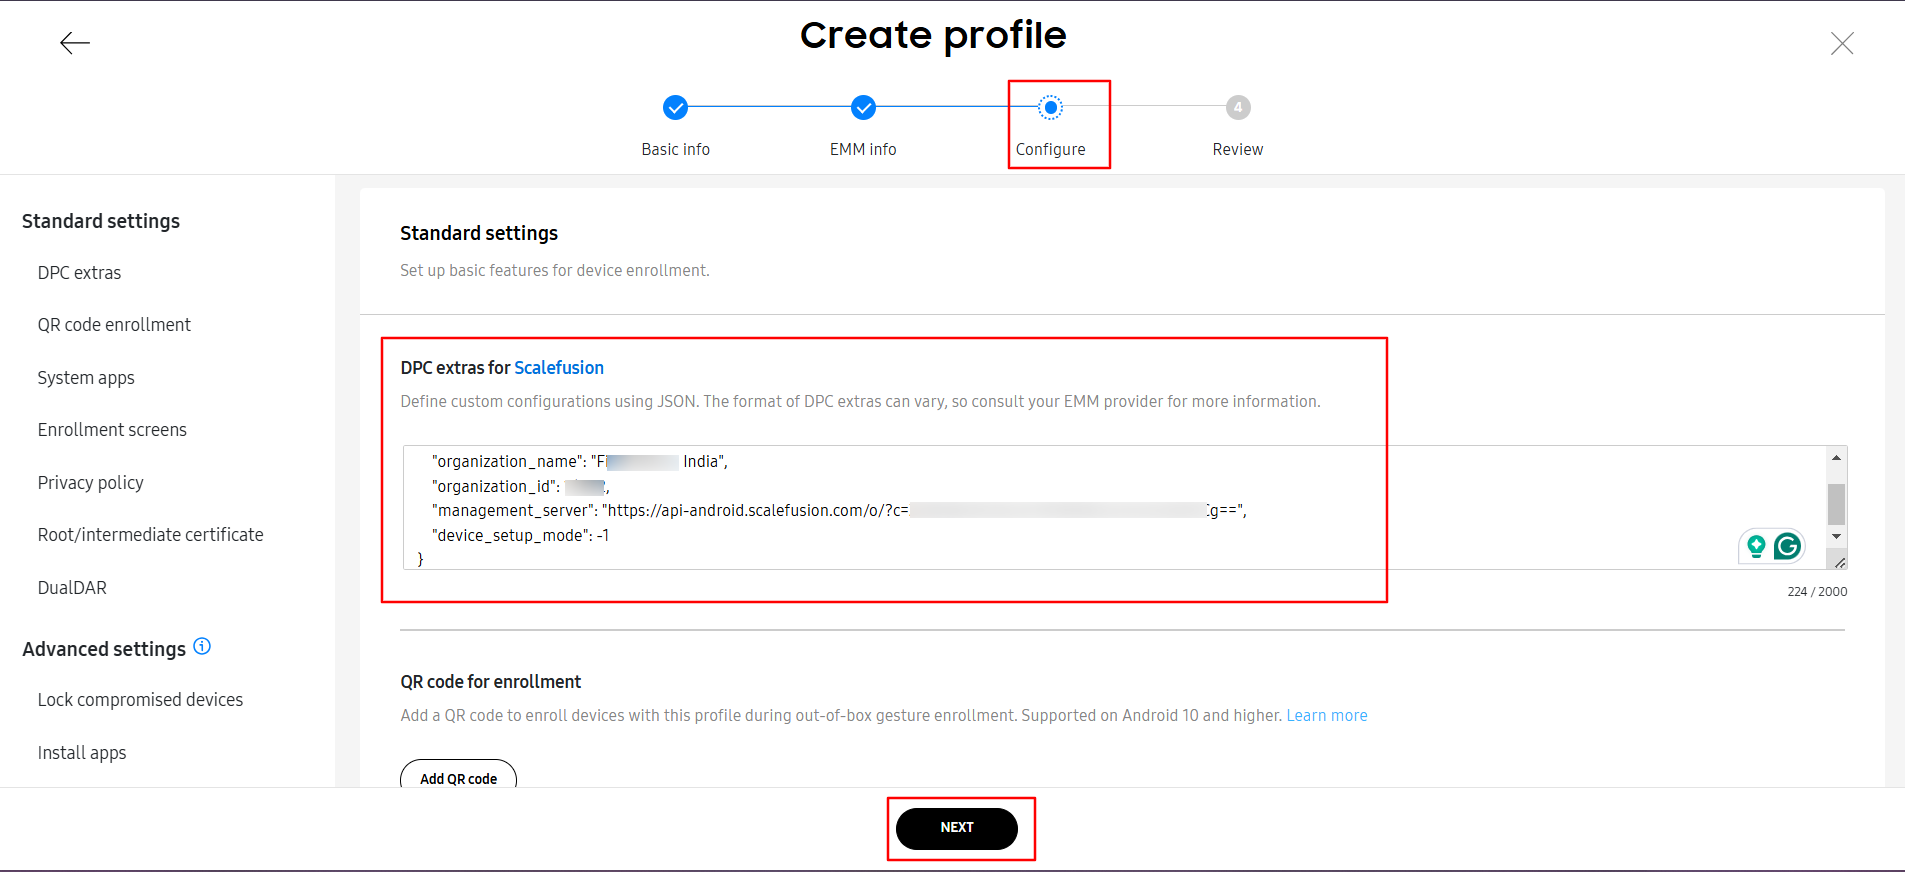
- MDM Configuration:This section lets you define the enrollment information that will be passed to the Scalefusion app once it is installed over the air. In order to provide this,
- Copy Configuration from Scalefusion Dashboard: At this point, navigate to Scalefusion Dashboard and copy the configuration data as shown below.
- Paste the data in KME Console: Click on the Custom JSON Data text field and paste the data that you just copied.DO NOT Modify the configuration data. Modifying/Editing the configuration will cause the Scalefusion app to NOT ENROLL properly.
- Copy Configuration from Scalefusion Dashboard: At this point, navigate to Scalefusion Dashboard and copy the configuration data as shown below.
- Device Setting: This section lets you define the enrollment experience and provides the following sections,
- System Apps: Choose the default state of the system apps.
- Disable System Apps: This will set up the device without enabling the default system apps that the device ships with.
- Leave all System Apps enabled: This will set up the device but leave the default apps intact. We recommend using this approach as some of the functionality may depend on default apps, or your IT may require the usage of default apps.
- Legal Agreement & Company Name: If you plan to provide an unboxed device to your employees directly, then we suggest providing a legal agreement so that they are aware that this device will be managed and know the legal agreement.
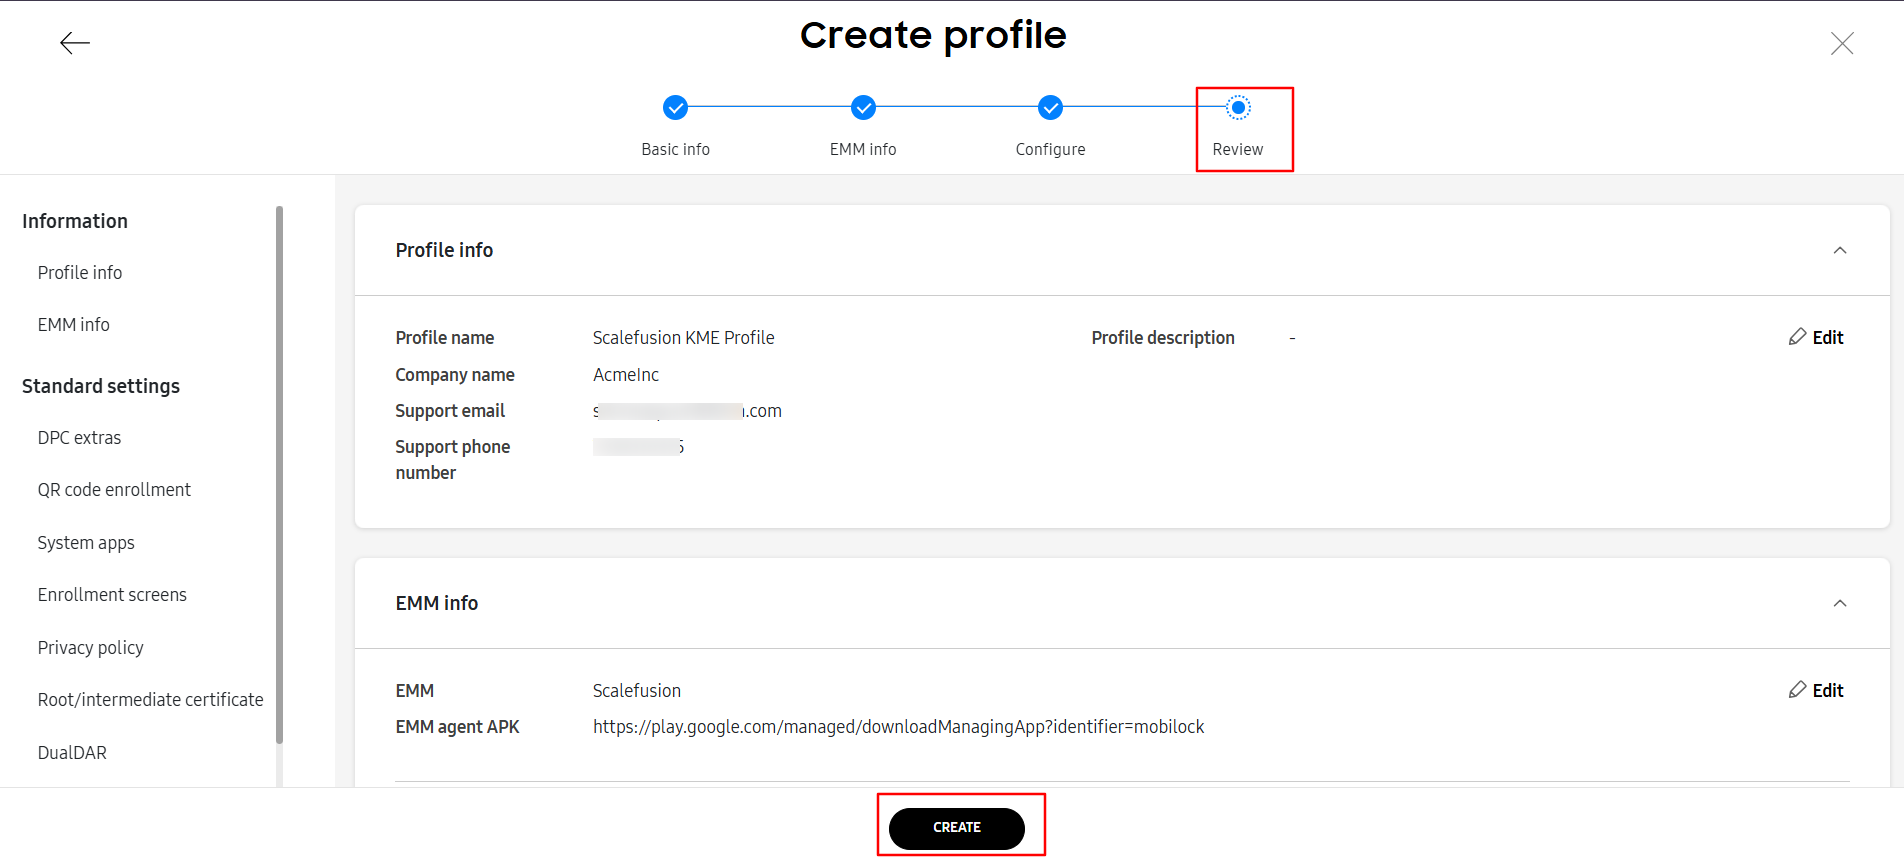
- Review the changes and click CREATE to create the profile.
- System Apps: Choose the default state of the system apps.
- MDM Configuration:This section lets you define the enrollment information that will be passed to the Scalefusion app once it is installed over the air. In order to provide this,
- Once the profile is created, it will be listed in the profiles as shown below.
(B) Device Admin Profile
- Clicking on Device Admin will launch the profile creation wizard. The first screen of the create profile wizard is divided into two sections,
- BASIC INFO: This section allows you to provide the following details,
- Profile Name: Give this profile a name to identify it.
- Description: Provide a description for this profile.
- MDM INFO: This section allows you to provide an MDM URI. Scalefusion does not require this option, so please select Server URI not required for my MDM & click CONTINUE
- BASIC INFO: This section allows you to provide the following details,
- The second section lets you provide the enrollment information & device settings. This section is further divided into the following sub-sections,
- MDM Configuration: This section lets you define the download location of the Scalefusion APK and the enrollment information that will be passed to the app once it is installed over the air. Please follow the steps below,
- Copy the APK URL (Scalefusion Dashboard): From the Scalefusion Dashboard, copy the APK URL.
- ADD MDM APP (KME Portal): Click on ADD MDM APP, paste the URL that you copied and click SAVE.
- Copy Configuration (Scalefusion Dashboard): At this point, navigate to Scalefusion Dashboard and copy the configuration data as shown below.
- Paste the data in KME Console: Click on the Custom JSON Data text field and paste the data that you just copied.DO NOT Modify the configuration data. Modifying/Editing the configuration will cause the Scalefusion app to NOT ENROLL properly.
- Device Settings: This section lets you control the enrollment experience. The options are,
- Enrollment Settings: Choose the Out of the Box experience,
- Skip Setup Wizard: Enabling this will skip the setup wizard during first-time device setup.
- Allow end users to cancel enrollment: Enabling this will allow the users to cancel the enrollment.
- Legal Agreement & Support Info: If you plan to provide an unboxed device to your employees directly, then we suggest providing a legal agreement so that they are aware that this device will be managed and know the legal agreement.
- Enrollment Settings: Choose the Out of the Box experience,
- Review the changes and click SAVE.
- MDM Configuration: This section lets you define the download location of the Scalefusion APK and the enrollment information that will be passed to the app once it is installed over the air. Please follow the steps below,
- Once the profile is created, it will be listed in the profiles as shown below.
Now that the profile has been created, we are ready to enroll the devices.
Out-of-box experience
To enroll devices through the OOBE flow, the device user must:
- Turn on the device and connect to the internet.
- If prompted, tap I agree if they agree with the Security statement and the Knox Privacy Policy, then tap Next.
- The Scalefusion app will be automatically downloaded and installed, follow the on-screen instructions.
- The device will be successfully enrolled in the Scalefusion MDM solution.
MDM Profile for Company Owned Personally Enabled devices (COPE/WPCO)
You can enroll your Samsung devices in COPE/WPCO solution as well. For additional information on the management of Company-Owned Personally Enabled (COPE) Devices, kindly refer to our help article available at this link.
Before you begin
- Complete the Android for Work step on the Scalefusion Dashboard.
- Create an Android COPE/WPCO Device Profile.
- Create a QR Code configuration with the Android COPE/WPCO device profile.
Steps
- Sign In to Scalefusion Dashboard. Assuming that you have performed the pre-requisites as mentioned above, navigate to Getting Started > Android Enterprise Setup
- Click on Android Zero Touch & Samsung KME Setup Tab.
- Click on Create Configuration or Newto launch the configuration creator wizard. In the configuration creator wizard:
- Provide a name for this configuration.
- From the dropdown, select the QR Code that you want to enroll your Samsung devices using KME.
- Click SAVE to save the configuration.
- Once a configuration is saved, it will appear in the list of configurations. Expand a saved configuration and select the Samsung KME tab to see the next steps.
- At this point, the flow shifts to the Samsung KME Portal. Sign Into the Samsung Knox portal and Launch the KME Console.
- Click on the Profiles option on the left-hand side and click on the CREATE PROFILE button on the top-right-hand side.
- Select Android Enterprise Profile and follow the steps as mentioned in Section (A) above.