ProSurf Browser for iOS gives you a wide range of options. Some of these options are available at a browser level, and some of them are available at a Website level. In this document, we will walk through all the options available. We will also see how to set up a Device Profile so that ProSurf can be used as a Kiosk Browser.
We suggest you Get a Cup of Coffee, as ProSurf offers quite a few configuration parameters!!
Before You Begin
Make sure you have a valid Scalefusion Dashboard account.
Make sure you have enabled ProSurf as described in our Enabling ProSurf guide.
Configuring ProSurf Browser settings
The first step is to configure the overall ProSurf browser settings. These settings work at the application level and allow you to control the overall application behavior. Please follow the steps below,
Sign In to Scalefusion Dashboard.
Navigate to Device Profiles & Policies > Allowed Websites section.
Click on the Browser Settings button.
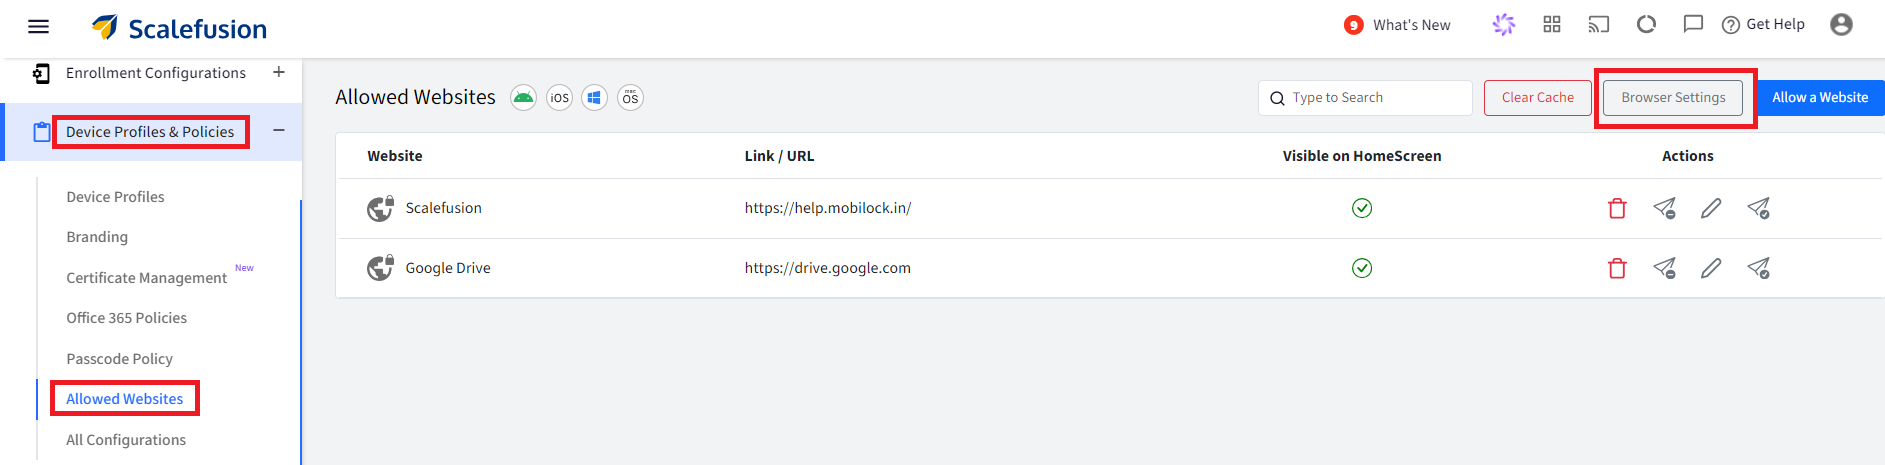
Click on the ProSurf tab as shown below, 

In this dialog, you will see various options. We have given the description of each option in the table below. Once you have configured the settings, click SAVE.
Setting | Description |
Display Browser Address Bar | If this option is enabled, then the address bar is shown in the ProSurf app. If you do not want your users to manually enter URL addresses, then disable this. |
Show Navigation Bar | If this option is enabled, then users see the navigation bar and the related options. Disabling this option hides the navigation bar and the related options. The related options are Print, Downloads, Request Desktop Site, and Forward/Back navigation. |
Allow Users to Print | If this option is enabled, then users can print the current webpage by using the Share option menu in the Navigation bar. |
Allow Users to View Downloaded Files | If this option is enabled, then users will be able to download and view the downloaded files. |
Allows Users to Switch to Desktop Site | If this option is enabled, then users will be able to switch between desktop and mobile sites using the Share option menu in the Navigation bar. |
Allow Back/Forward Navigation | Enable this option if you want the users to navigate back/forward on the website. |
Enable Allowed Websites to Open Tabs | Enable this option if you want the allowed websites to open new tab windows. |
Always Browse in Incognito Mode | Enable this option if you want to enforce In-Private or Incognito browsing by default. |
Allow Touch Interface | Disable this option if you do not want users to interact with your website. |
Always Run in Full-Screen Mode | Enable this option to hide the Notification bar by default. Note that user's can pull down the notification bar at any time. |
Settings Passcode | Set a passcode to access the Settings screen on the device. The default is 2323 |
Use Settings Passcode to exit ASAM mode | When your website or user requests to exit ASAM mode, then users will be asked to enter the settings passcode. |
Enter ASAM Mode on Launch | Automatically lock down the ProSurf app in single-app mode when the application is launched. |
Use Gesture to Exit ASAM Mode | By Enabling this, users can tap 5 times continuously on the screen to exit single app mode. Works only when ProSurf is running in Autonomous Single App Mode (ASAM) |
Hide Settings Option on Launcher Screen | Use this option to Show/Hide settings option on the ProSurf home screen. |
Block Screenshot / Screen-Recording | Use this setting to prevent users from taking screenshots or from the screen being recorded |
Block copy and paste | Enable this to prevent users from copying and pasting to and from the Prosurf browser |
Use Custom User-Agent (iOS Safari 16.0) | Enabling this replaces the default User-Agent with one that mimics Safari on iOS 16.0, ensuring better compatibility with mobile-optimized websites like Zoom and testing environments. |
Allowing a Website and related Settings
Allowing websites gives you the ability to control which websites are allowed to be opened using the ProSurf application. Additionally, you can configure various other properties to control the website's behavior. Please follow the steps below,
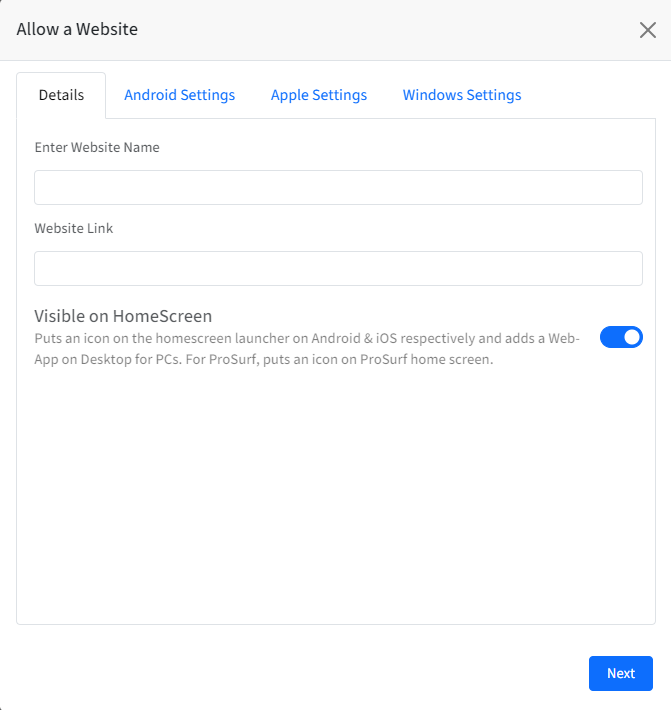
Navigate to Device Profiles & Policies > Allowed Websites section.
Click on the ALLOW A WEBSITE button.

In the DETAILS section, you get the following options,
Enter Website Name: The name of the website. This is used to refer to this website within the Dashboard, and on the client, this is the name used for the Bookmark/Shortcut.
Website Link: The URL of the website.
Visible on HomeScreen: Choose if a bookmark for this website should be placed on the ProSurf home screen.
Now click on Apple Settings tab. This screen is divided into the following 3 sections:
Upload an Icon: You can upload an icon for your website. This will be used by ProSurf when it shows the bookmark on the home screen. If no icon is given, then ProSurf tries to load the default icon for the webpage. This is also the icon that is used when this website is used as a web clip.
Safari Settings: These settings only apply when this shortcut is used with Safari. To learn more on how they work, please refer to this document.
ProSurf Settings: These are the settings that are used when the website is opened using ProSurf. The table below gives the details of these options,
Setting
Description
Allow Top Level Domain
Enable this setting if you want to allow the complete domain rather than just the URL. For example, if you want to allow all the pages and sub-domains in the domain mobilock instead of just mobilock.in, then enable this setting.
Allow Zoom Controls
Enable this setting if you want the end users to pinch and zoom in on your website.
Auto Play Videos
Enable this setting if you want the videos in the allowed website to be auto-played.
Allow Javascript Popups
Enable this setting if you want to allow Javascript popups on your website.
Auto-Refresh Website
If you want your website to automatically refresh after every X seconds, then set the value using this setting.
Clear Cache/Cookies on Auto-Refresh
Enable this option if you want the cache to be cleared every time the page auto-refreshes. This depends upon the Auto-Refresh value you have set.
Default to Desktop Mode
Enable this option to load the website in Desktop mode by default. Users can switch between modes if the setting is enabled in Browser Settings.
Always Load the Root URL at Launch
Enable this option if you want the page to start loading from the root URL every time the shortcut is clicked. This means the webpage will be closed when the user minimizes it.
Enable Javascript Interface for this URL
Enable this setting if you want to access the Javascript functions that ProSurf offers from your website. Refer to our Javascript API help document for more info.
Audio and Video Settings
Enabling this option automatically grants websites permission to access your device's camera and microphone. Exercise caution and only enable this setting for trusted websites. If this option is disabled, a dialog will appear prompting you to grant or deny permission each time a website requests access.
Note: This setting is available on iOS 15 and later.
Click SAVE once you are done, and the newly added allowed website should appear in the list of websites.
Enabling ProSurf & publishing websites in Device Profile
Once you have configured the ProSurf browser settings and allowed the websites, the next step is to create/edit an iOS Device Profile and enable ProSurf and publish websites. The steps to do these are quite straightforward and are explained below,
Navigate to Device Profiles & Policies > Device Profiles section.
Create a new iOS Device Profile or edit an existing one.
In the Select Apps section, enable the ProSurf application.
In the Allowed Websites section, enable all the websites that you want in this device profile.
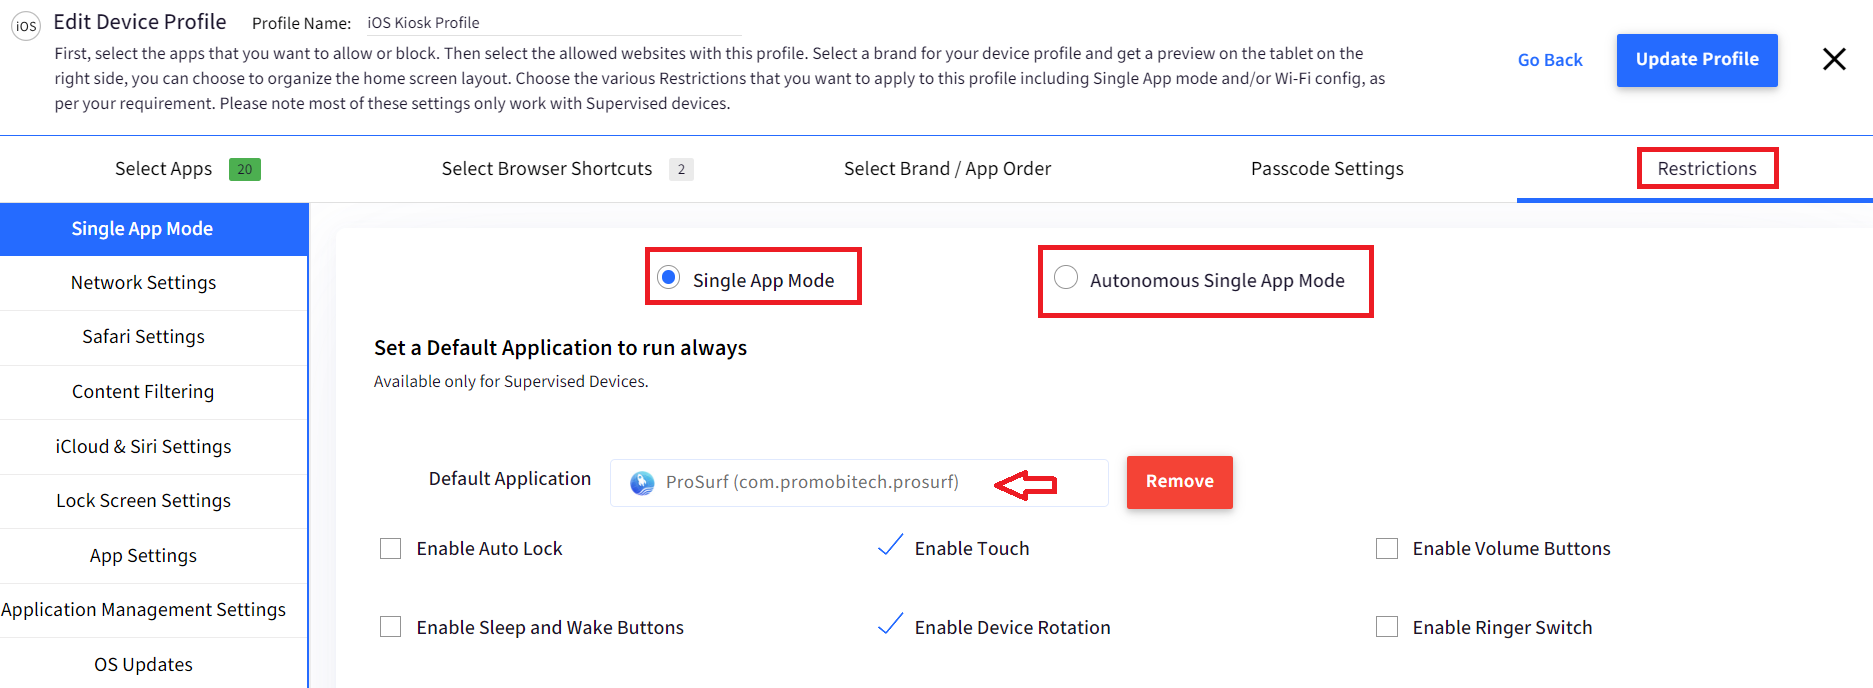
In the Restrictions section, choose the settings depending upon how you want to use ProSurf,
Use ProSurf as Kiosk Browser: In the Single App Mode section, select ProSurf app, choose a Default URL to run always, and select a poll time so that the ProSurf application can get the latest settings, as shown below.
Use ProSurf in Autonomous Single App Mode: In the Single App Mode section, choose Autonomous Single App Mode and enable privileges for ProSurf App as shown below.
Use ProSurf as a normal Browser: No special steps are required. Please proceed to the next step.
Now click on SAFARI SETTINGS and choose to disable Safari as shown below.
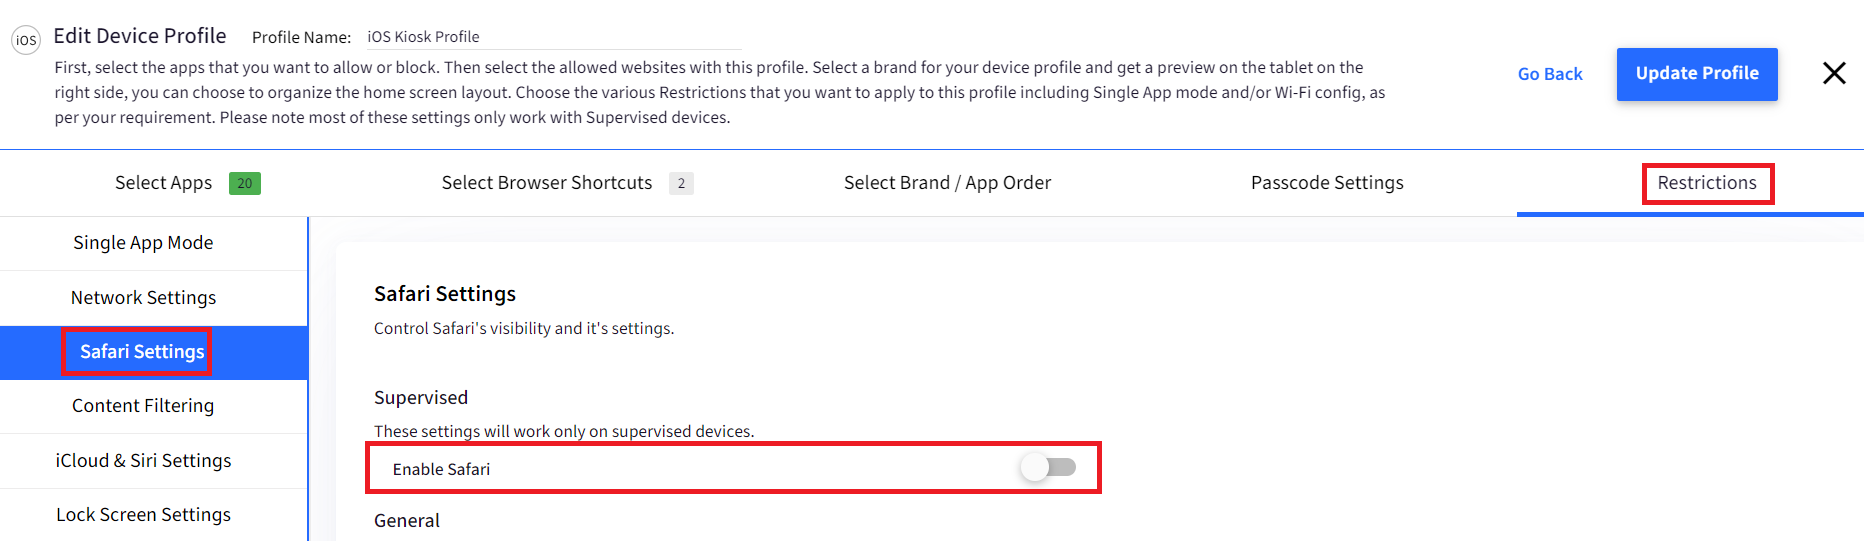
NOTE: Disabling Safari is an optional step. If Safari is also enabled, then users might end up seeing two browsers which may cause confusion. Also, the web-filtering logic might conflict between the two browser applications.
Click on UPDATE PROFILE to save the profile. Once the Profile is saved, a push will be sent to the devices to install the ProSurf application if not already installed. Once the ProSurf application is installed and launched on the device, it will sync the settings from the Dashboard.
NOTE: ProSurf application can also be installed from the Application Management > Scalefusion Apps section. If you are using a VPP subscription, then you can purchase licenses for the ProSurf application so that it is installed silently.
Using ProSurf Browser on iOS Device
Once you have set up the Dashboard and pushed the ProSurf application from the Dashboard, it will be installed on the devices. The following steps guide you through the flow of devices.
Wait for the application to be installed on the device. Once installed, you will see the ProSurf app icon on the home screen.
Click on the ProSurf app icon. You will be asked for the Notification permission. Please click on Allow.
On Supervised Devices, Notification Permission will be automatically granted.
Now the application will register itself to the Scalefusion dashboard automatically.
Once the registration is done, the ProSurf home screen will be shown with the allowed websites and other settings.
The following short video visually walks you through the process.
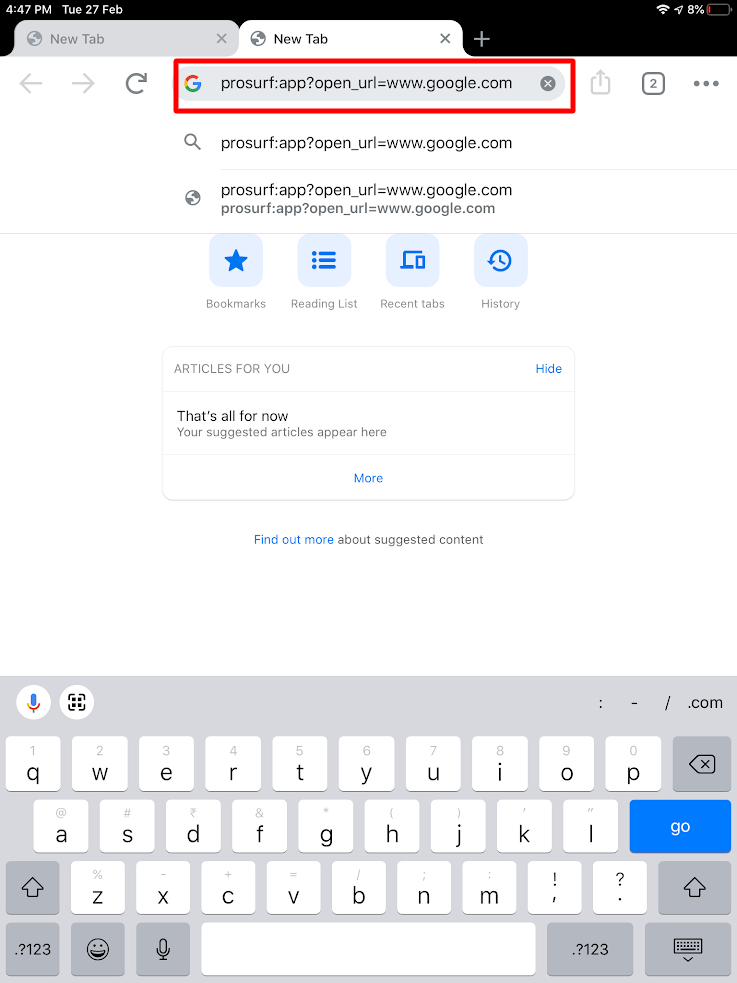
Launch ProSurf browser from other Apps
You can choose to launch URLs of other Apps and apply the browser restrictions that ProSurf offers. This can be done by using the following scheme:
prosurf://app?open_url=URLEncodedString
Here, URLEncodedString should be replaced with the URL you want to open. For example, if you want to open google.com in ProSurf, enter the following and it will be redirected to chrome browser:
prosurf://app?open_url=www.google.com
Note: The example screenshot is from Chrome browser