Keycard plugin provides capability to configure settings with which you can control users' access to devices where users can be Identity Providers or otherwise. This article explains the settings.
- In Keycard configuration window, navigate to Keycard Settings on the left panel.
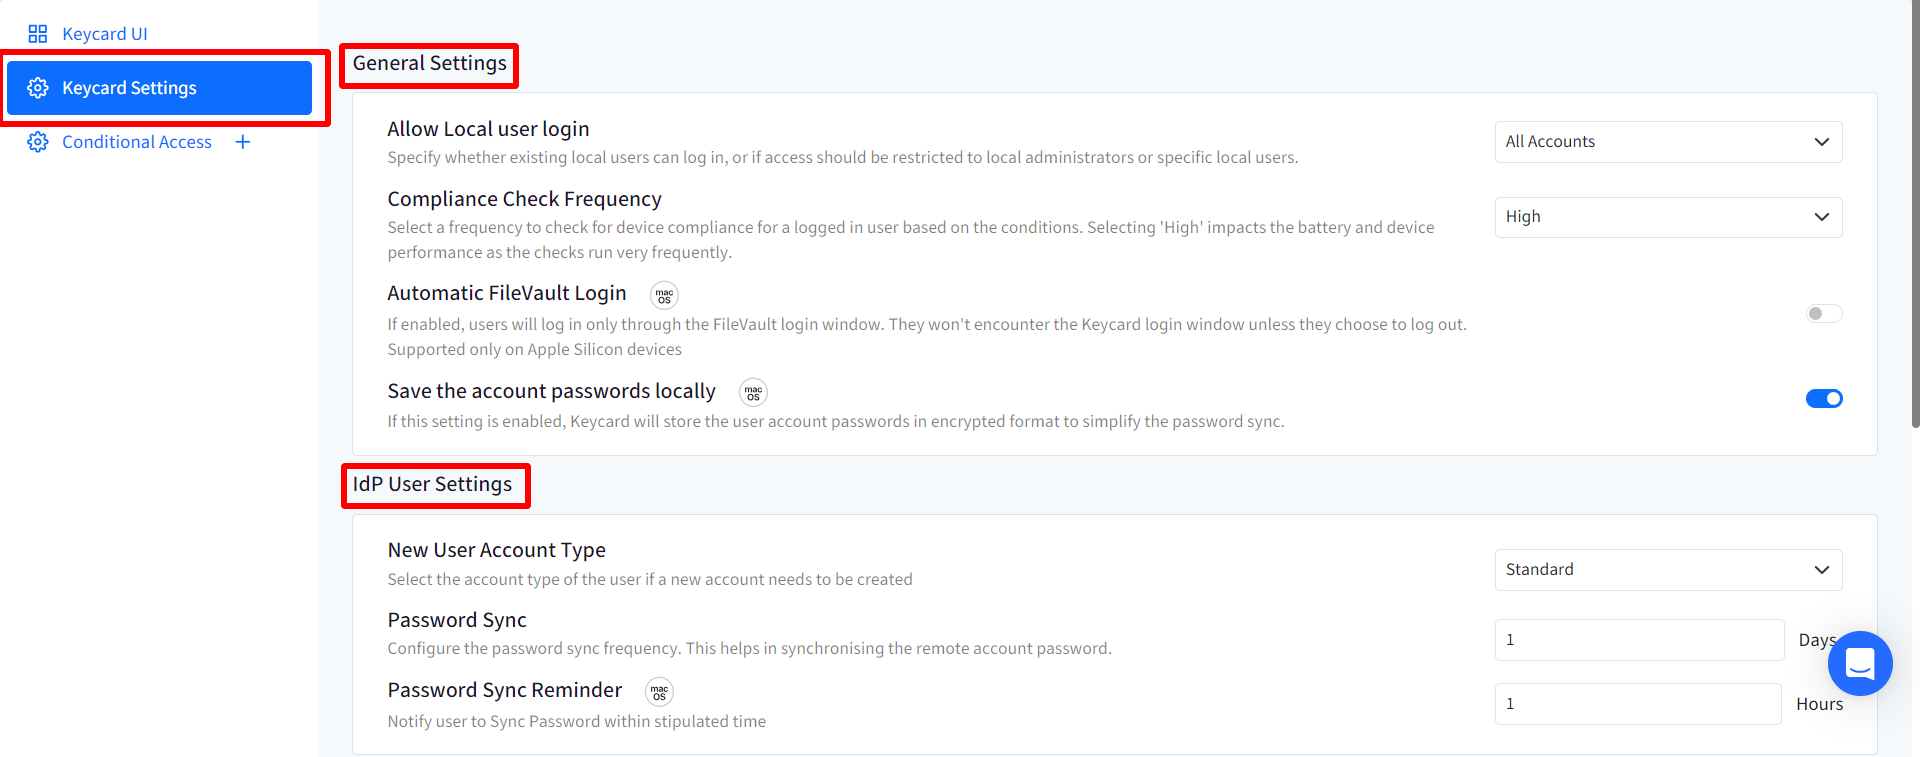
General Settings
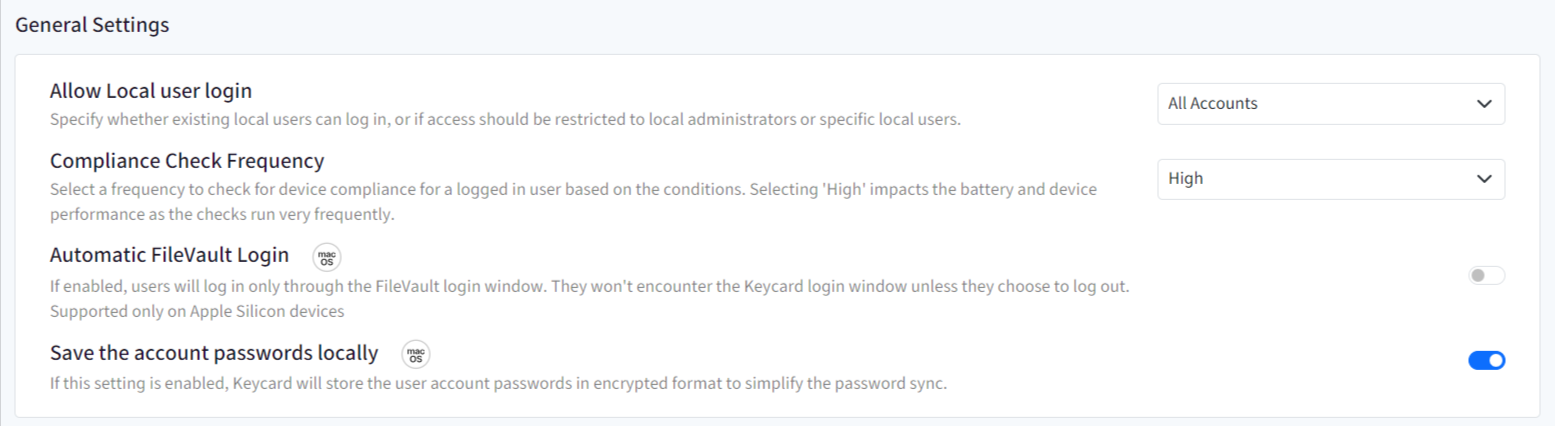
- Allow Local User Login: Select an option to specify whether existing local users can log in, or if access should be restricted to local administrators or specific local users. Choose one from the following options in drop-down:

- Do not allow: Does not allow local user to login. This option will be visible if you are an IdP user.
- Enrolled User: Only the enrolled user can login to the device
- All Accounts (default): All the user accounts can login
- Administrator Accounts: The users belonging to Administrator are allowed to login.
- Specify User Accounts: Specify the user accounts with which users can login. On selecting this option, a grid will be displayed where you need to enter Local user short names which have been previously configured, from the Device details > User Accounts section on Scalefusion Dashboard. You can search for a particular user which will populate list of users created. To add more than one user, click on New User link. If users are not configured (do not exist in UAM section), they can be configured from this section. Custom properties are also supported for configuring local users.

- Compliance Check Frequency: Select a frequency to check whether the device is compliant with the conditions specified under Conditional Accessfor logged in user accounts. The frequency can be selected from one of the following:
- High: The compliance check is performed every 5 minutes. Selecting 'High' impacts the battery and device performance as the checks run very frequently.
- Medium: The compliance check is performed every 30 minutes.
- Low: The compliance check is performed every 60 minutes.

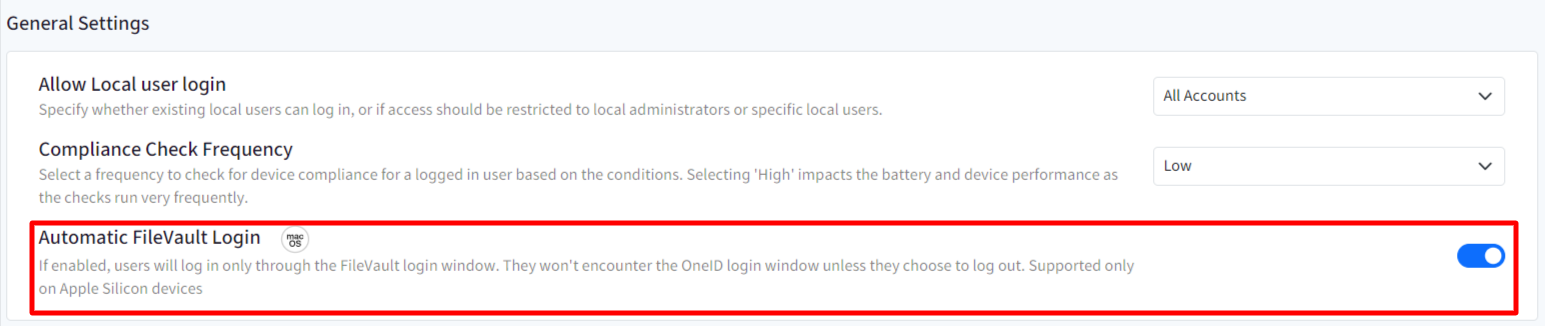
- Automatic FileVault Login: If this setting is toggled on, it will bypass the Keycard login window. The users will get the FileVault login screen to login to the device. Important Points to note for this setting:
- FileVault should be enabled
- It is supported only on Apple Silicon devices
- If you have provided any conditional checks, those will be performed post login only
- Automatic FileVault login will automatically login a user only if the user is allowed to login based on local account settings of Keycard.
- Save the account passwords locally: If this is enabled, the keycard will securely store the user's account password. As a result, during subsequent password sync operations, the system will validate whether the stored password matches the remote account password. If a password mismatch is detected, it will automatically get updated.On enabling this setting, for the first time, user will have to manually sync the password on the device by clicking on Sync Now inside Scalefusion MDM Client window > Settings or at the time logging in on the device.
How User settings work on device
Taking an example, if you have allowed local user login for All accounts, and pushed the configuration, then on the device you will get a list of all the local users. Select a user and enter password to login to the machine. This is also referred as offline login because you don't need internet access to login.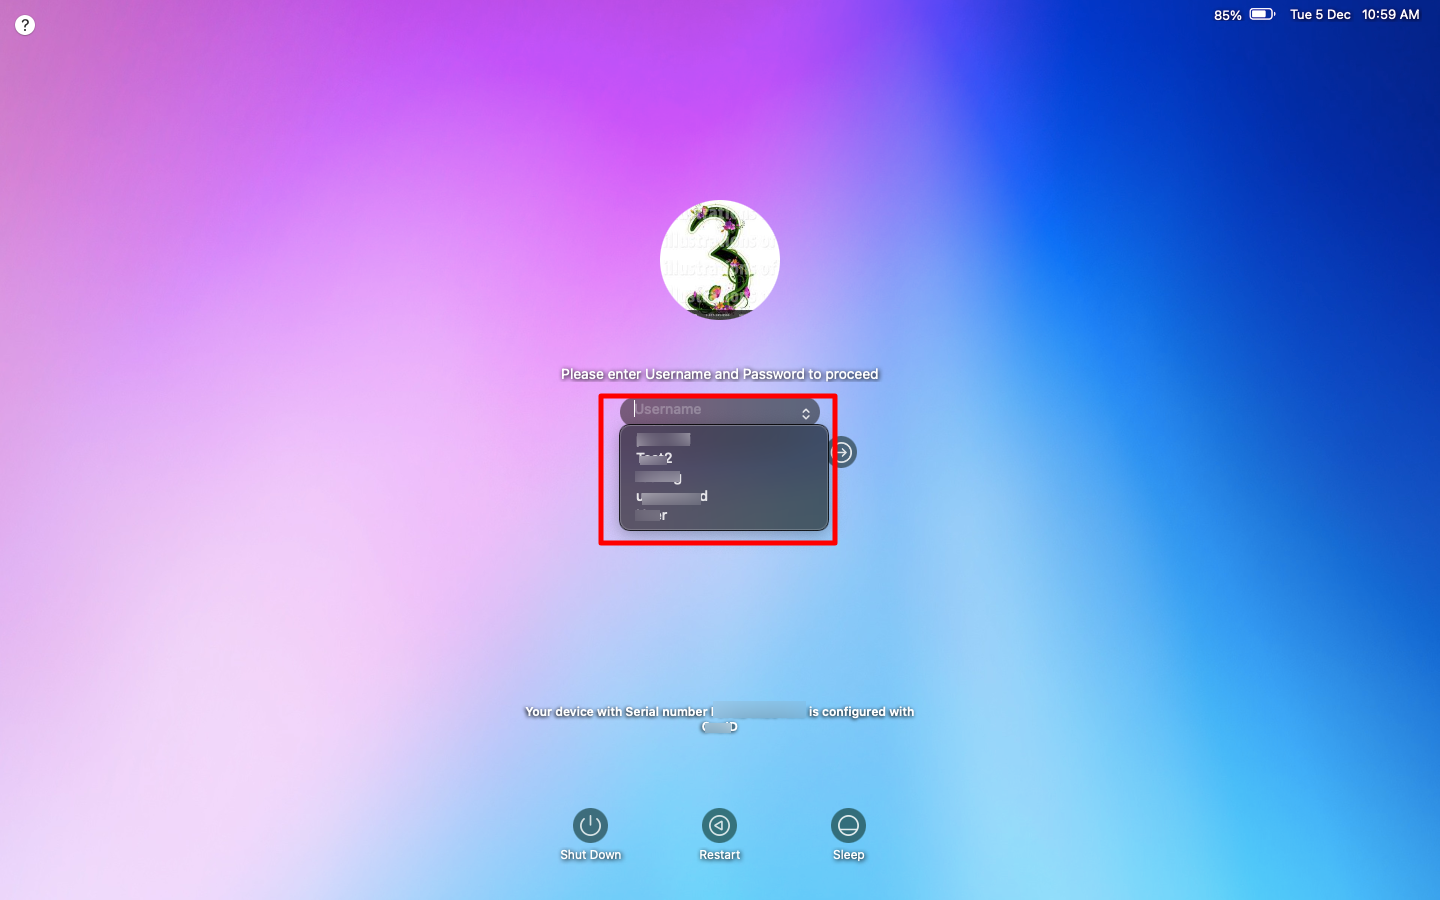
IdP User Settings
These settings are configurable if one of the following conditions are met:
- The account with which you have logged in on Scalefusion Dashboard, is an IdP account (Google Workspace / Microsoft Entra/ OneIdP / Okta / PingOne / OnPrem AD) For OnPrem AD, the OPC setup should be done on Scalefusion Dashboard
- You have created a Directory in OneIdP (with custom and/or default domain)
Also, the users should be existing under User Enrollment section on Scalefusion Dashboard.
Here are the settings:
- New User Account Type: For a new user account created on the device, you can select the new user's account type whether it will be Standard or Administrator. The user should be existing in the User Enrollment section on Scalefusion Dashboard.
- Password Sync: Synchronizes the remote account password with local account password after specified number of days to make sure that local account password and remote account password are the same. By default it is set to 3 days and can be selected anywhere between 1 to 30 days.
- Password Sync Reminder: This will notify user to complete sync password activity. Specify a time limit (in hours) and user will be notified to sync password within that timeframe. Reminder time can be set anywhere from 0 to 72 hours. Also, the users will not get logged off to perform the online login, the reminder window is shown to them to complete login.

For example, if you have selected password sync frequency as 1 day, the following prompt will display on device when user tries to login with local user credentials.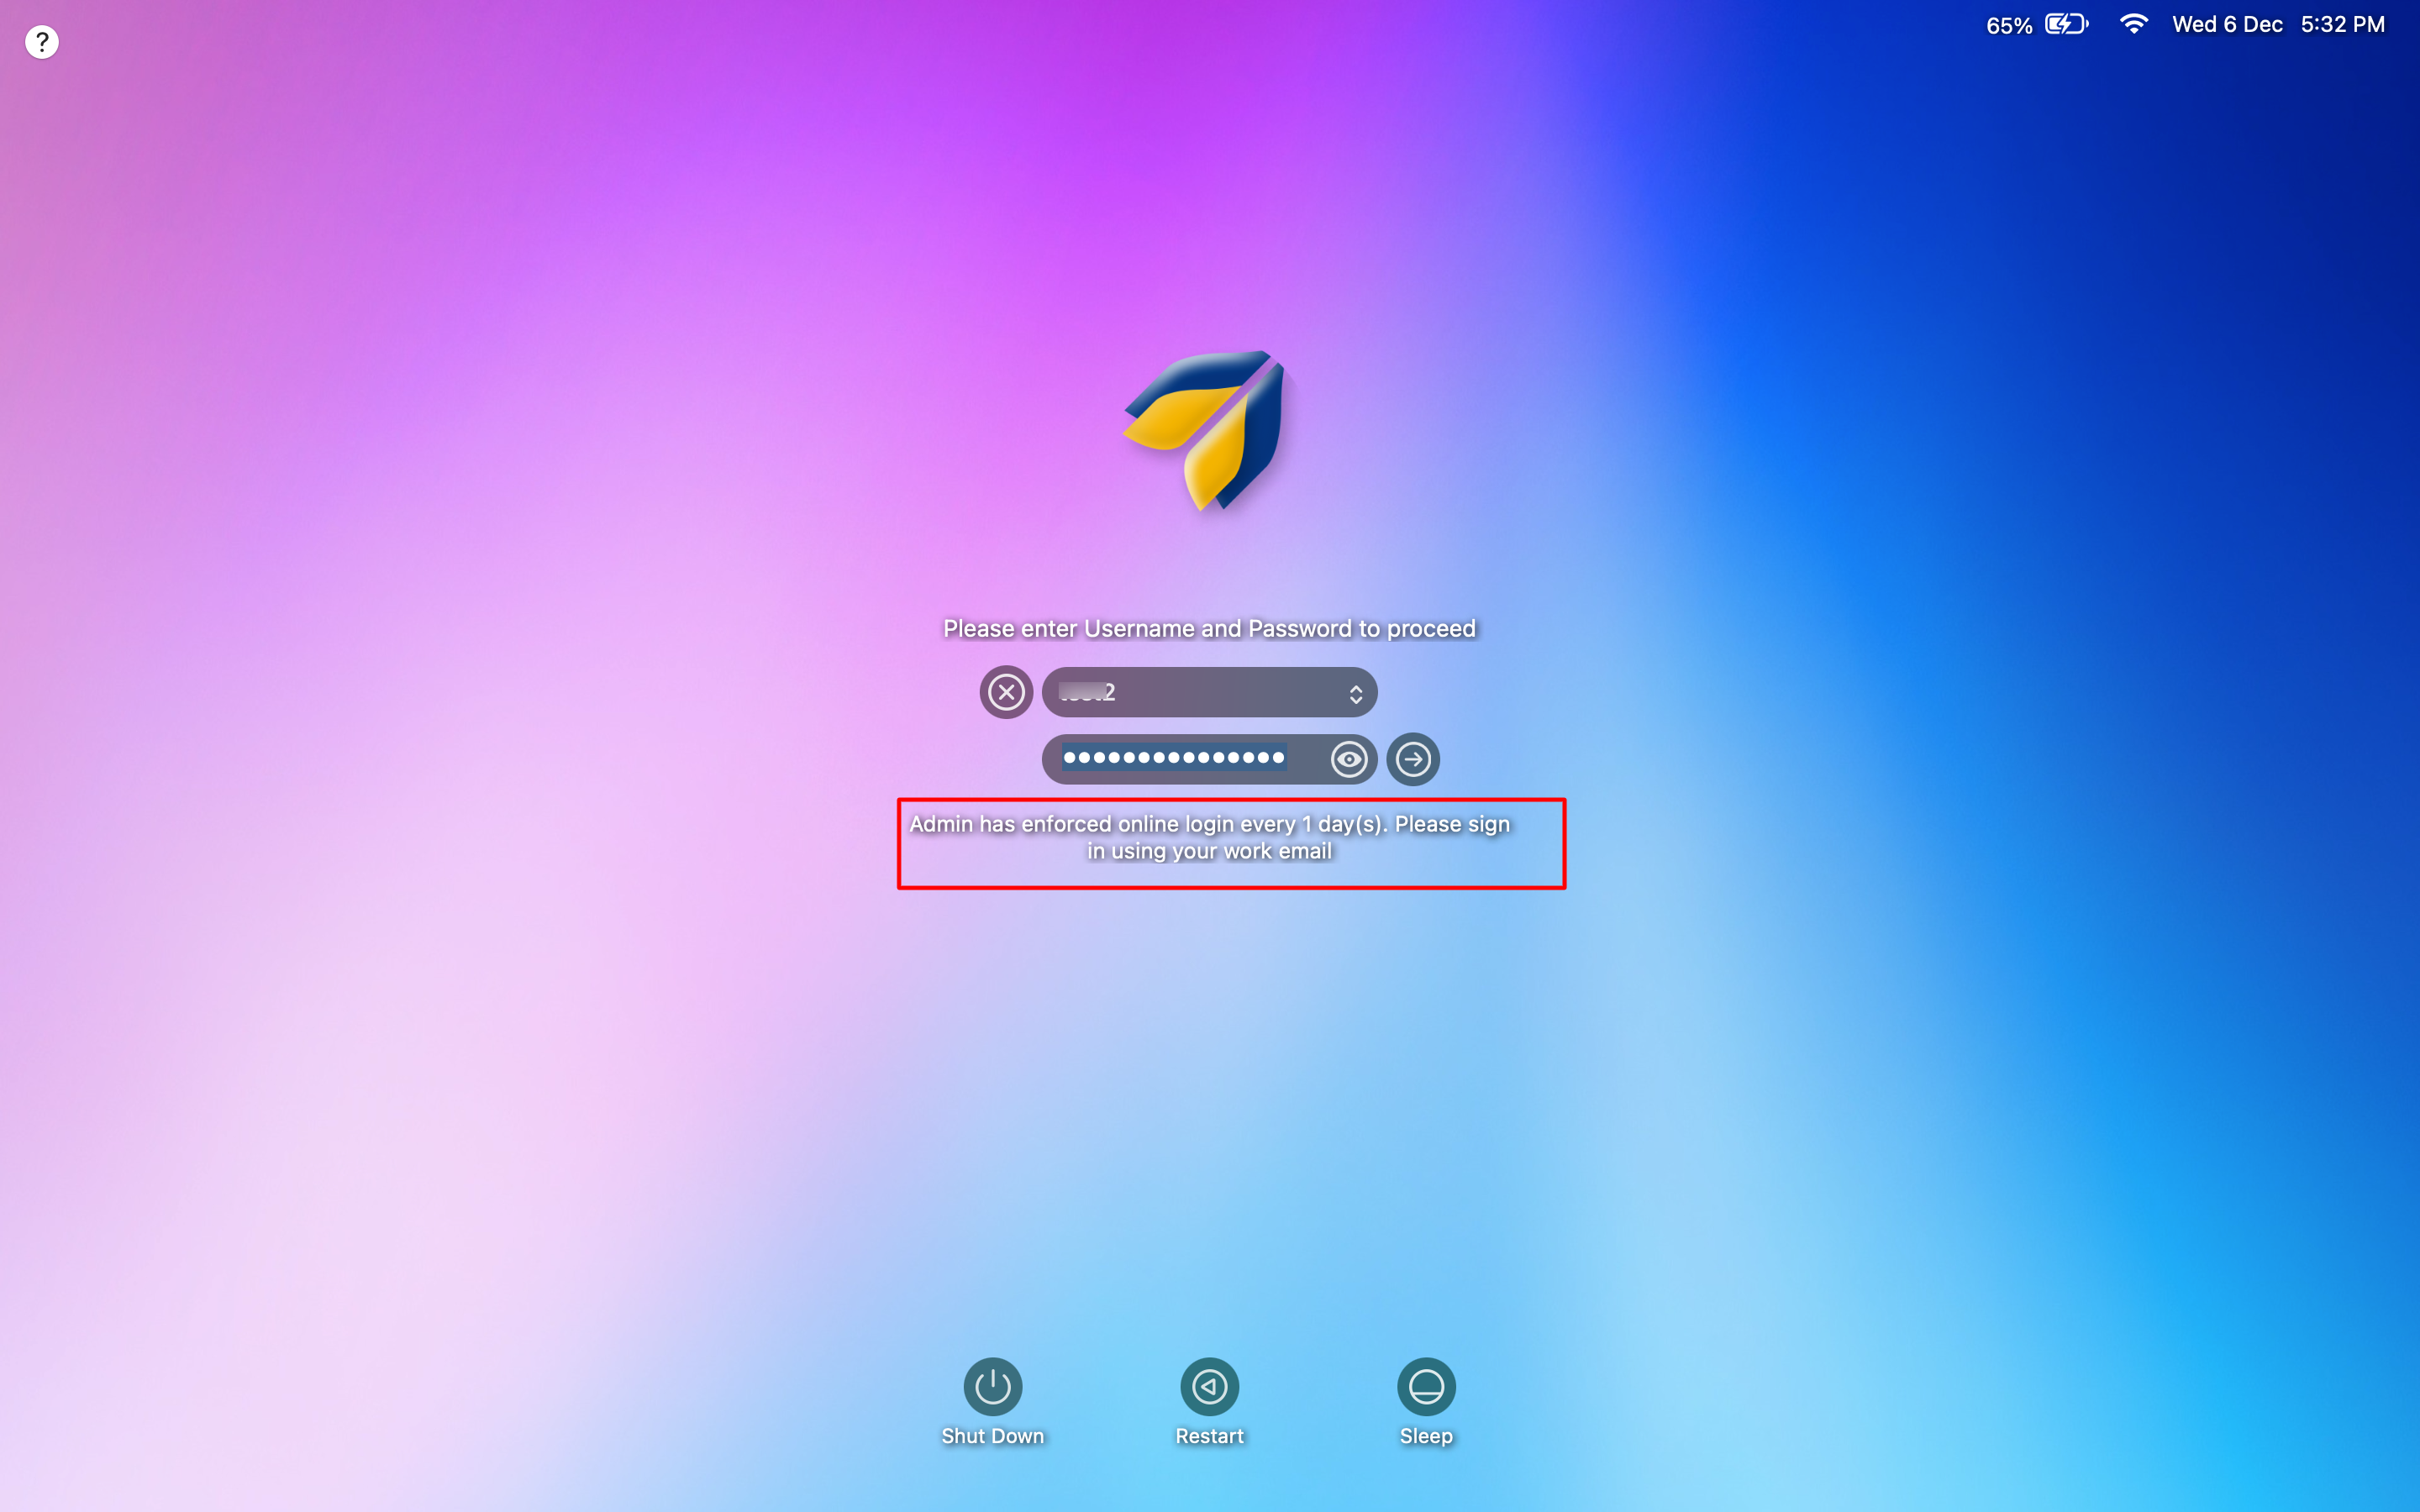
How IdP user settings work on the device
When you push Keycard configuration on the device with IdP user settings configured, you need to enter IdP credentials to login. This is also referred as online login.
- Taking an example of an account configured in google workspace, following will be the default screen in case of online login. Enter your email address on the login screen and click on the right arrow.

- The next screen will be from google for authentication. Enter your credentials (email address and password) and click on Allow on the next screen

- Once authenticated, a new user account will be created on the device with the user type (Standard or Administrator), as selected in the New User Account type in IdP User Settings, with which you can login on the device next time. The user will also be added in Device details > User accounts section.
- If a local user with the same username already exists on the device, then it will get linked to the existing user present on the device. Hence, it is up to the discretion of IT admins whether to have a new user created on the device or not. If they want a new user to be created then the username in User Enrollment section should be different from the users already existing on the device.
- If a local user with the same username already exists on the device, then it will get linked to the existing user present on the device. Hence, it is up to the discretion of IT admins whether to have a new user created on the device or not. If they want a new user to be created then the username in User Enrollment section should be different from the users already existing on the device.
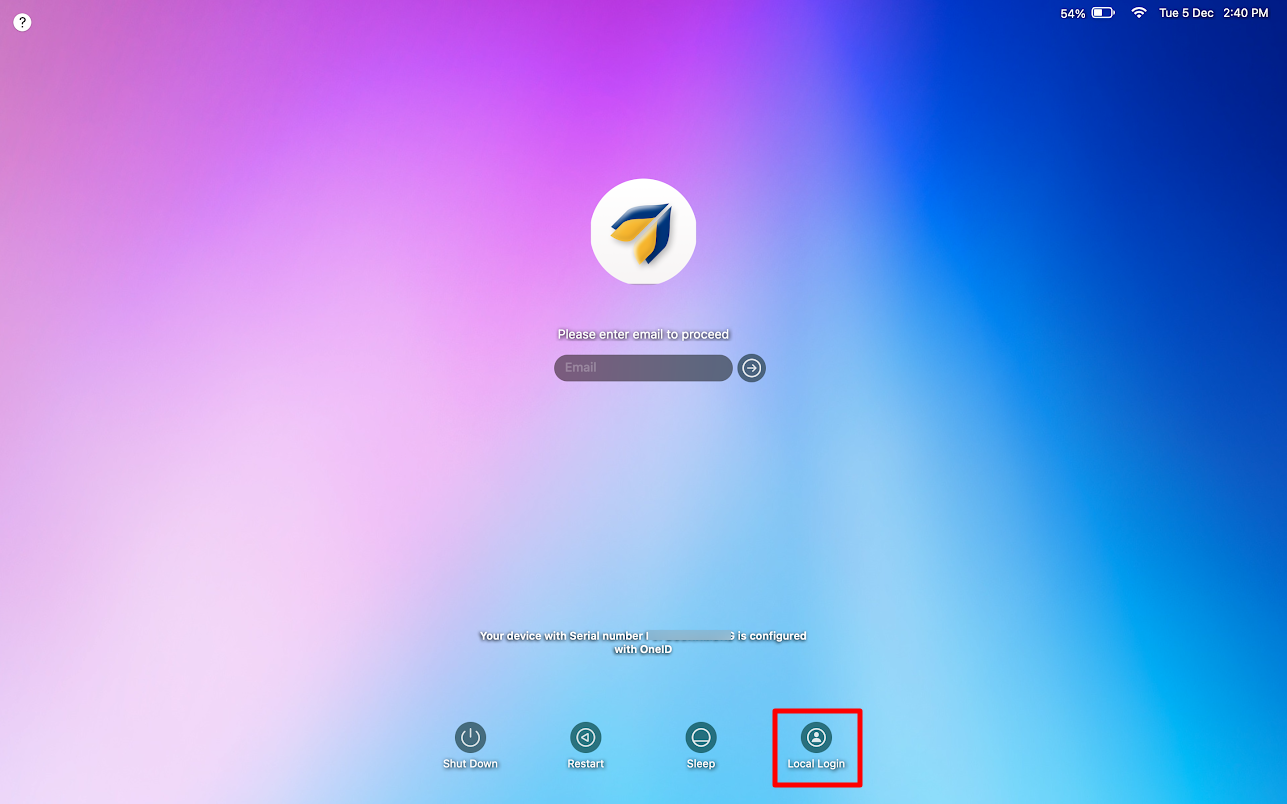
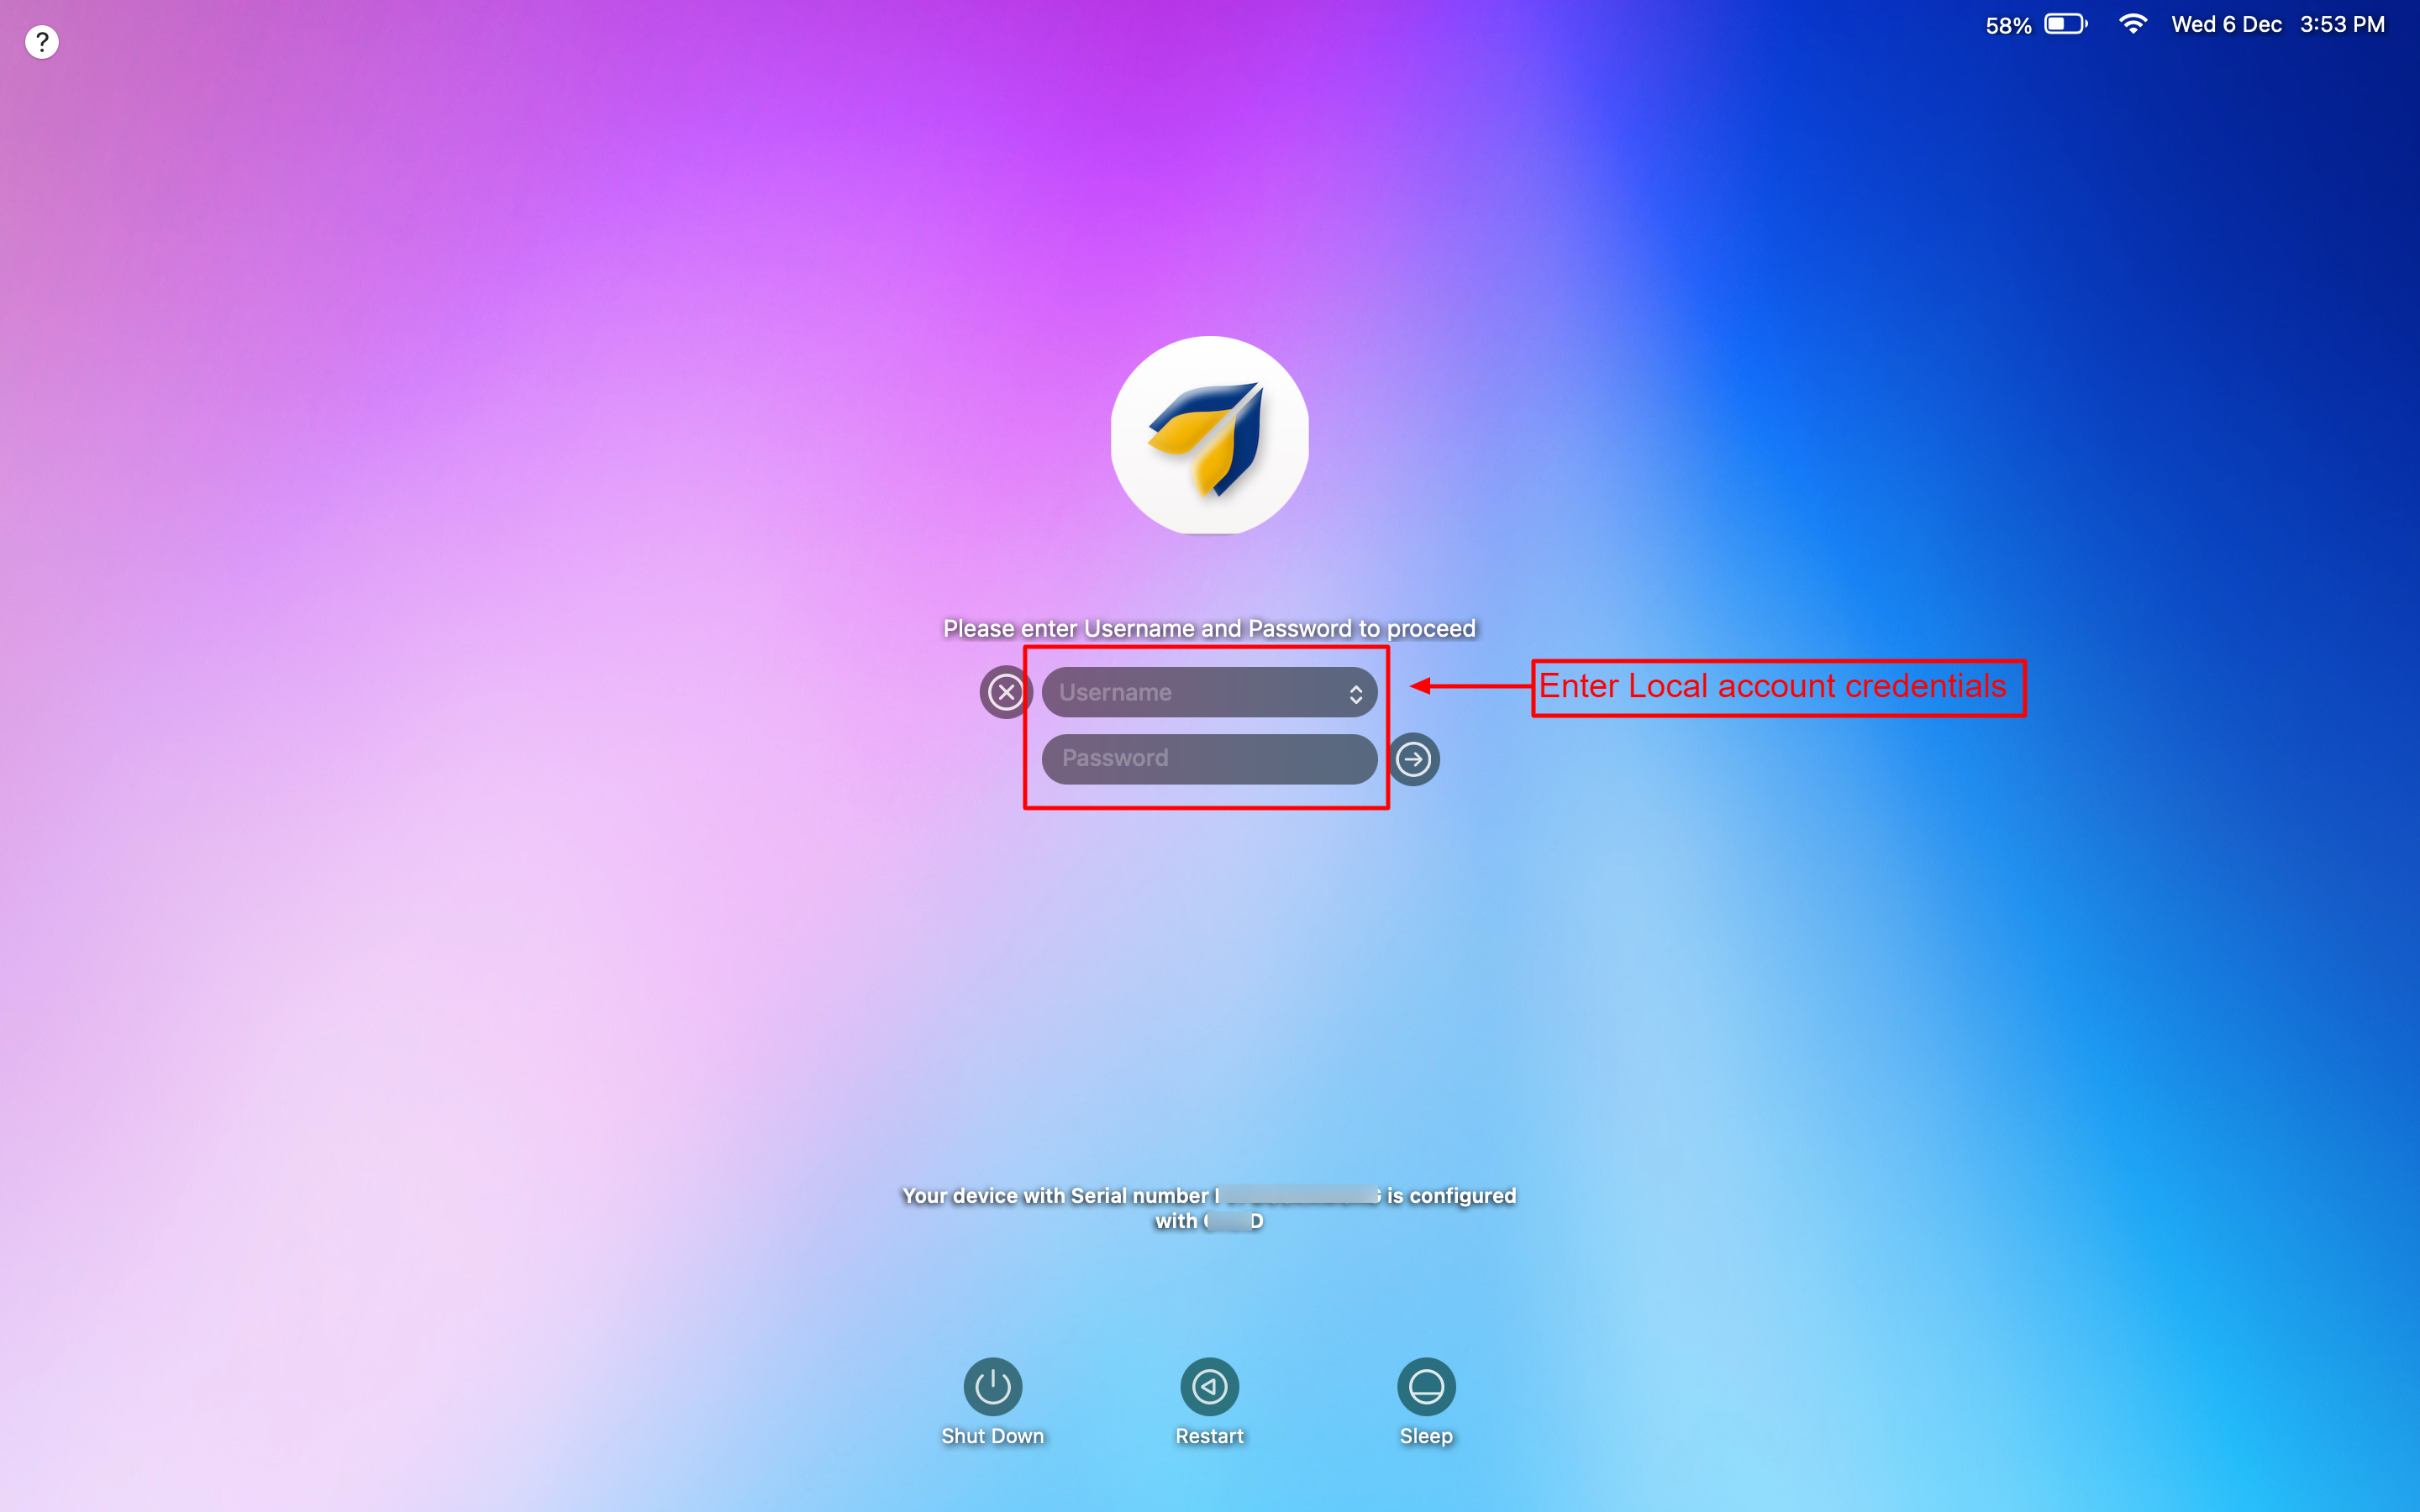
- Local login: Local users can login to the device (offline) by entering their Username and password. On the default login screen, an additional link Local Login is there. Click on it and enter credentials.
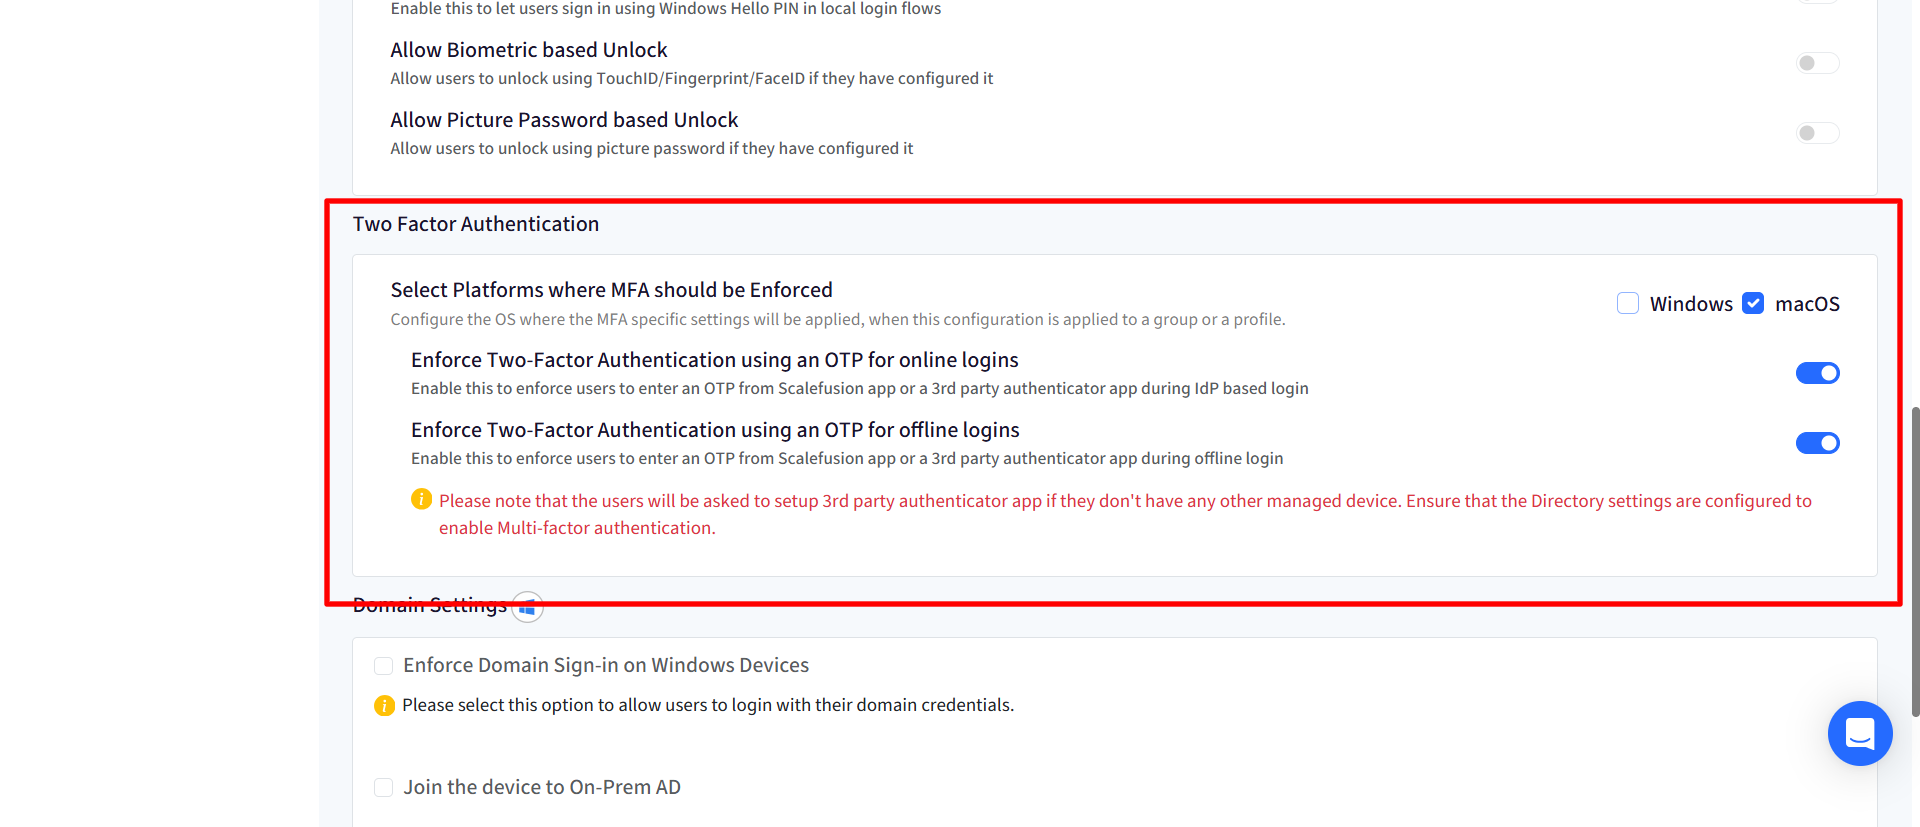
Two Factor Authentication
Traditional login methods often rely solely on stored credentials, such as passwords or cached tokens, which can be vulnerable to misuse if a device is lost or compromised. To enhance user authentication and reduce the risk of unauthorized access, implementing a one-time password (OTP) requirement for offline login provides an added layer of verification. This approach not only strengthens security by requiring users to verify their identity through an additional factor but also ensures that only the legitimate user can access the system, even without an active internet connection.
With these options, you can now enforce users to enter an OTP from the Scalefusion Authenticator app from a managed mobile device (Android or iOS) or a 3rd party authenticator app during offline and online login in the Keycard login screen.
Pre-requisites
- The user must have at least one managed device with the Scalefusion Authenticator app installed or access to a third-party authenticator app that can generate the required OTP.
- The user(s) must be migrated to OneIdP.
Enabling Two-Factor Authentication
- Navigate to OneIdP > Keycard > click on Edit.
- Go to Keycard settings > scroll down to the Two-Factor Authentication section.
- Following are the settings:
- Select Platforms where MFA should be Enforced: Select the operating systems (Windows and/or macOS) where the MFA-specific settings will be applied when this configuration is assigned to a group or profile. The settings below become configurable only after at least one platform is selected.
- Enforce Two-Factor Authentication using an OTP for online logins: Enable this setting to require users to complete two-factor authentication (2FA) by entering a One-Time Password (OTP) when signing in through your configured Identity Provider (IdP). Users can generate the OTP using any of the following:
- Scalefusion Authenticator app
- Any supported third-party authenticator application (such as Google Authenticator or Microsoft Authenticator).
- OTP on phone
- OTP from another managed device
- Enforce Two-Factor Authentication using an OTP for offline logins: Enable this setting to require users to enter a One-Time Password (OTP) when performing an offline login, ensuring an additional layer of authentication even when the device is not connected to the internet. Users can generate the OTP using either the Scalefusion Authenticator app or any supported third-party authenticator application. Access is granted only after the OTP is successfully verified.
- Enforce Two-Factor Authentication using an OTP for online logins: Enable this setting to require users to complete two-factor authentication (2FA) by entering a One-Time Password (OTP) when signing in through your configured Identity Provider (IdP). Users can generate the OTP using any of the following:
- Select Platforms where MFA should be Enforced: Select the operating systems (Windows and/or macOS) where the MFA-specific settings will be applied when this configuration is assigned to a group or profile. The settings below become configurable only after at least one platform is selected.
- Click on Update.
User experience for Offline Logins
A. User(s) have a managed mobile device with the Scalefusion Authenticator app installed
- Once the setting is successfully applied to the device, the user(s) may see the following message when they try to log in locally on the device.
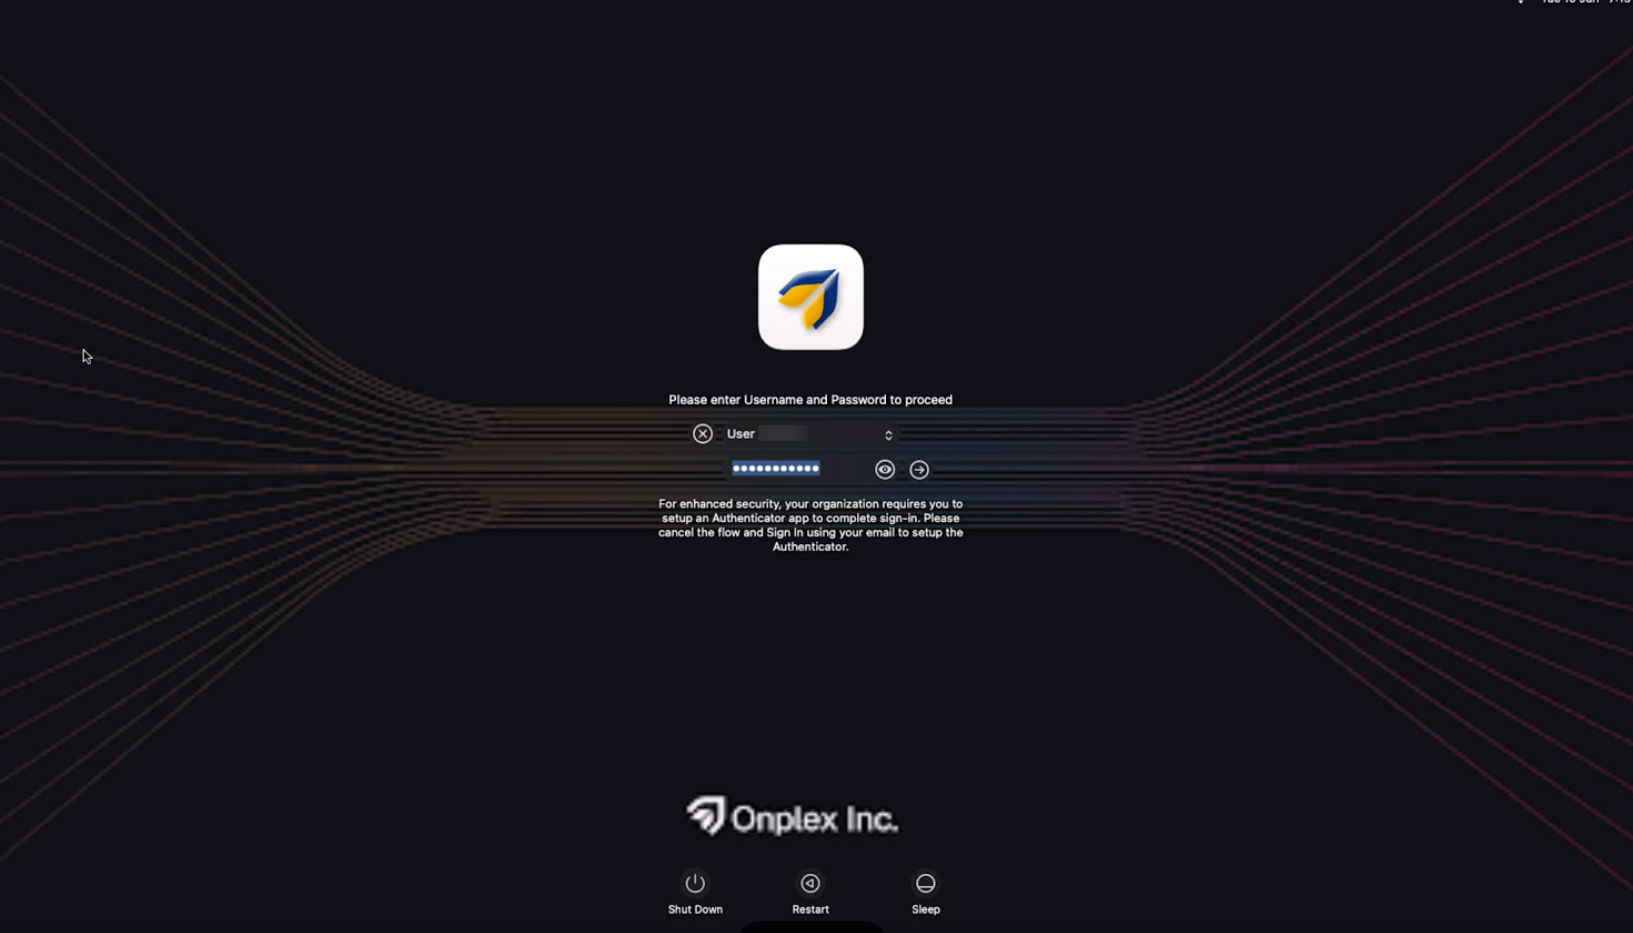
- They will be asked to complete an online login to synchronize the settings with the device.
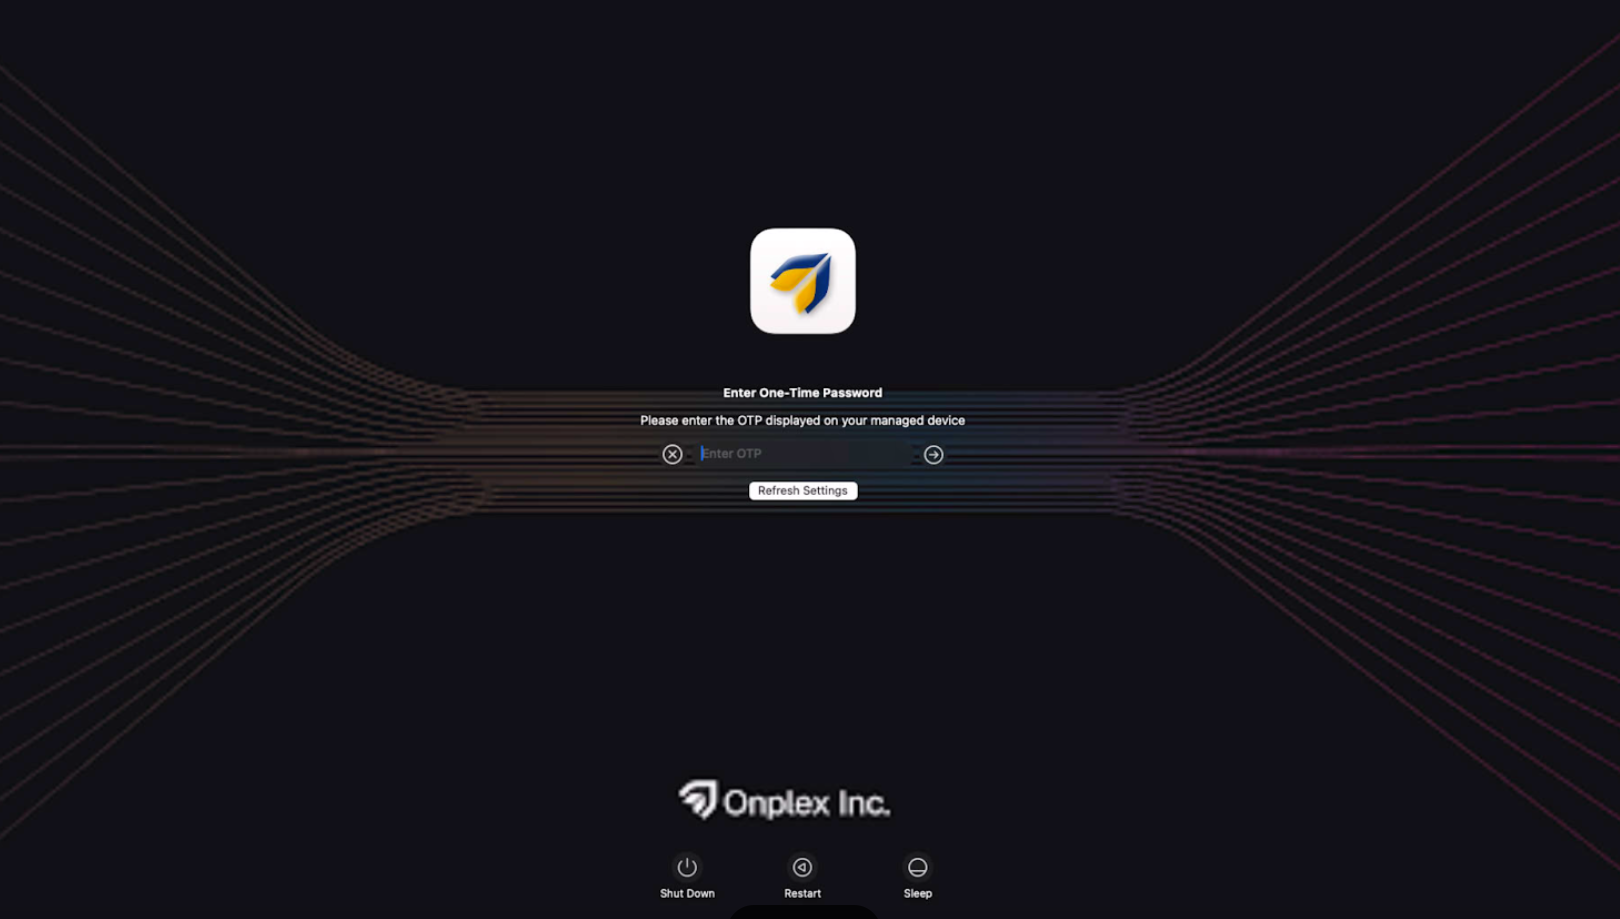
- If the user(s) already have a managed mobile device (Android or iOS) with the Scalefusion Authenticator app installed, they can use the OTP from that device for their next local login.
B. User(s) do not have a managed mobile device with the Scalefusion Authenticator app installed
- Once the setting is successfully applied to the device, the user(s) may see the message (as shown above in point 1)when they try to log in locally on the device.
- They will be asked to complete an online login to synchronize the settings with the device.
- In this case, where the user(s) don't have a managed device, they can set up a 3rd party authenticator app on their device.
- However, for this to work, you will have to enable the option "Enable MFA using third-party authenticator app" in Directory Settings.
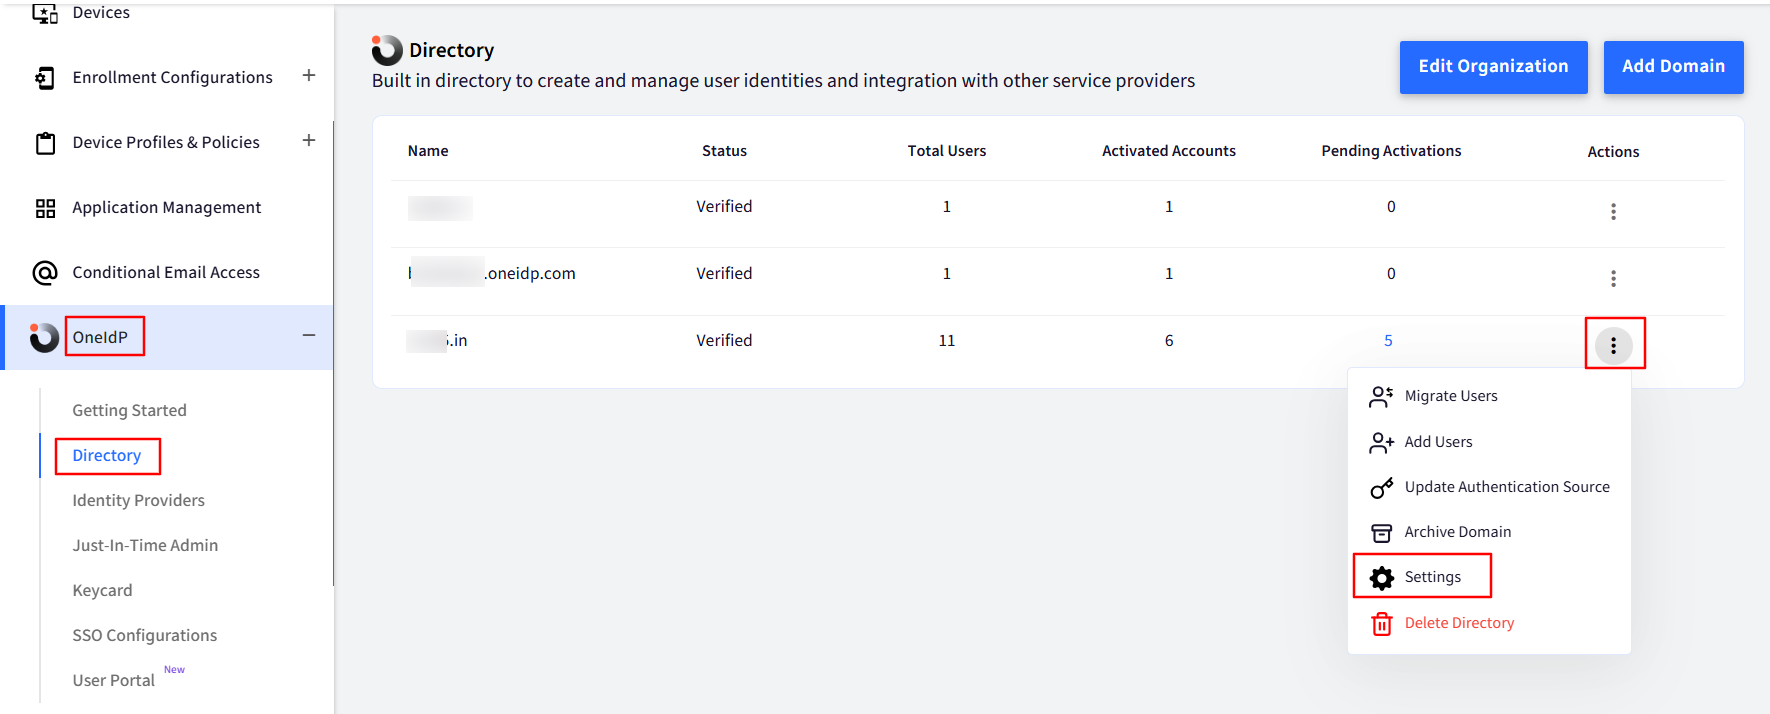
- Navigate to OneIdP > Directory.
- Click on the 3-dots for the concerned domain > Settings.
- Go to the Multi-factor Authentication tab and select the Enable MFA using third-party authenticator app option.
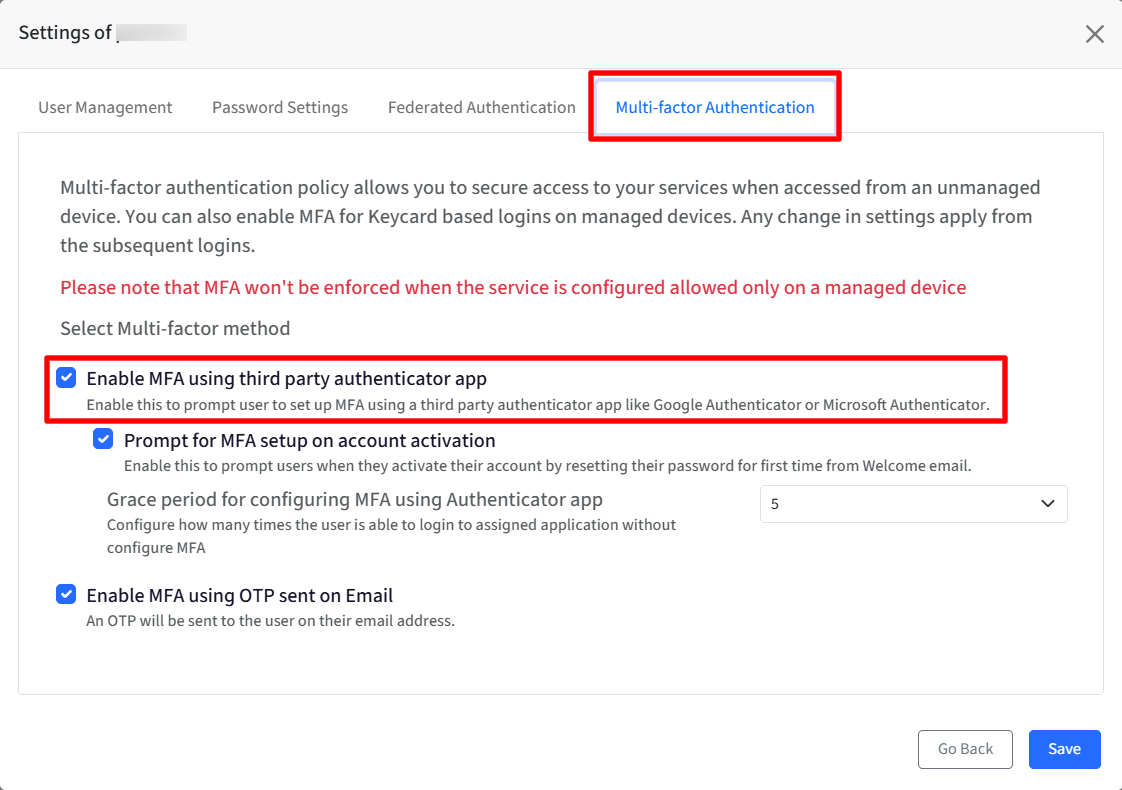
- Click on Save.
- Please note that the user must complete the online login using an OTP generated by a third-party authenticator app.
- Once this is done, on the next local login, they can use the OTP from a 3rd-party authenticator app.
- The Two-Factor Authentication will not be applied to the native lock screen.
- If the user(s) have both- a managed device and a 3rd-party authenticator app, they can use OTP from either source.
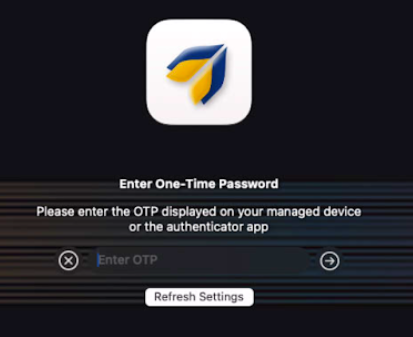
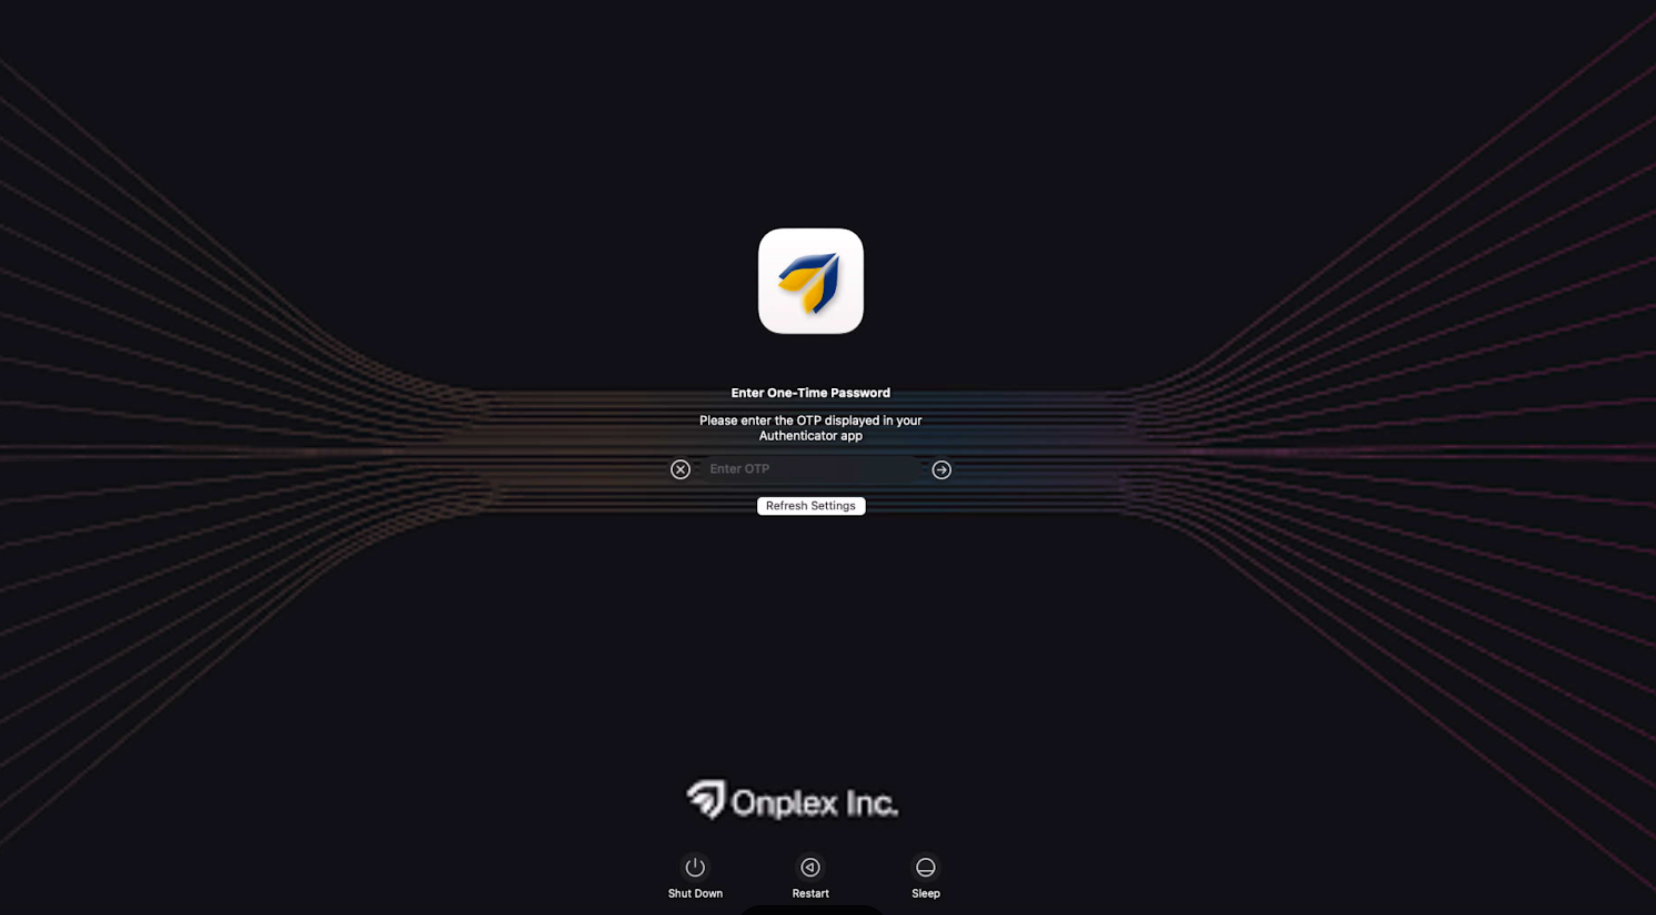
- If there are any updates about the concerned user that haven't synced with the device, the user can tap the Refresh Settings button, which will appear on the OTP screen, to retrieve the latest changes.
- If the 'Enforce 2FA' option is enabled, the user might be required to log in to their account at least once, either online or offline.
- If the device is a managed mobile device, the user must be assigned to the SSO configuration in order to receive the OTP from the Scalefusion Authenticator app.
Password Management and Synchronization Behavior
Managed User Scenarios
Q1: What happens when a managed user changes their password locally?
A password sync reminder prompt will appear.
Q2: What must the user do after changing the password locally?
The user must enter their IdP credentials and the new local password.
Q3: What happens after completing the password sync process?
The password will sync with the IdP, and the effective password will revert to the IdP password.
Administrator-Initiated Actions
Q1: What happens if a managed admin or local admin changes a user’s password locally?
The user will encounter an error during the next offline login attempt.
Q2: How can the user regain access after this issue?
The user must perform an online login via Keycard to regain access.