ProSurf Browser for Windows gives you a wide range of options. Some of these options are available at a browser level, and some of them are available at a Website level. In this document, we will walk through all the options available.
Before You Begin
- Make sure you have a valid Scalefusion Dashboard account.
- Make sure you have installed ProSurf as described in our Scalefusion ProSurf for Windows guide.
Configuring ProSurf Browser settings
The first step is to configure the overall ProSurf browser settings. These settings work at the application level and allow you to control the overall application behavior. Please follow the steps below,
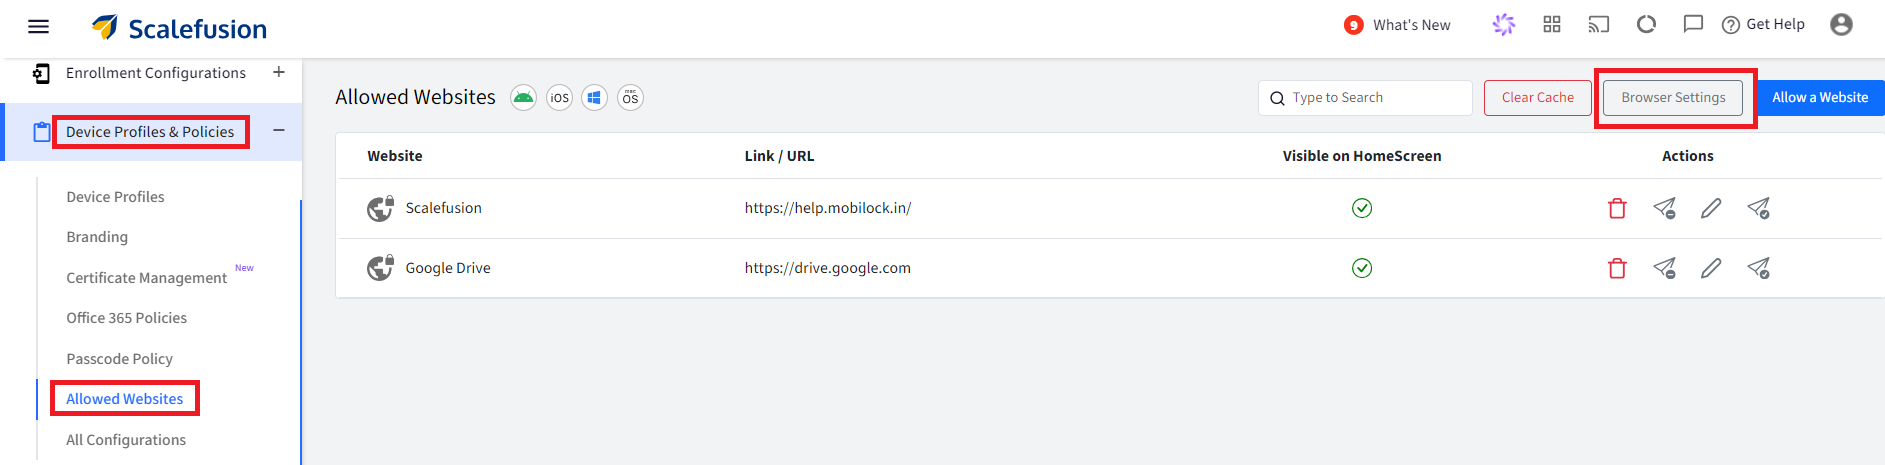
- Sign In to Scalefusion Dashboard.
- Navigate to Device Profiles & Policies > Allowed Websites section.
- Click on the Browser Settings button.
- Click on the Windows tab as shown below,
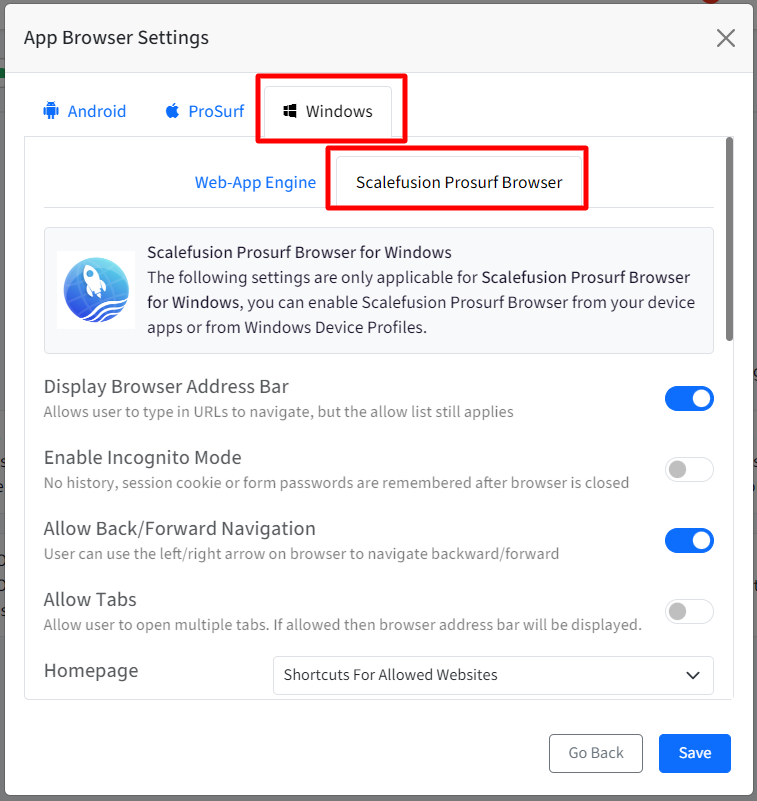
- Under Scalefusion ProSurf tab, you will see various options. We have given the description of each option in the table below. Once you have configured the settings, click SAVE.
| Setting | Description |
| Display Browser Address Bar | If this option is enabled, then the address bar is shown in the ProSurf app. If you do not want your users to manually enter URL addresses, then disable this. |
| Enable Incognito Mode | Enable this option if you want to enforce In-Private or Incognito browsing. Please note no history, session cookie or form passwords are remembered after browser is closed |
| Allow Back/Forward Navigation | Enable this option if you want the users to navigate back/forward on the website. Use the left/right arrow on browser to navigate backward/forward |
| Allow Tabs | Enable this to allow users to open multiple tabs. If allowed then browser address bar will be displayed. |
| Homepage | Configure how you want the browser homepage to appear by selecting one of the following options from drop-down:
|
| Extend Allowed Websites List Rules | With this setting, you can configure rules for accessing allowed websites. Select one of the options from the drop-down:
|
| Auto clear browser Cache | Enable this option if you want the cache to be automatically cleared periodically. Specify the time (in minutes) after which the browser will get cleared. The time interval can be anywhere between 1 to 1440 |
| Auto Play Videos | Enable this setting if you want the embedded videos in the allowed websites to be auto-played. After enabling this setting, browser should be closed once and then again opened to apply this setting. |
| Allow Users to Print | If this option is enabled, then users can print the current webpage. |
| Allow right click context menu on page | You can control right clicking on the webpage |
| Always Run in Full Screen Mode | Enable this setting if you want to run browser in full screen. This will also hide the windows taskbar |
| Allow opening non-network URLs | Allows opening of even non network URLs (like 'mailto:') from WebPage |
| Set User Agent | Sets User Agent for your browser. With this, the browser will use this user agent for all the communication with websites opened there. A sample format of a user agent string can be: Mozilla/5.0 (Windows NT 10.0; Win64; x64) AppleWebKit/537.36 (KHTML, like Gecko) Chrome/123.0.0.0 Safari/537.36 |
| Tracking prevention | Protects users from being tracked online by limiting the access of trackers to browser-based storage and the network. Choose one of the following options from drop-down mainly classified as levels for tracking prevention:
|
| Enable SmartScreen | Enabling this setting protects you against phishing or malware websites and applications, and the downloading of potentially malicious files. |
Allowing a Website and related Settings
Allowing websites gives you the ability to control which websites are allowed to be opened using the Scalefusion ProSurf application. Additionally, you can configure various other properties to control the website's behavior. Please follow the steps below,
- Navigate to Device Profiles & Policies > Allowed Websites section.
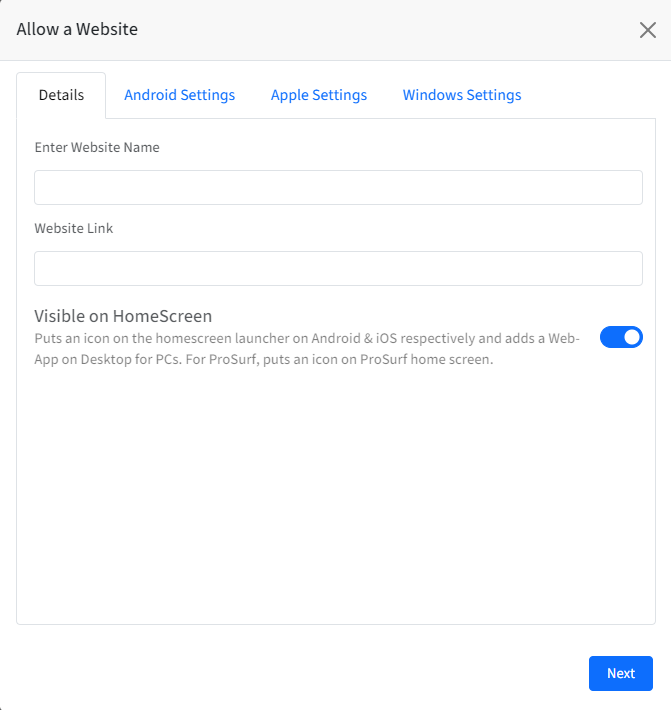
- Click on the ALLOW A WEBSITE button.

- In the DETAILS section, you get the following options,
- Enter Website Name: The name of the website. This is used to refer to this website within the Dashboard, and on the client, this is the name used for the Bookmark/Shortcut.
- Website Link: The URL of the website. Please ensure you give the exact URL. For example, https://www.google.com . Custom properties can also be used here to publish two or more unique URLs on a device (For eg. $device.<fieldname>).
- Visible on HomeScreen: Enabling this creates a shortcut of the website on desktop and displays it as a web application.
- Now click on Windows Settings tab. This screen is divided into the following sections:
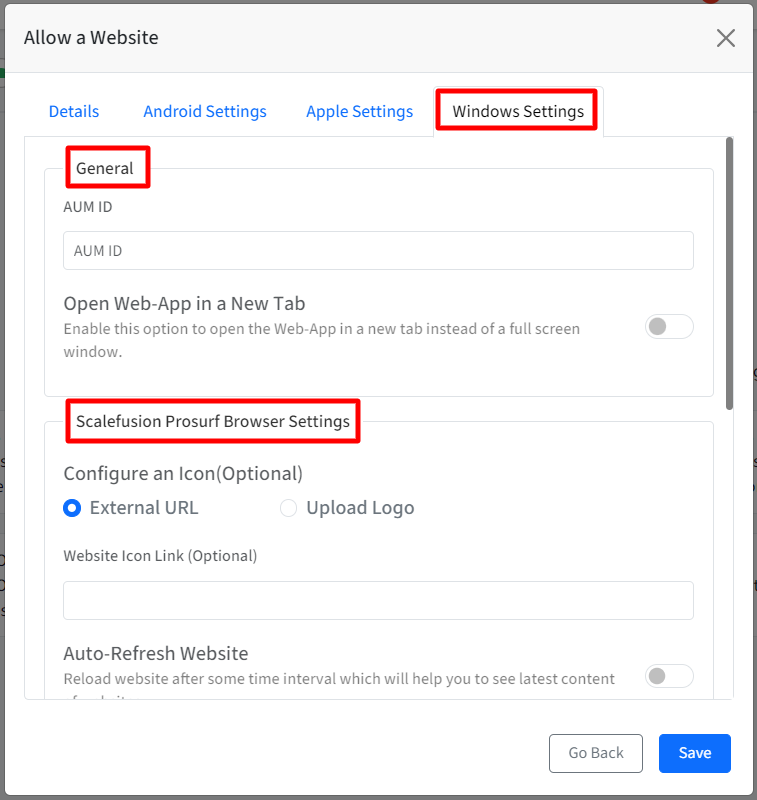
- General: These settings only apply when this shortcut is used with Google Chrome or Microsoft Edge. To learn more on how they work, please refer to this document.
- Scalefusion ProSurf Settings: These are the settings that are used when the website is opened using ProSurf. The table below gives the details of these options,
| Setting | Description |
| Configure an Icon | You can upload an icon for your website. This will be used by ProSurf when it shows the bookmark on the home screen. If no icon is given, then ProSurf tries to load the default icon for the webpage. This is also the icon that is used when this website is used as a web clip. There are two ways to upload icon. Choose any one:
|
| Auto-Refresh Website | If you want your website to automatically refresh after every X seconds, then set the value using this setting. Reloading will help you to see latest content of websites. |
| Location Settings | Enable this option to grant the webpage automatic access to your device's location. Please select this only if you trust the website. If left unchecked, a dialog will prompt for user consent. |
| Camera Settings | Enable this option to grant automatic access to your device's camera by the webpage. Please select this only if you trust the website. If left unchecked, a dialog will prompt for user consent. |
| Microphone Settings | Enable this option to grant automatic access to your device's microphone by the webpage. Please select this only if you trust the website. If left unchecked, a dialog will prompt for user consent. |
| Enable Zoom control for this URL | Enable this setting if you want the end users to pinch and zoom in/out on your website. |
| Clear Cookies on Auto-Refresh | Enable this option if you want the cache to be cleared every time the page auto-refreshes. This depends upon the Auto-Refresh value you have set. |
| Set font size for this URL | Enable this to set a base font size for the website. When enabled, provide the font size value in the text area below. By default it is set to 25 |
Click SAVE once you are done, and the newly added allowed website should appear in the list of websites.

Publishing Allowed Websites
Once ProSurf browser settings have been configured and websites are allowed, you need to publish those websites. There are two ways to publish the allowed websites from Scalefusion Dashboard on devices:
Allowed Websites
- Navigate to Device Profiles & Policies > Allowed Websites section
- Click on the Publish icon in front of website. This will open the publish dialog box.
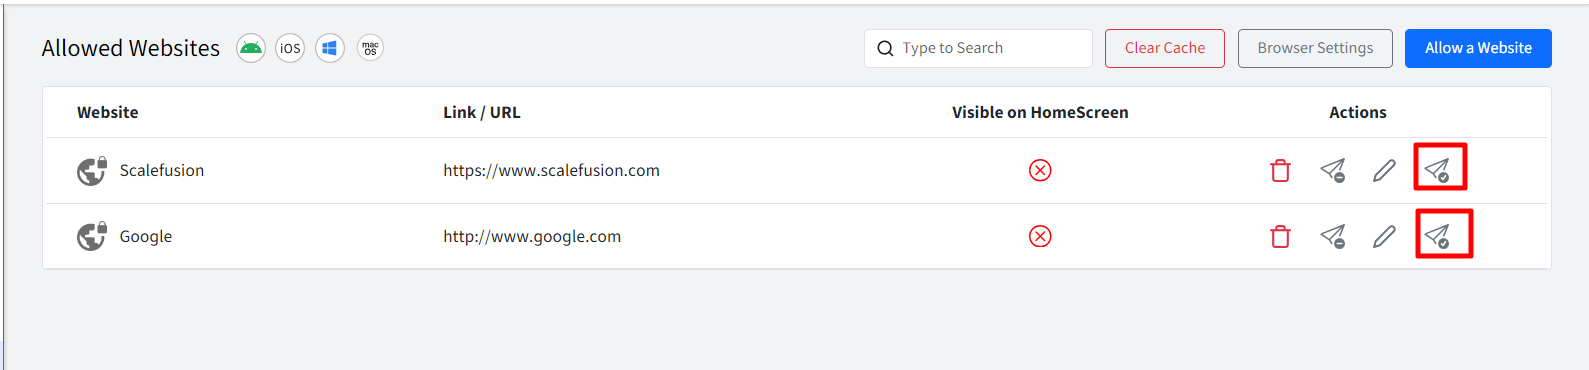
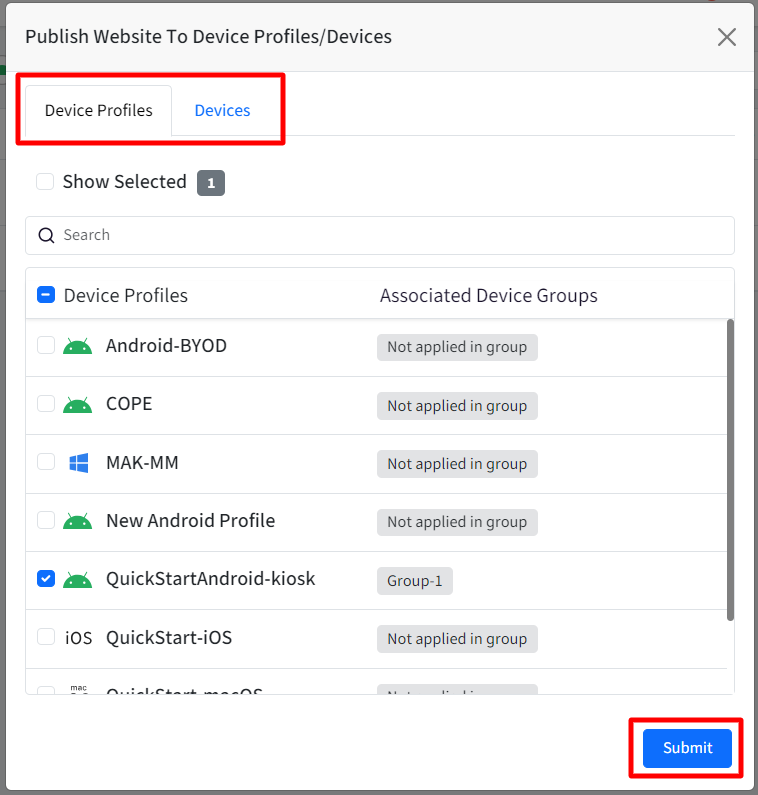
- Select the Device Profiles on which you want to publish the website and click Submit.Currently, websites can be published on Device Profiles only.
Device Profile
- Navigate to Device Profiles & Policies > Device Profiles section.
- Create a new Windows Device Profile or edit an existing one.
- In the Allowed Websites section, enable all the websites that you want in this device profile and click on Update Profile.
