There are various use cases where IT Admins would like to control the applications that the end users can see and use when using the managed Windows devices. Scalefusion's Multi-app kiosk policy allows IT Admins to configure such policies easily and enables the end users to have a dedicated account on the device, which, when logged in, provides a view consisting of only the allowed applications.
This document guides you on how to use the Multi-App kiosk mode and its associated features.
Before You Begin
- Make sure to Sign In to the Scalefusion Dashboard.
- Windows OS 10 and above - Applicable on Win 10 Pro, Enterprise, Education, or Business Editions with Win 1803 version
- Windows OS 7 and 8.1 and Windows Home (10 & 11) devices should be enrolled with Scalefusion MDM agent for the Multi-App Kiosk feature to work.
- Supported OS and architectures - Windows OS 7, 8.1, 10, 11 (22H2 and above) 32-bit and 64-bit Operating Systems
Configuring a Multi-App Kiosk Policy
Getting Started
- Sign In to Scalefusion and navigate to Device Profiles & Policies > Device Profiles and either create a new Windows device profile or edit an existing device profile.
- The first option/tab in the Profile creation wizard is to SELECT APPS. Within this, you would be shown the following options,
- Multi-App Kiosk Mode
- App Locker Policy
- Skip Application Policy
The features that work on both modes that is, Modern Management and Agent-based, are identified by iconography, where the Windows icon is for modern management, and the Scalefusion icon is for Agent-enrolled devices.
No iconography against a feature tab/setting/option would mean it is supported only by modern management.

- Choose the radio button Multi-App Kiosk Mode. This policy offers you the following sub-sections,

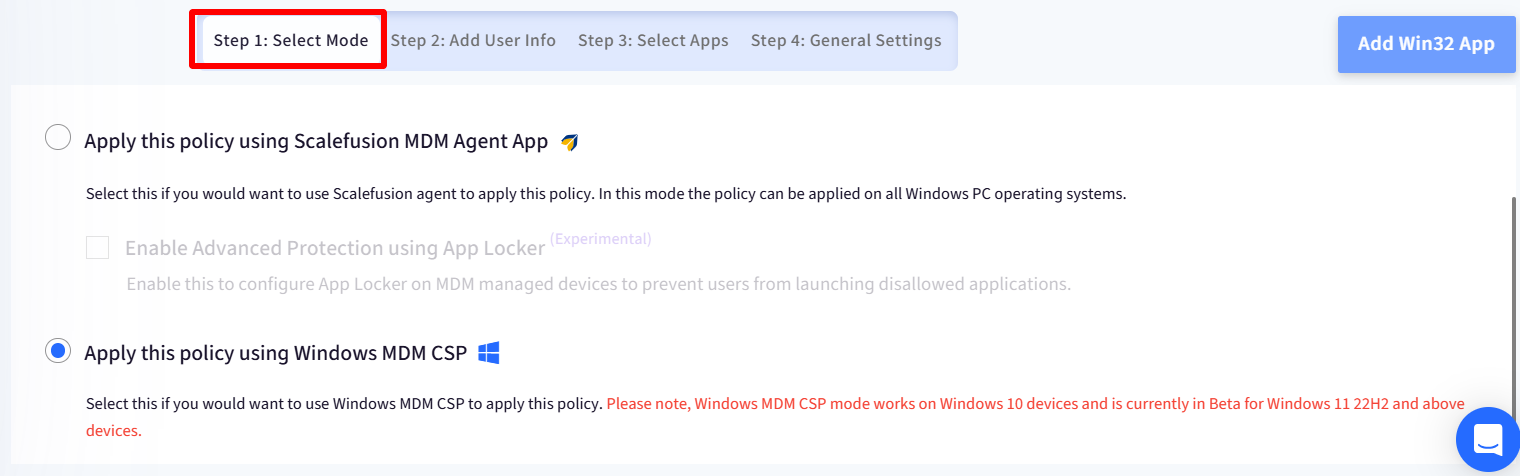
Step 1: Select Mode
Kiosk mode is offered in two modes. Select the mode how you want to use the device policy by choosing one of the following options:
- Apply this policy using Scalefusion MDM agent app: Uses Scalefusion MDM agent to apply this policy. In this mode, the policy can be applied to all Windows PC operating systems.
- Enable Advanced Protection using App Locker: If checked, it prevents users from launching disallowed applications on MDM-managed devices.
- Apply this policy using Windows MDM CSP: Uses Windows MDM CSP to apply this policy. In this mode, the policy can be applied on Windows 10, Windows 11 (22H2 & above) devices.
Summary of which policy will be applicable based on enrollment method:
| Enrollment Method | Selected Mode | Which Multi-app kiosk policy gets applied | On which OS is it applicable |
Modern Management | Windows CSP | Windows CSP | Win 10 Pro, Win 11 (22H2 and above) |
| Modern Management | MDM agent | MDM Agent-based | Win 10 Pro & above |
| Scalefusion Agent | Windows CSP | Windows CSP | Win 10 Pro & above |
| Scalefusion Agent | MDM agent | MDM Agent-based | Win 10 Pro & above, Win 7, Win 8.1, and Win Home (10 & 11) |
Step 2: Add User Info
This section lets you configure the user account settings and choose the taskbar and folder settings.
- User Account Selection
 The Multi-app kiosk mode policy works only for the non-admin user accounts on the device, and this section lets you configure the account settings. Choose from one of the options below,
- Enter Primary Username(Non-Admin user): Select this option if you want to apply the policy to an already existing user account on the device. If you have selected this option, then configure,
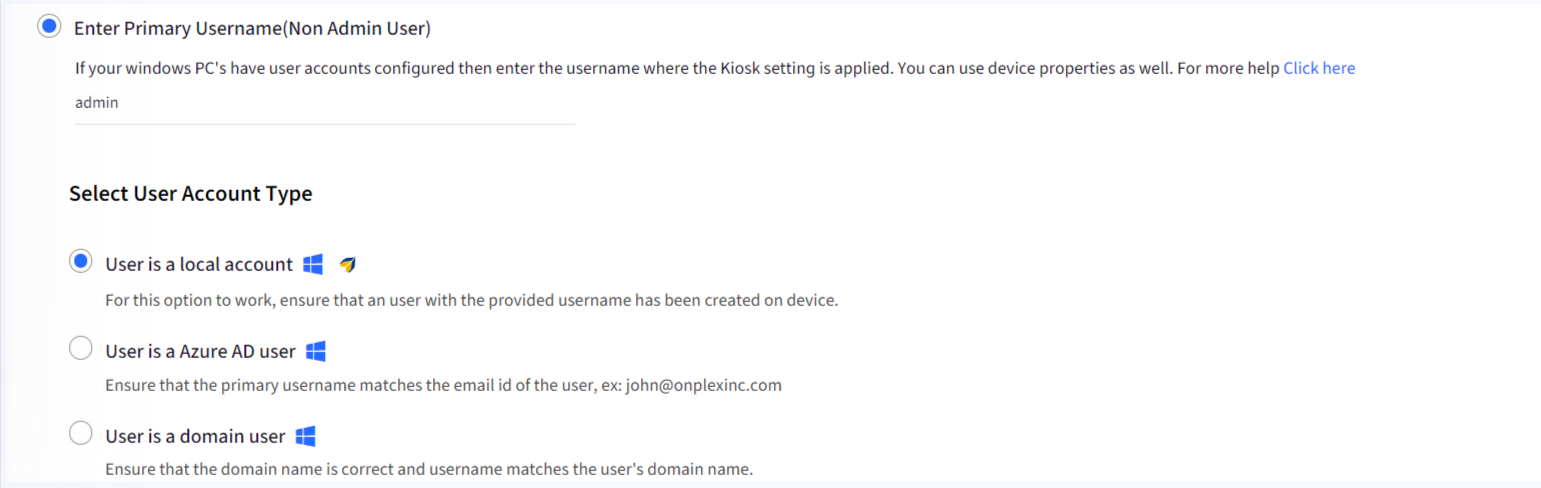
- In the Text field, enter the name of the user account on the device. You can also custom properties that you have defined, like $device.custompropertyname or $user.custompropertyname, to have these values dynamically populated based on the device or user.
- Select User Account Type:
- User is a local account: Select this if the user account is local to the device.\
- User is an Azure AD user: Select this if the user is an Azure AD user.
- User is a domain user: Select this if the user is a domain-joined user. If you select this, please provide the domain name as well.
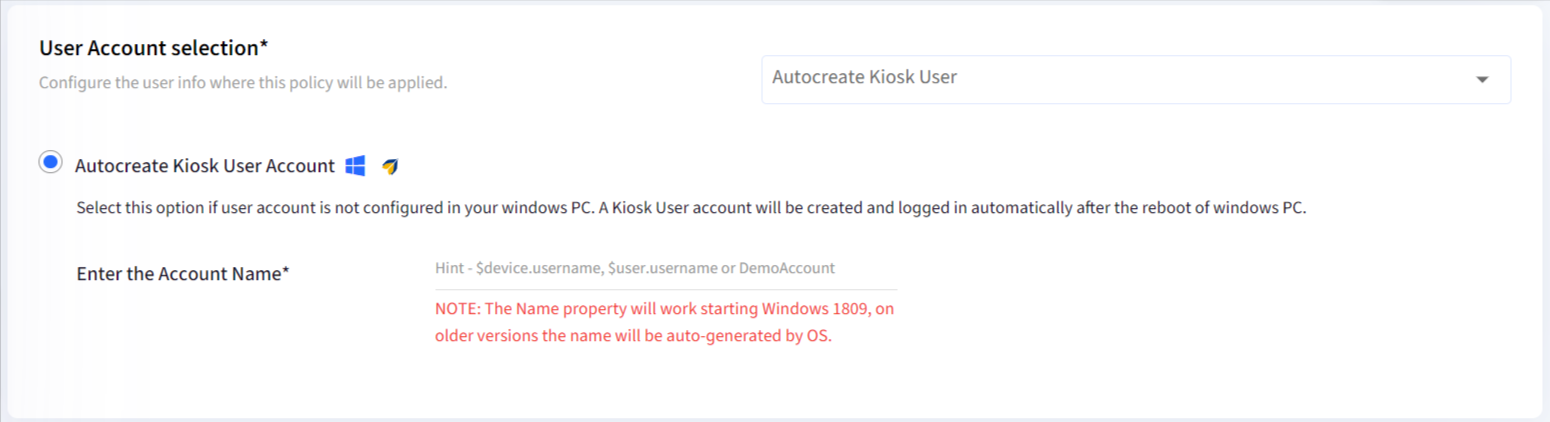
- AutoCreate Kiosk Account: This option is useful if you want to create a user-agnostic account on the device without any password. Selecting this option creates an un-named account on the device with standard user privileges, and the system auto logs in to this account on reboot. If you have selected this option, you can provide a display name for this account; leaving it blank will assign a Windows-generated name.
- Create a New Account: This option lets you create a new account with non-admin/standard user privileges on the enrolled device post-enrollment. To enable this, enter the account details as shown below,
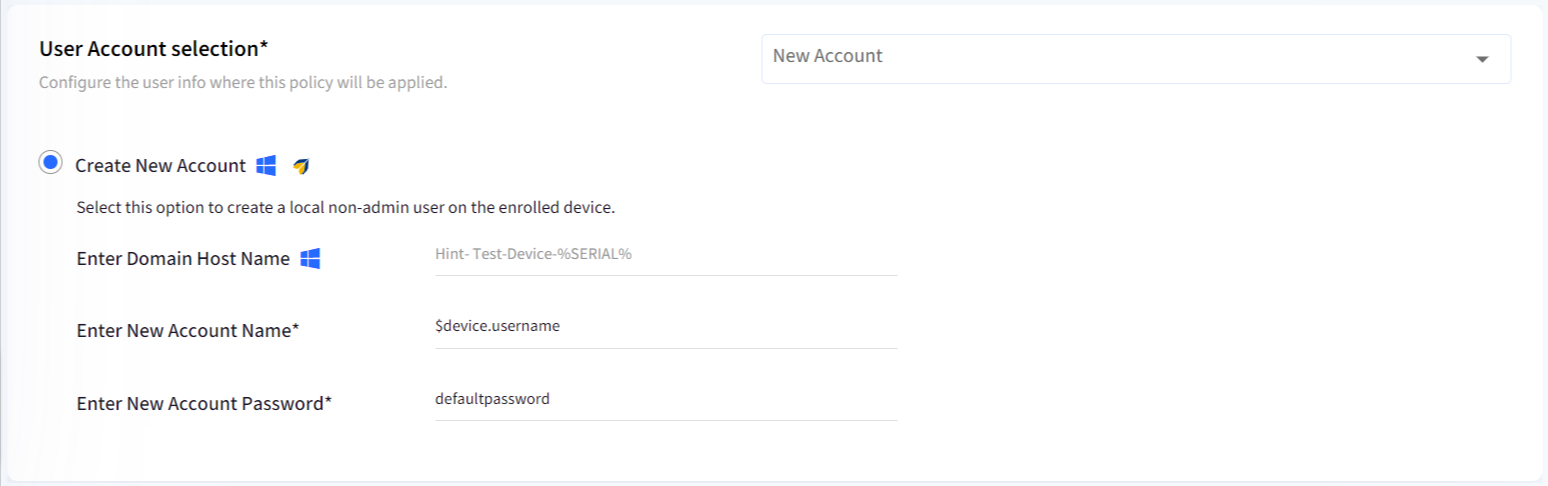
- Enter Domain Host Name: Provide the hostname for this PC.
- Enter New Account Name: Provide the name of the account that needs to be created. You can also custom properties that you have defined, like $device.custompropertyname or $user.custompropertyname, to have these values dynamically populated based on the device or user.
- Enter New Account Password: Provide a default password for these accounts so that the users can log in using this and change it as per the password policy.
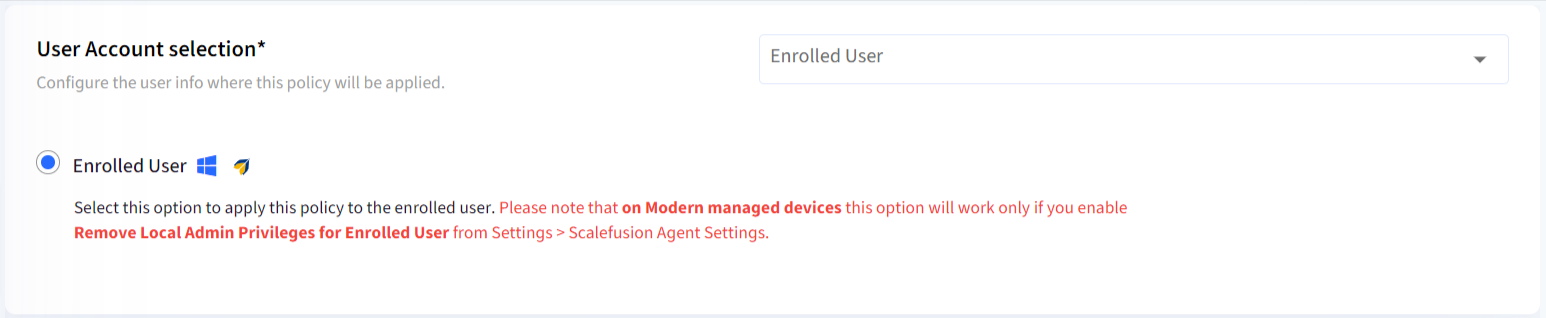
- Enrolled User: With having this selected, the allowed apps policy gets applied only to the enrolled user.For this setting to take effect, you need to remove Local Admin privileges for the enrolled user. This can be done by enabling the setting from Scalefusion Agent Settings.
- Non-Admin User Group: With this option, you can apply this policy to all the users belonging to a non-admin group. Enter a user group name where the group should have non-admin privileges. You can also enter custom properties that you have defined, like $device.groupname, or have these values dynamically populated based on the device or user.
 Primary Non-Admin Username, Enrolled User, and Create New Account are applicable on Scalefusion MDM agent-based devices.
- Enter Primary Username(Non-Admin user): Select this option if you want to apply the policy to an already existing user account on the device. If you have selected this option, then configure,
Once you have configured this step, move to the next step to configure the application policy.
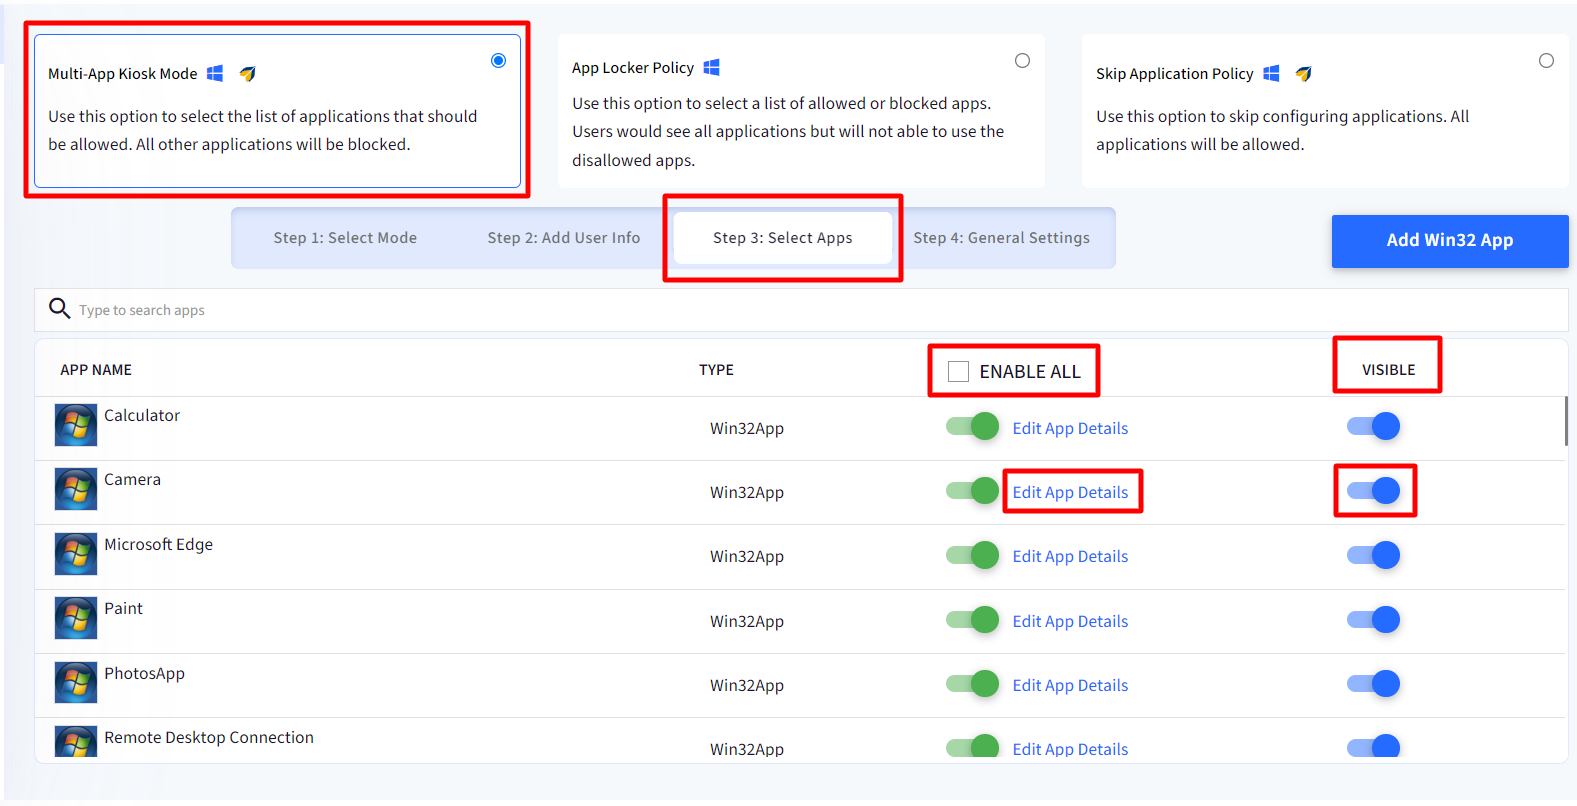
Step 3: Select Apps
Now that you have configured the account settings, it is time to configure the applications that will be allowed for this account. By default, this section displays a list with the following options,
- Apps: Displays the overall list of UWP & Win32 applications that have been reported/synced from the managed devices. Scalefusion seeds the default/preloaded UWP apps on a Windows device.
- UWP: Universal Windows Platform applications that run on all Windows platforms
- Win32: Legacy Windows applications that are installed based on architectures
- Type: Displays the type of application, UWP or Win32
- Enable Toggle: This allows you to toggle the enable state of the app. Enable All lets you enable all applications in one go. The applications that are enabled are the ones that will be visible to the end user.
- Visible Toggle: Set up the visibility of allowed apps that is an app that is enabled and can be chosen to be made visible as a tile or not. If this is not enabled, that means other apps can invoke this app when they need it, but users don't see a tile. By default, visibility is set to ON.
- Edit App Details: Additional details for the Application that will allow Scalefusion to apply this policy.
Use this section to enable the applications that you would want the end users to see on their devices. As you enable the applications, you will be asked for the Application details if Scalefusion doesn't have the details yet.
For Scalefusion to allow the applications using Windows protocol, we would need the AUM-ID/App ID for UWP apps and the installed application path for Win32 apps. We have seeded the required details for all the preloaded applications, but for new applications, this needs to be done by the IT Admin. Follow the steps below to enter the App Details,
- UWP Apps: For the default (inbuilt) apps, the details will be auto-filled, whereas for the ones that are installed from the store, the Edit App details dialog box will show up as soon as you enable the app. Here you will need to enter the App ID. The App ID can be fetched by downloading and running the script on one of the Windows devices where this app is enrolled. Follow the steps below to get the App ID for an application,
- In the App Details dialog box, click on Download Script
.png)
- Now log on to the Windows device where this application is installed and transfer/copy the downloaded script file.
- Double-click on the file to Run the batch file.
- If asked for UAC, then click on More info and click on Run anyway
.jpg)
- A batch shell will open. Enter the name of your third-party app in the batch script and hit the enter key for the App ID to be displayed.
.jpg)
- Once the App ID is displayed, copy this to the App Details dialog on the Dashboard and click Save.
.png) You can choose to update the Application Name and upload an Application icon for your own reference. These values have no impact on the Device policy.
You can choose to update the Application Name and upload an Application icon for your own reference. These values have no impact on the Device policy.
- In the App Details dialog box, click on Download Script
- Win32 apps: The Edit App details dialog box will show up as soon as you enable the toggle for the app. Here, enter the path of the file in the Application Path field. Follow the steps below to get the application path of a Win32 app,
- Login to the Windows device where this application is installed
- Right-click on the installed application and click Properties
.png)
- Copy everything shown in the Target field, excluding the quotes,
.png)
- Paste this path on Scalefusion Dashboard, in the Application Path field and click Save
.png) While updating the app details, select Set this as default path for all profiles checkbox to store this path at the account level, and it becomes the default for all the new device profiles you create whenever you enable this particular app.
While updating the app details, select Set this as default path for all profiles checkbox to store this path at the account level, and it becomes the default for all the new device profiles you create whenever you enable this particular app.
Once you have configured the application policy, move to the next step to configure General settings.
Step 4: General Settings
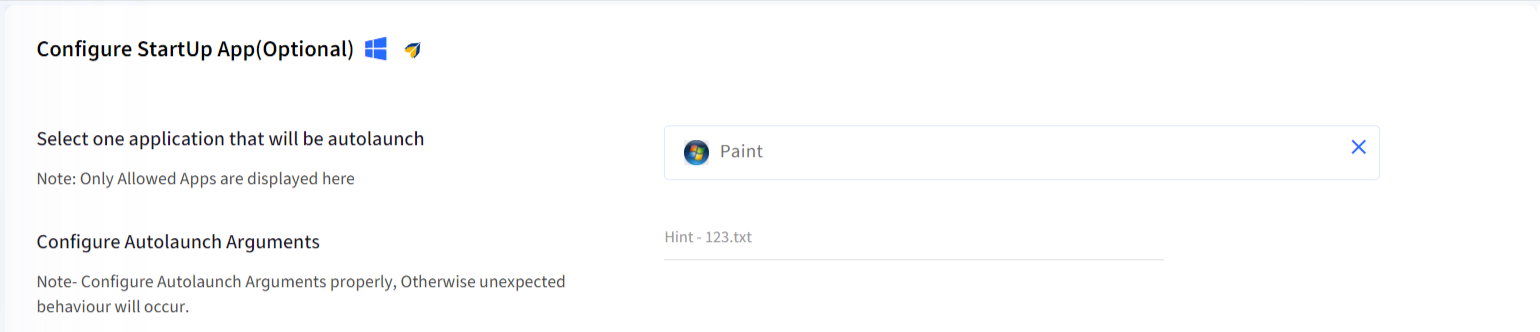
Configure StartUp App
Once you have selected the applications, you can choose one among them to be the start-up and also provide the launch arguments. The provided app will be started app at every login, and the parameters will be passed to the app.
Display Settings
- Allow Taskbar: Enable this if you want the taskbar to be visible on the managed Windows device when the user logs in
- This setting is applicable for both agent-based and modern management modes on Windows 10 devices.
- On Windows 11 this setting will not work in Modern Management mode.
- Hide Recommended section: Enable this setting if you want to hide recommended section from start menu. This will work on Windows 11 devices in Modern Management mode.
Folder Restrictions
Starting in Windows 10, version 1809, you can allow all or explicitly allow some known folders to be accessed when the user tries to open the file explorer. You can choose to,
- Allow All: Allows access to all folders
- Block All: Blocks access to all folders
- Allow the following: Allows access to only the Downloads folder and/or Removable drives.Folder Restrictions cannot be applied on Windows 11 devices in Modern Management mode.
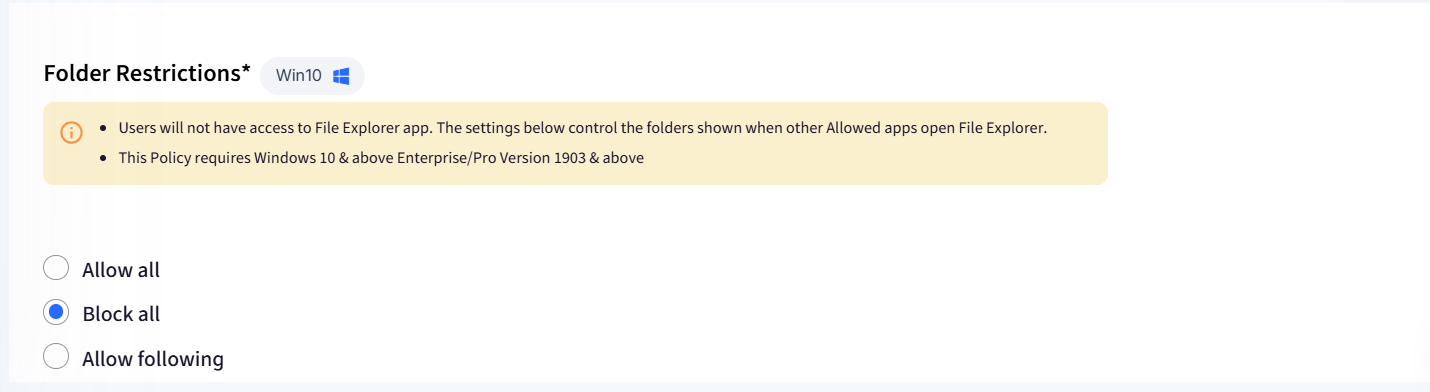 This feature lets you restrict the access to File Explorer on the managed device for the end user.Note that any changes done to the Multi-app Kiosk mode policy will reflect when the user logs in the next time.
Add Win32 app
In Kiosk mode, there are a few applications that do not open on Windows devices. Some apps also happen to be services system apps, or device drivers, which cannot be allowed as well. If you try to search for such apps in Device Profiles to enable them, they are not even listed in the apps list. As for eg. a Printer's driver.
In Scalefusion, there is a workaround to identify such apps and add them through Scalefusion Dashboard via the Add Win32 app feature, where you can explicitly provide the full exe path of the apps, which unblocks/enables the apps.
- Navigate to Device Profiles & Policies > Device Profiles
- Select the Windows Device profile (in which the app has to be added) and Edit it.
- Under Select Apps > Multi-App Kiosk Mode List, go to Select Apps
- Click on the button Add Win32 App

- This opens a new dialog box. Enter the following:
- Application Name: Provide some application name (minimum 6 characters)
- App Version: Enter the application version
- Application Icon: You can upload an image as an icon
- Application Path: Provide the application path. It is the full path of that exe. For eg. C:\Program Files (x86)\Adobe\Acrobat Reader DC\Reader\AcroRd32.exe
- Click Save
- Click Next and update the profile.
The application gets added and is available in the list of apps in the device profile in the Enabled state. When you restart the Windows device, the kiosk mode should work.
End User Experience
Once the end user signs into their managed account gets an experience as shown below.jpg)
Known Behavior
- If you have not provided the correct path for an application, then the entire policy will fail, and the changes will not reflect on the device.
- In case of agent based kiosk mode:
- Users will be able to open the file system but will not able to access any application or exe from the address bar.
- On allowing File explorer from Select apps in profile, you may face unexpected behavior when you try to open File Explorer.