Microsoft Office 365/Exchange Online is one of the popular Email providers, and many organizations use their services. This document provides a step-by-step guide for configuring conditional email access for Microsoft Exchange Online services and forces your users to enroll their devices before they can access the emails.
Prerequisites
- Please read through our CEA Pre-Deployment Guide
- Scalefusion Account with Enterprise License
- Administrator account with Global Administrator role in Azure AD.
Step 1: Import/Add Users or Configure Device Custom Properties
CEA works on the basis of Email IDs, so one of the steps before you configure CEA in Scalefusion is to Import the users or set email IDs as custom properties. Follow the guides below to configure the same,
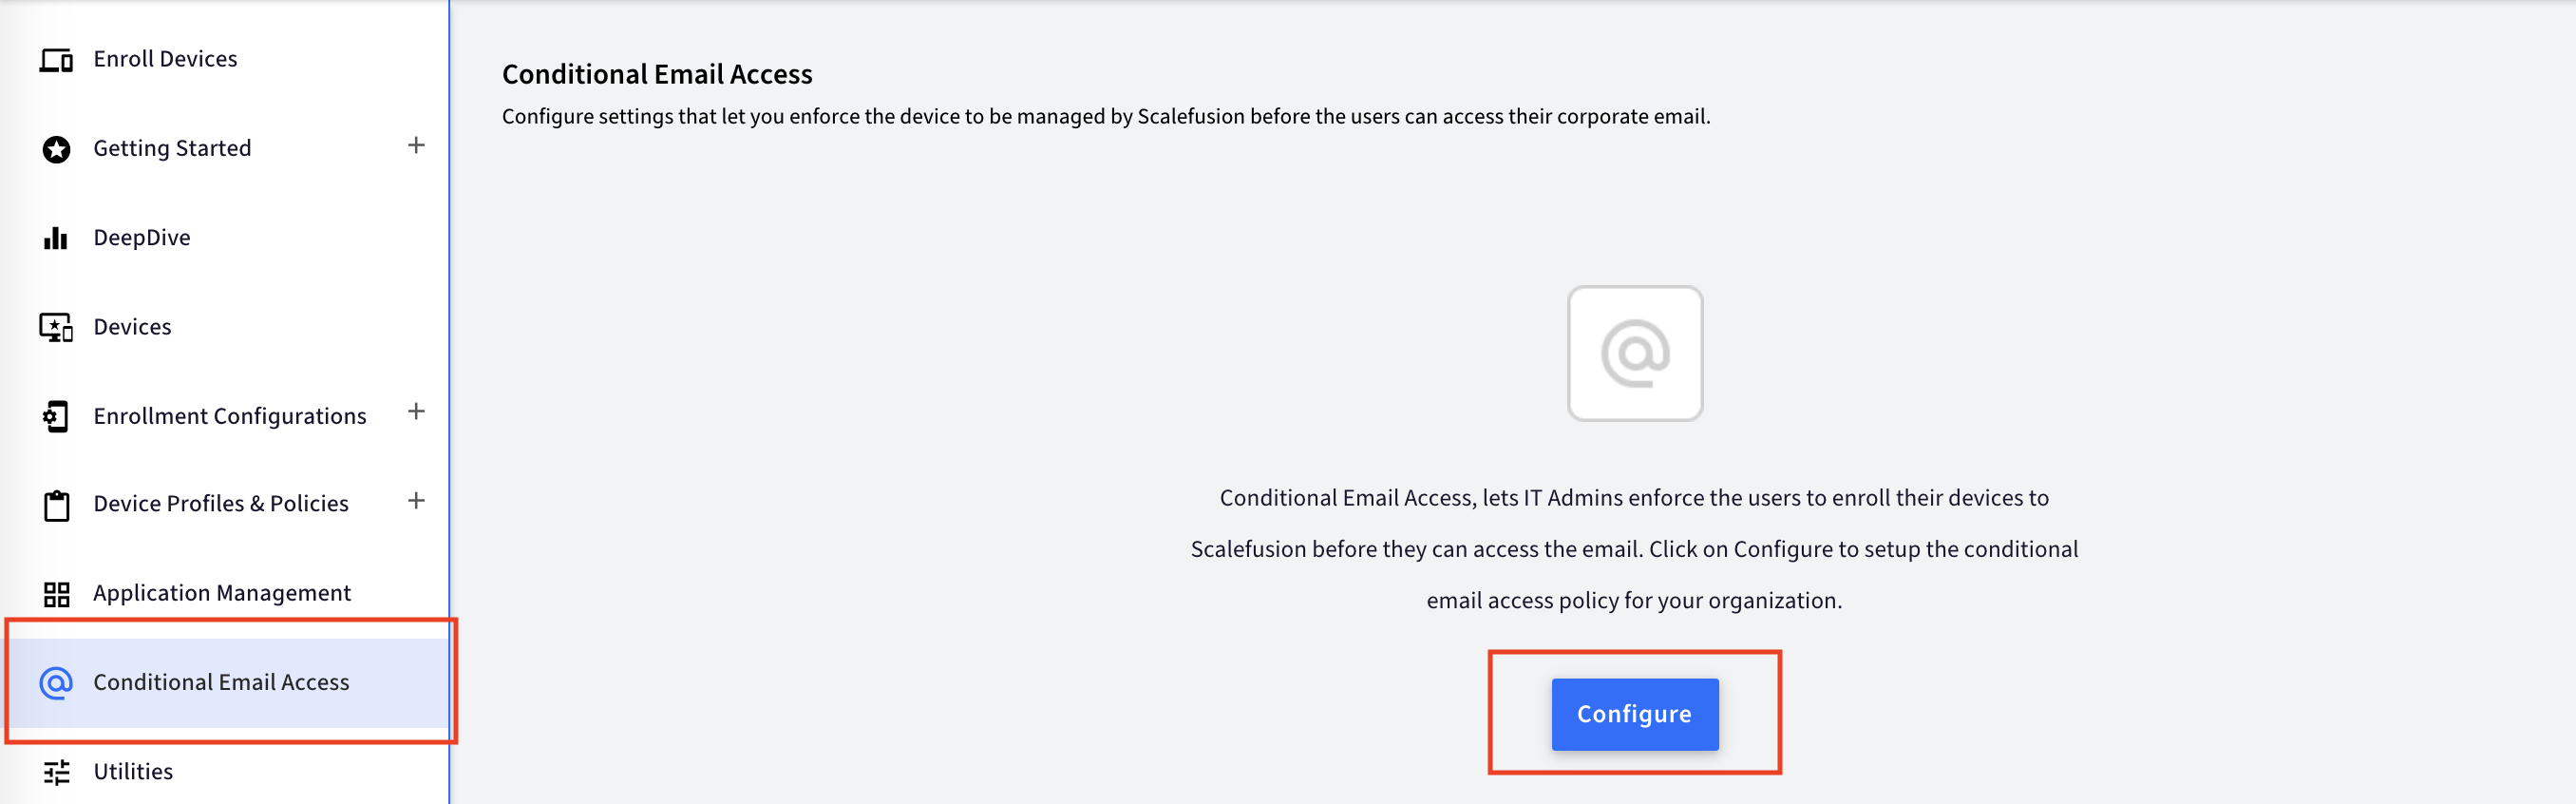
Step 2: Configuring Conditional Email Access in Scalefusion
Now that you have completed all the steps required to configure CEA follow the steps below to set up CEA.
- Sign In to the Scalefusion portal, navigate to the Conditional Email Access section and click Configure to open the CEA wizard.
- Configure Access: The first step is to configure the access and allow Scalefusion access to your exchange account and users.
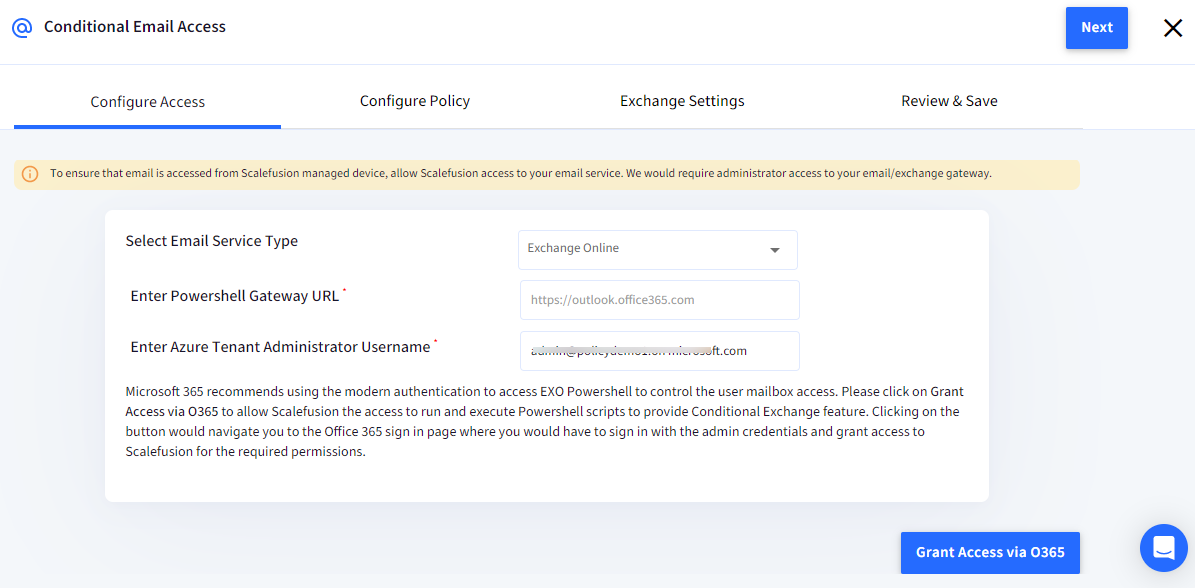
- Email Service Type: Select Exchange Online
- Powershell Gateway URL: By default, it is pre-filled with https://outlook.office365.com
- Enter Azure Tenant Administrator Username: Enter the tenant administrator username
- Now click on the button Grant Access via O365 to allow Scalefusion the access to run and execute Powershell scripts to provide a Conditional Exchange feature.
- You will be navigated to the Office 365 sign-in page. Sign in with the admin credentials.
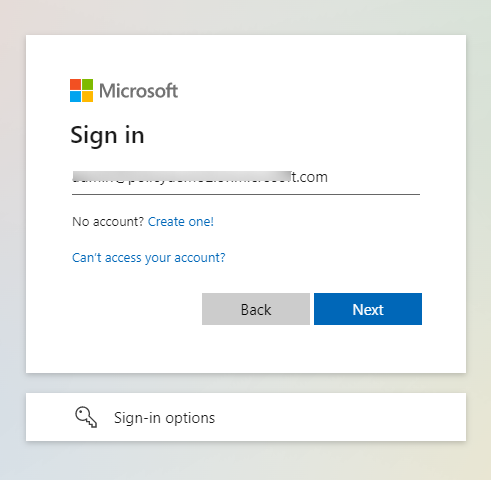
- Grant access to Scalefusion for the required permissions by clicking on Accept.
.png)
- You will be navigated back to the Scalefusion Dashboard.
- On the Scalefusion Dashboard, you can either click on Validate to validate the settings or Next toproceed to the next step, in which case the validation would happen while saving the settings.Please note that once you click on Validate, it takes about 30 seconds to a minute for the credentials to be validated.

- Configure Policy: The settings in this tab allow you to define the policies on the basis of which the conditional email access is enforced. Divided into 4 sections to let you easily understand and configure the desired policy.
- Access Policy: This section lets you define the broader access policies that apply to all users/devices.
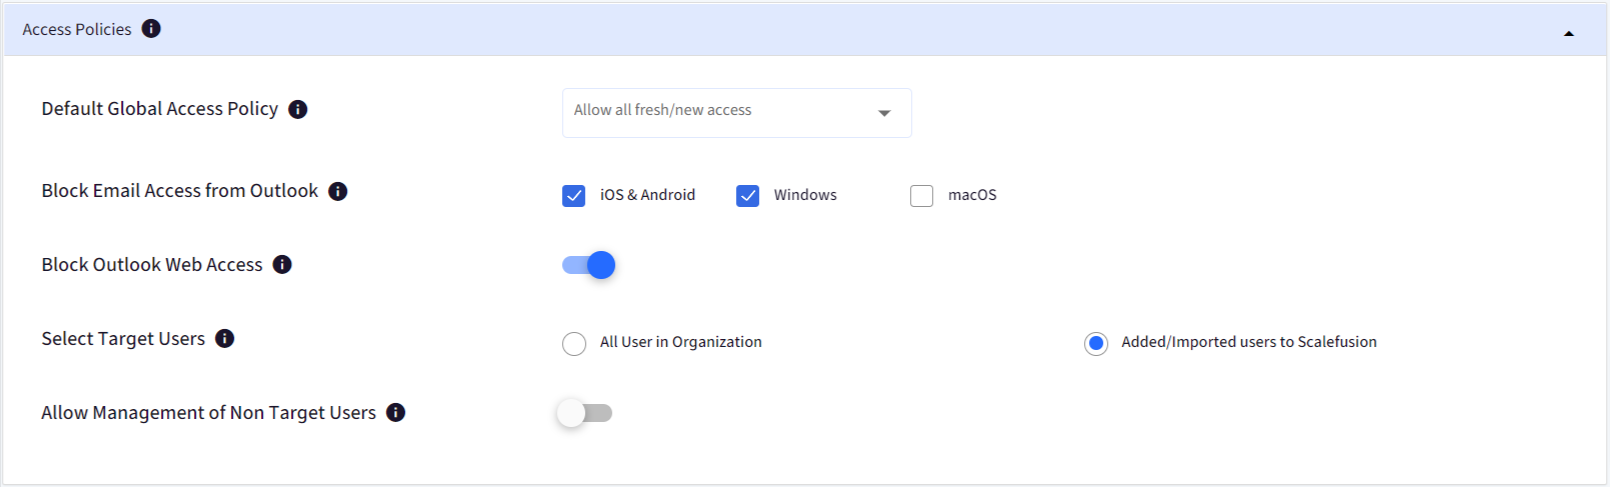
- Default Global Access Policy: There are two options to which default Global Access Policy can be set:
Allowed - Access to email on new devices from any user in the organization is Allowed initially. This means users are allowed to access their emails till the next sync takes place. After syncing, whether the access will be allowed or blocked or the grace period will be offered will be based on the CEA policy set on the Scalefusion Dashboard. - Block Email Access from Outlook: Choose if the users should be allowed to access Emails from Outlook or should be blocked. By default, we suggest blocking it on Android, iOS and Windows, as the CEA policies can be applied on these platforms. If Outlook access is blocked, then:
- All users will be blocked from accessing emails using Outlook clients on Android & iOS.
- On Windows, only the users that are defined by the Target users in Step iv below will not be able to access Email using the Outlook client. Other users can still access it.
macOS: Since there are no APIs available for macOS, we recommend not blocking access on a Mac.
- Block Outlook Web Access: Choose if users should be allowed to access Emails using Outlook web access from browsers like Google Chrome, Microsoft Edge Safari etc. By default, we suggest disabling this, and with this, all users are blocked from accessing emails using browsers.
- Select Target Users: This is one of the most important settings that defines which users are targeted by the CEA and which users are exempted. The options are,
- All Users: Select this to target all users in your organization and apply CEA policies.
- Imported Users: Select this to target only the users that you either Import/Add using User management or add their email IDs to custom properties/fields.Please note that any access to emails from existing users on new devices will, by default, be quarantined. Based on the target users set, they will be either allowed to access without enrolling their devices to Scalefusion or enforced to enroll their devices in Scalefusion.
- Default Global Access Policy: There are two options to which default Global Access Policy can be set:
- Grace Period: This section lets you define a grace period for the users during which they are allowed to access emails. Beyond the grace period, their access will be blocked, and they will be forced to enroll their devices.

- Configure Grace period for Users: Select a suitable grace period for users.
- Apply Grace Period To: For the Target users defined as per the access policy above, choose if the grace period should be applied to their existing devices and/or when they access emails on new devices. Unchecking an option means they would not be allowed a grace on the devices and would be forced to enroll their devices.
- Enrollment Settings: This section lets you choose the default enrollment profile for BYOD devices.

- Default Enrollment Configuration for User Enrolled Devices: From the dropdown, select a BYOD/Personal QR Code configuration that will be used to enroll the users.
- Apply these settings for all Corporate Owned Devices: This is a marker set, and by default, we would be applying these settings to all Corporate Owned devices. Please note that though it is applied for all CO devices, the settings will be pushed to devices that have an email ID set as a custom property.
- Configure Email Templates & Reminders: The last section lets you define the email content that will be sent to the users informing them to enroll their devices and set the reminder frequency.
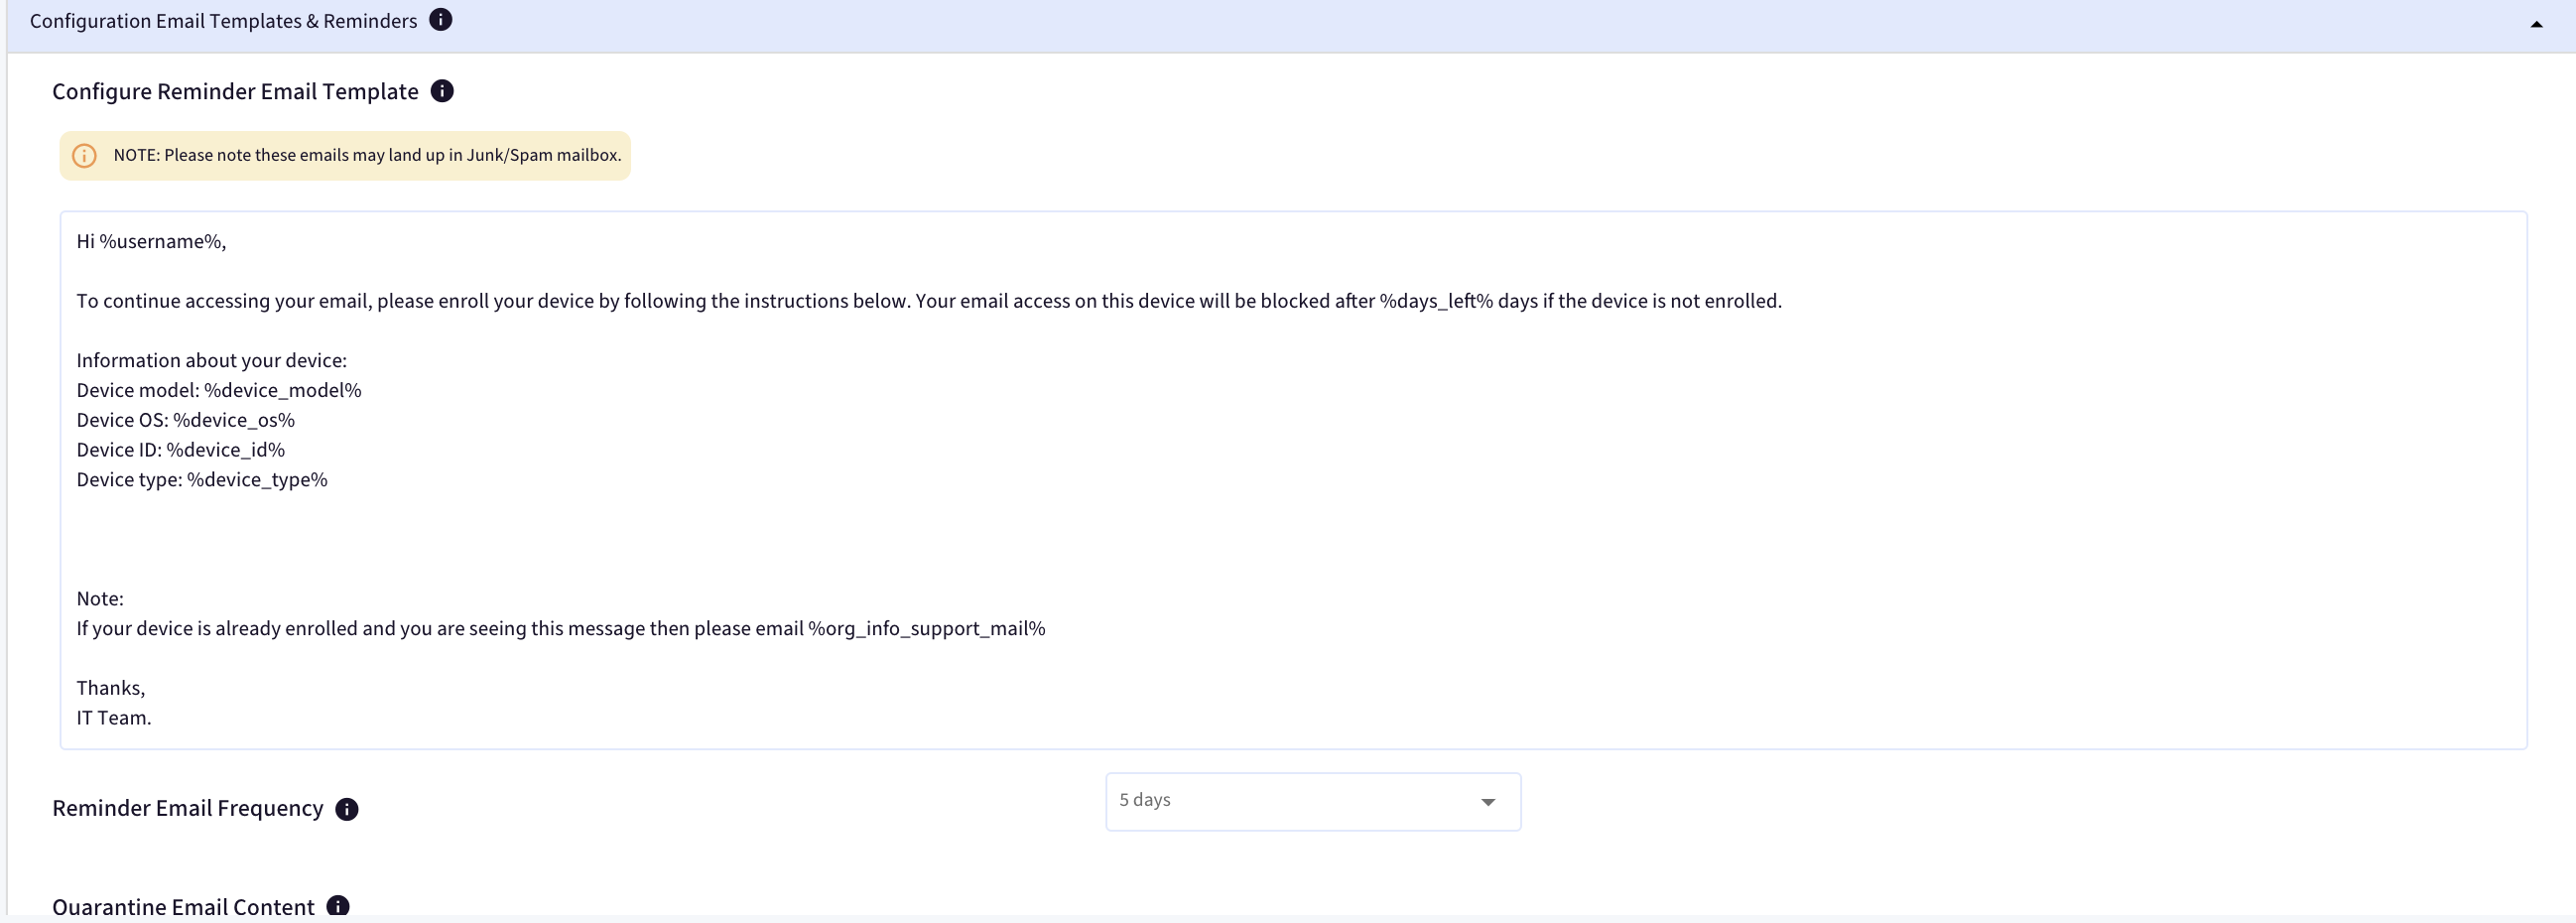
- Configure Reminder Email Template: Click on the input area to configure the email content. The placeholders like %device_model% or %device_os%, or %days_left% will be updated dynamically based on the device. We also append the required enrollment instructions based on the device type, like the QR Code to scan or the enrollment URL to use.
- Reminder Email Frequency: Select how often the users should be reminded to enroll their devices.
- Quarantine Email Content: Since all users will be quarantined by default, Microsoft allows you to set a small message of 255 characters that will let them know why their devices have been quarantined.
- Access Policy: This section lets you define the broader access policies that apply to all users/devices.
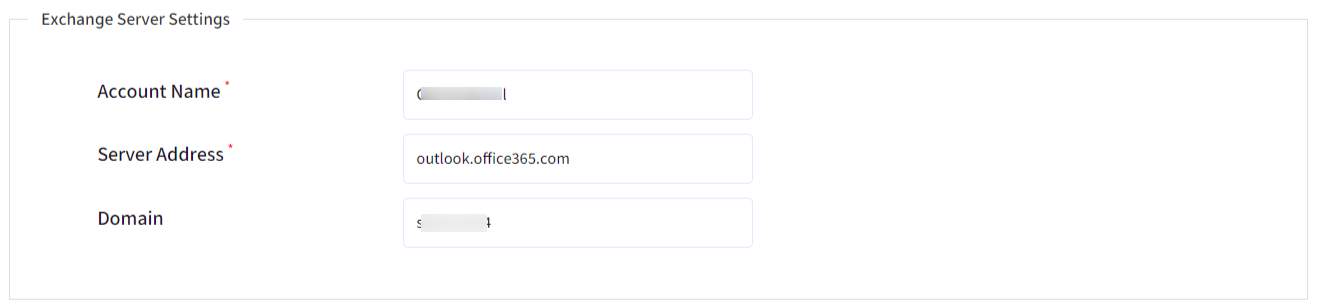
- Exchange Server Settings: The next section lets you define the exchange settings that will be used to configure exchange on the Scalefusion-managed devices.
- Exchange Server Settings: Enter your organization's Exchange Server settings.
- User Sign-In Settings: This section lets you define which fields should be used as the email and username when pushing an exchange configuration to the enrolled devices.

- User-Initiated Enrollments: For BYOD devices, Scalefusion automatically uses the imported/added user email as the sign-in email.
- Corporate Owned Enrollments: Choose which custom field should be used as the email ID & username that will be used to push the exchange configuration.All email IDs assigned to the custom fields will be considered as target users, and the CEA policies will be applied.
- Apple Settings: Set the OAuth URLs and also some additional privacy settings for email access via Mail app on Apple devices. OAuth helps in enabling modern auth for email access and is the only way to make exchange configs work for email providers which use/support modern auth. Following are the configurable settings:
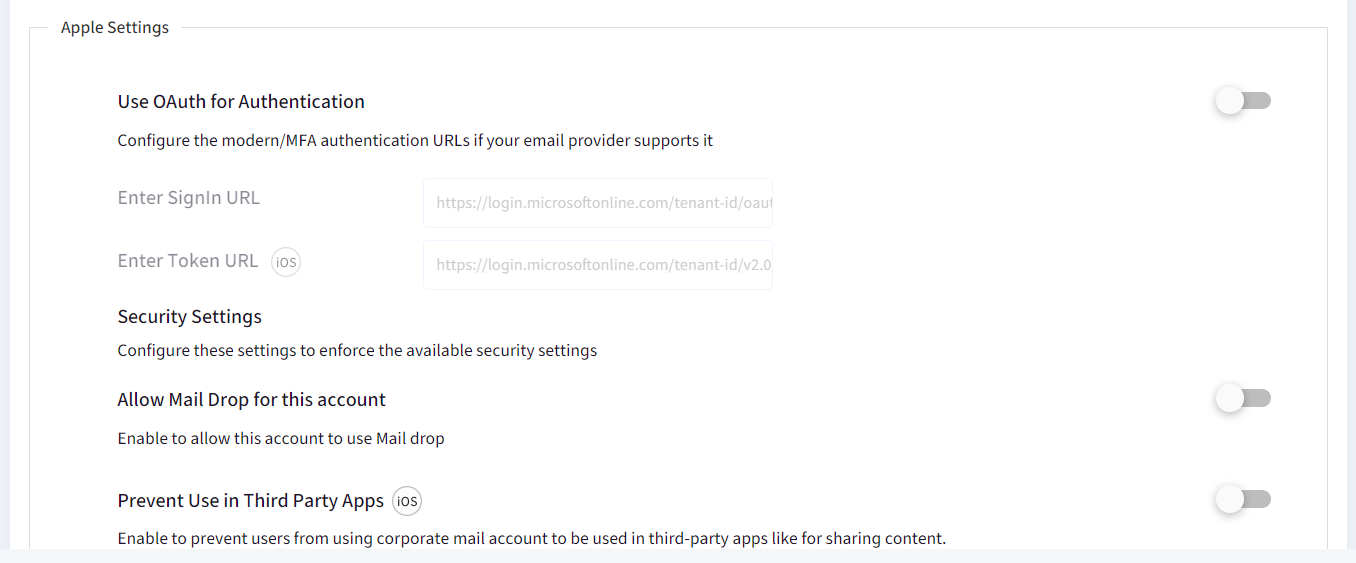
- Use OAuth for Authentication: Enable this setting to configure the modern/MFA authentication URLs if your email provider supports it. After toggling on, enter the following for authentication:
Sign In URL: https://login.microsoftonline.com/tenant-id/oauth2/v2.0/authorize
Token URL: https://login.microsoftonline.com/tenant-id/v2.0/tokenThe Sign In and token URLs above are sample URLs as these are commonly used for Microsoft - Security Settings: Configure the following to enforce security settings for the account:
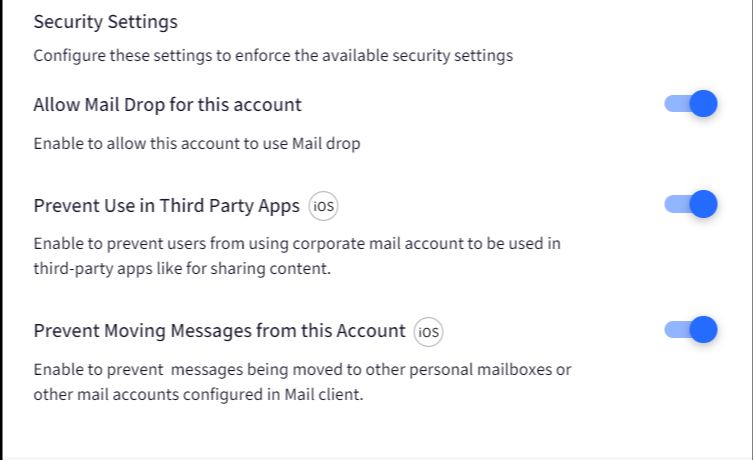
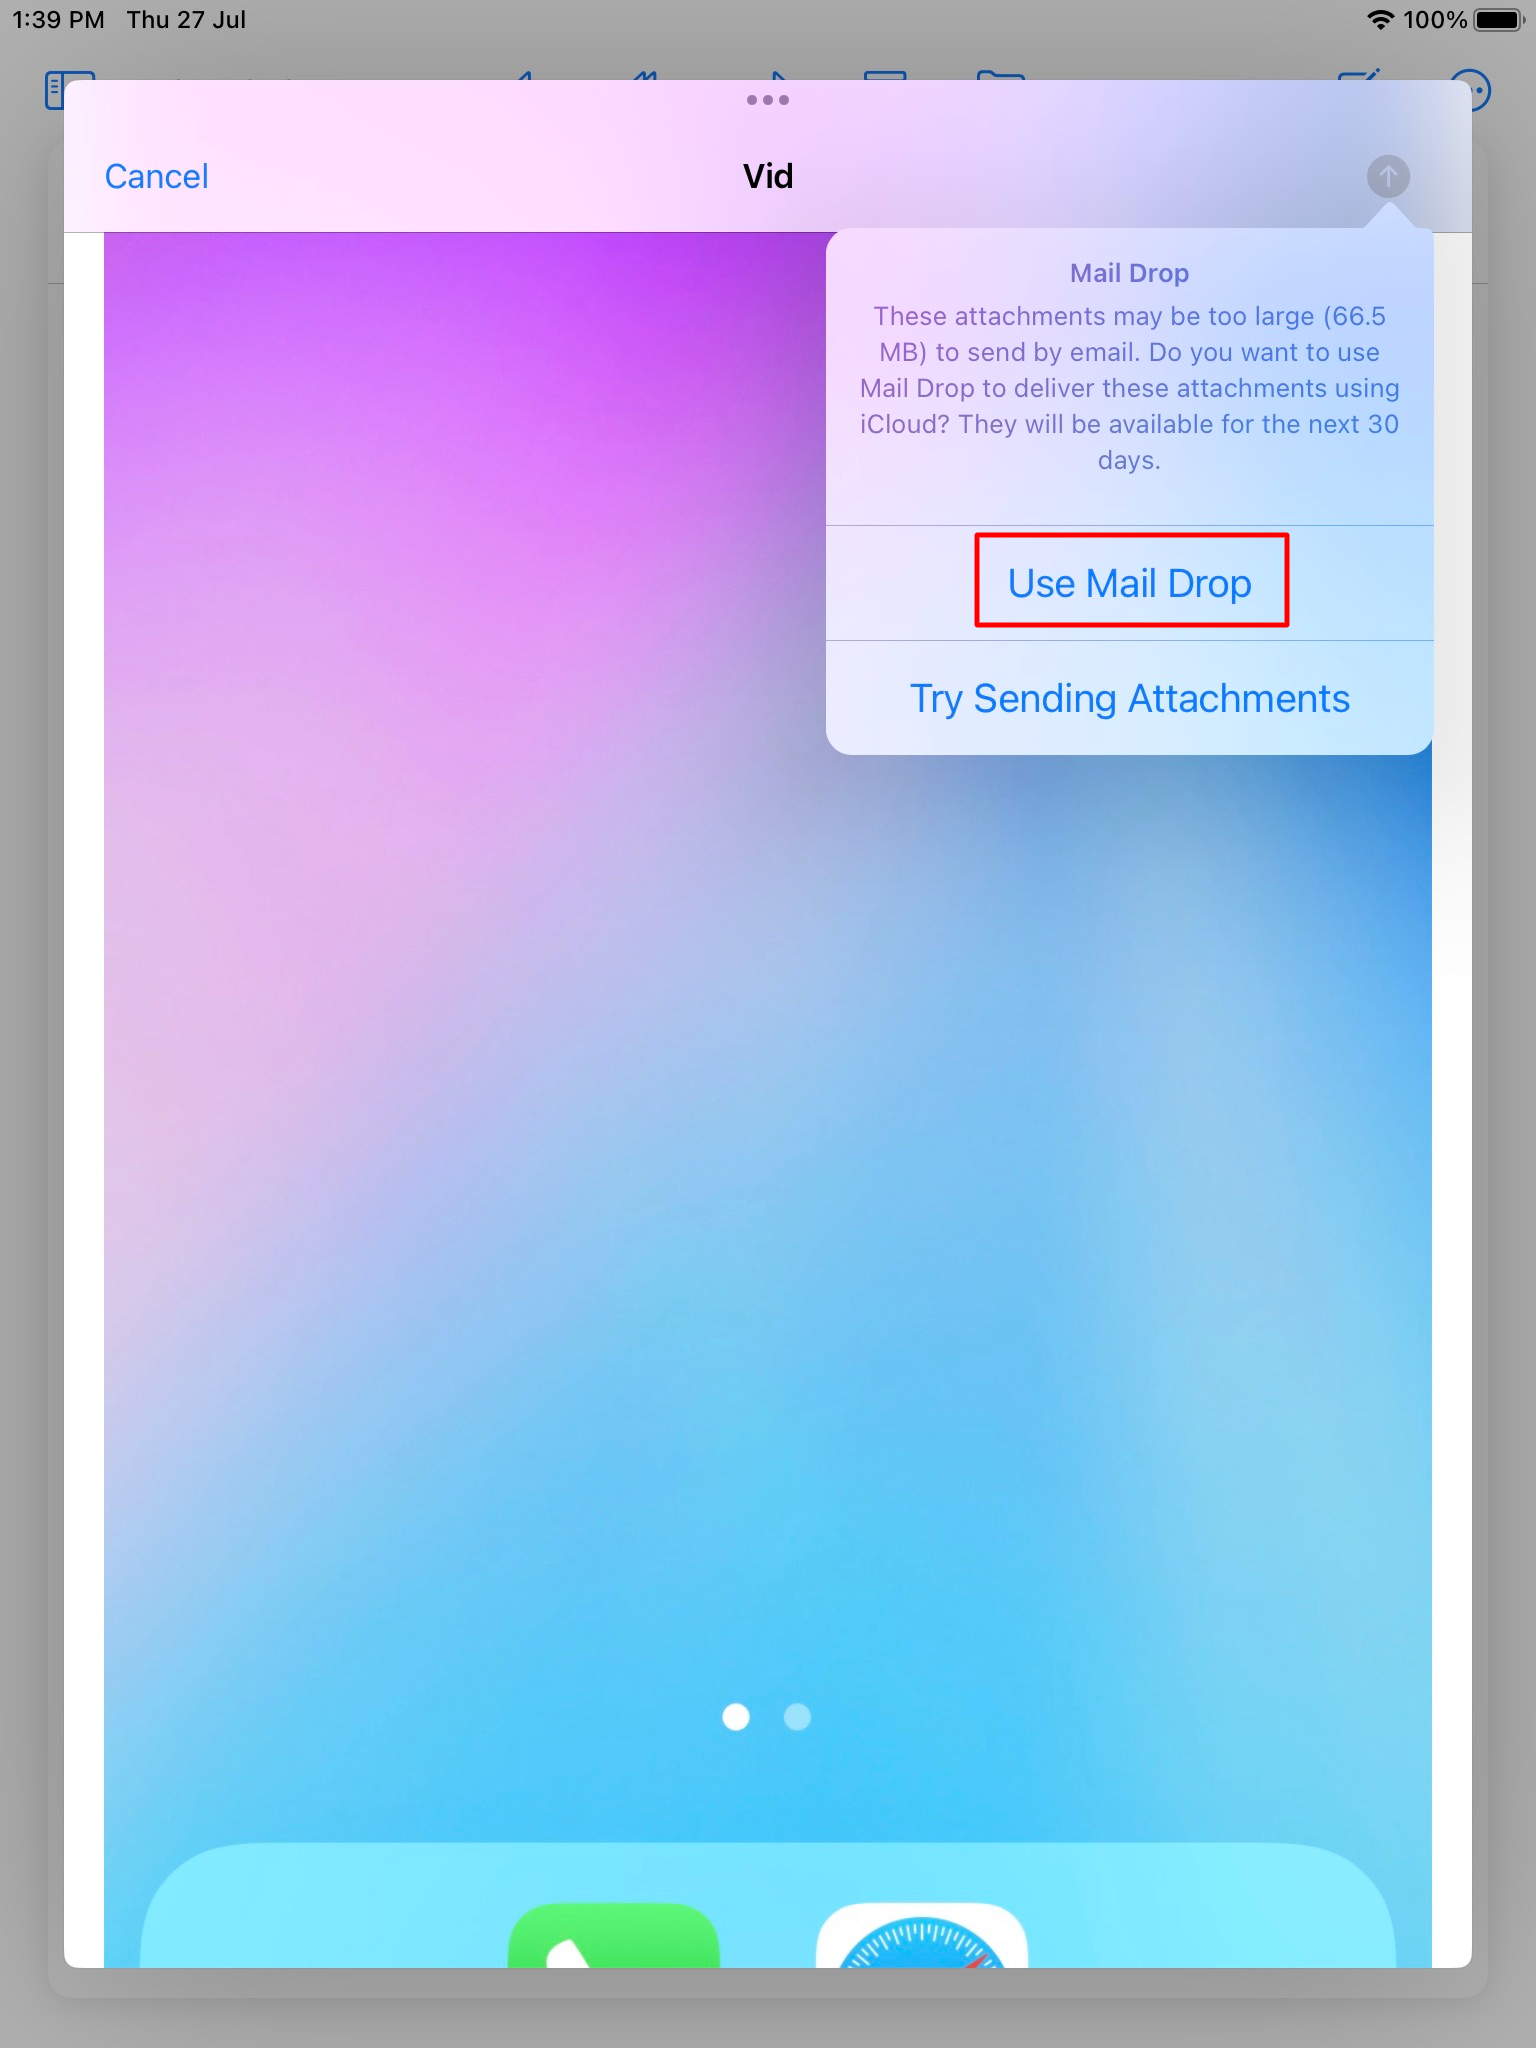
- Allow Mail Drop for this account: On enabling this setting, the Mail Drop feature (through which you can insert external links like iCloud for sending large size attachments), will be allowed for use on the mail account configured via MDM, else it will be blocked.
- Prevent Use in Third-Party Apps: Enabling this setting prevents users from using corporate mail accounts to be used in third-party apps for sharing content. This will prevent unwanted content from being shared within the organization or distributed from official email.
- Prevent Moving Messages from this Account: Enabling this prevents messages from being moved to other personal mailboxes or other mail accounts configured in the Mail client. This prevents data leaks.
- Allow Mail Drop for this account: On enabling this setting, the Mail Drop feature (through which you can insert external links like iCloud for sending large size attachments), will be allowed for use on the mail account configured via MDM, else it will be blocked.
- Use OAuth for Authentication: Enable this setting to configure the modern/MFA authentication URLs if your email provider supports it. After toggling on, enter the following for authentication:
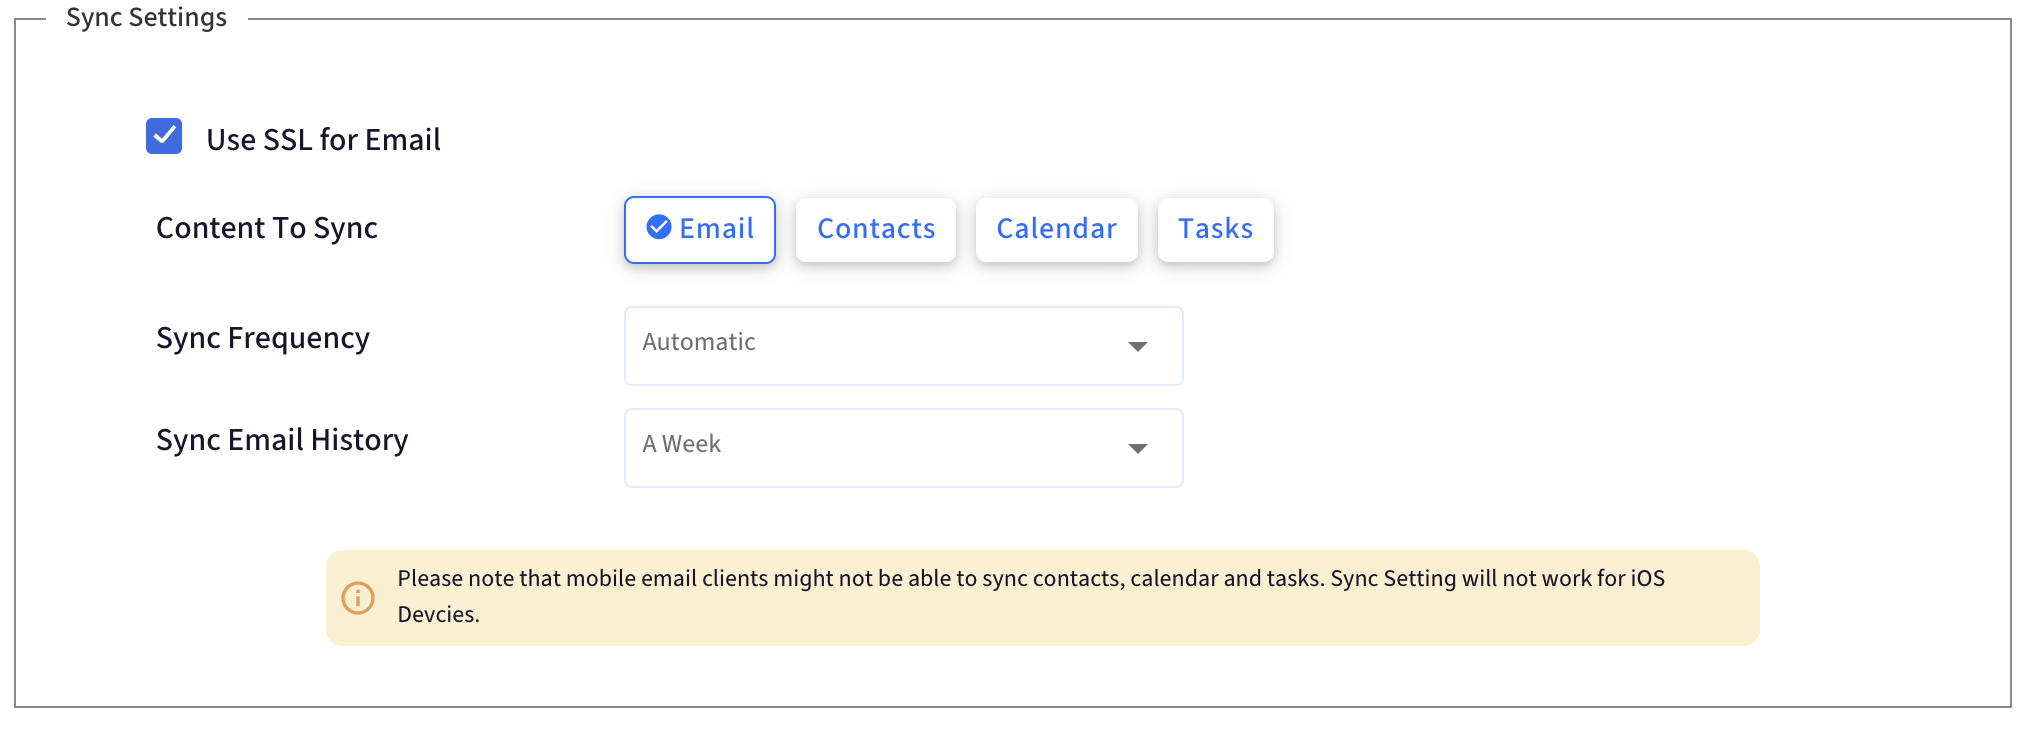
- Sync Settings: This section lets you configure the email and calendar sync settings.
- Exchange Server Settings: Enter your organization's Exchange Server settings.
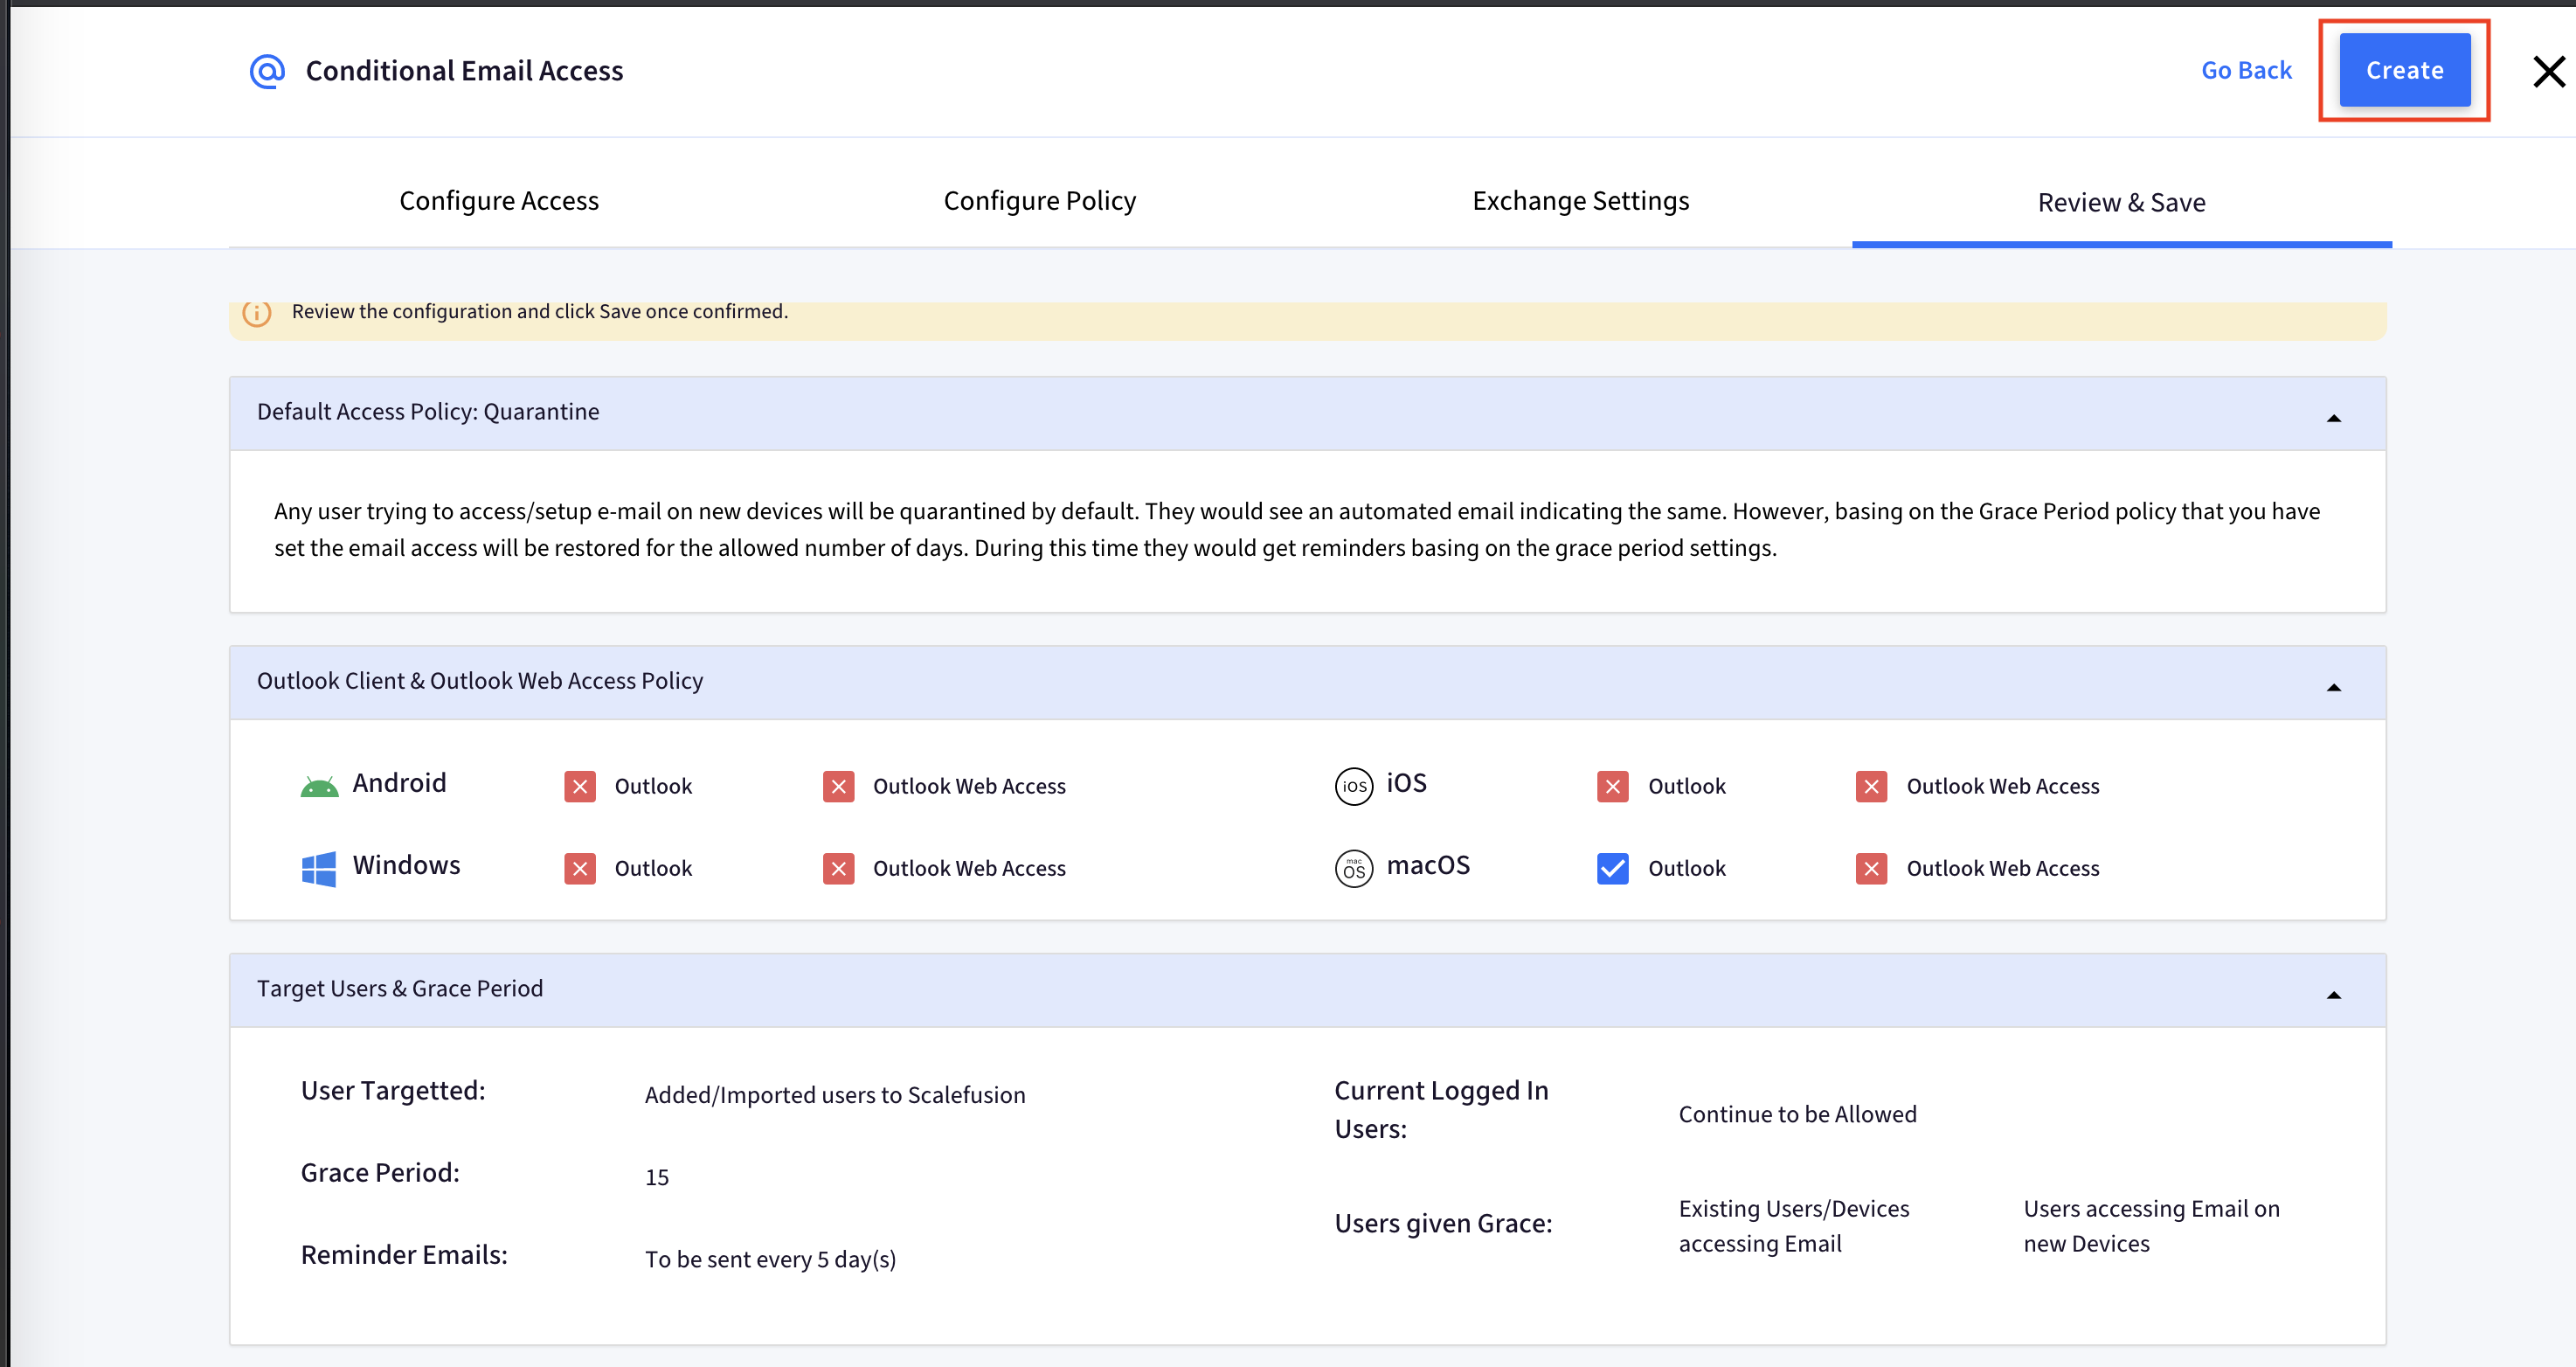
- Review & Save: The final step is to review the settings, and if everything looks good, click on CREATE.
- If the credentials are validated, then you will see the screen below as a confirmation,
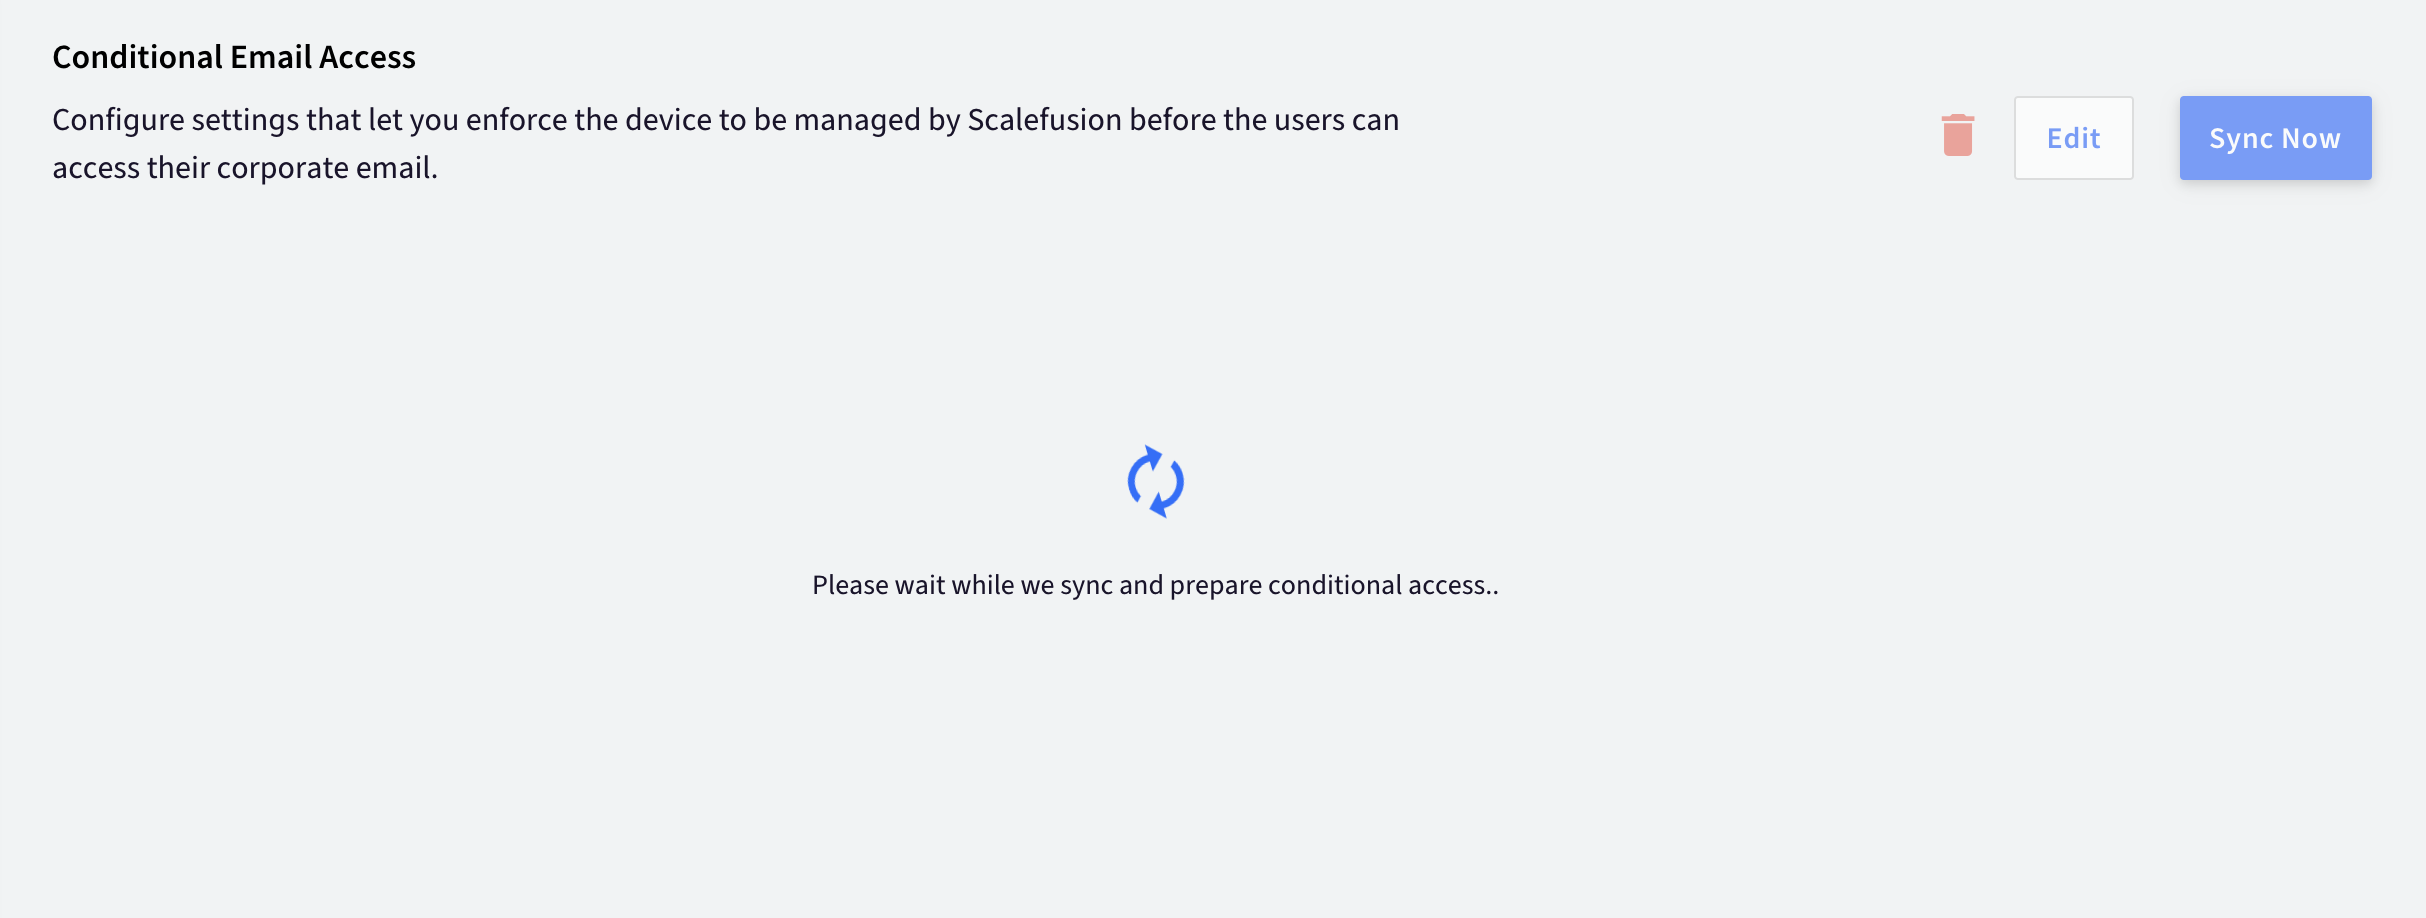 The Sync usually takes around 30 minutes of time, during which the CEA section is disabled to ensure consistency.
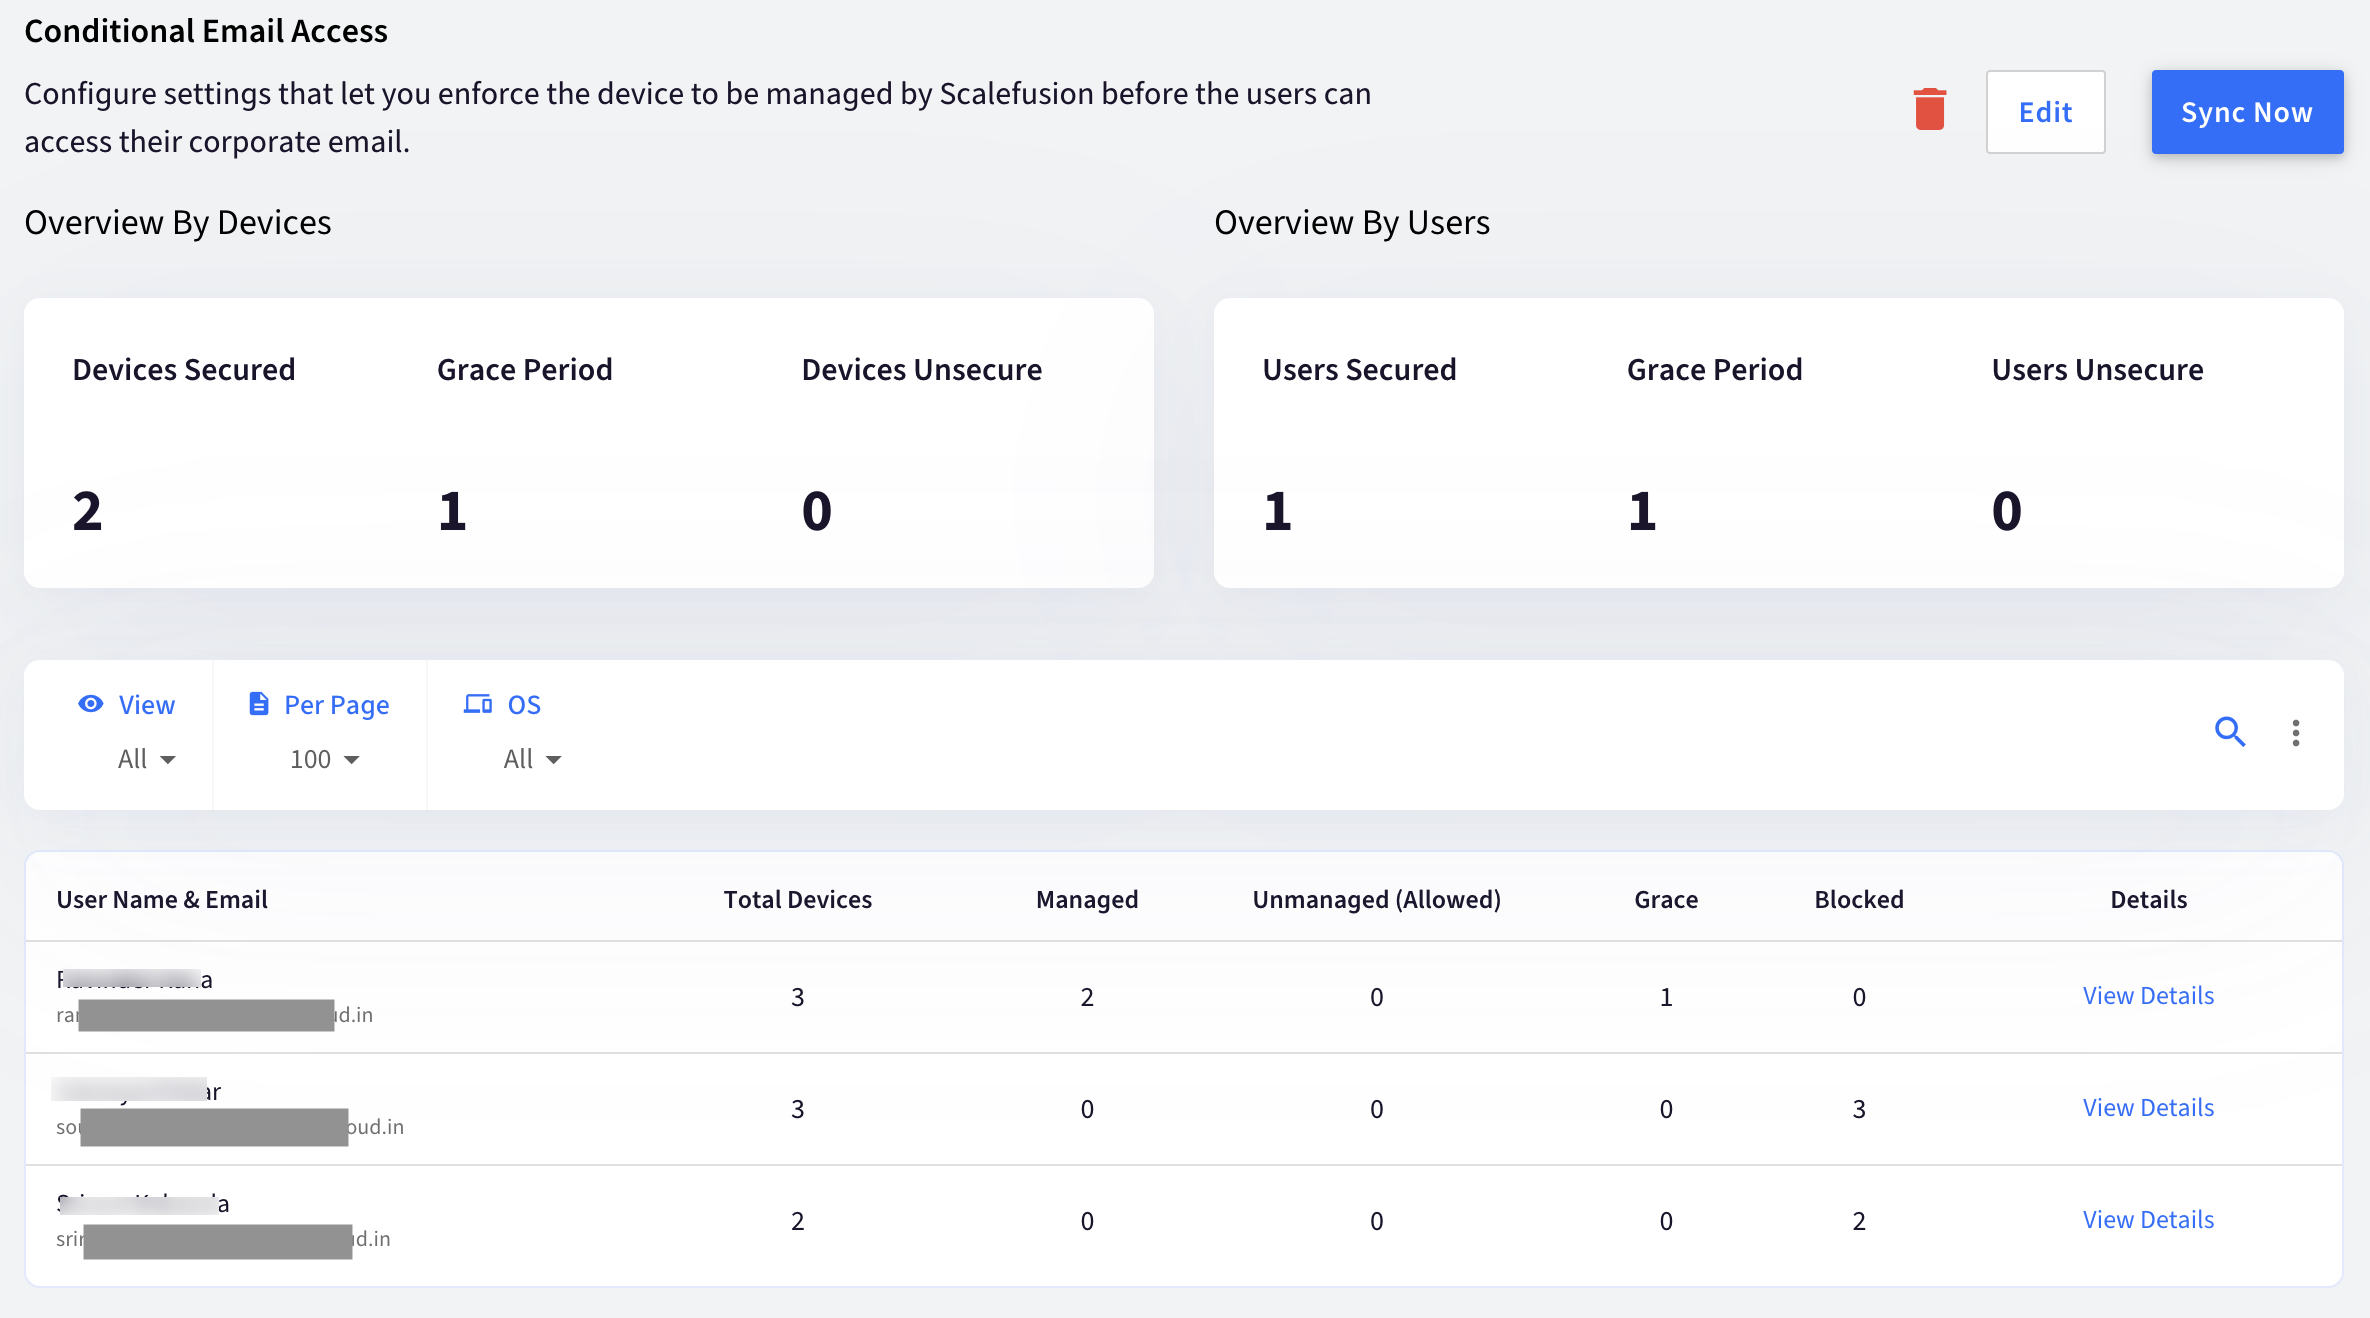
 - Once the initial sync is successful, you will start seeing the information updated as shown below,
Step 3: Update the Device Profiles
Once CEA is configured, you would have to update the device profiles so that users can get access to the applications that they are required to Sign in and access emails. These applications are based on the platforms,
- Android: In all the Corporate Owned (Kiosk) profiles and BYOD profiles that you had selected as Default Enrollment profiles, enable GMail and Google Chrome applications.

- iOS: If you are managing Supervised/DEP devices, then allow Safari and Mail application on the device profile.

- Windows: There are no specific changes required, but please note that in Windows, CEA or in general, Exchange configurations can be published only to the admin/enrolled accounts. Exchange configuration will not work for standard accounts or restricted accounts.
Now that you have configured CEA go through our document on the CEA Control Panel to learn about the information that is displayed here, various states of devices and how to manage them.
Frequently Asked Questions
Question: Why do we see an exclamation (!) mark once we have configured the CEA?
Answer: This can happen for the following two reasons,
- No Imported/Added Users: If you have not imported any users and are trying to configure CEA. Please contact our support to remove the CEA and start afresh.
- Invalid Powershell Administrator credentials: If the administrator credentials have been changed, post the configuration. Please edit the configuration and update the credentials.
Question: Why do all users see a Quarantine message once they access email on new devices even though they are not part of target users or are imported to Scalefusion?
Answer: To achieve CEA, by default, the global access policy is set to Quarantine, which means that all users attempting to access emails on new devices, irrespective of being imported/added to Scalefusion, will be quarantined.
Once Scalefusion detects these users and their new devices based on the periodic sync, it applies the policies and allows the users access to emails if allowed by policy.
Question: Why are the options to Edit, Delete and Sync disabled?
Answer: This is by design. During a sync operation, we disable the options to avoid any conflicts.
Question: What is the default Sync duration, or how often does Scalefusion detect changes?
Answer: Scalefusion detects changes every 2 hours.
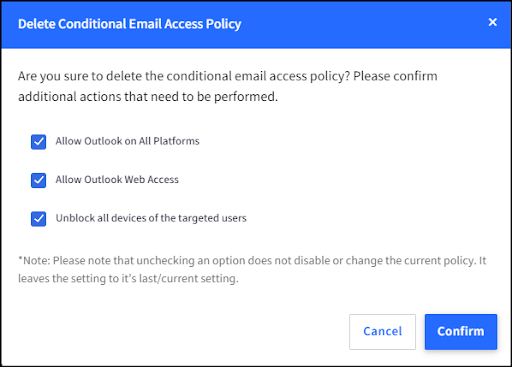
Question: What would happen if you delete the CEA configuration?
Answer: Scalefusion would do the following,
- Revert the Global Policy from Quarantine to Allowed
- Stop managing email access on new and existing devices.
- Delete all the data related to users and their devices.
- Provide option to perform the following additional actions:
- Allow/Disallow Outlook access on all platforms
- Allow/Disallow Outlook Web Access
- Unblock all devices of the targeted users: When a CEA configuration is removed, IT administrators have the option to allow all affected users and their devices to regain access to their emails.
Question: What happens when the target for CEA policy is changed from All users to Imported users?
Answer: Scalefusion unblocks all devices and users that have been previously blocked from accessing email and are not imported. This means that even if these users were previously blocked due to CEA policy restrictions, they may be able to access email again after the target is changed.
Question: What happens when a user is deleted from the Scalefusion Dashboard and CEA policy is already configured?
Answer: When a user is deleted from the Scalefusion Dashboard, their devices are automatically unblocked from accessing email. The user will no longer be restricted from using email services, even if they were previously blocked due to Scalefusion policies.