Compliance Reports enable IT Administrators to verify whether managed devices comply with defined organizational security and software standards. The feature provides visual data breakdowns along with downloadable detailed reports based on operating system versions, application versions, and device encryption statuses.
Key Capabilities
OS Version Compliance: Verify if devices are running specific or minimum/maximum required operating system build versions.
Application Version Compliance: Audit specific applications across managed endpoints using platform-specific identifiers (Bundle IDs, Package Names, or App Names).
Encryption Status Compliance: Monitor full-disk encryption state across endpoints using native security mechanisms (BitLocker for Windows, FileVault for macOS).
DeepDive Integration: Save frequently used compliance queries directly as custom widgets in the DeepDive analytics dashboard.
Scheduled Reporting: Schedule automated compliance checks and receive periodic reports directly via email.
Pre-requisites
You should either be subscribed to Enterprise Plan or Scalefusion 360 plan or the feature must be enabled for your account
Access with permissions to view Reports and DeepDive dashboards.
Platform Agents:
Windows: Scalefusion MDM Agent installed (required for BitLocker encryption checks and OS build comparisons).
macOS: Scalefusion MDM Client installed (required for FileVault status tracking).
Android & iOS: Enrolled under Scalefusion Management with reported app and device inventory.
Platforms
Compliance criteria and supported operating systems:
Steps
Accessing Compliance Reports
Log in to the Scalefusion Dashboard.
Navigate to Reports & Workflows > Reports.
Click on the Compliance Report card.
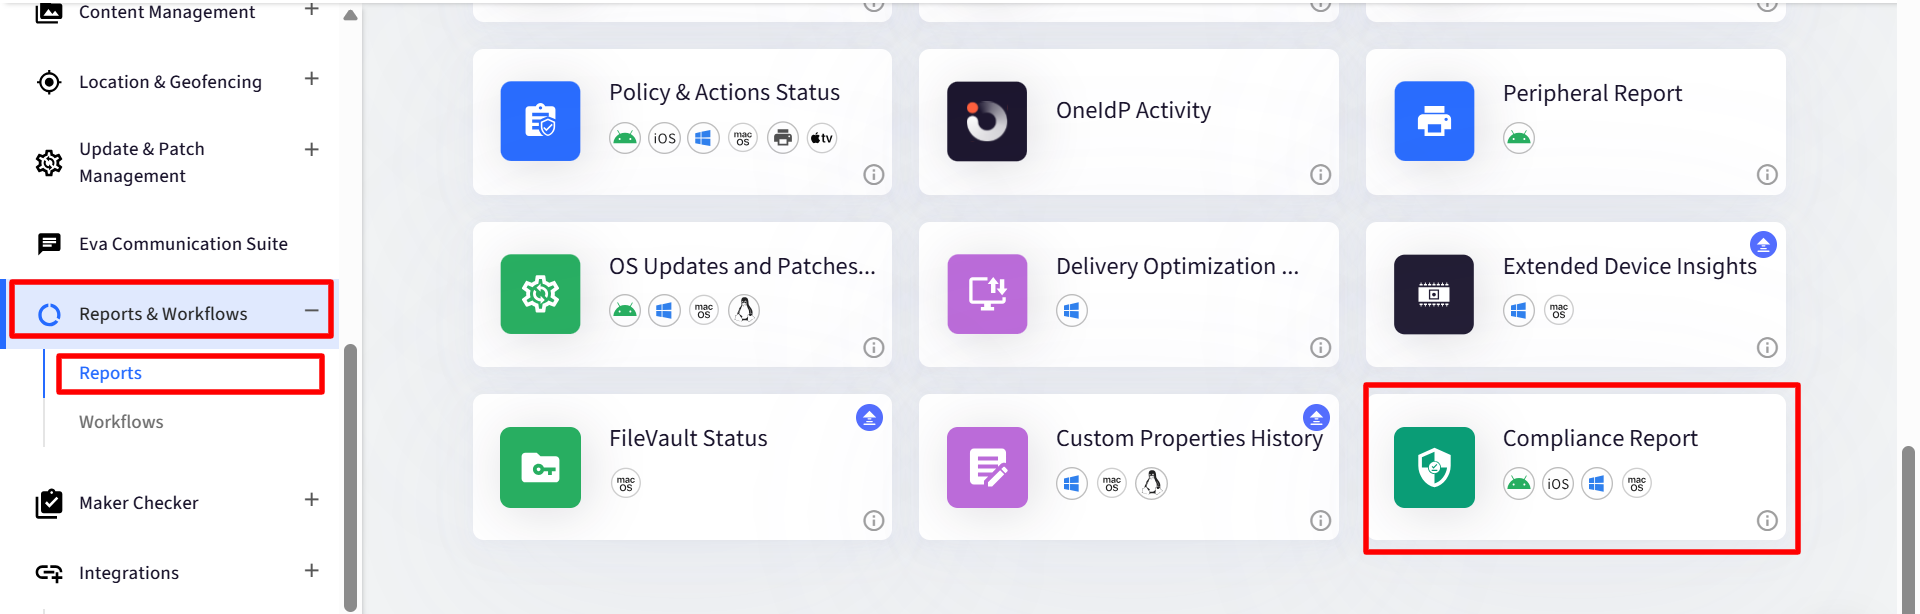
Configuring Report Filters
In the Filter Panel, select your target parameters:
Generating Criteria Reports
1. OS Version Compliance
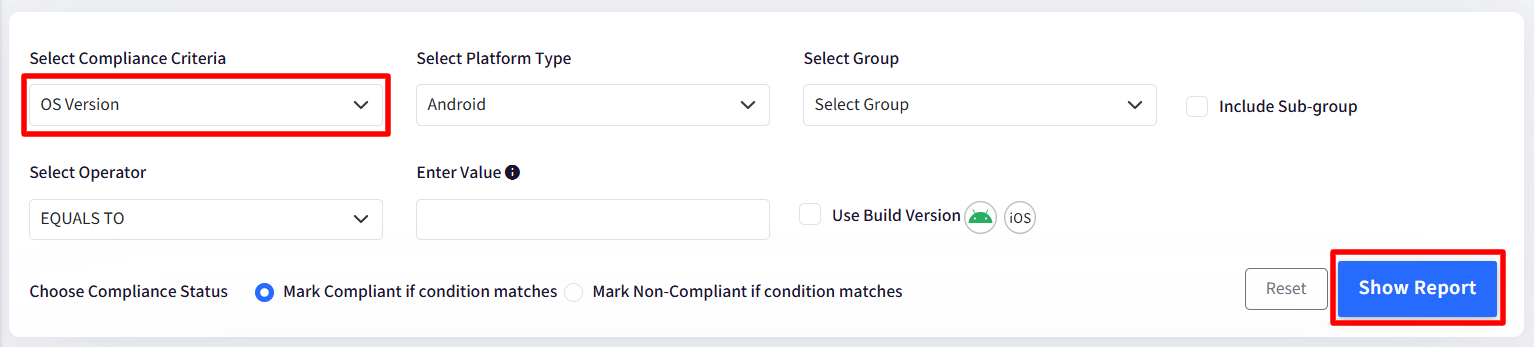
Select OS Version under Compliance Criteria and pick your target Platform.
Select Operator and Enter Value (For Android/iOS/macOS): Enter the OS Version that is displayed in Device Details
Select the target Group and toggle Include Sub-groups if required.
(Optional for Android/iOS) Check Use Build Version to validate against exact build numbers instead of commercial OS version strings.
Note: When Use Build Version is selected, the operator is restricted to EQUALS TO and NOT EQUALS TO.
(Windows OS Version): Click on Add Condition to configure conditions. These are to be entered in the right side panel
Select Operator and Enter Value: Enter the OS Version that is displayed in Device Details
Use Revision Number for Comparison: Compares based on the UBR (Update Build Revision) part of the version string.
Use Build Number for Comparison: Validates both the build number and revision number against the specified condition.
Exclude Devices with a different Build Number: Excludes devices from total count evaluation if their build number does not match.
You can add a maximum of 5 conditions
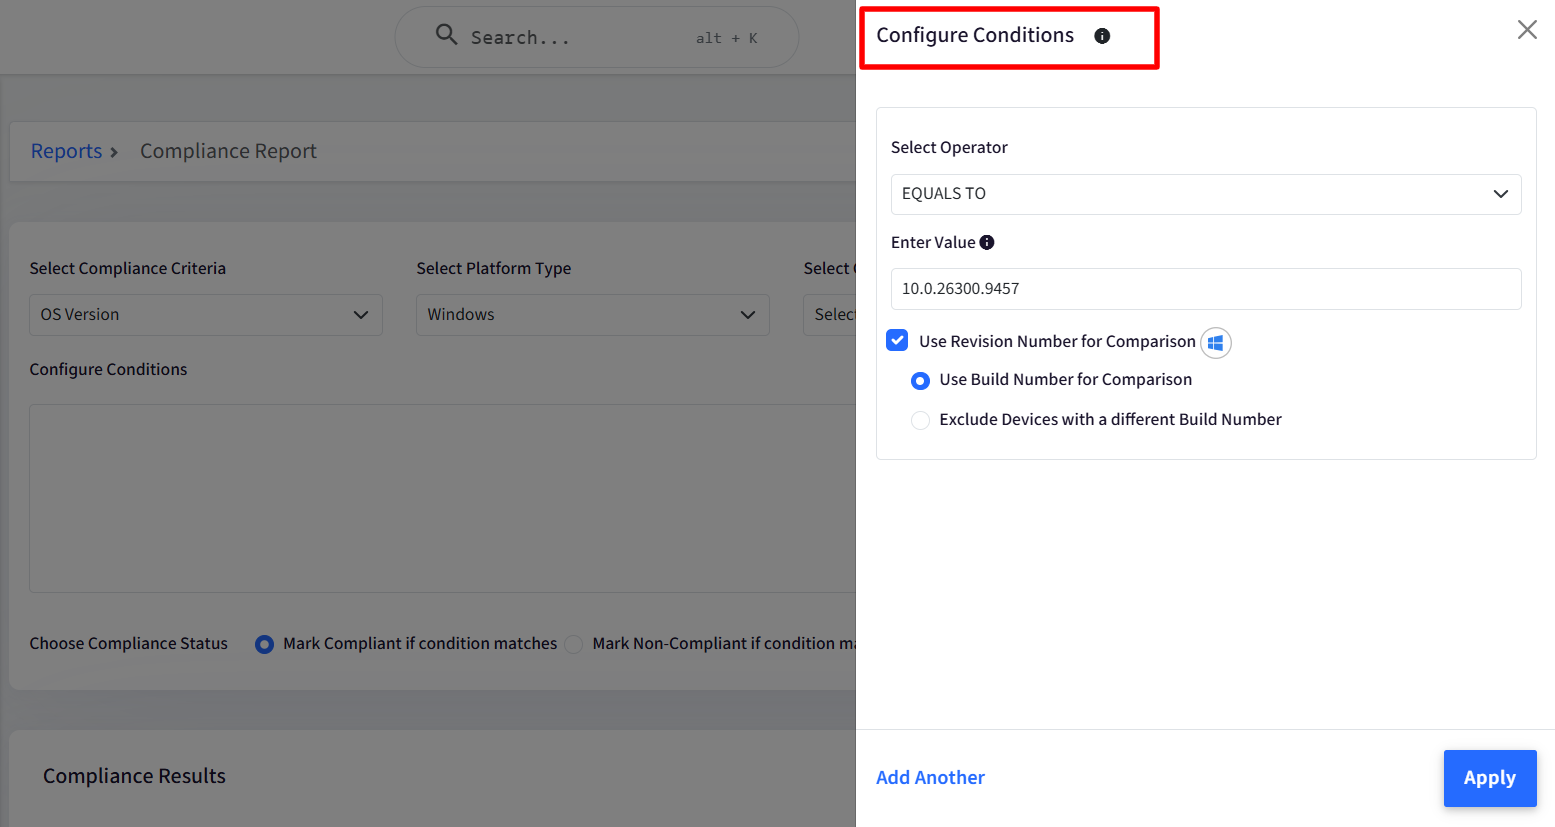
Choose the comparison Operator and enter the OS Version Value.
Under Choose Compliance Status, select whether matching devices should be classified as Compliant or Non-Compliant.
Click Show Report.
Example: Identifying Windows Devices Missing Security Patches
Scenario: You want to flag all Windows 11 devices running a build release lower than
10.0.26300.9457as Non-Compliant so IT can push necessary updates.Configuration Steps:
Under Select Compliance Criteria, select OS Version.
Set Select Platform Type to Windows.
Click Configure Conditions (or Add Condition) to open the drawer:
Select Operator:
LESS THANEnter Value:
10.0.26300.9457Enable Use Revision Number for Comparison to ensure accurate patch-level precision.
Click Apply.
Under Choose Compliance Status, select Mark Non-Compliant if condition matches.
Click Show Report.
Expected Outcome:
All Windows devices on builds prior to
10.0.26300.9457will be marked as Non-Compliant, enabling administrators to filter and download the list of endpoints requiring immediate patch deployment.
2. Application Version Compliance
Select Application Version under Compliance Criteria and pick the Platform.
In the Configure Conditions window that opens on the right side, enter the conditions based on the platform:
Windows: Application Name and Application Type (Win32 or UWP)
macOS / iOS: Bundle ID
Android: Package Name
(Android Only) Toggle Use Version Code to compare numeric version codes instead of version.
Select the comparison Operator and specify the version string or code value.
Enter Value: Enter the app version name to validate against.
You can configure a maximum of 5 conditions
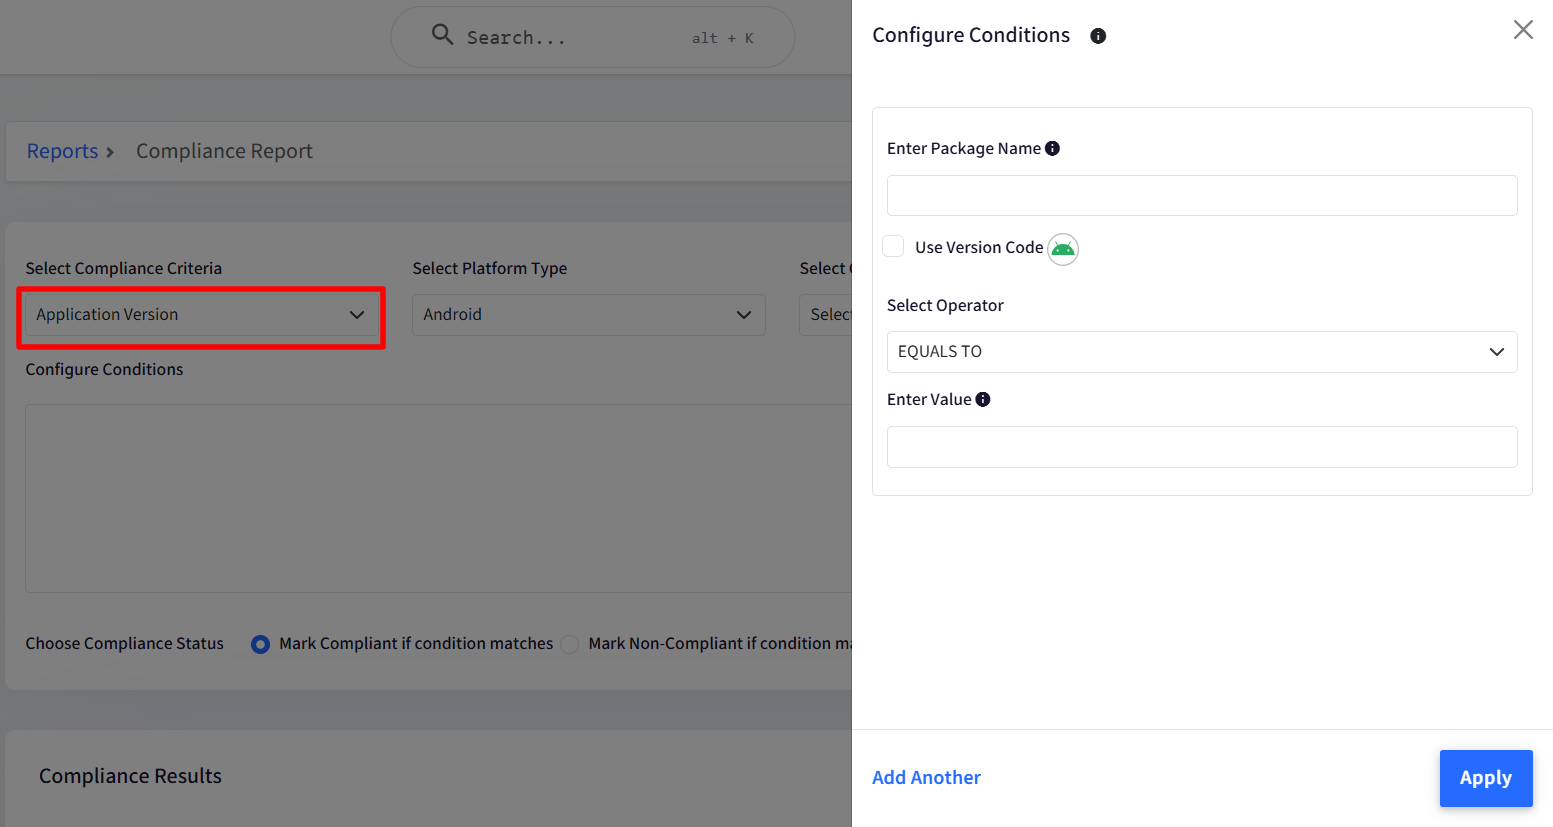
Under Choose Compliance Status, select whether matching devices should be marked Compliant or Non-Compliant.
Click Show Report.
Example: Audit Outdated Web Browsers Across Managed Windows Devices
Scenario: Security policy mandates that all Windows devices must run Google Chrome version
145.0.7632.68or higher. Any device running an older version should be flagged as Non-Compliant.Configuration Steps:
Under Select Compliance Criteria, select Application Version.
Set Select Platform Type to Windows.
Select your target Device Group.
In the Configure Conditions area, click Add Condition:
Application Identifier: Enter
Google Chrome.Select Operator: Select
LESS THAN(<).Enter Version Value:
145.0.7632.68.
Under Choose Compliance Status, select Mark Non-Compliant if condition matches.
Click Show Report.
Expected Outcome:
Non-Compliant: Any device running Google Chrome lower than
145.0.7632.68.Compliant: Devices running version
145.0.7632.68or higher.Not-Installed: Devices where Google Chrome is not detected in the software inventory.
3. Encryption Status Compliance
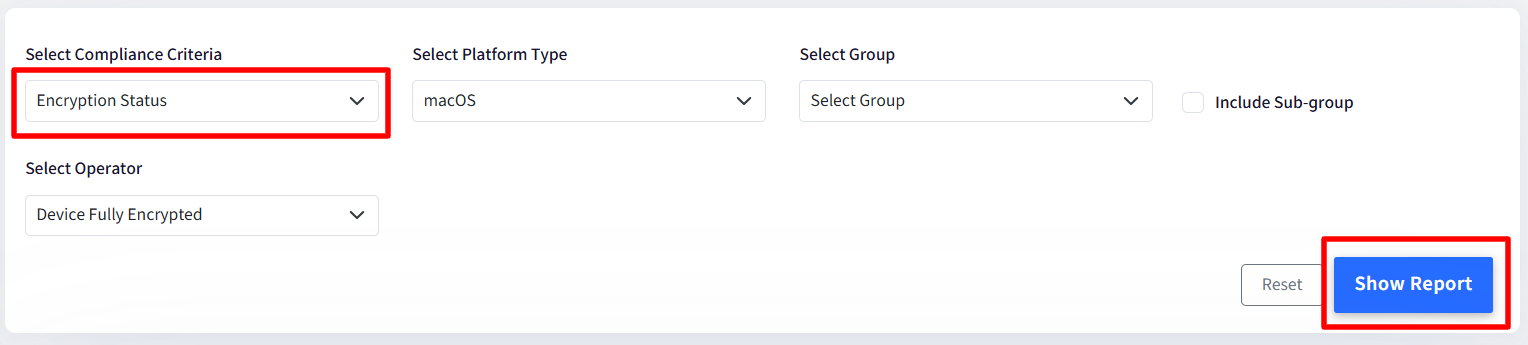
Select Encryption Status under Compliance Criteria (Platform automatically restricts to Windows and macOS).
Select the target Group.
The operator defaults to Device Fully Encrypted.
Click Show Report.
Example: Auditing BitLocker Encryption Across Windows Workstations
Scenario: Your corporate security policy mandates that all Windows laptops assigned to the Finance department must have full-disk BitLocker encryption active. You want to generate a report identifying any non-compliant devices.
Configuration Steps:
Under Select Compliance Criteria, choose Encryption Status.
Under Select Platform Type, select Windows.
Under Select Group, choose Finance Devices (check Include Sub-group if evaluating sub-teams).
Under Select Operator, select Device Fully Encrypted.
Click Show Report.
Expected Outcome:
Compliant Devices: Windows machines where all disk volumes have active BitLocker protection.
Non-Compliant Devices: Laptops where BitLocker is disabled, turned off, or waiting for initial encryption on secondary drives.
CSV Export Summary: The exported CSV will provide granular details per endpoint, including drive-by-drive BitLocker status, protection state, and drive encryption algorithms (e.g., AES-128 / AES-256).
Report Outputs
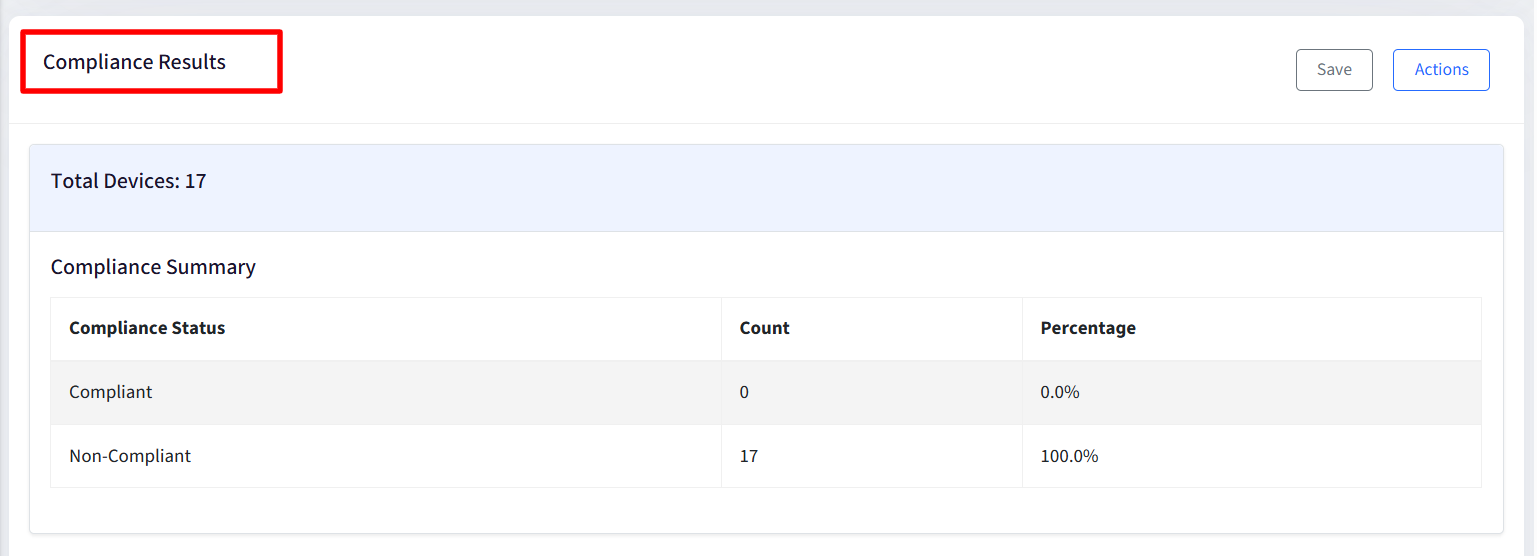
Upon clicking Show Report, a Summary Card and visual breakdowns are displayed
Compliance Summary Metrics
Total Devices: Total count of devices matching the platform, edition, and group criteria.
Compliant: Devices marked compliant according to the selected result classification.
Non-Compliant: Devices failing or classified as non-compliant according to the selected result classification.
Unknown / Not-Installed:
Unknown: Devices with missing status.
Not-Installed (App Compliance): Devices missing the specified application.
Breakdown Table
When Mark Compliant if condition matches is selected, the breakdown displays compliant devices grouped by OS/App version.
When Mark Non-Compliant if condition matches is selected, the breakdown lists non-compliant devices.
Actions
Clicking on Actions button over Compliance Results helps you perform following:

Downloading CSV Reports
Click Download As CSV under Actions.
The report processes in the background. If generation takes longer than expected, the file is automatically dispatched to your admin email address.
Report Output Fields
OS Version Export: Device Name, Device Group, Hostname, Serial #, IMEI #, Platform, OS Version Name, OS Version, Last Connected At, Compliance Status.
Application Version Export: Device Name, Device Group, Hostname, Serial #, IMEI #, Platform, Application Name/Bundle ID/Package Name, Application Version, Application Version Code, Last Connected At, Compliance Status, Overall Compliance Status
Encryption Status Export:
Windows: Device ID, Device Name, Host Name, Device Group, TPM, Last Connected At, Drive Letter, OS Drive, Algorithm, Encryption Status, Lock Status, Device Protection Status, Drive Protection Status, Drive Presence Status, Compliance Status
macOS: Device Name, Hostname, Serial #, IMEI #, Platform, OS Version Name, OS Version, FileVault Status, Last Connected At, Compliance Status.
Scheduling Reports
Click Schedule on the results card.

Configure execution frequency (Daily, Weekly, Monthly) and add recipient email addresses.
Saved schedules are accessible under Reports & Workflows > Scheduled Reports.
Saving and Managing Compliance Report Criteria
Admins can save frequently used compliance report criteria to avoid repeatedly entering filters when generating complex compliance reports. Saved criteria can be loaded, updated, and deleted as needed.
1. Saving Compliance Criteria
Once a compliance report is displayed, the Save option appears to the left of Actions.

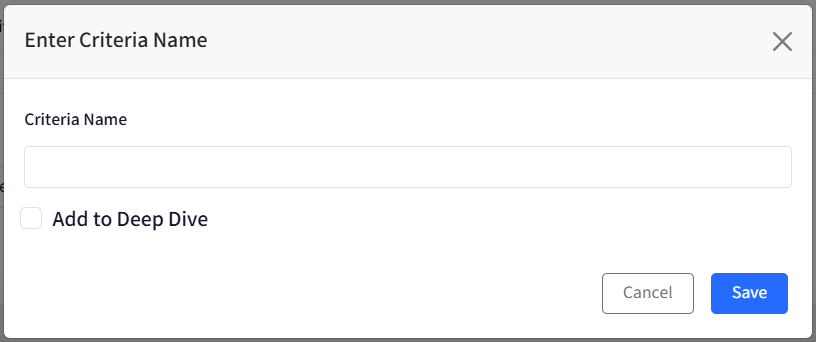
Selecting Save opens a dialog.
Enter Compliance Criteria Name
Limit: A maximum of 25 saved compliance criteria is allowed per account.
Updating existing criteria
If the current report uses previously saved criteria, selecting Save updates the existing record with any additional conditions applied.
2. Loading Saved Compliance Criteria
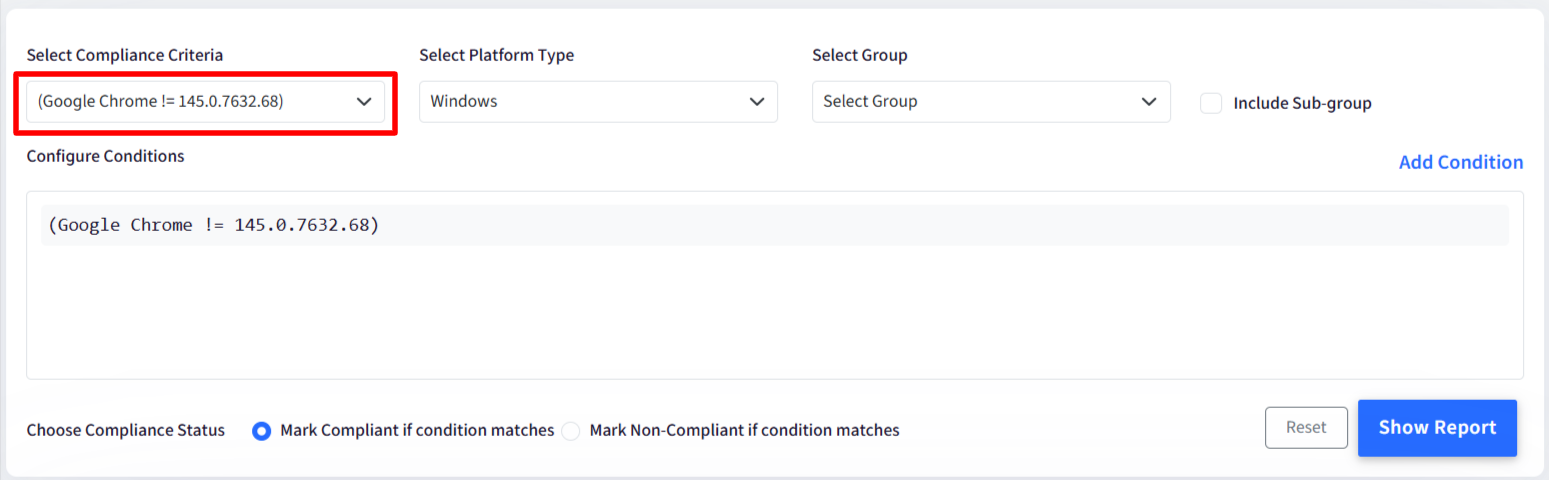
Admins can load saved criteria from the first filter dropdown on the compliance report screen. The dropdown contains two sections:
New: The default filter options, including OS Version, Application Version, and Encryption Status.
Stored: A list of saved compliance criteria, if any exist.
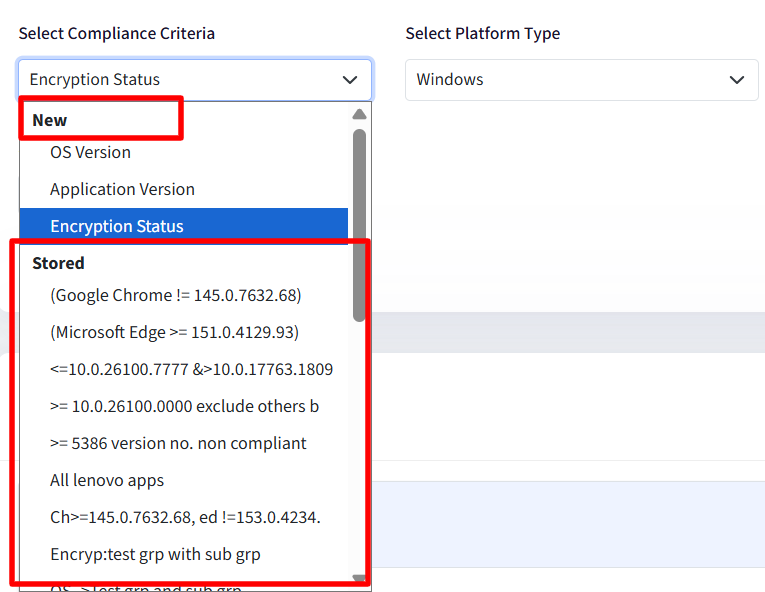
When an Admin selects a saved criterion, the associated filters are populated automatically.
3. Managing Saved Compliance Criteria
Save
Selecting Save updates the selected saved criteria with any additional conditions applied.
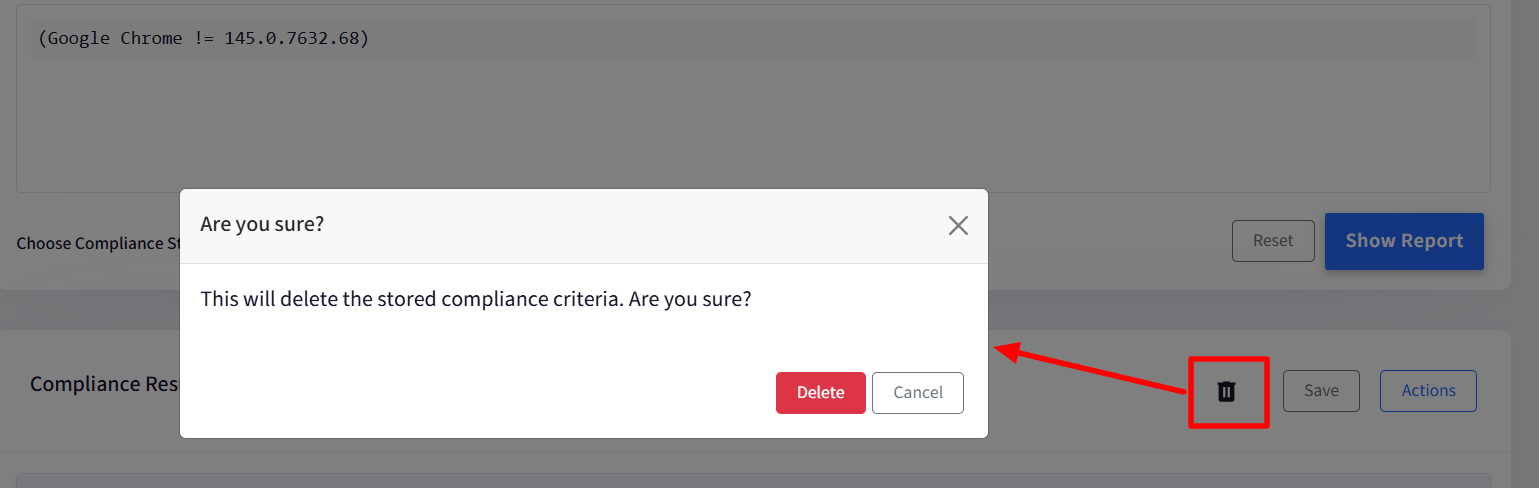
Delete
Selecting Delete opens a confirmation dialog.
Note: The Delete button appears on clicking Show report for a saved criteria.
DeepDive Integration
Save queries directly to the DeepDive analytics dashboard for real-time monitoring.
Click Add to DeepDive in the dialog where you are saving the criteria.
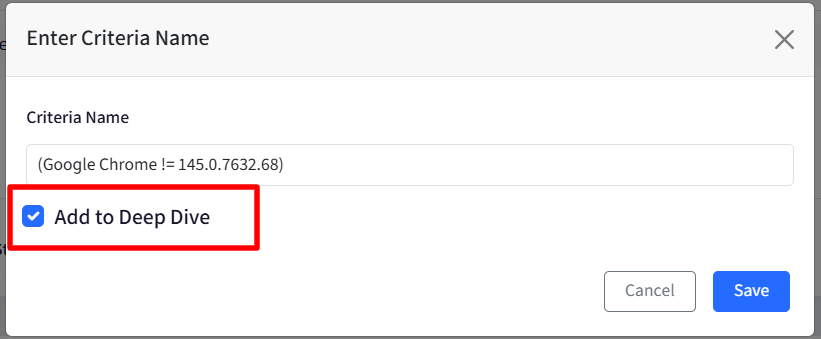
Enter a unique Compliance Card Name and click Save.
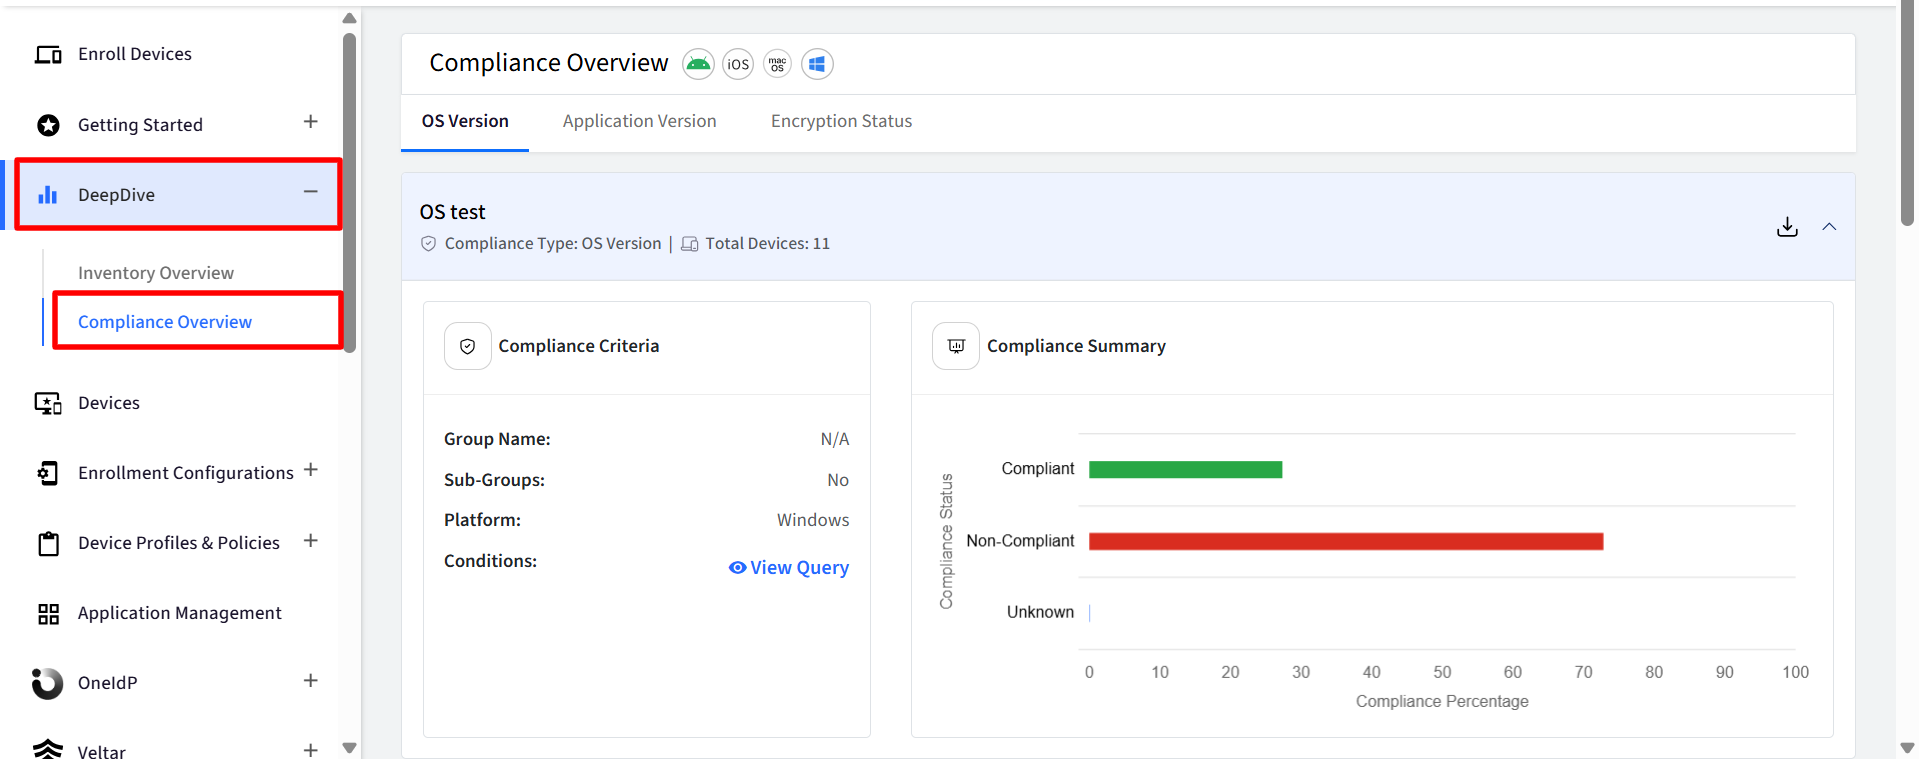
Navigate to DeepDive > Compliance Overview section to view saved card summaries, compliance percentage breakdowns, and status bar charts.
Deepdive Integration Features
Download Reports: Download reports for saved queries directly from the Compliance Overview page.
View Configured Queries: View the configured queries and their details using the View Query option.
Query Status: The status of the first query is displayed when navigating to the Compliance Overview page. All other queries will remain in the Calculating state until opened.