Eva Phone is a part of Eva Communication Suite that addresses the Call and contact management challenges. With Eva Phone, an organization can have unified contact lists across all Scalefusion-managed android devices and control outgoing and incoming calls at a very granular level. Eva Phone helps reduce the overall cellular costs of a company by a great margin and streamlines your voice call traffic.
In this document, we will see how to enable Eva Phone, set up the Eva client on Scalefusion-managed devices and create and publish a contact list on Scalefusion Dashboard.
Before You Begin
- Make sure you have the Eva Communication Suite enabled for your account.
- All the devices have been updated to the recent Scalefusion & Eva version
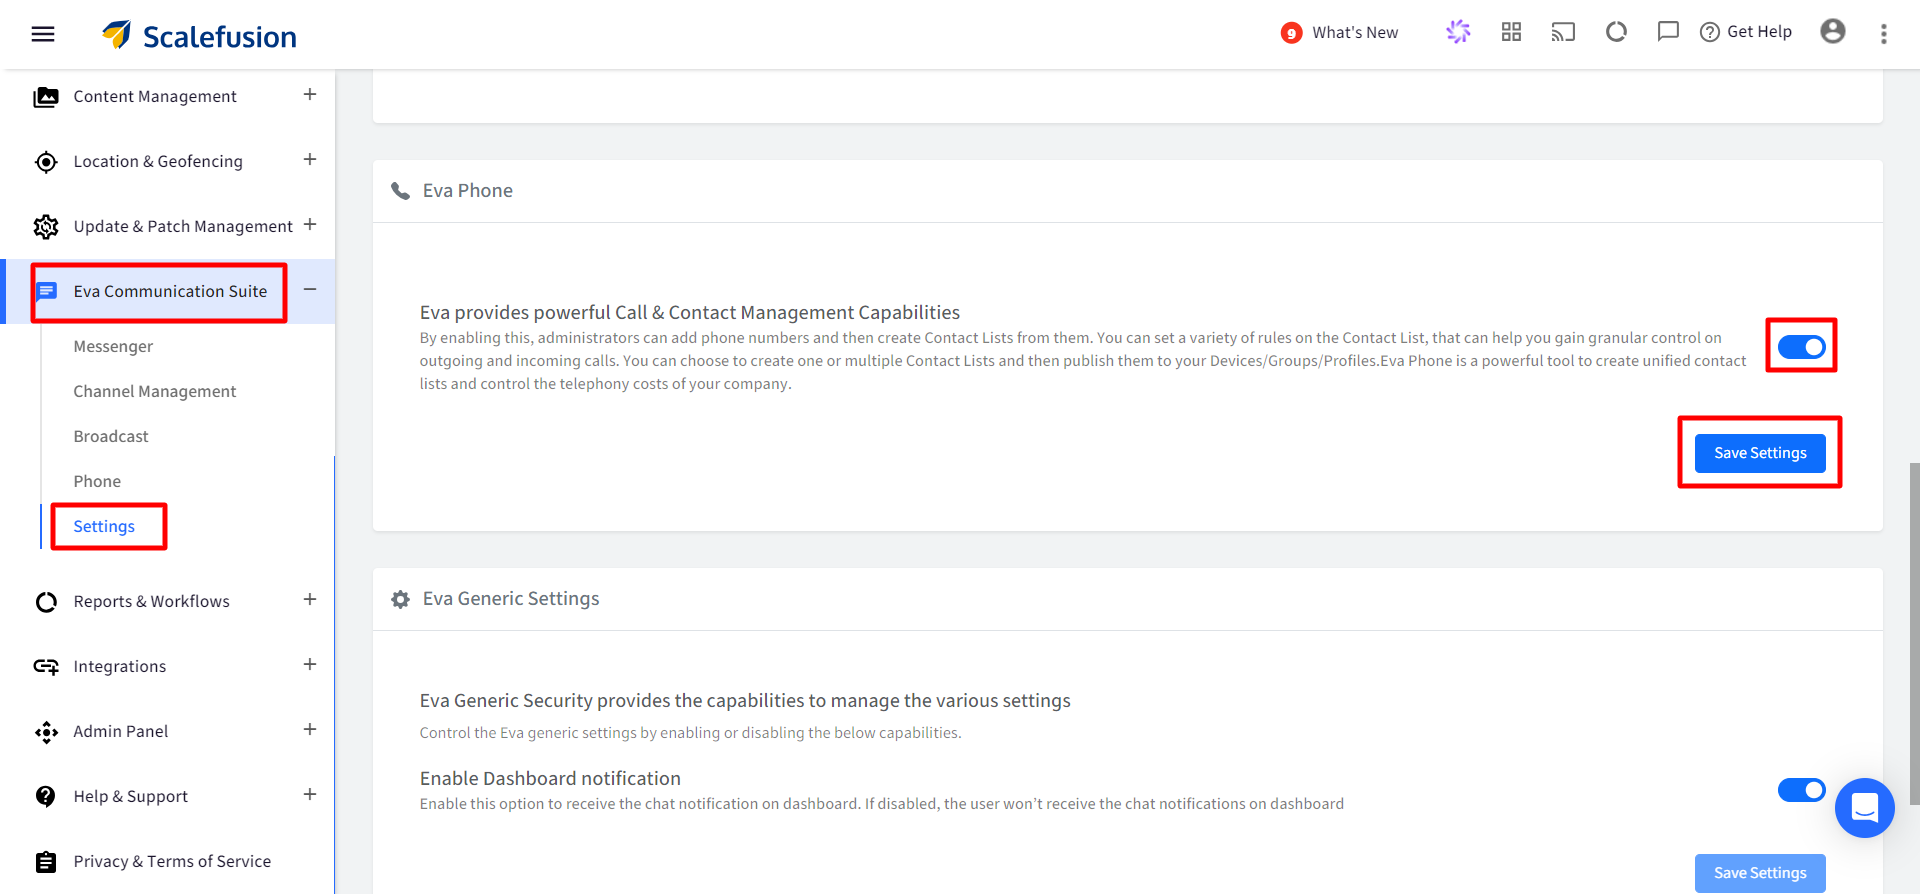
Enable Eva Phone for your Account
- Sign In to Scalefusion Dashboard.
- Navigate to Eva Communication Suite > Settings option.
- Enable the Eva Phone option and click SAVE SETTINGS.
Setting up the Eva Client on Devices
The first step is to set up the Eva client on your devices to start using the Eva Phone features. Please follow the steps below to setup Eva's client to handle Phone features,
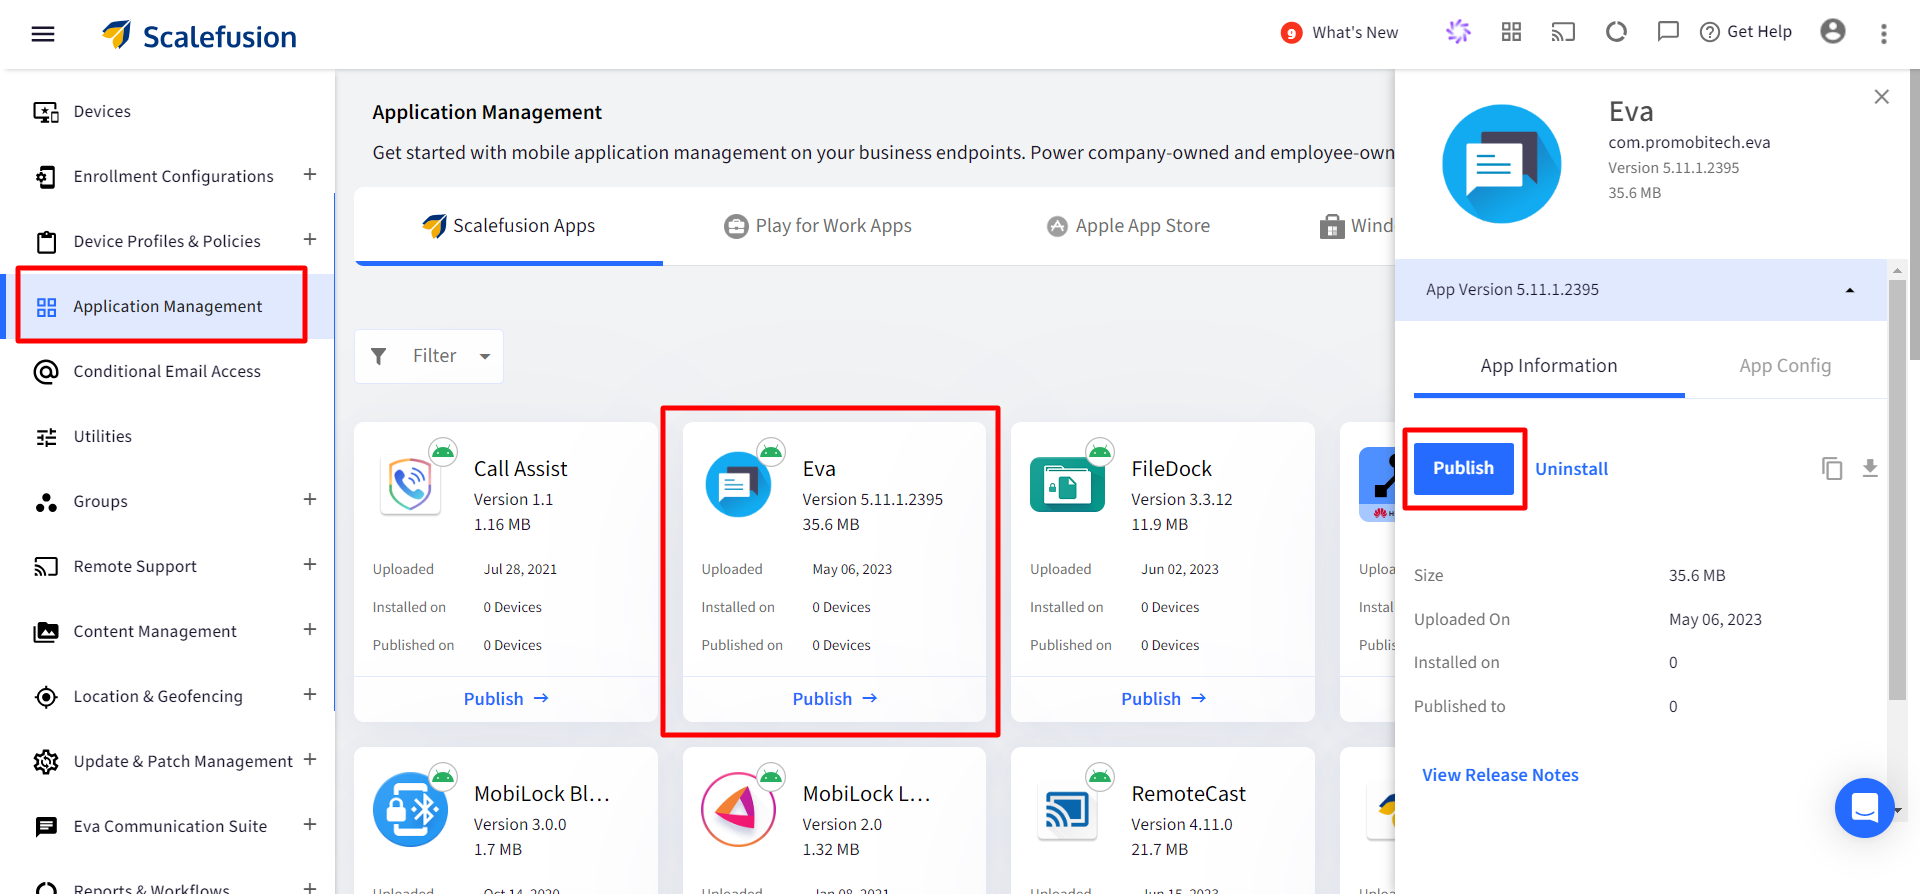
Steps on Scalefusion Dashboard
- Sign In to Scalefusion Dashboard.
- Navigate to Application Management > SCALEFUSION APPS section.
- Click on the Eva app to see the side card. Click on PUBLISH and publish to the device groups, profiles and devices where you want to publish the app,
Steps on Devices
- Once the application has been published, it will be downloaded to the devices. Click on the app icon on the Scalefusion home screen and complete the installation. Once the installation is complete, launch the Eva app.
- For first-time users, the Eva app will silently sign-in to the Scalefusion service. Please follow the onscreen instructions to complete the setup.
- An important step that is common to first-time users or users who are upgrading the application on Android devices 6.0 and above is to set Eva as the default phone application. Once you see the screen below, click on OK.
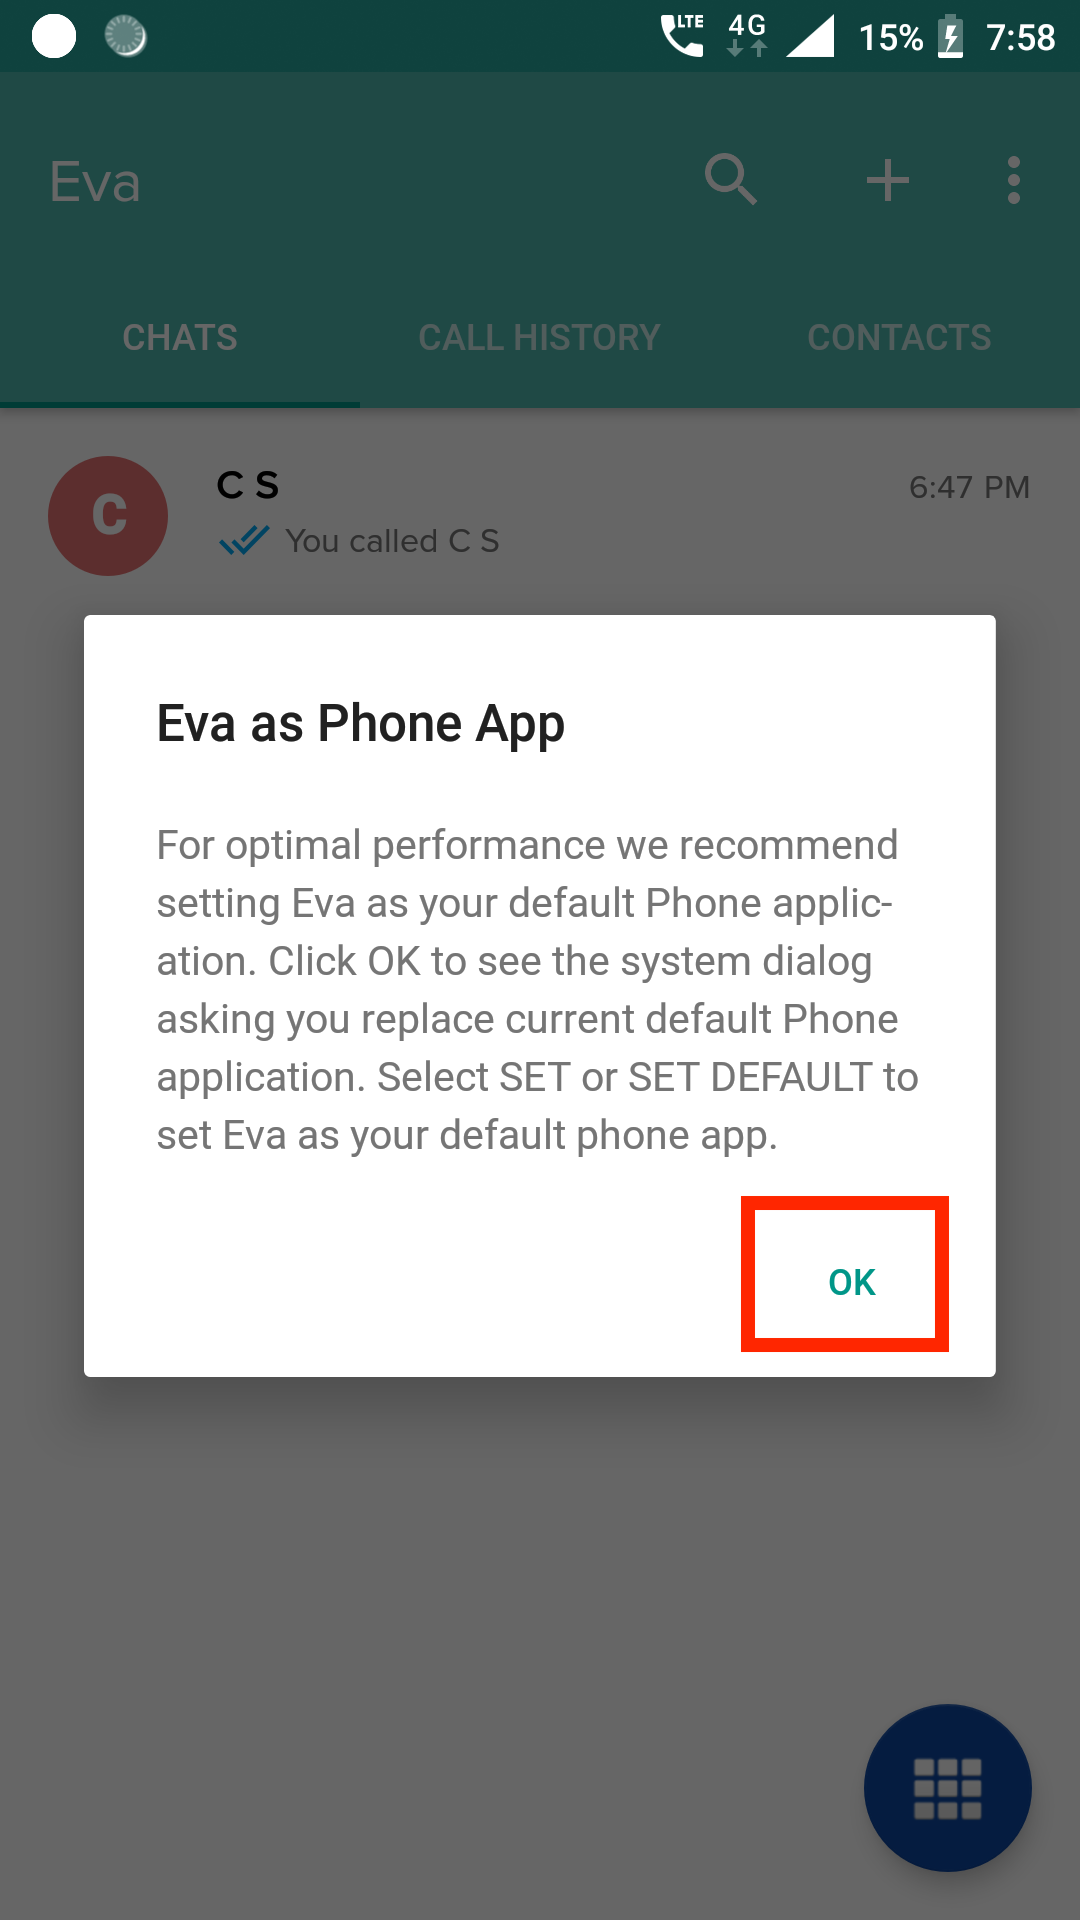
- A system dialog will be shown, asking you to confirm the action. Please select SET DEFAULT.

- Once Eva is setup properly you will see the following screen with 3 tabs,
- CHATS: Displays all the active conversations that the user has.
- CALL HISTORY: Displays the last 100 outgoing or incoming calls.
- CONTACTS: Displays all the contacts that have been published from the Scalefusion Dashboard.Administrators who want to use the Eva app on their Android phones can download the Eva app apk and install it on their personal devices. They need to log in using their admin credentials. However, the setup flow remains the same.
Adding or Uploading Contacts
Once you have enabled Eva Phone and set up the devices, the next step is to start adding Contacts to your Dashboard. This section helps you on how to add or upload your contacts. Please follow the steps below to add contacts or upload them in bulk,
- Sign In to Scalefusion Dashboard.
- Navigate to Eva Communication Suite > Phone.
- By default, you will be on the Contacts tab. This section gives you two options to add contacts,
- ADD CONTACT: Use this option to add one contact at a time.
- UPLOAD CSV: Use this option to upload multiple contacts at once.
- Click on ADD CONTACT to add your first contact. You will see a dialog with the following options,
- Contact Number: Select this option to add a complete contact number, including country code. e.g. +11234567890; here, ‘+1’ is a country code, and ‘1234567890’ is a contact number.
- USSD: Select this option to add a USSD number. e.g #06*#
- Starts With: Select this option when you want to allow or block a series of contact numbers in one go. e.g. +1123456; here, any contact which is start with ‘+1123456’ is allowed or blocked.
- Once you have entered the number, click SAVE to add the number. Once the number has been added, it starts appearing in your Dashboard.
- To upload contacts in bulk, you can use the UPLOAD CSV option. Before you start uploading, download a sample using sample csv using the DOWNLOAD SAMPLE CSV option as shown below,

- The downloaded csv has 3 column headers, “name”, “contact number,” and “used,” with some sample values. Delete the sample values, but DO NOT delete the headers. You can use a text editor like TextEdit or Notepad to edit the csv file.
- Start adding your contact information one by one. If the number being added is not a USSD, then use false. Once done, save the file.
- Now upload the csv file from your computer to Dashboard using the UPLOAD CSV option,

- A dialog will appear. Either use the ‘Browse File’ button to locate the CSV file and upload it or simply drag the CSV file inside this dialog to upload it,
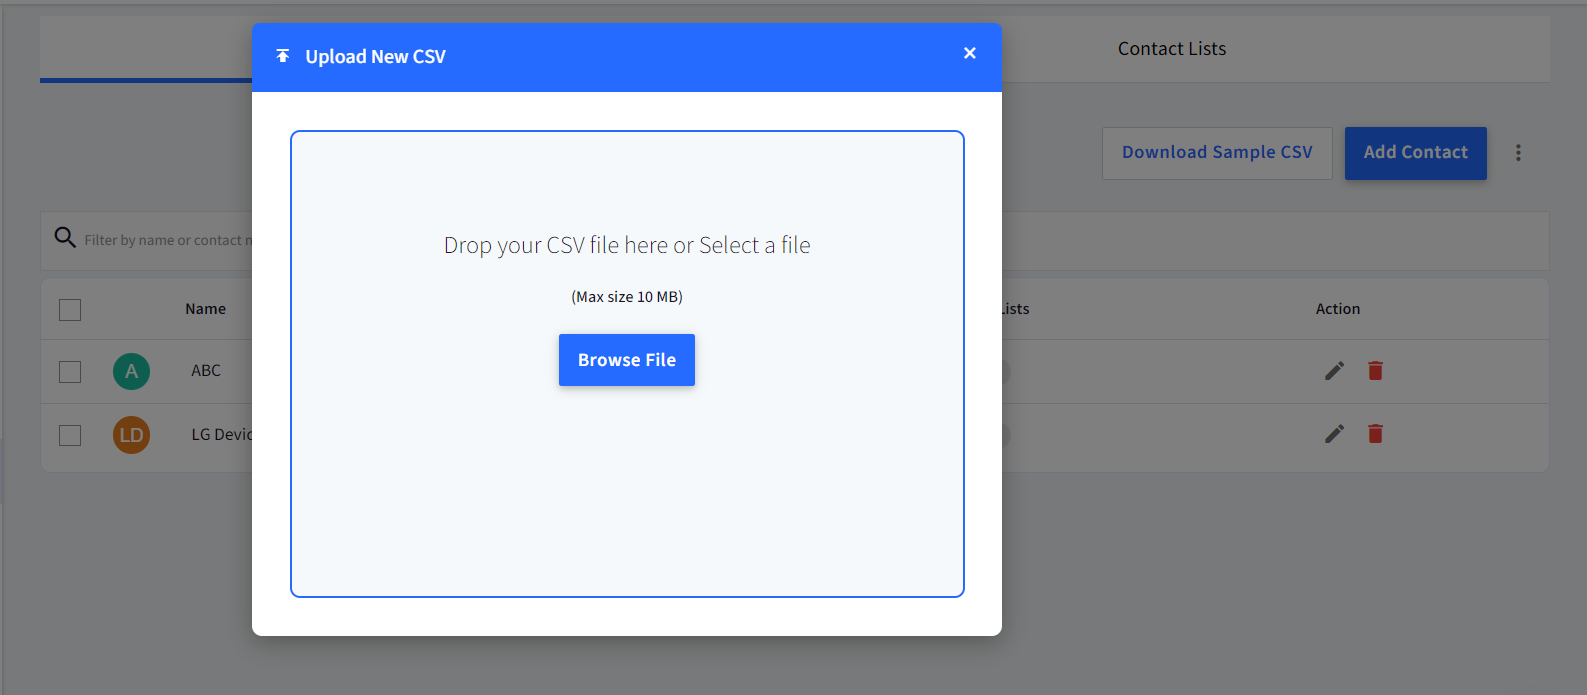
- Once the file is uploaded successfully, the contacts will start appearing in your Dashboard.
Creating Contact Lists
Contact Lists are a great way to organize the contacts that you have added and then set rules against each number or at a contact list level. You can create multiple contact lists each unique and customized for your Device Groups or Device Profiles. Please follow the steps below to create a contact list,
- Navigate to Eva Communication Suites > Phone & click on the CONTACT LISTS tab.
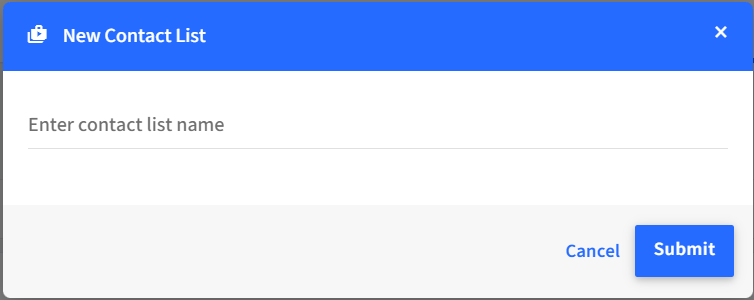
- Click on the NEW CONTACT LIST button and then give a name for the contact list. Enter a name for your contact list in the dialog and click on SUBMIT.
- Now you will be shown the Contact list creator window as shown below,
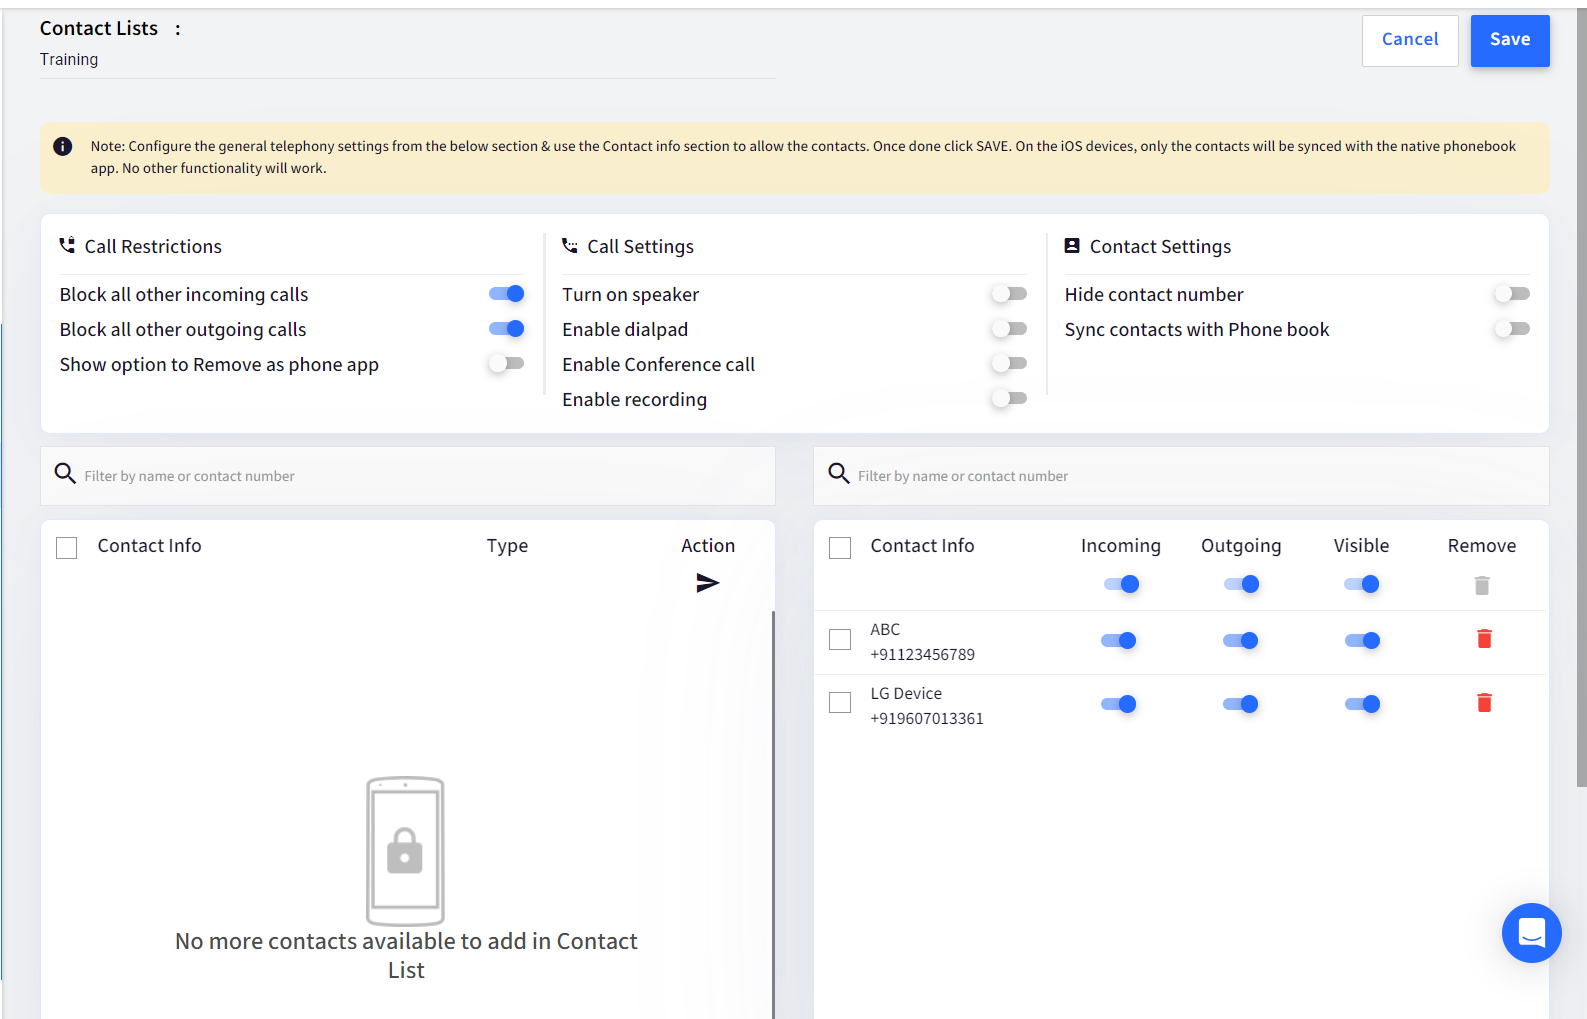 This window has the following options,
- Existing Contacts: This panel on the left-hand side displays all the contacts that have been added to your Dashboard. You can use the arrow keys in this panel to move the contacts to the Contact Lists panel on the right side.
- Settings Panel: This panel on the top displays the generic settings that can be applied to this contact list. The options are,
- Turn on the speaker: This setting is used to automatically turn ON the device speaker during incoming calls or outgoing calls.
- Enable Dialpad: If enabled, the end user will be able to see the dial pad option. Using this option, users can open the Eva dial pad and can dial any number or search for contacts. Only the numbers that are allowed, though.
- Block all other Incoming calls: If enabled, the Eva app will block all incoming calls except for the allowed numbers.
- Block all other Outgoing calls: If enabled, the Eva app will block all outgoing calls except for the allowed numbers.
- Enable Conference Call: If enabled, conference calls can be conducted through the Eva app.
- Enable Recording: Allows recording of calls made via the Eva app.
- Show option to Remove Eva as phone app: Once enabled, the option to remove Eva as the phone app will show up.
- Contact Lists Panel: This panel on the right side is the list of contacts that are a part of this list. This section will show the contacts that you have moved from the Existing Contacts panel. Once a contact has been added to this panel, you can choose to allow or block Incoming and Outgoing calls. At the same time, you can also make the contacts visible or hide them on the app.
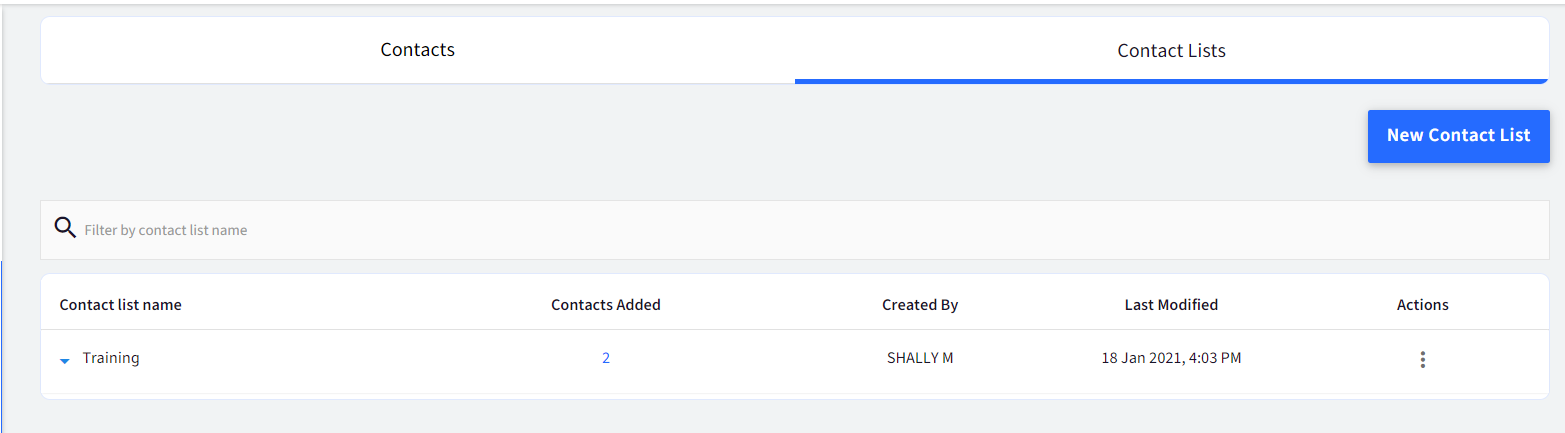
- Once you have created the Contact List, click SAVE. All your contact lists will appear under the CONTACT LISTS tab.
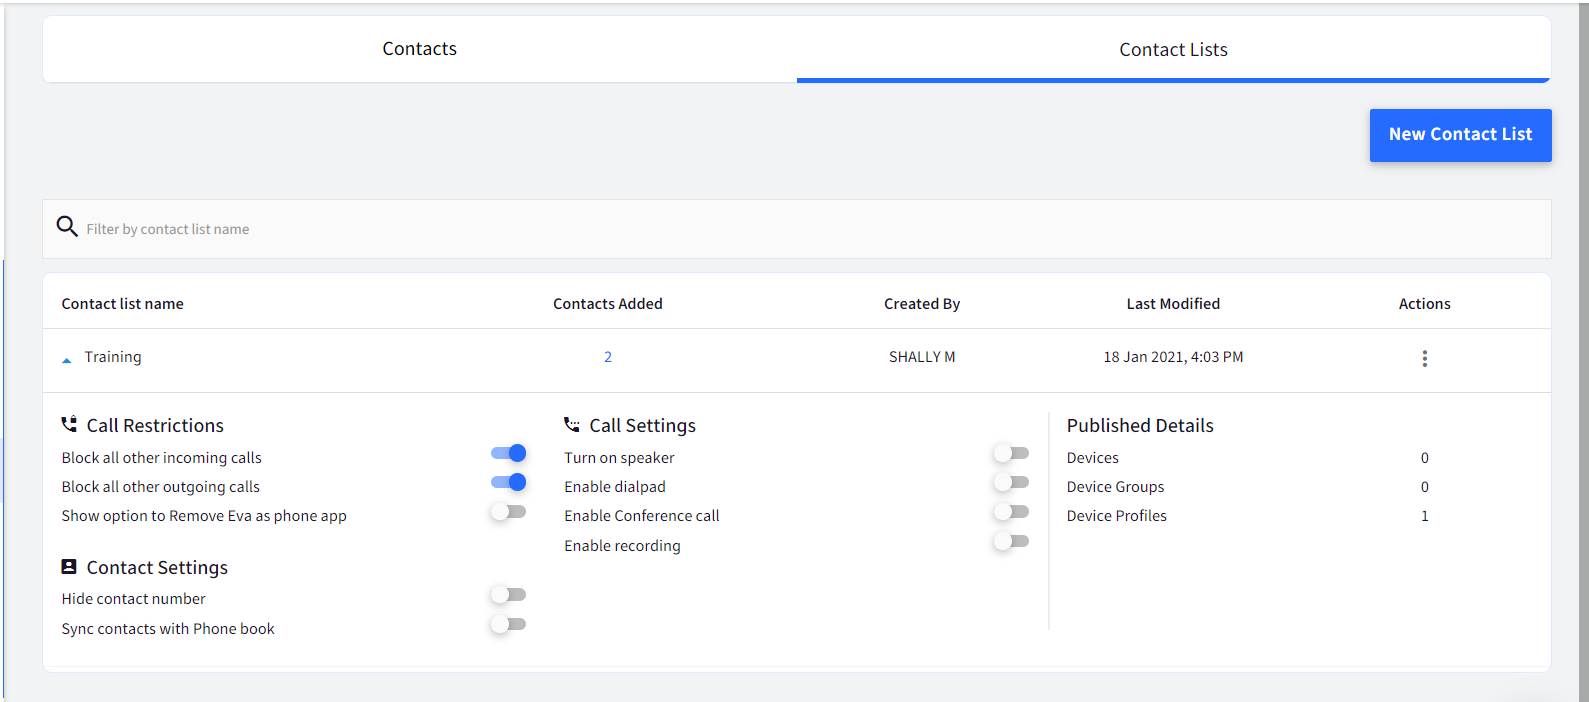
- At any point in time to get a quick snapshot of the Contact List, click on the contact list to see the info panel,
Publishing Contact Lists
Once you have created your contact lists, it is very easy to publish them. Please follow the steps below to publish a contact list,
- Navigate to Eva Communication Suites > Phone & click on the CONTACT LISTS tab. This screen will display all your contact lists.
- Click on the 3 dots to see the actions menu. The options that you see are,
- Publish: Use this option to publish the contact list to your devices, groups or profiles.
- Edit: Use this option to edit the contact list.
- Copy Contact List: Use this option to create a duplicate copy of this list.
- Unpublish: Use this option to un-publish the contact list, and it's settings from all the devices that it is currently published to.
- Delete: Use this option to delete the contact list. Note that this will un-publish the contact lists from all the devices where it is published.
- To publish a contact list, click on 3 dots and select Publish. From the dialog, select Device Groups, Device Profiles or Devices. and click PUBLISH.
How to dial extensions?
- On the Eva Android app, navigate to the Contacts tab & click on any contact. A contact's number will get dialed, and the outgoing call ringing screen will be displayed.
- Once the receiver accepts the call, the call-in-progress screen will be displayed.
- This screen has the dial icon. Click on it to open the dial pad.
- Use this dial pad to dial the extensions.
Frequently Asked Questions
Question: Is it mandatory to make the Eva app as the default Phone application on the device?
Answer: Yes. Starting Android 6.0 is a mandatory step for Scalefusion-managed devices and helps Eva control the outgoing and incoming calls seamlessly. For administrators using the Eva app on their personal devices, this step can be skipped.
Question: Can we set up Eva as a Phone if we did not do it on the first time setup or upgrade?
Answer: Yes. Please click on the 3 dots menu in the Eva application and choose Set Eva as Phone option.
Question: Why don't we see my usual Dial pad or Incoming call screen once Eva is installed?
Answer: That is because once Eva is set as a phone app, it replaces the default phone application and hence shows a custom view.
Question: How do we remove Eva as a Phone app as we no longer wish to use Eva's Phone?
Answer: Yes, this can be done once you disable Eva Phone from Scalefusion Dashboard. Once Eva Phone is disabled, launch the Eva app on the managed device, click on the 3 dots menu in the Eva application and choose the Remove Eva as Phone option.
Question: Do we need a SIM card for Eva Phone features to work on the device?
Answer: Yes. Eva just replaces your default phone app so that it can give you better control over call & contact management. It uses the device's SIM to place all the calls.
Question: Can I publish multiple contact lists to the same Device Group, Profile or Devices?
Answer: No. At any given point in time, only one contact list can be published.