- 25 Sep 2024
- 10 Minutes to read
- Print
- PDF
Application Management
- Updated on 25 Sep 2024
- 10 Minutes to read
- Print
- PDF
ChromeOS allows IT Admins to install and manage Progressive Web-Apps and control the Allow/Block list. The base URL comes from Allowed Website section.
Adding Allowed website URLs
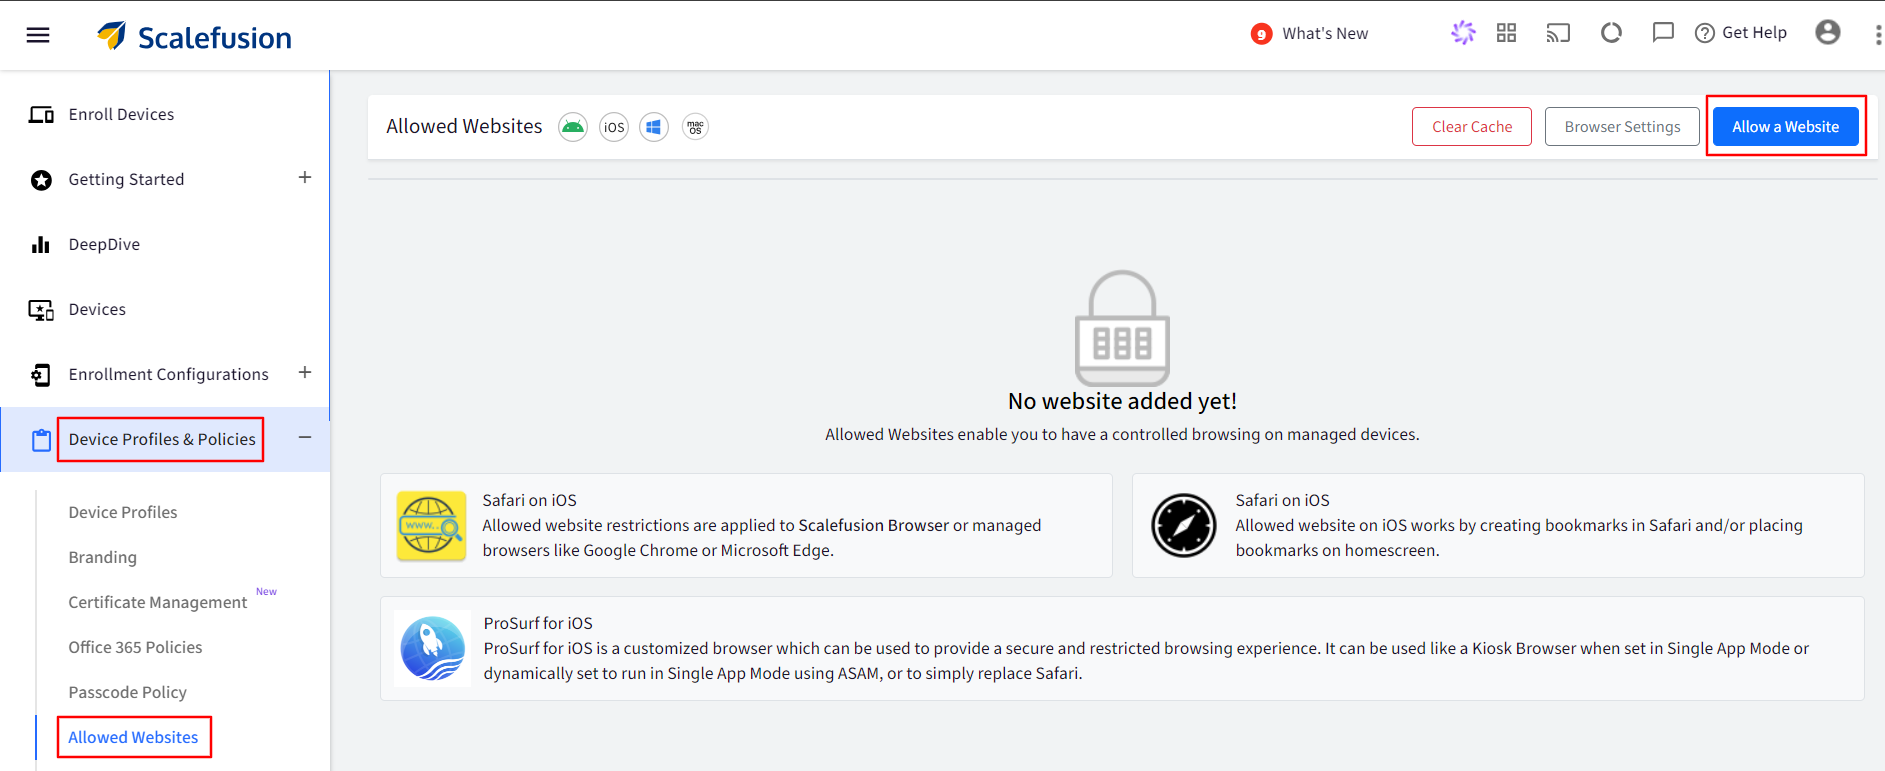
Navigate to Device Profile & Policies > Allowed Websites section.
Click on Allow a website button.
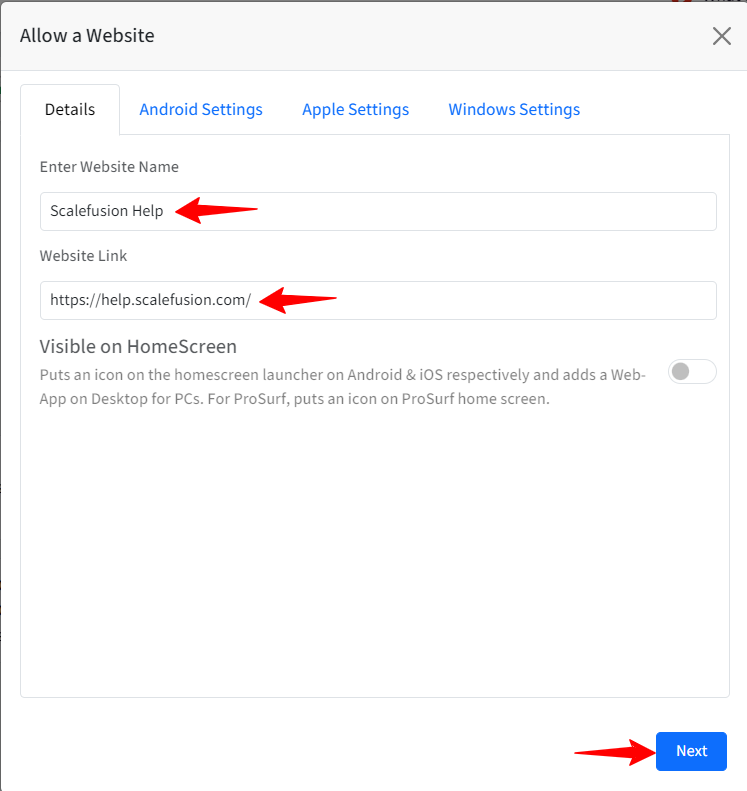
Enter the website’s name and enter the Website Link.
Click on Next to go to last tab and then click on Save button.
The website will be displayed in the list of Allowed websites.

The added website will also be visible within the ChromeOS Profile under Application Management > Web Application section.

Configuring Application Management policies
Navigate to Device Profiles & Policies > Device Profile.
Create a new profile or edit the existing profile.
Expand the Application Management section by clicking on the down arrow button and click on Web Application section.
The Web Application section consists of following sub-sections:
Progressive Web-Apps (PWA): In the section you can configure the URLs that should be installed as Progressive web apps. The section also contains additional settings that can be configured:
Website: Under this you will find the list of all the URLs that you have added in the Allowed website section.

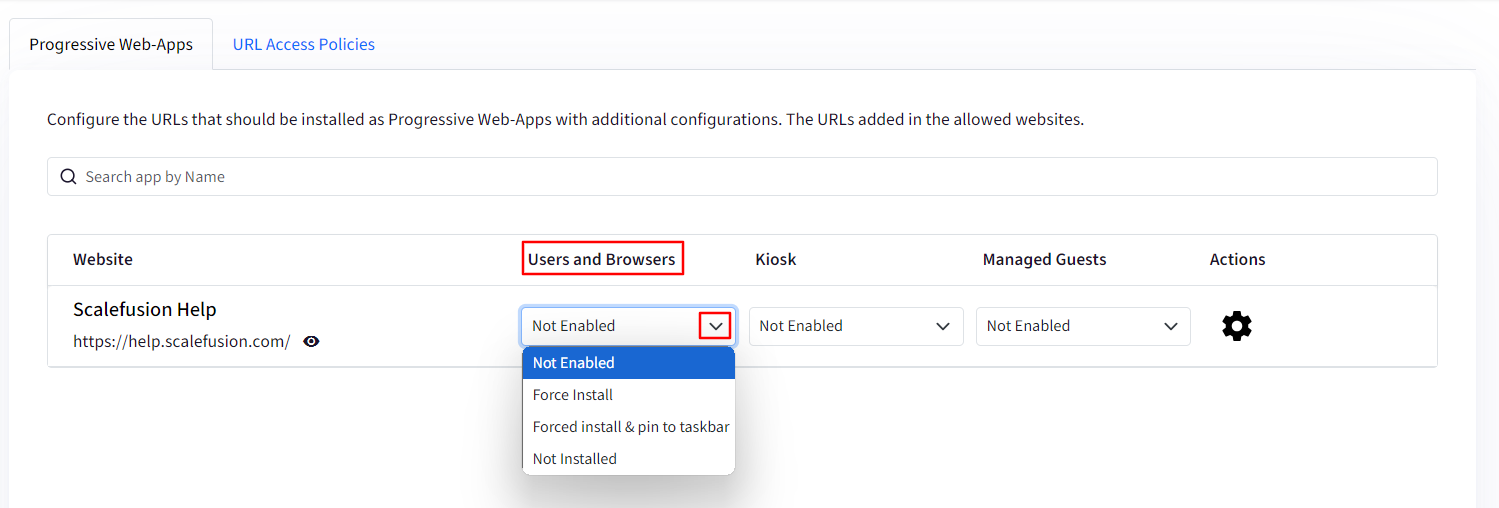
Users and Browsers: Here you can choose how URLs will appear for the user accounts and Chrome browser on the managed devices. You can select:
Not Enabled: It means the PWA is just added in Allowed websites. It is not pushed to the devices.
Force Install: PWA will be force installed on the devices.
Force Install & Pin to taskbar: PWA will be force installed and pinned to taskbar on the devices.
Not Installed: It means that PWA will show as recommend app to users in Chrome Web Store on the devices, however it will not be installed. Users can install the PWA, if required.
Kiosk: If you have set up the device as a Kiosk or Digital Signage, you can choose how URLs will appear on the device. You can select:
Not Enabled: It means the PWA is just added in Allowed websites. It is not pushed to the devices.
Installed: PWA will be installed on the devices.
Not Installed: It means that PWA will show as recommend app to users in Chrome Web Store on the devices, however it will not be installed. Users can install the PWA, if required.

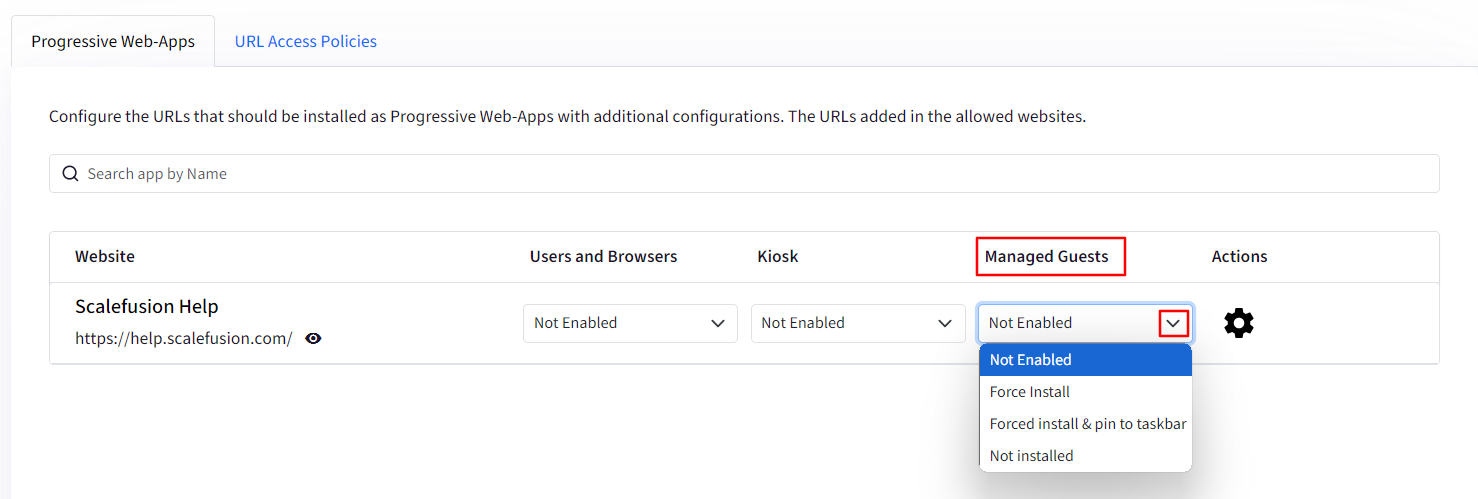
Managed Guest: If your device has a managed guest user account set up then you can configure how the URLs will appear for a managed guest session in this tab. You can select:
Not Enabled: It means the PWA is just added in Allowed websites. It is not pushed to the devices.
Force Install: PWA will be force installed on the devices.
Force Install & Pin to taskbar: PWA will be force installed and pinned to taskbar on the devices.
Not Installed: It means that PWA will show as recommend app to users in Chrome Web Store on the devices, however it will not be installed. Users can install the PWA, if required.
Actions: Clicking on the gear icon will open a new window on the right-hand side showing more settings that you can configure for Users & Browers, Kiosk and Managed Guest sessions. These are:

Open In: From the drop-down menu you can choose if the web-apps should open in a Browser or in a new Window.

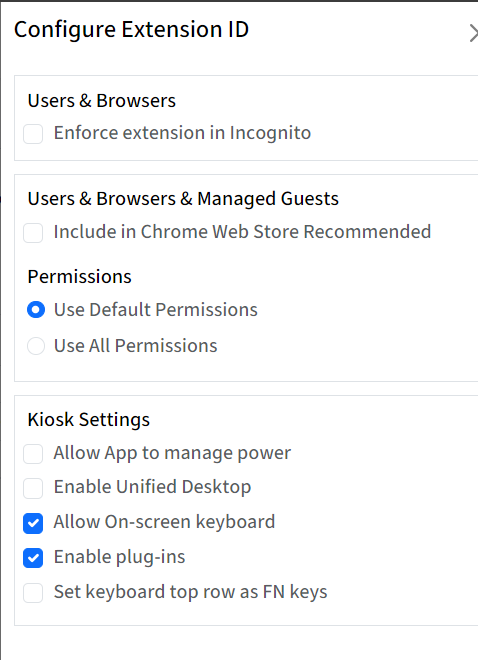
Kiosk Settings: These settings will apply when the device is in Kiosk mode or set up as Digital Signage. These are:
Allow App to manage power
Enable Unified Desktop
Allow on-screen keyboard
Enable Plug-ins
Set keyboard top row as FN keys

URL Access Polices: In this section, you can configure which URLs are allowed and which are to be blocked, with exceptions.
Allowed URLs: Set up access policies by specifying the URLs to be blocked and those that should be explicitly allowed. This will work on ChromeOS devices and managed Chrome browser.
Allow all except Blocked: If this option is selected, then you can specify the URLs that will be blocked in the Blocked URLs field. You can use * to block everything except Allowed URLs. This will work on ChromeOS devices and managed Chrome browser.
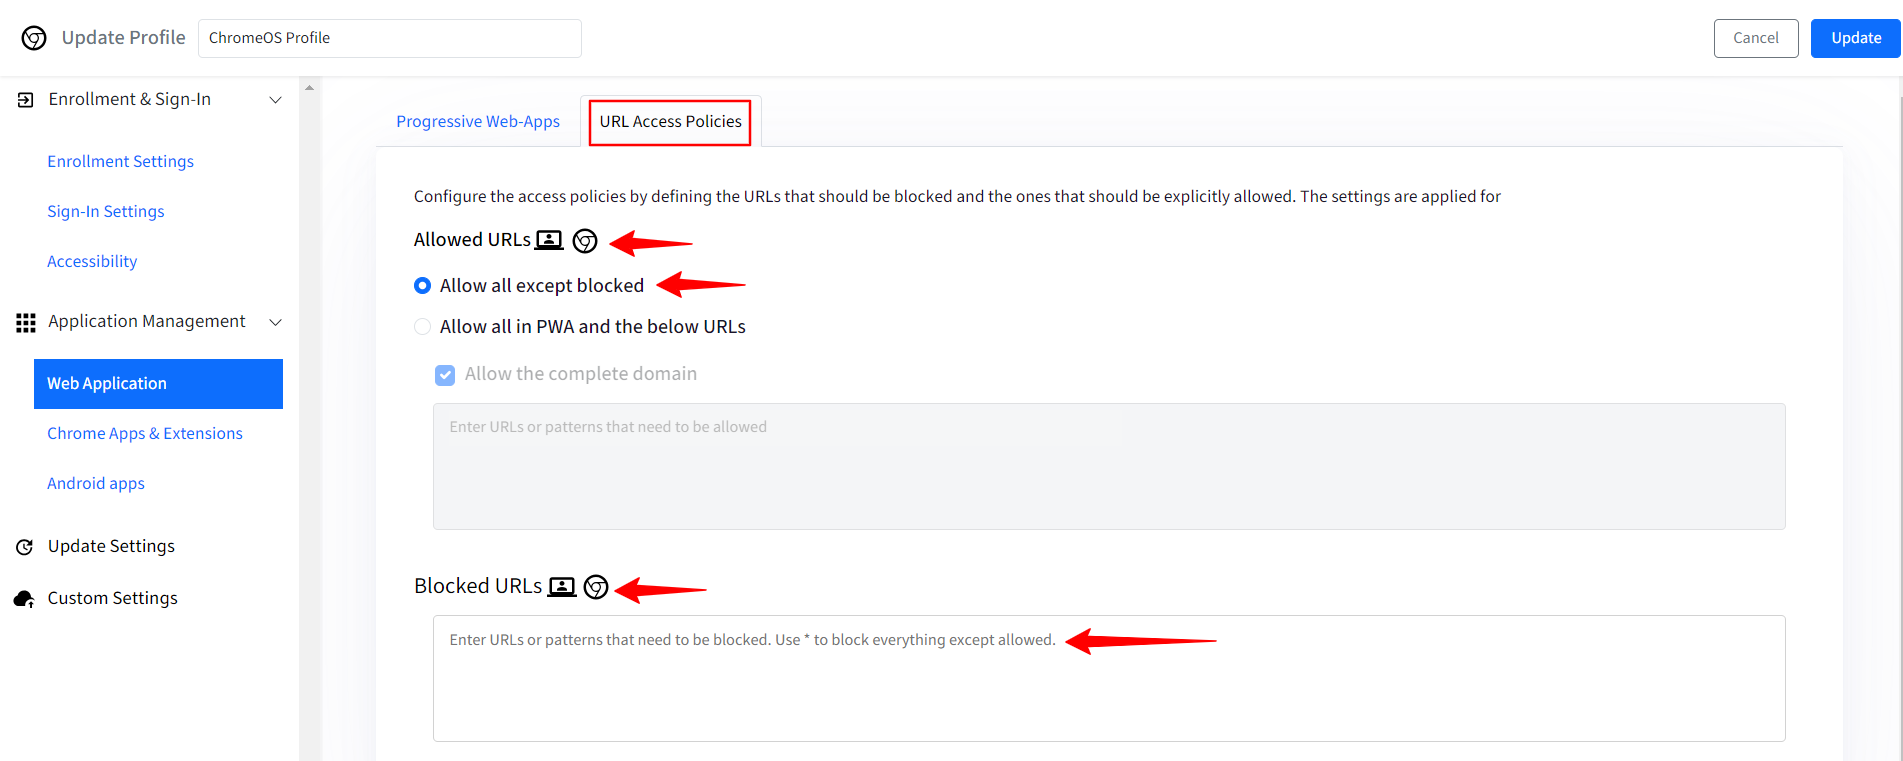
Allow all in PWA and the below URLs: If this option is selected, then you can specify URLs that should be allowed apart from the ones selected in Progressive web-apps section. You can also Allow the complete domains for these URLs for easier access. Enter the URLs and/or domains in the filed below Allow the complete domains.

Chrome Apps & Extensions: In this section, you can configure the settings for Chrome apps, extensions and Chrome Web Store on the managed ChromeOS devices. These settings will also be applicable to Users and Chrome browser on Windows, macOS and Linux devices. This section is further divided into following sub-sections:
Basic: It consists of basic settings that you can configure. Please note that this applies only to Users signed in to the devices and not for Kiosks and Guest sessions. You would also see items marked with
 meaning that those settings will also be applicable to Users and Chrome browser on Windows, macOS and Linux devices.
Chrome Web Store policy: You can choose how the apps will appear in the Chrome Web Store for a user on a managed ChromeOS device. You can “Allow all except blocked” or “Block all except allowed”.
Restore apps on Start-up/Sign-in: It means that on restarting the device, the previous session of the browser or app(s) should restore or not. You can choose to:
Do not restore
Restore Always
Ask user every time
Restore Chrome browser only
Allow insecurely packed extension: If there is a self-hosted app/extension which is not there on Chrome web store, enabling this will allow installing that app or extension. This setting will also be applicable to Users and Chrome browser on Windows, macOS and Linux devices.
Allow unpublished extensions in Chrome Web Store: If there is a self-hosted extension which is not there on Chrome web store, enabling this will allow users to install extension. This setting will also be applicable to Users and Chrome browser on Windows, macOS and Linux devices.
Allow users to publish private Chrome Web Store apps restricted in your domain: If there is a domain allowed in URL Access Polices section then users can install or use apps from that domain.
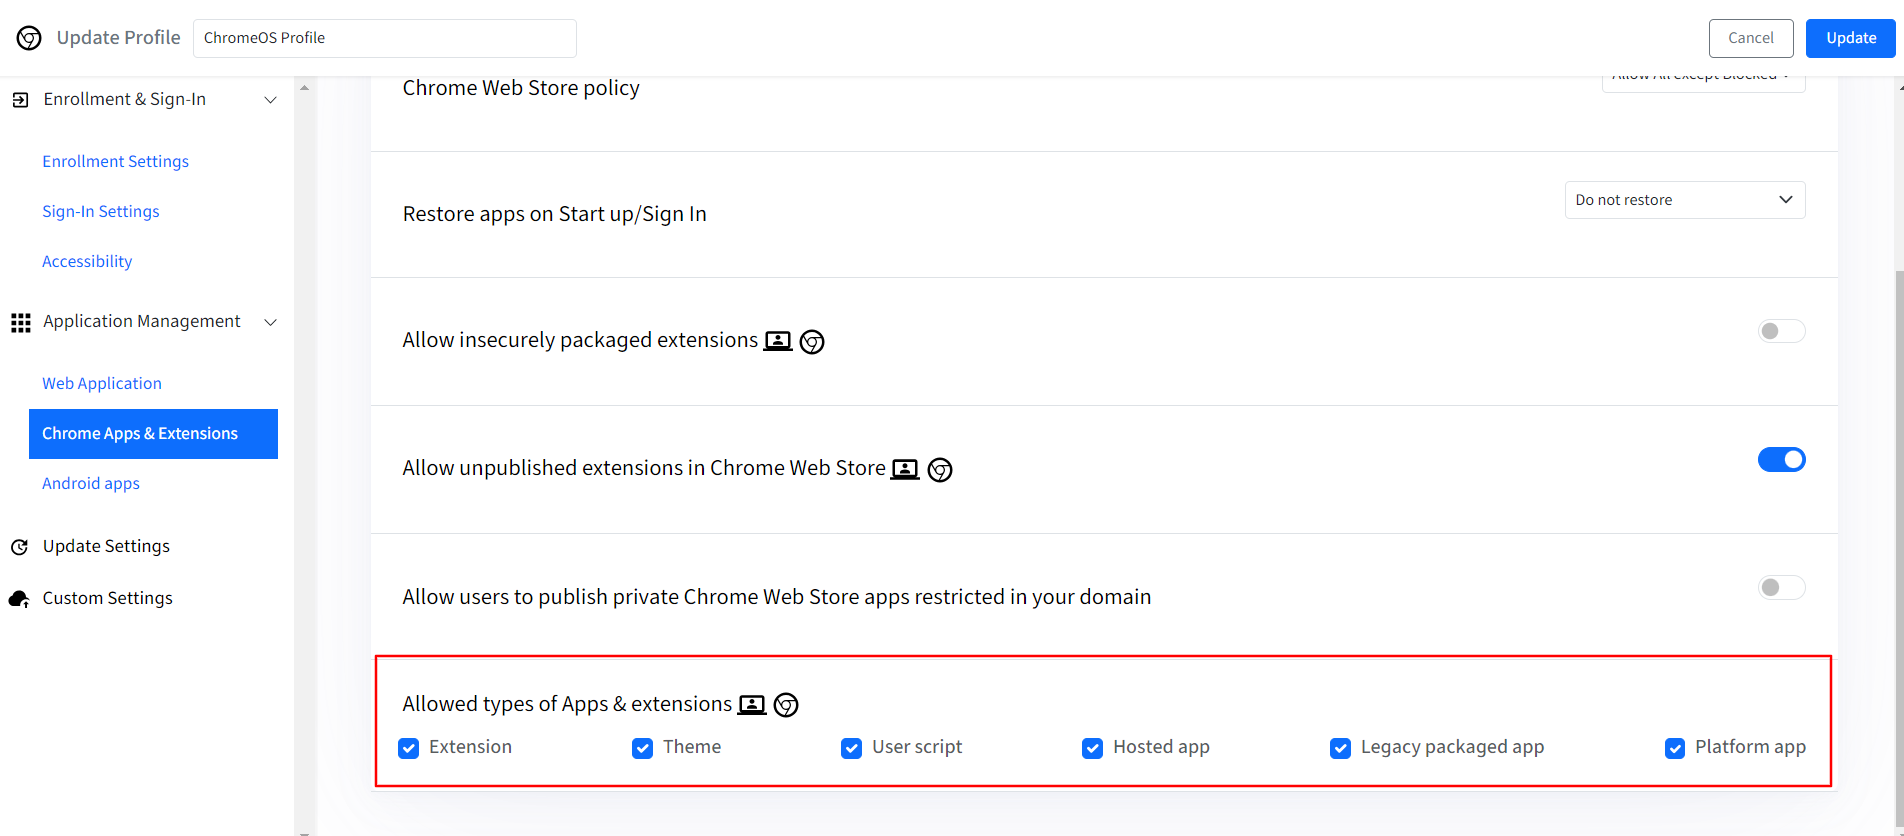
Allowed types of Apps & extension: Allow the selected components from the listed ones. Check or uncheck the boxes to allow or not allow the components. This setting will also be applicable to Users and Chrome browser on Windows, macOS and Linux devices.
Advanced: In this section you can configure additional settings for browser extensions. These are:
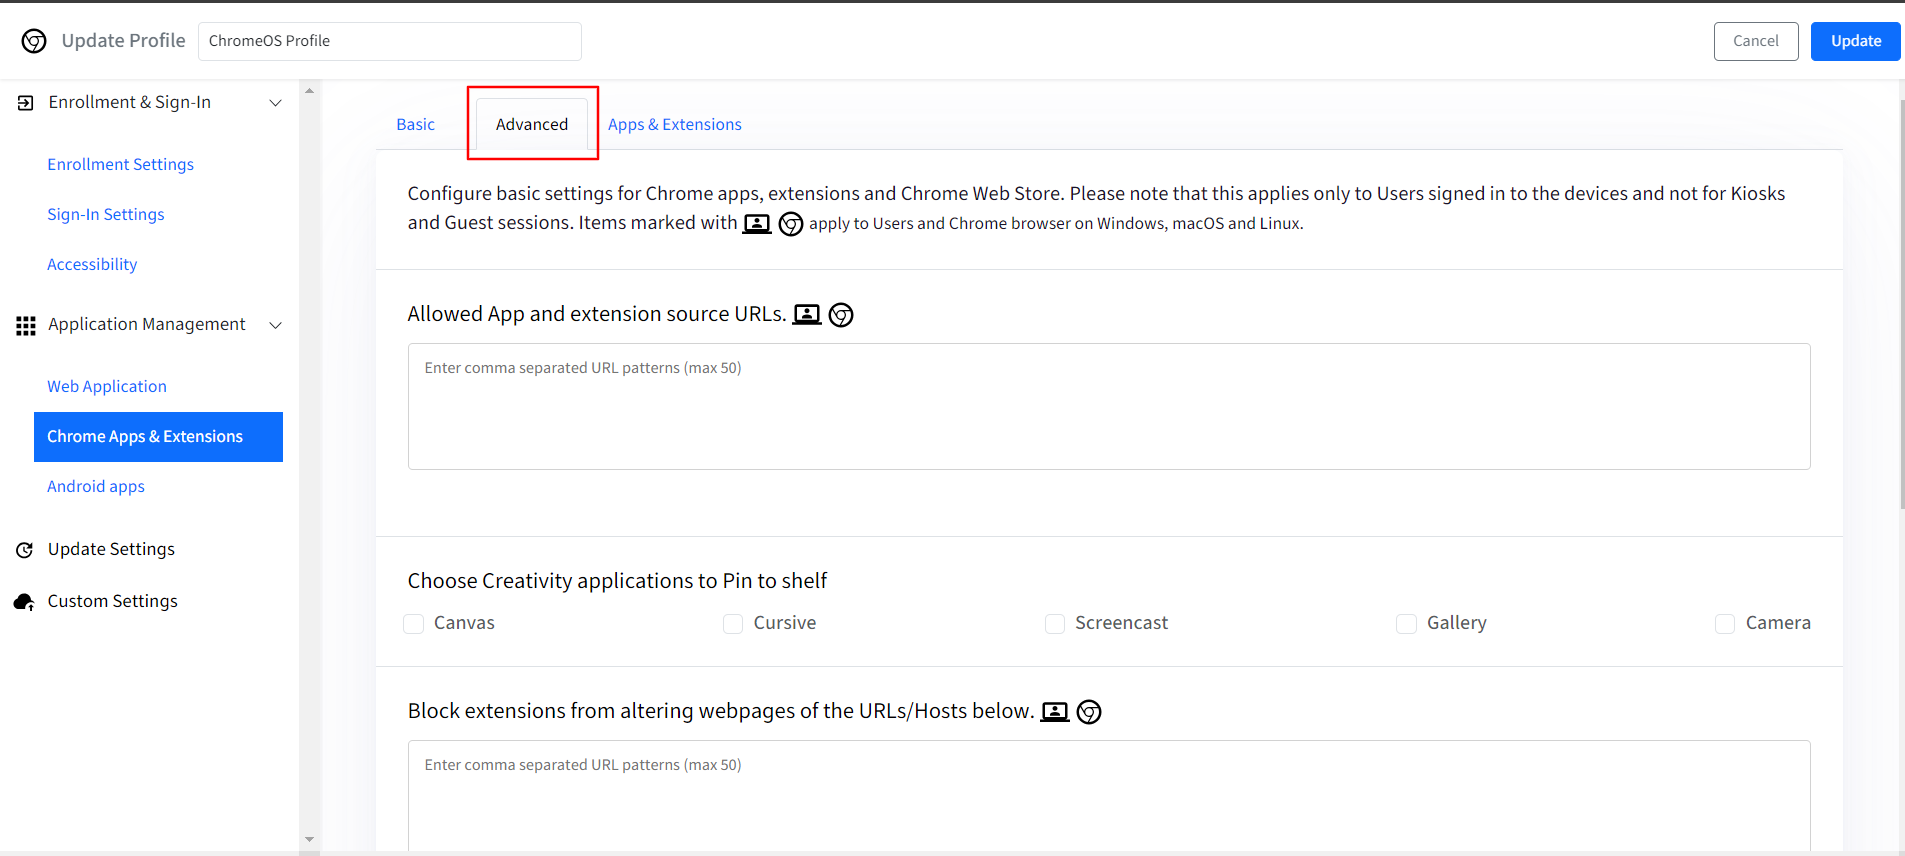
Allowed App and extension source URLs: The Apps & Extensions added in Apps & Extensions section can be allowed by adding the URLs for the same. This setting will also be applicable to Users and Chrome browser on Windows, macOS and Linux devices.
Choose Creativity applications to Pin to shelf: You can pin the creativity apps- Canvas, Cursive, Screencast, Gallery, Camera to the shelf for easy access.
Block extensions from altering webpages of the URLs/Hosts below: The Apps & Extensions added in Apps & Extensions section can be blocked by adding the URLs for the same. This setting will also be applicable to Users and Chrome browser on Windows, macOS and Linux devices.
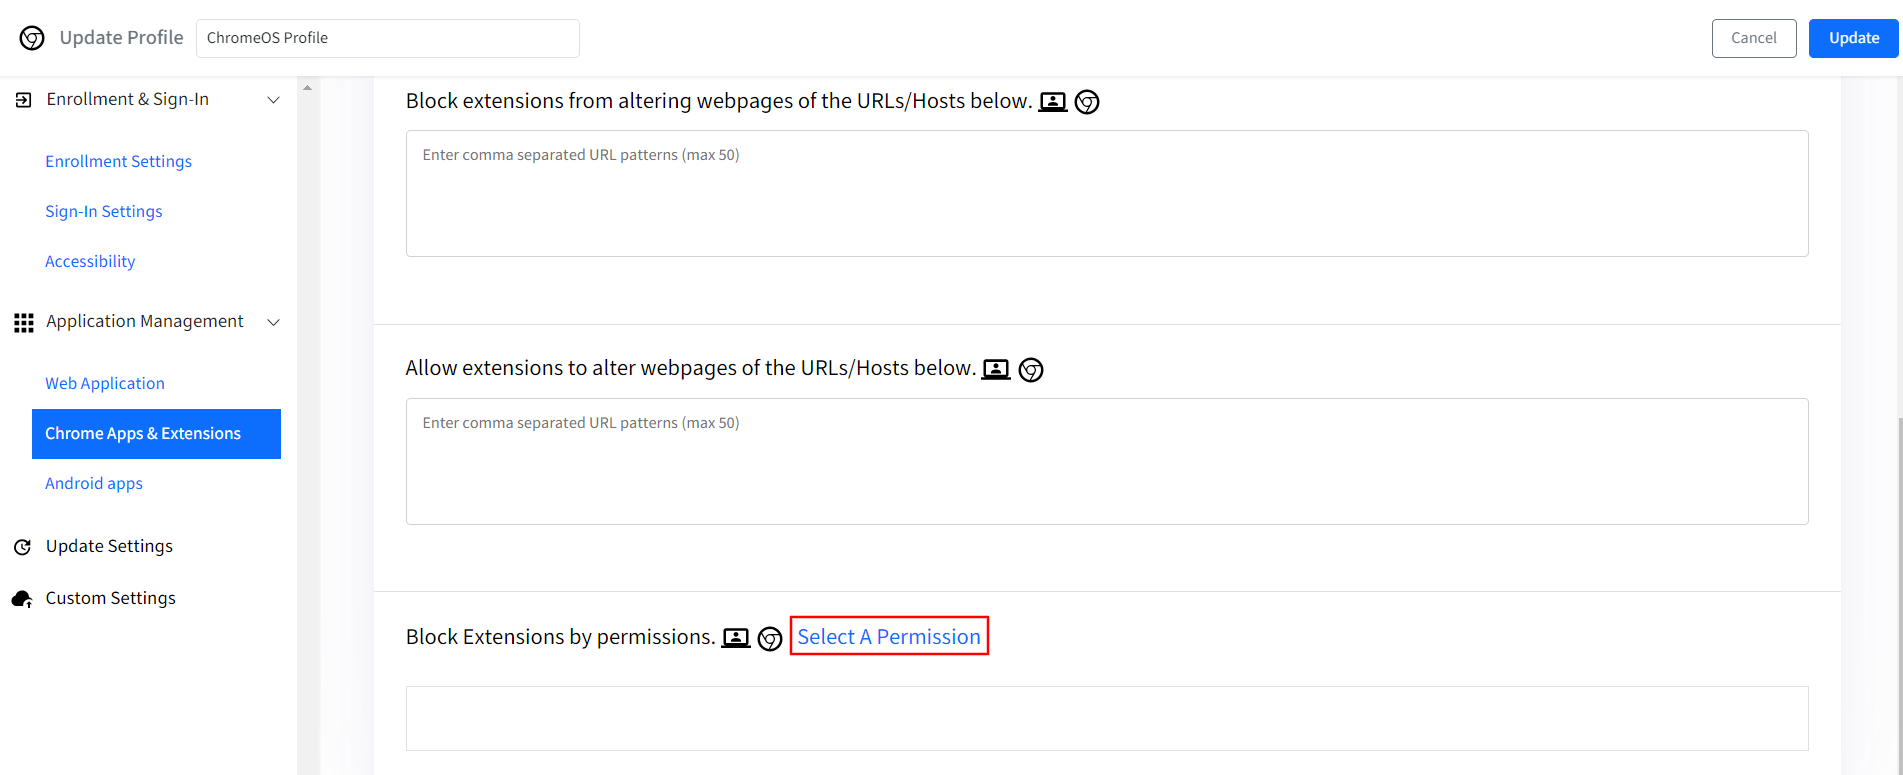
Allow extensions to alter webpages of the URLs/Hosts below: The Apps & Extensions added in Apps & Extensions section are allowed by adding the URLs for the same. This setting will also be applicable to Users and Chrome browser on Windows, macOS and Linux devices.
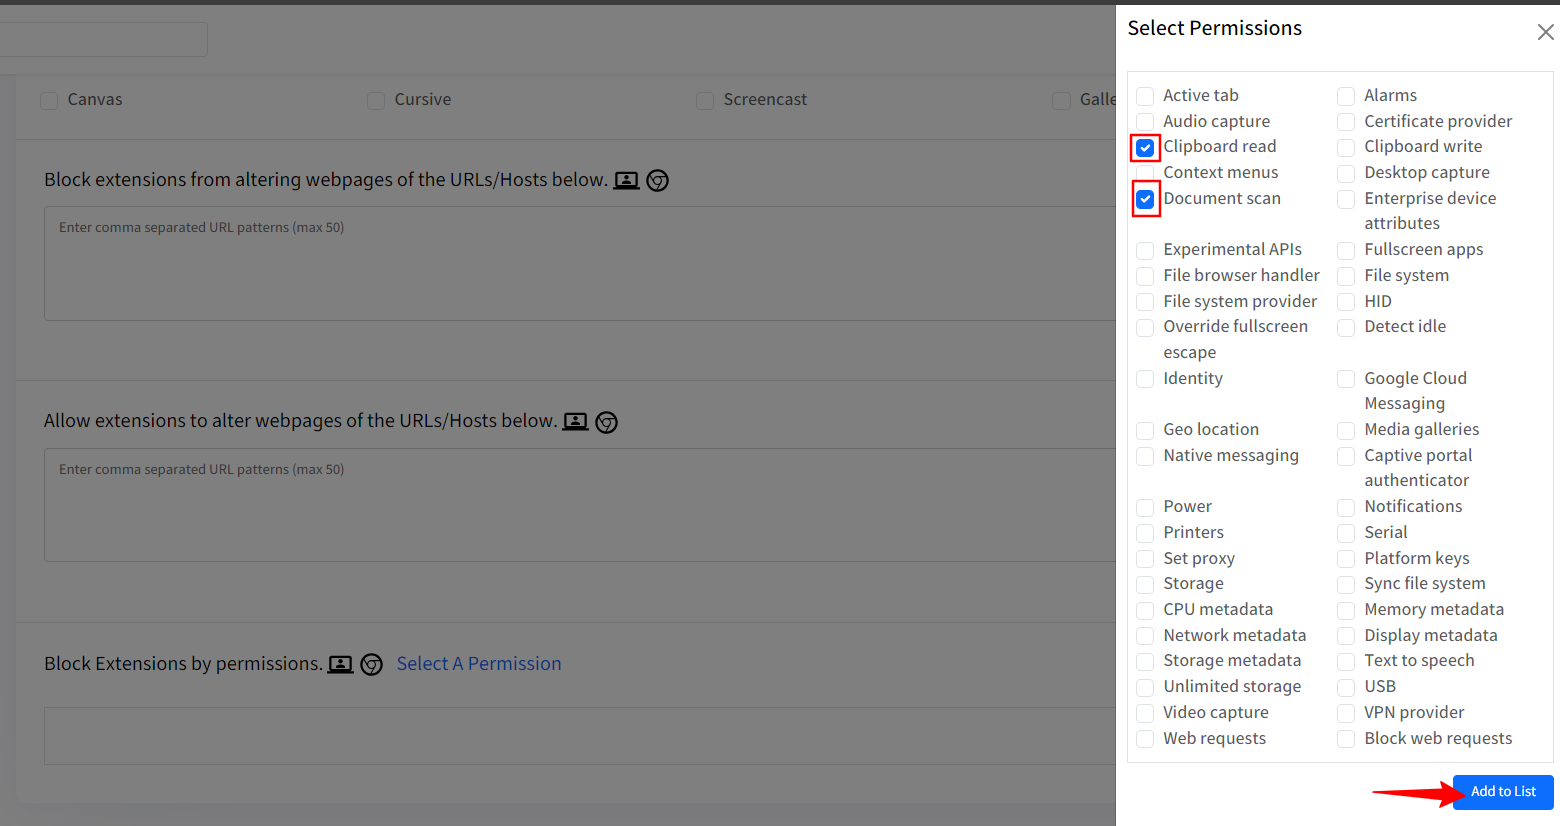
Block Extensions by permissions: From the list, you can choose which permissions are auto-granted to the extensions added to Chrome browser on the ChromeOS devices.
Click on the Select a Permission hyperlink which will open a new window on the right-hand side, select the permission(s) that you would like to block and click on Add to List. This setting will also be applicable to Users and Chrome browser on Windows, macOS and Linux devices.
Apps & Extensions: In this section you can add apps and/or extensions which will pushed to managed ChromeOS devices. You can additionally configure the various settings by clicking on the gear icon under Actions.
To Add an application: Click on the App Application button. This will open a new window with following options:

Select Type: Select if you want to add an application or an extension.
Name: Provide a name.
App or Extension ID: You will find the App/ Extension ID from the Chrome Web store or if it is self-hosted then you will have to choose Extension and provide the Source as Custom URL.
Source: If you have selected the type as Application then by default the Source will be Chrome web store.
Custom URL: This filed will become active if the type is selected as Extension.
Once you have provided the above details click on Add.
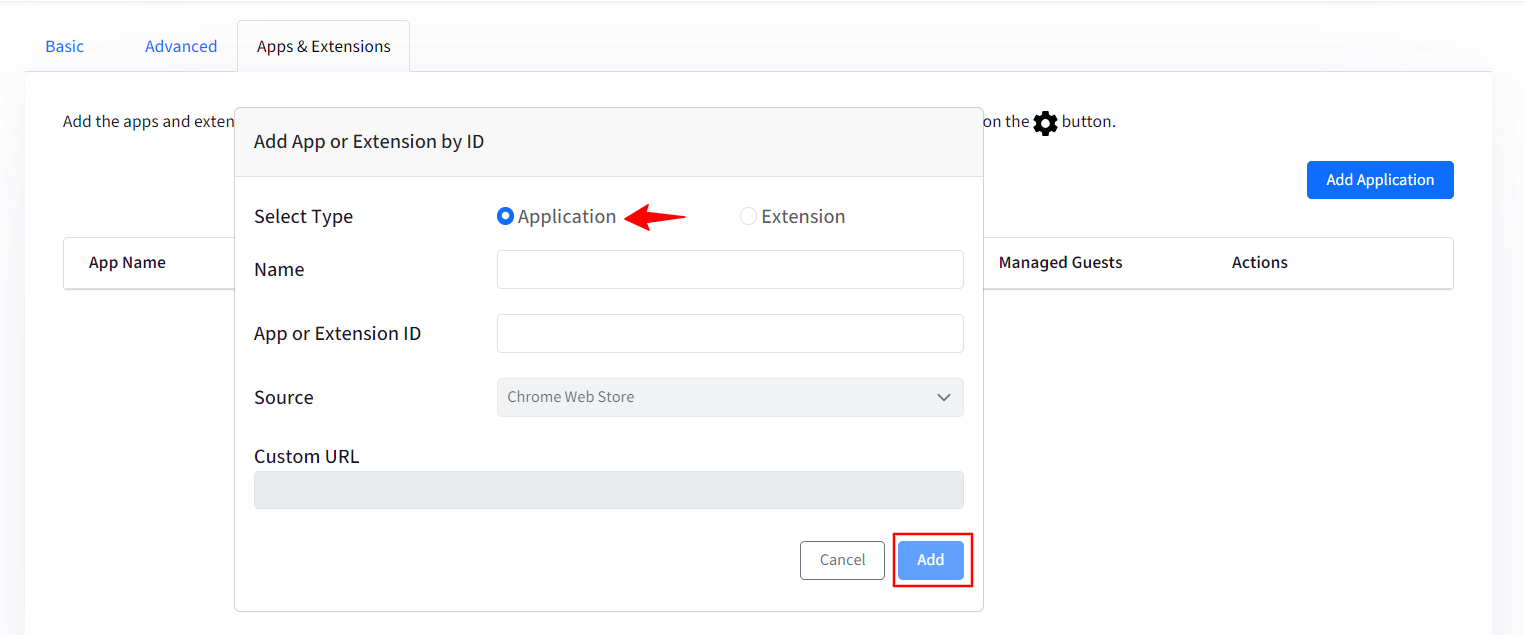
The added application will be visible on the main page.
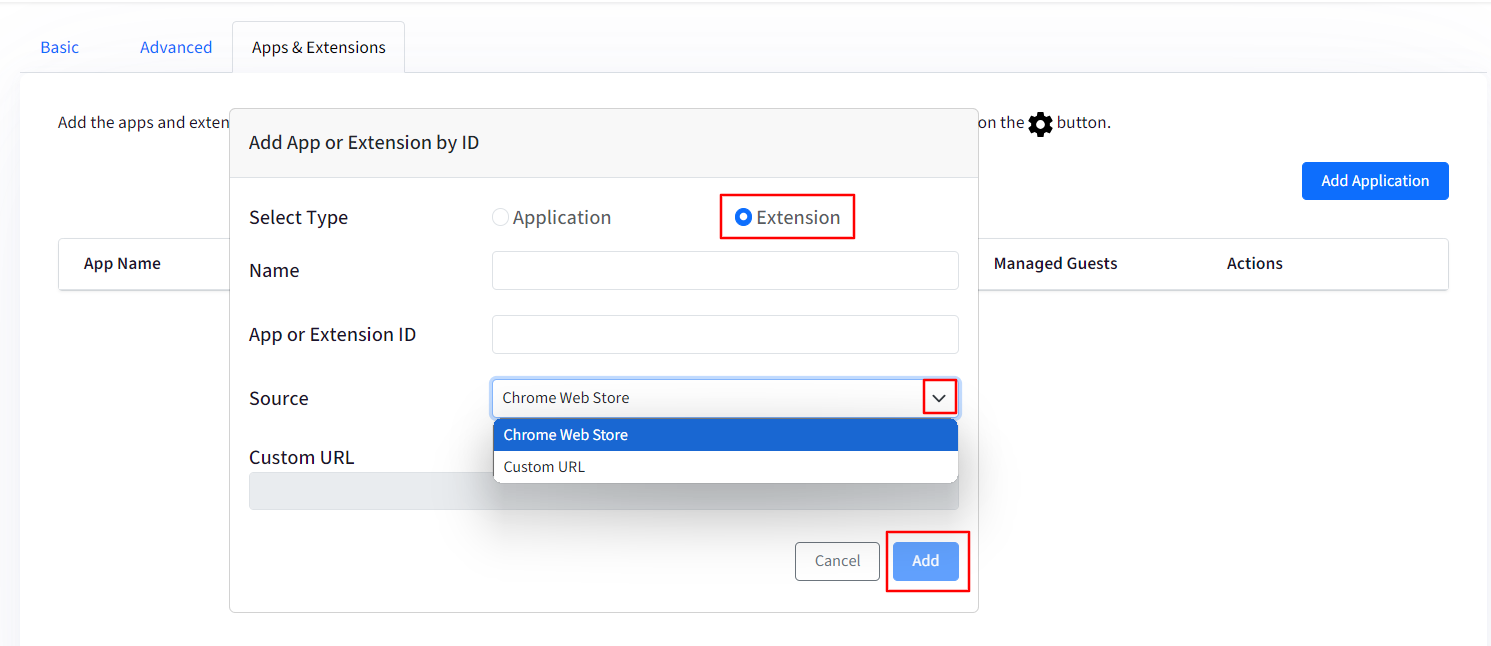
To Add an Extension: Click on the App Application button. This will open a new window with following options:
Select Type: Select if you want to add an application or an extension.
Name: Provide a name.
App or Extension ID: Provide the extension ID here.
Source: You can select either Chrome web store or a Custom URL.
Custom URL: This filed will become active if the Source is selected as Custom URL. Provide the custom URL here.
Once you have provided the above details click on Add.
The added extension will be visible on the main page.
Choose an installation policy: Once you have added application(s) and/or extension(s) you can further configure installation policy for:

Users and Browsers
Kiosk
Managed Guests
Actions: Clicking on the gear icon under Actions will open a new window on the right-hand side with additional settings to configure Extension IDs.
Note:
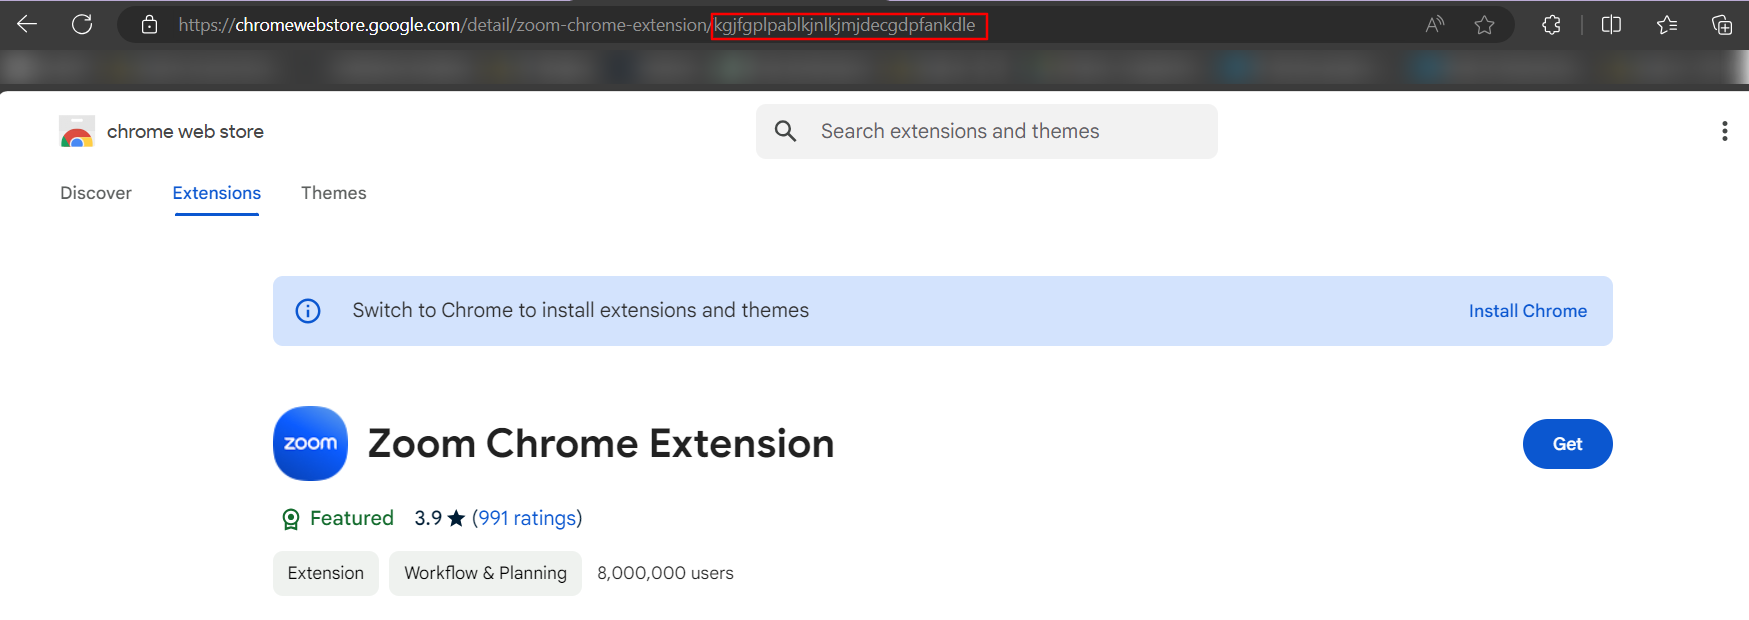
To search for the App/Extension ID, go to https://chromewebstore.google.com/ and search the respective app/extension.

Select the app/extension and copy the ID from the address bar as highlighted in below image.
Android Apps: In this section you can configure the settings for Google Play store applications on your managed ChromeOS devices. It has 2 sub-sections:
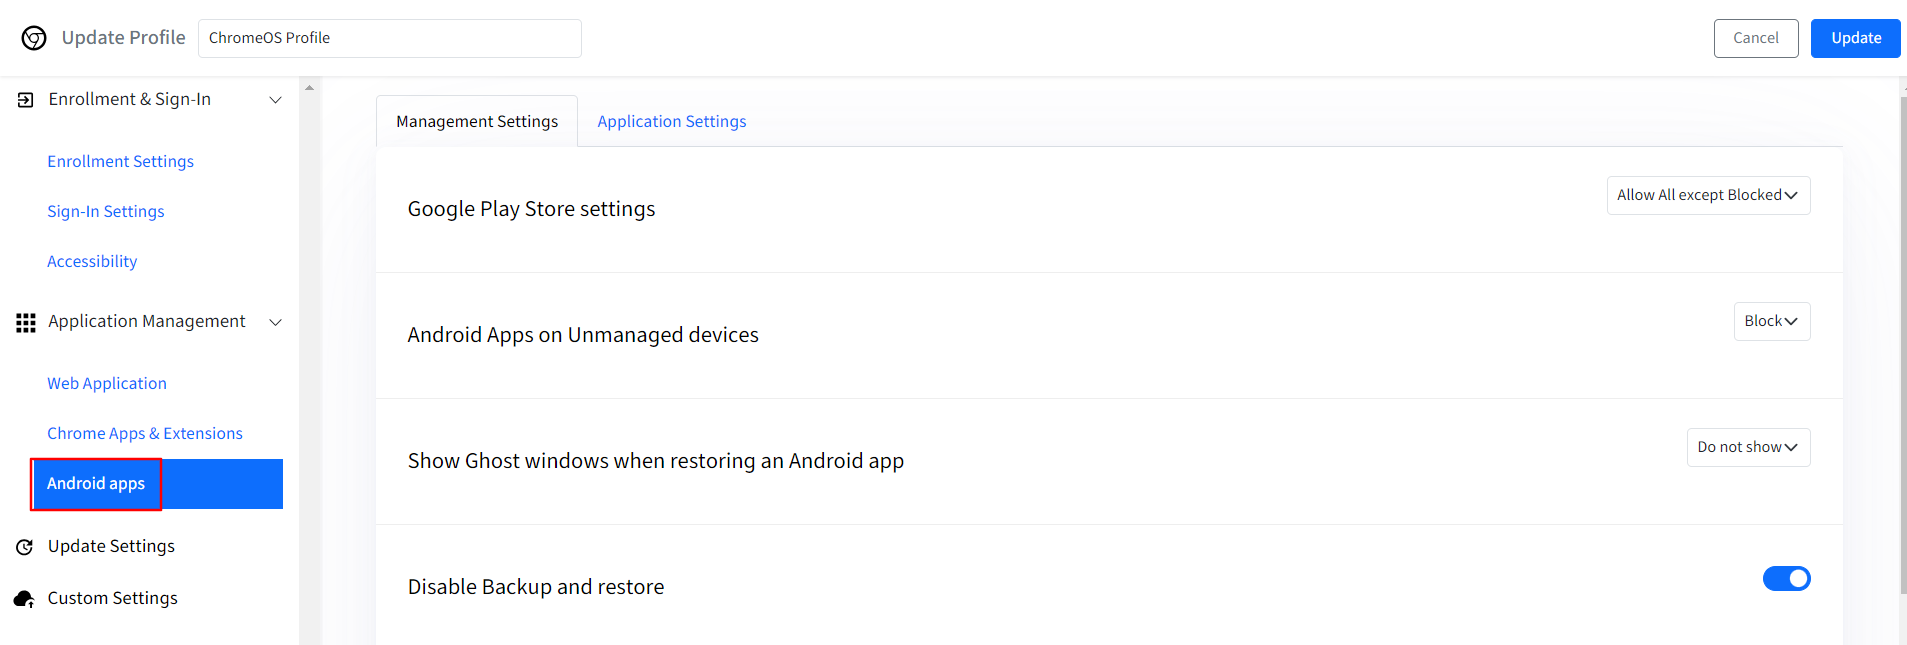
Management Settings: Select settings to customize user experience of Play Store and its apps on the managed ChromeOS devices.
Google Play Store settings: You can choose to “Allow all except Blocked” apps or you can “Block All except Allowed”.
Android Apps on Unmanaged devices: You can choose to “Block” the apps on unmanaged ChromeOS devices or “Allow” them.
Show Ghost windows when restoring an Android app: You can choose to either “Show” it or “Do not show” it.
Disable Location services during initial setup of device
Enable Android to Web Apps sharing
Enable usage of ChromeOS CA certificates in Android Apps
Allow users to install from Unknown sources
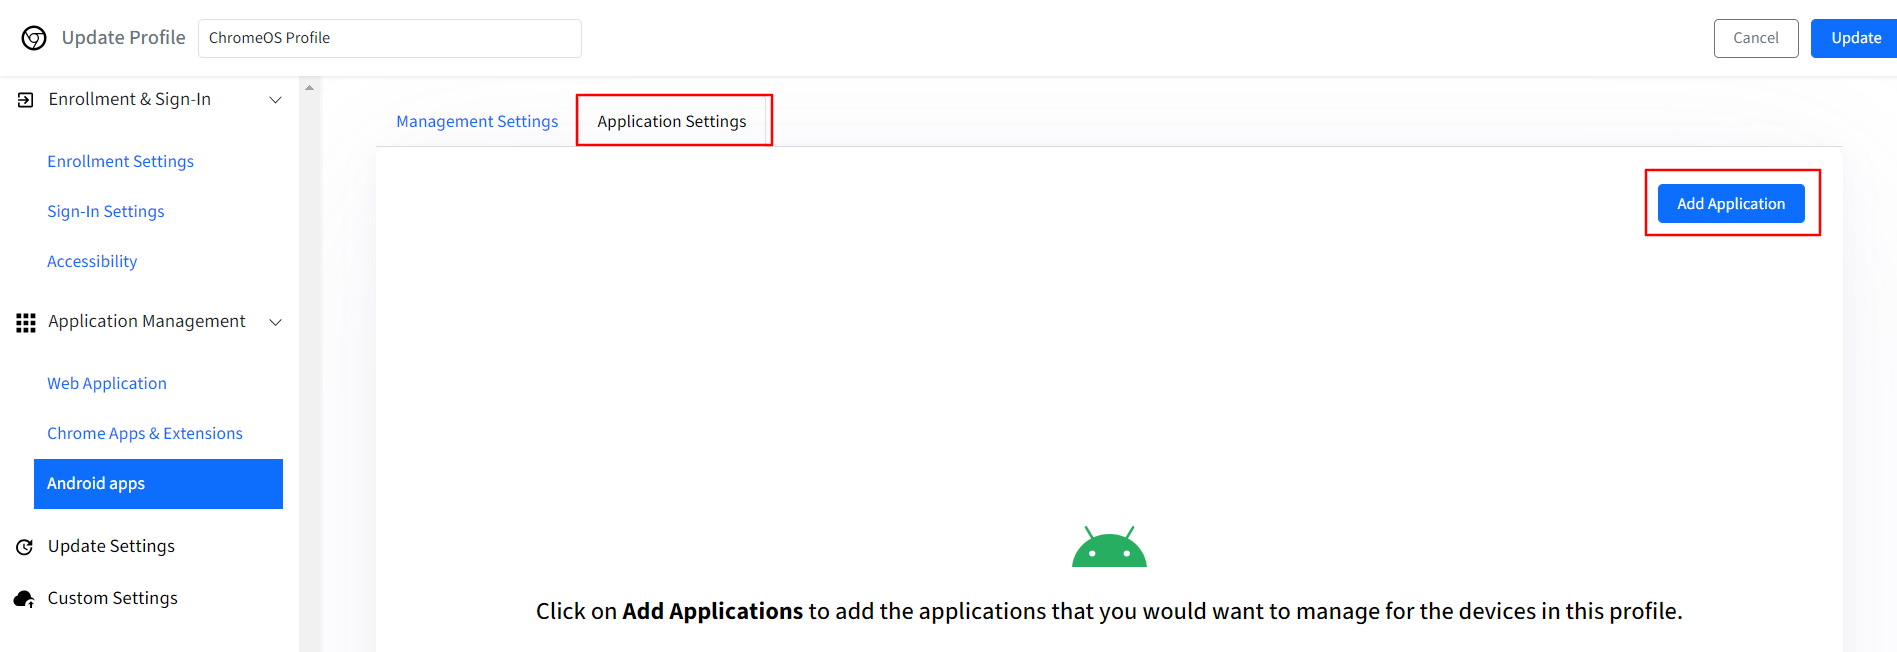
Application Settings: In this section, you can add and manage Play for Work apps for your managed ChromeOS devices.
Note:
Please make sure that you have completed the Android Enterprise set up on the Scalefusion dashboard. Please refer to our guide on the set-up process.
To add an app, click on Add Application button.
This will open a managed Play store iFrame window.
Search for an app and select it.
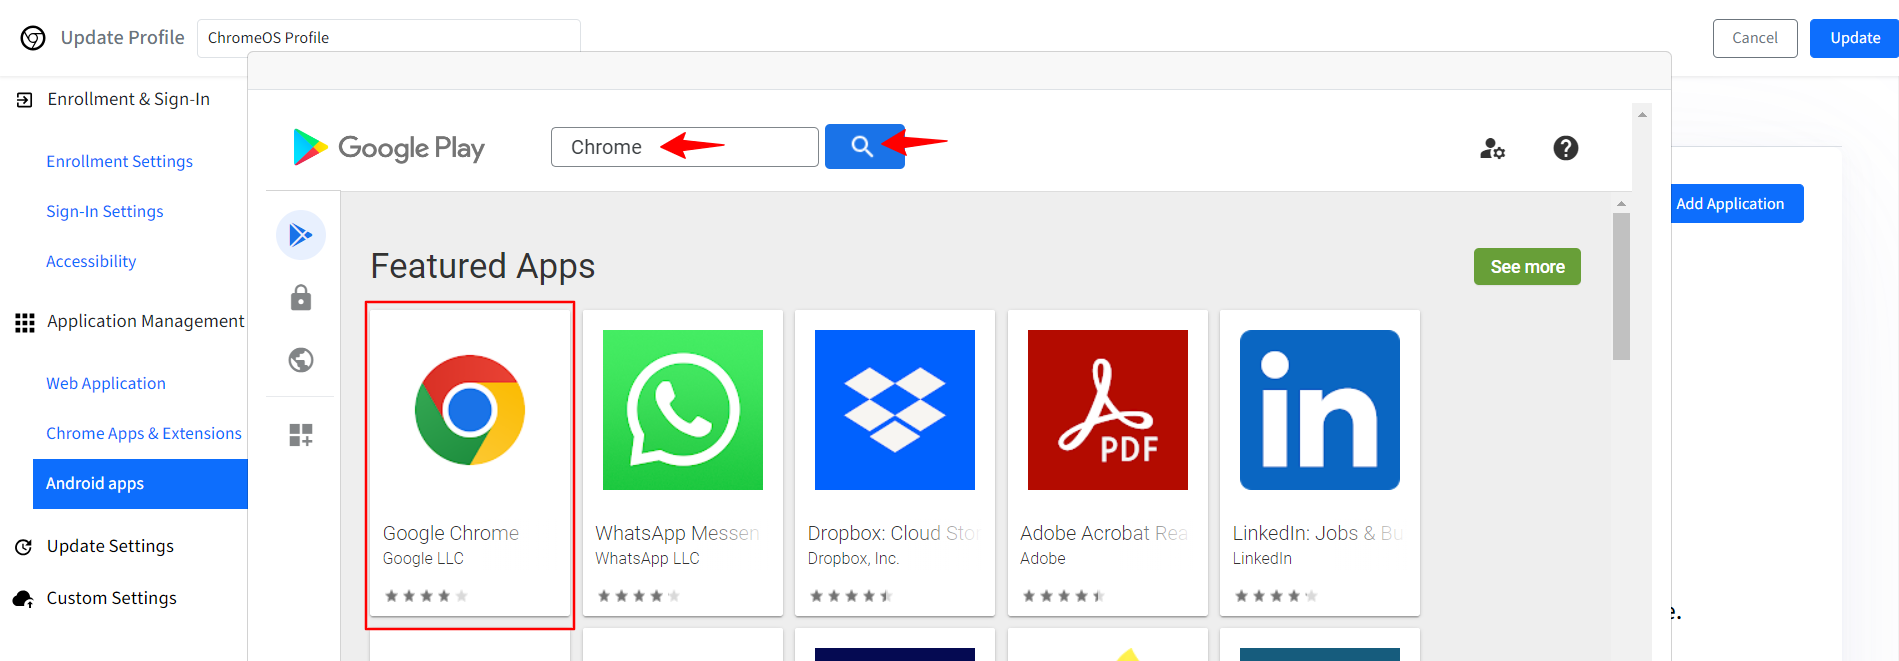
Click on Select to add the app.
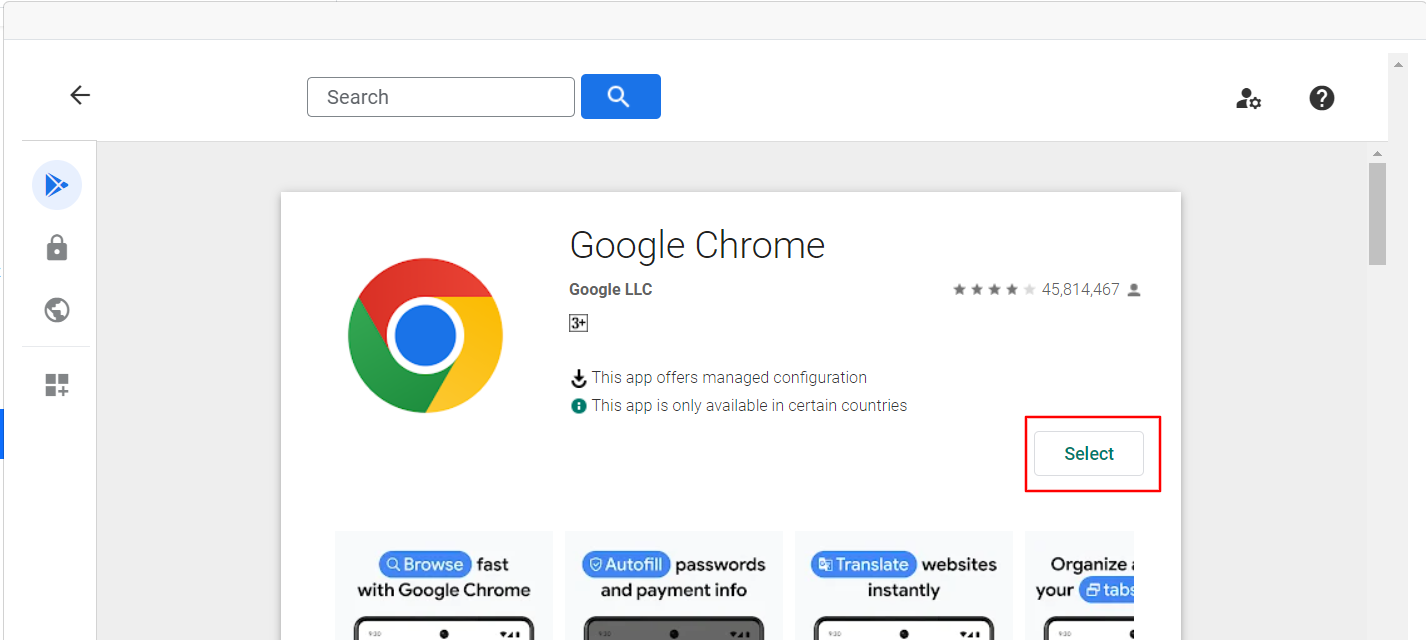
The app will appear on the main page.

You can now configure the Installation Policy for the added app. You can choose:
Blocked: It will block the said app. App will also not be visible or searchable in the Play Store on the device.
Allowed: The app will be visible in the Play store on the device and user(s) can install it.
Forced: This will force install the app and it will be shown in Launcher on the device.
Forced & pin to toolbar: This will force install an app and it will also be pinned to toolbar for easy access.
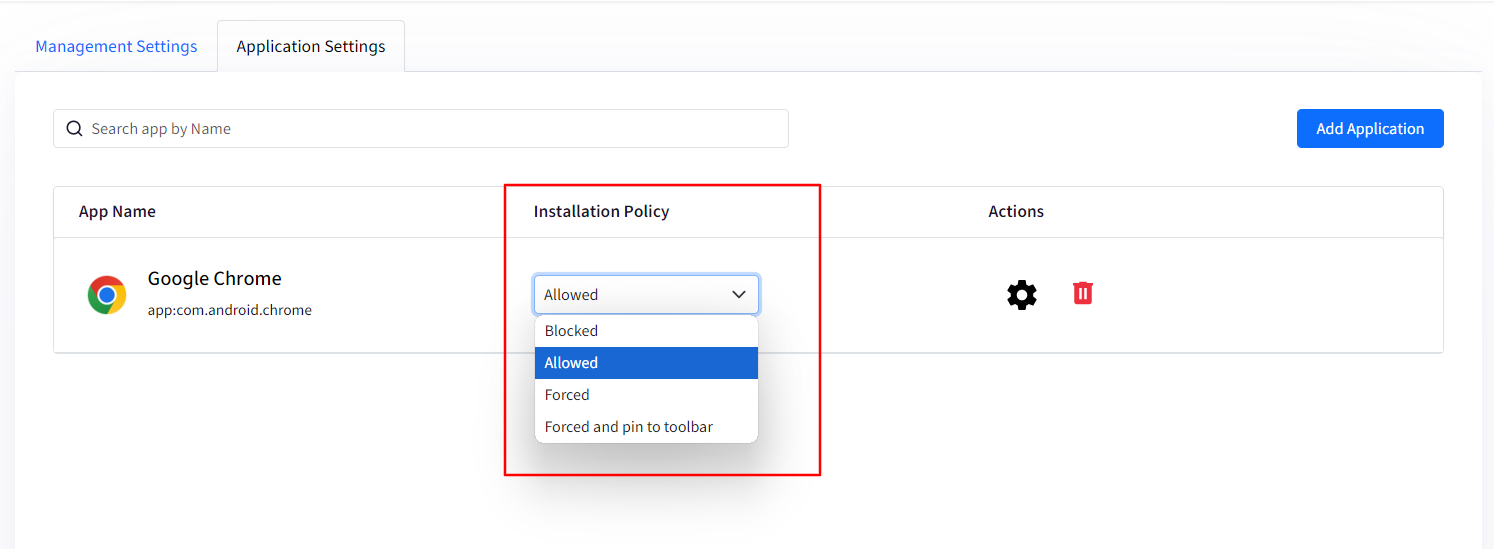
Actions: Under Actions you will find 2 options:
Clicking on the gear icon will open a new window on the right-hand side where you can upload Managed Configurations for the concerned app. Please make sure that the application supports configurations as only the apps that support configurations can receive remote configurations properties.
To upload a Managed configuration, click on the gear icon.

In the window that opens on the right-hand side, click on the upload icon
 to upload the JSON file or copy & paste the JSON code in the text field.
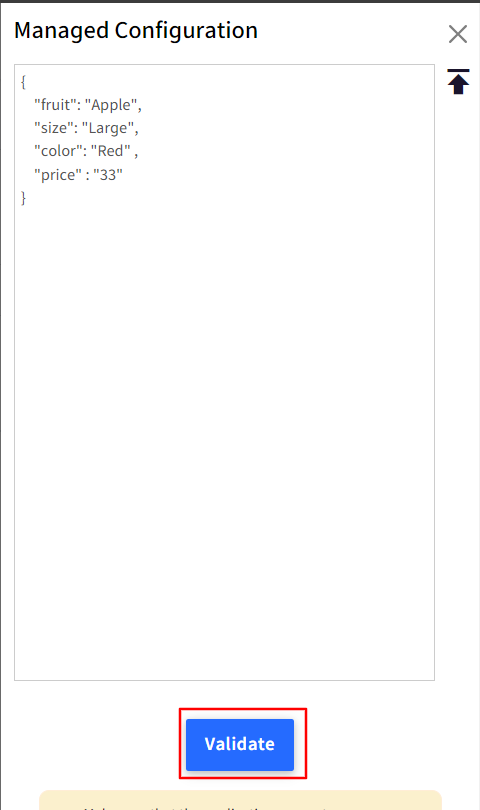
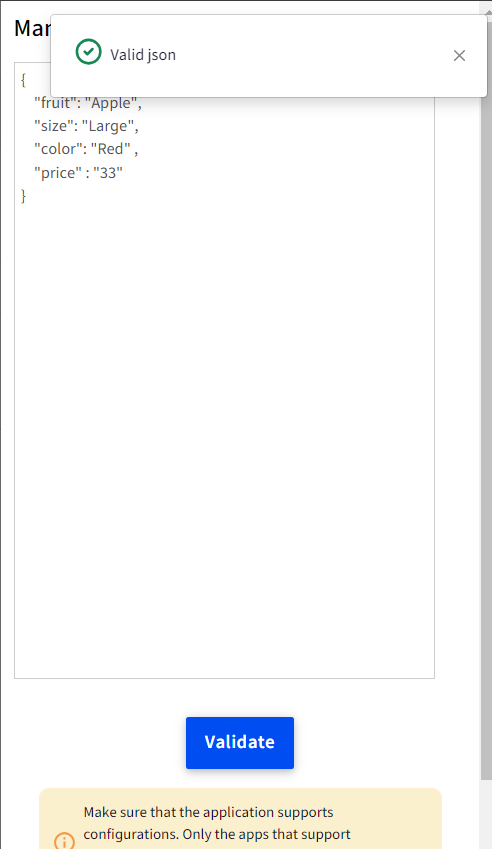
Click on Validate.
Clicking on the red bin icon will delete the app.


