- 19 Dec 2025
- 4 Minutes to read
- Print
- PDF
Apple Settings
- Updated on 19 Dec 2025
- 4 Minutes to read
- Print
- PDF
From this section you can configure additional settings for better management of iOS and macOS devices. This article describes settings offered under Scalefusion Dashboard and how IT Admins can configure them.
How to Access
These settings can be configured by navigating to Utilities > Global Settings > Apple Settings on Scalefusion Dashboard.

User Account Management Settings
Capture and sync Apple ID of user accounts
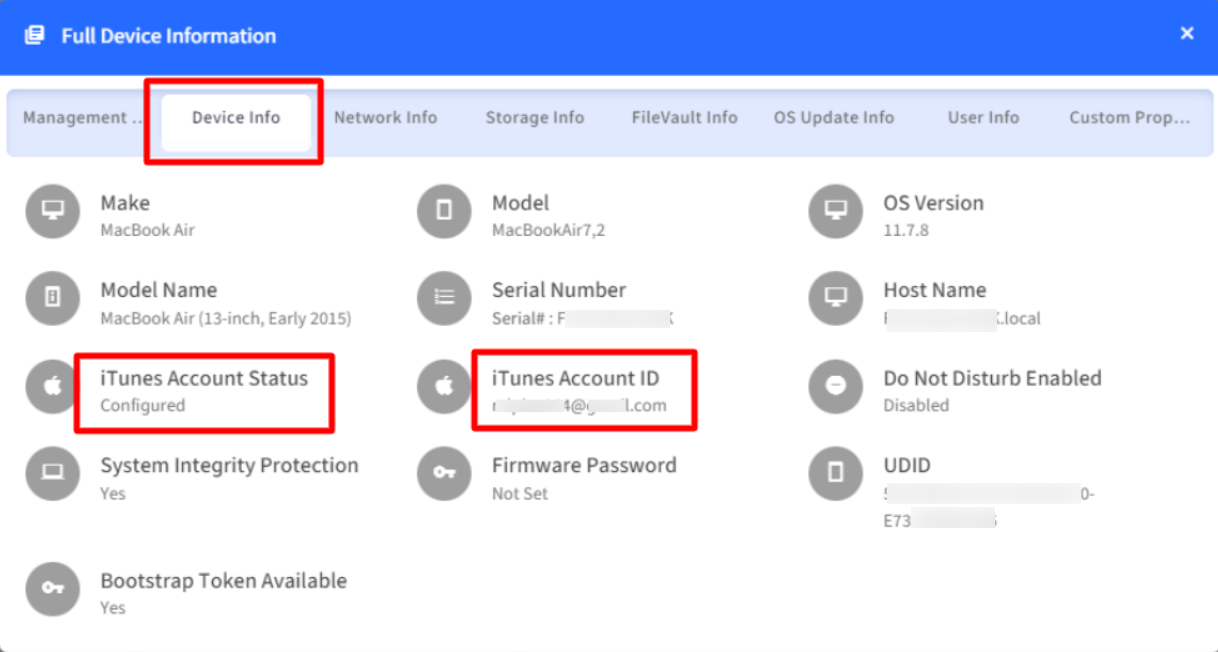
For Scalefusion managed macOS devices, you can capture the Apple IDs of user accounts. The ID captured and synced is shown at following places:
Device Info (Full Device Information > Device info), under iTunes Account Id.

User account information on clicking Info icon in User Accounts section
To capture Apple ID,
Navigate to Utilities > Global Settings > Apple Settings
Under User Account management settings, select one of the options from the drop-down:
Not Configured: If you select this option, the Apple ID is not captured and shown as N/A
Only Enrolled User: The Apple ID of only the enrolled user gets captured
All User Accounts: Captures Apple IDs of all user accounts existing on the device
Click on Save Settings

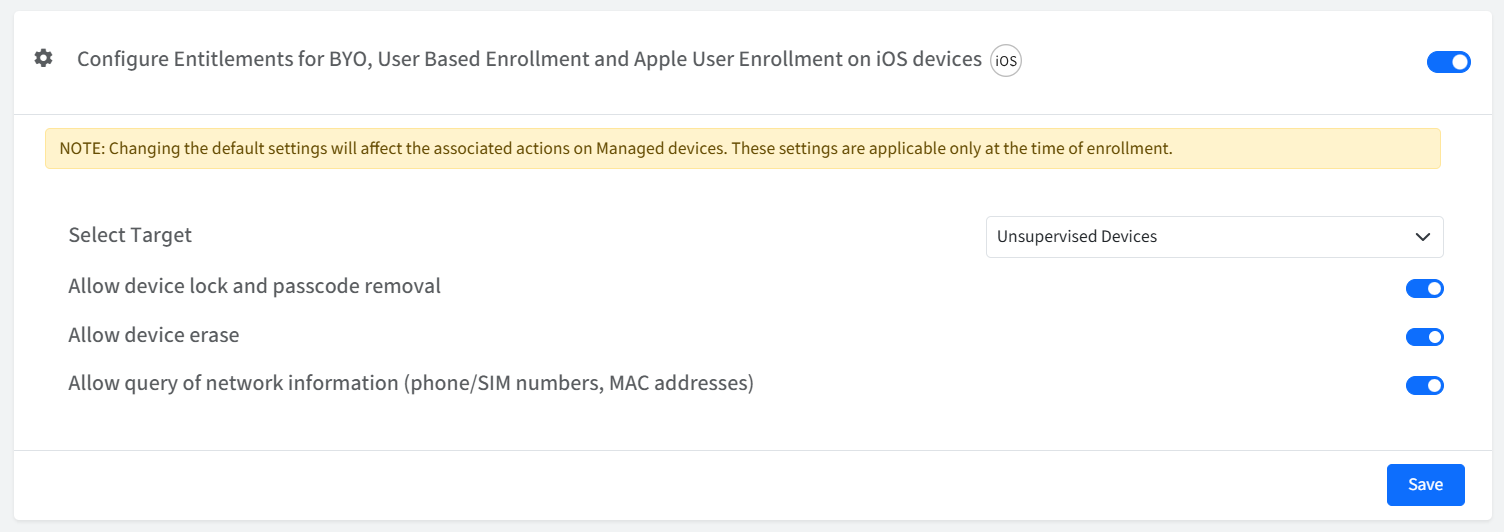
Configure Entitlements for BYO, User Based Enrollment and Apple User Enrollment on iOS devices
By enabling and configuring these settings, you can provide granular privacy controls for BYO, User Authenticated, and Apple User Enrolled (AUE) devices, to all device types (including supervised ones) for organizations prioritizing comprehensive employee privacy.
To configure settings,
Navigate to Utilities > Global Settings > Apple Settings,
Following are the settings that can be configured:
Select Target: Admins can select the target where these controls will apply, by selecting one of the following:
Unsupervised devices
All devices: All devices means Supervised as well, for cases where an organization provides devices to employees.
Allow device lock and passcode removal: Controls Scalefusion's ability to remove device locks and passcodes.
Allow device erase: Controls Scalefusion's ability to remotely wipe the device.
Allow query of network information: Controls Scalefusion's access to potentially private network data like phone numbers, SIM card numbers, and MAC addresses.
Important Notes:
These settings apply only during enrollment, not after. Changing these settings after a device has enrolled will have no effect on that device.
These controls are specifically for devices enrolled via BYO, User-based enrollment, Managed Apple IDs (MAID) or Apple User Enrollment methods.

Create Admin Account
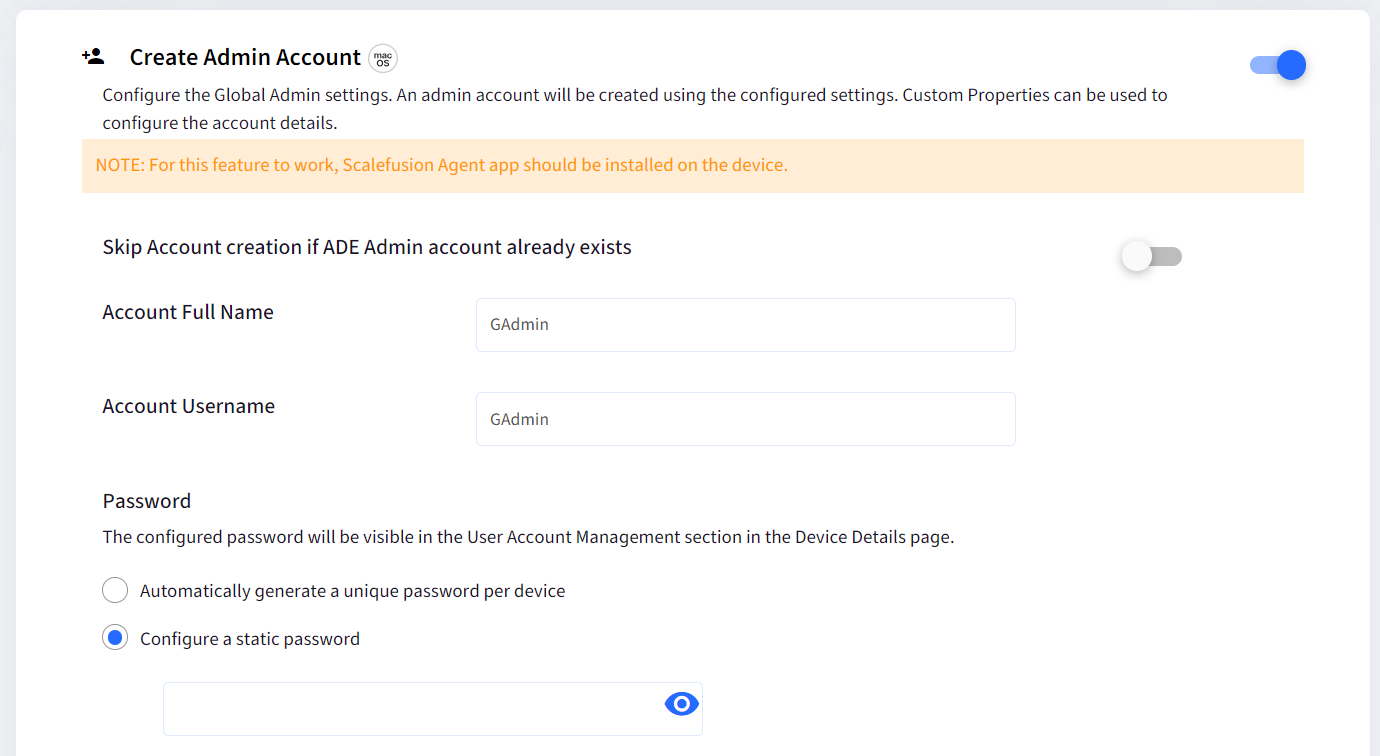
On enabling this, you can configure the Global Admin settings where a new admin account will be created using the specified details.
Pre-requisite: Scalefusion MDM Client (agent app for macOS) should be installed.
Skip Account creation if DEP Admin account already exists: If this is enabled, a new global admin account will not get created if ADE Admin account already exists on the device. Provide the following details to create global admin account:
Account Full Name
Account Username
Password: The configured password will be visible in the User Info section on the Device Details page. Select one of the options from below:
Automatically generate a unique password per device
Configure a static password: Enter a password for logging in with admin account. Password should be 8 characters or more and should adhere to Organization's password policy
Mark as Hidden Account: With this enabled, the admin account will be created but won't be visible on the device.
Admin Account Name conflict handling: Configure how to handle local account name conflicts for Global Admin Account by choosing one of the following options:
Skip Creation: This will skip the creation of Global Admin Account.
Delete Existing Account: This will delete the existing account and create a new one with the specified Username. Use this option with caution as this may cause Data Loss
Mark as Global Admin: If you have configured Global Admin with a username that already exists on device as a local user, then the account will be converted to Global admin.
Global Admin account creation is skipped when the account username contains characters other than underscore (_), hyphen (-), or dot (.) while being created using
$deviceCustom Properties.
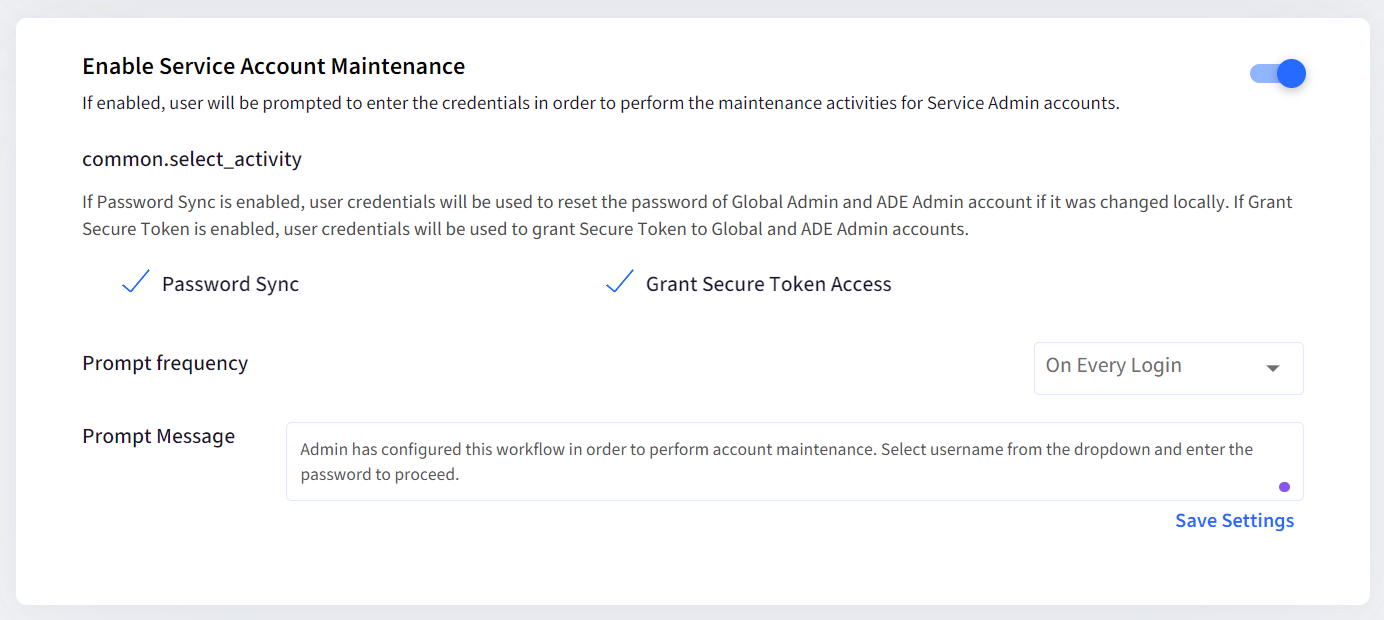
Enable Service Account Maintenance
If enabled, user will be prompted to enter the credentials in order to perform the maintenance activities for Service Admin accounts.
Password Sync: User credentials will be used to reset password of Global and ADE Admin accounts if it was changed locally.
Grant Secure Token Access: User credentials will be used to grant Secure Token to Global and ADE Admin accounts.
Prompt frequency: Configure the frequency at which users will be prompted to enter credentials, from the following options:
12 hours
24 hours
On Every Login
Prompt Message: Configure the message that will appear when the user will be prompted
Click on Save Settings

Scalefusion Apps Upgrade Method
On macOS 15 and above, updating the Scalefusion Agent through MDM can sometimes fail especially when the Scalefusion app is open and running in the foreground. To address this, IT admins now get more control to choose Scalefusion apps upgrade method by selecting between agent-driven or MDM-driven upgrades. To do so,
In Choose Scalefusion Apps Upgrade Method, select one option from the drop-down
Upgrade using Agent app
Upgrade using MDM
Click on Save settings
This feature is supported for Scalefusion (v5.0.0 or above) and Remote Support (v6.0.0 or above)

How Upgrade using Agent app flow Works
When an admin publishes the app (Scalefusion / Remote Support) to a device:
If the app isn’t installed or the version is below 5.0.0 (for Scalefusion), below 6.0.0 (for Remote Support), it will be installed through MDM as usual.
If the app version is 5.0.0 / 6.0.0 or higher, Scalefusion will update the app details automatically and send a quick settings update to the device.
This ensures the app stays up to date and synced with the latest settings.


