FOTA (Firmware Over-The-Air) refers to the process of wirelessly updating the firmware of a device. This technology allows manufacturers (OEMs) and service providers to deliver firmware updates remotely, ensuring devices stay up to date with the latest features and security patches without needing a physical connection.
With Scalefusion, IT Admins can now configure the FOTA updates via MDM to centrally manage and streamline the deployment of firmware updates across all devices. This ensures all devices remain secure, up-to-date, and compliant with the latest features and policies, reducing the risk of vulnerabilities and improving overall operational efficiency.
Prerequisites
EMM-managed Android devices with Android 10 (Company-owned and COPE/WPCO devices), Zebra (Android 8 & above), and Positivo devices.
The latest Scalefusion MDM client should be installed on the devices.
A direct external URL for FOTA update, which will respond to a head request and provide the OTA information.
Note:
This feature will work with EMM managed devices only if the OEM supports it. In this case you will need to contact your OEM to get more information if they support FOTA updates or not.
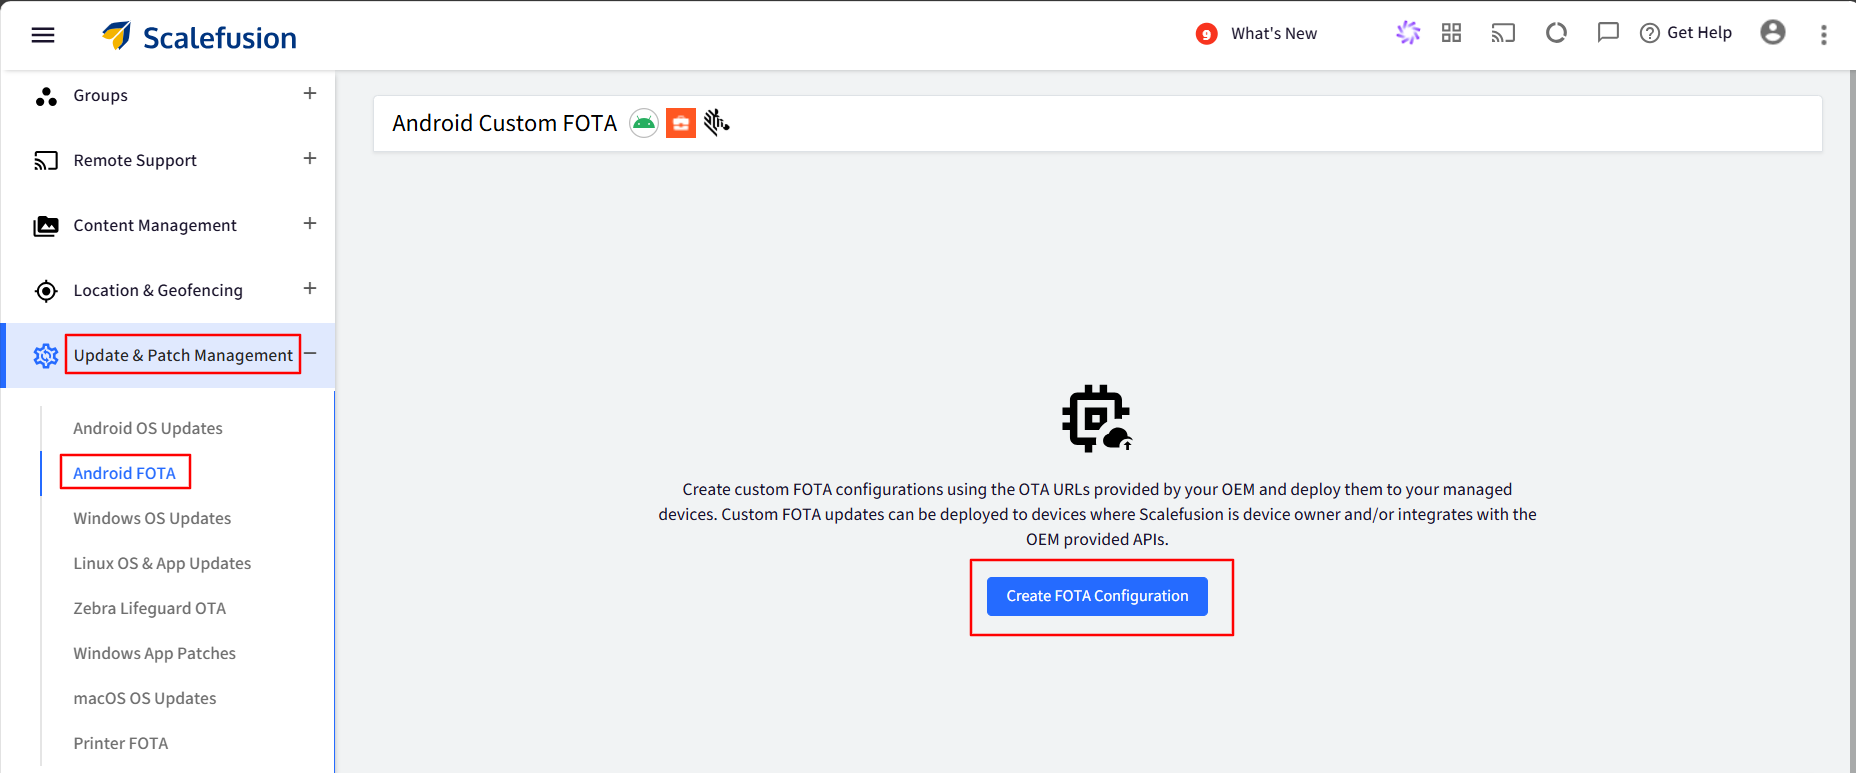
Creating FOTA Configuration
Navigate to Update & Patch Management > Android FOTA and click the Create FOTA Configuration button.
This will open a window where you will see 2 options to select- Android Custom FOTA and Zebra FOTA. Select the required option and click Submit.
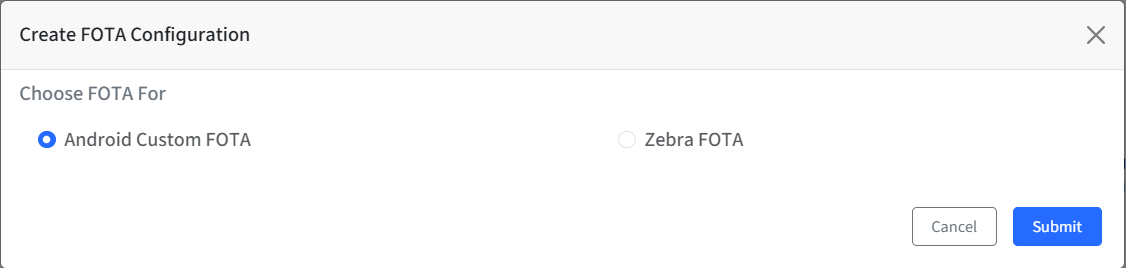
Choose FOTA for
A. Basics
Provide a name to this configuration.
Select the type of FOTA updates. It could be:
Full: A new firmware will be updated on the device, wiping the old one. The device's old data or apps will be wiped out.
Multi-Part Update: Can be a full wipe/update. The difference is that the FOTA files will be in parts, e.g., part0, part1. The Scalefusion MDM client will download the files (part0, part1) and merge them into 1 file for update on the device.
Differential/Incremental: Consider it as an update from version 1 to version 2. The update can be for an issue fix, a security patch, or an OS update.
Enter a compatible build number: Enter the build number of your device for which you are creating the configuration.
Click on Next.

Note:
Build Number is a must for Full and Multi-part updates. For Differential/Incremental it is optional, as it takes build number from the compatible link configured under FOTA URLs.
B. FOTA URLs
Enter FOTA URL: Enter the direct external URL for the FOTA update that you would have received from the OEM.
If you have selected Full in the Basic tab, then you will need to enter just one URL.
If you have selected Multi-Part or Differential/Incremental, then you get the option to add multiple URLs.

After you enter the URL, click the Check Now button. It will check the URL and fetch the following details automatically:

File Name: Provide a unique name to the URL file for easy identification, and this name will also be shown in the reports.
File size: Size of the zip file.
File Checksum: A file checksum is a unique value generated from a file's data using an algorithm (like MD5 or SHA-256). It verifies the file's integrity by ensuring the checksum before and after transfer or storage matches. If the checksums match, the file is intact; if not, it may be corrupted or altered.
Content-Type: It will always be application/x-zip-compressed.
File ETag: An ETag (Entity Tag) is a unique identifier assigned to a specific version of a file or resource on a web server. It is used primarily for web cache validation and efficient data transfer. When a file changes, its ETag also changes, allowing clients to detect modifications and manage cached data effectively. This helps in reducing bandwidth usage and improving web performance by only downloading updated content.
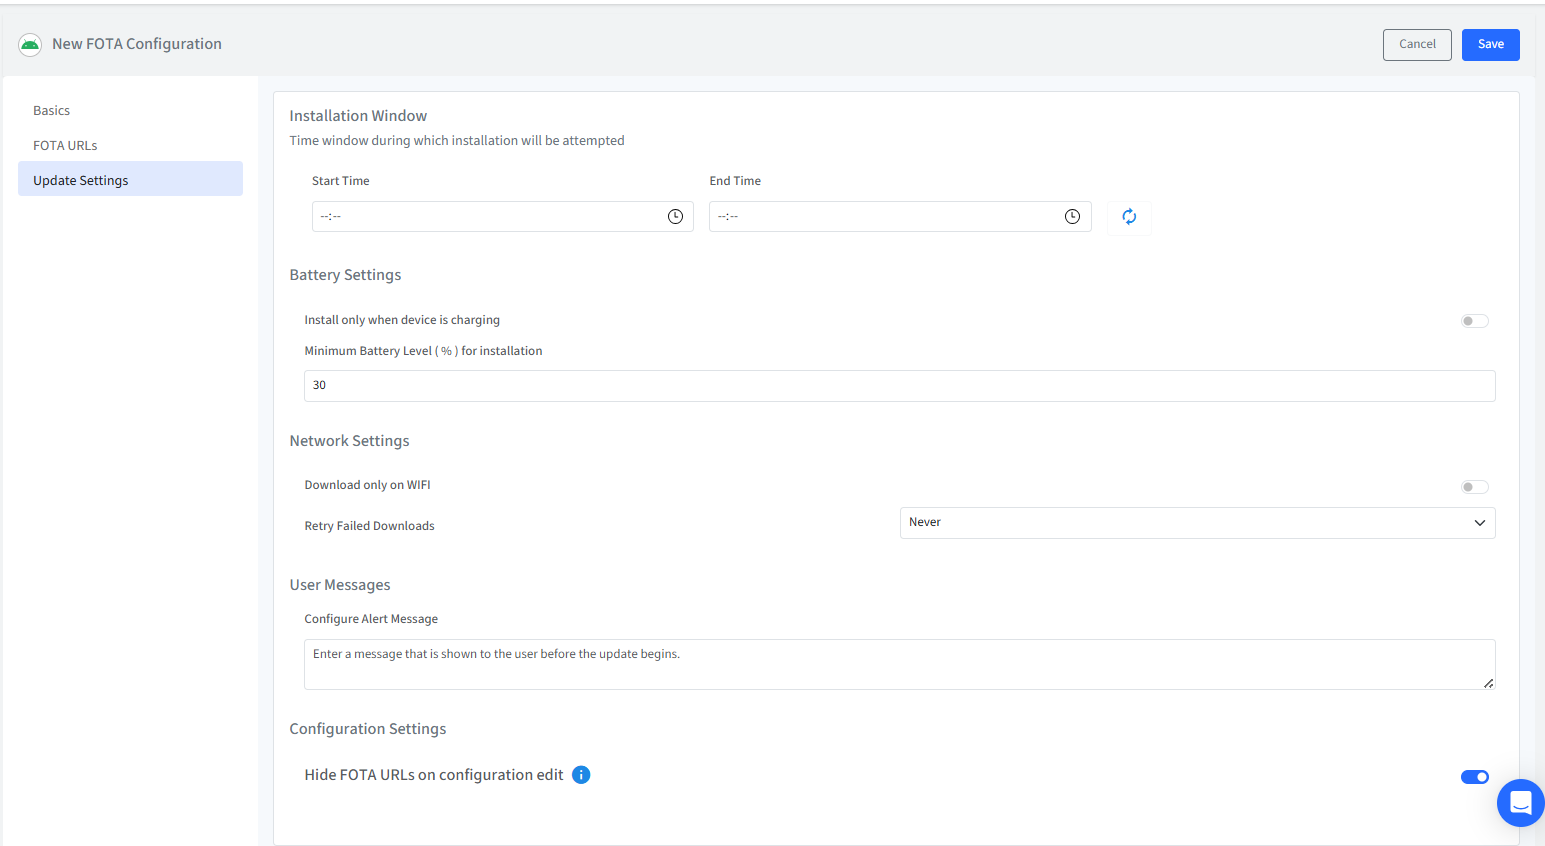
C. Update Settings
Here you can configure when the update will happen.
Installation Window: Set a time duration during which the update installation will be attempted.
Battery Settings:
Install only when device is charging
Minimum battery level: Select the minimum battery level the device should have for this update to install and complete.
Network Settings:
Download only on Wi-Fi: Enable this option if you want the update to download only when the device is connected to Wi-Fi.
Retry Failed Downloads: For any reason, if the download fails, you can set a retry duration after which the Scalefusion client will try the download the update again. You can set Never, 24 hours, 48 hours, and 72 hours.
User Messages:
Configure Alert Message: Configure a message for your users so that they are aware of the updates that are configured to happen on their devices.
Hide FOTA URLs on configuration edit: Note, this setting can be configured only once, and once set to true, cannot be turned off.
Click Save to save this configuration.
A. Basics
Provide a name to this configuration.
Click on Next.

B. FOTA URLs
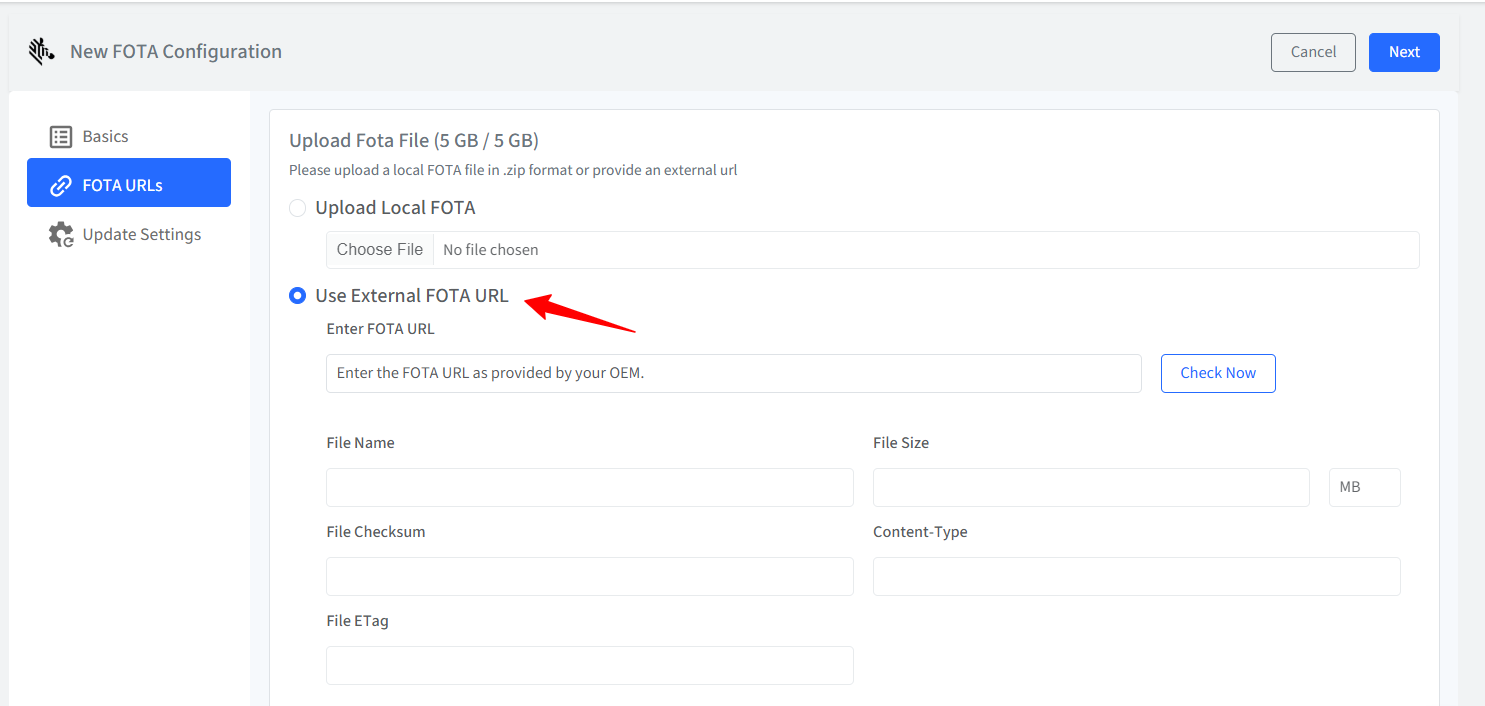
Upload FOTA File: Please upload a local FOTA file in .zip format.

Enter FOTA URL: Enter the direct downloadable external URL for the FOTA update.
After you enter the URL, click the Check Now button. It will check the URL and fetch the following details automatically:
File Name: Provide a unique name to the URL file for easy identification, and this name will also be shown in the reports.
File size: Size of the zip file.
File Checksum: A file checksum is a unique value generated from a file's data using an algorithm (like MD5 or SHA-256). It verifies the file's integrity by ensuring the checksum before and after transfer or storage matches. If the checksums match, the file is intact; if not, it may be corrupted or altered.
Content-Type: It will always be application/x-zip-compressed.
File ETag: An ETag (Entity Tag) is a unique identifier assigned to a specific version of a file or resource on a web server. It is used primarily for web cache validation and efficient data transfer. When a file changes, its ETag also changes, allowing clients to detect modifications and manage cached data effectively. This helps in reducing bandwidth usage and improving web performance by only downloading updated content.
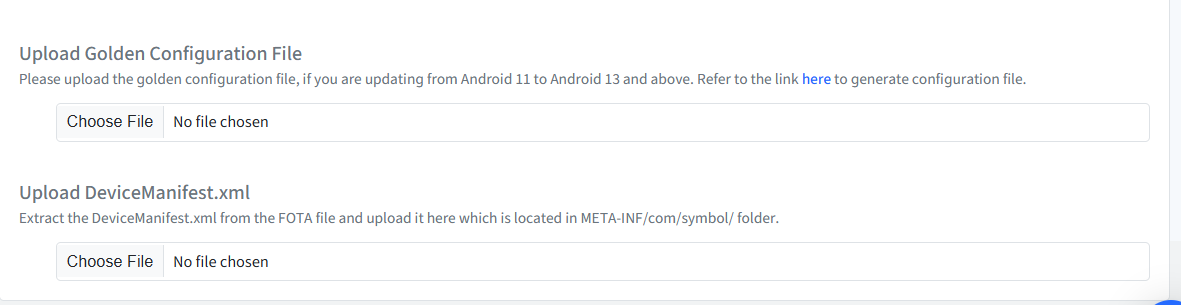
Upload Golden Configuration file: Please upload the golden configuration file if you are updating from Android 11 to Android 13 and above. Refer to the link here to generate the configuration file.
Upload DeviceManifest.xml: Extract the DeviceManifest.xml from the FOTA file and upload it here, which is located in META-INF/com/symbol/ folder.
C. Update Settings
Here you can configure when the update will happen.
Installation Window: Set a Time duration/Day(s) during which the update installation will be attempted.
Battery Settings:
Install only when device is charging
Minimum battery level: Select the minimum battery level (between 30 to 100) the device should have for this update to install and complete.
Network Settings:
Download only on Wi-Fi: Enable this option if you want the update to download only when the device is connected to Wi-Fi.
Retry Failed Downloads: For any reason, if the download fails, you can set a retry duration after which the Scalefusion client will try the download the update again. You can set Never, 24 hours, 48 hours, and 72 hours.
User Messages:
Configure Alert Message: Configure a message for your users so that they are aware of the updates that are configured to happen on their devices.
Hide FOTA URLs on configuration edit: When enabled, the URL entered in the FOTA URL section will be hidden. Note, this setting can be configured only once, and once set to true, cannot be turned off.
Click Save to save this configuration.
Things to Note
When setting up the Zebra FOTA configuration, please consider the following points:
There are two types of encryption: full-disk encryption (FDE) and file-based encryption (FBE). For FBE devices (for example, TC22), uploading the Golden configuration file is not required, but the manifest file is mandatory. For FDE, both the Golden configuration file and the manifest file must be uploaded.
For FDE, a Golden Config backup, Zebra Conversion Package (ZCP) & Zebra File Guardian file are required in the following upgrade. Also, the order for the upgrades should be followed.
OS 11 → OS 13
OS 11 → OS 14
OS 11 → OS 15
OS 8 → OS 11 → OS 13 (from 8 to 13)
OS 9 → OS 11 → OS 14 (from 9 to 11)
OS 10 → OS 11 → OS 15 (from 10 to 15)
Note: The above files are not required for updating the below:
OS 13 → OS 14
OS 13 → OS 15
OS 14 → OS 15
To ensure a successful update, the following conditions must be met:
The Security Patch Date must be newer than the one on the currently installed build.
The Build Version must be higher than the existing version.
The following packages must not be blocked for the upgrade to proceed:
com.android.systemui
com.symbol.fota
com.zebra.devicemanager
com.zebra.zebracontentprovider
com.zebra.enrollmentmgr
com.symbol.dataanalytics
com.zebra.oeminfo
com.zebra.lifeguardotamanager
com.zebra.zebradna
com.symbol.mxmf
com.zebra.fileutility
On the dashboard
Once the configuration is created, it will show on the main page of the Android FOTA section on the dashboard.
Click on the View Details for the created configuration.
In the next screen, click on the Publish button to deploy this configuration to Device Groups/ User Groups/ Devices.
Once deployed, you will be able to see the list of devices where this configuration is applied in an overview page with important details such as Device Details, IMEI/Serial no., Group/Profile, Status of the applied configuration, etc.
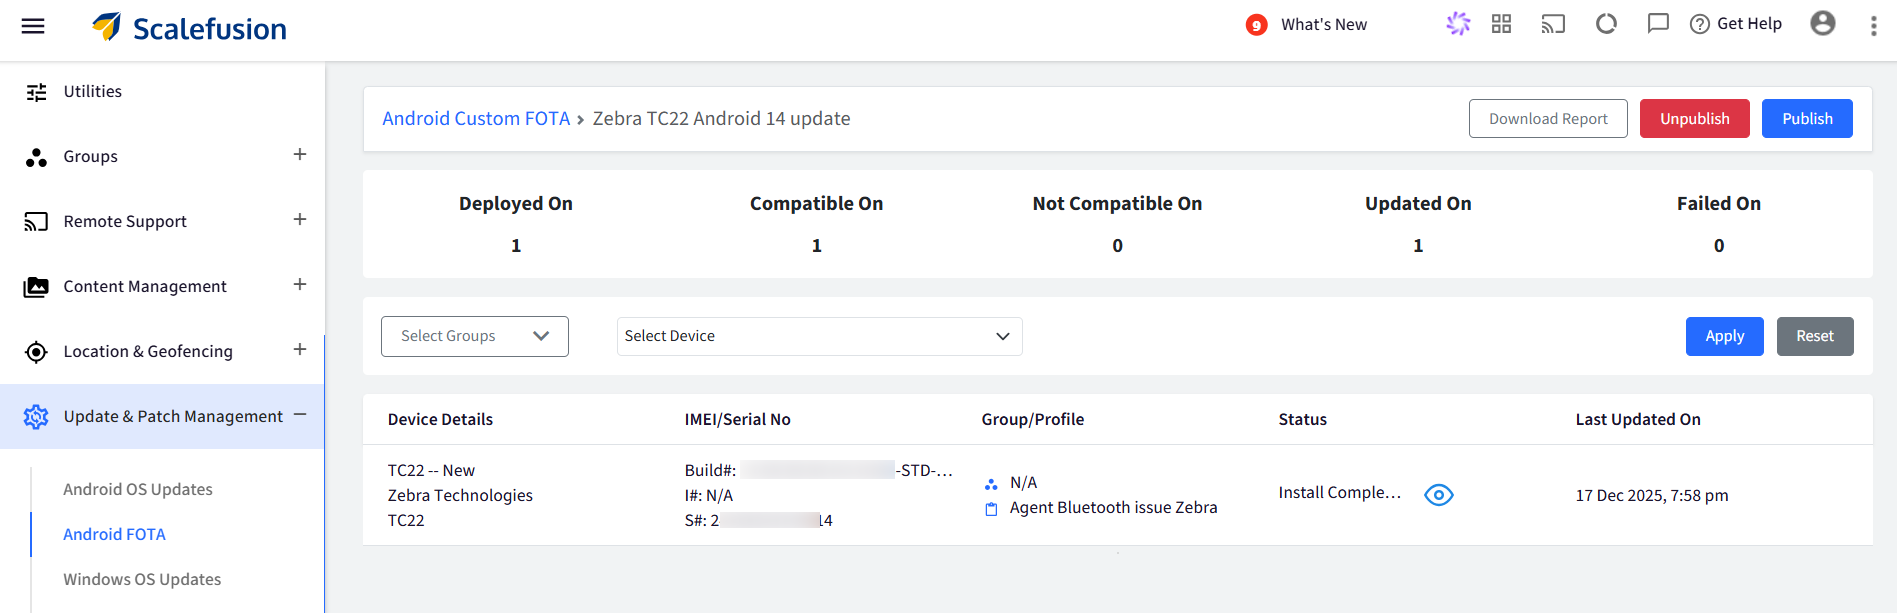
You can download a report of this by clicking on Download Report button, or Unpublish or Publish it.
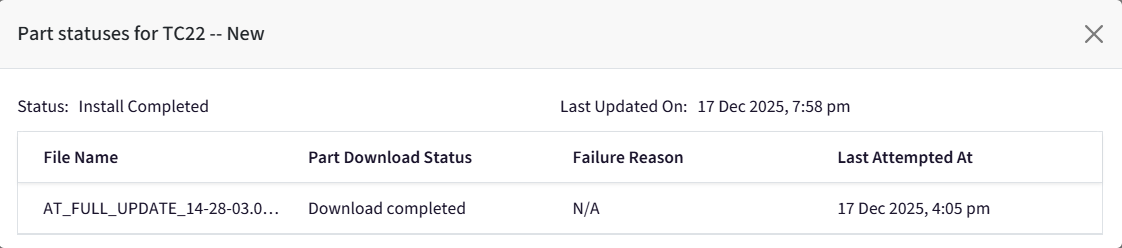
In the downloaded report, you will be able to see the device details along with update status, when it was last updated, and when it was last attempted. In this report, you will be able to see the Failure reason in case the download fails for some reason.

On the dashboard, click on the eye icon next to Status for each device to get a deeper look at the updated status.

You can also apply a filter to narrow down the report to a Device Group or a device(s).

The Account Activity report will also display details of actions taken on the created configuration.

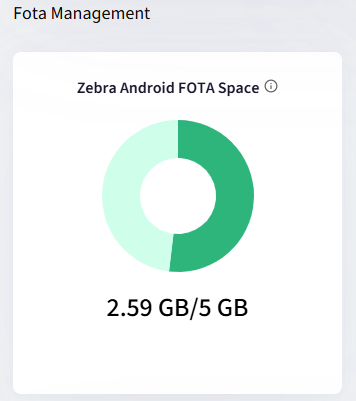
In the Deep Dive section, you can see a visual breakdown of the space consumed by the FOTA update file in FOTA Management.